You will definitely need temporary housing, that is, a place where people involved in construction will live.
And it is quite important that the construction of this temporary premises does not take much time. The consumable building materials used should be readily available and have a minimum cost.
Frame change house standard type is carried out without the use of internal partitions, this shed should contain a small amount of and.
With this budget option this cabin will cost you about twice as much as a frame-panel cabin, but its quality will be much higher and more reliable, because the frame cabin is much stronger due to durable timber and other building materials used in the work.
Necessary building materials and tools for installing a cabin
A do-it-yourself change house is carried out only using the building materials necessary for the work, as well as tools.
Below is a list of required materials:
- To build a temporary foundation, cinder blocks are needed;
- Sand and geotextiles;
- or bitumen mastic;
- Wooden and logs;
- Sand-lime brick;
- Various fittings, corners, screws;
- For roof covering;
- Mineral wool and;
- Lining, wooden boards, bars of different sizes.
You also need to prepare the tools that you will definitely need when building a shed: a shovel, a hammer, a drill and others.
Do-it-yourself frame change house step by step instructions
If the cabin is temporary, for easy disassembly in the future, the foundation is made of cinder blocks, which are easily disassembled and have a low cost.
 Temporary cinder block foundation
 To install cinder blocks, you need to remove them from the ground, then compact the soil and cover it with special geotextiles, then cover everything with sand and compact it well again.
Cinder blocks are laid on the made base.
They must be placed in each corner and with intervals between them of 1.5 meters.
Cinder blocks must be waterproofed with roofing felt or mastic and secured with a special wooden one.
Drawings, materials
The third stage is the construction of the wall frame and installation of the roof.
 Construction of walls and roof
 To begin with, build a base, using it around the perimeter of the entire structure. The logs are laid across and lengthwise.
To connect plumbing fixtures to the water supply network, a flexible water supply is used. It is in demand when connecting faucets, showers, toilets and other water intake points, and significantly simplifies the installation process. Flexible eyeliner also used during installation gas equipment. It differs from similar water devices in its manufacturing technology and special safety requirements.
Characteristics and types
The flexible hose for connecting plumbing is a hose of different lengths made of non-toxic synthetic rubber. Thanks to the elasticity and softness of the material, it easily takes the desired position and allows installation in hard-to-reach places. To protect the flexible hose, there is an upper reinforcing layer in the form of a braid, which is made from the following materials:
- Aluminum. Such models can withstand no more than +80 °C and retain functionality for 3 years. At high humidity Aluminum braiding is prone to rust.
- Stainless steel. Thanks to this reinforcing layer, the service life of the flexible water line is at least 10 years, and the maximum temperature of the transported medium is +95 °C.
- Nylon. This braid is used for the manufacture of reinforced models that can withstand temperatures up to +110 °C and are designed for intensive use for 15 years.
The fasteners used are nut-nut and nut-fitting pairs, which are made of brass or stainless steel. Devices with different indicators permissible temperature differ in the color of the braid. Blue ones are used for connecting to a pipeline with cold water, and red ones - with hot ones.
When choosing a water line, you need to pay attention to its elasticity, reliability of fasteners and purpose. It is also mandatory to have a certificate that prevents the rubber from releasing toxic components during operation.
Features of gas connections
When connected gas stoves, speakers and other types of equipment also use flexible hoses. Unlike water models, they are yellow and are not tested for environmental safety. For fixation, end steel or aluminum reinforcement is used. Distinguish the following types accessories for connecting gas appliances:
- PVC hoses reinforced with polyester thread;
- made of synthetic rubber with stainless steel braid;
- bellows, made in the form of a corrugated stainless steel tube.

Santekhkomplekt holding offers engineering equipment, fittings, plumbing and devices for connecting it to communications. The assortment is represented by products and materials from famous foreign and domestic producers. Discounts apply for bulk purchases, and product quality is confirmed by standard certificates. For information support and assistance, each client is assigned a personal manager. The ability to arrange delivery within Moscow and to other regions of the Russian Federation allows you to quickly receive the purchased goods without unnecessary hassle.
Drainage is a drainage and drainage measure to remove excess groundwater.
If water does not leave the site for a long time, the soil becomes gleyed, if shrubs and trees quickly disappear (get wet), you need to urgently take action and drain the site.

Causes of soil waterlogging
There are several reasons for soil waterlogging:
- clay heavy soil structure with poor water permeability;
- aquifer in the form of gray-green and red-brown clays is located close to the surface;
- high groundwater table;
- technogenic factors (construction of roads, pipelines, various objects) that interfere with natural drainage;
- disruption of the water balance by the construction of irrigation systems;
- The landscape area is located in a lowland, ravine, or hollow. In this case, they play an important role precipitation and the influx of water from higher places.
What are the consequences of excess moisture in the soil?
You can see the results of this phenomenon yourself - trees and shrubs die. Why is this happening?
- the oxygen content in the soil decreases and the content increases carbon dioxide, which leads to disruption of air exchange processes, water regime and nutritional regime in the soil;
- oxygen starvation of the root-forming layer occurs, which leads to the death of plant roots;
- the supply of macro and microelements by plants (nitrogen, phosphorus, potassium, etc.) is disrupted, because excess water washes out mobile forms of elements from the soil, and they become unavailable for absorption;
- intensive breakdown of proteins occurs and, accordingly, decay processes are activated.
Plants can tell you at what level groundwater lies
Take a close look at the flora of your area. The species inhabiting it will tell you at what depth the groundwater layers are located:
- perched water - it is best to dig a reservoir in this place;
- at a depth of up to 0.5 m - marigold, horsetails, varieties of sedges grow - bladderwrack, holly, foxweed, Langsdorff's reed;
- at a depth of 0.5 m to 1 m - meadowsweet, canary grass, ;
- from 1 m to 1.5 m – favorable conditions for meadow fescue, bluegrass, mouse peas, rank;
- from 1.5 m - wheatgrass, clover, wormwood, plantain.
What is important to know when planning site drainage
Each group of plants has its own moisture needs:
- with a groundwater depth of 0.5 to 1 m, vegetables and annual flowers can grow in high beds;
- water depth up to 1.5 m is well tolerated vegetable crops, cereals, annuals and perennials (flowers), ornamental and fruit and berry bushes, trees on a dwarf rootstock;
- if the groundwater is more than 2 m deep, fruit trees can be grown;
- optimal depth of groundwater for agriculture– from 3.5 m.
Is site drainage necessary?
Record your observations for at least some time. You yourself can understand how much drainage is needed.
Maybe it makes sense to simply redirect melt and sediment water along the bypass channel, rather than allowing it to flow through your site?
Perhaps it is necessary to design and equip a storm drain and improve the composition of the soil and this will be enough?
Or is it worth making a drainage system only for fruit and ornamental trees?
A specialist will give you the exact answer, and we strongly recommend calling him. But after reading this article, you will gain some awareness on this issue.
Upon completion of technological and production tasks related to the arrangement of the sewer system in apartment building, industrial building, and also in private households it is required to test the involved system using the forced flow method. This task used to identify possible defects or improper installation of the entire involved sewer part and a system testing report internal sewerage and drains will be material evidence of the work on acceptance of the object.

A visual inspection should be accompanied by inclusion in the test report of internal sewerage and drainage systems according to SNIP, which is currently represented by the current regulations of the “D” series appendix, which corresponds to SP 73.13330.2012 “Internal sanitary systems of a building”, recently a new one has been applied updated working edition according to SNiP 3.05.01-85.
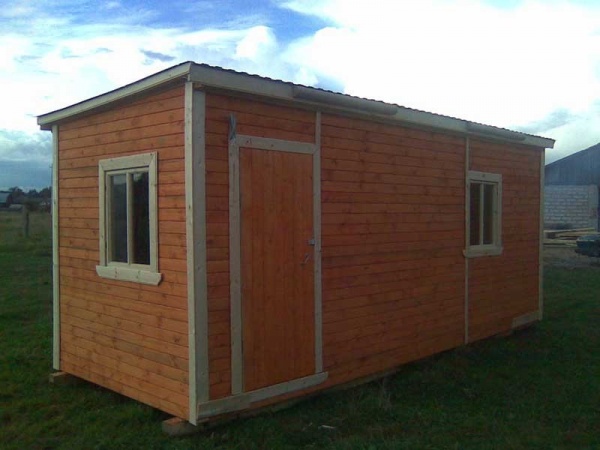
If you are the lucky owner summer cottage, but the construction of the house is still ahead, it is necessary to take care of a small utility room - a change house. The change house is useful for storing tools, building materials, work clothes and just for relaxing after a hard day at work. Of course, you can purchase a ready-made structure and place it on the site, but building a cabin with your own hands will cost much less, and besides, a wise owner of a suburban area will never miss the opportunity to gain useful experience and skills. In this article you will find step-by-step instructions for making cabins.
A change house is a utility room in the form of a small house where you can store all kinds of garden tools and construction supplies. But there are no clear rules for using a shed - you can turn it into a shed for storing unnecessary things or turn it into a cozy guest house. Depending on the future purpose of the cabin, the features of its construction also differ. So, if this is a tool shed, then there is no need to insulate it too thoroughly. And, on the contrary, if you plan to accommodate guests or relatives in the cabin, isolation and improvement should be approached in a special way.
In some cases, you can make a small garage out of a change house for garden equipment or a motorcycle. With the onset of cold weather, many people move there poultry, bees or rabbits, placing the animals for the winter. However, regardless of how you use the change house, it will come in handy in any case.
Types of cabins
There are several design options for cabins depending on the construction technology. This, in turn, determines the cost of the work and performance characteristics buildings.
There are the following types of cabins:

To save time, you can purchase a used cabin, but in this case, pay attention to the degree of wear. Carefully inspect the structure outside and inside. Keep in mind that the cost of transportation and crane rental will be added to its cost. Before you decide to buy even an old shed, add up all the amounts of upcoming costs and compare them with the cost of building materials - perhaps it will be cheaper and easier to build a shed with your own hands.
Construction technology
Despite the fact that the change house is considered a secondary utility room, its construction should be approached responsibly. And the best place to start is with a drawing. The layout of the change house should include the dimensions of the walls, the area of the roof, floor, insulating layers and points of attachment of elements. With the help of a sketch, you can imagine how the structure will look on the site and how it can fit into the landscape. Only after creating a detailed drawing of the cabin (or even several) can you calculate the required amount of materials (add 15% of the stock to the received amount) and go to the store.

If you plan to store gardening tools in the shed or construction tools, there is no need for windows there. In the event that it will serve as a guest house or summer kitchen, it is better to take care of full natural lighting (will help save on electricity).
Speaking of electrification of cabins. Electrical wiring should also be shown on the drawing (preferably on a separate one). You will find more information on this topic in the articles and.
Where to put the change house?
When all the building materials have been purchased, you need to choose a place to install the change house. First of all, you should take into account the duration of use of the building and the possibility of moving it to another location if necessary. For example, if you are going to build summer house for a couple of seasons, and then transport it to another site or sell it. In this case, it is better to locate the change house closer to the entrance to the site or provide vehicle access to it.
It is also necessary to think through all options for using the structure. If gardening equipment and tools will be stored in the shed, it is better to place it closer to the center of the site and create easy access from all sides. If you make a bathhouse out of a cabin, you can “hide” it in a secluded corner of the garden behind the trees. The farther the cabin-sauna is from a residential building, the better in terms of fire safety.
If the change house is planned to be used as a greenhouse, it is better to choose the highest and sunny place on the site. However, regardless of the purpose of the building, a site should be prepared for it.
How to install a change house:
- The selected area must be cleared of weeds and any vegetation.
- Next you should remove fertile layer soil. Depending on the characteristics of the soil, the thickness of the turf can range from 15 to 30 cm.
- Having leveled the site, you need to cover it with construction polyethylene (a film 200 microns thick is quite suitable). It is not recommended to use greenhouse film because it is not strong enough. The film layer should cover the entire area under the future cabin and extend to the edges by 20 cm on each side. Film is simple waterproofing for the foundation. You shouldn’t feel sorry for it, much less neglect this step, otherwise in 2-3 years you will notice signs of destruction of the foundation.
- The mixture should be poured over the film river sand and crushed stones in a layer of 20 cm. This will fix the waterproofing and at the same time level the surface.
- To ensure that sedimentary water moves farther away from the cabin without hindrance and does not linger near it, you can make a slight slope around the building of 2 cm per meter.
Cabin foundation
A change house is not a very heavy structure, no matter what materials are used, so there is no point in pouring a powerful, expensive foundation under it. The best option is columnar base. It's inexpensive, fast and quite simple. Plus, columnar foundation leaves ventilation gap underground, which extends the life of the building.
Helpful advice: If you think that a cabin on such a foundation will not be warm enough, there is great solution– create formwork around the perimeter, pour the solution over the entire area to create a border 7-10 cm high. It is quite enough to properly insulate the floor. Use expanded clay as floor insulation.
In our case, the pillars are concrete blocks, but they can be made from brick, reinforced concrete and other materials. You will find more information on this topic in the article.
Work progress:
- Install concrete pillar blocks in accordance with the plan of the change house.
- Cover the upper ends of the pillars with rolled waterproofing (regular roofing material will do).
- Using timber for the base and building level adjust the horizontal position of the pillars so that they are strictly in the same plane.

Cabin frame
As you already understand, we are building a frame shed, the base material for which was a timber with a cross-section of 100x150 mm. You can take a little thinner - 100x100 mm or 100x120 mm.

How to make a change house:

Roof of the cabin
How to make a roof for a shed:

Roofing material can be anything you like. In our case, this is ondulin - practical and inexpensive. If the change house is residential, the roof should be carefully insulated, since it is through it that most of the heat usually escapes. To do this, first attach a vapor barrier to the sheathing, then insulation, waterproofing film, and only after that - finishing coat(corrugated sheeting, ondulin, metal tiles, etc.).

House windows and doors
As for windows and doors, they should be installed in the same way, focusing on the functionality of the structure. Even if you are going to store shovels and rakes in the shed, you should make at least one ventilation window for ventilation, otherwise mold will very quickly grow inside.

The location of windows and doors should be established at the time of design, so that during the construction of the frame, additional reinforcing racks can be installed in the openings. If you forgot to include them in the project, then you can organize the openings after the construction of the frame. During work, be sure to use a laser level or water level to avoid distortions.
Cabin floor
With an uninsulated floor in a change house, everything is clear - I did it boardwalk and you're done. Another thing is to make the floor so that you can walk on it without shoes in winter and not be afraid of getting sick. To do this, you must first lay the subfloor, then the insulation and the finishing coating.
Expanded clay, vermiculite, polystyrene foam boards or mineral wool. To eliminate drafts from under the door, it is better to make a threshold at the entrance. It can be cut into the base beam itself or attached separately by nailing a strip.

How to build a floor in a shed:


Insulation and finishing
To make the change house warm and cozy, the walls need to be properly insulated. To do this, first cover the entire surface with thick plastic film - it will protect the interior from wind and moisture.

Then you can lay the insulation and cover it again with film for additional protection. In principle, this process is no different from insulating a roof or floor. For exterior wall cladding, you can choose siding or other weather-resistant material. The widest range allows you to choose an exterior finishing option that will fit into any landscape.

The inside of the change house can be lined with clapboard or the interior can be made more comfortable by upholstering the walls. wood panels. All those finishing options that are used in ordinary residential premises are acceptable here: wallpaper, paint, plaster, tiles, etc.
As for household amenities (lighting, water supply, sewerage), they must be taken into account when creating a drawing. The articles “” and “” will help you understand these questions.
The construction of cabins in practice is not so difficult. And if you are planning to build a residential building with your own hands, then a change house will be an excellent training before a large-scale undertaking.
Change houses: photo


When starting construction of a facility, most companies first of all think about where to store inventory and accommodate people for comfortable temporary living. A change house is a real solution to these problems.
What is a change house and its purpose
A change house is a small-sized, inexpensive and comfortable structure that is easily transported or moved. It can be made from different types building materials. The main purpose of the change house is to store equipment and accommodate construction crews in it. In addition, it can be equipped as a production or office temporary structure.
Metal cabins with one room are designed to accommodate construction crews and store various equipment
Types of modern cabins
Depending on the material used, there are the following types of cabins:

Depending on its purpose, the change house can be used for the device:
- Wagon-house. This type of mobile structure is equipped with runners in winter, and wheels in summer. This car-house is intended for people working on a rotational basis or film crews. In addition, it can be used as an office, a room for drying work clothes or a rest area.
A movable car-house on wheels can be attached to a tractor and towed to the desired location
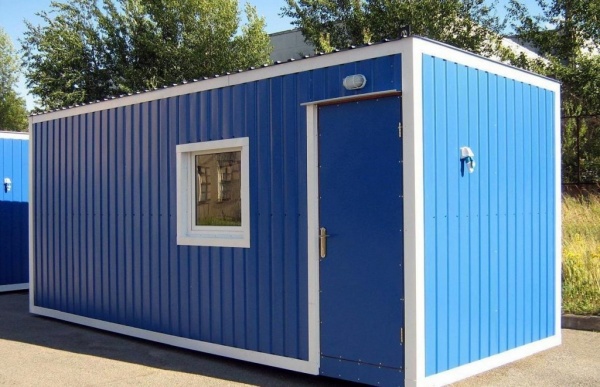
- Warehouse. This design is made mainly from container blocks, which are equipped with strong bars on the windows and iron doors. The internal equipment of the storage shed is made of plastic panels or fireproof hardboard.
Inside the storage shed there are racks for convenient storage goods
- Dining room. Inside the dining room, the required number of seats for eating is arranged. In addition, it has not only a dining area, but also a kitchen, which is equipped with various household appliances and even a plumbing system. Sometimes bathrooms, air conditioners and washbasins are installed in the dining room. Such metal structures are often converted into country cafes.
The canteen can be used for catering at construction sites
- Office. An office shed is a small container made of metal. It can be part of a multi-room building of the required dimensions. When such blocks are installed one on one, offices of several floors are formed, which in terms of convenience resemble concrete and brick buildings. Office cabins are equipped with everything necessary for comfortable work: electricity, heating, hoods, bathrooms and other equipment.
Stationary office huts are installed on construction and retail sites, parking lots and other open areas
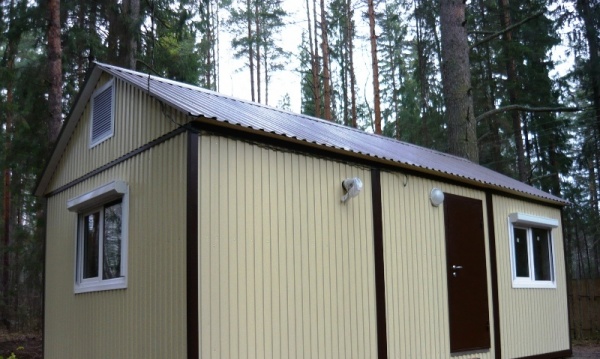
- Premises for living. Residential cabins are made of metal or wood and are equipped with electricity, heating appliances and a bathroom. They are intended for long-term living, since they not only have durable windows and doorways, but also convenient and comfortable interior rooms. If necessary, a change house for living can be made of several separate modules.
People can live in specially decorated cabins for a long time
- Sanitary units. A change house used for medical purposes has locker rooms, bathrooms, showers and other premises. This structure is heated, has a water supply, as well as window and door openings. However, according to sanitary and hygienic standards, not all types of materials for interior decoration can be used in a sanitary unit. Usually the finishing is made from wooden lining or hardboard, which is impregnated with a special substance.
Preparation for construction
By technological processes building a change house is not very difficult, since there is no need for special training, the use of rare and expensive tools, and extensive knowledge of the construction industry. But you should not hope that all stages of construction of the cabin structure will go smoothly and without problems, especially for novice craftsmen.
Project drawings for standard frame cabins
The most convenient size is a change house measuring 3 x 6 meters, since it is universal in weight, area, and availability of building materials suitable size and price. However, for each individual case, its own layout is designed, which is based on standard scheme frame with the addition of the necessary partitions and openings. If the structure is temporary or you need to divide the room into certain zones (kitchen, bathroom, warehouse, etc.), then the internal partitions must be indicated in the drawing.
The traditional configuration of a 3 x 6 meter cabin design implies the presence of the following premises: a central room 4.5 x 3 meters with amenities and heating, a corridor that prevents the entry of cold air, a bathroom and a storage room with dimensions of 1.5 x 1.5 meters. The roof is made from corrugated sheets, regardless of the model of the cabin.
Photo gallery: various layouts of cabins
Selection of material for the frame and foundation base
On the modern market you can find a huge amount of building materials for building a shed: panels, plastic, metal, wood slabs, and so on. Therefore, when choosing them, it is worth considering technical properties and design configuration.
The main part of the cabin is the frame. For its construction you can use:
- A metal profile that is connected by welding. This profile is durable and resistant to various mechanical damage. Change houses with a metal frame are used for frequent moves.
The welded metal frame has sufficient strength for repeated transportation of the cabin
- Wooden beam. This is the most cheap option execution. This design always supports optimal temperature at any time of the year. Wood is durable and quite reliable, but it is susceptible to destruction due to the appearance of bugs, as well as fungi and moisture. When using wooden parts When building a shed, treat them with antiseptic substances, which will make the structure more durable and very reliable.
The wooden frame of a cabin is usually insulated with one or two layers mineral wool, which is defended waterproofing film
- Steel corners. It is necessary to take into account that the corners must be coated with high-quality powder paints, since they increase the stability of the cabin and also protect it from rust.
The metal parts of the frame of the cabin must be painted with powder enamel
The foundation of the shed is best made from brick pillars, cinder block supports or concrete blocks. Under heavy metal frames A cast concrete foundation is made.
For external cladding For cabins, it is better to choose galvanized steel sheets. They are quite durable and very convenient to use. You can also use wooden clapboard.
Change houses from wood boards cost much less than wooden structures, but they can highlight different chemicals, providing negative impact on human health. Don't chase after cheap materials for construction and subsequent cladding, as you risk wasting your money. When choosing a building material for constructing a shed, proceed primarily from your individual preferences, standards of durability, practicality, ease of design and its reliability.
Material calculation and necessary tools
When calculating the cost of a 6x3 meter wooden cabin, you must take into account the cost of materials, as well as how much their delivery will cost. To erect a temporary structure of the above dimensions, you need to purchase the following materials:
- geotextiles - 30 m2;
- anchors - 9 pcs.;
- sand - from 3 to 6 cubes;
- expanded clay - up to 3 cubes;
- material for pillars or ready-made foundation blocks;
- insulation - 8 m 3 or plates - 81 m 2;
- beam 150x100 mm - 18 linear. m or 0.27 cubic meters;
- timber 100x100 mm - 47 linear m or 0.47 cubic meters;
- lining - 22 linear m;
- edged board 40x150 mm - 0.72 cubes;
- tongue and groove board 30x150 mm - 0.54 cubic meters;
- OSB - 63 m2;
- board 40x100 mm - 40 m or 0.16 cube;
- timber 50x100 mm - 95 meters or 0.47 cubic meters;
- sheathing beam 50x500 - 50 m or 0.125 cubic meters;
- polyethylene - 81 m2;
- waterproofing membrane - 81 m2;
- corrugated sheeting - 21 m2;
- metal corners for fastening;
- self-tapping screws for roofing - 180 pcs.;
- self-tapping screws 70 or 80 mm - as necessary;
- nails 150 mm;
- windows, as well as internal and external doors - in accordance with the drawing.
Additional materials:
- various types of partitions;
- decorative finishing;
- technical and engineering systems.
The final calculation of building materials should be made only according to the drawing.
You will need the following tools for work:

Cabin layout
Today there are quite a lot of traditional layouts of cabins. They differ in the location of windows, the configuration of rooms and other characteristics. However, the main types of layouts are:
- Construction of 2 rooms. One is workroom, the other is the hallway. There is a door opposite the hallway and one window.
- Construction of 3 rooms. The peculiarity of such a change house is the separation of two hallway rooms. Each room has one window. Such cabins are called vests.
- Change house from room and hallway. In this case, the hallway will more room. The length of the hallway is equal to the width of the entire structure.
- The simplest option is a one-room change house with one window.
- A cabin without windows.
There are other layouts of cabins. They differ in the area of the premises, the location of windows and doors. However, traditionally such structures do not provide more than 3 rooms, since total area cabins are very limited.
Step-by-step instructions for making a change house
In order to build a change house, it is necessary to carry out the following types of work:
- Site preparation. The shed must be placed on a horizontal surface. The soil must be hard, otherwise heavy excavation work cannot be avoided.
To place the change house, it is necessary to prepare a flat area on which drainage bedding will be laid
- Preliminary work for the foundation. Along the entire perimeter of the structure, 0.3 meters of soil is removed with a protrusion of 50 cm beyond its boundaries. The resulting trench is filled with a layer of sand (about 15–20 cm) and thoroughly compacted. To increase the service life of the cabin, sand is placed on geotextiles.
To protect the foundation base from groundwater, it is covered with a layer of sand and thoroughly compacted
- Foundation installation. We lay the pillars strictly along the construction cords to a depth of at least 30 cm. For a structure measuring 3x6 meters, you will need to purchase 15 pillars, which are placed in a certain order at a distance of 1.5 meters from each other.
- Cutting wood according to the agreed drawing. Prepared wooden elements are treated with hydrophobic substances or an antiseptic. Fireproof treatment of wooden parts will not protect your structure from open fire, however, it may well prevent fires from accidentally thrown cigarette butts.
The wooden beam is sawn according to specifications and treated with an antiseptic
- Assembly lower crown frame. Before installing the crown, a double layer of roofing material is laid on the pillars. The installation of the beam is carried out with the wide side down according to the developed design drawing. Next, the beams must be leveled and carefully secured to the posts with anchors. The base of the cabin will consist of two transverse and three longitudinal pillars (150x100 mm).
The lower frame frame is laid on the foundation pillars through a double layer of waterproofing
- Laying floor joists. We take a 50x100 mm beam and install it edge down with a certain pitch on the longitudinal beams of the crown. At the same time, we insert the timber into the 30 mm slots located in the lower frame of the structure. The step between the lags should be 60 cm.
Floor joists are laid in 60 cm increments
- Underfloor arrangement. The gaps between the pillars can be filled, for example, with construction waste. The subfloor is covered with expanded clay. This action will insulate the change house and extend its service life.
- Installation of corner vertical posts. They are made from 100x100 mm timber. It is necessary to align the racks strictly vertically and plumb to complete their complete installation.
The vertical posts are plumb and temporarily secured with struts until they are connected by the upper frame
- Installation top harness. For the side and rear beams we use a 100x100 mm beam, which is installed at the level of the rear beams in the same plane. We install the front beam higher.
The front side of the frame is made higher than the back side to ensure the required roof slope
- Installation of additional vertical racks. For them we use thick timber 50x100 mm. Each door or window opening needs two posts. In addition, it is necessary to install the beams on the walls in one and a half meter increments.
- Installation of rafters. According to the drawing, we install the rafters on the front and upper beam located at the rear. We use a 100x40 mm board for work.
The rafters are laid on the beams of the upper frame and form the frame of the future roof
- Installation of sheathing. According to the drawing, we fasten the sheathing material to the rafters. This part of the work must be done before wall cladding and the floor was laid.
The sheathing connects the structure of the rafter joists and serves as the basis for the roofing material
- Rough floor. Most suitable option- tongue and groove board 150x30 mm, the installation of which is done in a continuous flooring. The subfloor is installed along the lower end of the floor joists.
Subfloor boards are nailed to the bottom of the floor joists
- Floor insulation. We install a waterproofing membrane on the subfloor. We lay insulation between the joists on the membrane. You can use mineral wool or expanded polystyrene foam. We cover the joists and insulation with a durable polyethylene membrane.
It is necessary to leave a ventilation gap between the insulation and the waterproofing film to remove moisture
- Flooring and exterior finishing of the cabin. The floor is laid from edged boards 150x40 mm. The frame of the structure is sheathed with outside vapor-proof film, then facing material - plywood panels, clapboard or edged boards.
The finishing material is pressed onto a layer of vapor-proof membrane
- Installation of doors and windows. You can use both wooden and metal-plastic structures.
- Installation of necessary engineering systems and insulation of the frame from the inside. The insulation is placed in the spaces between the frame posts. The width of the material should be slightly larger than the dimensions seat under it so that the insulation fits into the cells with a slight interference fit. We do the same with the ceiling surface. We cover the ceiling and walls inside with clapboard or any sheet material.
The insulation material is placed into the prepared frame with little effort and stays there without additional fastening
- Installation of partitions. We fix the 50x50 mm beam to three bases: walls, ceiling, and floor. We cover the partitions with sheet material.
- Decorative finishing work. You can cover the floor with linoleum, and paint the walls or treat them with some other material.
Video: do-it-yourself summer house
Interior decoration of the cabin
A mobile temporary structure performs a wide variety of functions. And this is achieved thanks to the interior decoration. It is this that makes the cabin suitable for temporary or permanent residence of people. On at the moment The following types of materials are mainly used for finishing the structure:
- laminated chipboard - attractive material, having a laminated dense surface that is resistant to negative temperatures. In addition, laminated board has different colors, textures and textures. Change houses made from laminated chipboard are practical and quite durable, but more expensive.
laminated chipboard is one of the the best materials for interior decoration of cabins
- MDF - the material has a medium density. It differs from traditional fiberboard in durability, as well as high reliability. However MDF is expensive material having a different color palette and finish. It is mainly used for finishing cabins for temporary housing or offices.
- PVC is the most attractive material for cabins. Mainly used PVC in white color palette. The material is also highly resistant to humidity and water.
- Lining - made from natural wood, so it is quite attractive and easy to use. The lining may have different configuration front panel and is used for both internal and external exterior finishing cabins
Lining for interior decoration is most often used when it is necessary to build a change house with a beautiful and inexpensive interior
- Fiberboard is the most affordable building material. It is easy to use, durable and very strong, but has a rather plain appearance. This material is suitable for office sheds and warehouses.
Photo gallery: interior design of cabins
Video: construction of a change house, part 2 - interior decoration
Construction cabins at the moment are the most inexpensive and comfortable type of temporary housing and accommodation for any necessary equipment. Thanks to their simple design, ease of movement and adaptability to all kinds of weather conditions, they can be used at any time of the year without restrictions.
Most modern summer residents agree that they cannot do without a utility room on their site. Gradually, tools, work clothes and other equipment no less important for work begin to accumulate. It should be stored in a special place, because most parts are made of metal and are therefore subject to corrosion. To reduce the risk of rust and keep tools and clothing in good condition for several seasons, it is recommended to build a shed, which thereby becomes an inexpensive but effective structure. How to build a shed without additional help, and will tell you detailed instructions with pictures and videos.
How to build a country house from cabins
In some cases, it is necessary to create a small building that will allow free time summer resident indoors. To achieve your goal, you do not always need to give preference to a new home with all the amenities. Sometimes the construction of such structures drags on for several years. To simplify construction, it is recommended to build a mini house from a change house. It’s quite easy to do, just use the tips that our video offers.
Naturally, in every special case a special approach to construction is used, but mandatory conditions It is considered that there are 4 mandatory conditions:
- creating a foundation;
- walling;
- finishing of external wall surfaces;
- heating installation.
Foundation for a future house
The main advantages of a change house are: country house, is the ease of construction itself. This condition implies that there is no need to install a special foundation. Building a shed from timber will not be difficult if you create a base of posts.
In some cases, a small porch is immediately installed. It is created for ease of entry into the room. If it is necessary to build a global approach to the house, a small but noticeable terrace is created. In this case, the foundation under it is mounted in a separate order.
Walling
A change house involves creating walls from lightweight material. In most cases, it will be used only in the summer, and therefore the walls will be created quickly, without unnecessary problems and emphasis on insulation. Building a shed according to the drawings will not be difficult if you prepare in advance required material. Constructed walls, in most cases, are only subjected to small finishing inside and outside. A detailed description of the installation can be seen in the video.
If the owner of the building wants to get a full-fledged house, then the walls must be made of high quality. A special lathing is used here. It is recommended to use a thin profile, although sometimes it is enough to use small beam. Fastening these objects involves the use of special plates that have holes for self-tapping screws. The width between the two walls should imply further installation of windows inside them.
You can build a 6x3 shed with your own hands using high-quality insulation erected walls. In this case, the lathing must also take into account the width of the insulating material. The intended use of the building in spring or autumn will require the use of mineral wool. The thickness of one mat must be at least 10 centimeters. If the house will be used during the winter season, then it is necessary to install at least two layers of this material. If the installation process is carried out correctly, the resulting building can also be used for temporary residence.
External wall finishing
When the construction of a log cabin is completed, a completely appropriate question arises about starting to decorate it. First of all, you need to pay attention to external walls house. Here you can take advantage of a wide variety of offers. Since a change house is either a temporary version of a living space or a building for equipment, most summer residents choose facing material in the form of siding. The first attention is drawn to the relative ease of installation, as well as the low cost of the material.

Sometimes the best option is the use of special siding, which resembles a log in appearance. The base version of the material is often used. Since in construction stores You can find several finishing options at once, so choosing the optimal one will not be difficult. In some cases, the change house not only looks beautiful, but also acquires a unique style.
Heating in a building
The instructions for building a change house do not tell you how to create heating in it. Unfortunately, modern construction a house made of cabins implies not so much large number heating system options. Most often, it is customary to install a stove in this building, called a “potbelly stove”. Although many people associate this device with a very ridiculous design, in fact it has a lot of effect.
As a last resort, you can purchase a convector that runs on electrical power. If you install approximately 2 convectors with 1,000 W power each, they can give required heat for the premises.
Expansion of an existing building
Building a shed on a site, as the instructions show, is quite simple. But sometimes there is a need to expand an existing premises. In this case, it is enough to build an extension on the same foundation and from the same material. In some cases, it is permissible to combine two similar buildings, and sometimes more, together. The only condition is the installation of additional interior doors.
How to mount the frame and walls correctly
In order for a change house to give a person the opportunity to fully feel himself inside, it is necessary to focus on detailed description frame construction and wall construction.
After the floor is covered with joists, it is necessary to consider the installation of vertical and transverse joists. The main frame is built, as a rule, mounted from timber measuring 150x100 millimeters. It is used to cover the floor and also create corners.
It is possible to build a change house at your dacha with high-quality parameters with your own hands only after installation, and most importantly correct fastening lag To do this, a small notch is made on each of them, at the ends. In this way, the bars are literally inserted into each other. To make them more likely to be fixed, they are secured with self-tapping screws. In this simple way, an effective frame of the building itself is created.
It should provide, before subsequent actions, the marking of door and window openings. This procedure is quite simple to do using a previously prepared drawing. In places where it is necessary to create a window or door, the building will have additional frame reinforcement.

Lastly, you need to create a frame for future roof. Here it is customary to use a standard beam measuring 50x100 millimeters. Installation is carried out using the same technology as when constructing walls - cutting and fastening with self-tapping screws. You should ensure that the rafters hang slightly outside the building, but not more than 30 centimeters. Roofing material can be selected at your personal discretion.
Types of cabins
In the last part I would like to talk about what types of cabins there are. Today it is popular to build four types of buildings, namely:
- Panel;
- Frame;
- Timber and logs;
- Change houses-containers or made of metal.
If with wooden buildings If there are no particular difficulties, cabins made of metal or built from a container require some attention.
How to build a metal shed if you have your own container? Quite simple if you know how to handle metal and the devices that process it.
In this process, the well-known sandwich panel is used. It is worth noting that this product is suitable exclusively for the installation of temporary housing. In this case, the frame will be made of metal. It is believed that such a structure will preserve heat in the room for a long time and provide a long period of preservation from various external negative factors. The analogy of insulation is the same as in wooden change house, with the only exception - the material is already laid between sheets of metal.


, Islam, Judaism How do temples of different religions differ")


