What kind of tricks do amateurs go to? indoor flowers in order to conveniently and beautifully place your favorites: capricious violets, monstera or. To avoid inconvenience in arrangement, today we will figure out how to make flower stands with your own hands from waste materials in a matter of hours.
Simple flower stands
It may be hard to believe, but stands for indoor flowers can be made without spending money on expensive materials. We present to your attention the easiest and budget options designs.

Stand in the form of a woodpile
Original coasters are made from simple paper towel rolls. Alternate them, coat them with PVA glue, and fold the “woodpile”. Paint it with acrylic or oil paint. If desired, decorate the design with colored yarn, which seems to entangle the “logs”.

Flower model for window installation
A stand for flowers on the windowsill should not only be comfortable, but also light. You can cut identical pieces of plywood of any configuration to your liking, make holes with a drill, string them onto a pipe, and secure them with special fasteners at the required distance. After that, put everything on the window and decorate beautiful flowers in designer flowerpots. We wrote about that earlier.

Stylish forging
Forged jewelry always looks appropriate and elegant. They can decorate as interior decoration, and emphasize the features landscape design. The only problem is that not every person can make such strong and durable stands on their own.

Floor flower stands made from tree trunk
For lovers of eco-style, wood options will be interesting, which would look as natural as possible and fit perfectly into the interior or landscape design. For example, a floor covering will look beautiful wooden stand from a felled whole trunk. To do this:
- Using a grinder, cut off the excess branches to make a cylinder about 1-1.5 m long.
- Step back 20-25 cm from the ends and make deep cuts to the middle of the diameter.
- Hollow out the area between the cuts to create a place where small indoor plants will later be installed.
After finishing the work, when looking at the structure, you will get the feeling of a flowering log, which looks more than impressive.

Wooden candlestick
This is another option from a tree trunk, but in this case the section of the trunk where the branching occurs is taken.
- The bottom is cut down in such a way as to create a comfortable and stable platform.
- In addition, from the thickest part of the log, discs about 3-4 cm thick are cut according to the number of branches.
- Each cut is secured with a self-tapping screw on its branch parallel to the floor.
- After this, the structure can be painted, and if you are a supporter of eco-style, then leave the stump in its original form.
- As a result, you will get a floor stand for flowers that resembles a large candlestick.

Chair flower stand
Great idea to breathe in old chair new life. In order to do this original design, and install large flowers on it, you need to:
- remove the upholstery from the seat;
- cut a blank from plywood according to its shape;
- make small sides by gluing wooden strips along the contour 4-6 cm wide;
- reinforce this box instead of a seat.
In such a niche you can either pour soil and plant flowers, or put ready-made pots with plants. Keep in mind that the more vintage and older the chair is, the more interesting the improvised bookcase will be.

Interesting! Cut a hole in the seat that is 3-4 cm smaller than the top edge of the flower pot. Insert the pot into the hole and, if necessary, strengthen it with polyurethane foam. If you do not need a high stand, then from high chair or a stool will make an equally interesting low design.
Creative model of a two- or three-wheeled bicycle
A flower stand in the shape of a bicycle will become a real decoration of your garden. To do this:
- Flowers are placed on a bicycle in the front basket or rear trunk.
- Attach the box to the front and rear fenders with wire or clamps.
- You will need white or any colored metal paint. Paint the entire structure and place flower pots in the boxes.

Such a bicycle is either attached to buried pipes, or placed and screwed to a stump.
Stands made of plastic bottles
Stylish products can be made from the garbage that people throw into landfills every day. As you can see in the photo, outdoor stands that are not afraid of rain and snow can be obtained from simple plastic bottles. The following materials will be required:
- scotch;
- PVA glue;
- a skein of thin twisted cord;
- roll of toilet paper;
- 1 pack of paper napkins;
- 13 plastic milk bottles;
- lentils or beads, beads;
- thick cardboard;
- gold plated paint.
Algorithm of actions:
- Tie 12 bottles in pairs with tape to make 6 pairs.
- Using the same tape, form the lower part of the product from 3 pairs of bottles into a “flower” shape, and strengthen one of the 2 remaining unpaired bottles in the middle so that its neck rises 4-5 cm above the others.
- Knit another similar part, but without the bottle in the middle. This part will be the top.
- “Push” the top onto the bottom with the necks so that the protruding central bottle acts as a stem.
- Wrap the device toilet paper smearing it with glue.
- Place another 2-3 napkin layers, covering each one with glue and allowing it to dry.
- Leave the workpiece to dry at room temperature for a day.
- Apply a design you like to the surface, for example, a floral one.
- Cut out leaves from cardboard and glue them to the surface of the stand.
- Lay out the flowers from beads and seed beads, and the stems and cuttings floral decor can be imitated with a cord.
- Paint the finished structure with gold and let it dry.

Models with wall mounting type
Wall stands can be very diverse. Such structures are made of metal, tires, twigs, glass, etc.
- From a tire. Remove the car tire from the rim, hang it perpendicular to the floor, and insert miniature pots of climbing greenery.

- Metal products for the wall are made from scraps of pipes with a diameter of at least 10-15 cm. Cut them into 4-5 pieces of the same length. Stepping back 3-4 cm from the edge, cut out top part so that it looks like a trough, in which flowers are already placed, and even seeds are planted. To hang the structure, take a metal rail equal to the length“trough” tubes, tie 2 ropes to it 2 cm from the edges so that 2 ends still hang down on both sides. Make 2 holes on the pipes, retreating the same distance from the cuts. Thread the ropes and secure the pendants so that they do not move. Instead of metal, you can take sewer pipe(photo on the right).

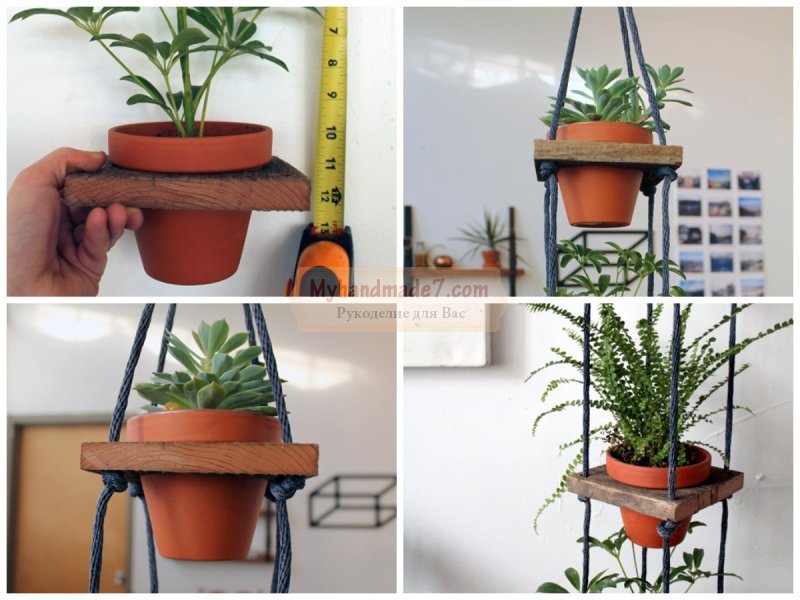
- Hanging options made of wood. Take a board and cut out 3 squares of equal size. In the center of each, you should cut out a circle that will be 4 cm smaller than the diameter of the pot in the upper part (if the pot is a cone), and drill one hole in the corners for the rope. Take 4 identical pieces of rope, each of which will be intended for a separate corner of the stand. Tie a knot on the first rope, stepping back 10-15 cm from the edge. Pass it from below into the hole of the lower “floor”. Tie another knot at a distance equal to approximately the height of the pot, multiplied by 2. Re-thread the rope from below into the hole from the next “floor”, and repeat the manipulation with each level. Repeat the same with all ropes. Gather all 4 ends into a knot at the top, thread it into the hook, and hang it.

Important! You shouldn’t get carried away with the floors, because the structure will be quite heavy.
There are a lot of options for flower stands, but do you have any original ideas? Share with readers in the comments.
Video: DIY flower stand from an old stump
Let's see how you can transform your favorite indoor flowers? For example, if you create flower pots with your own hands, then such decor will please the eye and add zest to the interior. In addition, by arranging flower stands and/or shelves with your own hands, you will also find it convenient to care for your pets.
Design options for pots for indoor flowers
What is the difference between a flower pot and a regular flower pot? Translated from French cache-pot means "to hide the pot." Thus, a flowerpot is a decorative “wrapper”. Certainly, the best home there will be a clay pot for flowers, but it quickly loses its attractiveness appearance, since ceramics allow water to pass through and stains appear on its surface that cannot be removed. Glaze is often used as a protective film, but over time it will crack and crumble, and then the pot will either have to be replaced or decorated. In this case, a flowerpot comes to the rescue - with its help you can easily hide unsightly places and create decor in the same style.
If you have a couple or three pots, then the easiest way is to arrange them beautifully on the windowsill. But if there are more than a dozen colors, then placement can become a problem. The most common way to hang flowerpots is to use ready-made hanging hooks or make holes for rope. But you can make the mounting method creative.

You can organize a simple crossbar or build an entire structure under the ceiling, on which, for example, hang several.

The design of a one-piece flowerpot does not provide drainage holes, and openwork ones do not hold excess moisture, so this must be taken into account when watering.
Or here’s an idea for hanging flowerpots, even those who don’t know how to do it can do it:
If you need to small space post a lot flower pots, then this idea is for you!

Using simple techniques from wooden blocks and rope, you can make a whole shelf for flowers with your own hands, arranging suspended structures. More detailed instructions in this video:
Imagine, combine different ways, the more flowers you can place, the cozier your home will be.
Making flowerpots with your own hands from scratch: materials and master classes
In this section we will look at options for independent “cases”, which are made separately and then “settled” in them. flower pot. For indoor flowerpots the choice of materials is unlimited and relates only to overall design and your preferences. The most common and used for hand made:
- cardboard,
- paper straws,
- felt,
- recyclable materials.
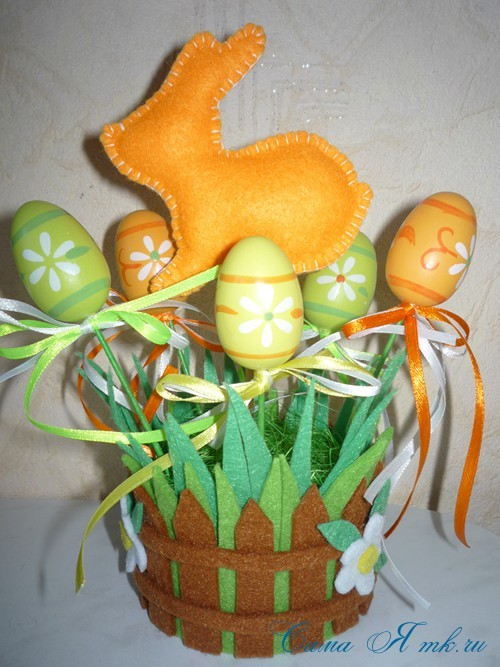
From felt
From simple materials for handicrafts and children's creativity Wonderful things come out, you just have to use your imagination. Look, a charming flowerpot from...

DIY stands and shelves for pots
Making a flowerpot or decorating a pot is not everything. This beauty needs to be put somewhere! Here you can’t do without special shelves and stands. You can build a structure on the wall.

Or you can order a whole shelf for the floor.

Or this stepladder bookcase.

And it’s not at all necessary to ask someone. If you buy blank parts cut to size in a store, then even a delicate one can handle the assembly. female hand. Like in this video:
But it’s much more interesting to use your imagination and adapt unusual objects under shelves to place flowerpots. For example, pallets. Paint it with stain or dark paint and voila - a great shelf is ready.

And they get along great in this tool cart various plants, creating mini .

"Cross" will not give bad advice! :)
Categories,In the interior of an apartment, a flower stand allows you not only to optimize the space near the window, to accommodate more flower pots than the area of your window sill can afford, but at the same time to become interesting decor, highlight the beauty of green plants. It’s interesting that many DIY garden ideas that we are used to seeing and using during the summer season can be quite successfully used in a city apartment. This applies to homemade wooden coasters, as well as creative use of old things.
Types of stands by location
Floor, tabletop or wall-mounted products are often used. They may have various sizes and shapes, so the owner of each house will be able to choose more suitable option. When choosing such products, it is worth deciding which ones will be more convenient to place in the house or on the street:
Metal wall flower stands for indoor installation. Such products have small sizes, therefore suitable for every home. They can be placed even in narrow passages without cluttering up the space. Often these products are used to fill empty spaces on the walls. Forged flower supports that look more elegant look quite attractive.
Tabletop. To install them, you need to purchase additional furniture. This includes shelves, cabinets and tables. Such products should be placed only in spacious rooms. If you neglect this rule, the room will look more like a flower garden than a living room.
Floor-standing. Similar stands look more solid than the other named species. They are independent interior elements that do not require the placement of additional items. Their feature is large size, what you need to consider before purchasing.
Outdoor flower stands made of metal. Such designs are selected based on the style in which the site is designed.
Materials for DIY flower stands
When creating forged stands, we use following materials and blanks:
Rods square section. From them are created floor stands, which are combined with classic interiors.
Rods round section used to create products complex design. They look more elegant and are suitable for rooms decorated in a romantic interior.
Thick wire. This material is used to create lungs wall structures. They look elegant and can be made in different styles. Often stands with complex patterns are made from wire.
Decorative elements. These include leaves, metallic insects, balls and spirals that make the stand more attractive.
If desired, you can find non-standard designs, made, for example, in the shape of a bird's nest. 
DIY flower stand made from tree branches
Any wooden stand always looks great. Ecologically pure material associated with nature, therefore it is perceived especially favorably. Try making such an item from ordinary tree branches. Take a small pima, bag fabric, straight branches without knots, any container cylindrical, twine and glue gun. Order further actions is:
- Using a hacksaw, we cut the branches so that they are the same length, and their height is a couple of centimeters higher than the height of the selected container.
- We cut off a thick thread of twine and use it to tie together the wooden pieces laid in a row. We place the twine so that it is at a distance of 3 centimeters from the top edge of the branches. It is enough to make one very strong knot on each element.
- When performing work, it is advisable to periodically apply the branches to the container in order to understand how many more parts need to be connected - the width of the workpiece should be equal to the volume of the container. After the top row is completed, repeat the operation and knit the bottom row, fastening all the parts.
- Then we take the container and wrap it with burlap. We fold the lower part of the piece of fabric under the bottom and glue it glue gun to the bottom of the cylinder.
- The final stage is to wrap the cylinder with tied branches and fasten them with twine. The result is very original stand for flowers.
 DIY wall stands for flower pots
Can be placed in any room hanging option, mounted on the wall. For flowers, a window sill is often used, on which various types of products can be placed. This is usually flat designs made of wood, plastic. The wicker jardiniere looks beautiful. Housewives are interested in how to make a stand themselves. After all, you want to not only please your family and guests with an ideal order in the apartment, but also surprise original decor. DIY flower stands can be made at home. 
The main materials when creating such decor will be wood and rope. You will need the following materials and equipment:
- wooden shelf or regular board;
- medium thickness rope;
- pots different colors;
- drill;
- jigsaw;
- paints.
Flowers that you don’t want to put on the windowsill will look good in this frame. The strength of the product depends on the wooden bases, which have square shape. We apply the wide side of the pot to the board and outline it, enlarge it by 2 centimeters and draw a square. This is how we get the size of the base; we cut out as many squares as there are pots that the decorative stand can accommodate. The diameter of the internal cut of the base is made 2 cm smaller than the outlined pot.
Then, using a jigsaw, a hole is cut into which the pot will be inserted. After completing this stage of work, we make holes in the corners of the square base with a drill for ropes. Wooden parts and the rope can be painted in different colors. Assembly is carried out taking into account the height of the plants. 4 ropes are threaded into the ring and pulled into the holes on the first square. We tie a knot from below and continue working until we have secured all the bases to the ropes. The product for indoor flowers is ready, all that remains is to place the pots in it and attach it to the wall. It is better to choose a place where the plants will have enough light.
How to make an elegant wooden flower stand to place on a windowsill:
Do-it-yourself vertical stand with chipboard shelves:
DIY floor stands with round shelves for flowers made of metal tubes and chipboard
Growing flowers, for most housewives, is very exciting activity. A small hobby gradually develops into a big hobby, filling all the free space. It's good if living area allows you to select the necessary territory to create a green oasis. But what about this sprout, which has no place on the windowsill, can’t be placed on the closet, the table is occupied, and on the floor among the large flowerpots it will simply get lost.
The solution is this global problem, floor and wall shelf options are becoming available. The modern market offers wide range ready-made structures. Variety of shapes, structures and color designs is amazing and has no boundaries. However, made with your own hands, flower shelves become unique design solution and bring an extraordinary atmosphere to the interior.
Variety of solutions and materials
Before you get to work, you need to create rough plan arrangement of colors, based on which the sizes and features of future shelves will be determined. Depending on the type of plant, two main options are used:
- wall;
- floor
The number of flowerpots located on the selected structures also divides them into several types:
- Single rooms. In most cases, they are used as wall hangings; small, densely flowering bushes or climbing dense greenery look very beautiful in them.
- Double. It is better to choose flowers with the same care conditions for them. They can be wall-mounted or floor-mounted; for the second option, large ones are more suitable tree plants.
- Multi-seat. The shelves occupy a certain section of the wall, the main thing is not to place very heavy pots to prevent them from falling; in the floor version you can place up to ten flowerpots.
All proposed options can be designed in the form of corner shelves, so you will save space and additional features for design innovation. For lovers of liana plants, ceiling shelves are offered for consideration.
To create your own flower racks, you can choose and combine a wide variety of materials. Very often, many people choose a tree. Despite the environmental friendliness and versatility of use, do not forget that you can always find others at hand interesting options, which have their own advantages. We will look at some of them in more detail.

Plywood shelves
Plywood - perhaps this is the simplest and cheap material, from which we obtain flower shelves the most various forms and sizes. If there is no one in the house plywood sheet it will take a small amount of money to purchase it. The process of creating a shelf from plywood is not complicated. Subject to availability necessary tools assigned task in short terms will turn into a work of art.
First, you need to make a sketch. Here you can show unlimited imagination. The main thing is that the resulting design corresponds to the initial purpose, is durable and can withstand the intended number of pots.
When the canvas is ready, the edges of the cut are cleaned sandpaper and holes are made for future fastening. The entire surface is covered special solution, thereby increasing moisture resistance and preventing the appearance of mold. After drying, the shelf is opened with varnish.
Creative people can demonstrate their talents by decorating the product with drawings, covering it with pebbles or shells, and showing creativity.
To secure wall options plywood shelves use metal corners or brackets, due to which they are attached directly to the wall.


Plastic rack
The most common place to place flowers indoors is the windowsill. Using this plastic sheet, flower racks are created. You can buy it at almost any hardware store or order from the manufacturer.
For the design you will need several nickel-plated pipes, fasteners, flanges for attaching to the floor and a pair of brackets, do not forget about the tools necessary for the work.
After the measurements have been taken, the window sill is cut to the required length. The next step is drilling holes for the pipes, two at the edges, it is important that they are parallel to each other, and one in the center. The length of the pipes must be the same, otherwise the structure will be unreliable and shaky. Fixed assembled rack using ceiling brackets and floor flanges.
The advantages of plastic shelving are durability, they are not afraid of moisture, and they are easy to care for.

Corner shelves for flowers
To create a corner shelf, you can use all the materials listed here. For small products there will be enough leftover materials.
Creation technology corner shelves DIY is very simple. From chipboard sheet The surface is cut to the required size. A galvanized pipe is threaded into the prepared holes and the entire invention is connected to each other with flanges. Using brackets it is fixed to the selected surface.
The next stage is treatment with varnish or paint.
To create a green corner, interesting solution There will be a kind of corner shelving. As they grow, the shelves become smaller, representing a pyramid. On this design you can arrange flowers of different sizes using climbing plants on the sides.

Wooden flower shelves
Wood is one of the most reliable materials used in construction. Properly assembled and secured wooden racks or shelves adapt to any number of plants, regardless of size. When choosing wooden wall shelves, you can limit yourself to the most simple option. To do this, take a beam of the required length, coat it with varnish or paint and fasten it using metal corners to the wall. If you replace the fastenings with leather straps, you get a creative design approach that brings individuality.
Wooden floor racks are made for plants in large flowerpots. They endure heavy weight, allowing you to combine different types flowers.
A corner shelf can be easily assembled from scraps, even if they are of unequal length. Flowering bushes diversify the boring life of corners with their bright colors.
For lovers unusual options We offer for consideration wooden shelves that combine several different materials.
The method of assembling wooden shelves or racks is the same as in the version with plywood.

Wall flower shelf made of wood and metal
When combining materials for flower shelves, we recommend choosing a combination of metal and wood. Welded metal frame With wooden flooring used for wall views shelves and fits very harmoniously into a modern interior.
For manufacturing, you will need a drawing with measurements, several rods, which will later create the base of the shelf, and wooden board for the partition. After welding the main part, it must be treated with an anti-corrosion solution and painted in the chosen color. Next, the prepared wooden plank is installed, the finished product is attached to the wall using self-tapping screws.
Considering this combination of materials in floor options flower racks, the main work is carried out according to the same plan. Preference is given to options with several tiers, and lovers of sophistication will appreciate forged flower stands.

Glass shelves for flowers
The main location of glass shelves is usually in the window space. On such shelves, all plants will receive the necessary portion of light. When preparing for work, you need to choose the right glass thickness. The best option 0.5 cm. By strengthening the lower part with wood, this design can easily support up to ten small pots of flowers.
If handling a glass cutter causes some difficulties, it is better to seek help from knowledgeable craftsmen. By providing required sizes, they will easily complete your task.
In addition to the glass, you will need iron corners to attach the slats. Shelves are placed on top of the slats.
Equally important is the proper arrangement of flower racks and shelves. By following a number of simple tips, harmony is achieved between the green space and the atmosphere of the home:
- If the floral diversity is dominated by decorative flowers, it is better to use a wide floor rack. Its height should not exceed the middle height of the room, otherwise there will be a visual distortion of the space.
- When arranging flowers on tiered shelves, we use the rule from largest to smallest. On the lower floors there are lush bushes more voluminous, and gradually create a transition to miniature options.
- Making flower stands with your own hands, special attention should be given to supports. Large flowerpots require a strong and stable structure, especially if there are small children or animals in the house.
- Large quantity plants placed next to each other on the same shelf should have the same conditions for care.
- Add variety by inventing interesting ideas and adding little accents. Any driftwood with an extraordinary approach, with the addition of artificial accessories in the form of butterflies or bugs, will turn into a masterpiece.
The use of flower shelves is not limited to internal part premises. Houses and apartments with balconies or loggias contain entire greenhouses. Owners of personal plots create incredible compositions on their territory. Restored stairs, bicycles and wheelbarrows are used as shelving. Teapots, watering cans and other old utensils can serve as a hanging shelf. Such green corners become one with the owners, and self-designed racks and shelves for plants are an integral part of a small flower paradise.


84 photos of shelf ideas


Today, almost all houses and courtyards are decorated with fresh flowers. They enliven the room, make the air cleaner, and lift your spirits. To save free space or create a composition from pots, flower stands are usually used. But store-bought copies are quite expensive and do not please with the variety of designs. Therefore, creative people who want to create interior items with their own hands can easily make a flower stand themselves.
Main types of flower stands:
- forged stands. Flowers look very elegant in them. They are durable, reliable and have an elegant appearance, but you most likely won’t be able to make them yourself at home, unless, of course, you are a professional craftsman;
- wooden stands. This option occurs most often. They are more economical and suitable for any interior. The easiest way to make a flower stand with your own hands is from wood. The material can be boards, chipboards, natural material, for example, a piece of log with sticking out different sides branches, etc. To make a wooden stand look even better, it is usually varnished;
- metal flower stands. Such stands, just like forged ones, are not subject to self-production. The exception is combined products, in which the bases for the pots are made of wood, and ready-made ones are used for supports. metal pipes with a cross section of 25 mm. But if you still decide on metal flower stands, due to their reliability and resistance to external influences, then you will have to buy ready-made ones;
- flower stands, which are a composition of several different items. There are no rules or features here anymore. It all depends on imagination and quantity free space. Below is a master class on making one of the options for such flower stands, and photos as illustrations.
Master class No. 1: flower stand + decorative birdbath
This stand is more suitable for decorating the yard or open veranda. You can use pots for it different shapes, or maybe they are the same. The color they will be painted depends on your idea and taste preferences. In our case, the pots are one color, but you can paint them in different colors.

For work we will need:
- one large and tall pot that will serve as a base;
- four smaller flower pots;
- one pot, which will be at the very top. It is smaller in size than the base, but larger than the intermediate pots. A decorative bath will be attached to it;
- metal rod as a support for the entire structure. If the store does not have the size you need, you can buy a longer one and cut it with a hacksaw;
- spray paint;
- spray primer;
- a small figurine of a bird made of ceramics;
- water-repellent glue.

The sequence of work is as follows:
- We prime the surface of the pots and after drying, cover them with paint. There can be one or more colors, according to your taste;
- we measure and add up the height of all the pots, add 600 mm to them and thus calculate the height of the support rod. Using a hacksaw, cut a piece and hammer it into the ground 600 mm. This action will ensure the structure is in a stable position;
- through the hole in the bottom we put the pot-base on the rod, set it straight and fill it with earth;

- then we put all subsequent pots on the rod, one after another, fill them with earth and tilt them alternately to the right and then to the left;
- We install the topmost pot directly, like the base, and attach a plastic or ceramic bath prepared in advance to it. We glue a bird figurine to its edge and let it sit for a day until it dries completely;
- After all the work is completed, we plant the flowers and enjoy the result.
Master class No. 2: hanging flower stand
For placement on the veranda or indoors, most suitable hanging stand for flowers. Wood and rope are the main materials needed for its manufacture. You can place flowers on it that you don’t want to hide on the windowsill behind the curtains.

To make it we will need:
- wooden board or shelves from old furniture;
- rope, not thick, but not thin either;
- flower pots, in our case four pieces, and you can take them as you wish;
- jigsaw;
- drill;
- paint and brushes;
- metal ring.

- in order to provide the product with the necessary strength, wooden bases, into which the pots will be inserted, should be made a couple of centimeters wider than the pot itself. To achieve this, place the pot on the board with the wide side, outline it with a pencil, and then, measuring 2 cm in each direction, draw a square. This will be the size of the base. We draw such squares according to the number of pots;

- To outline the line of the internal cut, cut out a circular template from cardboard paper. Its diameter should be 15-20 mm smaller than the circled pot. Once the template is made, trace it inside each of the base squares;

- Now you need to cut a hole into which the pot will be inserted. To do this, attach the square to the work table with a clamp, make a hole in its middle with a drill, insert a jigsaw through this hole and cut out the inner circle. While working, be careful and take your time so as not to damage the product;


- After the holes for the pots have been cut in all the base squares, drill holes for the ropes in all corners of each of them. You need to carefully ensure that the holes on all squares are in the same places;


- Now you can think about design. Paint the wooden parts with paint of different colors or stain, depending on the style and interior of the room. The rope also needs to be painted, we chose black, but you can take any other color at your discretion. To do this, use acrylic paint;

- This is followed by the assembly of the structure. It must be done taking into account the height of the plants that will be installed in the base. We start the assembly from the top: thread the four ends of the rope into the ring, pull them into the corner holes of the first square and tie a knot under it to secure it;

- In a similar way, we fasten all the base squares for the pots to the rope, and cut off the remaining ends under the last of them;
- after that, insert the pots and hang the stand in the desired location.
Master class No. 3: floor flower stand
Featuring graceful curved legs, this stand will brighten up any room. It consists of a triangular base with rounded sides on which the pot will stand, a slightly smaller shelf of the same shape, and three curved metal legs.
To make curved legs, you will have to bend metal tubes on one's own. A special bending template will help us with this.
We will need materials:
1. For the stand:
- 2 pieces of waterproof plywood 24 mm thick - one 37x37 cm, and the second 22x22 cm;
- 3 copper pipes 1.5 cm in diameter and 68 cm in length;
- 3 bars with balls at the ends for legs;
- polyurethane glue.
2. For the template:
- a piece of fiberboard or MDF 40x80 cm;
- 5 bars 2x4x10 cm;
- clamps, screws.
Manufacturing sequence:

- on the pieces intended for shelves, we make markings using a compass;
- cut out the parts using a jigsaw, sand the edges with sandpaper;
- On the base under the flower pot we draw medians so that even ones appear along the rounded sides. We place the shelf exactly in the center, press it tightly and drill three holes in its corners. The drill must go through both parts;
- We sand the edges of the shelves with sandpaper;
- We fix the wooden balls used for the legs with a vice and drill holes in them;
- We open the wooden parts with a layer of varnish, dry them, lightly sand them with sandpaper and apply another layer;
- We also grind the metal legs and apply varnish or paint;
- insert the legs into the holes on top shelf, and at the level of finding a small shelf we rewind them double-sided tape and glue it;
- We insert a block with a ball-shaped tip into the hole in the pipe leg and fix it with glue for greater reliability.

Making a template and giving the legs a curved shape:
- We mark the slab around the circumference and attach the bars to it using screws;
- We carefully press the tubes themselves to the bars using clamps;
- After the clamps are relaxed, the pipes spring back.


, Islam, Judaism How do temples of different religions differ")


