When there are so many things that there is nowhere to put them, the task of creating additional storage space arises, and the rack is perfect for this.
- it is easy to make, it will cost inexpensively;
- any materials can be used;
- you can think over the design so that it does not take up much space;
- its height will allow you to use the space up to the ceiling.
Shelving is suitable for any interior and can fit anywhere in the house. The design itself implies a significant degree of freedom in the choice of material and forms - it can be made for any interior, from the corridor to the living room.
Racks made of natural eco-friendly material can be used in the nursery, in the kitchen. With the help of a rack, you can quickly put things in order in any cluttered room.
The rack can also be used in the kitchen to free the kitchen table from unnecessary items.
The design of the rack is extremely simple - it is a frame on which shelves are fixed at different heights. For added stability, it is attached to the wall.
For the rational use of space, hanging racks are suitable - the upper part of the wall is often left unoccupied, it can be used to place things.
Despite the huge volume they hold, they do not clutter up the space, maintaining a feeling of air and spaciousness, especially for shelving without back walls. For storage of stocks, you can choose just this type of shelving. They can be arranged so that the approach is from any direction. They are also suitable for a garage or pantry.
Graceful creations made of wood and chipboard with partitions, drawers and lower closed shelves will be an excellent addition to the interior of a living room, bedroom, or your own office.
The rack can be used for zoning the room, while it will help maintain order. The absence of a back wall will make the division of zones weightless.
The rack can be placed on furniture wheels, and if desired, moved, changing the space, or used as a static partition.
 Most often, racks are used to store books, and such a rack can stand anywhere, even occupy non-functional space in the corridor.
Despite the numerous advantages of solid bookcases, bookcases are very popular, and their low cost only reinforces their advantage.
 Small shelving fits perfectly into the hallway, regardless of its size. Umbrellas, shoes, gloves and keys get their permanent places, and are in sight and at hand.
 The rack installed in the kitchen saves space significantly, because you can place hanging, hanging products by placing utensils on them according to the frequency of use.
In the living room, a beautifully executed rack can replace a bulky wall; everything will fit on it, from a TV to books and trifles.
If you make several shelves with doors, then it will be possible to arrange bottles of wine, glasses, dishes for receiving guests.
Development of a model for self-production
 To begin with, the idea of \u200b\u200bthe rack must be depicted in the drawing. To do this, the space that is allocated for it must be measured and plotted on graph paper on a scale. Then the shelves are drawn, with reference to the actual size and taking into account what will be stored on the rack.
If heavy things will be placed on it, for example, spare parts or tools, you should not make the shelves too long so that they do not sag over time. Their length should not exceed 1 meter, while they can be additionally reinforced with a metal profile.
If the rack is installed from wall to wall, then you need to decide which design to choose:
- a static version from wall to wall is possible, with shelves fixed directly to the walls. This solution has several drawbacks, and the gain in space is small;
- it is better to make an autonomous structure, then, if necessary, it can be moved. In this case, the drawing leaves a margin of at least 15 cm to the wall, maybe even a little more, so that it can be placed and moved if necessary.
Even if there are things with low weight on the shelves, they should not be made longer than 1.5 m, otherwise they will begin to sag.
The shelves themselves should not be too deep so that all things can be easily reached. In general, the presence of several rows on the shelves very quickly becomes tiring, especially when you have to put everything out to find what you need. Therefore, the depth of the shelves should not exceed half a meter.
The height of the shelves is also worth considering separately. It can range from 30-40 cm to 50-60 cm. This value depends on the dimensions of things, you must immediately plan what and where it will stand. Shelf height should be at least 7-10 cm above the tallest item that will be placed on the shelf, then it will be convenient to get it. 
The simplest rack is suitable for a garage or pantry, if the product will stand in the rooms, you should consider a more elegant design solution - finishing, configuration, decorative details.
All calculations should be schematically reflected on a scale grid in compliance with proportions. Then simply measure the dimensions of the components, make an approximate layout of the material and get to work.
Below is an assembly diagram of the simplest shelving, the main parts of which are support frames and shelves.
Material selection
The most affordable material is wood, it is inexpensive and easy to buy. In addition, its processing requires minimal skills - if the rack is the first product, then making it from wood guarantees success even if there are errors.
For a simple model, you need to choose a 5X5 planed timber and boards for shelves. Shelves can also be made from sheet material: chipboard, plywood.
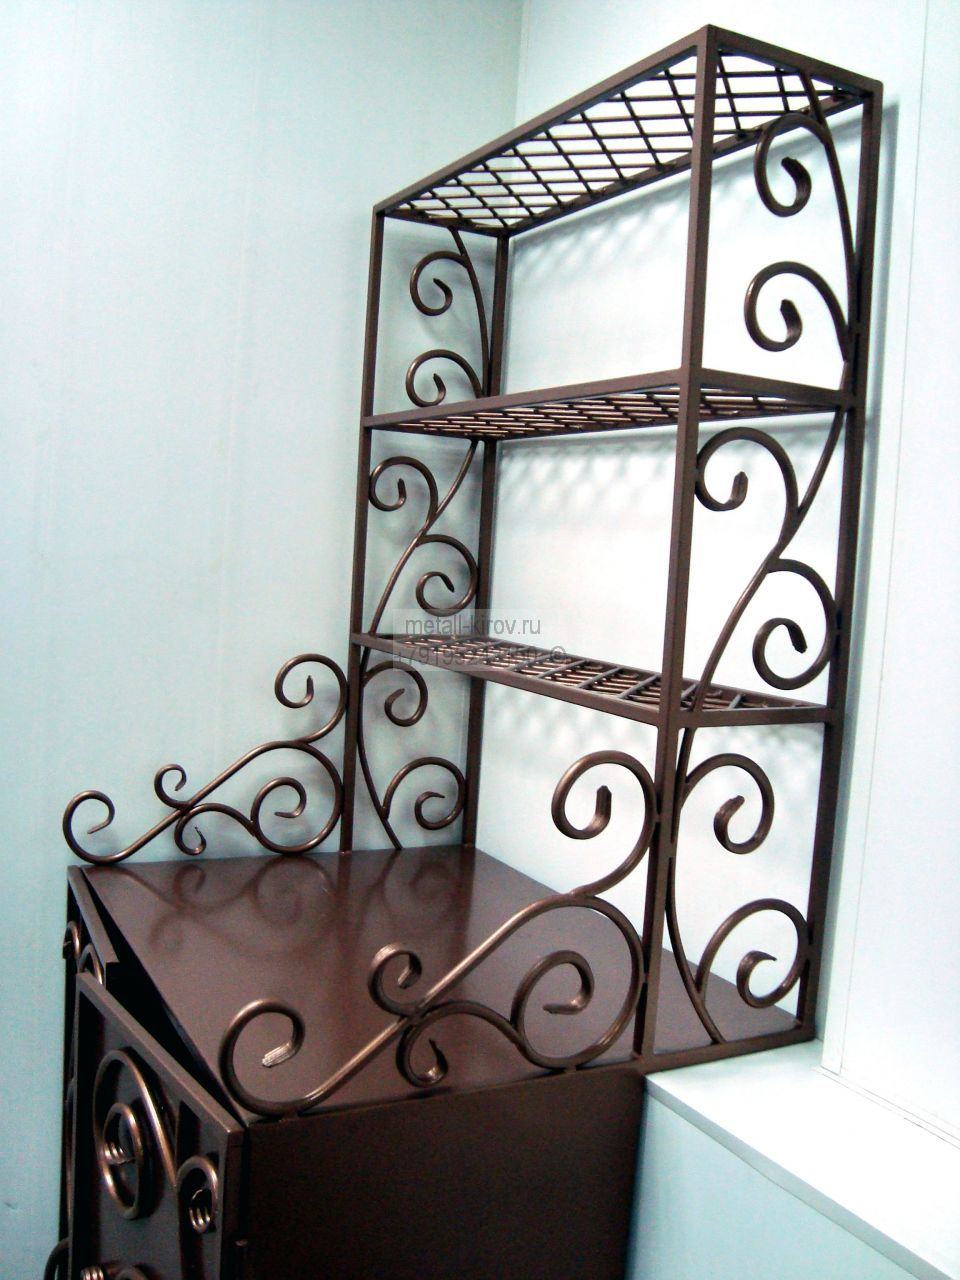
Metal works well too, but working with metal requires some skills, for example, you will have to master drilling a hole in metal. Metal products have increased strength, durability, and are well suited for high-tech interiors. It is possible to combine a reinforced frame with wooden shelves, which will be carefully processed - this product can be done elegantly.
Instrument preparation
To do the job, you will need the following tools:
- construction pencil (a regular one with a soft lead is also suitable);
- tape measure (preferably with millimeters, or at least with half-centimeter marks);
- jigsaw;
- drill (drills with a diameter slightly smaller than the diameter of the screws and a drill with a diameter slightly larger than the screw head);
- grinder with nozzles or rings with different grains;
- self-tapping screws;
- crosshead screwdriver;
- a hammer;
- a set of skins with different grains.
You also need to buy brackets for fixing shelves or metal corners.
To process wood, you need to buy special liquids, for example, with fire and bioprotective properties, stains of the desired shade, varnishes. Varnishes can be purchased immediately with the desired shade, there are also colored ones: green, blue, etc.
Part preparation
First, in accordance with the drawing, mark the main parts of the product on the material, carefully measure everything down to the millimeter.
After they are cut, they should be processed:
Grind with a grinder, changing the nozzles from coarse and medium grain to fine. When buying material, it is better to choose planed boards, then finishing work will take less time. When sanding, you should pay attention to the sides and especially to the cuts - you need to make them smooth.
Soak the prepared parts with an antiseptic or stain, dry well.
Shelving assembly
The steps for assembling the rack look something like this:

Then the parts are combined on the floor and fastened with self-tapping screws.
- The boards must be cut to the intended length of the shelves. You can screw each one separately, you can first assemble the shelves on the transverse bars (1-2), then install the already assembled shelves;
- The installed longitudinal bars will increase the reliability of the shelves and fasten the rack frames together;
- If the material is sheet, the task is simplified - they are cut out entirely;
- After assembly, the product should be sanded again and processed, coated with paint.
Shelving options
The easiest way to get a new piece of furniture is to buy a prefabricated kit.
The advantages of this solution to the problem are obvious:
All parts are already professionally processed, metal parts are made of stainless steel, galvanized or coated with anti-corrosion agents, wooden parts are also fully prepared for assembly.
In most models, the variability of the heights of the shelves is provided - they can be rearranged without any additional steps. 
- Metal racks have special strength, the plasticity of the material will make it possible to make a whole system around the perimeter of the room and store objects of any weight on it, from wheels from a car to stocks and conservation;
- The traditional material - wood - will never lose its relevance. Eco-friendly, durable, easy to process, allows you to realize any idea. Depending on the design, it has some restrictions on the weight of things; it is less durable than iron.
Do-it-yourself shelving will not only save a substantial amount, but also transform the space of the house. One has only to try once to put your own piece of furniture and load it with things, there will be a desire to do something else.
Even if the hands are not very skillful, they will be able to make a rack after watching this video. When viewing, you should pay special attention to the processing of parts and how they are connected.
The most practical and simple design for storing a variety of things and objects in a home is a rack. It can be installed not only in the pantry, but also in any other room, from the study to the bedroom, as well as on a closed balcony or in the garage.
Racks - different in design and operation options
When there are no special places for storing things, working tools, books and other trifles in an apartment or house, the home becomes cluttered very quickly. Well, if the living space allows you to install an additional chest of drawers or a closet, equip a pantry. But in many apartments this is simply not possible. Their quadrature is not designed for a large amount of furniture. In such cases, it makes sense to independently make a compact and at the same time roomy rack, using affordable and easy-to-process wood material for its manufacture.
A wooden rack is structurally a product with special racks on which the shelves are fixed. The number of the latter can be any. On the shelves you can store relatively small items - tools used by home craftsmen, dishes, all kinds of trinkets. With the correct design of such a structure, it will fit without problems even in a very modest dwelling. In addition, wood products are suitable for any interior of a house or apartment. Natural wood harmoniously fits into the classic decor of the room, and into the newfangled options for its arrangement, whether it be Provence or country.
Homemade racks are divided into several types. Each of them has its own characteristics. For example, stationary products are mounted "for centuries" in one place. They are built in the form of a solid frame with many crossbars and several racks that allow you to mount the required number of shelves. Mobile racks are described by a similar design. But, unlike stationary ones, they are necessarily supplied with wheels. With the help of the latter, the described furniture moves without difficulty throughout the dwelling. This option is suitable for people who constantly change the interior of the house, rearrange objects in it.
In small apartments, we recommend installing wooden shelving. They allow rational use of the available area by optimizing the available space. Hanging structures usually include a small number of shelves fixed to the walls. If you need a rack exclusively for small items and things that a person uses every day (hygiene products, tableware, kitchen utensils), you can make a rotating structure. It can be both mobile and stationary. Rotating shelving is most often placed in kitchens and toilets, mobile - in bedrooms and children's rooms, installed once and for all - in libraries. Hanging structures are allowed to be mounted in any premises.
Preparing materials for assembling a structure - where do we start?
According to experts, it is best to make the structures of interest to us from high-quality boards (timber) from red rocks, oak or more affordable pine. The use of products from chipboard wood materials (chipboard) is not welcome due to the short period of their operation. It makes sense to use such blanks only in certain cases. For example, when a temporary storage facility is being built.
The selected wood material must be well dried. It is optimal if its humidity is not more than 12%. Before assembling, the boards are necessarily impregnated with special compounds and antiseptic solutions. If the rack is planned to be installed in the bathroom or in the kitchen, the blanks are additionally treated with water-repellent mixtures. After applying the indicated compositions, the boards must be left for a couple of days in the room where we will mount home-made furniture. During this time, they acclimatize to the humidity and temperature in the room.

In addition to the boards, we will need metal corners, shelf clamps, plywood sheets, timber for the construction of crossbars, legs on wheels (if a mobile structure is planned), a brush and varnish for wood coating, fixing screws, wood glue. The tool for making shelving needs the simplest. A hammer, drill, grinder and jigsaw will suffice. Don't forget to take a pencil and a tape measure as well. Without them, we will not be able to mark up and make design drawings. And without these operations, it will not work to build a really high-quality rack.
Dimensions and drawings of improvised structures - let's listen to experts
To assemble a practical and easy-to-use design, you should decide on the place where it will be mounted. We measure the parameters of the area allocated for these purposes and strictly focus on them when designing the rack. If the work on creating a rack is being done for the first time, and the structure itself is intended to store cans of seams, rarely used items and work tools, it is better to design a simple structure. You don't have to come up with fancy shapes. Do not try to decorate a purely practical design. For the manufacture of such racks, it is enough to determine its height and width of the shelves.
If home-made furniture is part of the original interior of the room, the design issues will have to be approached more creatively and much more responsibly. It is necessary to think over not only its dimensions, but also the decoration option, consider different schemes for arranging structures, choosing the best one. It all depends on your personal preferences, ideas about beauty and financial capabilities. From wood, you can create very unusual structures with your own hands that will decorate any home.
Schemes for arranging homemade devices and drawings for their manufacture can be the simplest (Figure 1). It is not necessary to have skills in the field of engineering graphics. On the drawing, you just need to correctly indicate the dimensions of the planned structure. And then build it strictly according to them.

- 1. We determine the width, taking into account the available free space in the room. Nuance. The width of the rack is taken 7–10 cm less than the width of the free area. This is necessary to ensure that all assembly work takes place in the most comfortable conditions.
- 2. We calculate the width of the shelves based on the purposes for which they will be used. If the rack is needed to store large items (car tires, heavy tools), we take its maximum value (it is limited only by the bearing capacity of the structure). When small things with a small mass are stored on the shelves, a width of 25–40 cm will suffice.
- 3. The length of the shelves is also selected taking into account the overall dimensions of the items that will be stored on them. Tip: do not make the shelves longer than 150 cm. With an increase in their length, the risk of deformation and destruction of the rack increases.
- 4. The optimal depth of the shelves is 50 cm. If this recommended size is exceeded, you may have difficulty getting things out.
We take the height of the shelves in the range of 30–60 cm. The lower shelf, as a rule, is made deeper than the rest. It is convenient to store heavy tools and large items on it. And the upper sections are intended for shoes, clothes, voluminous, but light boxes and things.
We make rack elements - the main stage of work
The rack is made by hand according to an understandable algorithm: first we cut out the individual parts of the structure, and then we assemble them together. Work should always begin with the preparation of the lower base of the structure of interest to us. It must be made from a massive board. Its thickness is taken such that a three-centimeter self-tapping screw can be screwed into the resulting shelf.
To increase the strength of the base, it is desirable to fix pieces of timber in its lower part. We take the same length and width. We install the bars across the base shelf in increments of 50–100 cm. Now we make the side racks (in fact, the walls). We use timber or boards. If we want to save on materials, we use plywood instead (we choose thicker products).
The width of each plywood rack must be equal to the width of the bottom board. But their height is not limited by anything.
Next, on the inner sides of the side walls, we put marks for placing the shelves. We select their height ourselves. Most often, home craftsmen make shelves of the same size, which is wrong. It is better to design their height differently. Then we get a really roomy design that allows you to rationally store things with different geometric parameters.
The next stage of work is the manufacture of shelves. They should enter the rack freely, but tightly. The thickness of the shelves is 2.5–5 cm, the width is equal to the depth of the structure. It will be correct to support each shelf with transverse bars (by analogy with the lower base). They are easy to nail with small nails. After that, we make the back of the rack, with which it leans against the wall.

If you are satisfied with the color and texture of the wall in the room, the back of the structure may not be installed. In other cases, we make it from chipboard or plywood. There is no point in using expensive boards. We have prepared all the necessary elements, which means that you can start assembling the structure. This operation will not cause any special problems for us.
Assembling a system for storing things and objects - no difficulties are expected!
The connection of individual parts of the rack can be done in a way convenient for the home master. Some use nails and screws, others prefer glue. The choice is yours. We begin the assembly by attaching the back wall to the bottom shelf. This procedure is best done with self-tapping screws. It is clear that when there is no back wall in a home-made cabinet, we skip this stage of the operation, and we begin assembly work with the installation of shelves and side walls-racks. On the latter, we have markup. We install the holders on the marks made. For their manufacture, materials such as plastic and metal are used.
If there is no special load on the shelves, we attach plastic holders, otherwise - metal ones. And already on the fixed elements we put shelves. Then we take self-tapping screws and connect the lower base with the side walls into one frame. It is very important to achieve perfect evenness of the corners of the structure. Additionally, you can fasten the base and racks with metal corners. So we will significantly increase the strength of the rack.

Some self-taught masters do not consider the holders to be reliable enough and prefer to install shelves using a different technology. It is more labor intensive. But the finished structure is noticeably stronger. The technology involves fastening the shelves directly to the racks on the sides of the rack. The operation is performed with a partner (you can’t do it yourself) according to the following scheme:
- 1. We connect the base and side walls.
- 2. One person brings the shelf to the fastener, inserts it and holds it firmly.
- 3. The second one fixes the shelf with self-tapping screws on the reverse side.
The operation must be performed very carefully. The slightest distortion - and the appearance of a homemade rack will be spoiled. To avoid this, the process of installing and fastening each shelf should be carried out using the building level.
After assembly, the structure, in principle, can be placed in the place intended for it. But experts advise to additionally cover it with a lid, which is installed above the topmost shelf. This addition protects the rack and things stored on it from dust. The lid can be put on glue or fixed with nails, self-tapping screws. It also does not hurt to attach legs to our structure on small rollers. This will make it possible to move the rack around the home.
If chipboards (chipboards) or other products from pressed sawdust were used to make the back wall or shelves, it is advisable to decorate the structure. The easiest option is to glue parts of the rack with melamine film. It is fixed with a bitter iron on a chipboard, from which all the roughness is removed with sandpaper or a grinder before that. The wooden materials from which we made our home cabinet can also be treated with varnish or stain. Then the rack will look more elegant and respectable.
Shelves play a big role in our lives, they are needed everywhere - in the house, on the balcony, in the garage, in the greenhouse, in the basement. They are used to store collections, jars, boxes, books, tools, spare parts, unnecessary things that are a pity to throw away. A beautiful rack will decorate a bedroom, a nursery, a living room, and a shelving partition with fresh potted flowers zones the room in an original way.
In other words, the scope of racks is very wide. In the article we will tell you how to assemble a rack with your own hands, what tools and materials to use for this. Here are examples of the manufacture of original and inexpensive budget shelf structures from improvised materials.
Shelving materials
You can make a rack from various materials:
- tree.
- Metal (see).
- Plastic.
But if from the first two types, with sufficient, careful processing, the rack turns out to be neat and original, then working with plastic is quite difficult. It can be problematic to make high-quality cuts, the accuracy and strength of joints, it is not easy to hide burrs, chipped and other defects that occur when cutting or drilling material. Therefore, plastic is usually used in combination with wood or metal.
But you can combine not only plastic, shelving made of forged metal or bent wire with shelves made of plywood, chipboard or MDF looks original. As well as wooden shelving with artistic casting finishes or stained glass doors.
Manufacturers offer a huge selection of racks from various materials, with a wide range of shades, a wide variety of models - from the simplest forms to creative and fantasy ones. But if you decide to make a rack from improvised materials with your own hands, then we will try to help you with this.
Preparatory activities
Before you build a rack with your own hands, you must do the following:
- Choose a seat where he will stand.
- measure length, width and height of free space.
- Come up with the shape of the rack and sketch it. If it is a garage, a balcony or a pantry, then it is not necessary to be particularly sophisticated, the rack can be made in the usual form, standard sizes, it all depends on the capabilities of the room. To save space, it is better to make it up to the ceiling.
For residential premises, the shape of the rack can be different, it all depends on your imagination and skill.

- Decide on items that will be placed on the shelves, their dimensions depend on this.
If you decide to make a rack for cans with your own hands, then a shelf width of 25-30 cm will be enough here; for larger items, the size increases in accordance with their volume.
The length of the shelves is also calculated based on the weight of the stored items: shelves up to 150 cm are suitable for light items, and for heavy items (for example, books), it is recommended to make a length of no more than 90 cm to avoid deflection. It is better to use steel frames for metal tools.
- Select and prepare the material from which the rack will be made. Wooden frames should be made of dry, planed boards and bars of the correct geometric and linear dimensions (see). For shelves, you can take plywood, boards, plastic, glass, laminated chipboard or MDF panels, but at home these materials are difficult to cut to size with high quality and precision, it is better to contact a specialist.
- Prepare the tools and fasteners necessary for the job. You will need: a jigsaw or a hacksaw, a screwdriver, dowels or self-tapping screws, a tape measure, a level.
Important! The material is prepared taking into account the operating conditions: for wet rooms (bathroom, cellar, balcony, etc.), it is recommended to cover wooden parts with antiseptic and water-repellent compounds, and metal with an anti-corrosion agent.
Manufacturing technology of wooden shelving

In order for you to quickly assemble shelving for your home with your own hands, we will tell you about the main stages of work.
So, let's begin:
- Marking the installation site.
First you need to decide what type of rack will be. If it is freestanding, then it is assembled anywhere, and if it is wall-mounted, then the frame bars can be attached directly to the wall.
In this case, you need to take care of the appearance of the wall surface behind the rack, as the back wall will be missing. If you plan to rack the entire wall, then the wooden frame is recommended to be attached to the floor or ceiling.
- Frame assembly.
For the base, square or rectangular bars are used, the thickness depends on the height of the rack, the number of shelves and the weight of the things that are supposed to be stored. Usually they take dry planed bars 50 x 50 mm, 60 x 60 mm, 50 x 60 mm.
First, the lower base is assembled according to the dimensions of the rack, a beam is vertically attached to it to the expected height in the corners, perimeter and middle, if an intermediate wall is planned. The racks are connected by an upper strapping from the same bar.
Important! If the rack is long and high, then vertical racks cannot always provide the necessary rigidity of the structure. Here, several diagonal struts along the ends and the back wall will be appropriate, which are placed between the uprights flush with the frame bars.

The racks are carefully measured vertically and fastened with self-tapping screws to the lower and upper trim, the corners are reinforced with furniture corners. On the verticals, the locations of the shelves are measured and additional horizontal connections are established on which the shelves will lie.
- Arrangement of the box, installation of shelves.
The finished frame is sheathed with facing decorative plates on the sides, bottom and top, which are fixed with self-tapping screws or furniture screws. The joints are closed with matching clips.
For external walls, laminated chipboard, MDF panels, plexiglass, "Finnish" plywood, planed boards are used, the bottom and top can be covered with a simpler material.
If necessary, install the back wall, it will give additional rigidity to the entire structure (this is true for free-standing racks, structures fixed to the wall do not need it). For the back side, ordinary fiberboard is used.
The shelves are leveled on pre-attached horizontal bars and fixed with self-tapping screws, which are taken slightly longer than the thickness of the shelf.
The ends of the shelves made of chipboard or MDF are finished with matching melamine tape, sticking it to the surface with a hot iron. Do-it-yourself decorative shelving can be partially or completely closed with doors, install several drawers, decorate the facade with carvings, original fittings, and hidden lighting.
Sheathing can also be selected in one stylistic decision with the interior in the room.
Metal or combined shelving

If you have the ability and skills to work with welding, then you can make a metal rack in a garage, greenhouse or balcony. In addition, recently a metal rack has become an indispensable piece of furniture in various styles, such as loft, hi-tech, modern.
Suitable material can always be found in the garage or bought at an affordable price. The frame is made mainly from a corner, the section of which is chosen based on the mass of the intended load.
For lighter structures, a perforated galvanized profile is used, which is much easier and more convenient to work with. Instructions for assembling racks from a profile are available in the understanding of the most ignorant person in this area. The technology for manufacturing a metal structure is similar to assembling a wooden rack, only welding or bolting is used instead of self-tapping screws.
Shelves for heavy things are made of sheet metal or boards 40–50 mm thick. Masters of artistic forging and welding fill the side walls of the racks with openwork patterns made of wire or strip, but if this is not possible, then the ends can be closed with the same chipboard or MDF, clapboard, planed board.
A do-it-yourself rack from a corner will cost an order of magnitude cheaper than ordered or bought ready-made. In addition, if you show imagination, you can get an original design product that can become the author's pride.
Original racks and whatnots - a new use for old things

A zealous and creative owner will not throw away things that have become unusable if something else can be made from them. This applies to old cabinets, chairs, wooden containers, old ladders and other things.
With a little effort and imagination, you can make new unusual interior items from old things that will decorate and unrecognizably transform a room, cottage or yard. Since we are talking about shelving and whatnots, we offer you a selection of photos in which craftsmen have found use for objects and materials that seem to have already gone out of use.
Original shelving with your own hands can be made from completely unusual things:
- It turns out that not only buildings, stoves and fireplaces are built of brick, the wall rack for books looks original and unusual. A used brick looks even more interesting than a new one, although, as they say, this is not for everyone.
The main thing here is to strictly maintain the verticality of the structure and put a brick on a high-quality mixture, otherwise, if such a rack collapses, it will bring quite a few problems. In this case, for stability, it is better to attach it to the wall using reinforcement drilled into the wall and laid with the other end into the masonry.

- Old fruit crates can transform a room in an extraordinary way and even zone the space, separating the sleeping area from the dining area. The gaps between the rails do not block the light, the height, width and location of the rack boxes can be different.
True, it is rather problematic to grind the boxes with high quality so that there are no burrs and the danger of getting a splinter. The white color in this case hides a rather unpretentious appearance of the material, although you can paint the rack in any color, make it plain or multi-colored.
Of course, thin slats will not withstand heavy loads, but such a rack is perfect for small items and light decor items.

- A plastic or cardboard pipe from under linoleum or other rolled material can also be used. By cutting the pipe into segments of the same length and folding them in a certain order, we get an unusual rack in the form of a honeycomb.
The volume of each cell is small, but for shoes, toys, bottles and other small items, it is ideal. It is better to connect the pipes with high-quality glue, smearing them along the entire length, and attach them to the wall in several places, since such an interior item is light in weight and can tip over if handled carelessly.

- The same type of glass bottles and a few planed boards are another design idea for a shelving unit. The photo shows ordinary bottles, but you can choose interesting models with curly shapes or an unusual color.
Yes, and you can arrange them in a more original way, asymmetrically, at different levels, there is enough room for imagination. Such do-it-yourself collection racks are good because they are made in a single copy, have a creative look and speak of the individuality and excellent taste of the owner.
The shelves in this case are connected by drilling holes into which the necks of the lower bottle are inserted, in addition, the transverse bar between the boards is attached to both shelves with self-tapping screws, giving the rack a certain rigidity.

- The rack presented below does not seem to represent anything special, except for an interesting design of shelves in the form of broken geometric shapes. It is unique in that it is made from pallets (pallets), disassembled into separate boards.
The price of such a piece of furniture is negligible, since pallets can be found in any warehouse or bought for a nominal fee, and the result is obvious! A bright rack in the children's room will be the main piece of furniture, decorate and enliven any room and will last for more than one year.
Pallet boards are made from hardwood, dried and treated with antiseptics, this is an almost finished furniture material. It is enough just to carefully grind them so that the child does not suffer from splinters and burrs, cut them to size, assemble them on self-tapping screws and paint them with bright colors. Everything, the original toy rack is ready!

- Not only the material of pallets is used for the manufacture of furniture, but the pallets themselves do not stand aside. Of these, for giving, they make various racks and whatnots for seedlings, flowers, and small household items. When placed outdoors, it is not necessary to carefully treat the surfaces; deliberately rough boards fit perfectly into the landscape.
For the manufacture of a rack, several pallets knocked together with each other are enough, which fill the soil and plant seedlings.

In conclusion, we can say that with a little effort and imagination, you can create real masterpieces from old things with your own hands. We talked about how and what shelving can be made for your home. The video in this article will clearly tell you how to assemble a shelving rack yourself.
Scattered toys are the most common thing in a child's room. We, unfortunately, have only one room for everyone, but there are also a lot of toys in it, and they are also often scattered around the apartment. However, according to the method of early development of Maria Montessori, teaching kids to order begins from early childhood. You just need to help the baby. So we decided to make a Montessori rack for storing children's toys, materials for creativity and activities with our own hands.
Rack for toys :)
The popular IKEA shelving unit from the Expedit series was taken as a sample. We downloaded the instructions for its assembly on the IKEA website, examined it in detail. Thanks to this, we saw how it is arranged, what parts it consists of and how it is assembled.
Then we measured the space that we planned to allocate for the homemade “Ekpedit”, and planned it first in mind and on paper. Then Kostya drew it in Corel Draw and 3Ds Max. Thus, we considered the most convenient configuration for us with 12 small and 3 large sections.
Drawings for a homemade rack:

Shelf layout options

Dimensional drawing


Cutting details
According to the sizes obtained in the lumber and furniture fittings store, Kostya bought 1 sheet of MDF and fiberboard each and ordered the cutting of the material into the necessary parts. In general, almost a rack came home :)
By the way, our shelving was made possible thanks to the advice and guidance of a professional furniture maker. Nikita Maksimova who lives and works in St. Petersburg. Thanks, Nikita!
So, how to make a rack with your own hands?
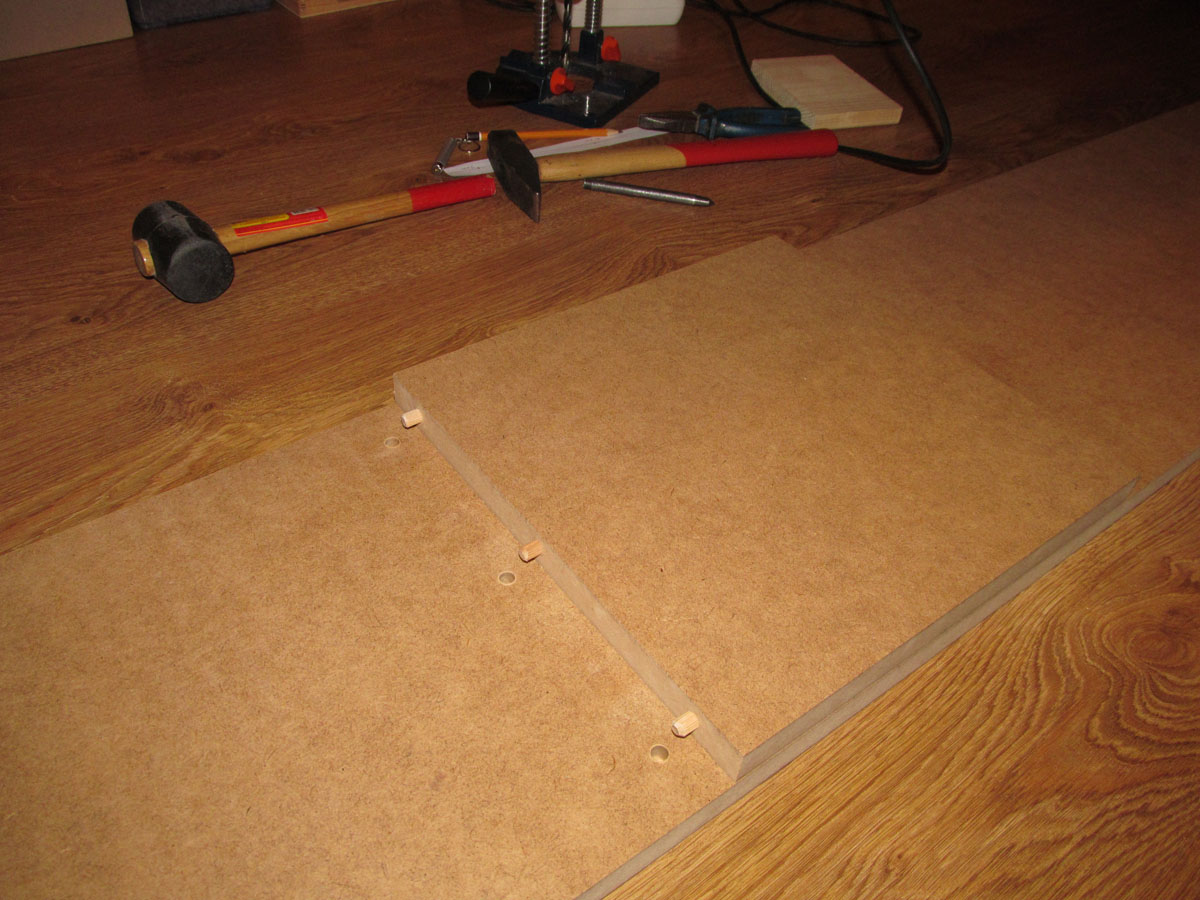
1. First of all, we draw a template for marking holes. This is done in order not to measure each label separately n-number of times. We got 3 marks: 2 at the edges, 1 exactly in the middle. On them we will drill holes for dowels and confirmations.
 We mark places for dowels
2. According to the marks, we drill 2 holes for confirmations in each corner of the structure. We twist the confirmations.

We drill holes for confirmations

We spin confirms
3. With the help of an angle clamp, we fix the box of 4 longest parts during the installation of the shelves. This is necessary so that the structure has rigidity, does not fall apart and maintains a right angle.

Fixed the main parts of the rack
4. Picked up a drill according to the diameter of the dowels. Using the template, mark the places for the holes. We make recesses with a core. We drill holes. The dowel has a length of 35 mm, so at the ends of the parts we make holes with a depth of 25 mm, and in the planes of 10 mm.

Choosing the right size drill
We mark places for dowels

Marking for drilling

Setting the drilling depth

Drilling holes for dowels
5. We insert not dowels into the holes obtained, but markers for dowels. With the help of them we put marks on the second part. This is necessary so that the centers of the two holes (in which the dowel will be placed) coincide. According to the received marks, we drill holes for dowels.

Insert dowel markers into holes

We use the shelf as a template

Apply marks by hitting the shelf from above

Marks are clearly visible in side light

We make indentations in the places of marks

Drilling holes for dowels
6. We hammer dowels. We put the part in place. By the same principle, we do the entire first row.

We hammer dowels into holes
Putting the item in place
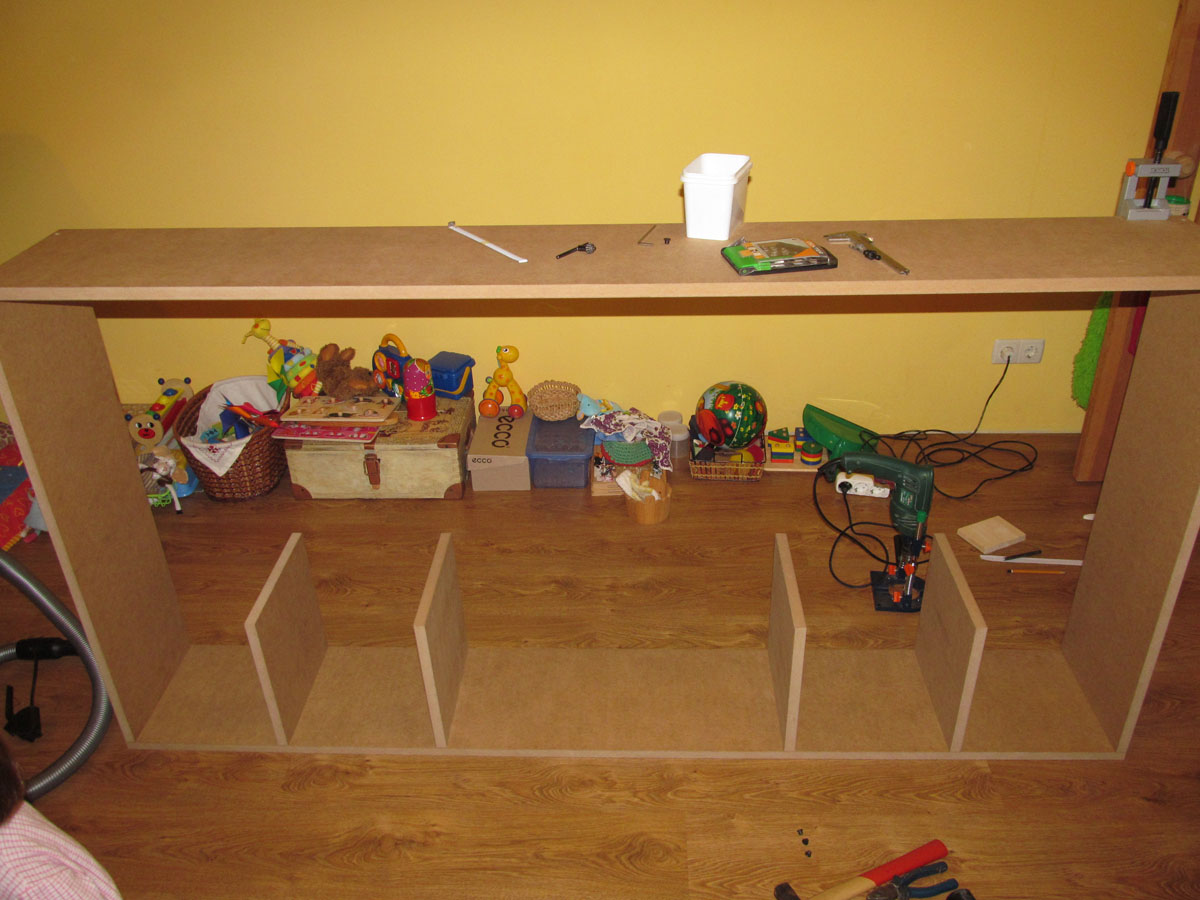
Bottom row done
7. For the second row, we needed to drill holes 46 mm deep, so the drilling depth board was slightly improved with a paper ruler. The sponsor of the alteration is the free line of the construction supermarket Leroy Merlin :)

Gadget for measuring the depth of drilling :)
8. To connect 3 parts, we used 2 dowels. To do this, in the upper part, as before, we drilled a hole 25 mm deep. And 2 lower ones were drilled simultaneously (24 mm + 22 mm = 46 mm).

Sample connection of parts

Second row completed
9. To assemble the last row, the upper parts 2 m long were removed. According to the principle of the 1st row, all the holes for the dowels were made, the dowels were inserted. Fasten the top piece in place.
At each end of the rack, 4 holes were made (2 per shelf) for confirmations, confirmations were twisted. This makes the whole structure stronger.

The rack is fully assembled
10. Getting ready for painting: we laid newspapers, put the part on jars to make it easier to paint the ends and nothing sticks. All parts were painted with acrylic paint (Komposit Enamel Profi) and acrylic varnish (Sadolin Celco Aqua), they are non-toxic. The windows were opened as much as possible so that the paint dries faster and the fumes do not linger in the room. All parts were covered with 2 layers of paint and 1 layer of varnish.

Preparing for painting

Acrylic paint and varnish

How to make a shelving unit with your own hands, which will resemble antique furniture from the museum, because it will have an arched shape at the bottom and top. You may get the impression that such a homemade rack once belonged to your grandfather and it is very dear to you.
And if you want to make such a product that will not only decorate the room, but will also be a multifunctional place to store different things - vases, books, photo frames and souvenirs, items dear to your heart.
We have prepared instructions for the manufacture of the main product for you. And how you will refine it - it depends only on your imagination. It can be a rack in Provence, country or vintage style.
Such a piece of furniture made of wood with your own hands will be a reason to be proud of your craftsmanship. Start learning the material.
The wardrobe ladder is assembled quickly and easily. We will use lamellas, screws or confirmations and grooved joints.
Dimensions, if you stick to the drawings, will be as follows: WxDxH - 1120x445x1990 mm.
It is possible to make shelving from furniture board, but we recommend using cheaper materials, such as plywood for shelves and pine boards for racks.
Start with the legs
The manufacture of the rack begins with the legs, or they are also called racks.
- We will make front, rear and side legs. Front and rear (A) have the same dimensions - 18x60x1990 - 4 pcs., side (B) - 18x65x1990 - 4 pcs. Pay attention to the picture below, it indicates that the lower parts of the legs are beveled - saw off and sand along the line. You can make one leg as a sample and saw off the rest along it so that they are the same.

Legs. The inner surface of the left front and right rear pair of legs
- Divide and mark each pair of legs for yourself to make two front-side and back-side pairs. It is necessary to take into account the direction of the bevels, carefully study the drawing of the rack, as this will ensure proper assembly.
- Cut a groove 18mm wide and 6mm deep with a circular saw on the inside of the side legs to fit them to the front and back legs and glue them in production because the shelving will not be collapsible.

- On the inner surface of the legs B, using masking tape, which must be glued to the hole markings, a tape measure and a pencil, mark the points for holes d = 6, 10 mm deep. Supports will be installed in these holes, on which the shelves will be installed.
Master's advice. To visually determine the depth of the hole, make a mark on the drills in advance and wrap the area above the line with masking tape. Or use depth gauges.

- When connecting the legs, use wood glue. Align the ends and clamp with clamps.


