What could be better than a summer holiday own dacha? Indeed, the popularity of this kind of holiday from year to year not only does not decrease, but also attracts everyone with its accessibility. more people. For many, the dacha has turned from a personal plot with beds and greenhouses into full place recreation, a full-fledged culture is being formed in society country rest. And, you see, what rest without convenient and comfortable furniture? The dacha has already ceased to be a place where all the junk from the apartment is brought, and the arrangement of the dacha requires a full-fledged functional furniture, created specifically for giving.
Advantages of making outdoor furniture

The choice of furniture for a summer residence, of course, will not be difficult, given the variety of furniture that manufacturers offer. But apart from the trivial purchase of items you like country interior there is another way out - self-production country furniture.
This approach to arrangement country house will not only save you money, but also bring a lot of positive emotions. If you like to do something “with your own hands”, then making furniture yourself will help you realize your creative inclinations, enjoy working with wood, and the result of the work done will be a useful and necessary thing in the household. You can rightfully be proud of the result of the work done, because there is nothing better than to see the thing you personally created. If you are already on fire with the idea of \u200b\u200bmaking your own country furniture and firmly decided to try yourself in this business, then, for sure, you are now tormented by a lot of technical issues. But first things first. Let's try to conditionally divide all the questions that concern you into 2 large groups: "what to do?" and “how to do?”.

The answer to the first question is actually the most important. This is the area strategic planning. You should not take on work that you cannot do, otherwise, instead of the pleasure of work and an excellent result, you will get another headache. If you do not have special work skills and a special tool, you should not take on very difficult work.
An indispensable attribute of a country house is a large wooden table with the accompanying set of chairs. A large comfortable table, at which all family and friends could gather, will never be superfluous - this, one might say, is the basis of a set of country furniture. It is his creation that can be dealt with in the first place.
Material selection

Now it's time to answer our second question. And first of all, you should decide on the choice of material for the future table. Naturally, a person comes to the dacha to take a break from the bustle of the city, to spend a little time in nature, so in our table you will refuse all artificial materials that are used in modern furniture. Our table will be comfortable, beautiful and environmentally friendly, and the most environmentally friendly material is, of course, wood. It is from wood that it is best to make a table for giving with your own hands, because in addition to environmental friendliness, wood is also very convenient for processing. After choosing the material, you should focus on creating a table design. To create a table, you can use ready-made design solutions or spend a few hours creating your own original design project. Alternatively, you can use the simple table design shown in the diagram.

Materials and tools for work

After choosing a table model, you should calculate in detail the need for materials to create a table: the number of boards, timber, fasteners and paint. The required materials, of course, are best purchased with a small margin. Before starting work, you must acquire all the necessary tools, preferably electric. Your tool list should look something like this:
- Electroplaner. For primary surface treatment of boards.
- Electric grinder. For "finishing" the surface of the boards, sanding the board.
- Drill driver. It is used for installing fasteners, drilling holes.
- Electric jigsaw. For curved surfaces, cross cutting boards.
- Roller and brushes for painting, hammer, set of chisels.

The assembly order will look something like this. First of all, the tabletop boards are cut and prepared. They can be installed close or leave a distance of 3-4 mm, which is somewhat easier. We fasten the processed boards to two bars with self-tapping screws or special furniture bolts, while the heads of the self-tapping screws must be recessed into the tree. For the manufacture of cruciform racks, we cut the ends of the boards under right angle, docking of boards is carried out in half of the board. To select the docking grooves, we perform cuts limiting the groove, and select an extra tree with a chisel or a milling cutter with a “barrel” type cutter. We securely fasten the assembled supports to the tabletop, after which we measure the required length of the longitudinal stiffener. It is desirable to fix the finished and processed stiffener on furniture self-tapping screws, which will allow you to adjust it in the future if necessary. It is desirable to cover the finished product with a natural stain on a water or oil basis.
How to make a country table
Landscaping is an ongoing process. You build something, you improve it. Moreover, furniture is constantly required and tables are most in demand in the country. And put in the garden, and near the house, and also in the gazebo. How to make a table for a summer residence with your own hands we will tell in this article using the example of finished projects.
Homemade table from boards from pallets
Dismantled pallets served as the material for this table. Naturally, you can use new boards. Only one condition - they must be dry. You can buy dry ones (it costs more) or buy ordinary ones, put them somewhere in ventilated piles and soak for at least 4 months, or better, half a year. In general, any furniture, including garden benches. made from dry wood.
We assemble the table for the street - put it in the gazebo, therefore we will not glue the tabletop boards, but we will fasten them from below, with the help of planks. This is a very simple country table and very cheap.
Having dismantled the pallets, we get boards with an individual color and pattern. Having conjured a little, shifting them several dozen times in different manners, we achieve the desired result. It turns out quite a nice table.
From the boards we assemble the countertop
We take the side parts of the pallet. We use them for the frame of the table. We grind them first with coarse sandpaper, then finely bring them to the required smoothness (grain 120 and 220).

Side rails will go to the side of the table
We take the strips that remained unused, with their help we fasten the countertop. We place them in the place where the joints of the boards are located. We use two self-tapping screws for fastening each board with a joint, one for a solid one.
From the processed sidewalls and two boards (also sanded), we assemble the table frame. We fix its parts with self-tapping screws at the end (two for each joint). The frame can be glued or also “planted” on self-tapping screws. Only their length is large. Under each, we pre-drill holes with a drill, the diameter of which is slightly smaller than the diameter of the self-tapping screws.

Tabletop almost ready
We turn the assembled countertop over and grind it. The order is the same - first with sandpaper with a large grain, then with a fine one.
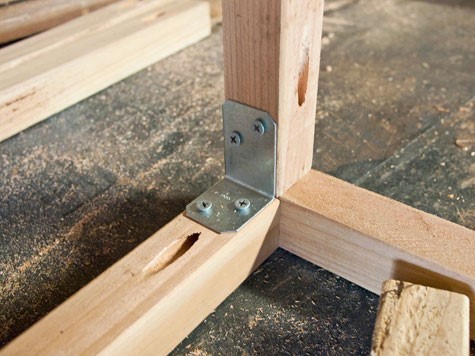
Next is the installation of the legs. Choosing four boards the same size, check their length, adjust if necessary. Then - again grinding. It's easier than sanding already screwed legs. We fasten the sanded boards to the frame. These will be the legs. For each - two self-tapping screws fixed in a diagonal (look at the photo). For greater stability, we install jumpers at the bottom. About 10 cm can be left from the floor to the jumpers. We connect everything with self-tapping screws so that the boards do not crack, we pre-drill holes.


The do-it-yourself table is almost ready. It remains to cover it with varnish
After removing the dust, varnish again. In theory, the varnish should lie flat, but depends on the wood, so another sanding / painting cycle may be necessary. As a result, we get such a homemade country table.

DIY garden table ready to use
If you do not like motley boards and traces of old nails, you can make their boards the same design. This table can be rectangular, maybe square. All sizes are optional - see available space.
Country table from the remnants of the boards
This do-it-yourself dacha table is assembled from the remnants of boards different breeds and sizes. Pine boards 25 mm thick and 50 mm wide went to the frame of the tabletop, the remains of 15 * 50 mm were left on the legs. We make the frame according to the dimensions you need. This table will stand on the veranda, and it has a small width. So let's make it not wide - 60 cm, and the length is 140 cm. The height of the legs is 80 cm (everyone in the family is tall).

We collect the frame, attach the legs to it
We immediately cut off two long boards of 140 cm each. To make the tabletop width 60 cm, subtract twice the thickness of the board used - this is 5 cm. Short bars should be 60 cm - 5 cm = 55 cm. We fold the frame, following right angles, twist with self-tapping screws. We check whether the bars are folded correctly - we measure the diagonals, they should be the same.
We cut off the boards four boards of 80 cm each, fasten them from the inside to the assembled frame. You can use 4 screws for each leg.

We make jumpers under the shelf
Approximately at the middle of the height of the legs we fasten the crossbars. This is a shelf frame. The shelf can be used for its intended purpose, and it also increases the rigidity of the structure. We fasten strictly at right angles, checking with a large square.

We put the frame on the floor, check whether it staggers or not. If everything is done correctly, it should stand rigidly. Next, take sandpaper or a grinder and grind.
Let's start assembling the countertop. From the finishing work there were boards of different types of wood, some of which were stained. We alternate boards of different colors.

We fasten the tabletop boards with finishing nails, carefully finishing them with a finisher. On the shelf can be fixed with ordinary nails or self-tapping screws. Then smooth with a grinder. The last step is painting. Very unlucky with the choice of varnish. Bought too dark appearance didn't like it. Will have to sand again and paint a different color.

Homemade table for a summer residence is ready
Wooden table with glued top
This design features L-shaped legs. They are assembled from boards of the same thickness. In this case, 20 mm. To keep them well, 5 self-tapping screws are needed. Pre-drill holes with a drill with a diameter of 1-2 mm less than the diameter of the self-tapping screws. Then with a drill larger diameter drill holes for the caps. Diameter can be matched to furniture plugs suitable color or make them from a wooden rod. Another option is to use wood putty, to which you add wood dust that remains after sanding. After drying and sanding, traces will be difficult to find.

Legs with markings for fasteners
When assembling the legs, make sure that the angle is exactly 90°. As a pattern, you can choose a bar. First, we coat the joint of the two parts of the leg with carpentry glue, then install the screws in the following sequence: first the two extreme ones, then the middle one, and only then the other two. After the glue dries, sand the legs, varnish and dry.

Table legs ready
It's time to make the table top. It is assembled from boards of the same thickness. Pick up the size you need. You can use snippets different widths. It is only important that everything looks organic, and the sidewalls of the boards are even and docked without gaps.
We coat the sides of the boards selected for the table top with glue, lay them on a flat surface (some kind of table) and tighten them with clamps. In this case, they managed one, but preferably at least three. We tighten so that there are no gaps in the resulting shield. We leave for a day. Having removed the clamps, we get an almost finished countertop. It still needs to be trimmed - to align the edges, and then sand it. You can trim with a jigsaw or a regular hand saw. Using a grinder is difficult to get a straight line, but you can try. After grinding, we get a beautiful countertop.

We glue the tabletop from the boards
Using the same technique, you can make an oval or round tabletop. It will only be necessary to draw the appropriate line and cut the glued boards along it.
To make the table look more attractive, we will make a frame. We take a thin bar, process it with sandpaper and fasten it around the perimeter of the countertop. You can also use finishing nails. Only the planks are also pre-lubricated with carpentry glue, and then with nails.

We fasten the bar around the perimeter
After the glue dries, we again process the junction with sandpaper.

This is the finished tabletop.
Now you can attach the table legs. We assemble a table frame from four boards (there is no photo, but you can do it as in the previous paragraph). We fasten it to the back of the countertop with glue, then install it through the countertop furniture confirmations. Under the confirmations, a preliminary hole is drilled with an extension for the cap. Holes for fasteners are masked in the same way as on the legs.
We attach the legs to the fixed frame. We put them inside the frame. You can attach with ordinary screws. That's it, we made a table for giving with our own hands.

Board table ready
How to make a wooden garden table with benches
For this table, boards 38 * 89 mm were used (they dissolved themselves), but you can take standard sizes. The difference in millimeters will not really affect the results. In the photo below you can see what should happen.

To connect the parts, studs 16 cm long with washers and nuts (24 pieces) were used. All other connections are made with nails 80 mm long.

We connect the parts of the table with each other with studs with washers and nuts
Parts are installed in place, drilled with a drill through hole. A stud is installed in it, washers are put on both sides and nuts are tightened. Everything is pulling up wrench. How convenient is this option? For the winter, you can disassemble and take it to a barn or garage.
Making seats

Bench drawing with dimensions
We cut the boards according to the drawing required size. Everything is necessary in double quantity - for two seats. grinding boards, Special attention pay attention to the ends.
We cut the short segments with which we fasten the three seat boards along the edges at an angle of 45 °. First, we assemble a structure that is attached to the seat from below. We take a board about 160 cm long, at the end we attach two short boards cut at an angle to it. Attach it so that this board is in the middle.

Bottom seat support assembly
Then we attach the legs to the resulting structure (you can use nails). Then we add more boards cut at an angle and tighten everything with studs and bolts.
We attach the seat boards to the resulting structure. Since this is a table for the street, it is not necessary to knock them down close. Leave a gap between two adjacent at least 5 mm. We nail to the supports (which are cut down), two for each board.

Fastening the seats together
We fix the finished seats with four boards 160 cm long. We fasten each leg with studs (if you walk, you can put two studs by setting them diagonally or one above the other).

We connect the legs to the boards with studs
Putting together a table
The table is assembled in a different way. Please note that for the countertop, the transverse boards are sawn along the edges at 52 °. We fasten them at such a distance that the legs enter. Each board has 2 nails. You can finish, with small hats, or you can hammer deep, and then mask the holes with putty.

How to make an outdoor table out of wood
Now we need to assemble the legs-crosses. We take two boards, cross them so that the distance between their ends is 64.5 cm. We circle the intersection with a pencil. At this point, it will be necessary to remove the wood by half the thickness of the board.

This will need to be cut
We make the same notch on the second board. If you add them together, they are in the same plane. We connect with four nails.

How to make X-shaped legs for a garden table
Similarly, we make the second leg for the table. While the table is not collected.
Installing the table
Now you need to fix the legs to the structure on which the benches are installed. We put them on equal distance from the benches, fasten with hairpins.


Table leg mount
Now install the table top. We also fasten it with studs. The last step is painting. Here everyone does as he pleases.
Outdoor table for giving with benches
Variations on a theme
According to this drawing, you can make benches and a table separately for giving, garden. The design is reliable and easy to implement.

Separate benches and a table for the garden according to the same drawing

You can make the appearance more decorative by slightly changing the design of the seats and table top.

Another option with separate benches

Painted white
Do-it-yourself table for giving: drawings

Sustainable country table

Simple table with X-shaped legs

Wooden garden table

Homemade wooden table with a cross bar at the bottom
http://stroychik.ru
We continue to equip country cottage area. Today we’ll talk about how and with what to fill dining area or recreation area. It is difficult to imagine a cozy gazebo or shade canopy no table and comfortable benches or chairs.
Today, garden furniture manufacturers offer a huge variety of tables: large and small, wooden, forged, wicker or plastic.
Of course, you can buy a finished product, but many people prefer to make garden furniture with their own hands.
About how and from what material to make a table, how to decorate the countertop will be discussed in this article.
Wooden outdoor table
Undoubtedly, the most malleable and environmentally friendly material is wood. Wooden table can be made round, square, rectangular or irregular shape, it all depends on the size of the gazebo or the number of seats. As a tabletop leg, you can use a regular stump.

The shape and appearance of the table largely depends on the style of your country house and exterior. log cabin can be supplemented with furniture made of logs and boards. The main tool for processing parts is a grinder, since the surfaces of the tabletop and benches must be smooth, without nicks.


The tabletop can be made from slats or narrow board, strung them on metal rods, or by connecting them with short rails.

A table made of wooden saw cuts looks interesting, especially if there is one on the site.


There are several ways to make such a table:
- connect the saw cuts to each other with brackets or tongue and groove, forming a flat surface;
- fix the saw cuts on some basis (in this case, the parts must be of the same thickness to form flat surface). The product must be sanded and varnished. If desired, the gaps between the cuts are filled epoxy resin, after drying of which, the surface is polished again and covered with a protective compound.
A garden table made of wood with benches, made of a single design, looks great both in the gazebo and in the open area.


It's easy to make. Use the diagram below to make your own drawing and calculate materials.

When drawing up a drawing, consider some generally accepted standards:
- bench seat height from ground level - 400-500 mm;
- seat width - 300-400 mm;
- tabletop height from floor level - 700-750 mm;
- tabletop width - 580-900 mm.
The length of the table and benches is individual. The figure shows an example of the manufacture of a table with benches located on two long sides of the tabletop. Similarly, you can make a design with benches on four sides.
And here is a small version round table with stationary bench-stools for four seats. It is easy to move it to the place you need at the moment: to an open area, under a canopy or in a house.

If you wish, you can purchase or make your own folding garden furniture, which can be easily installed in any part of the garden or in the house.

Such furniture will last longer, as it will not be subject to constant impact. precipitation. The weight of such products is small, they can be easily and quickly transferred to a permanent storage place in a house or barn, where they do not take up much space.
In order for the product to serve for a long time, all wooden elements must be treated with an antiseptic and coated with varnish, wax or paint. To give the wood the desired shade, use a stain or a special impregnation with pigment.


Garden table from improvised material
Earlier we already talked about furniture made. Stylish table, made of pallets, is cheap and organically looks on personal plot. The design, complemented by furniture wheels, is also mobile.

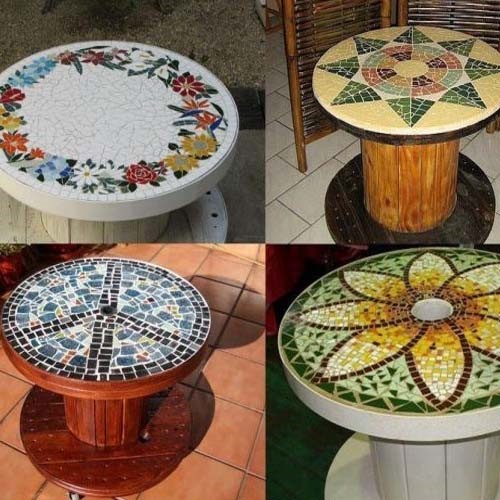
Ordinary stumps, decorated with mosaics, look very original and can serve as a small table or stools in the recreation area. Suitable for mosaic decor various tiles, left over from the repair, chopped into small fragments and laid on tile adhesive or cement mortar.

The originality of this composition lies in the creative approach of the owners. The most ordinary stumps turn into a work of art.

An old table that has fallen into disrepair can also be decorated with mosaics and thereby update the tabletop. Remove from legs old paint sand them down and repaint them. Such garden table will serve the owners for a long time and will gather around him a family for lunch and tea drinking.

A wooden reel for winding a cable can also serve as a table, it is enough to process it and decorate it a little or simply paint it in the desired color. The table will be easy to move if you attach wheels to the bottom.


Many have things that they inherited, as they say: it’s a pity to throw it away, and there is nowhere to put it. Try to be smart and use them when arranging a summer cottage. As table legs, you can use the base of an old sewing machine, metal headboards and much more. By the way, you can simply buy a countertop and install it on top of a metal structure.

Those who have weaving skills can make garden furniture from vines with their own hands. If you are not capable of such feats, but love wickerwork very much, then you should go to the store. Manufacturers offer tables and chairs made of wicker, rattan or artificial fibers for every taste and budget.

Metal garden furniture
If you are “friends” with metal, have a welding machine, then you can make garden furniture from this material. Such furniture, as a rule, is openwork and original. In order for the product to serve for a long time, the metal must be protected from corrosion before it is used. One of the most simple ways protection of metal surfaces is a primer that is applied to the product before finishing painting.

Forged furniture for a summer residence - perfect solution for respectable owners of the house. Only craftsmen can make it blacksmith forging with the appropriate equipment and the presence of a forge.

Forged products are perfectly combined with many materials: wood, glass, marble. If desired, you can purchase a forged blank for the table, and fill it yourself.
Stone table
Recently, small architectural forms from stone. Including on sale you can find tables and benches made of marble or granite. Such products have a high cost.

But this is not the only solution. You can independently make a stone base for a table and benches, for example, from rubble, flagstone, brick or blocks, fitting them into the overall look of the garden, combining them with other stone buildings.
As you can see, there are quite a few options for arranging a recreation area on a personal plot: from cheap, practically worthless, to expensive ones. A table made with love will surely gather wonderful people around it, and joint gatherings will bring pleasant moments.
The interior of any home will be decorated with crafts made with your own hands. Not the most difficult option individual creativity - home table from wood. Designing your own is easy. Here the flight of fancy is unlimited, but you need to start with the choice of design, purpose and design features that you plan to implement. At the very beginning, you need to create drawings and drawings, according to which it will be possible to assemble the finished table.


Drawings and diagrams
Initially, work out each element in detail, especially decorative additions if they are planned. This is just the case when embellishment will not be superfluous. It is best to draw a drawing according to real size by selecting the appropriate scale on paper.


The type of the table can be the most diverse, from the usual written to the children's massage. It is also possible to make a table with your own hands for a bath. One of the easiest to make is a corner table.


It is not so difficult to create a small transformer or a table-book. It takes up little space in the room and is functional in many situations. The sliding design will help save some space. For home construction, a carpentry table is very suitable. And, of course, a table on the veranda, where you can gather with the whole family for an evening tea party.


Decor
Decorating will greatly improve the appearance. Almost any table design will be decorated with carved legs, especially if you decide to implement a project in a rustic style. The addition of the countertop decor with LED lighting will look elegant. A luminous table in the corner of the living room will add warmth on a cold winter night. There can be an infinite number of options, but the main thing is not to overdo it and not go too far with decorations.


Style and design
There are no restrictions and strict limits for your own creativity. The easiest way to make an original thing is to perform it in an "antique" style. This is the most common and not too difficult craft to perform. Imitation of antiquity will decorate almost any interior.


Design homemade table Ideally, it should organically fit into the interior of the room in which it is planned to use it. Possible various forms and artistic solutions. Wood products allow you to experiment with geometry.


How to make an unusual table, see the following video.
The form


Such a table can have different angles and will not lose functionality at all. For each side of this design, you can fix permanent places for family members. The smaller sides are for children. The larger sides are for adults.


Material
The tree is convenient to use in any condition. The secondary use of wooden structures is also quite suitable. It is very good to use old boards. Many breeds only get better with time.


It is no secret that a floor made of valuable species that has served a century is sometimes used to make musical instruments. When reusing, be sure to remove the top layer, which will give the final product a neater look. Products made from such material, without exaggeration, will last forever.
Combination of dissimilar materials
Combinations of wood and metal look original. The massive plane of the table will be decorated with iron, and ideally, cast-iron legs. The combination of oak and cast iron will achieve an excellent result. Heavy cast iron pairs perfectly with oak or ash.
The combination of hard African breeds and metal structures. The result will amaze anyone, even the most demanding connoisseur.


Glass and wood are the perfect match
Graceful wooden stand will be the best decoration for glass table. Modern fastening devices will ensure a reliable articulation of these materials. The round shape of the final product with this combination is the most optimal solution.


You can combine different materials
It is quite possible for light concrete base install wood or glass top coffee table. Quite modern solution, which will add a slight industrial touch to the interior design. The combination of glass and concrete, as well as pine additions, will look great.


How can natural stone be used?
Quite an elegant combination, if everything is done in moderation. Do not overload the table structure with too heavy elements. Try to find a suitable base from natural stone. The design of the wooden top will be prompted by the stone itself. Put a massive wooden surface on it and you will get a table that no one else has.

Beautiful examples and options
With your own hands it is quite possible to make very beautiful, original things that will look no worse than those of famous masters. Homemade items will always be your pride and topic of discussion among friends.


What can you make yourself?
Almost any table is within the power of each of us. This simple household item does not require special knowledge and special professional skills. We start making wood products at school, at labor lessons. Therefore, the simple wooden design of the laptop table will be quite on the shoulder. Both chairs and a bench for a country house can also be made independently.


You can come up with your own design of home crafts. Folding table will not permanently occupy living space. It can combine several functions. From baby changing station to work surface for home crafts.


A wide field for creativity will give a combination of wood and other materials. Don't be afraid to experiment. Combine dissimilar objects together, and you will achieve amazing results. Even if you decide to combine rarely combined elements, do not be afraid to try. Any ideas can be realized.


How to make a table?
Home design should start with a small coffee table. The design can be quite simple. work surface can be purchased at the grocery store.

Glued pine is best. The glued array is less prone to deformation with changes in humidity and temperature changes. It is most convenient to pick up legs for your crafts in the same place.


Desk
It is better to assemble it from ready-made wooden panels- quite a reasonable start to home needlework. Ready-made elements or entire blocks are easiest to order with delivery on a site that sells components for such work. Here you can find all the necessary accessories. It remains only to spend a little time on the assembly. Additional processing and fitting will not become too complicated, the main thing is that you will get the necessary experience for further creativity.

Table for the kitchen
It's not that hard to make your own kitchen utensils. You can start small kitchen table from pine. Legs are easiest to buy ready-made, pine is the most a budget option. The working surface is easier to choose according to the planned dimensions. Remains only in literally put the table on its feet.

Kitchen set

Everyone can assemble a set of kitchen furniture according to their own drawings. You need some skills to install opening doors, but this simple science can be comprehended by watching a few videos on the Internet.


Required Tools
You can start with a small set. A hammer, planer, chisel, wood saw, nails and screws can be found in every home. You will also need a ruler and a pencil. If it is possible to purchase an additional power tool, be sure to do so.

An electric planer in the house or a jigsaw will come in handy for the following crafts. Such a tool must be good quality. He will last long years even if you don't use it every day.

Special tool
To achieve high quality, it is better to use special equipment with an electric drive. Acquisition costs will not be significant, and you will have the opportunity to move on to more complex projects in the future.

What can be purchased in addition to an existing electric drill:
electric jigsaw - will allow you to make a high-quality cut of any materials;
electric planer - will make the surface of the tree perfectly flat;
circular saw - will provide a longitudinal or transverse cut industrial quality;
mechanical device for milling work- will process the edges of your craft with an intricate pattern and help you cut decorative elements on a wooden surface;
grinding machine - will make finishing a wooden surface is a simple and pleasant activity that does not require significant effort.


It is best to purchase a combined power tool that combines several different functions in one device. This will reduce costs and allow many design ideas to be realized. By the way, home electric drill can be supplemented with various nozzles, which will expand its capabilities.

Accessories
If you decide to make a trip to the needlework store, stock up on everything you need right away. For your craft, you will need additional components to securely fasten the wooden parts. Protozoa steel corners make the design more reliable in operation. Do not skimp on additional decorative elements. They will not be superfluous, but only decorate the appearance.

Ready-made kits that can be purchased at the store will add more elegance to wooden crafts. It will look very nice homemade desk for the child if used metal legs from any ready-made furniture set. It is easy to make a bedside table for him from the same standard kits. Handles and accessories can be picked up in the same store.


Fastening of wooden structures
The ancient technology of wood joining without iron nails and glue is almost lost. But it won't hurt to try. Adjust all wooden joints with minimal gaps, drill holes in the joints with a diameter of six to eight millimeters and hammer a dried wooden spike into it.
If all wooden parts are excessively dried before assembly, then over time they will gain required amount moisture and increase in size. The connection will become strong enough, and the swollen wooden spike will give additional strength.

Traditional mounting options
The easiest and most reliable option is to drive a screw into a tree. Now they make special self-tapping screws for wooden joints, which, unlike a conventional screw, do not require an exact hole for screwing in. If the thickness of the connection is not very large, then additional holes can be dispensed with. The wood screw will do everything by itself, especially if you use an electric screwdriver. Such a connection will last a long time without glue.

Why is glue needed?
To give a wooden structure additional strength, it is best to glue the articulating surfaces. You need a little glue, but the result will be excellent when combined with self-tapping screws or nails, glued wood connection will remain strong for many years. Glue is best used on a water basis. There are many varieties of reliable wood glue.

How to make an original home table?
It is not so difficult to create crafts of your own design. The material is found in any forest.
A unique craft will come out of an array of wood. But this will take a little effort. The ideal base big tree, whose diameter is more than eighty centimeters in circumference. If you manage to use part of the root system, then a reliable base for the table will come out and additional legs will not be needed.
You need to understand that it will not be easy to deliver such a blank from the forest, but the result will pay off all the work, such a table cannot be compared with anything.


Table for summer cottage
outdoor table for suburban area you definitely need to do it yourself. Ideal Material- all the same log brought from the forest. The base is conveniently made from birch logs of small diameter. They need to be dug into the ground about fifty centimeters.

Then align their upper parts by sawing off the excess wood. The working surface can be made from a log of large transverse diameter by sawing it longitudinally. The flat part will just be the surface of the street table.

All outdoor additional buildings are best made of wood. This natural natural material perfectly transfers both moisture, and heat, and frosts. It is also better to make a bench for a summer cottage yourself from the same wooden components. A homemade bench will look organically near your handmade table.
Why is it better to use an array tree?
The structure of the tree is such that its durability directly depends on how intact its integrity is. Therefore, since ancient times, solid logs have been used to build houses. With minimal processing, when the whole structure is preserved as much as possible, wooden structures can last for hundreds of years without collapsing or changing its shape.

What can be made from solid wood?
For starters, you need to be patient. Cutting down a tree and delivering it to the house is not the most difficult task. It is important to properly prepare the material for subsequent processing.

Preparation of a wooden blank
Be sure to rid the tree of excess moisture. If it is not possible to agree to do this at a woodworking enterprise where there is special drying equipment, then it is quite possible to do the drying at home.
Logging is usually done in the spring, when the trunk has not begun to absorb moisture from the soil, that is, before the thaw. Usually it is March. Drying naturally lasts from several months to a year, depending on the type of wood.

Why is it important to use only dry material?
Raw wood will definitely crack as soon as the bark is removed, unless, of course, this is planned by your design idea. Some breeds greatly change shape when dried improperly.

Dry wood should be well cleaned and sanded, a light layer of texture varnish or stain will not interfere to give more texture to the product. If the diameter of the circle is large enough, and part of the root system has become a reliable support, then the table is almost ready. The upper part must be well sanded and varnished. Here it is ready perfect design for a laptop.

Dimensions
If you want to make a large dining table out of whole log, you will have to work hard and make a longitudinal cut in the middle of the trunk with a chainsaw. You will get two almost identical halves. If the width of one part is a meter or more, and the length is not less than one and a half meters, then the basis for dining table has already. You can leave the bottom semi-circular or even out by cutting off the semi-circular bottom.
It remains to build reliable legs and treat the surface of the table with any convenient way. It is not necessary to make the table absolutely flat, especially if used valuable breeds tree. Moderate irregularities will give the craft an additional charm.

How to use the second half of the log?
A little extra effort, and - a strong bench for the table is ready. If the width of the log is of sufficient size, then two strong benches can be obtained on both sides of the table. They are best hardwired into general design, or make two separate strong seats for several people. The bench, of course, will have to be leveled and all irregularities removed. Ideally, sand well and varnish or stain.

Colors
Do not be too zealous in painting wooden products. If you decide to enhance the natural color, then coffee tones are best suited for any breed. It is best to use water-based varnishes and paints. They are less toxic and interact well with wood.
It is perfectly acceptable to use undyed materials with natural colors. Cast iron without additional coating and wood in natural color will become original decorative solution that does not require additional color shades.

Very well combined raw aluminum and dark woods. Natural silver color and dark oak texture look very original. Elements with natural flowers good for additional decoration.
But iron components, unless, of course, it is stainless steel, in any case, you need to paint. Even if your table with iron legs will always be indoors, the metal must be covered with any coloring composition. Iron corrodes even in dry and warm rooms and needs painting.
Wood coloring
When using wooden planed products outdoors, painting is required, not only for decorative purposes. good coverage protect the tree and prolong its life. In this case, are used special formulations for outdoor work. The color scheme can be any. The most acceptable are all the same dark coffee shades.

Useful little things
- The wisest thing is not to rush. Any work requires thoughtfulness and accuracy of execution. Don't set any deadlines for yourself. Do work when you feel like it.
- If something does not work out, put the craft aside and return to it after a while. Such work will only be a joy, and you will achieve a good result.
- Do not take on a complex project right away, start with simple work. It is necessary to gain some experience for the next more complex crafts. Using power tools will make your job easier. Be sure to follow all safety precautions when working with any tool used for woodworking.

- Even a small splinter can become a problem if you do not pay attention to it at the time. Follow the safety regulations. Always wear goggles when working with wooden products especially if machining is used.
- If you have little experience, but there is a desire to make at least a wooden table with your own hands own house, start by going to the building materials supermarket. There you will find everything you need for individual creativity. Design solutions materials suggest.
- To begin with, use wooden blanks that require minimal post-processing.
- Carry out all work in a spacious room. A small workshop in the country - perfect option. Painting should be carried out in a well ventilated area, even if low toxicity products are used. Observe all necessary drying times for glued and painted parts.
Advantages and disadvantages
Handmade crafts do not always look perfect. But don't get upset about it. Minor flaws will be compensated by absolute satisfaction from the work done by oneself. Such disadvantages can be attributed rather to advantages. An industrial product will not keep your hands warm.
Many of the people, coming with their families to their summer cottage, first of all want to get together at a large table to relax and have lunch. Meals in the country, whether breakfast, lunch or dinner, usually take place on fresh air. That is why a special place must be assigned to your garden plot, which plays the role of a kind of dining room. In order to avoid the need to take furniture out of your house every time, you can simply make do-it-yourself table for giving from improvised materials. Naturally, it is necessary to take care not only of the construction of the table, but also of the chairs. Making a table for a summer residence is not such a difficult matter, for example, an experienced summer resident, who is not the first time building structures on his site, will take no more than one or two hours. Those who are building for the first time will have to make some efforts.
Benefits of making your own furniture
Choosing the right furniture for a summer residence is not so difficult, because manufacturers offer a fairly wide range of products for every taste and budget. Nevertheless, independent production of country furniture is becoming more and more popular, which is not at all surprising. Thanks to this solution to the issue of arranging a dacha, you can not only save a significant part of the budget, but also get a lot of new impressions in the process of work, giving vent to your creative powers. The result of the work will be a thing that will not only ideally fit the interior, but will also become the highlight of the whole house, attracting the eyes of guests.

Required Tools
To build a table for a summer residence, you will need the following tools:
- hacksaw or circular saw;
- drill and a set of drills from 1 to 10 millimeters;
- a hammer;
- ring wrench (12 and 14);
- corner;
- measuring tape.
Building materials needed in construction:
- boards in the amount of 11 pieces (board length 4 meters, width 100 millimeters, thickness 50 millimeters);
- boards in the amount of 8 pieces (board length 6 meters, width 100 millimeters, thickness 50 millimeters);
- galvanized furniture bolts for fixing in the amount of 20 pieces;
- galvanized nails in the amount of 100-150 pieces (3.5 by 90).

Drawing
Before the beginning construction works it is necessary to pay special attention to drawing up a drawing of the future table. The following is a brief discussion of one such example:
- table legs, 4 pieces. The length of the legs is 830 millimeters;
- seat support elements in the amount of 2 pieces. The length of the elements is 1600 millimeters;
- tabletop support elements in the amount of 2 pieces. The length of the elements is 80 millimeters;
- boards in the amount of 14 pieces. Length 2 meters. These elements are necessary for the table and seats;
- amplifier board. Board length 800 millimeters;
- cross boards in the amount of 2 pieces. Needed to reinforce the seats;
- elements of the amplifier structure of the table. The length of the elements is 960 millimeters.
Attention ! It is necessary to strictly follow the dimensions listed below only if the work on the table is made from dried and planed wood.
Manufacturing technology
Sawing out elements of the future design
To do this, you will need a hacksaw or a circular saw. Cutting out the parts is as follows: using a hacksaw or a circular saw, make the required number of parts for the table from boards 4 meters and 6 in size. Based on the above drawing, it is necessary to cut boards 2 meters long, which will be used for table flooring and seating.

Attention ! In order to avoid mistakes when cutting out elements for the sidewalls, it is best to cut them out according to a template that must be made in advance from strong cardboard.
Assembly
After cutting all the structural elements, it is necessary to proceed with their assembly:
- first you need to install the side parts (sidewalls). In order to mount the parts evenly, it is recommended to use a measuring angle;
Attention ! The assembly of the table must be carried out on a perfectly flat surface. This will help prevent distortion of parts.
- after the installation of the sidewalls is completed, you can proceed with the installation of the table legs. To do this, we place the legs at the required angle and lay them on the transverse elements, grabbing the parts with the help of nails. Then, using a pencil or marker, mark the surface in the places where the bolts will be installed. After marking with a drill, it is necessary to drill holes and fix all the parts with bolts;
- then you need to start connecting the side parts and the countertop. This assembly step is best done with an assistant. Have a helper hold the first sidewall before it is secured. You hold the second sidewall yourself. On the upper part sidewalls, it is necessary to hoist one of the boards intended for flooring the table and seats. We fix the board with nails. We repeat the same moment of assembly: on the other side of the table we set up a board and nail it;
- Next, we proceed to the installation of the countertop. Before installation, it is necessary to prepare small wedges with which you can leave the same gaps between the elements. Then start fastening the tabletop boards. After the installation of the boards is completed, the wedges can be removed;
- The last step in assembling the table is mounting the amplifiers. We turn the structure upside down and install transverse amplifiers. According to the drawing according to which the assembly was carried out, the amplifiers are installed in the middle of the table top and bench, after which they are nailed. In order for the design to be safe for health, the saw cuts must be sanded. Then it is necessary to install amplifiers that have a figured cutout and repeat the transverse part of the tabletop. Nail them to the countertop and sidewalls.

Treatment
After the assembly of the table is completed, it is necessary to process it using special means. It is recommended to carry out processing before the start of the assembly process, which will make it possible to more thoroughly coat all elements and protect them.
To give a more attractive appearance to the country table, you can use color or varnish. Lacquer will become additional means protection of furniture and increase its service life.
Tables for giving from improvised materials
In addition, you can make a table for a summer residence with your own hands, using simple improvised materials.
For example, what can be done with an ordinary stump? It can be easily made from original table which will decorate your garden plot. Stumps can be decorated with mosaics, tiles, or other decorative items. It all depends on creative imagination. You can also make stools for sitting (also from hemp), after decorating them with a mosaic.
If you found in the country old table, then do not rush to throw it away, because you can give it a second life. Remove old paint from it, decorate the countertop with mosaics, and repaint the legs. Such a table will last for many years and will please the eye.
Tennis table for a summer residence
So that in the country you can occupy yourself with some kind of active sports, you can build a tennis table. It is quite easy to make, you just need to buy the right materials and prepare the tools.
Necessary materials:
- 2 sheets of plywood 20 mm thick;
- planed boards in the amount of 2 pieces (3 mm thick and 3 meters long);
- for racks you will need construction goats with supports in the upper part.
The dimensions of the table should be 76 centimeters high, 152 centimeters wide, 274 centimeters long.

Then you need to choose a place to place the table 7 by 5 meters.
Mounting process:
- construction goats must be installed horizontally at the same level;
- after installing the construction goats, it is necessary to lay two boards along the edges of the supports 3 mm thick (the boards are laid along the length of the tennis table). Boards are screwed with self-tapping screws;
- then plywood sheets are laid, which are subsequently fixed with battens.


After that, the countertop must be sanded and coated with several layers of antiseptic.


 in the configuration?")


