Professionals have managed to bring the technology of installing windows and doors to perfection. Special attention in this work, slopes are allocated, which are a mandatory element. According to current terminology, slopes are the surfaces of the walls located around the door.
Peculiarities
After installing the door, you want to relax, but the most important stage is just ahead. After installing the product in the opening, it turns out that the door slopes look, to say the least, ugly, and can spoil the first impression and the joy of replacing the door. A completely reasonable question arises: what can be used to cover the walls to make them look attractive.
The most popular options are to plaster and then paint or cover the space with laminate. Both options are practical, but when working with laminate you will have to do lathing. If you have no experience at all in conducting construction work, and want to spend a small amount, then plaster remains the most attractive option.


There are several reasons why you should choose plastering walls. Among the main advantages:
- there is no need to make a lath, which on interior doors will take up part of the space in the passage;
- there is no need to involve specialists in the work;
- low cost of material;
- it takes half as much time as in any other case when designing slopes.


But this method also has disadvantages that are worth knowing about:
- it is necessary to additionally coat the slopes with paint;
- from an aesthetic point of view, not the best option.
Working with laminate requires not only experience, but also patience. Creating a sheathing takes more time, additional tools will be required:
- hammer;
- glue;
- screwdriver


It is necessary to spend money not only on purchasing material, but also on dowels, wooden beam, decorative corner and self-tapping screws. But, from an aesthetic point of view, this is the most attractive design option for door slopes.
Species
Slopes can be classified into two large groups, without taking into account the material from which they are made and the installation location:
- internal;
- external.
Internal ones carry not only a functional load, but also an aesthetic one, so working with them is especially important.


There are quite a few options for how to finish the surfaces of the walls around new door, it doesn’t matter whether it’s interior or entrance. According to the material used, they are:
- wooden;
- cork;
- plastering;
- plasterboard;
- plastic.
Depending on the material from which the slope will be made, the installation technique also differs.


Materials
Finishing the slopes will help highlight the new metal door. Among the most popular materials:
- dye;
- ceramics;
- wallpaper;
- tree;
- drywall;
- stone;
- laminate;


PVC panels are a modern and inexpensive finishing material with aesthetic appeal and reasonable cost.
Device
In places where the front door is adjacent to the walls, heat leaks, so polyurethane foam is used around the structure. It helps to quickly close gaps and achieve the necessary tightness.
The panels can be easily mounted on a safe door; however, you will need to purchase corners and trims if simple plastering is not intended.


This element makes it possible to carefully close the structure after installation:
- cracks;
- polyurethane foam;
They can be considered as additional protection from drafts, smells from outside, noise. If you look at it in cross-section, it looks a little like a sandwich.


The first layer consists of:
- primer;
- plaster;
- corners;
- finishing.
Before applying the primer, the surface must be prepared. You can use a brush or roller. Sometimes after its application, if it is necessary to thermally insulate the opening, polystyrene is laid.


Plaster is the simplest way to finish openings, but you can use drywall, which is applied to a previously applied layer of plaster. Be sure to use a level or beacons, since the surface must be flat.
The use of drywall allows you to qualitatively prepare the opening for further finishing. This is a cheap and lightweight material, most often it is used for installation interior doors. Cut sheets create flat surface Without wasting too much time, working with plaster will require experience and patience. A layer of plaster is best used on front door, since there the wall surface may be exposed to moisture, and drywall cannot withstand it.


Platbands or a corner are installed along the edge, which acts as reinforcement for further application of putty and grout. Finally, a finishing primer must be applied.
The second layer of the slope is decorative finishing, which may vary. Some decide to simply paint the surface, while others use ceramic tiles and even natural stone.


Surface preparation
Before installing door slopes, it is necessary to prepare the surface. The work consists of several sequential actions:
- the locks and handles are removed from the door structure, I cover it with a film that is easily attached with simple tape, and the floor is covered with ordinary cardboard;
- old plaster is removed using a hammer drill;
- construction waste is removed, freeing up space;
- the gaps that appear in sight are filled polyurethane foam, before this, experts advise moistening the surface with a spray bottle with plain water, which improves the adhesion of the material to the surface door jamb;


- the foam dries in 8-12 hours, after which the excess is removed with a knife;
- the surface is treated with antiseptic impregnation;
- if provided electrical cable, then it’s worth laying it at this stage;
- You can begin plastering or installing the frame.


DIY installation
It’s not easy to make repairs yourself, you just need to study the issue more carefully. If you decide to plaster the slopes, then, in addition to a small container for the solution, you need to prepare and construction mixer. Its use guarantees the absence of lumps and uniformity of the applied composition.
There is no way to do without a level during finishing, the length of which must be at least two meters. Plastering is done using spatulas, one should be narrow, the other wide. The primer is easily applied to the surface of the jamb using a flat brush.
After the preparatory work, the cut edges of the polyurethane foam must be sanded using sandpaper. The use of a primer is mandatory because it provides better adhesion of the plaster to the surface. Experts recommend applying the primer several times, but only after the first layer has completely dried.

Now you can start plastering the surface. The composition is applied in a thick layer starting from the upper slope of the door. Wooden slats allows you to quickly level and remove excess plaster. Perforated metal profiles pressed into the corners help strengthen them.
The starting coat must be completely dry before applying the finishing coat, which is necessary to hide minor unevenness.


Laminate, PVC is attached to a frame, for which it is first necessary to make a 2x4 cm beam.
The timber is sawn to the size of the slope, on each part of the doorway they are attached perpendicularly to the planks, 4 on the sides and three on top. Nails can be used as a fixing element.
You can beat the corners only if you bend them plastic panels. Their structure is hollow at the end; there is a void along the entire length, so cuts can be easily made. It is very easy to do this with a simple stationery knife. The cut modules are attached to the frame using self-tapping screws, bent panels are attached to the wall.
You should work in the following order:
- mark the border of the finishing elements;
- 5 holes are drilled in the wall, which in the future will be covered by a finishing panel;
- Wooden plugs are driven into the recesses, into which self-tapping screws should be screwed, thus securing the finishing material to the wall.


Drywall like building material allows you to quickly finish slopes.
- At the first stage, it is necessary to drill holes along the entire surface of the opening, the distance between which should be 20 cm. Dowels are installed in them, into which the screws are then not screwed in completely. It is necessary to select the dimensions of the starting rail, which will act as a guide. To do this, you need to measure three sides of the opening. The upper guide should be the width of the opening, since the sheets of material on the sides will rest against the slope from above. The first top rail is screwed to the wall using self-tapping screws.
- At the next stage, the sheet of drywall is cut according to pre-made markings. If you do not follow the technology, the edges will turn out torn. Be sure to use a ruler or anything that can replace it during installation. The top layer of paper is easily cut, then the knife is a little more difficult to plunge into the plaster, but you need to ensure that its tip becomes visible from the back side. If you use an adhesive mixture on which the drywall will be placed on the wall, then it is important to carefully read the instructions from the manufacturer in order to maintain the proportions.

- The adhesive mass is placed on the back side of the sheet of material, and the dowels are also coated. The edges of the strip are inserted into the guide, and the drywall itself is pressed against the base. The same should be done on the sides. Any excess glue that appears is removed immediately, as it leads to deformation.
- Beacons are required to keep the sheet in a constant position. If gaps appear between the sheets, you can use excess glue to fill them. Finishing possible only in a day.


MDF slopes look good. Before installation, the wall surface must be treated with a lime-cement mixture . After it dries, a primer is applied. Before cutting the material, you should carefully measure the corners of the joints and cut off the corners. If you place elements next to each other, there should be no space between them. The first part of the opening is formed, onto which the adhesive composition is applied. The sheet is propped up until it is well secured in place. The side parts are installed second. The corners can be secured with liquid nails.


If you want to finish the slopes with paint, then depending on the material you need to choose the composition. First, the door is removed, impregnation is applied to the wood, if they are going to be varnished, then stain. For other dyes you can use drying oil.


You can cover the slopes with any wallpaper; there is no product specially created for this. The pattern will not look attractive, so it is recommended to choose plain ones. The technology consists of several stages:
- Glue a large sheet of wallpaper next to the doorway, which should cover the size of the entrance;
- cut it horizontally so that the slope can be completely covered;
- using a rag or roller, smooth the material over the surface so that there are no bubbles underneath;
- repeat the steps on all sides of the opening.


Wet areas finished with resistant materials, this also applies to slopes. Stone or ceramic tiles ideal for caulking. Before installation, the surface must be plastered and leveled. Experts do not advise choosing heavy tiles, as they will not adhere well to the wall. The operating procedure is as follows:
- the material is cut according to the dimensions of the slope using a glass cutter or tile cutter;
- glue is prepared in accordance with the manufacturer's instructions;
- the composition is applied to the surface using a spatula, which helps to distribute it evenly;


- the area of application of the adhesive should be equal to the area of the tile being glued;
- the reverse side of the tile is also covered with the composition;
- The material should be slightly pressed to the surface, checking the correct position using a level;
- the second and subsequent tiles are installed with a gap of no more than 3 mm, and it must be free of glue; for this it is best to use beacons.


The composition under the tile will completely dry only after 4 days, after which the plastic beacons can be removed and the free space filled with grout.
Door slopes in an apartment are a great opportunity to experiment with design. You should definitely take into account the purpose of the door, that is, whether it is an entrance or an interior door, the purpose of the room, what material the frame in the opening is made of.
Some types of materials are not so easy to install; skills, experience, and tools are required.
- When using drywall, tiles or wood, you will need to take correct measurements before installing the slopes. The slopes in front of the front door should not have free cavities, this will increase the durability and reliability of the cladding.
- Finishing with wood panels or plastic looks more attractive than painting surfaces. Drywall allows you to hide all errors. Using this option, you get rid of unnecessary expenses when purchasing materials needed to level the walls. This method can rightfully be called economical and simple, since you can handle the installation yourself.


- Plastic panels are rarely used for decoration doorways, because the material does not withstand physical impact and breaks even with a small impact. This option is never reliable or durable. But wood is durable and reliable material, which will serve for a long time. This finish is suitable for different rooms.
- Finishing work must be carried out taking into account the size of the doorway and the materials used. Thermal insulation is necessary as an additional installation step for entrance doors, since they must not only be durable, but also not create drafts in the apartment. When working with the front door, you need to pay a lot of attention to sealing the holes. Most often, polyurethane foam is used for this, which, after application, expands in volume, thereby filling the entire hole, leaving no free spaces inside. After complete drying, excess foam can be easily cut off with a simple knife, thus leveling the surface for further decorative finishing.


- The plaster can be used directly on brickwork or already on installed panels MDF. If you have to work with it, it is worth studying in more detail the features of the material and the process of its application, since this is one of the most complex options slope finishing.
- The advantage of perforated corners is difficult to overestimate, since they can significantly reduce the time spent on leveling the surface. The solution applies easily to them, and they themselves are completely hidden from view after applying the plaster.
- It must be remembered that before starting work on finishing the slopes, especially if it is an entrance door, it is important to close all gaps. If this is not done, then it begins to penetrate into the gaps. cold air, which condenses into the wall, wet spots appear on the wall, and subsequently mold, decorative trim falls off.
- Surface preparation is important for plastering walls. The work takes a lot of time, but it is recommended to process the surface in several layers. First, a layer of primer is applied, which improves the adhesion of the plaster to the surface. To achieve a perfectly flat surface, a profile must be applied and secured with dowels.


- To make the mortar, you should use cement, sand, lime mortar, you can buy it already ready mixture. The surface application technology involves starting work from the slopes of the upper area. First, a thick layer of plaster is applied, after which the excess is removed. To ensure smooth slope angles, it is recommended to use a perforated profile. It is fixed to the surface with an applied plaster mixture. Only after this is the finishing layer applied, which should be thin. It helps eliminate unevenness and roughness.
- If you work with MDF panels, the base must be made of lime-cement mortar. After drying, it is applied to a surface previously treated with a primer. The panels should be divided into three parts, each of which corresponds in size to the side of the doorway. Special glue is applied to the surface, then the panel is installed.


The work of installing slopes is carried out in strict sequence; if you skip even one stage, the end result will only be disappointing, and the materials will be wasted.
To learn how to properly trim door slopes, watch the following video:
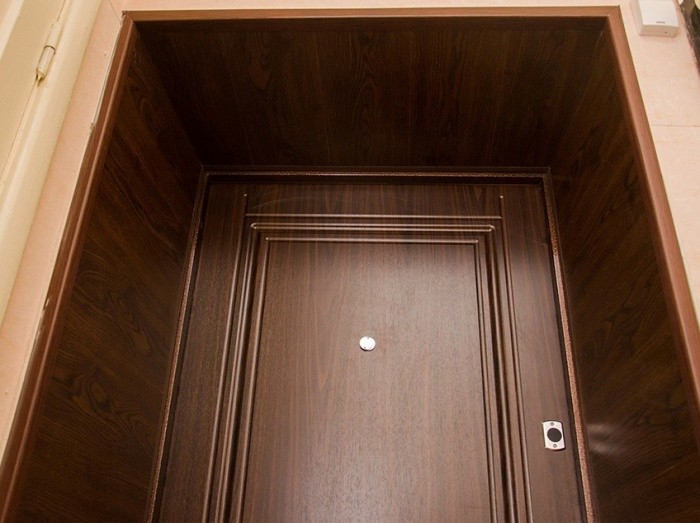
After installing a new iron entrance door in an apartment, all the pleasant impressions about it can immediately dissipate if slopes are not made from inside the apartment. Only them can say about a completely completed stage repair work .
To make them perfect, specialists are most often invited. On the other hand, you can do them yourself if you first study all the tips and recommendations.
What are door slopes?
The slopes are small area walls around door frame(outside and inside it).
In recent years, their arrangement is mandatory, because they not only decorate the general appearance door space, but also serve as the beginning general design corridor or rooms.
Types of finishing materials
By selecting the right material, we can safely say that success awaits you in the process of finishing the slopes. If you are a beginner builder or do not have large quantity time and money do not take on methods that require really significant skills and experience.
To avoid mistakes, you need to know what materials suitable for creating a beautiful space around the front door.
MDF panels
MDF panels are a popular material that is perfect for these purposes. As a result variety of colors, panels can be used to decorate slopes in almost any interior.
Installation occurs using conventional or liquid nails, as well as self-tapping screws, corners or casing are applied around the perimeter.
Among the positive properties, the following should be noted:
- able to withstand small impacts and damage;
- have an attractive appearance;
- easy to install by one person, do not require professional help;
- they resemble various types of wood, which makes the appearance of the slopes visually expensive and sophisticated;
- have good noise insulation properties.
One of the disadvantages of the panels is that they cannot withstand scratches and strong blows, and also can change their appearance and structure, if installed in rooms with high humidity(for example, baths and saunas).
In addition, being exposed various contaminants, require careful care, otherwise it will be almost impossible to wash them.
Decorative stone tiles attached to a special solution. Interior decoration decorative tiles looks interesting and expensive.
The advantages include:
- has a lower cost than natural stone;
- is light in weight;
- does not require special care;
- thanks to the wide color scheme can imitate the appearance of any stone;
- able to withstand significant temperature fluctuations;
- resistant to moisture.
Main The disadvantage is the fragility of the material. In rare cases, the size of the opening will coincide with the size of the tile, so its installation almost always requires the ability to correctly and accurately cut the tile to avoid cracking.
If you choose a heavy tile, there is a possibility that it will lag on the upper part of the slope, creating danger for human life and health.
Laminate
Another option for finishing door slopes is laminate, a material has the following advantages:

- good indicator of strength;
- shelf life can be up to 15 years;
- a wide selection of colors allows you to choose the one that suits each specific room;
- have excellent thermal insulation characteristics;
- easy to wash and clean from various contaminants;
- You can easily attach decorative elements to them (using regular glue).
Among the disadvantages, it can be noted that this type of finishing material poorly resistant to moisture and temperature changes. As a result, over time it may change its appearance and initial technical characteristics.
If you plan to install laminate flooring on a frame, then you need to be prepared for the fact that the doorway will become smaller.
You may be interested in learning about plastic wall panels, their types and sizes. Read this one.
Plastic
Plastic trim is well suited for a doorway only because you don’t need to spend a lot of money to purchase it, it is lightweight, can imitate various textures and materials, and is also easy to care for.

One of the disadvantages can be noted - its fragility, because even with the slightest impact and effort, it simply deforms and breaks.
Decorative stone
Decorative stone is a material with a huge number of positive properties. Finishing decorative stone quite expensive compared to other materials, but also looks more luxurious in the interior, as shown in the photo.

Advantages:
- completely environmentally friendly material;
- installation does not require a perfectly flat surface;
- stand up well high temperatures, a large amount of moisture;
- unlike natural stone, it has significantly less weight;
- wonderful appearance, variety of textures allows you to satisfy the tastes and requirements of any buyer;
- can be mounted in a doorway of any shape and size;
- does not burn, retains heat well in the room;
- It washes well and does not absorb foreign odors.
Of the disadvantages of decorative stone, the only thing known is that it is not recommended to use it for exterior finishing doors, which immediately go out onto the street.
Under the influence of very low temperatures in severe frosts the material may deteriorate slightly.
Plaster
Plaster is often used to create doorways. This is one of the economical finishing options; with the help of plaster, if necessary, you can not only seal the slopes but also level them.
It has the following advantages:
- perfectly insulates living space;
- cleans well from dirt;
- has high strength;
- thanks to various methods of application to the surface, you can give the slopes a unique appearance;
- long shelf life.
Main stages of drywall installation:
- Having measured the size of the side slope, cut a blank from a sheet of plasterboard, which must necessarily be 1 cm larger in width. If this is not done, then the sheet will not be able to be inserted into the gap between the opening and the box.
- Having made a recess with a knife in the mounting foam passing between the door frame and the opening, insert the side cut sheet into it. Slightly bending it on the other side, use a gun to apply polyurethane foam along the entire length.
- Press the material well against the wall. Make sure there are no distortions. The sheet must be positioned strictly vertically. Fill all cracks with foam.
- Carrying out all the above steps, secure the second vertical slope in the same way.
- Measure the top of the opening and from a sheet of drywall cut a sheet of identical length, which will be 1 cm larger in width (for the same purposes as the side sections).
- Make a recess in the polyurethane foam into which to place the resulting piece of material. Use a level to check the correct angles between the side and upper sections of the slope.
- Glue the sheet with polyurethane foam, pressing it well to the base of the wall.
- Wait until the polyurethane foam has completely dried(this will take 1 day) you can start applying finishing materials to the drywall.
This video shows step by step how to finish the slopes with your own hands.
How to apply?
Design of slopes – an important stage in the entire work of creating a doorway. You need to start by creating corners on the drywall using putty.
This should be done this way:
- Using a spatula, apply a small layer of putty to the corner.
- After waiting for it to dry completely, we apply serpyanka, which is covered with another layer of putty.
- When the second layer is completely dry, finishing putty is thinly applied to the corners. In this case, any unevenness must be avoided.
If you plan to paint such slopes, then the entire surface of the drywall must also be plastered twice. In the event that the repair work will be completed with wallpaper, the sheets do not need to be further processed.
Creating beautiful door slopes - not very difficult work which any man can do, without resorting to outside help. The main thing is to first study all the necessary recommendations, consult with a specialist and purchase those materials that will be simple and easy to work with.
Even the most luxurious entrance door can spoil its appearance if the slopes around it are not made carefully. These products serve as a beautiful frame, complement and highlight main object. Its role is played by the front door. To decide how to make the correct slopes for the front door, you need to look at its style, color scheme and design.
Materials for finishing slopes
The slopes framing the entrance to the apartment must correspond not only external features doors, but also the design of the hallway as a whole. Apart from purely decorative function, such elements around the door serve as additional insulation. They also cover the joints between the frame and the wall.
For this purpose, you can use various materials or put existing slopes in order. If the door is strong and reliable, but does not stand out in any way in appearance, it is enough to level the slopes with plaster and strengthen them. Such work is usually carried out not only from the entrance, but also in the hallway. Plastered slopes look quite neat. They can be painted in a color similar to the shade of the door itself or to match the wallpaper in the hallway.
If the walls of the house are quite thick and the slopes are wide, you can use drywall for finishing.
It will reliably close the joints between the wall and the door frame, and will also make the walls warmer. Due to this, the slopes will take on a neat appearance. Drywall can be:
- cover with wallpaper;
- cover with paint.
 This material has many advantages. The main advantage is that there is no need to level the plaster according to building regulations and then clean the wall. You can finish slopes made of natural wood, if it is suitable for finishing a doorway.
Wood has always been in demand and never goes out of fashion. It combines perfectly with any interior. It can be easily tinted using modern or folk remedies. The tree will serve for many years, maintaining its decorative properties. As a last resort, you can paint the wood to match the color of the hallway.
An alternative to wood can be laminated lining made from fiberboard. It is produced in various colors and imitates a textured pattern. various breeds tree. Accordingly, you can choose housing to suit any hallway design. But it is not recommended to finish slopes with this material outside doors, since it does not stay there for long.
Another finishing option is ready-made PVC panels. They are made in various widths and in a wide range of colors. The production of such parts and their subsequent sale are carried out by specialized schemes. They have a subway that installs panels. This finishing option looks respectable. He has good aesthetic properties. PVC panels can last a long time. But it is better to place them on the side of the apartment.
On the entrance side, it is better to use 1 or 2 finishing methods, as discussed above. If you are confident in your abilities, then you can install ready-made slope parts yourself. Another option is to use polymers for finishing on the inside. This is a plastic lining. It can be easily matched to the color of the walls in the hallway. Available in stores wide range the specified material.
 Slopes are sometimes sheathed Chipboard panels. They are usually used for very thick walls. But it should be noted that today this finishing method is becoming less and less popular. This is due to the emergence of alternative materials that can replace these massive panels.
One way or another, if material of the required size was found at home, you can use it to design door slopes from the inside. It should be noted that there are other materials that can be used to install slopes on the front door. They can be used to arrange planes around the door. And yet the options that were described above are the most popular.
List of basic tools
To finish the slopes you will need tools and materials that will make it possible to carry out the work carefully. What is needed for plastering when finishing the slopes of the front door:

Tools for measuring work must be prepared in advance. The list includes:
- jigsaw;
- hacksaw or screwdriver;
- hammer;
Once everything necessary is prepared, you need to move on to surface preparation and installation.
Finishing process plan
 Each type of work on finishing door slopes after installing the front door has its own nuances. Installation of the presented materials is carried out using the same technology. Some finishing methods are extremely simple. If you approach the work correctly, they can be completed with your own hands. There are techniques that can be performed independently when the owner of the premises has the necessary skills in working with tools and building mixtures.
Any measures for installing slopes begin when the door leaf is installed and all the cracks between the wall and the jamb are closed. In addition, broken fragments are removed from the slopes. It is necessary to clean all areas that are crumbling. After completing the specified work, they proceed to finishing using the chosen method.
Plastering methods
If you decide to level the walls with plaster, then the process must have a certain sequence. First, clean the surface of any dirt. Prime properly. It is better to use two layers for this. The primer material is applied only after the previous layer has dried. Find out how much straight corners slopes. If a deviation is detected, then this must be taken into account when installing reinforcing corners. There is no need to level surfaces that have slight deviations from the vertical.
After this you need to put perforated corners at the slope angles according to the level. It is better to plant them on finishing putty. This material is available in stores in ready-made form. It is applied to the corners of slopes. The composition serves to glue the corner and makes it possible to level it to ideal position horizontally or vertically. The resulting excess solution leaks through the hole in the corner. Remove them immediately with a spatula.
 Once the corners are perfect, the solution under the corners is left to dry. If the surface of the slope is uneven, then before installing the perforated corners, set the direction from the door jamb. To do this, fix a narrow strip of drywall with a width of 8 to 10 mm along it. It is fixed with putty. If it is made on a gypsum basis, then it takes very little time for the material to harden. The edges of the drywall and the strips that strengthen the corner become points that are connected with putty and level the plaster.
After the elements for adjusting the wall have dried, spread the putty. Focus on the proportions indicated on the packaging. You should get a paste-like consistency. Using a spatula, throw the finished composition onto the wall. Start from the floor.
Throw a certain amount, approximately a meter high. Level with construction rules. The role of the lighthouse in in this case performs a perforated corner and a piece of drywall glued to the wall.
Following this, the solution is poured onto the next area and leveled again. This continues until the top of the opening is reached. Puttying the ceiling area is much more difficult. This requires putty and a wide grip. A short rule is used for leveling. After this, the putty is applied to the wall above the doorway. Cover the upper zone of the metal corner with it.
After treatment with putty, the slopes are left to dry. This requires different times. It depends on the composition of the putty and the thickness of the layer. After this layer has dried, the quality of the surface is checked. Any possible shortcomings are corrected. To do this, you need to chip away and clean the protruding irregularities. Following this slopes must be treated with finishing putty for perfect evenness.
After drying, the putty is coated work area primer. The resulting surface can be painted. You can paint it, apply decorative plaster or wallpaper it.
Plasterboard finishing
It is much easier and more pleasant to work with this material than to remove slopes with plaster. But, one way or another, you will have to work with the finishing putty. She will play the role adhesive composition for sheets of material. Instead of her use special glue for working with gypsum-based gypsum plasterboard fragments. If there is not enough space, then drywall is ideal for decorating slopes. This process is carried out in the following sequence.
First, all surfaces on the slopes are measured separately. The obtained values are transferred to GVL sheets. They are used to cut out elements that will be mounted on the wall. The finished parts are mounted going in the direction from the ceiling part. For this purpose, glue is applied to the plasterboard blank in several layers. Firmly press the element to the installation site and fix it in this position with supports. They need to be prepared in advance. Cut out parts from gypsum fiber boards.
They are used for finishing walls and slopes. Apply glue in small layers to the prepared products. Press the sheet against the wall and check the level. Drywall can be fixed with driven dowels; I made through, but not too wide, holes for them using a hammer drill or electric drill.
At the corners of the slopes, in the same way as when applying plaster, perforated metal corners are secured using putty. It is used to cover all joints and level the layer. After drying, clean the surface thoroughly. Subsequently, the entire surface of the slope is covered with a primer. To ensure an ideal plane, apply a thin layer finishing putty. It should not be more than 1 mm. The material completely hides any joints and irregularities, including holes for dowels. As soon as the putty has hardened completely, sand with fine-grained sandpaper, if there is such a need.
Following this, they move on to decorative design slopes. They should be covered with decorative plaster, pasted over or painted. Drywall is glued differently if it is necessary to level the surface by covering large area walls. For this purpose, bars of the required cross-section or metal profiles are fixed to the slopes. An alternative is angles or components U-shaped, which form the sheathing. It helps to align the wall and ensure it is in the right direction.
This method of fastening has a number of advantages. First of all, it is possible to lay insulation on the guides fixed to the wall. Subsequently, the structure is covered with plasterboard. It is screwed with self-tapping screws to the bars. The process then proceeds in the same way as in the first option.
Application of lining or panels
 There is a list of materials that are not marketed in rigid panel form. These include various types linings, MDF, fiberboard. Their technology for attaching to the wall is similar. Their use is attractive because panels make it possible to align corners, characterized by a large deviation from the norm. Algorithm for working with the following materials:
The surfaces of the slopes are primed. Markings are made in order to later attach metal profiles or bars to them. Finishing materials will be installed on top of these products. Auxiliary components are placed at a distance of 30 cm from each other if installation is carried out across the slope. When lining is used for finishing, it is necessary to fasten the products parallel to the door frame. If it is required that the panels lie across the surface, the bars are fixed closer to the corner along the jamb. For wide surface They use not 2, but up to four bars.
When the installation of the sheathing is left behind, it is necessary to lay insulation between the pieces. This could be polystyrene foam or mineral wool. Following this, installation of the selected material is carried out along the sheathing. facing material. Solid, even panels are placed end to end with each other. The lining is connected with a tongue-and-groove fastening.
Lining made of plastic or laminated material fixed to the bars from the side of the lock chassis. Metal holders are used for this. They are put on the bottom flange of the groove with their protrusion and mounted with self-tapping screws or small nails with guides.
Panels with a large area are screwed to the sheathing with self-tapping screws. Their heads must be recessed 2 mm into the structure of the material. These elements are sealed with wood putty with the addition of a dye of the appropriate shade.
When the installation of the panels is completed, it is necessary to refine the corners appearance slopes. They are selected in accordance with the color of the cladding. The corners are glued on the outer horizontal and vertical corners. This must also be done in the area of the junction of the door frame and the finishing material.
Many owners prefer to do apartment renovations with their own hands, especially at the stage of solving design problems. Modern man Feel free to order a metal base for the front door, do the decorative coating and installation yourself, significantly saving the family budget. This is the only way out in cases where the interior decoration of the front door is difficult to combine with the interior of the corridor.
How to cover the front door
 When decorating a house from the outside, the master takes into account a wide range of air temperatures in summer and winter, fluctuations in humidity levels depending on precipitation and other operational features. The likelihood of damage to the door leaf inside the house is almost minimal, the influence of natural factors is limited. Selection of materials, suitable for decorating the interior of the corridor, presented in the construction market in a large assortment.
It is necessary to carefully study the instructions and the procedure for performing installation work, taking into account the peculiarity of the location of the rooms. Perhaps it would be better to highlight the central entrance so that it stands out from other openings. The design looks impressive mirror glass. An illusion appears free space in a small corridor.
Solid wood panels
The most expensive type of wooden overlays for decorating a metal frame are oak slabs. The high price of wood is justified by its advantages:

The panels can be ordered directly from the machine, and you can paint them yourself, choosing the desired shade. After a few years, it is recommended to apply the top coat of varnish again to give a new shine to the whole house. In the modern construction market arrays of 40 species of trees are presented.
Laminate
 Laminate planks are a multi-layer material that is perfect for interior decoration front door. Laminate has become a popular interior decor because it does not require special skills during installation and is easily assembled into a single piece. Care without special requirements, dirt can be easily removed with microfiber and a damp cloth.
The planks are technically easy to connect to profiles, contours, decorative elements of any complexity. First, the master takes precise measurements, then assembles a solid laminate panel separately from the metal frame. The plates are mounted on the leaf one by one, because often the shape of the door is not perfectly rectangular. Sometimes you have to deal with intricate cutouts and voluminous elements.
Wooden lining
The high-quality material is universal and is widely used in construction. It is recommended to use wood paneling to decorate doors coniferous species. Pine and spruce have a number of advantages:
- less expensive;
- exudes a pleasant forest aroma;
- has a natural antimicrobial effect due to phytoncides;
- beautiful drawing wood fits any design idea.
The lining is easy to assemble into a single piece due to special lock connections, in this case you can create any direction of the jointing line.
Leatherette
 Finishing work using artificial leather remains relevant in modern design interiors of houses and apartments. The main advantage of the material is its relative cheapness. It’s easy to sheathe any structure with dermantine, no expensive tools or glue required. The result of the work is a high quality top layer of the front door.
Dermantin has a stable color, and it is possible to choose any shade necessary for implementation design solution. The material does not evaporate toxic substances, repels water drops, does not deform under temperature changes. Leatherettes are fire resistant. They are easy to care for; just wipe the surface with a clean damp cloth.
Plastic panels
 Polyvinyl chloride is often used for cladding metal door. PVC has established itself in the construction market as a high-quality waterproof material that does not absorb moisture, retains its shape, appearance and serves long time. The plastic panel does not rot or crack due to temperature changes in summer and winter.
Thin, even layer tightly adjacent to the main surface, without gaps, forming a continuous decorative surface. Wide selection textures and colors meet any design requests. With proper care, plastic panels last for many years without losing their original shine.
Combinations are especially popular different materials in door decoration. The elements are securely attached to each other, taking into account quality and stylistic compatibility. To perform highly complex work, it is necessary to have additional tools and fastening devices.
How to finish the slopes of the front door from the inside
 The luxury of oak and the shine of gold fittings will spoil unattractive slopes; their shape and appearance must be carefully thought out in order to fit organically into the overall environment without loss of functionality. Cosmetic work begins with repairing the base layer.
The plaster will have to be leveled, facing, for example, with plasterboard, if future decor easy. Drywall won't hold up on its surface of bricks. IN difficult cases Alabaster is added to the plaster to make it especially durable.
The pattern and texture of the slopes can repeat the design of the walls in whole or in part. The method of gluing slopes is no different from working with walls in an apartment. To fasten laminar panels or MDF, you need to prepare a perfectly flat surface, especially if the slopes are wide. In narrow areas the panels hold up better. At the same time, the mounting foam reliably fixes the decorative material.
In the light of modern fashion trends design of the entrance door slopes inside the apartment using artificial stone looks stylish and rich. This is a durable decor that does not require special care. A variety of textures and colors allows you to create a unique artistic composition, simulating rough masonry. Compared to natural stone artificial material much lighter, reduces the load on the main structure.
Decoration of slopes with decorative stone is carried out in several stages. To create the desired shape in the chosen style, various layout schemes are used, so a sketch is determined in advance. The material is attached to liquid nails or polyester resins.
Wooden slopes in classic style remain popular today. Great variety colors and shades help to bring any interior to perfection, elegantly and unobtrusively. To the disadvantages wooden slopes consider the need to update the top layer more often than other materials. But the advantages of natural wood far outweigh this drawback.
 The most economical option for decorating the entrance is considered to be a layer of plaster. Without prior experience, the opening can be plastered in a few hours efficiently and reliably. Paint of any color that matches the interior of the corridor is applied on top. Plaster is also used in emergency cases to gain time before overhaul, For example. Plaster experienced craftsmen called the most reliable and in a simple way finishing works.
Decorate with plastic doorways extremely rare, because this is an area of increased physical influence, and plastic is not a very strong and durable material. But if the door is covered with polyvinyl chloride on top, then perhaps PVC panel will be the only one suitable material for decorating slopes.
Before finishing work, the doorway is carefully checked for sealing in the joint area, areas with suspected air leaks are foamed. Then the excess foam is cut off, cleaned and coated with a primer.
Repairing slopes is an interesting activity that requires responsibility. Correctly selected material taking into account operational features is the key to a successful labor-intensive process.
The front door will look complete only in one case - if the walls next to it are finished. As a rule, it is installed in a small recess in the opening in the wall, and on the sides of it completely ugly elements are formed, which need to be covered with something or somehow finished. But the design process often depends on what shape the doorway is in the apartment.

Table. Types of doorways.
| Type | Brief information |
|---|---|
| This is the usual rectangular entrance that is most common. Any option for finishing slopes is suitable here, and various materials can be used, which will be discussed below. Despite the general simplicity of finishing such a doorway, many are faced with certain problems, which are most often associated with the choice of the most suitable and easy-to-use material. In general, designing a classic doorway is not so difficult, since there are no complex or curved lines here. |
| This version of the doorway looks much more impressive than the usual classic one, and is a rectangle with a rounded top in the form of an arch. Doors that fit it are more difficult to install and technically more difficult to design. Typically, sufficiently elastic materials that can be bent or plaster are used to finish slopes. Often, the door comes with special linings that precisely match the shape of the door. In general, finishing such an entrance is much more difficult than a regular one. |


Advice! If you want to have an arched entrance to your apartment, but install an ordinary rectangular door, then there is a way out. You can simply install an arched lining at the top of the doorway from the inside, but the door will look like a regular one from the outside.

Drywall slopes are a very common type of slopes.
What are slopes?
The door frame is usually called jambs, but not everyone knows that the end part of the wall where the door (or window opening) is located is called slope. By the way, some decorative overlays that are used to finish the opening are also called slopes.

The slopes themselves can have different sizes, but in any case, according to their parameters, they must fit the end part of the wall where the entrance door is installed. In general, they may have different thickness, but if we are talking about decorative overlays, then in order to avoid deformation and damage to the material, its thickness should be at least 1 cm.

The easiest way to design a slope is to use “L”-shaped panels
The purpose of finishing and installing slopes is to achieve a beautiful frame for the door. In any case, when the door itself is installed, the slopes will be damaged, and in general the end part of the wall does not look beautiful - it is either concrete, or brick, or any other material that becomes visible to everyone. Usually the ends are quite uneven, and simply covering them with wallpaper will not work - some preparation will be required. Also, the slopes will help hide the mounting foam, anchors and other elements and substances that were used directly when installing the door. Only if there are slopes or proper finishing you can ensure that the door looks beautiful and the doorway looks finished and neat.

Note! Slopes will help achieve a certain level of heat and sound insulation - apartment residents will hear less sounds coming from the entrance. Do not assume that slopes are just a decorative component.
Basic information about door installation and design
In general, finishing the front door includes three stages:
- threshold design;
- finishing of slopes;
- installation of platbands and additions.

All this work is carried out after the installation of the door leaf itself. As for the threshold, it must be strong enough and resistant to various types of loads. It is usually made of wood, metal, concrete. These types of materials are much more stable than the now so common PVC and can last for many years until the next door replacement.
As for platbands and extensions, they are usually used to achieve neat design of the doorway. Thus, they help to hide imperfections and irregularities when the physical parameters of the wall and the very door frame that is being installed do not match. Without them, the door will look crooked and sloppy. Quite often, these elements are made from MDF, and then you don’t have to think about leveling the slopes themselves with putty. The voids between the extensions and the wall are simply filled with polyurethane foam.

Note! Platbands and extensions will also help protect the door from subsidence that may occur in the future.
The slopes are finished after the door is installed. This can be done in various ways:
- sheathing;
- finishing;
- plastering.

The last option is considered the best, as it allows you to achieve ideal evenness of the end of the wall and seal the doorway. Also, if you use your imagination, you can create an interesting unique design. And excess dust will not accumulate on top of the finishing materials.
Find out in a special article on our portal.
Prices for various types of door frames
Door frames
Selection of materials
Yes, the slopes perform a protective function, but no one took away their decorative function. And to decorate them you can use a lot various materials. The main requirement for them is the absence of fragility and tendency to mechanical damage. The slopes must be finished so that they can last for many years without the need for repairs, not even major repairs, but cosmetic ones. Moreover, it is worth considering that the doorway is the place where all family members pass every day, and more than once, something constantly falls here, the door and the slopes themselves can be subject to impacts. So the material for finishing them needs to be one that can withstand all these loads for a long time and not deteriorate.
Plastering
This is a classic and the most common design option for a doorway. This method probably originated back when the very first front door was installed. A slope finished with plaster will serve faithfully for many years without complaints. The material is not afraid of temperature changes, damage, and it will perfectly hide and fill all the unevenness of the end of the wall (no other material can compare with it in this regard). Using this material you can achieve a perfectly flat plane at the end of the wall.

Plastering slopes - a method proven over the years
You can paint the plaster for beauty, cover it with wallpaper, or put some kind of pattern on it. In general, there is a lot of scope for imagination here. The main disadvantage of this method is the appearance of a large amount of dirt during the work. Also, the disadvantages include large labor costs, and it will also take time for the material to dry. If you have no experience working with plaster, then it is recommended to carefully study this issue or even invite a specialist - working with the material is not easy for a beginner.
Advice! In order for the slopes to look finished, after plastering they need to be sanded and puttied.

Prices for popular types of plaster
Plaster
This material is loved by many craftsmen, and it is readily used in construction and repair work. It is universal and easy to use, and therefore can also be used for finishing slopes. This option is also called dry plaster.

The main advantages of using drywall are increasing the speed of work and simplifying it. If necessary, drywall will perfectly hide all the shortcomings. In general, the work on using it to design slopes looks like this:
- The surface is primed after cleaning it of debris;
- a metal frame is formed from the profile;
- moisture-resistant wall plasterboard is cut into pieces of the required sizes and fixed to the frame, forming a box;
- after installing the sheets, the cracks and the sheets themselves are puttyed (it will not be possible to glue anything onto untreated sheets of drywall or cover them with some kind of decorative composition);
- when the putty dries, you can decorate the doorway.

Note! If necessary, under the frame on which the drywall is fixed, you can lay insulation - then the apartment will be warmer.
This is also a very popular option for decorating a doorway. On at the moment MDF finishing is considered perhaps the most common. The material is resistant to various influences, does not require additional decoration, and has a mass color variations and it can be matched to installed door. Veneered MDF as a whole is indistinguishable from natural wood.

Advice! If the door slopes are designed not only inside the apartment, but also outside, then it is worth purchasing a moisture-resistant MDF version.
Installing this option is simple - even a beginner can handle it. You can buy materials in advance - all that remains is to adjust them to required sizes, assemble the box and install. The cavities are foamed with polyurethane foam.
Prices for polyurethane sealant
Polyurethane sealant

Unfortunately, it’s not cheap, and it’s easy to scratch. So you need to handle slopes made of this material carefully. Plus, it tends to absorb odors, and fat on it easily leaves stains.
Cladding
An excellent option for those who want as much natural wood as possible in their home. By analogy with MDF paneling, you can decorate the ends of the walls near the front door. They will look very beautiful and noble.

Installation must be done on top wooden sheathing. So narrow slopes cannot be covered with clapboard. Natural wood is not cheap, so you need to be prepared to shell out more money.
It is also worth considering that with changes in humidity and temperature natural wood prone to deformation. It must be coated before installation. protective compounds, preventing rotting and the spread of insects. It is also better to impregnate it with a fire retardant to reduce the level of flammability.

Advice! Instead of varnish, it is better to coat the lining with a special wax-oil composition. She will look better and more noble.
PVC slopes and polyurethane linings
Wherever PVC is used now! So the front door can be framed with it. Installation is quick, and the price of PVC slopes is quite low. But this stuff is no different a large number advantages.
PVC is fragile and easy to break. Sometimes it’s enough just to lean your elbows on him and that’s it. work will go down the drain. The slope cannot be repaired; it will only have to be replaced. And in general, the service life of the material does not exceed a couple of years. Some people cover plastered slopes with plastic, but in reality it looks ugly and cheap.

By the way, you can also decorate the slopes with polyurethane overlays, which can imitate stucco. This option looks decent. But the price for such overlays is high. You need to glue the overlays on a flat surface, so you will still have to pre-plaster or cover the ends of the walls with plasterboard.
How does the process of decorating slopes with MDF panels take place?
Step 1. The first step is to prepare all the tools. This includes a tape measure, a square, a pencil, a miter saw, a sharp knife, a hammer, masking tape, a screwdriver, and a drill. You also need fastening materials and polyurethane foam.

Prices for popular models of screwdrivers
Screwdrivers
Step 2. Next you need to take measurements. The procedure is carried out after installing the door - you need to measure the width of the end part of the wall, as well as the width of the doorway. It is better to take measurements at several points vertically and horizontally.


Step 3. Now you need to make markings on the MDF strips according to the obtained dimensions. The edge along which the cut will be made must be taped with masking tape. If this is not done, unsightly chips may appear on the panel during sawing.


Step 4. Using a square, you need to draw an even cutting line.

Step 5. Taking advantage miter saw, you need to saw the workpieces.

Step 6. Now you need to collect the received additions into one design. Use a drill to drill holes for the screws. It is not recommended to screw them in directly with a screwdriver - the fasteners can damage the panels. The holes are made in several pieces at a distance of 10-15 cm from each other.


Step 8 Now follows from wooden block make about 10-12 spacer elements.

Step 9 Spacer elements must be hammered between the wall and the box. About 3-4 pieces are hammered vertically, and 2 pieces along the upper and lower borders of the box. The block should not stick out; it must be hammered in tightly.

Step 10 Now you can install the platbands. First you need to attach the trim and measure the desired length.


Step 12 Before installing the platbands, the gaps between the wall and the frame must be foamed with foam. It will help further secure the box and provide sound and heat insulation. Excess foam can be cut off with a knife after it hardens.


Step 14 Now you need to measure and saw off the casing at the top and bottom, and then secure it with nails.

Step 15 After the structure has been assembled, you need to fix it on the door frame with masking tape for about a couple of hours. Once the foam is completely dry, the tape can be removed.

Video - How to make slopes?
Video - Finishing narrow slopes
After the main work on finishing the slopes has been completed, you can begin additional decoration. If they were plastered or decorated with plasterboard, then there is a lot of room for creativity. You can cover the slopes with paint, decorative plaster, wallpaper, draw patterns, attach laminate, stone, tiles and use other materials. The main thing is that they fit the overall style of the interior and meet all the wishes of the home owner.


, Islam, Judaism How do temples of different religions differ")


