Sometimes I just want to say a huge thank you, technical progress, for thanks to him on our own, you can turn a dull summer cottage into a piece of paradise.
Not so long ago, it was possible to admire a fountain only in city squares or parks, but today, it is enough to build a fountain in your dacha with your own hands and enjoy the splash of water at least every day. A common misconception is that your own fountain is expensive and complicated; as a rule, people who do not delve into this issue think so.
The most important thing is to cast aside all doubts and boldly take on construction decorative fountain at the dacha.
But don’t immediately grab a shovel and start digging a pit. Most important stage in the construction of a fountain is the correct calculations, the choice of shape and materials, and for this, first of all, you need to understand what kind of fountains are and how they differ from each other.
Submersible
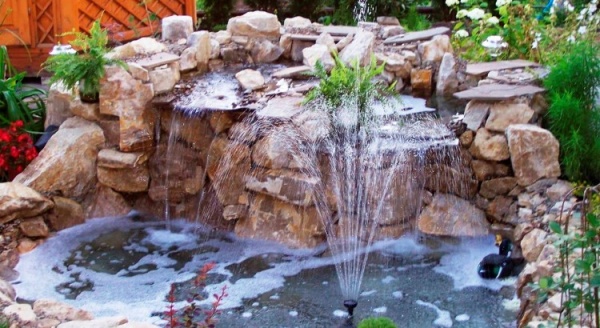
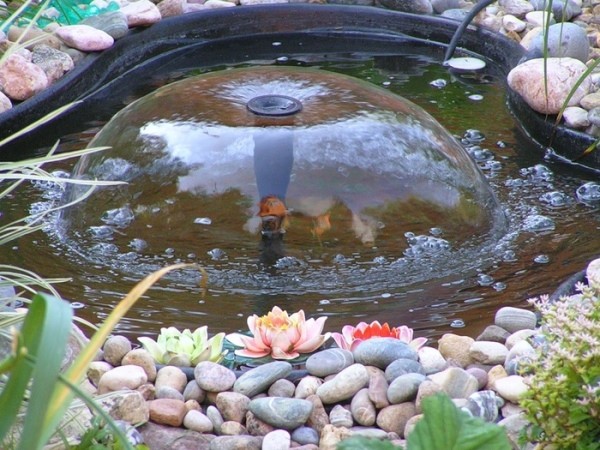
If we talk about the complexity of construction, then a submersible fountain for a summer house is the simplest option, with minimal costs. Its peculiarity is that the stream shoots straight out of the water. This structure does not require the installation of additional technical devices; it is enough to select a spray nozzle that will form a jet and fix the hose from the pump.
The water will rise into the air and fall back. By the way, there can be several jets, if the pump power allows, which we will talk about below. By experimenting with nozzles, you can create various compositions from rising water that will harmoniously fit into any setting.
Stationary
They are the ones most often found in city parks and squares. The word “stationary” implies the presence in the design of the fountain of various decorative elements, which act as a source of water.
In a stationary country fountain the following can be used:
- Statues.
- Sculptural compositions.
- Any items of landscape decor.
The design of such a fountain is somewhat more complicated than a submersible one, but it also looks more impressive. Especially if you include a composition in general concept landscape design.

Interesting ! Stationary garden fountains made of polystone are very popular today. This polymer material imitates natural stone, but products made from it are much cheaper.
Polyresin compositions have relatively light weight and at the same time completely not subject to deformation and rotting.
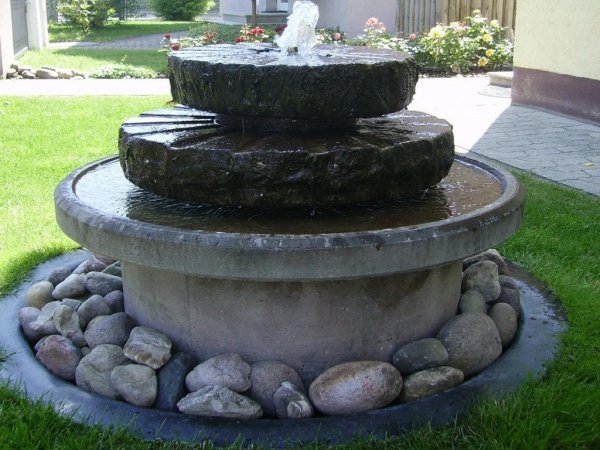
Compositions made of stones with water flowing over them look very stylish. To do this, a hole is drilled in the middle of the boulder through which a hose is passed. At the same time, the source of water is not visible, and one gets the feeling that it is coming from stones.
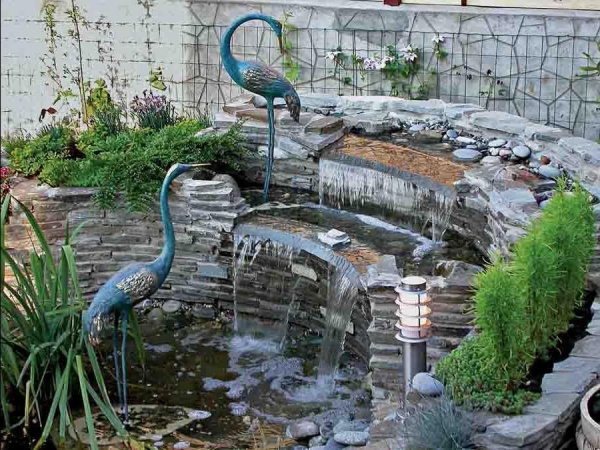
"Falling Water"
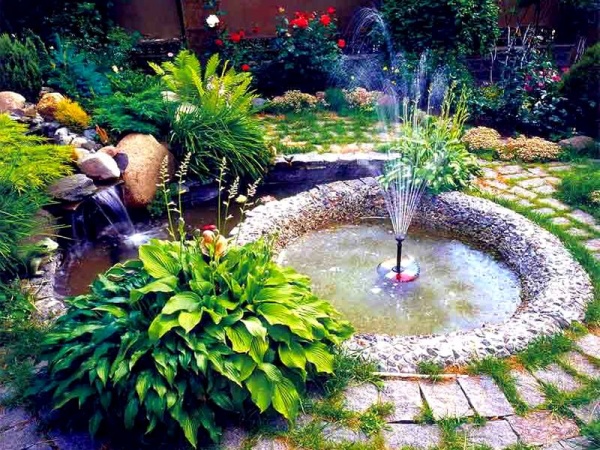
This is a combined composition that combines a fountain and a waterfall. In this case, the fountain stream, rising, does not simply fall back, but falls on a cascade of stones, along which it returns back to the reservoir.
There are few difficulties when building such a fountain in a country house; it is much more difficult to achieve harmony so that the waterfall and fountain look like a single whole.
Certainly, listed species- this is far from full list what can be created on the site. A lot here depends on personal imagination. You can even combine multiple types to create original composition, which will become a key element of the landscape decor of the dacha.
Building a fountain at the dacha
The type of fountain for the dacha has been selected, and you can proceed directly to work on the site, but it’s too early to take up the shovel again.
Popular wisdom says: measure twice, cut once, and for the construction of such a structure as a country fountain, it is very relevant.
Choosing a place in the country

The choice of location, as they say, is a matter for the owner, but if you do not take into account all the nuances, as a result, instead of a beautiful country pond, you can end up with a stinking puddle with very undecorative frogs. To prevent this from happening, several important factors must be taken into account:
- There should be no trees near the reservoir. Falling leaves will constantly clog the filter and can even damage the pump. A root system, sooner or later it will feel moisture and destroy the entire structure.
- You should not place a country fountain near a house or other buildings. Constant humidity and splashes have a negative impact on the façade and foundation.
- The predominant direction of the wind at the dacha also needs to be taken into account. By placing the reservoir on the leeward side, all kinds of debris will constantly fly into the reservoir. As a result, most of the time you will have to do cleaning, and not enjoy the views of falling water.
- An open area of land where the sun constantly shines is also not suitable for a country fountain. At the height of summer high temperature water can damage the pump, and, moreover, flowering begins faster in it. Light and shadow should alternate evenly throughout the day.
As you can see, pick up at the dacha perfect place, is not so simple, but it is better to do this now, when the conditions can be created artificially, than to suffer later with a failing and rancid reservoir.
Choosing a bowl for a country pond

In this matter, much depends on the chosen type of fountain and the size of the reservoir. In order to make a mini fountain at your dacha with your own hands, the easiest way is to use ready-made bowls made of plastic or composite. IN construction stores you can find many various forms and colors.
Advice ! When choosing a bowl for a pond in the country, it is better to give preference composite materials, since they do not have temperature deformation.
In order not to ignore the topic of country mini fountains in a plastic bowl, you can watch the video
But if you plan to have a pond with a large fountain at your dacha, then you will have to make the bowl yourself. The process, of course, will be much more complicated, but as a result you can get exactly what was intended, and not what was offered in the store.
Because, self-production bowls, more difficult than installing a ready-made one, we’ll look at it in more detail a little later. But the selection of elements for the fountain at the dacha has not yet been completed.
Choosing a pump for a country fountain

Unlike a country waterfall or artificial stream, where you just need to raise water through a hose to a certain height, the pump for the fountain must also push the stream to the desired height.
People with technical education, they may well apply the necessary formulas for calculations, and for humanists and simply lovers of country landscape design, we will present several tables that will help make the right choice.
Fountain with cascade nozzle:
Required jet height. cm | ||
|---|---|---|
300 or more | 25 or more | 8000 or more |
Fountain with bell nozzle:
Required bell height. cm | Optimal hose diameter. mm | Pump performance. l/h |
|---|---|---|
Meter or more | 25 or more | 6000 or more |
Geyser type fountain:
Required geyser height. cm | Optimal hose diameter. mm | Pump performance. l/h |
|---|---|---|
80 or more | 25 or more | 7000 or more |
Making a pond at the dacha

Well, the time has come to take up the shovel. Using pre-made markings, a hole of the required size is dug.
Important ! The depth of the pit should be approximately 50 cm greater than the depth of the planned country pond.
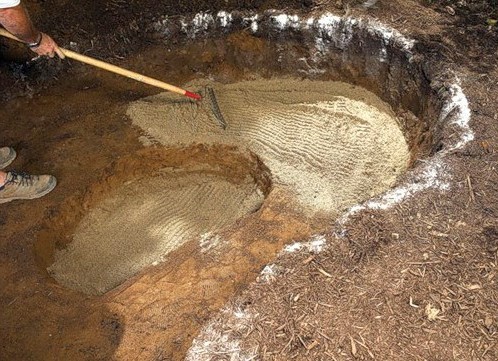
The banks and bottom are compacted with a shovel. Then again there is a choice. You can make an outdoor fountain for your dacha:
- In a concrete bowl. Then, a drainage cushion is poured onto the bottom, flexible formwork is installed and concrete mortar is poured.
- In a “lightweight” bowl, it is more optimal for a country fountain, since people will not swim in it, reinforced walls optional. To do this, small pebbles mixed with sand are poured onto the bottom, and the entire pit is covered with dense polyethylene. The laid film is fixed along the banks with stones, and the bottom is also lined with them. The bowl is ready and needs to be filled with water and checked for leaks.

Important ! All stones used in the “lightweight bowl” must be river stones, that is, rounded and without sharp edges, so as not to tear the film.
A pump is placed at the bottom of the reservoir. As a rule, they have a decent weight, and there is no need to fix them. A spray nozzle is put on the pump outlet hose, and now it needs to be firmly installed in the desired position.

Some models of pumps for fountains in the country are already sold complete, with special spacers, but if they are not there, you can simply clamp the hose with several stones, but in such a way that it is not pressed and nothing interferes with the free passage of water.
Before you start decorating, you need to check the operation of the pump and adjust the fountain.
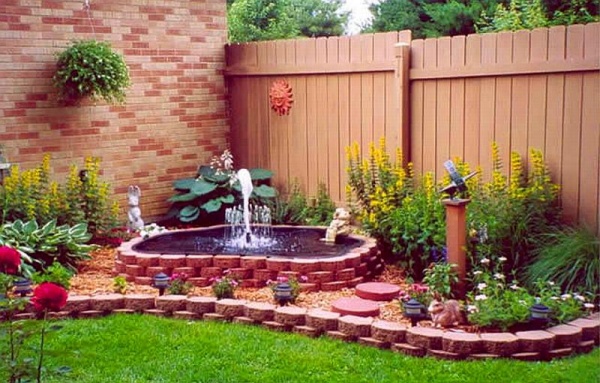
Decorating a country fountain
There are practically no restrictions in this matter. Complete freedom of imagination. And if compositions made of polystone were chosen for the fountain at the dacha, then it does not need additional decoration at all. Such fountains are more laconic and less demanding to maintain.

And when creating a reservoir that claims to be natural, you should adhere to a few simple rules:
- The stones in a country fountain should be one, or maximum two, types. There are no places in nature with a pile of stones different colors and forms.
- Plants for the fountain should be selected especially carefully. They should not be afraid of being hit by jets of water. It is better not to use bright coastal flowers, but to give preference to those for which water is a natural environment habitat.
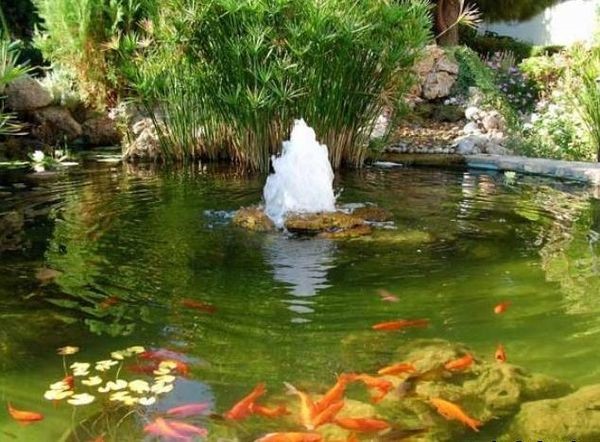
- If it is decided to place fish in a fountain at the dacha, then they must calmly tolerate the falling water and its noise. Some fish that live in lakes and rivers become nervous when they hear splashes.
Lighting
In addition to plants, stones and fish, multi-colored lighting is often used to decorate a country fountain. These could be solar lanterns along the banks, which gain energy during the day and then release it all night, or special waterproof lamps that can be installed directly on the bottom of the reservoir. This decor looks very impressive.
You can also use LED strips; they are installed along the banks, emphasizing the contours of the fountain. The soft glow of small diode lamps does not look intrusive, but it is enough for illumination in the dark.
Conclusion
Having understood in detail the question of how to make a fountain at the dacha with your own hands, it becomes clear that there are not as many difficulties as it might seem at the very beginning. And the presence of such a decorative element on your own site will transform it beyond recognition.
Beautiful is not always a synonym for the words expensive and difficult.
This article is about how to make a fountain in your country house with your own hands. We have to decide what equipment is needed to set it up; purchase everything you need; finally, all devices and materials will need to be combined into a coherent composition with attractive design. So, let's go.
Components of success
Obviously, making a fountain flow is too wasteful: drinking water It’s not cheap, and its disposal in the simplest and most obvious way will mean an abundance of dirt and puddles on the site. Our choice is a closed system, in which recirculation is provided by a pump.
What will be needed to organize it?
- Capacity It should be large enough so as not to require frequent replenishment of the water supply: the main problem of mini-fountains is precisely that due to evaporation and splashing, the miniature pond rapidly becomes shallow.
- Area around the container, ensuring the absence of puddles in windy weather.

Please note: the site should have a slight slope towards the center.
In this case, the water from the wind-blown stream will be properly returned for recirculation.
- Power supply. Powerful pumps are powered by 220 volts, so to connect them you only need to ensure that the cable connections are sealed and protected from mechanical damage. Low capacity applications may require a converter with 12 volt DC output.
- The pump itself. Technically, nothing prevents you from using any drainage; however, specialized devices look much more preferable - fortunately, their price starts from a little over a thousand rubles.
- Decorative design. In most cases, the fountain is decorated natural stone- boulders placed on the bottom and around the container; however, the reader’s imagination may well suggest unconventional solutions.
Gift - to the studio
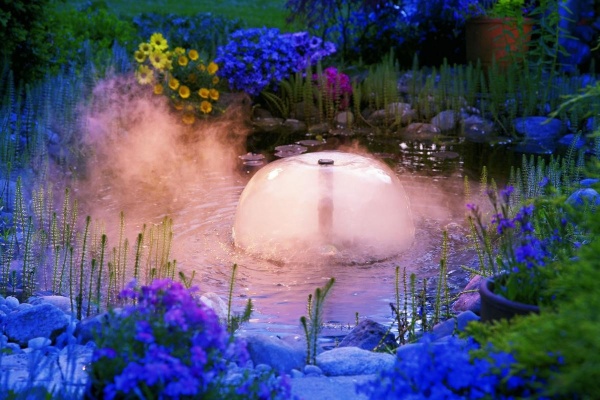
Aren't you scared by the front of work? For those who find a significant amount of work burdensome, the current market can offer ready-made solution, and quite inexpensive. Garden and country fountains made of polystone simply need to be installed on a flat surface, pour water into the container and turn on the power.

Perhaps an unfamiliar term needs clarification. What is polystone?
The origin of the term is obvious: poly - from “polymer”, stone - a transcription of the English “stone” (stone).
The exact composition of the material is not widely available and is probably a trade secret of the manufacturer, the Chinese company Acrilica; however, since it is marketed as an acrylic stone, it is not difficult to guess the main components.
- Aluminum trihydrate Al(OH)3 (more precisely, white clay consisting of a little less than entirely of it).
- Acrylic resin (in solid form, better known to us as plexiglass).
- Mineral pigments that give artificial stone kind of natural.
Since our material is a typical thermoplastic that can be molded (as well as glued, cut and sanded), products can be made from it as desired complex shape. How is it different from natural stone?
The cost of products starts from approximately 1,500 rubles.
Please note: many manufacturers supply inferior price category without pump included.
Purchases and their application
For those who resisted the temptation and want to build a country fountain with their own hands, let’s continue. As always, the big job starts with shopping; In the process of discussing purchases, we will inevitably touch on their use.
Capacity
The most obvious solution is small garden pond made of polyvinyl chloride. These products are manufactured in any shape and size; typical color the inner surface is black. The pond can be of constant height or stepped.

Plan B - use regular old bath. The outlet is plugged with a plug placed on the sealant; the inner surface is etched oxalic acid and can be painted with any waterproof black paint.
Platform and drainage
Obviously, you will have to dig a small pit under the container. However, do not rush to put it on the bottom: first you need to fill the pit with 10-15 centimeters of sand, screenings or small crushed stone.
For what?
- The bedding will provide drainage. After rain, the container will not be immersed in liquid mud.
- In addition, crushed stone and sand are non-heaving soils. Water freezing in cold weather will not push the container to the surface.
Please note: backfill It is also better to do it with sand or crushed stone.
An even more practical option is to backfill with a mixture of cement and sand in a ratio of 1:5: in this case, the pond will be surrounded by a strong and rigid frame that prevents any external influences.
It is not difficult to provide a slope towards the container; but how to make the soil surface impermeable to water?
The most obvious solution is concreting the site followed by ironing (the set concrete is sprinkled with dry cement). As an option, flat stones can be pressed into freshly laid concrete, imitating the natural topography.

Nutrition
The power cable is laid at a shallow depth in metal-plastic pipe with a diameter of 16 mm. It has sufficient rigidity and is covered with a dielectric on both sides - external and internal.
For low-voltage pumps, a low-power transformer is installed in the house for LED lighting systems. These devices are inexpensive and have high efficiency and practically do not heat up.
How to splice a cable in a section laid in the ground?
- We clean the general insulation and conductors.
- We put a heat shrink tube on each of the cores. Another one, of a larger cross-section, is for the cable itself.
- We twist or, better yet, solder the wires and heat shrink them with a hairdryer or lighter.
- Apply a little silicone sealant to the area with the general insulation stripped.
- We slide the thick heat shrink and warm it up. The resulting connection is absolutely sealed.

Pump
Our choice is a submersible pump with an adjustable spray nozzle. The presence of a tee in front of the nozzle, designed to organize a waterfall, is welcome. Even if it’s not part of your plans, installing fountains in your dacha means draining them for the winter; By connecting a hose to the outlet, you can quickly drain the container.

The photo shows several pumps of different capacities.
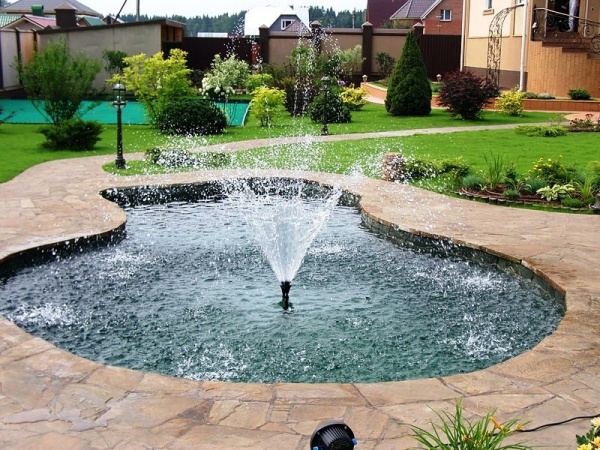
The main problem in choosing a pump is to select its optimal performance. It is linearly related to the expected jet height; for that, in turn, the optimal value is equal to a third of the cross-section of the pond.
Here is a table of the relationship between productivity and jet height for domestic Cascade pumps.
Please note: the jet height depends not only on the performance, but also on the nozzle used.
Don't forget to read the documentation before purchasing.
The pump is installed in the pond on a slight elevation: in this case, it will not become clogged with silt.
Decor
Decoration is a matter of personal preference; imposing your opinion in this area is frankly a thankless task. We can only offer the reader a few ideas that seem interesting.


Conclusion
We hope that the material presented to the reader’s attention will help him decide how to build a fountain in his country house. Good luck!

Even the smallest body of water can decorate your own summer cottage and give it some zest. And a fountain made with your own hands will not only become a favorite place to relax and provide aesthetic pleasure, but will also become a reason for compliments from invited guests.
But not everyone decides to build this mysterious hydraulic device with their own hands. Some summer residents mistakenly believe that building a fountain is a labor-intensive and expensive process and cannot be done without the help of specialists. But every lover of spending time in nature can give themselves such pleasure; the main thing is to know all the nuances of constructing a fountain with your own hands.
There are two types of fountains based on the type of design.
- The open version involves supplying water to the nozzle. The formation of a jet in this version of the device occurs due to changes in water level. In this case, the water pressure is weak, so it is necessary to constantly monitor the water level. In addition, the water in such a fountain becomes polluted quite quickly. To create it, you need to install a small reservoir at a height of about one meter above the nozzle.
- A fountain with a pump installation is the most practical and spectacular option. By placing the pump at the bottom, continuous circulation of water is ensured. Here the pressure is stronger and the visual effect is more beautiful.

By design, pumps that act as fountains are divided into submersible and surface (stationary).


The optimal place to place a fountain
Picking up convenient place For the construction of a fountain, it is recommended to take into account the degree of slope of the ground. If the area is uneven, it is better to place such decoration in a low area. This option for the location of the reservoir will not only allow you to adjust the volumes groundwater, but will increase the oxygen saturation of the air.
- too close to the house so that moisture does not fall on the walls in windy weather;
- in open areas, in order to prevent water from blooming due to sun rays to a body of water;
- near trees so that leaves, seeds, fluff falling from them do not clog it, and roots do not damage the waterproofing.
The fountain must be positioned in such a way that it is not an obstacle to other buildings and is visible from all points. It is recommended to place the structure near the resting place.

The minimum distance that must be maintained between the fountain and plants, buildings, and furniture is 50 cm. This way, the plants will not die from excess moisture, and the furniture will not become unusable. Ideal option for the location of the fountain - partial shade and a place protected from the wind, located close to a source of water and electricity. This arrangement will save you from unnecessary wires and additional work by isolating them.
Having decided on the location, it’s time to think about the shape and depth of the future fountain.
Preparation of materials for construction
To build a fountain in order to save money and effort, you can use construction technology decorative pond with its pump equipment.
Materials required to build a fountain:
- fountain container;
- pumping station;
- durable film;
- bayonet shovel;
- natural stones of various sizes;
- sand, gravel;
- decorative elements.

Selection and installation of capacity
If you plan to build a miniature fountain, you can use an ordinary plastic basin or any other container as a reservoir small size.
For large bodies of water, old bathtubs or a self-dug pit are suitable. If a bathtub is used, it is necessary to dig a hole of such a size that its edges are not higher than the surface of the ground. All holes in the bathtub are securely sealed, after which it is lowered into the pit and strengthened with earth, stones and sand.
For a homemade tank, make a hole of the required depth and cover it with a thick, high-quality film, which is secured along the edges on the surface with stones. Stones of various shapes and sizes are also poured onto the bottom. It is important that the stones do not have sharp edges and cannot cut the film. The stones are evenly distributed throughout the bottom of the future fountain.
Choosing a pump for fountain construction
In order to construct a fountain on your site yourself, it is not necessary to purchase expensive materials; you can adapt any old elements. However, you should not spare money - the pump, the better quality it is, the more beautiful the fountain will be and the longer it will decorate the area without causing problems.
Submersible pump – best option for the construction of a fountain on a summer cottage. It works on the principle of a centrifuge. You can also install surface pump, it is mounted on the edge of a pond, but is most often used on large fountains and cascading ponds.

When choosing a pump, you should take into account the pressure that is constantly present in the pipe and the differences in this pressure. Therefore, purchasing the most powerful pump may not be justified, since not in all cases it will be able to work out its full power.
Regardless of which type of pump is chosen, it is important to remember that its power must be related to the diameter of the pipe. The fountain jet should come out under powerful pressure, and not slowly flow out of the pipe, since there will be no effect from such a design.
How to make a fountain with your own hands: step-by-step instructions
The construction of a fountain includes several main stages:
- pit preparation;
- securing the trench;
- installing a container or covering the bottom and edges with film;
- installation of pumping equipment;
- fountain decoration.

To build such a fountain you will need:
- old tire from truck or tractor;
- cement mixture, water, crushed stone and sand;
- a container for mixing cement and a shovel;
- sealant;
- building level;
- mastic;
- stones;
- pump.
Stages of work:

Video - DIY tire fountain
For such a fountain you will need to prepare:
- thick film;
- shovel;
- sand;
- pump;
- stones different sizes no sharp corners.

Stages of work:
- we dig a hole, clear it of stones and compact the bottom;


New life for an old bath
For this version of a country fountain you need to prepare:
- shovel;
- pebbles;
- pumping equipment;
- bath;
- insulating tape;
- metal scissors;
- non-ferrous iron sheet;
- drill.

Stages of fountain construction:
- we dig a pit corresponding to the size of the existing container;
- place the bath inside and plug all the holes;

- We cut out wide strips of iron and lay them around the bathtub, covering it with stones;


For this sprinkler you will need:
- plastic bottle;
- metal, strong wire or nail;
- insulating tape;
- garden hose.

Stages of constructing a fountain:

- Place the mini-fountain in the right place and turn on the water.
This option is perfect for watering your garden.
Decorative fountain for home
To build such a fountain you will need:
- big flower pot with pallet;
- paints for glass and ceramics;
- small water pump;
- contours;
- decorative balls, aquarium decorations.

Construction stages:
- decorate the pot with paints;
- make a small hole in the bottom of the pot;
- install a pump under the pan;
- we drag the pump tube through the hole made in the pot;
- fill the bottom with pebbles;
- decorate artificial plants and figurines;
- fill the pot with water.
Video - DIY decorative fountain
Fountain decoration
You can emphasize the uniqueness of a hand-made fountain by decorating it. It is recommended to lay out beautiful, colorful stones of different sizes around the pond, put flowers in pots, place cute figurines of animals, birds, etc.
To make the fountain amaze with its beauty and unusualness at night, you can backlight it using special equipment. Lamps installed around the perimeter of the fountain and lighting at its bottom will create a fabulous, magical atmosphere.

The bottom of the reservoir can be landscaped using special plants, plant bushes around the fountain.
Any country pond and fountain, including one, needs careful care. To maintain order and clarity of water and a pleasant spring appearance of the structure, it is necessary to regularly clean the tank. Using special devices, it is necessary to remove leaves, seeds, fluff and other objects from the surface of the water that can not only spoil appearance reservoir, but also lead to a malfunction of the fountain.
Upon completion summer season it is necessary to drain all the water, move the removable parts of the structure indoors, and cover the remaining parts and the bowl with film so that dirt does not get into them.
Building a fountain with your own hands in a country house or even in an apartment will not be difficult and will not require large financial resources. Before building a decorative fountain, you need to decide on the shape, size and installation location. There are many options for the location of such structures - near the gazebo, on the lawn, in the garden. After constructing the fountain, you need to carefully monitor the cleanliness of the water, regularly remove debris and add water, as it will evaporate.
Such designs are widely used in the design of suburban areas. Fountains can decorate any ownerless area or become the highlight of a summer cottage. And by adding imagination and decorative elements, you can make it even more beautiful and unusual.
What could be a better decoration for your garden than a fountain? It's so nice to relax next to him on hot days. summer days, forgetting about the heat, worries and city bustle. Such a device can be purchased at the store, and specialists will install it. But it’s much more interesting to make a fountain at the dacha with your own hands. In this article we will tell you how to make fountains from improvised materials that you will probably find on your site.
Choosing a suitable place
In fact, building a country fountain is not a difficult job and does not require professional skills or expensive materials. But you can bring to life the most daring designer fantasies, and at the same time make good use of things and objects that have fallen into disrepair and are taking up space on your site, but it’s a pity to throw them away. When creating such a fountain you can use:
- stones;
- old tires;
- gas cylinder;
- bath
First of all, before you make a fountain in your dacha, you need to choose a convenient platform. For simplicity, it is advisable to have a water source near this place. It can be natural, but technically it is more convenient for it to be water supply.
The next factor of choice is that the place where the fountain will be located should be visible from any point in the summer cottage, and be located next to the recreation area. The structure should not be an obstacle to other buildings.
For the fountain, choose a place in the recreation area that is close to a source of water and electricity.
It is very important to position the fountain so that it is not in close proximity to plants that are harmed by excess moisture. Carefully calculate, according to the size of your site, the location of buildings, flower beds and fruit and vegetable plantings, and only after that make a decision on the size of the future fountain.
It is better to choose a strictly geometric shape of the reservoir for the fountain. This is the best option for a plot with a small area. Please note that the jets must fall into the pond at a distance of more than 50 cm from furniture and nearby plants, otherwise you will lose both.
The direction of the jets will be determined by the type of nozzle, so choose it according to your taste, but do not forget to take into account the above. Consult with the seller, he will help you in choosing electrical equipment that ensures the operation of the structure.
What do you need to get started?
First you need to know a few basic rules and features construction process, as well as the nuances of choosing devices, tools and materials. There are two simple types of fountains that are easy to use and well suited for a summer cottage.
- An open fountain: in it, water is supplied to a nozzle, and the formation of jets is ensured by a difference in the liquid level. It will require a small container, which must be installed 0.5-1 meter above the level of the nozzle. Since this type provides low water pressure, constant monitoring of the liquid level will be required. Such a fountain has disadvantages: the water quickly becomes contaminated with dust, dirt, etc.
- Fountain with a circular pump: the device sinks to the bottom and ensures constant circulation of water. This is not only the most practical option, it also looks much more effective.
Select suitable pump for your fountain
The pump is the heart of the fountain, necessary equipment for proper functioning, so its selection requires attention. For the conditions of a summer cottage, it is better to choose between two types of pumps.
- Submersible (underwater) pumps. They are installed under water. The liquid is pumped to the nozzle through the filter. It is better to place such a pump on a hill so that you do not have to clean the filters often. This device is inexpensive, easy to install, operates silently and is compact in size.
- Surface pumps are installed on land. The principle of operation is that the device sucks up water and supplies it to the fountain by pumping it through a hose through a filter. Such pumps are expensive, noisy during operation and difficult to install, but they are much more reliable and easier to maintain.
Please note: try to position the fountain so that the power supply network is as close as possible: this will save you from unnecessary wires on the site or work on their insulation.
The magic of stones: step by step
You can choose any shape and any type of fountain, but its construction will be carried out according to the same sequence of work:
- pit preparation;
- securing the trench;
- tank installation;
- pump installation;
- decoration.
If you decide to build a large fountain, you will need a foundation, but for a small structure, a container - a cylinder or a bathtub - will be enough. But be sure to provide an emergency drain at the edge of the surface to avoid water overflow.
To make a pipeline, select plastic pipes: They are not subject to corrosion and can be easily connected with a soldering iron.
A rock fountain may require a foundation
Now let's start building a fountain from stones. To do this you will need the following tools and materials:
- flat stones and cobblestones;
- gravel for drainage;
- pump;
- waterproof bowl;
- copper tube, coupling, PVC tube;
- slats, planks to strengthen the fountain;
- hammer;
- hand saw;
- scissors, pipe cutter;
- insulating tape;
- drill;
- sliding key;
- syringe for sealing seams.
First of all, dig a recess that will be 5 cm deeper than the level of the bowl, as well as a groove for the socket. Pour 5 cm of gravel - it will serve as a drainage layer. Install the bowl, lay the PVC pipe, connect them together. Cover the groove with soil.
Place the pump in the bowl, mark and cut out the outlet holes. Connect the bowl to the tube, add gravel to the bottom, and secure the pump. Place slats and planks on top of the bowl to secure the fountain.
Place the stones on top of each other and mark the places where the holes will be drilled. Once the holes are drilled, string the stones onto the copper pipe.
To decorate the fountain, fill the gaps with small pebbles and the cracks with silicone glue. Now fill the bowl with water, connect the pump, adjust the pressure and enjoy a great fountain!
Old bathtub as a base
Surely you still have acrylic or cast iron bath, which you decided to take for now to the dacha, and over time, figure out where to put it. This time has come - make a fountain with a pond out of it.
For such a fountain you will need:
- stones, cobblestones;
- priming;
- pump;
- bath;
- sheet of iron;
- decor to choose from - sculptures, plants, lighting, etc.;
- iron scissors;
- shovel;
- insulating tape;
- drill;
- others, depending on the chosen decor.
You can find stones anywhere - in a field, by a river, even on your own property; the main thing is that their shape is round or oval. Dig a hole the size of the bathtub, install the bathtub and close all drain holes.
Cut out wide inserts from iron that will protect the seating area from splashes. Lay them down and decorate them with stones.
An acrylic or cast iron bathtub can serve as an excellent base for a fountain
Cover the bottom with small stones. Install lighting if you have provided it. After this, you can fill the bowl with water and finish decorating the fountain if necessary.
Please note: anything can act as decorative elements: plants in pots or planted in the soil, old dishes, buckets, figurines and ceramic figurines, thick tree branches. This is a great opportunity to show your imagination and practice landscape design.
There are many styles in which you can decorate your fountain: country, ethno, antique, baroque. Even if your fountain is very small, focus on a figurine or an antique vase: this will give the structure a unique spirit.
Styles in which you can decorate a fountain
Unnecessary wheels and gas cylinders: how to use them?
Old tires that will never serve their intended purpose again are perfect for making a fountain with a small pond out of them. One wheel is enough, the main thing is that its size matches your recreation area.
- Cut off the top edge of the tire with a jigsaw. It is enough to grab the bending area.
- Dig a hole so that the tire goes halfway into the ground.
- Cement the bottom of the future fountain. Can be used as waterproofing plastic film. Level it properly along the bottom and secure it with outside tires.
- Install a water supply system and install a pump.
- Paint the inner walls of the wheel. If you used film, cover the bottom with a layer of gravel so that the polyethylene is not noticeable.
- Outside on the wheel you need to do decorative coating from stones of different sizes. They can be of any shape, but large flat stones are easier to cover the protruding edges of the tire. Secure them with cement, and when it dries, fill the fountain with water.
Use old tires to create a fountain
Using approximately the same principle, you can make a fountain using an old gas cylinder. You need to decide how to cut it into two equal parts - lengthwise or crosswise. Dig one of these parts into the ground so that the edges protrude 5-8 cm above the soil level. The main steps are the same - supplying water, installing a pump and decorating. You will not need to cement the bottom, but the inside of the cylinder should be cleaned of possible rust and painted.
Such a fountain will look great in a small area due to its size. And it will require fewer decorative elements than other fountains.
Video about building a fountain at your dacha with your own hands
Now you know how you can use a fountain made with my own hands, give summer cottage cozy and original look. Perhaps you know of some other options for such structures, or you have experience in their construction. Share with us in the comments. Easy work and pleasant spring days!
Decorating a site is a favorite pastime of summer residents and homeowners. Beautiful flower beds, flower beds and even beds are a true decoration. However, nothing pleases the eye more than ponds and ponds surrounded by beautiful vegetation. And if a stream of water still comes out of it, then the corner turns into best place rest. If you manage to make not only a fountain with your own hands, but also beautiful lighting, put a swing or bench nearby, in the evenings all the inhabitants will gather on this spot.
This fountain is DIY and so is the lighting: a waterproof LED light with remote control for changing colors
Fountain device
To make a fountain at your dacha you don’t need to spend a lot of money. Of course, it all depends on the size of the reservoir and how you imagine it. Depending on the method of construction, fountains are of closed and open type. We are talking about the cyclical use of water. The closed type uses the same volume of water, driving it in a circle. Open - new all the time. Garden and country fountains are mainly made of a closed type: their design is simpler and more economical. Of course, water has to be added and changed periodically - it evaporates and becomes dirty, but still, the costs are not very high.
When installing an open type system, you will have to think through the water supply system, control of its level, drainage and disposal. You can, of course, use the fountain’s reservoir as a container for heating water before watering, and use the bowl to distribute it throughout the garden, but watering is not needed around the clock, and the fountain can operate in this mode.

Visible plastic container, and the pump is located at the bottom, right in the place where the pipe sticks out of the water
In the very simple version To make a small-sized fountain, you need some kind of sealed container and a submersible pump. Any container can be adapted - a special plastic one for a pond, a barrel, old bath, basin, trimmed tire covered with film, etc. With pumps it’s a little more complicated.
Fountain pumps
Fountain pumps are sold specially, with built-in filters. To make it easier to make a fountain with your own hands, you can buy such models. It’s very easy to work with them: put them in a container, secure it so that it doesn’t move, fill it with water, carry out the starting manipulations (described in the instructions) and turn it on.
There are fountain pumps different power, raise the jet to different heights. Often the kit comes with replaceable nozzles that change the nature of the jet. They are powered from a 220 V network, there are models that operate from solar panels. They are made hermetically, so there will be no problems when connecting, no step-down transformers are needed. The only thing that won’t hurt is an automatic machine and an RCD on the line to which the pump will be connected. This is just in case, to increase security. The price of the smallest and low-power pump for a fountain - $25-30. Productive models cost several hundred or more.
You can use any submersible pump for the fountain. But you need to buy or make a filter for it (you can make a sand filter) and a step-down transformer. A security group from a machine gun and an RCD on the line will not be out of place here either. This circuit is worth tinkering with if you have an old pump that is not currently being used.
How to do it without a pump
Is it possible to make a fountain without a pump? It is possible, but it is open type. For example, bring a water supply pipe into the pond - central or supplying water from a well or borehole. The water coming out under pressure will produce a jet of some height. By installing a tip on the pipe, we can change its shape. But with such a construction, it is necessary to figure out where to divert the water. You can go back to the well or to the river, to the irrigation area, etc. Although with such an organization there is a pump, it pumps water into the house, and the fountain is only one of the flow points.

Scheme of organizing a fountain without a submersible pump
The second option is to place some kind of container at a height, pump water into it, and from there it is supplied through pipes to the fountain located below. To create a more or less decent jet height, the container must be raised 3 meters or higher. But the question remains: how to supply water there. Again using a pump, but no longer submersible. They are cheaper, but require a filter. You will also need a pit in which the equipment is installed. A system of pipes connects it to the bowl of the fountain.
Read how to make a waterfall here.
Fountain lighting
In this area, everything has become easier with the advent of LEDs. They are powered by 12V or 24V, which is much safer than regular power. There are even lamps that run on solar-powered batteries.

Fountain lighting
Illumination can be done using waterproof LED strips or the same spotlights and lamps. To power them, you need an adapter that converts 220 V to 12 or 24 V, but they are usually sold in the same place where LEDs are sold, so there shouldn’t be any problems. Installation is simple: the spotlights have mounting brackets, the tape can be “shot” with a stapler, you just need to find the brackets more sizes tape: there is no need to punch it, so as not to break the tightness.

There are LEDs that change color. Shades from 8 to several thousand
Schemes of fountains of different configurations and photos of their design
Surely you know that the main component of a fountain is its bowl. In essence, this is the same pond, but with additional equipment - a pump. A pond can be made with at least a dozen different ways and some of them are described in a separate article, because we will not describe how to make a bowl for a pool. We will pay maximum attention to the organization of fountains and their decor.
Small fountain
The device requires a container and a pump. Decoration is put on the tube that comes from the pump. These can be slabs of stone, in which it is necessary to drill and unscrew, with a diameter of slightly larger diameter pipes. These slabs are strung on top of each other like a children's pyramid.

Scheme of organizing a decorative fountain for a summer residence
To avoid overflow of water, it is necessary to provide a drainage system - just below the maximum level, cut a pipe into the container, the second edge of which is led into the sewer, drainage system or to the garden. You can do it another way: arrange a water collector around the bowl - make a concrete groove or dig in a plastic one. Collected water also take it somewhere. Usually in closed systems the problem is not overflow, but a lack of water - it evaporates, but you can play it safe.
DIY fountain: photo report 1
And now a photo report of how a mini-fountain was made with your own hands according to this scheme. It turned out interesting.

This decorative fountain took several hours to create.
To make this fountain you needed:
- square plastic flowerpot for flowers without holes;
- small fountain pump;
- a plastic pipe 0.7 m long, the diameter is such that it fits over the pump outlet;
- a bag of decorative pebbles;
- three bricks;
- red granite sawn into slabs.
From the tool - drilling machine to drill holes in granite with a diameter slightly larger than the diameter of the pipe.

Installing a fountain container
We install a bowl in the prepared hole and place bricks in it, closer to the edges. They are needed for the stability of the structure and to reduce the amount of pebbles. They also serve as support for the stone structure. Between installed bricks We install the pump with the tube on, fill it with water and check how it works.
Holes were pre-drilled in the slabs in the workshop. They should be located approximately in the center so that the weight of the stones does not overturn the structure.

Folding the fountain
The first slab rests on lying bricks, the rest are strung so that the center of gravity does not shift. Having laid the first one, we fill the remaining space with pebbles. After the last piece is laid, a mark is made on the pipe. The very last stone is removed, the pipe is cut down just below the mark, then the last fragment is returned to its place. When the water is turned on, it seems to come straight out of the stone. Very unusual and uncomplicated.
Photo report 2
The next version of a small fountain is made according to the same principle, only instead of a pipe it is used flexible hose, and instead of a stone - driftwood. The effect was simply wonderful.

Making a small fountain with your own hands
Everything is so clear that there is no need for comments. It differs from the previous design only in the presence of a mesh. This is to increase the volume of water: the tray is small in size.

Fountain decoration
Until you see it, it’s hard to imagine how easy it is to make amazingly beautiful things. As for pipes, it is better to use polyethylene pipes - they bend well and are not afraid of ultraviolet radiation.
How to make a fountain from a tire, see the video report.
Room or tabletop
Mini-fountains are made according to the same principle, only they use very low-power pumps. Suitable even for aquariums, but without aeration. They even work almost silently. We will make a fountain in the Japanese style. In addition to the pump, you will need a small ceramic container for this. In our case, oval made of baked clay. A piece of bamboo - about 70 cm long (bought in flower shop, sold as a support for climbing plants), a bunch of living growing bamboo and some small pebbles. From all this comes such beauty.

Do-it-yourself home mini fountain
First of all, cut a piece of bamboo into pieces of different lengths. It's hollow inside natural pipes, which also do not rot for a long time. One of the sides should have an oblique cut, the other should have an even cut. You cut it so that the longest piece near the evenly cut end has a “joint”. The lower incision goes approximately 5 mm below this thickening. There is simply a partition inside, with its help it will be easy to attach this segment to the pump outlet. It is difficult to cut, but I managed to saw through the thin trunk with a metal blade.

We cut bamboo into three pieces of different lengths
We put a small pump in the vessel, put the longest piece of bamboo on it - its length is about 35 cm. On the other side we put a bunch of living bamboo, filling the space between them with pebbles.

Filling the mini fountain
We tie the two remaining pieces of dry bamboo to our “pipe”. You can use hemp rope. That's all, we made a mini fountain with our own hands. All that remains is to add water and turn on the pump.
Other models can be made using the same principle. Now you understand how and it will be easy to change the design. A few photos for inspiration.

Another indoor bamboo fountain in Japanese style

Outdoor fountain made of granite bowl and bamboo
Another type, more traditional and familiar to us, uses almost the same idea and the same tools. The difference is in the design. You can take a large ceramic one or even plastic pot. It is only important that it has no holes for drainage. Then it’s a matter of technique: divide it with a plastic partition into two or three zones, pour it into one more soil and plant one of the moisture-loving plants.

How to make a mini fountain
The second part will be the reservoir. Only when organizing circulation is multi-stage filtration necessary: the water becomes very polluted. Therefore, glasses made of filter materials with different meshes are inserted one after another - first - a wire or plastic mesh, then - fabric with different meshes, and inside this structure - a small pump.

Tabletop mini fountain
You can make with your own hands not only the composition of such a tabletop fountain, but also a pump. How? Watch the video.
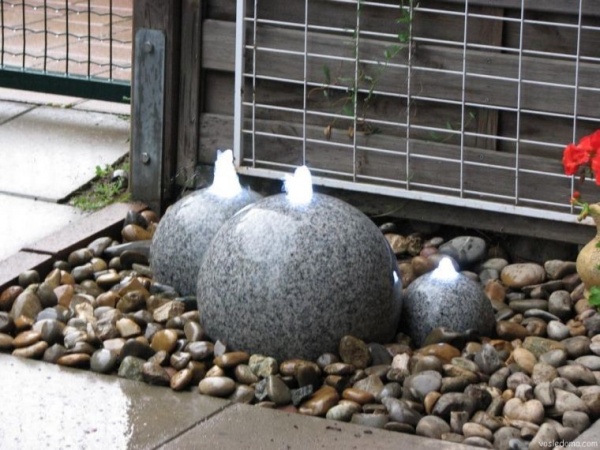
Pebble fountain
The fountains with pebbles have a very interesting design. Their bowl is disguised, so it looks like a dry fountain, without a bowl. In fact, there is a bowl, but it is decorated with pebbles, which are laid on a mesh covering the tank.

Dry pebble fountain - device diagram
A container is installed in the dug pit. Its volume and size should be quite decent: to collect all the splashes, or at least most of them. Place a pump in the container and cover the top with a metal or plastic mesh with a fine mesh. It serves to protect against large contaminants getting into the water, and a thick wire mesh can be laid on top of this fine mesh. This is if you use pebbles. If you will lay stone slabs, you can use boards or bars.

How to make a “dry” fountain with your own hands
With pebbles, it’s probably better to do the opposite: first lay a mesh with a large cell as a base, and on top of it with a small one. This way you won’t have to worry about choosing large pebbles, and debris won’t get into the water.

Rockery with a source - this is what this fountain might look like

To decorate a garden in modern style this option would be more suitable
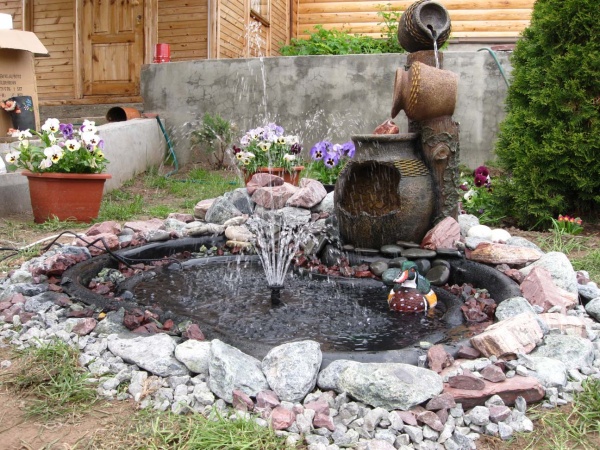
If you use your imagination, you can come up with very interesting compositions based on this. For example, one of the options with a garden watering can. If your garden is designed in classic style, a fountain made from a watering can will hardly fit well, but it will fit very well into the country style.

Watering can garden fountain
As you can see, water is collected in the same vessel, hidden under pebbles, and from there it is pumped into a watering can with a small pump.
Against the wall
This classic version- a small or large stream of water runs from the wall, flowing into the bowl. As you may have guessed, there is a pump in the bowl that supplies water through a pipe to the water outlet point. It's simple if you know how. It's just a matter of implementation and decoration.

Scheme of organizing a waterfall near the wall
To prevent the pump from floating, it is screwed to some kind of heavy plate. At least for the sidewalk, as long as the size fits. The case usually has corresponding holes for mounting, but when choosing, you should pay attention to this.

Classic design of wall fountain
If you plan to do something similar near the wall of a house or fence, take care of its waterproofing. Even if the water does not flow down the wall, splashes will fall on it and the humidity will be increased. At a minimum, it is necessary to coat it several times with a hydrophobic compound. Try to find one that doesn't change the color of the surface too much.

Another option for a fountain against the wall
The design style may be different. At the top bowl they do flat surface, from which water flows off like a wall. The effect is very interesting. It is important that the surface from which the water falls is mirror-smooth and absolutely horizontal.

Beautiful fountain for a garden in a minimalist or modern style
Fountain-cascade
The iridescent jets look very interesting. Fountains of this type are called cascades or cascading. With this organization, water is poured from one bowl to another. In the case of a country or garden fountain, you can come up with interesting shapes. For example, a fountain made from buckets, watering cans, teapots and even old garden carts.

Fountain cascade of garden carts
The principle of organizing such a cascade is simple: several vessels or bowls mounted above each other so that a stream of water flows from one to the other. At the bottom is the largest tank, where the pump is located. He delivers water through a hose to the highest of the vessels.

Another decorative garden fountain
How to make a fountain bowl
If you need classic shape- a round, square or oval bowl from which a stream of water flows; the easiest way to find a suitable plastic tank. They come in different shapes and volumes - from tens of liters to several tons. In color they are mainly black and blue. Although it seems that for our purposes it is better to take a blue color, keep in mind that against such a background the pollution is more visible. To prevent your fountain from looking like a swamp, you will have to clean this bowl often. From this point of view, it is more practical to take black - the water looks the same, but you need to wash it less often.

Garden fountain made of plastic bowl
The selected tank can either be buried flush with the ground level, or left with a side. Most often, the sides are decorated with stone or pebbles. Depending on this, choose the depth of the pit. It is dug out and is slightly larger than a bowl.
You can read about how and what to decorate your site here.
When the required depth is reached, all stones, roots, snags are removed, the bottom is leveled, compacted, sand is added in a layer of about 10 cm. It is well leveled and spilled so that it becomes compacted. Place the bowl on the prepared base and fill it with water. Sand or soil is poured into the gap between the walls of the bowl and the pit. Sand - if the soil is clayey, and soil - if it drains normally. Having filled in a small layer, it is compacted - carefully, using a pole or deck to get into the gap to be filled. But no matter how well you compact, be prepared for the fact that in a couple of weeks you will have to add more: the soil will shrink by several centimeters.

The bowl protrudes above the ground level
You can do without a plastic bowl. There are two other options: make a tank from monolithic concrete. In this case, you can make a fountain with sides. The process is long and expensive, and you also need to worry about waterproofing.
Most cheap option— dig a pit and line it with film. In principle, any polyethylene will do. high density, but it will last a year, maybe two. Then it begins to let water through. Special films for swimming pools are more reliable in this regard, but they cost a lot of money, but can be used for years. The manufacturing technology of such a fountain bowl is captured in the photo.

Pit marking and excavation work
The first stage is digging a pit and leveling the walls. After the required shape and dimensions are achieved, the horizontal areas are leveled and covered with a layer of sand. It will protect the film from possible damage.
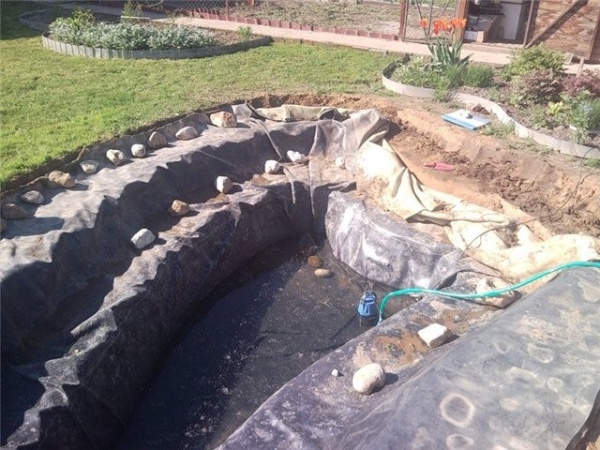
We lay the film in the finished pit. It should lie inside without tension, freely. Its edges are covered with soil and pressed down with boulders. To prevent plant roots from growing through the film, it is not advisable to lay geotextiles underneath. This non-woven fabric, very tensile strength. It is used when laying roads to prevent the soil from being crushed and trees from sprouting. So she can protect the fountain without difficulty.

Laying film in the pit
Boulders are laid out on the laid film. If the pit is stepped, boulders should lie on each step. When the design of the bowl is almost complete, a pump is installed. The bowl is filled with water and the bowl is tested for leaks and pump performance.

The film laid in the pit is decorated with boulders. After installing the pump
Actually, that’s it, if the electricity is supplied, you can start the fountain.
Photo design ideas


, Islam, Judaism How do temples of different religions differ")


