The pond in the garden is a wonderful place to relax on a hot summer day. Those lucky ones whose dachas are located on the banks of a river or lake are incredibly lucky. If there is no natural reservoir nearby, you will have to build an artificial pond yourself.
We outline an action plan
To begin with, let's try to figure out where to place a man-made reservoir in the country. It is advisable to take a place for him at the stage of designing a summer cottage.

Photo: marking the territory for a decorative pond on the site
Users often search:
The pond must meet the following criteria:
- be in an open place - foliage and branches from trees will clog the water, and the roots will damage the artificial bottom of the pond;
- do not fall under prolonged exposure to direct sunlight - constantly heated water provokes the rapid development of microorganisms and algae. The pond will quickly become cloudy and begin to exude an unpleasant musty smell.

Photo: a small pond on a site with a wooden bridge
It would be useful to provide for the option of expanding the surface of the man-made lake over time. Perhaps you want to transform a mini-pond into a full-fledged water complex - with a bridge and a small fountain.


Experienced builders recommend making the pond shallow - after all, it is used mainly as a beautiful detail of the surrounding landscape. In addition, immediately think about how you are going to care for the pond. Make a convenient approach to the pond - of course, not through the garden or alpine slides.
You will have to change the water yourself, because it is not purified naturally, as in natural lakes and rivers. Therefore, make sure that the tap in the country is in close proximity to the artificial reservoir.


Choosing a base material
Before you grab a shovel, decide what will serve as the basis for an artificial pond. There are several standard solutions. Consider the advantages and disadvantages of popular options.
Reinforced concrete structure
With this material, you can create a durable pond. The bottom and banks, filled with concrete and reinforced with reinforcement, will withstand various additional loads - the installation of a fountain, for example, or sculptural compositions on the banks.
The complexity of the process makes it impractical to use this technology for the construction of small ponds or decorative ponds in the country. The negative aspects of such a solution include the high cost of building man-made lakes from reinforced concrete. You will have to use a lot of building materials, rent special equipment. The dismantling of the structure will also cause difficulties, so it is immediately necessary to carefully consider the location of the pond.


PVC film
This is a budget solution for creating a simple country pond. The shape and depth of such a structure is easy to change, you can also expand or reduce the size. A pond with a PVC base is often made seasonal - for example, they fall asleep for the winter and re-equip in the spring.
The disadvantages of such a solution include the fragility and fragility of the film coating - this material can be easily damaged, and if the tightness is broken, the water from the pond will quickly go into the ground. Therefore, swimming or indulging in such home lakes is not recommended, they are intended to decorate a summer cottage.

Photo: decorative pond with a bridge in the landscape design of a summer cottage
Artificial shop ponds
This option is the golden mean for those who dream of their own pond and at the same time do not want to bother with the materials to create it. Shop forms for artificial reservoirs are made from strong and durable materials - PVC or fiberglass.
The latter option is much more expensive. But the cost of such a product is fully offset by the high performance of the material. It is easy to install such a form on your own, without involving friends or acquaintances in the process. The disadvantage of the option is that the pit will have to be dug under the form, and not vice versa.
In this case, the opportunity to use the unevenness of the relief to create natural coastal outlines is lost. In addition, the method will cost much more than using a film or improvised materials. The photo below shows a finished form for arranging a pond in the country.

We make a reservoir from improvised materials
Another interesting option is the use of various containers that have become unusable. Old cast-iron bathtubs, troughs, vagans - all unnecessary containers will come in handy for construction.
The advantages of this method are that you do not have to buy standard forms or build bulky reinforced concrete structures. The disadvantages include the low decorativeness of old containers - you will have to show imagination and skills in order to make, for example, a small Japanese-style pond out of a dilapidated trough.
Mini pond of tires
For those who have a catastrophic lack of space in the country, craftsmen recommend using a simple and convenient tire pond. The old car tires are dug in, a film is laid inside, and the banks of the mini-reservoir are drawn up at their own request.


The result obtained sometimes surprises even experienced landscape designers - a finished pond in the country becomes an exclusive detail of the backyard. For example, who will say that this pond in the photo is made from an old car tire?
foundation pit
After the material is selected, it is time to start excavation. It is best to do this in the summer, when the groundwater leaves as much as possible. The depth of the pit is calculated based on the material chosen as the basis. If this is a finished form or an old bath, they dig a pit 20-30 cm deeper than the tank parameters.
If the construction of a PVC film pond is planned, it will be necessary to dig to a depth of about 80 cm, since a shallow reservoir will completely freeze in winter and dry quickly in the summer heat. For reinforced concrete ponds, they dig a pit with a depth of more than one and a half meters - here you can’t do without special equipment.

Film reservoir construction technology
When the pit is ready, it remains to clean the bottom and make small terraces about a third of a meter deep and up to 20 cm wide on the sides of the future mini-lake. The bottom of the reservoir is compacted, stones, rubble, pebbles, and foreign objects are removed. The cleaned surface of the pit is sprinkled with washed sand and lined with a geotextile. Such preparation of the bottom will significantly increase the strength and service life of the coating.
The next step is the laying of the film. The size of the canvas is calculated as follows: it is necessary to add the length of the coastline to twice the depth of the reservoir. The material is fixed on the terraces with a margin of about 50 cm. The laid film is laid with bricks or stones - this is done to preserve the shape.


Then they fill the pond with water, check the tightness of the film and begin work on the design of the coastline. Do not cut off the remaining film under the bricks too quickly. It will serve as a hydro-sealant during the construction of the blind area.
We build a pond from an old tank
To equip a country mini-lake from an unnecessary bath or other container, you will need:
- a piece of chain-link mesh;
- some rubble;
- decorative stones;
- coil of aluminum or steel wire;
- cement, sand or ready mix concrete.
After the pit is dug and a bath is installed in it (30 centimeters below ground level), they begin to equip the coastline. To do this, along the entire perimeter of the future pond, the top layer of soil with a width of at least 40 cm is removed and a trench is dug, the depth of which reaches the upper edge of the installed container.

To give naturalness to the man-made lake, tile glue is applied to the bottom and walls of the bath. After processing, the container is allowed to dry well - usually this takes at least two days.
Then, a chain-link mesh is laid around the entire perimeter of the bath, which is necessary to reinforce the sides and bottom of the pond. A concrete mortar or a sand-cement mixture is applied to it and allowed to dry. Then comes the turn of the decorative design of the banks: planting plants, decorating with stones, paving paths, installing figures and other design techniques.
Thematic material:
Pond from the finished mold
The pit prepared for the reservoir is cleaned from branches, piles of earth and other debris. The bottom and walls of the pit are rammed. If the countryside has too loose soils, they are strengthened. For the finished form, a perfectly flat surface of the pit is important. The plane is leveled with a building level.
The bottom of the future pond is covered with clean washed sand, which is also compacted. This layer ensures the integrity of the finished form.

After that, the container is placed in a pit and filled with water. Empty spaces between the sides of the mold and the walls of the pit are filled with sand, and this is done gradually. First, a layer of 25-30 cm thick is poured and watered. After a uniform distribution of sand, the actions are repeated until the space between the installed bowl and the walls of the pit is completely filled.
Carrying out this procedure is mandatory, since the form for an artificial reservoir is quite fragile and easily deformed. Even pressure from all sides will prevent warping.
After 24 hours, the gap between the sides of the tank and the walls of the pit is checked: if there are voids, sand is added to them. Then the water is pumped out of the pond, the mold is finally washed and filled with clean water.
The final stage is the decoration of the finished mini-lake at your discretion. There are no strict rules and trends here. Just make sure that the country pond brings pleasure and joy. After all, that's what it's set up for.
Most owners of summer cottages or country houses dream of equipping it with an artificial reservoir, thereby making it more interesting and attractive. But, the arrangement of such a zone requires certain knowledge, where to place it, how to provide water, how to clean it, and so on. Our article is just for those who have more questions than answers.
Artificial reservoir on the site, features
Finished plastic pond tank
Ready pond
The finished pond is a plastic form that needs to be dug into the ground or installed on a special frame in your backyard. Let's look at the pros and cons of buying it.
Advantages | disadvantages |
Availability | Limited shapes and sizes |
Durability | The fragility of the form itself |
Ease of installation | Lack of naturalness |
Ease of maintenance |
A more complex option, but the possible forms of such a pond are endless.
It can be either a complex concrete structure, or simply a pit dug in the ground, lined with pebbles or a special butyl rubber film to provide waterproofing.
The advantages of such a device are:
- unlimited choice of shape, depth and size,
- creating the effect of a natural zone,
- a huge selection of ways and methods of decorating.
This method of building a reservoir has its drawbacks. The main drawback is the time, it takes much more than, for example, to dig in a finished plastic mold.
To carry out such work, you need to have experience and the right equipment. Often this option will cost much more, as materials will be needed, plus the masters will take money for the work.
Do-it-yourself artificial pond on the site is real, 7 stages
If you decide to build a pond, you can do it yourself, with little experience in construction, desire and imagination. The whole process can be conditionally divided into seven successive stages.
We perform markup
You can get started by deciding on the size, depth and style of the zone.
We prepare the pit
We dig a pit according to a given markup, taking into account multi-level depth
Having decided on the location of our reservoir, following the tips described above, we begin to dig a pit. To do this, we first clean the area from all unnecessary and markup. You can dig with a shovel, in the process removing stones, roots, someone's treasure, and so on from the ground, so that this soil can be used in the future.
The depth of the pond can be made single-level or several levels. The coastal part is less deep than the central one, creating a cascading effect. There may be several such cascades. We distribute the depth:
- The coastal part is from 10 cm to 40 cm. Plants can be placed here.
- Shallow water - from 40 cm to 100 cm. Deeper plants can be placed here. Lay out the pebbles.
- Deep-water part - from 100 and above. This zone is necessary if fish will live in the pond. It can be laid out with larger stones. The area of such a part should be approximately 30% of the total pond area.
It is desirable to level the coastal part with a level. You can use laser or water. In this case, the water level will be uniform around the entire perimeter.
Choosing a base material
The bottom of the pit must be closed with something, waterproofed from the ground, otherwise the pond will quickly silt up. There are several options for arranging this part, choose the appropriate one:
Pond concreting
concreting, reliable, but expensive and long way. It is not difficult to implement it being a specialist in monolithic works. I choose this option, as a rule, for large reservoirs or pools. Only hardened concrete mortars are used, more details about which can be found here.
plastic mold. This is a fast device method that can significantly shorten the entire process. This form is placed in a pit, the remaining voids are filled with soil or sand.
Mini ponds can be made from improvised materials: an old bathtub, a barrel or even a basin. According to the installation technology, they are identical to the installation of a plastic mold.
Filter installation diagram
Buy a cleaning filter in a specialized store. It can be pressurized and non-pressure, they differ in the way they work, pressure filters more quickly. An effective way to clean, but professional models can cost a lot of money. They can be disguised as sculptures, decorative boats or amphorae. The disadvantage of this method is the increased stress for the inhabitants of the reservoir.
Plants for a water treatment pond. They also purify water, less effectively and for a longer time, but in a natural way. The following will fit:
- blotnotsvetnik (nymphaeum);
- nymphea or water lily;
- vodokras ordinary;
- yellow capsule;
- urut (pinnate);
- eichornia;
- vodokras;
- pondweed;
- hornwort;
- duckweed;
- aponogeton.
It is not difficult to buy all these plants in the store. They will also tell you how to properly plant them and how to care for them. However, many plants will die when the temperature drops, which is simply unavoidable in our climate zone.
Fish in the pond
Launching the fish. If you still decide to do this, you need to choose climate-adapted species. It is better not to experiment and immediately consult a specialist. Keep in mind that the fish will need to be fed, so consider whether you need them.
It is impossible to launch fish immediately after filling the reservoir with water, need to wait some time, 3 to 7 days until the microclimate is formed.
An inverted aquarium in a pond, now the fish are watching us
Making lighting. This is a rather spectacular element of decor, but requires some care, as it involves the use of electricity next to water. It is best to entrust this work to an experienced electrician.
 You can independently put autonomous solar-powered lamps around the pond. Their choice is quite large, they do not require a network connection and installation is very fast.
Nearby you can equip a patio area or a gazebo. Both one and the second option are perfect for enjoying the freshness and beauty of the pond.
Video lessons
Pond care
Even if you have installed automatic pumping and cleaning pumps, you still need to monitor the pond. Excess plants should be removed, the surface of the water should be cleaned of debris and leaves. Keep an eye on the fish: remove sick individuals or very large ones, for which this reservoir has already become small in size.
Periodically, 1-2 times a year, it is necessary to clean the bottom of the pond with a water vacuum cleaner from silt. This can be done without pumping out water, if the technical features of the apparatus allow and it is convenient to do this from the shore.
Water has always attracted people. That is why many people are thinking about how to make a mini-pond in the country with their own hands, because then landscape design will have its own zest. Being near water is natural for a person. You can relax on the shore, run fish into the water, make a fountain or waterfall.
The tradition of decorating areas near the house with ponds came to us from the East. But let's not consider simple stone bowls in the yard. After all, we are interested in the integration of the pond into the design of the site. So East. There are 2 design options: Chinese and Japanese. In China, a mini-pond was a pond richly decorated with lush plants. It looked like a piece of wilderness. In Japan, ponds were decorated differently - in the style of minimalism. Having adopted this tradition, European designers began to make ponds in their own way. Often they were of the correct geometric shape. Which style to choose is a matter of taste for each owner.

There are no fundamental differences in the construction of reservoirs, so this material will be useful, no matter what style you choose for your structure. It can be a traditional Chinese or Japanese mini-pond or a high-tech creation. Creating a pond is fun and you can get all your family members involved in it. This is especially true for the design. Well, if you start the fish, then the children will be happy to feed them. The only thing not recommended to do in the pond is to swim. This is what the pool is for.
Pond construction
Just like in any other construction, you need to choose the right place. Do not build a reservoir where the water will be under the sun all day. Plants will wither from excess sunlight, and algae in the water will multiply intensively, and the pond will overgrow. At the same time, if you make a pond on the shady side of the site, this will adversely affect plant growth. The best option is when the sun's rays illuminate the pond for at least 5 hours a day. A mini-pond should not be located near trees. When making a pond in the garden with your own hands, keep in mind that in the fall all the fallen leaves will be in the water and rot. In addition, overgrown tree roots can damage the bowl, even if you make it out of concrete. Such a garden pond should be located at some distance from the trees. As a last resort, choose a place where old trees grow, cut them down, remove the stumps and use this place for a pond in the garden.
You should be able to admire your creation. What good will be in the reservoir if it is located in the depth of the site and it will not be visible? It is good to have a pond near the garden gazebo or terrace of the house. Or set up a comfortable bench on the shore so that you can sit and enjoy the beauty.

You need to choose the size of the reservoir. There are also recommendations here, according to which the pond occupies 3% of the site. This is the best option. However, not all people who want to decorate their site in this way follow it. Often they make mini-ponds from old bathtubs or even basins. They also construct a pond from a tire. Well, lovers of large reservoirs spend a lot of effort to dig the appropriate pit. Or they make two ponds and a small river channel connecting two reservoirs. This is a personal matter for everyone. In any case, no matter what kind of reservoir you are planning to make, look at the different options for how you can make a pond in the country with your own hands, the photo will help you with this.
After choosing a place, start digging a pit. Marking can be done with a regular rope. If the volume of work is large, it will be more rational to use the labor of hired workers or an excavator. Well, you can dig a small pond yourself. But before you take out the ground, you need to decide how you will make a reservoir. There are different options. You can install formwork and fill the walls and bottom of the pit with concrete with the addition of liquid glass for waterproofing. Or buy an annual plastic pond tank and dig a hole for it. And you can use the most budget option - PVC film, which will cover the bottom and walls of the pit.
The pit is dug in ledges (usually 2-3). Plants are then planted on them. It is not recommended to make the deepest place of the pit deeper than 1.5-1.8 m. The pond should not be made too shallow, as in this case the water will be very warm by the sun. Some owners drain it for the winter, while others do not. Usually water is left if fish are released into the pond. If the depth of the pit is normal, then they hibernate in the deepest place. Well, if the bowl is too shallow, then the water freezes in winter and the fish die.

So, a pit for a small pond was dug. What's next? It is necessary to seal the walls and bottom. Consider the option with PVC film as the most budgetary.
It is recommended to work with the film in the warm season, when it is most elastic. A thick layer of sand is poured on the bottom of the pit and on the terraces and compacted. A film is placed on it. Sand is needed in order not to accidentally damage the material with sharp stones or plant roots in the ground. The film will serve as an excellent waterproofing that does not allow water to go into the soil. On the surface of the earth, around the pit, the film is folded and pressed down with large stones. By decorating this garden pond, you will arrange the stones more beautifully, but for now, you need to finish with the bowl. When the film is laid, it is recommended to pour a layer of sand on it. If the plants on the terraces will be planted in the ground, then you need to fill in the ground, but it is much easier to plant plants in pots.
Another point that must be taken into account when building a mini-pond is that the water must be flowing. So you have to spend much less effort on cleaning the bowl and replacing the water. Making water circulate is easy enough. It is necessary to install a submersible pump in the pond. The water supplied through the hose will pass through the filter and drain back into the bowl. When making a pond in the country, you can choose any design for the drain. It can be a stream flowing down from a nearby alpine hill (this is where you can put the earth from a pit), or you can make a fountain, which is also easy to build. It is only necessary to beautifully arrange the pipe connected to the pump and towering above the surface of the water. Having built such a pond in the country with your own hands, take enough time to design it. You can use natural stones, paving slabs, decking and other materials. Your imagination is not limited by anything. You can also provide a multi-colored backlight, which will light up in the evening. Various design options for ponds in the country will help you choose.

When making a pond with your own hands, you must strictly observe safety measures if lighting is planned, since water and electricity are a dangerous combination. Use only factory sealed fixtures that are specifically designed for installation underwater. If you do everything right, then such a pond for giving with a fountain and lighting will become a real gem of your summer cottage.
DIY mini pond (video)
mini ponds
As already mentioned, in addition to a large bowl, you can also make a pond from a tire. It will be very small, but beautiful in its own way. It is much easier to make it than a large body of water. You need to pick up an old large tire from KamAZ or a tractor and dig it into the ground. The tire pond from the inside is also laid out with a PVC film. There is 1 small terrace for planting plants. Small tires are not recommended. After all, the reservoir will be tiny. But car tires can be used when you want to make a cascade of small ponds, in which water will flow from one to another. Such a structure also looks great, especially if it is well decorated. For this purpose, you can use basins or old bathtubs. Tires can also be used to build flower beds around a large pond. In this case, they can be painted with bright colors.

Conclusion
As you can see, making a pond with your own hands is quite simple. You only need to fulfill the following requirements:
- choose the right place;
- make good waterproofing;
- provide for water circulation;
- beautifully arrange the space around the pond.
And then, having created a pond with your own hands, you can rightfully be proud of it. Creating a beautiful artificial reservoir is creativity, where you can fully use all your imagination. Please note that it should harmonize well with the rest of the landscape design elements. Although construction options for a summer cottage were considered here, a pond can also be built in the courtyard of a private house in the city. Beautifully designed small ponds can decorate any courtyard.
Mini pond on the balcony (video)
2014-10-02 113

Content
“I'll buy you a house…” - a line from the song literally slipped out of my mouth when a noisy group of my friends drove up to a country cottage.
"By the pond, in the suburbs ..." - three of the most cheerful of us sang in unison. The silence of the calm village street was blown up by friendly laughter.
“You shouldn’t laugh,” the owner of the estate was slightly offended. Unload, now you yourself will see both the house and the pond.

And indeed, behind the high forged gates with aristocratic monograms, a luxurious dacha was hidden. A straight path lined with paving slabs led to the two-story house. But the whole company, pissed off by the gentle autumn sun, moved, without saying a word, to the right, along the thick green lawn to the area with the barbecue. There was no such dacha building as a gazebo.
In my opinion, these buildings with a circular shop and a fungus roof can already be safely classified as relics of the past. We settled in comfortable deck chairs around the fire, over which the men were already conjuring, and did a pleasant thing - we began to carefully examine the decorative pond. Along the way, many questions arose, to which the owner of the summer cottage kindly answered.
Pond - what and why
“In general, water is my element,” a friend began a fascinating story. - You know that I can sit fishing for days with a fishing rod, I have a huge aquarium at home, where dozens of fish species coexist perfectly. So I also wanted to build a pond in the country house. Indeed, the atmosphere here is simply magical. She dreams great, but the passage of time seems to freeze. In addition, it does not take up much space.

Even on a modest plot, you can equip a small pond by sacrificing two beds of potatoes in its favor. The country artificial pond will become your favorite vacation spot. After all, the water element relaxes, helps to forget about fatigue and everyday problems. To get rid of the baggage of negative thoughts accumulated during the day, just sit for a quarter of an hour near such a miniature reservoir. In addition, building a pond is not such a difficult task. For those who at least once in their lives held a shovel in their hands.
Important design decision (style)
“And how did you get started?” - I was distracted from my thoughts by the question of a friend addressed to the owner of the dacha. I got ready to listen.
Before you make a pond with your own hands, you need to choose an ideological concept. So that the artificial reservoir organically fits into the overall picture, so to speak. And indeed, - I figured in my mind, - after all, on a plot of six acres, a garden pond with a fountain and exotic vegetation along the coastal border will look at least ridiculous. “We considered a lot of options, because we wanted to make this corner of the hacienda unusual,” said a friend. Any shape for the pond can be chosen.

Clear square or rectangular artificial ponds look good next to austere mansions. Especially if lawns are designed according to a similar principle in the yard and straight avenues of tiles connect, like arteries, its main parts.
If you want to create the effect of maximum closeness to nature, then you should think about how to make an artificial pond of arbitrary shape. The advantage of this variety is that at first glance it is even difficult to distinguish such a reservoir from a real lake.
Fans of eastern currents can build a pond in the country in the original style. For example, in Japanese - with huge smooth stones along the edge and undersized coniferous plants. Or with a Chinese flavor: a small wooden bridge connects the two banks, a light breeze tangles in the round crown of a tree nearby, and colorful herbs complement the landscape.

“I took the path of least resistance,” the narrator smiled, “I chose the simplest pond device.” A round reservoir is easier to build, since you can use a basic blank of the desired diameter: a concrete ring, a wooden tub, or even a truck tire. The round pond in the garden looks perfect, especially next to young fruit trees or a picturesque alpine hill.
Choosing a place for a country pond
The construction of ponds begins with a thorough study of the area. My friend was lucky, he did not suffer from reflections for a long time, since there was only one place for a reservoir - to the right of the house, in front of the orchard. And for those who are interested in the rules of choice, I will tell you about some secrets. First, avoid a site in close proximity to trees, especially mature ones.

Roots can get in the way when you dig a ditch. Leaves falling into the water are certainly picturesque, but not very useful - cleaning ponds is a rather troublesome business. The pond should remain in the shade for some part of the day. This is necessary so that algae do not develop too actively in its abyss. Under the sun, aquatic vegetation will feel great, but you will have to regularly clean the pond during the seasonal "blooms".

However, the shadow will have a bad effect on the state of the decorative "inhabitants" of the coastline. So here you need to choose the best option - as they say, the golden mean.As for the functional side of the design of the pond in the country, be guided by your own design flair. Place it where it is convenient for you: next to the house as an alternative to the pool, near the gazebo for friendly gatherings, in a quiet corner of the hacienda, if you like to be alone with yourself and just dream while enjoying the beautiful view.
Materials: three basic options
As in any construction, in the construction of a pond on the site, the choice of materials depends on the budget. And, of course, from the desired result.
Have you decided on a major construction project? Look for a concrete base, build formwork, use rebar. Expensive, troublesome, but reliable and, as the owner of the dacha said, "for centuries." The second option is to build a plastic pond from a finished one-piece container.

And the most popular type of building material is a special film that is resistant to moisture. Making a pond using this technology can be called the most acceptable, the most affordable from a financial point of view and the most convenient in terms of implementing a design idea.
Pond construction process
“At first I was scared by the amount of work,” we continue to listen to our friend. The men left the brazier and, having surrounded it with a dense ring, came to learn all the technological secrets of the homegrown builder of country ponds.
1. Making a plan.
We draw a sketch of the future reservoir. Here it is immediately worth considering the main emphasis - which element of the decor will be the key one (a tree on the shore, stones along the edge, bright perennials, or maybe a mini-fountain).

2. Sketch on the ground.
We transfer the drawing from paper to the site - we blur the earth with the pressure of water from a hose or draw contours with sand.
3. Earthworks.
The construction of a pond in the country can be started with an excavator if the volume of the future reservoir is impressive. For a small decorative pond, a depth of 80 cm will be enough, and if you plan to breed fish, then you should go deeper into the bowels of the site by at least a meter.

When the pit is completely dug, it is covered with a layer of sand and carefully compacted.
4. We line the bowl.
On top of the sand it is necessary to lay out geotextiles. As an analogue, you can use old carpets or blankets, linoleum or roofing material.

Along the perimeter of the reservoir, it is necessary to dig a trench in order to fill the edges of the film there.
5. Filling the bowl.
Fill the bowl with water. The film will then stretch. When the pond is completely filled, fill the film into the trench. Then fix this seam with soil and subsequently decorate (rubble, natural stone, boards, etc.).

To prevent water from stagnating, you can include a stream in the device of an artificial pond or use a special submersible pump. “But this is already aerobatics,” was the summary of the story. “I will make my next pond even more perfect.”
It became clear to everyone that our hospitable comrade was not going to stop there. And rightly so, because in any business, and especially in design, there is always something to strive for.
"I'll get the pigeons ..." Well, here it is again! What is this song haunting me today? Probably, the atmosphere is conducive, because the aroma of barbecue has already begun to tickle our noses.
“And with you, and with love…” The “most musical” of our company deftly hit the guitar strings.
“We will plant lilacs under the window…” Everyone has already picked up the familiar motive.
“Thanks, guys, for the hint,” the owner of the hacienda interrupted the song. “Exactly, the dovecote should be built over there, where the garden path winds. And I will plant lilacs here, there will be a hedge.
Photo selection


Even the smallest and seemingly unremarkable personal plot can be made cozy and interesting if you equip an artificial pond on it. A decorative pond in the garden is not only able to harmoniously fit into the landscape of a personal plot, but also visually expand the space.
An artificial reservoir in the landscape of a personal plot

The presence of a pond or a small artificial waterfall in a personal plot is determined not only by aesthetic considerations, but also by a practical component. On a hot summer day, even from a small pond, it breathes coolness, the air seems much cleaner and fresher, and a calm smooth surface or measured murmur will help relieve nervous tension and fatigue.
The most popular types of artificial reservoirs in landscape design:
- pond;
- Creek;
- fountain;
- waterfall.
In terms of shape, reservoirs on household plots can be either round, with an irregular coastline, or regular geometric shapes - square, rectangular and diamond-shaped. It all depends on the style of the site as a whole, its location, the features of the site and your imagination. The main rule in this case is that the reservoir should ideally fit into the surrounding landscape, become its integral element.

The most common shape for an artificial pond is round or oval. This is what natural lakes look like, so if you want to create a corner of nature near the house or in the garden, then this option will be the most acceptable. In this case, the wrong coastline and asymmetric planting of the reservoir with plants may even appear.
If the reservoir is located on a site where everything is done in a classic style, straight lines dominate and there is no place for natural forms, then they equip a pond of the correct shape. Often, this is the basis for the fountain, which is the center of the exposition. Since such a pool does not have a natural barrier in the form of vegetation and stones, its sides must be placed higher to prevent falling into the water. As an option - to protect such a reservoir with a low forged grate.
It should be noted that the most common and least expensive in terms of labor and financial investments is the pond. But it is quite possible to equip one on your own site without the involvement of specialists.
The key here is experience. When it appears, the pond you created can become the first in the whole complex, connected by waterfalls, streams, decorative bridges.

DIY decorative pond - where to start?

If a wonderful idea came to your mind about how to equip an artificial reservoir on your personal plot, you should not rush headlong after a shovel. First of all, you need to choose a good place. In doing so, the following factors must be taken into account:
- plot size;
- illumination;
- relief;
- degree of landscaping;
- soil type.

It is best to equip the pond closer to home. At the same time, it should be positioned in such a way that the entire area of \u200b\u200bthe reservoir is illuminated by the sun for at least 5 hours a day. Otherwise, the once beautiful pond can eventually turn into just a fetid swamp.
The terrain is also of no small importance. The best place is a low-lying area where the water level in the well or in the well is closer to the surface of the earth.
In the selection process, you should also pay attention to the presence of vegetation - large trees located along the banks will pollute the reservoir with fallen leaves in the autumn, and the roots of the trees can damage the protective film on the bottom.
Soil type is important. Loamy and clay soils, as well as peat soils, are suitable for arranging a reservoir, chernozem is less preferable - it contributes to the formation of silt. On acidic soils, it is impractical to equip a reservoir without reliable protection of the side walls and bottom.
After the site is selected, the shapes and sizes are determined - it's time to stock up on the necessary materials and tools. Most often, ready-made rigid containers are used to create a pond, which can be purchased at a specialized store or flexible waterproofing, much less often - concrete (the most costly and time-consuming process).

Types of waterproofing for an artificial reservoir:
- polyethylene film - an inexpensive material that is not resistant to ultraviolet radiation;
- PVD - high pressure polyethylene. Visually, it practically does not differ from polyethylene, but it has greater flexibility and durability.
- PVC - polyvinyl chloride - strong and durable material, the edges of which are welded together.
- rubber and butyl sheets are the most optimal, but expensive option. The service life of this material is practically unlimited.

Experts recommend avoiding polyethylene film for arranging waterproofing. It copes with its function, but it lasts no more than 2 years. If you want the pond to please for a longer time, choose more durable materials.
Materials and tools:
- shovel;
- protective film or reservoir;
- pipes for supply and discharge of water;
- valve;
- geotextile or sand
It's better to see once. The whole process of arranging a pond in pictures looks like this:
Construction of a decorative pond

There is another way to equip the pond - a concrete bowl, but this method is laborious and costly, so it is not currently used. Construction begins with the fact that markings are made on the selected site and the turf layer is removed. After that, you can start digging a pit of the desired shape. At the same time, be sure to leave the edges slightly sloping (sloping, not steep). Further, if you plan to make a decorative pond using a PVC film, and not a finished tank, you need to lay out the bottom of the future reservoir with waterproof material. For these purposes, clay is quite suitable. You need to lay it in two layers - the second after the first has completely dried (between them you need to lay a waterproof film). After that, the bottom should be covered with gravel.
Important: if you plan to plant a pond with plants, special recesses should be made at the bottom and filled with fertile soil.
How to make a decorative reservoir in such a way that the water in it is always clean and fresh?
In order for the appearance of the reservoir located on your site to always please with its appearance and give freshness and coolness, it is necessary to make sure that the water in it is running. For these purposes, two pipes must be laid: flow and waste. Through the flow pipe, water will flow into the reservoir, and through the waste pipe it will be discharged into the ditch. Please note: the level of the drainage ditch should be slightly lower than the level of the pond. For ease of use, you can install a valve on the sewer pipe or simply close the hole with a plug as needed. The first option is the most practical.
The device of a decorative reservoir with the use of "galoshes"
Labor costs will be much less if you purchase a special tank for an artificial reservoir. The people called these containers "galoshes". Why is that? Everything is very simple: they are made of black plastic, and the shape of such tanks resembles rubber shoes in its external outlines. But if you wish, you can always find and buy a bowl for a reservoir of a shape that suits you.

In order to equip a decorative pond in the country , you will need to purchase a special tank of a suitable size and shape: the cost of such is relatively low.
The main stages of arrangement of the reservoir:
- contour marking;
- digging pits;
- container installation.
In order to correctly mark the contour of the reservoir, it is necessary to install the tank on the ground and vertically install slats along its perimeter with an interval of 40-50 cm, then tie them with twine. Thus, you will get the outlines of the future pond.
The container must be installed strictly horizontally. The tank should be filled with water gradually, while the gaps between it and the walls of the pit should be carefully filled with sand.
Note: if you want to equip a fountain in an artificial reservoir, it is important to purchase a special pump and nozzles in advance, which are installed during the installation of the reservoir.
The final stage is the design of the reservoir. In order for your man-made pond to look really stylish and beautiful, for example, just like the fancy decorative ponds, the photos of which we posted, you need to properly arrange its banks.
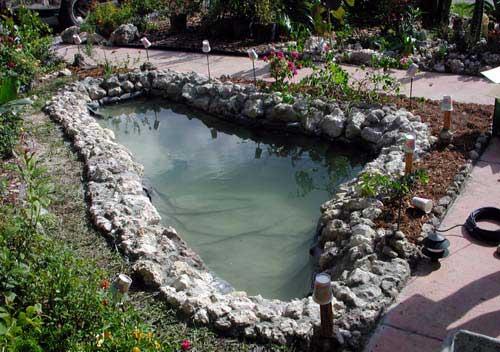
Decoration of the banks of an artificial reservoir
At this stage of work, you can not limit the flight of your imagination. To decorate an artificial reservoir, you can use ceramic tiles, marble, granite, artificial stone, pebbles, wood, etc. These materials need to mask the edges of the reservoir, in appearance close to natural. It is important to fix them with cement mortar. If you are planning to additionally equip your pond with a fountain, in the process of work, you need to make sure that the pump hoses are hidden under tiles or stones.

Then you can sprinkle the bottom of the reservoir with pre-washed sand, lay small pebbles and plant aquatic plants in pots or baskets. You can plant an ornamental shrub or just a flower bed around the pond.

Decorative inhabitants of ponds are always a joy. It can be both aquarium fish and dwarf turtles. And if you hold a backlight along the bottom of the pond or place floating lanterns on batteries on the surface, you can create a real extravaganza of light and water.

Pond Care
- To keep an artificial pond in good condition, it will need maintenance.
- First of all, you need to get a bottom vacuum cleaner for collecting garbage.
- During the period of leaf fall, you will need to cover the pond with a net so that the foliage does not fall into the water.
- If fish live in a pond, then they will need filtration and aeration of the water.
- To avoid greening of water, it is either filtered and purified (for this, the reservoir must be flowing), or planted with oxygen-producing plants: swamp, hornwort, elodea.
- If water lilies or capsules are planted in the pond, then with their wide leaves they will prevent the sun's rays and overheating of the water.

An artificial pond on your backyard is an important element of landscape design, the arrangement of which must be approached with sense, feeling, and arrangement! And then the beauty created by your hands will delight both you and your guests!


")


