It is very important that at the dacha the eye enjoys not only the plantings, but also the surrounding environment. About, and we have already talked about, it’s time to talk about how to make fences for your dacha with your own hands. Settlement without them dacha area is not possible and therefore it is better to take care of creating a strong and good fence. And it’s even better that it fits into the overall picture of what you create on your site.
DIY garden fences cheap
Don’t let the length of the fence or its height bother you. Let's start with the fact that it is easy to make a fence with your own hands and quite inexpensively, because if you have the desire and basic knowledge of the “fence theory”, then you can safely move on to the next stage - the choice of materials.
Country fencing can be made from:
- wood;
- picket fence;
- metal profiles;
- grids;
- yes everything, anything!
You just have to choose what you like best and fits into the overall design.

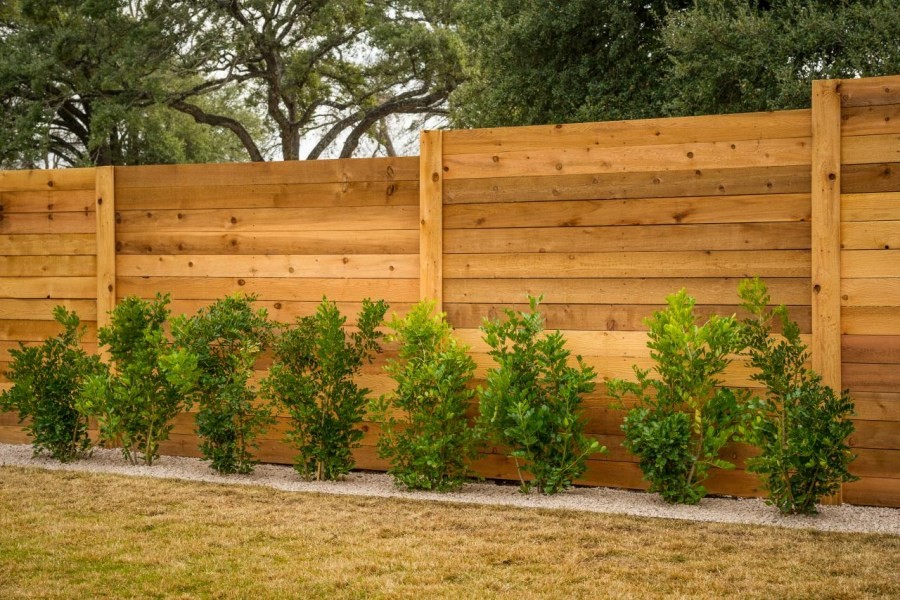
Wooden garden fence
Wood is one of the the best materials. It looks noble, can withstand bad weather, can be purchased without problems, and at the same time it is environmentally friendly.

It is not necessary to purchase a pre-prepared board. Just take out the supplies and scraps that have accumulated in the backyard and are still suitable for use - for example, ranch fences allow the use of uncut and uneven boards. All you need to do is dig in the wooden posts along the intended path and nail the boards to them in a horizontal position.

It's quite simple and cheap fence for a summer residence, and if you take into account its environmental friendliness, then you should give preference to just such fencing.
In addition, depending on the length of the board, you yourself choose its direction, so you can build either a ranch fence or a simple vertical or horizontal fence, which has long proven itself.

To install a wooden fence with your own hands you will need:
- beam;
- boards;
- nails;
- hammer;
- shovel;
- sand.
If desired, you can add cement and bitumen to this list if you want the timber to be installed as stably as possible.
The principle of installing a wooden fence is very simple. You dig holes to install the support beam and fill them with cement or cover them tightly with sand, compacting it. This way the supports will not deform under the load of the boards and will become more stable.

Next, all you have to do is nail the boards to the posts. If you want to attach the boards vertically, then you will have to stretch and nail two planks between the supports, onto which the boards will then be attached. If you still want to see a ranch fence on your property, then it is enough to immediately attach the boards from pillar to post. More details in the video Ivan Galkin:
Just don’t forget that wood has its own shelf life and doesn’t like moisture. Therefore, be sure to paint the fence after construction and periodically inspect it for damage in order to repair or replace the board in time.


Picket fence
Picket fences are the most popular type of wooden fence. And no wonder, because the picket fence is so easy to install, economical to purchase and beautiful when finished.


Before starting construction, it is necessary to mark the area where the building will be located, determine its height and the frequency of installing the picket fence. Although we install a fence for protection, if we close the area tightly, we can deprive the plants of light, which will lead to crop failure.

The set of materials for building a picket fence is similar to what we presented above:
- timber for supports;
- board for horizontal screed;
- cement;
- sand;
- nails or screws.
Tools can be different - from a shovel with a hammer to a screwdriver and an electric drill. Only the speed of construction will depend on this, but not the quality of the fence.

First you need to install the pillars, which will become the basis of the fence. Therefore, dig holes for the timber at an equal distance from each other, but no further than the length of the board that will serve as a screed. After this, install the supports and fill them with cement mortar.
While the solution hardens (and this will take at least 3 days), you can proceed to the installation of sections. To do this, we cut the board to a length sufficient to attach its ends to the support. We place the sections on supports using nails or self-tapping screws and then attach a picket fence to them equal distance.
As you can see, the process of building a fence is quite simple and does not require any special construction skills - just patience to wait for the solution to harden. Then you can create a fence to your liking.


Well, to understand the intricacies of working with a picket fence and its installation, we recommend watching a video master class Andrey Krylov:
Metal profile fence
And yet, despite the beauty and cheapness of the picket fence and wood in general, it has one drawback - such a fence is short-lived and its maximum service life is only 15 years. Therefore, many, wanting to save money, are looking for a more durable, affordable and strong material - metal profiles.
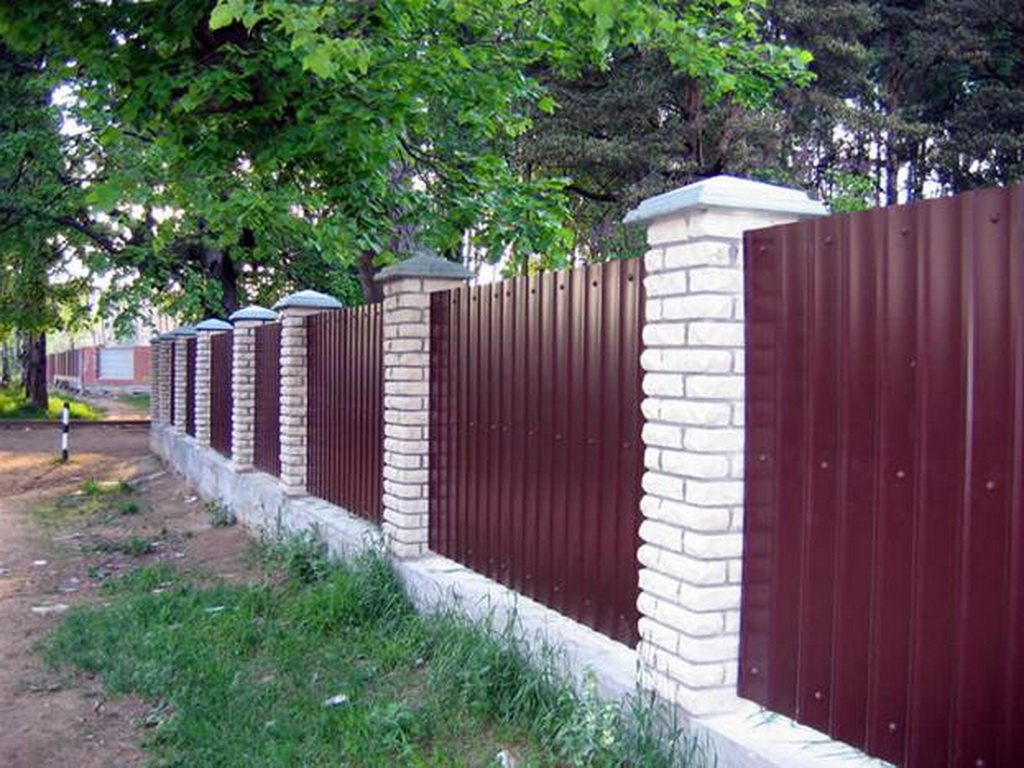
Due to its durability and availability, corrugated sheeting has long been widely used among summer residents. It is used for garden beds, roofing and, of course, fencing.
Metal profiles do not have the most aesthetic appearance, so most designers categorically bypass corrugated sheets when creating beautiful and original fences. But its availability and ease of use plays into the hands of summer residents, allowing them to make a good garden fence with their own hands.
The construction of such a fence is not much different from others. You will need the same support posts and boards for the horizontal screed, on which the profile itself will be attached.

And since metal profiles are still not the most popular material for creating a fence, it’s worth dwelling a little on basic requirements for its installation:
- The distance between supports should not exceed 2.5 meters. It’s better to stick to a more frequent, half-meter installation. This is due to the fact that the profiled sheet is quite flexible and will be deformed under the pressure of the wind, losing its beauty and, most importantly, strength. Therefore, the shorter the sections, the better the quality of the fence.
- The supports must be buried at least 1.5 meters into the ground. Despite the flexibility of the metal profile, the sheet itself is quite heavy and requires stable support. That is why it is recommended to cement all supports at the base.
- It is best to use not a beam as a post, but a pipe with a diameter of 6-8 cm and a wall thickness of at least 2 mm; such supports will definitely become a good basis for a stable and strong fence.
- It is recommended to use 3 horizontal logs when installing the profile - top, bottom and middle. This way the fence will be more resistant to deformation and will better hold its shape under any pressure.

And so that you can be convinced of the simplicity of building such a fence, we invite you to watch the channel’s video master class We do it ourselves 36, where they share with us all the tricks of working with metal profiles:
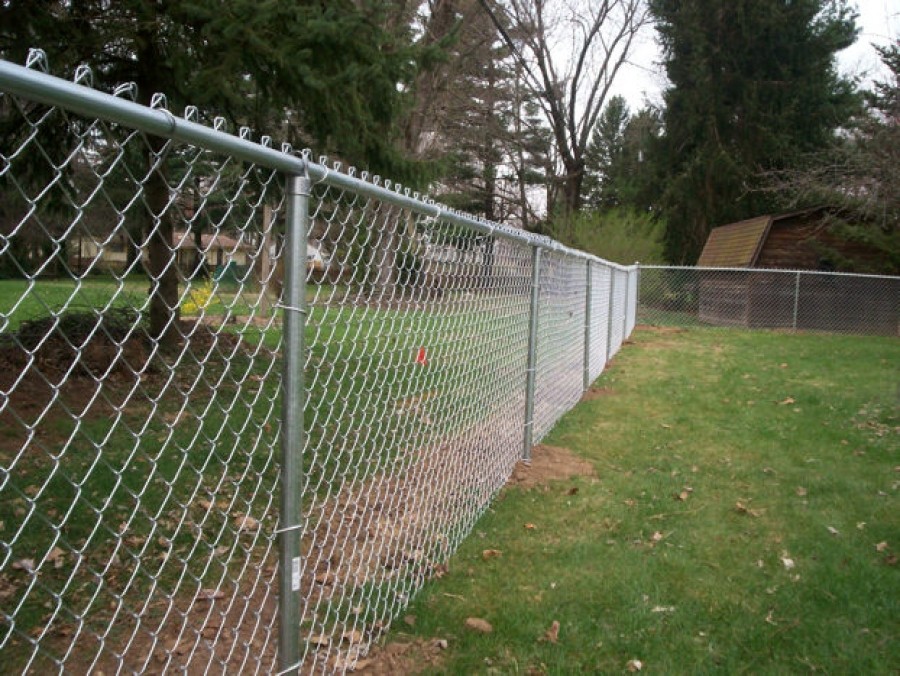
Mesh fence for a summer residence
And yet one of the most budget options considered a chain-link fence. Like any metal product, the mesh perfectly withstands most natural phenomena. And even rust can be prevented by timely treatment. Therefore, fences made from it are quite durable.

Fence mesh comes in several types:
- Chainlink, which is sold in rolls, treated with polymers to prevent corrosion and can be easily installed between posts without unnecessary partitions,
- Grooved, formed from wire with a cross section of 6-7 mm and bent by a wave. It has a strong weave. And thanks to it, it keeps its shape well.
- Welded, has a smaller wire cross-section than in the case of corrugated wire, but due to welding it is stronger. True, using it for a fence will be more expensive than in the case of chain-link.
A fence from any mesh can be made in two different ways:
- Stretch the fabric around the perimeter and attach it to the support posts.
- Stretch the mesh over the frame, and then assemble the fence from the resulting sections.


Allows you to keep track of your pets
Both methods have their own characteristics, so it is impossible to single out one of them as more profitable or simpler.
So, for example, by simply stretching the mesh from pillar to post, you will reduce the time for preparing materials. After all, you will only need to drive in the support, determine the height of the future fence and stretch the mesh, attaching it to the posts with wire.
This method is easy to implement and practical if you are short on time and want to make a temporary fence.
And yet it is worth considering that for a chain-link mesh, the posts will have to be placed at intervals of 1.5-2 meters, and this will increase the budget for the material. While for a corrugated mesh a distance of 3-4 meters is sufficient.

But if there are differences in height on your site, then this is the only solution if you have chosen mesh as the material. Sections are already prepared frames from metal profile, which brings us to the limitation - if you install them in a descending manner, there will be open space under the fence, which does not add either safety or aesthetic beauty to the site.
Installation of sections is simpler than stretching the mesh fabric. The finished frames are simply attached to pre-installed poles equipped with the necessary anchors, or even welded to them.

As you can see, the choice of grid and method depends entirely on your desire to improve the area, the time you have and, of course, the budget allocated for this.
To figure out which material is right for you, you can take a look at a detailed master class on selecting materials and installing them in a fence.
If you want more clarity and understanding of how to do everything correctly, with explanations from an experienced master, then you should watch the video tutorial from the channel RemontHelp.com:
The grid itself consists of cells, i.e. your area will be clearly visible from the street. Therefore, it is usually recommended to use this material only between areas so as not to block the plantings from light.

Original ideas for a fence at the dacha from scrap materials
Every practical summer resident will consider it his duty to save as much as possible and use everything that remains from other projects. Therefore, before you start building a fence with your own hands, we suggest you think about whether it’s worth rushing to the store to buy a mesh or picket fence? Maybe we can make do with improvised materials?
Then let's see what we have accumulated over the entire time we owned the dacha? And is it possible to make decent fences out of this trash?
There is only one answer - yes, you can.
Both car tires and covers from them can become a fence or its decoration. Moreover, it will be no worse or more boring than one assembled from high-quality materials.
Tire fence
Let's start with tires, for example. A lot of this stuff always accumulates, so over time the question arises of where to put it. Recycling costs money, but the fence will also bring benefits. The choice is obvious.

Somewhat eclectic

All that remains is to fill the area well and begin to install the tires on top of each other in a checkerboard pattern, as if laying out bricks, or secure them to a previously installed chain-link fence.
By the way, if you build a fence from tires according to the pyramid principle, then the soil in the protruding parts can be used for flower beds, thus creating an entire green wall.

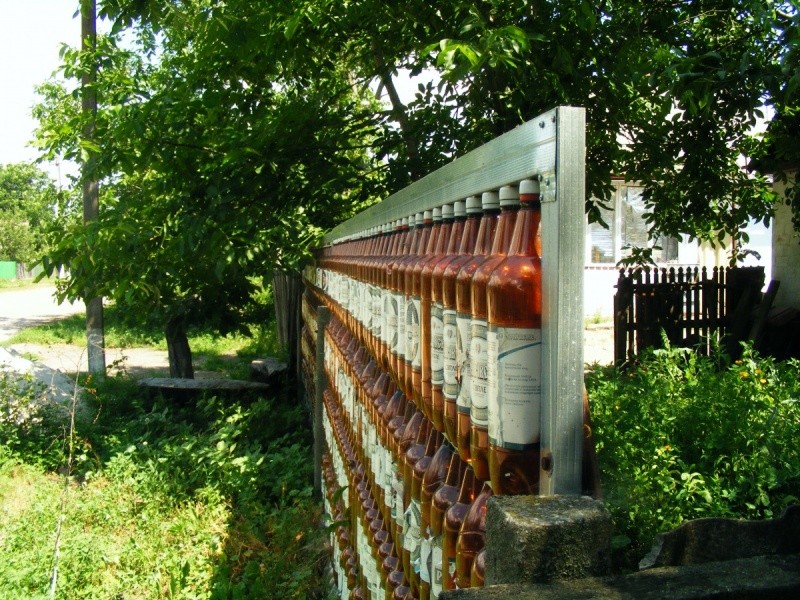
Fence made of plastic bottles
Plastic can be considered an ideal material for a fence. After all, it decomposes in at least 60 years, which means that a fence made from it will not suffer from rain or sun. Although bottle plastic is still soft, and its shape at first glance is not suitable for building a fence, many began to give it a chance and use it for other purposes.
To enclose your entire summer cottage with such a “plastic fence”, you will need to accumulate a lot of bottles to create a full-fledged fence.
The low weight of the material makes it easily deformed from physical damage. In addition, if you have accumulated mostly transparent bottles, then give protection from prying eyes there will be no such fence. But the cost of the finished fence will be small.
If you combine bottles different colors, then you can assemble entire mosaics. That's why creative personalities agree to endure shortcomings for the sake of an original fence that attracts the attention of passers-by.
To create a full-fledged fence from plastic bottles, it is recommended to take the same size of material. And it can already be assembled into a wall, stringing it on a wire like a curtain, or placing it on top of each other, filling the voids with cement mortar. The result will depend entirely on your desire to strengthen the fence or make it more airy.
By the way, bottle caps will also be used. After all, you can make a movable fence from them, and even with any pattern.
This will require a lot of caps with four drilled holes and meters of wire. Based on the colors you have, choose a pattern, and better diagram for embroidery with beads, and then simply string the lids in order, as in embroidery, in rows. Then pass the wire through vertical holes, thus connecting the rows.

If you're just bored old fence, and you still want to put the covers into use, then simply screw them on with self-tapping screws, creating a bright pattern-panel on the fence. And now you already have an interesting wall on the site, attracting the attention of kids and pleasing to your eyes.
A master class from Soloremont.
However, an ordinary picket fence or an old picket fence can simply be painted in an original way.


Fun pencils


You create your own mood and desire to visit the dacha more often!
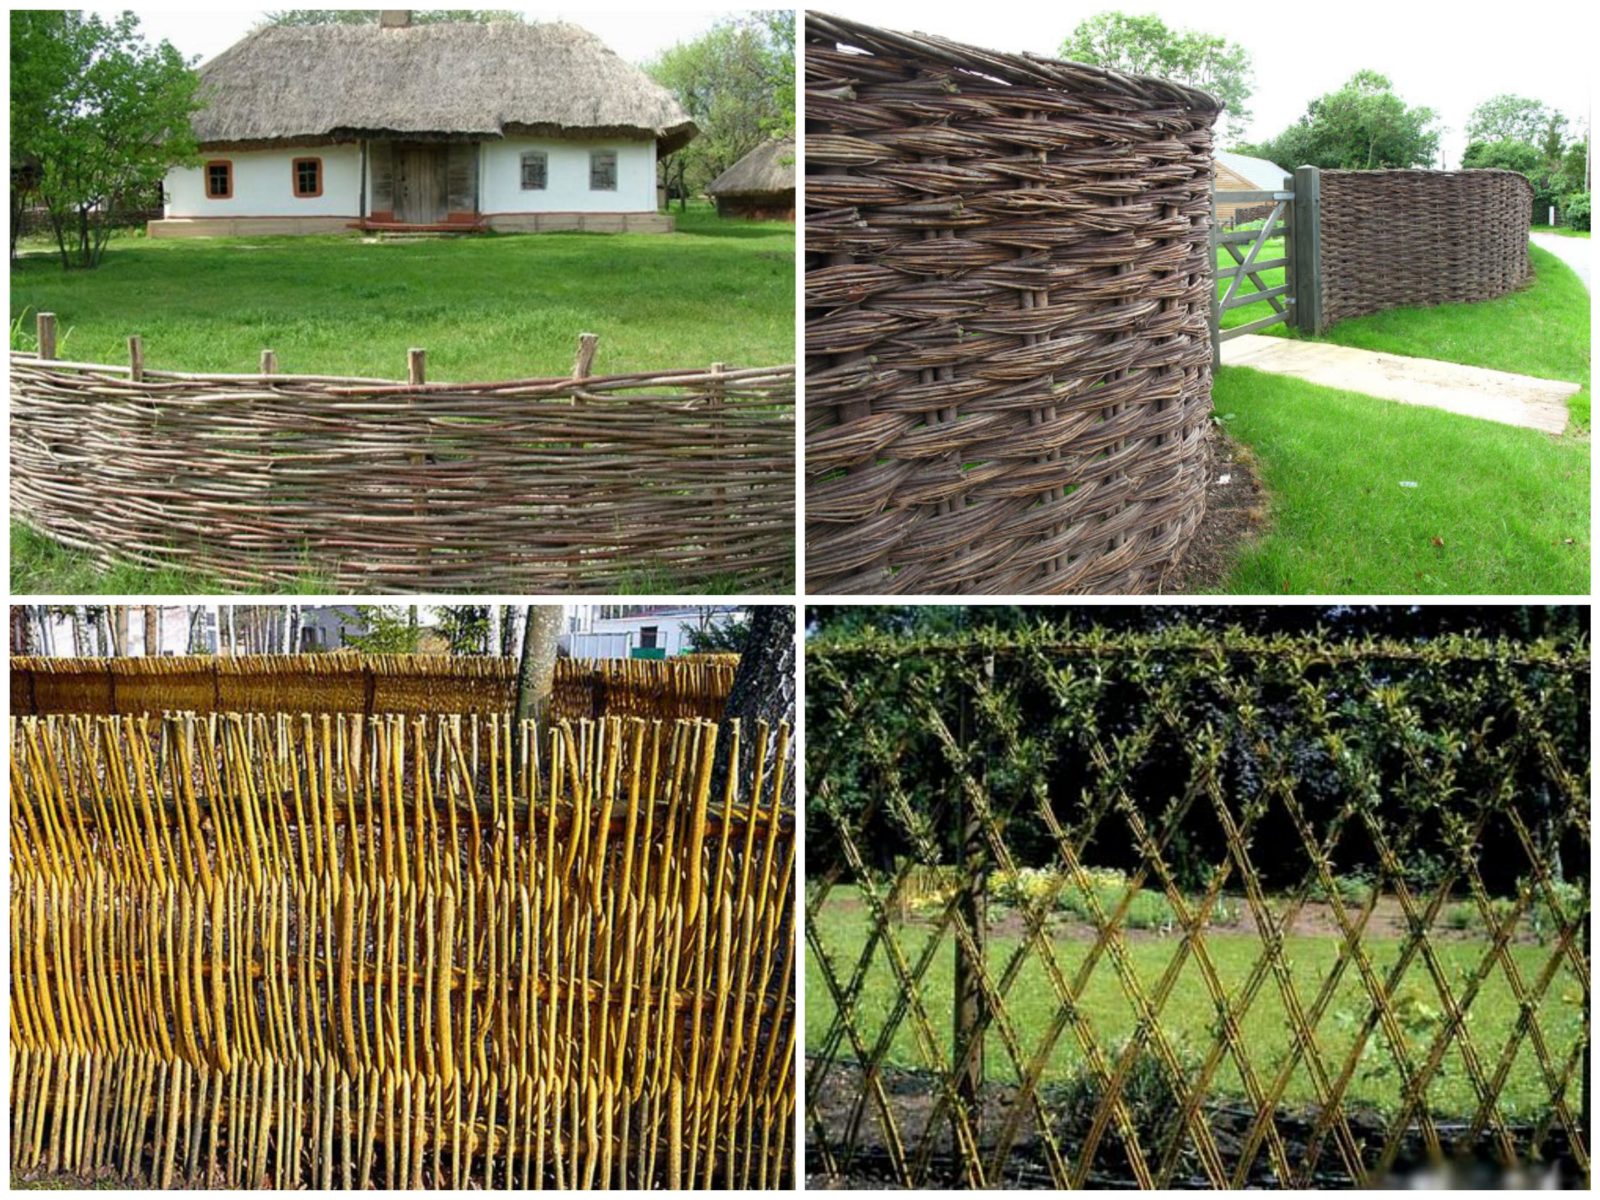
Do-it-yourself wattle fence in the country: a master class for lovers of rural romance
And if you have ever seen a Ukrainian farm or met huts in the south of Russia, then your heart could not remain indifferent to this peaceful romance. And it’s not even these dear ones that sink into your soul, as if toy houses, With thatched roof and whitewashed walls, and a wicker fence with clay hanging on it upside down.

And yet, in addition to the decorative component, the wattle fence is great solution even for a modern dacha. Such a fence is not inferior in strength to either wood or metal. And in terms of beauty and attractiveness it will rank first among them.
And from the point of view of economy, it fits well into our criteria. After all, weaving such a fence will allow you to realize your creative side, and will also save your budget.

Flowers are clearly visible
But first, it’s worth preparing the material:
- timber or logs as a support and basis for weaving;
- material for weaving (preference is given to willow twigs, although twigs of other trees are also suitable, the main condition is their plasticity);
- gloves;
- shovel;
- sand.
If you are going to weave along already driven posts, then first dig them in and cover them with sand and compact them. After that you can start working on the rods themselves. It is necessary to steam the rods so that they become more flexible and do not break when deformed.

You can weave in different ways:
- horizontally, passing the rods in a figure eight between the pillars. This method was borrowed from weavers;
- vertically, between horizontally located logs. This weaving turns out to be more decorative than practical. That is why it is used for fences between adjacent areas, but not external ones;
- diagonally, forming an original wooden mesh. This type of weaving is the most labor-intensive, because the rods must be long for the fence to be at least of medium height. In addition, it is recommended to dig each rod into the ground for greater stability.
To understand the intricacies of simple weaving and try to make your first wattle fence, we recommend taking a look at the video tutorial Oleg Bryukhanov, where he shares the secrets of creating a simple but beautiful fence.
If you prefer sectional fencing, then the master class will be useful for you Yury Kulakevich, where he shows how to create a wicker wicker base.
As you can see, a fence is not just a protective structure that hides a summer cottage from prying eyes, lovers of other people's crops and stray dogs. A fence created with your own hands is also a decoration of the territory, allowing you to enjoy every day spent in nature, among the plants we planted with great love.
The area near a country house or dacha should look not only interesting and attractive, but also individual. Of course, you can use the services of a designer and order a project, but it will still be a set of certain template modules. And individually made elements will be quite expensive. Most economical option- try to do everything yourself. If the area is small, you don’t have to spend money on a massive fence for fencing. Use decorative. It will only outline the boundaries of your site and will not hide it from prying eyes.
Functions and uses of a decorative fence
An abundance of flowers, well-groomed lawns, smooth paths, decorative pond- it seems that everything is already there. But over time, you always want to change something, add something. In this case, with the help of decorative fences, the area can be divided into several zones. Indeed, in city apartments, each room is decorated in its own way, for each family member. The same principle can be used for garden plot. Zoning can be done using various types of decorative fences. Bright and colorful picket fences will separate the children's area, wattle fences will outline the area in rustic style, strict, made of log components - indicate a male territory or a guest area.
Gallery of fences with different purposes
A fence made of willow twigs will decorate any area  Multicolored
  A pencil fence will decorate the children's area
  A fence separates the recreation area
A decorative fence will first of all give a finished look to the flower bed and emphasize the beauty of the flowers. In addition to the aesthetic function, it also has a number of practical ones:
- Flowers will grow only within the boundaries specified for them and will not grow throughout the entire area.
- The fence will protect the plants from strong wind and accidental damage - flowers will not be trampled and there will be no broken branches.
- Caring for flowers will be greatly simplified and the problem of accidentally mowed plants will disappear.
- If there are quite a lot of different types of flowers on the site, then thanks to the installed fences and mini-fences, the problem of searching “where which flower was sitting” will disappear. early spring. It is enough to look at the photographs taken last summer, and everything becomes clear. This is especially true for perennials that bloom by mid-summer.
- Thanks to zoning, it will be possible to plant flowers separately that require a certain type of soil and a certain degree of moisture.
- For each type of flower, you can choose a fence of a certain height.
Types of fences
Today you can purchase fences of a wide variety of types and sizes, made of plastic, wood, and metal. But I wouldn’t want to see the same one at my neighbor’s. There should be individuality in everything. Therefore, it is more interesting and easier to design and make a fence yourself, using improvised means. It doesn’t have to be large - sometimes one or two spans are enough to give a plot or flowerbed a certain charm.
Gallery of products made from scrap materials
 A woven corina fence and at the same time a flower bed for different types of plants
  Fence made of tall plastic bottles
  Fence-flower bed made of car tires
  Traditional Ukrainian wattle fence
  On one site you can combine different types fences
To make a fence you can use the most various material: wire, stone, plastic or glass bottles, PVC pipe, old tires, reeds. Various elements made of wood are also suitable: vine branches, hazel branches, willow twigs, picket fences, wood cuts, wooden logs, etc. Almost everything that is on the farm.
You can increasingly see wicker fences. These are traditional wattle fences that can be easily made from pre-cut and prepared willow twigs, vine branches, hazel, raspberry, cherry branches, and reeds. Easy to make, they go well with almost any plant. With certain skills, you can build a basket fence for a flower bed. Weaving can be horizontal or vertical. Beginners should start with vertical weaving to understand the working principle. If the wattle fence is made in the spring from unprocessed willow branches, it will turn out to be a hedge, since the willow takes root well and quickly.
Types of fences made of different materials in the photo
 Slab fence
  Simple fence for zoning
  Wattle goes well with hedges
  You can decorate a flowerbed with such a fence
  Original fence from glass bottles
  Hedge from willow
  Vertical wattle can be very dense
  Original fence made of willow twigs
  Stone fence for decorating a flower bed with low-growing flowers
  Gabion - a fence made of mesh filled with stone
Preparing for construction: determining the type, location, size
Before you begin construction, carefully plan where the fence will be installed. Make a preliminary sketch according to which you will work. Take the time to draw in detail what types of plants will be planted and the color of the future fence. It is better if there are several sketches linked to existing buildings. So you can choose more interesting option. For example, if the main fence around the site is made of stone, it is good to combine it with various types wooden fences - wattle fence, picket fence, wooden posts.
The fence is installed before the plants are planted, so in the sketch take into account the approximate height of the flowers - the data is indicated on the seed packages. It is important to pay attention to the direction of the world. If you plan to plant shade-loving plants, the fence should be installed so as to create maximum shade during the day and be high enough. For sun-loving plants, the fence should be of minimum height and not shade the plants.
A decorative fence can be installed by going deep into the ground if you plan to plant plants that reproduce by root shoots, and by raising it a short distance above the ground if the plants are tall or curling. As a rule, the fence has a height of 40 cm and above.
Since the fence is a decorative element, it means that we are not making it for “the rest of our lives.” It should serve us for at least 5–7 years, and then we will still want to change something, because new design ideas or new flowers will appear. You need to choose the material with which you will be comfortable working. Let's look at the most common ones.
Wood is the most environmentally friendly and available material. Fairly easy to use. With proper preparatory treatment it can last up to 10 years.
Plastic and glass bottles are the easiest materials to work with. The downside is that plastic is not an environmentally friendly material and can release toxins into the soil. Glass bottles are easy to break and can cause injury in the future.
Options for building materials in the photo
 Original fence from thin pipes PVC
  Colored plastic bottles make a fun fence
  Glass bottles are not only for storing alcohol
  The easiest picket fence to use
  Fence-fortress made of tires
Car tires will last a long time, but like plastic, they emit toxins. They look pretty rough.
PVC pipe will last a long time. If you have a special soldering iron, you can simply make an original fence from it.
Calculations
If the fence is installed along the entire perimeter of the site, you must first determine its corner points, drive pegs into them and pull the cord. Once you have established the exact perimeter of the fence, you can move on to planning the spans. To do this, you need to divide the length of the fence by the span. As a rule, for high decorative fences this is 1–1.5 m. Low fences can be made with smaller spans, this will make them more stable.
For example, our plot has dimensions of 4x5.5 m. We plan to make a span of 1 m. The 2 widths of the plot will consist of 8 spans. When dividing the length, 5.5 m does not give a whole number. In this case, you need to increase the length of each span by 10 cm. We get 10 spans of 1.1 m each. The increase is insignificant, but we will avoid two fragments of 0.5 m each, which will disrupt the completed appearance of the fence.
If the fence will be installed in a small fragment (for example, one span of fence), draw its exact dimensions and think over the installation method. It should have a stronger mount, since there is no connection to other parts. It will be secured only by the main pegs and will be more susceptible to the influence of strong wind and rain.
Having calculated required quantity spans, you can start calculating the material. Draw a span on paper, count the required number of pickets (posts, branches, planks, etc.), and then multiply by the number of spans. This way you can quite accurately calculate the required amount of material.
Making your own wattle fence
Materials and tools required for work:
- Posts for side supports - 2 pcs. for each span
- Cross bars - 3 pcs. for each span
- Rods for weaving - blanks of the same height
- Garden secateurs
- Axe
- Nails
- Construction level
- Shovel
- Hand protection gloves
Wattle is the easiest type of fence to make. It can be made from either thin branches or thicker poles.
Using a shovel and building level install side pegs. We deepen them to a third of the height. It is better to first treat the part that will be in the ground with resin or seal it with fire so that it does not rot so quickly.
Using a screwdriver and self-tapping screws or a hammer and nails at equal distances, we attach the crossbars to the posts.
We prepare branches of the same length. We use for this sharp knife or pruning shears. To do this, use a template - a thicker branch of the required length. The wattle fence is usually not made higher than 1.7 m.
We start weaving from the side that will be less visible. The branches go around the crossbars alternating: if the first one is braided from the outside, then the next one is braided from the inside. We press the branches tightly against each other.
We continue weaving until it is completely filled with twigs. At the end of the weaving, use pruning shears to trim the sharp corners of the rods, if any.
Sectional small fence made of wooden pickets
Such a fence can be made even by a woman from the most simple blanks, which remained from construction work. The work is quite simple and easy, and you will be pleased with the result.
Materials and tools needed for work
Cross bars - 2 pcs. for each span
Side posts - 2 pcs. for each span
Pattern for maintaining the distance between the pickets - 1 pc.
Pattern for maintaining the distance between the slats - 1 pc.
Pickets, pre-treated sandpaper- 9 pieces per span
Screwdriver
Self-tapping screws
Sandpaper
The peculiarity of installing such a fence is that if the side posts are made with pointed lower ends, it will be easy to install by pressing it into the ground. You don't need to use a shovel. The corners are easy to connect with self-tapping screws or nails.
We lay transverse planks on the ground. Between them we place a special pattern (a piece of picket fence), which will determine the distance between the crossbars.
We attach the first plank to the beginning of each of the crossbars using a screwdriver and self-tapping screws. We lay an additional pattern and the next plank close to it. We also secure it with self-tapping screws. We attach side posts along the edges.
When the first section of the fence is ready, we begin assembling the next one in a similar way.
We prepare several sections in this way, paint or varnish them. Our fence is ready for installation.
If the fence was made of wood - pickets, chocks, saw cuts - pre-treatment with an antiseptic is required. This will protect against damage by fungus and various pest beetles. After this, if necessary, you can treat it with stain and varnish if you need a natural, beautiful color. If the design calls for some interesting colors, you can paint it in a variety of colors using exterior paints. They withstand temperature changes well and protect the wood from moisture, which means the fence will last quite a long time.
If the fence was woven from willow, cherry, or hazel branches, it is best to coat the prepared rods with varnish or paint before weaving. This ensures both protection of the material and complete staining of the fence.
Almost any decorative fence easy to make yourself at home. As you can see, it does not take much time and does not require certain skills. Makes your imagination work and turn your cozy space into a storehouse of ideas. Having made one small fence according to your own sketch, you can gradually learn how to make more complex and interesting designs. The main thing is to start.
You made several flower beds on your site and planted them in various flowers. The territory acquired charming view, but it feels like something is missing... Some touch to make the overall picture look complete. The solution is simple - install decorative fences.
Advantages of using decorative fencing in the garden
You will not only decorate the flower garden, but also solve several additional tasks:
- fences allow you to achieve a uniform style throughout the entire site;
- the territory looks more well-groomed and tidy;
- the fence holds the grass and plants, preventing them from “creeping” beyond the flowerbed;
- using decorative fence, you can divide the territory of the site into functional zones;
- your flowers will be reliably protected from cats, dogs and other animals;
- the fence will tell guests where not to step, so as not to inadvertently destroy the first inconspicuous shoots.

Using a decorative fence for flower beds, you can divide the site into functional zones
Specialized stores sell a variety of plastic fencing the most different forms and colors, you can also buy forged fences or wooden fence chicks, but the cost of such decorative elements Not everyone can afford it. But even novice gardeners can make a fence for their flower beds with their own hands from stones, plastic and glass bottles, willow twigs and small logs.

Video about what kinds of fences there are for flower beds
What materials can be used to build a decorative fence. Their pros and cons
Basically, at dachas they use leftover building materials or purchase inexpensive ones.Wooden fences
Wooden structures bring people closer to nature, blend with the landscape, and are easy to repair. The material is easy to process, so fences can be created with my own hands. When choosing a tree, you need to take into account that you will need special preparations to combat insects.
Wooden fences are susceptible to rotting, so the material must be treated promptly.
Natural stone fencing
The structure, made of cobblestones, looks very natural. To create such naturalness, you need to try, selecting parts according to size and connecting them with mortar. The disadvantage of this structure is that the heavy material gradually settles, so it is necessary to restore the bed.
Metal fences
Cuttings of rods and pipes have always been in demand summer cottages:- short ones were used as fastenings for sides;
- medium cuttings connected with wire lift large branches well;
- long ones will serve perfectly as trellis posts when growing grapes.
Modern designs of decorative borders and beds
Plastic is one of the new materials for country fences; it does not require special care, is easy to use, and has a long service life. When purchasing such material, it is necessary to require certificates for environmental safety. Flexible border tape is a plastic sheet with a wavy surface. The advantages are obvious:- accessibility;
- Convenient installation with minimal tools;
- simply give the required shape;
- does not deteriorate in the soil, does not rot.
Video: border tape
How to make a wooden fence for flower beds with your own hands
Most a good option A fence made of twigs, pegs, planks or logs is considered to be a fence. The tree gradually decomposes in the ground, filling the soil nutrients. In winter, wood freezes less than stone or plastic, which means root system plants will be protected from freezing.
Willow fence

The most successful option is a fence made of twigs, pegs, planks or logs.
Wicker fences for flower beds look charming. Although making wattle fence requires time and some effort, the result will delight you for many years!
Willow twigs can be obtained from the shores of any natural body of water. It is recommended to harvest them in early spring, then the bark will be easy to remove, and in the end you will get a strong fence for a pleasant light color. Having collected more twigs, prepare them for work: peel them from the bark and cut them to the same length. Along the perimeter flower bed Place pegs with a diameter of 3 cm at equal distances. The closer the pegs are to each other, the stronger the wattle fence will be. The pegs are braided according to the principle of basket weaving - the rods are passed either in front of the stakes or behind them. After completing 3-4 rows, compact the entire structure by tapping it with a hammer so that after drying your wattle fence does not become loose. The ends of the twigs can be further secured by nailing them to the pegs.
Decorating a flower bed with logs

A long-lasting beautiful fence for a flower bed is made from small logs of wood
A long-lasting, beautiful fence for a flower bed is made from small logs of wood. Logs of approximately the same diameter and height are prepared, taking into account the fact that about 20 cm will go underground. A strip of turf is removed from around the flowerbed and a shallow ditch is dug. Logs are placed in it, close to each other, then the lower part of the logs is covered with earth and compacted thoroughly. It is recommended to first remove the bark from the logs and process them special solution, then such a fence can last about 50 years. Instead of logs, you can also install pegs.
Miniature wooden fence
Decorative fences for flower beds made from boards look charming. It will take more time to make such a fence, but the result is worth it! First make blanks of the same size from boards or wooden planks with a triangular or shaped top, fasten them together with transverse boards to create several small sections. Dig the posts into the ground at equal distances and secure the prepared sections to them using self-tapping screws or nails. The finished fence is covered oil paint for protection from rain and snow.
DIY decorative metal fence
Set for work: tape measure, rope, level, cement mortar, crushed stone, supports, welding apparatus, shovel and logs.
Suitable for supports iron pipes, it is possible to use square or round pipes with a diameter of at least 70 mm. To mount the logs, we purchase a 25 x 40 mm flat profile.
We fasten the logs horizontally, due to them a strong connection of the profiled sheets will be created.
- We explore the terrain of the territory. We select suitable places for placing gates.
- We mark the area. So we install rods around the perimeter of the fence and connect them with rope. We also mark areas for racks. Maximum size between them is 3 meters.
- We dig holes for the racks approximately 20 cm in size and up to 1-1.3 m deep.
- We install the supports, checking them strictly according to the level.
- We fill the bottom of the holes 20 cm with gravel or crushed stone and fill it with cement mortar. It takes 3 days to dry. Special caps are put on the supports; they will protect the structure from rain.
- We install transverse joists. For better fencing strength we use welding machine. We select the number of crossbars according to the required height of the fence. For example, for a fence 1.8 m high, 2 crossbars are enough. When the fence is built higher, the number of joists is needed more.
Brick fence
We will place the bricks on cement mortar; it is not difficult to prepare it yourself: mix a portion of cement with three portions of sand, add water until a mass is created.Before work, you need to decide on the size of the fence. When the fence is intended for decoration, it is convenient to build it in half a brick. If the fence is intended for protection, it should be made of one and a half to two bricks. The length of the product varies up to 3.5 m.To ensure the reliability of the fence, the masonry is done in columns with piers, and pillars are also made in the gates. Rods and rope are used to mark the foundation. We place pegs along the walls and corners of the trench at intervals of up to one meter, using a rope between the rods. We mark the areas of pillars and gates. Trim the corners using a square. All the shortcomings need to be corrected.
Making the foundation
- We dig a trench 6-7 cm larger than the intended masonry, a depth of 0.8-1 m. We trim the walls and bottom of the pit. We place up to 10 cm of sand into the trench, compacting it well.
- We put up the formwork. We lay boards so that the surface is level after concreting. To reinforce the foundation, we connect the rods into a mesh with wire. We place the net on compacted sand.
- We concrete the trench. We make the composition from a portion of cement, two or three portions of water with sand, four to five portions of crushed stone. We thoroughly level the poured surface and remove the air by piercing it with reinforcement. We leave the pouring for three to four weeks for strength.
Fence laying
First, lower the bricks into water for a minute. Due to this, the pores are moisturized and will not absorb moisture from the solution. For strength and reliability, we will build a one-piece fence along its length.
- We make pillars from four bricks, creating space inside. The void is filled with reinforcement and concreted. First, we lay columns three bricks high. We lay the walls between the columns at the same height.
- We connect the columns with the spans and lay out the reinforcement.
- We increase the masonry to the height of three bricks in the same way. We build it this way to the required height: put 3 rows, reinforce, again 3 rows and then reinforcement.
Plastering the fence
- We moisturize the walls. Apply a layer of plaster up to one and a half cm.
- Let the solution dry for an hour. Level the plaster with a lath and let it dry for 2 days. In between, we moisten the plaster to prevent cracks from appearing.
- After 2 days, we again moisten the plaster with water for troweling.
From natural stone to plastic bottles

When installing the border, large stones are pressed into the prepared concrete pad around the perimeter of the flower bed
Quite often, fencing for flower beds is used in landscape design. from natural stone round or uneven shape. Such borders look noble, and with their help you can significantly transform the area near your cottage or country house. Whatever stones you use - small or large, they must be fastened with cement so that the fence does not fall apart under the pressure of the soil. When installing a border, large stones are pressed into a prepared concrete pad around the perimeter of the flower bed, and small stones are held together using concrete mortar, to which special glue is added for greater strength. For high flower beds, you can lay out a border of flat stones, fastening them with cement.
You can simplify the process by replacing natural stone with brick. Decorative fences for flower beds made of red brick are ideal for decorating a site in a country style. It is possible to lay a border made of bricks without concrete mortar, since the smooth sides of the bricks form a strong adhesion that can withstand the pressure of soil from the flowerbed and prevent the structure from falling apart under its own weight.
Video about fencing for flower beds
The most economical solution is to make a fence for your flowerbed yourself from glass or plastic bottles. Although such a fence is easy to deform, you can always replace a damaged bottle with a new one. For one small flower bed you will need from 15 to 25 bottles same shape. Fill the bottles with any bulk material: sand, soil, small stones. Cover them with lids and dig them, neck down, halfway into the soil around the perimeter of the flowerbed. If desired, you can paint the resulting fence.
How to care for fences - minimum requirements for summer residents
A combined fence made of wood and brick has little moisture resistance, so you need to take care of the paint and varnish coating. It doesn't take much effort. It is enough to occasionally check the product for suitability of varnish and paint, as well as timely updating.

In the fencing, it is necessary to pay attention to the correct calculation of the load and the selection of reliable frame posts. This calculation also takes into account the presence of large dogs on the site, leaning on fences or many anthills that destroy wooden panels.
The fence made from car tires needs to be repaired every one or two years - remove cracked paint and renew it to increase the life of the fence.
When the fence is made of picket fence, the wood needs special care:
- treatment with antiseptic substances that protect wooden products from pests;
- painting the fence.
To increase service life metal fence it is necessary to update the varnish and paint coating, so before applying a new paint it must first be sanded and degreased. A surface that has been cleared of peeling coating will take on the new paint much better.
For hedges, everything is clear; pruning, proper watering and crown formation will help create a green fence on the site.
Now you know how to fence a flowerbed, all that remains is to decide on the general design style of your site and stock up suitable material. Having once spent time creating decorative fences, you will be able to admire your landscaped area for several years!
Spring work on the site is associated with the improvement of the garden area. At this time, summer residents prepare seedlings of flowers and home garden plants for planting, form flower beds and beds, fencing them with small fences or borders. These fences perform several functions - they protect plants from trampling, decorate and zone the area.
Review of ready-made decorative structures for fencing flower beds, front gardens and vegetable gardens
The range of decorative fences for flower beds allows you to purchase a suitable fence without any apparent problems, which meets the aesthetic and functional needs of the summer resident. Conventionally, fences are grouped according to the material from which they are made, which accordingly affects the cost of the structure.
Types of plastic fences
Plastic fences for flower beds are presented on store shelves in the following forms:

Metal fencing for flower beds, vegetable gardens and front gardens
Metal fences have a lot of advantages, and one striking drawback is the price (the countdown starts at 600 rubles). The fence looks great in almost any landscape composition, has a stylish and expensive look.

metal fencing is suitable for open flower beds and front gardens
Forged structures are made to order according to a project, taking into account all the disadvantages and advantages of the territory. It makes sense to install such expensive fences if, according to the site plan, there is an open flower bed or front garden.
Concrete products
Concrete barriers are well tolerated high humidity, are resistant to aggressive environments and can withstand sudden temperature changes. The price for such fences ranges from 200 rubles, depending on the texture, size and decor of the structure.
Ready concrete structures for decorating flower beds, flower beds and front gardens, they are available in two types:

- In the form of ready-made decorative borders various shapes and sizes that are installed on the solution or sand cushion. Such fences are applicable in city park areas, as well as in summer cottages for zoning the territory.
- Ready-made frames for flower beds, polyhedrons and separate sections for creating multi-level structures, flowerpots and bowls. They can be recessed into the ground or raised on a certain piece of land.
Ready-made decorative wooden fencing
Wooden structures are classics for fencing flower beds, front gardens and the basis for the formation functional zones on the territory. Due to their naturalness and environmental friendliness, wood fences will organically fit into any classic, modern or rustic landscape.

wooden fences combine effectively with lush greenery
Minus wooden fencing for flower beds is the predisposition of the material to rot. To avoid damage to the structure, you should varnish the fence every season or by special means from rotting and pests.
Interesting photo ideas for making fences for flower beds with your own hands
Arranging a dacha area is not only a painstaking process, but also an opportunity to show your imagination and creativity, creating unusual and original fencing for flower beds, vegetable gardens and front gardens. Often, the material used for the construction of decorative fences and flower beds is household items and used utensils.
Flower bed made of car tires

Car tires have long been used to improve gardening. At the moment, there are many technologies for turning an ordinary tire into an elaborate flowerpot. The main thing in this matter is safety.
Rope fencing
An ordinary rope or decorative rope will help you make an unusual fence from ordinary materials. This type of fence is easy to make with your own hands, without using heavy tools. The main thing is to make the correct markings by placing wooden pegs around the perimeter of the fenced area. When laying the rope, you should lower it slightly (do not tighten it).

DIY bamboo fence
Bamboo decorative fencing is perfect for a landscape made in the Japanese-Chinese style. To frame the flowerbed, you will need a ready-made roll of bamboo, which is dug a little into the ground and rests on pegs.

Making a bamboo fence yourself is quite simple. The material you will need is bamboo sticks of two sizes (large for edging the fence and small for filling it), synthetic rope. Tools – jigsaw, crochet hook, drill.
Step-by-step implementation of weaving a bamboo fence:
1. Bunches of five or three rods form spans on the fence, the length and height of which are calculated depending on the size of the material (branches). So, for horizontal spans, 12 segments of equal length are used, and for vertical spans, 30.
2. For convenience, it is better to lay out the diagram future design on the ground, fixing the necessary points with clamps.
3. Temporary connections are replaced with skillful knots using a hook and synthetic cord.
 correct node for bamboo tying bamboo with a hook
4. Secure the finished fence with a synthetic rope on previously prepared bamboo columns. The underground part of the pillars is impregnated with a solution to prevent rotting, allowed to dry, and only then dug into the ground. The distance from the bamboos depends on the size of the wicker fence.
Gabion flowerbed
A gabion is a mesh structure filled with stones. Gabion structures began to be used in summer cottages relatively recently, but the aesthetic qualities of this fencing have become very popular among summer residents. It’s easy to make a flowerbed from a gabion with your own hands, you just need to prepare the necessary materials for this: mesh, decorative stones, scissors or metal tongs, wire.

The process of creating a flower bed from gabion:
- Pre-measure the area and decide on the design of the future flower bed.
- Layers are cut out of the wire, and, forming the desired structure, the ends of the mesh are bent for a strong connection.
- The resulting structure is filled to the top with stones, covered with mesh and connected with wire.
Flower beds made of clothes
Worn jeans can be a great tool for decorating a flower bed, herbal bed or flower garden. To do this, you should completely fill the clothes with soil, mixed with stones and sand, then plant any plants in the resulting “vase”.

Furniture as a flower bed
Old discarded furniture that just clutters city apartment or country house, will become an excellent fence for flowers.

Original flower bed made from a tree trunk
Eco-friendly and natural material for a flowerpot that can be placed anywhere personal plot, and, if desired, transfer to another location. The idea of a flower bed is simple: a hole is cut out in a tree trunk, which is alternately filled with stone, sand and soil, and your favorite flowers are planted.

Kitchen utensils as a fence for a flower bed
The composition of the kitchen sink is perfectly combined with annual alisum and the decor of plates and a water tap.

Plumbing as a fence for flower beds and flower beds
Using a bathtub or toilet as a fence for a flower bed, you will be guaranteed the uniqueness of the fence.
Flowerbed from a bathtub - unusual fencing for a flowerbed
Unusual fence made of plastic bottles
All kinds of crafts from plastic containers pleasing to the eye and spurring the imagination. There are a lot of ways to use plastic and glass bottles in dacha farming, the main thing is to come up with your own original and unique hedge.

After all, this main element landscape decorations.
But even the most beautiful flowers need a decent frame.
And here you can’t do without decorative fences or fences.
Fences for flower beds - functional and beautiful
Decorative fences for flower beds play not only a decorative, but also a practical role:
- protect plants from domestic animals;
- help divide the site into zones;
- thanks to them, the territory looks neater and more well-groomed;
- do not allow plant roots to grow beyond the flower bed;
- create a unified style of the site.
A good choice for country flower beds would be - the best perennials and annuals are discussed in the article on our website.
Original hand-made borders will help give your flowerbed a beautiful, finished look. What options for borders are available on your site?
Types of fencing
Currently, in stores you can find a huge variety of plastic, metal and wooden borders, fences and fences of different colors and shapes:
- Fences from separate plastic sections have a small height, can be different colors and forms. They have molded legs that help keep the fence in the ground.
- Border for flower bed in the form of a continuous flexible plastic tape in a roll they are almost completely buried in the ground. With its help, you can create a flowerbed of any shape.
- Forged metal fences look great in any composition; they are ideal for open front gardens and flower beds.
- Concrete fencing are able to withstand sudden changes in temperature, are resistant to unfavorable environments, and tolerate excessive humidity well. They come in the form of decorative borders different sizes and shapes. Frames and individual sections are also made from concrete, allowing you to create multi-level compositions.
- The classic option for fencing flower beds is wooden fences. They fit seamlessly into rustic, modern or classic landscapes.

Despite the variety of ready-made fences, they all have one significant drawback - a rather high price.
Therefore, if you lack finances and have skillful hands, you can create original fences for flower beds and flower beds from any available materials with your own hands.
The video shows ready-made decorative fencing for flower beds, made by yourself.
Choosing a fence for a flower garden
When choosing how to fence a flowerbed, you need to determine the purpose of the structure. The fence, which will simply separate flower beds from lawns or paths, may be low.
If the fence is expected to protect plants from pets, it is better to make it taller (about 40 cm) and use wood or metal. Plastic is not suitable for these purposes.
In flower beds raised above the ground, fencing should help strengthen the soil and prevent it from crumbling. Won't fit here either plastic structures. For such flower beds it is better to use concrete, stone or metal.
Flower bed fencing can help solve another problem - preventing the roots of perennial plants, such as ferns, from spreading.
In this case, a rolled plastic border is ideal, which should be buried in the ground to 2/3 of its height.
It is also necessary to take into account the style in which the site is decorated. So, a fence made of plastic bottles will look ridiculous in a classic style. And graceful forged fences are in country style.
Fence made of plastic bottles
Plastic bottles are a material available to any summer resident. You can use them to make a fence around your flowerbed with your own hands. It is enough just to select bottles of the same shape, size and color, fill them with small pebbles or sand and close the lids.
Then you need to dig the plastic blanks along the edge of the flower bed with their necks down.
If the required number of bottles of the same color is not found, the finished fence can be painted. The same border can be made from glass bottles.
How to make a fence for a flower bed from plastic bottles with your own hands:
Wooden structures
A wooden fence for a flower bed can be made in several ways:
- Fence made of driftwood looks very unusual. Making it is quite simple - you need to find several dry thick branches or thin trunks, remove the bark from them, treat them with some means that prevent rotting, and lay them out around the perimeter of the future flower bed. After this, add soil and plant your favorite flowers.
- has an attractive appearance and will please the eye for a long time. To make it, you need to prepare the required number of logs of approximately the same height and thickness. Along the perimeter of the flower bed, remove a strip of turf and dig a small groove. Insert wooden blanks into it, tightly next to each other, fill their lower part with soil and compact them well. In the same way, a palisade is made from low pegs.
- Wicker fence Suitable for a country style plot. In order to make it, you will need fresh willow twigs and wooden pegs.

Decorative fence made of logs
Sequence of actions in the latter case:
- first you need to dig pegs around the flowerbed;
- then take a twig and start braiding from the wrong side;
- the pegs should be braided in a checkerboard pattern;
- so that the branches fit more tightly to each other, they need to be tapped with a hammer;
- the ends of the rods must be secured to pegs using nails.
If there are bricks left after building a house, they can make a cute and, at the same time, easy-to-make flower border. The easiest way is to lay the bricks flat around the flowerbed.
You can do it another way - remove top layer earth, pour sand into the resulting groove and compact it tightly. Then build a wall of bricks placed on the short side, cover it with earth and compact it well again.
Instead of sand, you can use cement mortar.
The photo shows a simple decorative brick fence
Natural stone - unusual and functional
In addition to bricks, you can also use natural stones. After all, they are found almost everywhere - in the field, in the garden or at the edge of the forest.
It’s enough just to make a border from large boulders - remove the turf around the flowerbed and lay them close to each other. The bottom of the stones should be covered with earth.
If you need a higher fence, it is better to choose flat stones. The first row is laid out on a concrete pad, and all the rest are laid using concrete mortar, to which (for strength) you can add special glue for exterior use.

Stone fencing
In recent years, fences made of luminous stones have become very popular.
To make such a decorative fence with your own hands, you need to cover the pebbles with luminescent paint, which will accumulate energy during the day, and in the evening all the flower beds will be surrounded by a mysterious light.
Mosaic fences
A very beautiful fence around a flower bed can be created from multi-colored pebbles:

Pieces are also used instead of pebbles ceramic tiles, dishes, glass shards or shells.
Rope fence
Using a rope or string you can make a unique fence. It is made without the use of special tools.
It is necessary to place wooden posts with holes drilled in them around the perimeter of the flower bed and stretch the rope, lowering it slightly.
Unusual uses for ordinary things
Almost every home has unwanted or damaged CDs. But few people know that they can make an excellent fence for a flower bed.
You need to tie the disks one to the other in a chain (no more than 6 pieces in each) and attach them to pegs dug along the edge of the flowerbed. You can make a fence either in one or in 2-3 rows. Such a fence will sparkle beautifully in the sun, attracting the attention of passers-by.
Often used to make fences for flower gardens.
They are painted in different colors bright colors, then dig in vertically or lay flat. Several tires laid one on top of the other make an excellent multi-tiered flower bed.
How to make fences for flower beds from tires?
Old furniture and plumbing - unusual and interesting
Eye-catching surrounds can be made from old furniture and fixtures, such as beds, dresser drawers, bathtubs and vanities. They are dug into the ground, covered with nutritious soil and flowers are planted. Old boats or carts are also used.

Fence for a flower bed from the bathroom
An original border can be made from unnecessary plates, placing them on an edge along the perimeter of the flowerbed. The main thing is to choose dishes according to color and size.
Each type of fencing has both pros and cons. However even the most modest and easy-to-make fence can make a flower bed attractive. And making decorative fences for flower beds with your own hands is not so difficult. The main thing is imagination and patience.


, Islam, Judaism How do temples of different religions differ")


