Hello! I think for those who get lost in the forest, a whistle is simply a necessary thing. This article caught my eye.
So, we need an even willow rod, 7-10 millimeters thick. Why willow? Because it is very easy to remove the bark from a willow wand without damaging it. And this, as we will see later, is very important for us.
In addition, willow is a plant with brittle branches, which means that you will not have to spoil a living plant. It is enough just to walk in the after-fresh breeze under the willow tree to collect a bunch of branches, just the ones we need.
We select a branch with intact and even bark (this is a very important condition), if possible, without knots. Now we need to find on this branch a flat area 4-7 centimeters long. There may be buds in this area (this is common with willow), but in no case should there be any knots.
Now we cut the branch along the border of a flat area. At the other end of the section, we make an annular incision, as shown in Figure 1. The incision should be deep enough and slightly (precisely slightly) cling to the wood. To make sure that the entire layer of bark is really cut through, you can remove a ring 1-2 millimeters thick.
After that, we begin to lightly “tap” the bark with a small hammer in a circle in all places. Instead of a hammer, you can use a knife handle (Figure 2). Instead of tapping, you can also “roll” a branch. This is done with the aim that the bark subsequently peels off the wood more easily.

We make a cutout on the branch, of such a shape as shown in Figure 3. After that, carefully, with rotational movements, we try to remove the bark from the branch without damaging it. You should not hurry, if the bark is not removed, you need to knock on it again and try again. In the end, it will definitely be removed (Figure 4).


Now, carefully cut off the “round” with a knife from the branch left without bark just along the line of our cutout, as this is done in Figure 5.

Then we cut off the round barrel (Figure 6).

Do not try to cut it absolutely evenly, it still won’t work. Yes, we actually don’t need it. If the cut turns out to be wedge-shaped, as in our drawing - this is only for the better - it will be easier to adjust the sound.
We insert the cut circle into its original place, cut up. If the cut turned out to be oblique, then we put it as a bottleneck to the hole (Figures 7 and 8).


Now, attention. We clamp the open end of the resulting tube and blow it strongly enough from the side of the round. The result will be a distinct whistle. True, its timbre may not be very beautiful.
Don't worry, we'll fix it now.
We cut off the remaining end of the stick, insert it into the open end of the tube and, moving the stick back and forth, select the most pleasant timbre of the whistle (Figure 9). Then we cut off the protruding part of the branch and the whistle is ready! (picture 10)


Attention! Our whistle gives a rather loud whistle. Therefore, the best place for exercise is a summer house or a country house, but not a city apartment.
And finally, one piece of advice. If you manage to find a willow twig with a fairly long section of even bark, 10-15 centimeters, then instead of a whistle you can make a simple home-made pipe. It is made in the same way as a whistle, but instead of choosing the timbre of the sound, just plug the open end with a wooden cork, and in the remaining space, make 3-4 holes in the bark so that they can be plugged with your fingers at the same time. By opening these or those holes in turn, we will be able to reproduce the simplest melodies. Of course, our notes will not correspond to the natural scale, but we do not need it. The main thing is that the melody is pleasant.
The article was taken from here.
Making a wood whistle that fits in your pocket is a complex process that takes practice, experimentation, and tweaking, but I hope this guide will give you all the information on how to make your own pocket sumac whistle.
Materials:
- An even branch of fluffy sumac (or any other tree with a soft core, such as willow) 7 - 10 cm in length and 1.5 - 2 cm in diameter
- A pair of twigs, debarked, about 0.5 cm in diameter
Tool:
- Manual pruner
- Hacksaw for metal
- Small sharp knife
- Drill
- 0.5 cm cue ball
Security. This manual is about working with power tools and knives, so be careful and wear protective gear.
Step 1: Drill a hole in the bag

Focusing on the core of the sumac, we drill a hole through it with a 0.5 cm cue ball.
Keep the drill at high speed, but do not push it too hard. This will increase the chances that the wood will not burst during drilling. Try to get the hole as close to the center of the wood as possible. If the cue ball is shorter than the sumac, then drill a hole on the other side as well.
Step 2: Remove the bark from the sumac

Peel the bark off the sumac until you reach the wood. If the sumac is fresh, then there will be a thin green layer around the wood, which is easy to scrape off with a knife, and sometimes it is removed simply with your fingers. When using a fresh branch of sumac, the bark is the easiest to peel off.
Step 3: Cutting the notch, part 1

Using a fine-toothed saw, saw through the sumac to half its diameter. This cut should start about 1.5 - 2 cm from one of the ends of the whistle. Saw slowly so that the cut is even, straight and accurate.
Step 4: Cutting the notch, part 2

Measure 1.5 - 2 cm from the previous cut and make a mark in this place. Using a knife, cut the wood in the direction of the cut. The angle of the cut part should be approximately 35 - 45 degrees. Cut the wood carefully so that you do not inadvertently cut off the part that comes after the cut.
Step 5: Create the First Cork

Cut off the first branch, leaving a length of 1 cm. To get a branch of the desired diameter, you will have to be patient and make several attempts. This cork should fit very tightly into the end of the whistle. The opposite of where we made the incision.
Be careful when cutting cork. After all, working with such small objects requires caution, accuracy, and the knife must be very sharp.
Step 6: Create the Second Cork

Following the same procedures as in the previous step, create the second plug. It should fit snugly on the side of the sumac where we made the cut.
Once the cork is ready, cut off 2/5 of it along the long side. This will create a small opening for air when the cork is inserted into the hole and air is blown into the notch.
Step 7: Insert the plugs

Insert the plugs into the appropriate holes so that they are flush with the ends of the whistle. The inner end of the cork inserted from the side of the mouth should be in line with the serif line.
Step 8: Finishing touches

Trim the end of the whistle to which the lips will be applied. To make it more convenient. I kept the design of this whistle simple by cutting the same piece of wood from the other end and making a single circular cut along the body of the whistle.
Feel free to experiment with different whistle embellishments, just don't cut too deep grooves. Make whistles with different shapes under the lips, also whistles from a branch of different lengths will create different tones and pitches.
The most valuable gift is a handmade gift! To make it interesting, original, unusual, you will need not so much time and effort! The main thing is desire. If you have, then this article is for you.
Whistle- a great, unusual gift for any child and for every adult. The task is not the easiest to make the whistle work, whistle the first time. This will require your patience and care.
How to make a whistle with your own hands?
You will get a very beautiful and interesting toy if you make a whistle out of wood! It will turn out natural, natural and alive! It will bring joy and pleasure to its owner. When choosing a tree for a future whistle, willow or linden is usually preferred, since you can easily peel the rod without damaging it at all.
How to make a whistle from a tree?

1. Be careful when choosing the future basis for the whistle. It is necessary to choose a beautiful rod, the thickness of which will be approximately like a finger, about 12 millimeters and cut it off. It is very important to choose a branch with a smooth, beautiful skin, because this is the basis of the future whistle. The length of the branch can be from 5 to 7 centimeters.

2. After you have chosen the desired rod, you need to cut it from all kinds of knots, leaves and small twigs. It is necessary to clean it from this, the rod should be even and smooth. Next, you should cut off the edge of the future workpiece.

3. The next step is to make a small wedge-shaped cut. It should be made deep enough. The notch should catch on the wood. You need to make such an unusual mark, which will soon be needed and will help your future creation.


4. The next step is an annular incision. It must be done 4 centimeters from the end of our rod. The rod should be cleaned of bark, this can only be done with a deep incision.

5. Need to tap the rod. For quick and convenient tapping of the rod, you can use the handle of the most common standard knife. It is lightweight and easy to use.

6. A very delicate task - you need to remove the bark. We scroll the workpiece, and carefully remove the bark with a knife. You must be sure to succeed!

When you peel the bark, it will look like this:

7. Have you forgotten about the unusual mark we made earlier? Now she is useful to us! It is necessary to remove small roundings of wood. Very important: it is necessary to give it the shape of a strip.
So, we need an even willow rod, 7-10 millimeters thick. Why willow? Because it is very easy to remove the bark from a willow wand without damaging it. And this, as we will see later, is very important for us.
In addition, willow is a plant with brittle branches, which means that you do not have to spoil a living plant. It is enough just to take a walk under a willow tree after a fresh breeze to collect a bunch of branches, just the ones we need.
We select a branch with intact and even bark (this is a very important condition), if possible, without knots. Now we need to find on this branch a flat area 4-7 centimeters long. There may be buds in this area (this is common with willow), but in no case should there be any knots.
Now we cut the branch along the border of a flat area. At the other end of the section, we make an annular incision, as shown in Figure 1. The incision should be deep enough and slightly (precisely slightly) cling to the wood. To make sure that the entire layer of bark is really cut through, you can remove a ring 1-2 millimeters thick.

After that, we begin to lightly “tap” the bark with a small hammer in a circle in all places. Instead of a hammer, you can use a knife handle (Figure 2). Instead of tapping, you can also “roll” a branch. This is done with the aim that the bark subsequently peels off the wood more easily.

We make a cutout on the branch, of such a shape as shown in Figure 3. After that, carefully, with rotational movements, we try to remove the bark from the branch without damaging it. You should not hurry, if the bark is not removed, you need to knock on it again and try again. In the end, it will definitely be removed (Figure 4).

Now, carefully cut off the “round” with a knife from the branch left without bark just along the line of our cutout, as this is done in Figure 5

Then we cut off the round barrel (Figure 6).

Do not try to cut it absolutely straight, it will not work anyway. Yes, we don't really need it. If the cut turns out to be wedge-shaped, as in our drawing - this is only for the better - it will be easier to adjust the sound.
We insert the cut circle into its original place, cut up. If the cut turned out to be oblique, then we put it as a bottleneck to the hole (Figures 7 and 8).
Now, attention. We clamp the open end of the resulting tube and blow it strongly enough from the side of the round. The result will be a distinct whistle. True, its timbre may not be very beautiful.
Don't worry, we'll fix it now.
We cut off the remaining end of the stick, insert it into the open end of the tube, and moving the stick back and forth we select the most pleasant timbre of the whistle (Figure 9). Then we cut off the protruding part of the branch and the whistle is ready! (picture 10)

Attention! Our whistle gives a rather loud whistle. Therefore, the best place for exercise is a summer house or a country house, but not a city apartment.
And finally, one piece of advice. If you manage to find a willow twig with a fairly long section of even bark, 10-15 centimeters, then instead of a whistle you can make a simple home-made pipe. It is made in the same way as a whistle, but instead of choosing the timbre of the sound, just plug the open end with a wooden cork, and in the remaining space, make 3-4 holes in the bark so that they can be plugged with your fingers at the same time. By opening one or another hole in turn, we can reproduce the simplest melodies. Of course, our notes will not correspond to the natural scale, but we do not need it. The main thing is that the melody is pleasant.
© www.freee.ru/masterskaya/samodelnyi-svistok-iz-vetki
DIY whistle
Manufacturing difficulty: ★☆☆☆☆Production time: Less than 10 minutes
Materials at hand: ██████████ 100%
I want to introduce you to the simplest homemade - a whistle. Making such a whistle with your own hands is a little more difficult than whistling into it, as you will see later.
- Tin can or any other thin sheet metal
- Paper
- Scissors. Ordinary scissors will also cope with a tin can.
- Writing instrument (pen, pencil, marker, nail)
- Pliers
Step 5. Bend the cylindrical part
We bend the rest of the ring. Use some kind of cylindrical object.
If the metal of your whistle is thick, I advise you to sharpen the edge.
To whistle, tightly hold the whistle with your thumb and forefinger, and blow.
By the way, such a homemade whistle is not the easiest way to whistle loudly! It is much easier to whistle using your fingers. You can learn more about this from the videoResults of the work and advice
- Making a whistle with your own hands is very, very simple, the materials are as affordable as possible.
- You can make a whistle of any tone, even ultrasonic.
- It whistles very loudly, not like plastic toys.
- If you throw a couple of balls inside, you get a typical football turbo whistle. Only the balls will fall out if you do not hold the whistle in your hands =)
DIY whistle
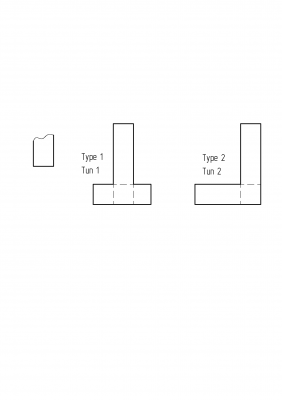
Step 1. Drawings and design selection
You can make such a whistle in two different ways. They practically do not differ, so you can do as you like, more details about the differences will be written a little further. Blueprints


If you don’t feel like drawing, just print the following drawing, it is made in the right scale.
Step 2. Material selection
About the material: make a whistle the best thing made of thin sheet metal, slightly thicker than a tin can. If there is none, then we take directly tin can. Cans of beer and soda will also work, but they are made of too thin metal, and the whistle will turn out to be very fragile, and the whistle will be extremely unstable. It is possible to make a whistle from a sheet of galvanized steel, but it is rather difficult. But at the same time, I succeeded (the first photo of the article).

Step 3. Transferring the drawing
We draw the selected whistle pattern on the metal and cut it out (tin cans are cut without problems with ordinary scissors).
If you have printed a drawing, just cut it out and circle it with a nail or pencil on the metal

Step 4. Bend
Here is the fundamental difference between the two types of whistle, just in the design of the front:
First type


Second type


As you can see, the difference is only in the variant of the bending of the petals. To form a gap through which air will flow, put a strip of metal as in the photo below (it is shaded) and bend the petals onto it according to the selected type and drawing. I do the first type.


Here it is important to press the edge hard enough with pliers so that the gap has the most even rectangular shape.

Now we remove the strip of metal from the gap

If your metal is too thin, fold the strip in half

As a result, we get such a rectangular slot


