The most popular and easy-to-use material for interior decoration of the bath is lining. A tree for a bath is the most suitable option due to its useful qualities and naturalness. Let's figure out how to make this finish with your own hands.
The easiest way to get a beautiful front lawn
Of course, you have seen the perfect lawn in the movies, on the alley, and perhaps on the neighbor's lawn. Those who have ever tried to grow a green area in their area will no doubt say that this is a huge job. The lawn requires careful planting, care, fertilization, watering. However, only inexperienced gardeners think so, professionals have long known about the innovative tool - liquid turf AquaGrazz.
Where to begin?
First of all, you need to opt for high-quality and natural materials. The cladding must be resistant to constant condensation, humidity and high temperatures. You can choose such types of material as brick, foam concrete or gas silicate blocks. However, none of stone materials will not replace wood, if only for the reason that the stone cannot create a special microclimate that attracts to the steam room, as well as the smell of wood, which is still loved by all visitors to the bath.
Why all the same lining?
clapboard - view building material made from wood. It is distinguished by its board structure, which has a special groove along the sides. Due to this fastening between the panels, maximum contact is ensured, which contributes to greater thermal insulation. Among other things, lining is considered outwardly beautiful material, practical and durable.

What kind of lining will be needed for sheathing?
It is important to pay attention to the characteristics of the tree when choosing. It should:
- be resistant to high temperatures and temperature fluctuations;
- be moisture resistant and durable;
- have an affordable and reasonable price.
Faced with a wide range of material, we begin to distinguish typical characteristics boards.
- eurolining
Many stop at this variety, since the large dimensions of the board make it easier to install, and special slots on the back side provide ventilation for the wood, which prevents it from drying out and cracking. Eurolining at the manufacturing stage is being processed protective equipment. This facilitates the process of self-processing wood. Feel free to use the lining as a lining.

- classic lining
Narrow boards standard size with right angles. the best way sheathing such a board is considered a vertical mount. If you mount them horizontally, the space will visually lose its beauty, condensate will be able to flow under the boards, which will lead to the destruction of the finish and its deformation.
- lining "calm"
Similar in design to the classic board, but has rounded corners. The back side is provided with special gaps that contribute to the ventilation of the material.
- lining "soft line"
It is considered a type of lining that combines the “calm” option and eurolining. It features an elongated spike for better bonding and rounded corners.

- block house
A popular type of lining, imitating a log. As a rule, it is considered the best option for exterior finish facade, however, for bath sheathing can be considered suitable material. Convenient installation and durable operation are ensured by tenacious fasteners and ventilation of the boards on the reverse side.
Varieties of lining
Having decided on the type of lining, select the type of material:
- premium class (grade 0)
It has a perfectly smooth surface and a high price. The material is absolutely high quality, has no flaws, irregularities.
- class "A" (grade 1)
Has an acceptable number of knots and cracks. Resin can be observed on the surface, roughness is possible.
- class "B" (grade 2)
Cracks have a through character. The presence of knots is increased. In some places there is a protrusion of the natural rot of the board. It is necessary to protect the surface with varnishes and paints, which does not allow the use of the material in the steam room. Sheathing of other rooms in the bath is allowed.
- class "C" (grade 3)
Bad material for sheathing baths. If you use material for decoration, then no more than as auxiliary material for technical purposes. The characteristics of the lining are such that there are a large number of flaws and defects on the board.
Choosing wood
Finally, you can start choosing the type of wood.

- Linden
The interior decoration of the bath with linden clapboard is the most popular. The tree provides an ideal microclimate. Linden characteristics:
- strength, reliability;
- resistance to drying out;
- loved by many wood structure and color palette;
- requires processing, otherwise the surface will begin to noticeably rot or acquire a dark shade.
- aspen
The lining has a soft and elastic structure, which allows for easy installation. A special feature of wood is the fact that over the years it does not wear out. On the contrary, the longer the material is used, the stronger its structure becomes. Aspen is considered a moisture resistant material. During operation, the material is easily sanded.
- alder
It has tannins, which is beneficial for the body, it is well susceptible to high temperatures. However, wood has a low thermal conductivity and a high price.

- oak
Oak lining is a difficult material to process and install. This may turn out to be insignificant disadvantages, given that the tree is practically not exposed to rotting and mold. In addition, the cost of the material is very high.
- other types of lining
Alternative options can serve as a lining made of ash, as well as hardwood or softwood.
What are the nuances to remember?
Installation of thermal insulation
The most important condition for a bath or sauna is exposure to heat and steam. Therefore, sheathing the walls and the floor with the ceiling with clapboard is half the battle. Preliminary stage before finishing, the installation of a heat-insulating layer will be considered. There are several ways to do this:
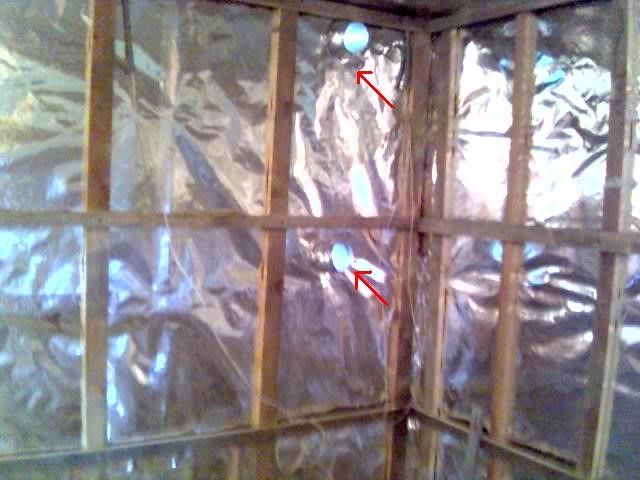
- The budget option is to mount with a stapler to the wall aluminum foil or parchment. The insulation is installed in the free spaces of the crate and closed with a vapor barrier.
- Laying insulation directly on the walls before installing the crate for finishing. The heater is covered with foil. Only after that we build a crate and trim the walls with clapboard.

As a heater the best option for the bath will use basalt wool.
It is important to install the insulation so that there are no gaps, no free spaces, or even gaps left on the wall. It is necessary to protect yourself from getting small particles of cotton wool into your eyes or mouth with construction goggles and a respirator.
Thus, when installing insulation and wrapping the walls with foil, you will provide your bath with good thermal conductivity and resistance to condensation and moisture.
Ventilation
We have already talked about the fact that the walls should be the right way ventilation installed. After installing the insulation and the crate, the most important thing for the walls will be the formation of holes under the ceiling and on the floor, preferably next to the firebox. Ventilation must be installed so that there is Free access To her.

Sheathing installation
As with any construction activity, a special list of tools is needed to finish the bath from the inside. Install the skin with:
- perforator (you can use an electric drill);
- construction stapler (you will need the appropriate staples);
- electric jigsaw;
- building square, level and tape measure;
- screwdriver (you will need self-tapping screws of the same size);
- nails, kleimers and a hammer.
Clapboard upholstery of bare walls will not lead to anything good. After installing the insulation or even before that (depending on which method of insulation you have chosen), you need to install a crate, on which the lining boards will be attached in the future.
First of all, check the presence on the walls big holes or indentations. If there are any, they must be sealed, otherwise there is simply nothing to fasten the crate to.
The direct manufacture of the crate with your own hands begins with the preparation of rails, wooden bars. They are attached to the wall with nails or screws. Rails should be installed horizontally on the wall, on equal distance from each other. The interval between them must be made such that the insulation can easily fit into it. The fastening of the rails begins at the edges, and then the installation moves towards the middle. The crate is ready, you can proceed to the sheathing.
After purchasing the lining, do not rush to fill it on the walls. The material needs to "settle" in the closed room of the bath for 24 hours. What is it for? The answer is simple: the boards need to absorb the necessary moisture, deform as much as possible so that the boards do not crack before the allotted time. After waiting for their deformation, the boards need to be treated with a solution and dried.
There are three ways to fasten boards: vertical, horizontal and diagonally.
- We fasten the lining vertically
A common option for baths or saunas, as the mount is quite simple and convenient. When used, the fastening is practical: when condensation appears on the walls, moisture flows along the boards, this protects the material from water entering the wall.

Air is circulated through this right direction, due to this, the correct microclimate is created in the steam room, the movement of air around the room is free.
The disadvantage may be unprofitable use. If you need to replace one of the lining boards, you will have to disassemble the entire structure.
- We fasten the lining horizontally
Many reject this method because of its insecurity. This is not so: the fastening of the boards occurs with a spike up, which means that water, as well as with vertical mount, will get inside with a low probability.
When choosing such a mount, get ready to install the crate: thanks to it, the air will circulate properly between the lining and the wall.
Boards are easy to replace. It is especially correct to install this type of fastening of the lining on the floor, since the boards are subject to rapid deterioration.
The horizontal way of sheathing is convenient in the baths "under the frame". Such structures shrink over several years and have a permanent deformation. When installing the lining vertically, a change in the position of the boards is inevitable. 
- We fasten the lining diagonally
As a rule, the mount is used for the ceiling. Boards are fastened with clamps. Installation starts from the corner. Installation of boards is carried out in rows around the entire perimeter of the ceiling. Excess boards along the edges are sawn off with an electric jigsaw at an angle.
Facing the bath in stages
We begin the installation of cladding from the ceiling. Fasteners for boards are carnations or kleimers, which are driven in in several ways:
- Nails at 45 degree angles. On the ceiling, the fasteners will be completely invisible. Fasten the boards together with a small gap, allowing them to swell quietly without damaging the structure.
- Nails are driven through. The best option for eurolining. It is important to first drill a recess in the wood, and then drive in a nail. You can mask the fasteners with stoppers.
- Fastening with clamps facilitates the process of mounting the lining. They are installed on the crate, and the lining simply interlocks with them during installation.
- It is possible to use oblique or hidden nailing. One of difficult ways mounts. If you are working with such materials for the first time, it is better to refrain, as there is a risk of spoiling not only the board, but the whole work as a whole.

Finishing the sauna with clapboard
Lining - the material is thin, it is difficult to finish nails with a hammer, so you can use a hammer.
As on the ceiling, on the floor and walls, the lining should be fixed with a small interval between the boards for its free movement. The distance of the gaps is approximately 2-3 mm. You can leave a space of 15 mm between the ceiling and walls, hiding it with a ceiling plinth.
The lining is mounted on the walls in the same way as on the ceiling. We start the sheathing from the corner and move towards the center. The gap from the floor should be about 1-3 centimeters so that water does not approach the boards and they do not rot at a rapid speed. We take into account the gaps between the boards. It is important to leave them so that each board has its own space for movement and swelling.
How to make these gaps? Simple: the second board is driven into the first until it stops. Several stripes are marked along the seam with a sharp object. After that, the board moves to the marked lanes. Make sure the board is spread evenly using a level.
The final stage of the sheathing will be the first warming up of the room and "sampling". It is necessary to check the material for strength and make sure of its quality after the room has cooled down. If fastening defects are found somewhere, they can be additionally fixed with nails.

Finishing the bath clapboard inside with your own hands
Consider the subtleties when lining the clapboard:
- be sure to consider the location of the lining spike when installed in a horizontal position;
- fasteners must be galvanized to avoid corrosion and rust of the metal, and, consequently, smudges on the tree itself;
- observe the correct spacing between boards for proper ventilation and free movement of the lining during the heating of the room;
A home sauna or bath can be not only convenient and practical, but also very original. Even using standard materials for decoration, you can decorate the interior in a very interesting and unusual way, the main thing is to show imagination. The combination of wood and tiles, the combination of contrasting shades, experiments with the shapes of the shelves will make the room truly exclusive. In addition, finishing the sauna with your own hands will not require high costs or specialized knowledge.
The ideal finishing material for the steam room is wood. The wood must have a high density, beautiful view, resistance to decay. It is not recommended to sheathe the steam room with pine: when heated, it releases a large amount of resin. If funds allow, you can buy African oak, Canadian cedar, fir or rosewood. These breeds have a delicate aroma, very beautiful pattern and attractive colors.

Linden, birch, aspen, ash and alder are considered budget options. Linden croaker covered with bast is in great demand. Its surface is pleasant to the touch, never gets too hot and, thanks to its porous structure, has the ability to regulate the humidity in the steam room. Birch, like alder, is valued for medicinal properties, and ash for durability and a beautiful cut of the core.


It is not necessary to use the same wood for lining the washing room as in the steam room. For this room, pine lining is ideal: due to the presence of resin, the tree is not afraid high humidity, emits a pleasant aroma, does not rot, retains for a long time beautiful colour. Spruce lining has the same properties, so it is also often used to finish the washing in the sauna.

Of great importance is not only the breed, but also the quality of the wood. You should choose boards with a minimum number of knots, well dried, without distortions and black spots. On cuts, the wood should have an even light shade; slices gray color indicate poor quality of the material and inappropriate storage conditions.
Along with wood, other materials are also used in the decoration of the sauna. The areas around the stove are affected high temperature, and therefore they need to be faced with stone or heat-resistant tiles. Soul walls, separate sections washing and the floor are also recommended to be tiled. For convenience, on a tile floor, you can install wooden pallets rectangular or square shape. To make the interior of the sauna extraordinary, you should correctly combine wood with stone and tiles.

Surface preparation
Before proceeding with the finishing, you need to properly prepare the floor, ceiling and walls of the room: isolate them from moisture, insulate them with high quality, check for strength. wooden ceiling and the walls must be treated with a primer with antiseptic properties, walls made of bricks or blocks are leveled with cement plaster.

The floor is especially carefully leveled: both tiling and plank flooring require maximum flat surface slight slope. At the preparation stage, they think over the location of the drain for water and the chimney, mount everything you need.
Finishing technology
During finishing works would need:
- building level;
- screwdriver;
- hammer ordinary and rubber;
- nails;
- self-tapping screws;
- tile adhesive;
- notched trowel;
- jigsaw;
- drill;
- clinker tiles;
- lining;
- timber and slats for lathing;
- insulation;
- vapor barrier film.
Step 1. Floor cladding
Finishing the sauna should start from the floor. For cladding, usually choose clinker tiles because its surface does not slip even after getting wet. Experienced Builders it is recommended to lower the tiles into water before laying, which will reduce the consumption of glue. So, knead the glue, lay out the tiles, take a notched trowel.

Finishing the floor in the steam room
Begin facing from the corner opposite the entrance to the steam room. On the concrete surface apply a layer of heat-resistant glue and level with a notched trowel. The first tile is applied, pressed to the floor, plastic crosses are inserted between the wall and the edge of the tile. Next, adjacent tiles are laid, again inserting crosses to ensure uniformity of the seams. Be sure to check the location of the tiles horizontally, the protruding elements adjust rubber mallet. Excess glue is wiped off with a clean, dry cloth so that there are no sloppy marks left.

After facing the entire surface, the joints are grouted with a special compound. It is applied with a narrow rubber or metal spatula, carefully rubbed into the seams, and the excess is removed. Finally, wipe the floor with a clean, damp cloth. While the glue dries, you can start making wooden pallets.
Step 2. Mounting the battens on the walls

For insulation and vapor barrier of the walls, a crate is required. To make it, take even beam 50x50 mm and nailed to the base of the wall. If the walls are brick or block, the crate is fastened with anchor bolts. The sheathing is attached to the crate perpendicular to the beams, therefore, for horizontal sheathing, the beams are nailed to the walls vertically and vice versa. The distance between the posts is approximately 50 cm.
Step 3. Laying thermal insulation

A waterproofing membrane is fixed on top of the crate with a stapler so that the material sags slightly. Between the racks of timber, sheets of insulation are inserted in one or two layers. The thickness of the insulation should not exceed the thickness of the racks. Carefully check the surface for gaps and cracks, if necessary, blow it with foam. The final layer is a vapor barrier film. It is also attached to the frame with stapler staples, laying the material with an overlap of 10 cm. The seams are sealed with adhesive tape.

Step 4. Wall cladding
At this stage, it becomes possible to show imagination and decorate the interior to your liking. You can completely sheathe the walls with clapboard or boards, picking up fragments different shades, or you can combine wood and tile. The tile looks beautiful under the stone around the perimeter of the doorway, framed by light wood. Mosaic inserts in the middle look original wooden panels, tiled niches for bath accessories, masonry around the oven.

All wooden elements brought into the room a day before the start of work, so that the material acclimatizes. First you need to mark the areas for tiles and under the tree, and then proceed to the sheathing. Stuffed across the racks wooden slats, which will provide a gap between top coat and vapor barrier. Then, with the help of self-tapping screws, the lining is attached to the rails, checking the vertical position of the boards with a level.

In the steam room, it is advisable to make inserts from heat-resistant tiles only around the stove, but in the washing and locker rooms you can veneer any surface. After cladding with wood, the remaining areas are covered with decorative tiles. The joints between the extreme board and ceramics should be as even and tight as possible, so all gaps are sealed with mastic.

Step 5. Ceiling finish

Ceiling beams are covered with a waterproofing film, fixing it to the ceiling with stapler brackets. The space between the beams is filled with any insulation, the thickness of which does not exceed the thickness of the beams themselves. Then the insulation layer is carefully covered with a vapor barrier film or foil, the seams are sealed with a special tape. Laths 2 cm thick are nailed to the protruding beams every half meter. Finishing trim - lining is attached to the rails.

Sauna cladding with bamboo panels
An alternative to wood paneling are bamboo panels. This material is only gaining popularity, so it is not often found in home saunas. Bamboo panels have a lot of advantages: they are not afraid of high temperatures, humidity, mold, they have high strength and an unusually attractive appearance. Thanks to their flexibility, these panels easily take any shape, so they can be mounted on curved and rounded surfaces, arches and niches.

To sheathe the walls of the sauna with bamboo panels, the surface is prepared in the same way as the wall paneling. After warming and fixing vapor barrier film strong wooden slats with a thickness of 2 cm or more are nailed or screwed to the racks. The panels are attached to the slats with staples of a construction stapler or liquid nails, if the panels are small.

Manufacturing and installation of shelves
Furnishings always play an important role in interior decoration. In the sauna, this function is assigned to the shelves. Usually they have a rectangular shape and are mounted on 2-3 levels. They are sheathed completely or with small gaps, and linden boards are used as sheathing. There are 3 ways to arrange the shelf in the steam room: "compartment", stepped and L-shaped.


The first option involves the arrangement of the lower stationary shelf and the upper lifting shelf adjacent to the wall. This method allows you to save space in a small sauna: if necessary, the seat can be easily lifted and fixed in this position against the wall. The second option is to install three shelves different widths at one of the walls. The shelves are located one above the other, the widest is attached at the bottom and is the coldest. With the L-shaped method, two shelves are installed around the perimeter of the corner, and the third is fixed above one of them.
Of course, the easiest way to assemble shelves standard view and sizes, arranging it in one of the described ways. But if you connect fantasy, you can make everything much more interesting. For example, if you use light wood for sheathing a shelf, and fasten a dark-colored board along the edge, the look of the room will noticeably change.

The corners of the shelves can be rounded off or decorated with details cut out with a jigsaw, lattice fragments can be inserted between the solid seat trim, and the seats can be shifted along the walls in a checkerboard pattern. Anything that differs from the standard arouses interest and attracts attention, so even a slight change in shape will help bring a touch of originality to the finish.

Video - Do-it-yourself sauna decoration
Interior decoration is the most important stage in the arrangement of any bath, and the Finnish sauna is no exception. You can handle the finishing work with your own hands. You just need to understand the basics of the work ahead and gradually carry out all the activities in accordance with the most important recommendations.

First of all, you must choose materials that are optimally suited for the interior. Finnish sauna. In the steam room, the air temperature will rise to high values. The materials must be such that visitors to the sauna could not get burned.

Finishing can be done using materials that heat up to a maximum of 50-60 degrees. This requirement is met only by wood and ceramic tile. The walls near the stove and the stove unit itself are lined with various natural materials.

The use of paints and varnishes for finishing the Finnish sauna is strictly prohibited.
Wood is subject to mandatory treatment with special water-repellent compounds that can prevent excessive moisture and rotting of the material. Such hydrophobic compounds do not change the color and texture of wood and are completely safe for human health.

Features of different types of wood
Present on the market today huge selection the most varied wood materials suitable for interior decoration of the bath. Be sure to study the features and basic properties of the available options.
Abashi

This is African oak. Among the main advantages of this type of wood, the following points should be highlighted:
- high strength;
- durability;
- relatively low weight;
- absence of knots and resinous secretions.
Oak finish does not burn the skin. the only significant disadvantage material is its high price.
Cedar

Altai, Ussuri and, of course, Canadian breeds are suitable. Advantages:
- resistance to excess moisture, high temperatures and temperature extremes;
- resistance to fungi, insects, rot;
- excellent aesthetic qualities;
- good fragrance.
In alternative medicine, cedar occupies an honorable place and is considered a healing material that has a calming effect on the body and destroys pathogenic bacteria.
Linden

One of the most widely used finishing materials. Main advantages:
- high strength and sufficient hardness with a relatively small weight;
- normal tolerance of high temperature and excessive humidity;
- pleasant aroma;
- beautiful colour;
- medicinal properties.
Alder

Excellent material with healing properties and a pleasant non-burning surface. Alder does not emit resin, which is a very important advantage in high temperature conditions.
During heating, the material slightly changes shade, and when cooled, the color returns to its previous state. This gives additional aesthetic pleasure in the process of bath procedures.
Larch

Tree of the pine family. It has high strength and pleasant to the touch surface. When heated, it gives a pleasant aroma and releases a lot of useful substances. Larch is characterized by a long service life even in conditions of high temperature and humidity.
Pine

If you want to use pine or spruce wood for finishing the Finnish sauna, pay attention only to wood from northern regions. Spruces and pines from Finland stand out favorably against the general background.
Wood has a high density and does not lose its original properties for a very long time. Pine normally tolerates contact with moisture, does not rot and is not affected by fungi, provided it is properly handled. High-quality pine fills the steam room with a pleasant smell.
Aspen

Budget finishing material. The wood contains no resins. Aspen is easy to process. new material has a pleasant White color. However, after a while, the aspen begins to darken. Also, the disadvantages of the material include a tendency to various wood diseases.
Birch

It has a strong and uniform structure. Under the influence of high temperatures may be somewhat deformed. To prevent this from happening, you need to buy already high-quality dried material. It has a pleasant color and healing properties.
The sequence of finishing work
Interior finishing work in the Finnish sauna begins with the arrangement of the floor. Then the ceiling is made out, and in the end - the walls.
If possible from the device wooden floors sauna should be avoided. Of course, with a plank floor, the interior of the steam room will look more organic and whole, however, it is very difficult to dry such floors. Usually, the owners do not pay due attention to drying, as a result of which the steam room quickly begins to smell unpleasantly of rotten wood.
That is why it is best to use ceramic tiles for flooring in a steam room.
First step. Align the base under the tile. To do this, fill in the usual concrete screed. At the same stage, equip the foundation for the future stove. Select the dimensions of the base in accordance with the dimensions of your furnace unit. Make the height such that the foundation rises above the floor by about 10 cm.

Pour the screed so that the finished base for the tile is tilted by about 1% towards the location of the pit for collecting water.
Second step. Make a pit near the location of the furnace. Lay a drain pipe from the pit to the street with a diameter of 5 cm or more.
Third step. Lay the tiles on the dry base. It is best to use clinker tiles - it does not slip even when wet.

Start facing from the corner furthest from the entrance to the steam room. To fix the tiles, use a special heat-resistant adhesive. Apply adhesive composition on the base with a comb trowel. Optimal Thickness glue layer - 1.5-2 mm.
The joints between the tiles must be the same. To comply with this requirement, use special plastic crosses. Make seams up to 4 mm wide. Remove excess adhesive from the seams immediately.
Fourth step. After the glue dries (usually it takes 1-3 days), start grouting the joints. A rubber spatula and a special grout will help you with this. Choose the color of the grout at your discretion. After grouting, wipe the floor with a damp sponge.

Fifth step. Lay wooden grates on the floor.

The ceiling of the Finnish sauna is subjected to the most intense heat exposure. The best option for such premises is a hemmed ceiling structure.
First step. Assemble the frame of the structure from boards measuring 15x5 cm.

Second step. Attach plastic wrap to the frame boards. This will help you construction stapler with staples.
Third step. Lay the selected insulation in the cells of the frame. Usually mineral wool is used.
Fourth step. On top of the insulation, attach a vapor barrier membrane material to the frame boards.
Fifth step. Attach perpendicular slats about 3 cm thick to the frame boards. These slats must be fastened in increments of about 6 cm.
Sixth step. Attach lining boards to the rails. For fixing, use clamps or other convenient fasteners.

If a stove will be used in the bath that requires the installation of a chimney, mount a special flange or a passage assembly into the ceiling. These elements are sold in specialized stores for oven equipment and accessories for steam rooms.
wall cladding
Before you start decorating the walls, provide conditions for sufficient ventilation of the steam room. To do this, create in the walls through holes for air supply and exhaust.
Equip the supply channel at a height of up to 50 cm from the floor, preferably not far from the stove. Place the hood on opposite side to the supply duct at a distance of about 50 cm from the ceiling. Install on the holes ventilation grates preferably wooden. After that, you can proceed directly to the decoration of the walls.

First step. Attach the vertical support posts to the base. To fix these elements, use screws or nails. First, fasten the corner posts, pull the rope between the extreme supports and, guided by it, set all the internal beams in increments corresponding to the width of the selected insulation.
Second step. Lay the waterproofing film on the wall and attach it to the posts with a stapler.
Third step. Lay insulation on top of the film in the cells of the frame.

Fourth step. Cover the insulation vapor barrier material. Attach the vapor barrier to the posts using a stapler.
Fifth step. Nail on top of the racks perpendicular rails.

Sixth step. Attach the lining to the rails. Place sheets vertically. To fix the skin, use clamps or other convenient fasteners.

If you decide to fasten the lining in a horizontal position, do the work in the same order, but do not fill the perpendicular rails, but fasten the sheets directly to the racks. In such a situation, it will be necessary to use racks that would protrude 2-3 cm above the thermal insulation. Start the sheathing from below.

Line the walls near the stove with non-combustible materials. The best option is natural minerals such as soapstone, jadeite, etc. These same minerals are perfect for finishing the stove.
Finishing work
Install the door. Linden canvases are usually used. The size of the door to the steam room should be at least 190x70 cm. A tempered glass door is also perfect.


If your sauna is designed with windows, opt for double systems to ensure better thermal insulation. If possible, windows should be placed at a small distance from the floor.

To illuminate the sauna, use luminaires that are resistant to high temperatures and excessive humidity. Most the best way– fiber optic lighting devices.

In conclusion, you will have to lay out or install a ready-made stove unit and very soon you will be able to enjoy the warmth of a Finnish sauna finished with your own hands.

Successful work!
Video - Do-it-yourself bath interior decoration
Video - Exclusive steam room, top-level bath finishing
Wooden paneling of the walls and ceiling in the bathhouse is a traditional finishing option that allows you to accumulate heat in the rooms and create an optimal microclimate for bathing procedures and relaxation.
Finishing a bath inside with a clapboard with your own hands is available to anyone who has minimal skills in working with tools for building wood. But at the same time, it is important to strictly observe the technology of work at all stages so that the skin does not deform over time and does not lose its functional properties.
Material selection
You can decorate the bath rooms with ordinary clapboard or eurolining, and it is recommended to use eurolining at least for cladding the walls and ceiling in the steam room. The advantages of eurolining include:
- larger size lock connection(the lock is more reliable and easier to install);
- the presence of vertical slots on the back side (they compensate for internal stresses, preventing cracking of the planks, provide ventilation and condensate drainage, protecting the wood from decay);
- protective treatment (the tree is pre-treated with products suitable for use in a steam room).
The lining of the bath inside is carried out using lining only of the highest (elite) or first grade - such wood has no defects. If, for the sake of economy, planks with knots are used, they are placed in areas where contact with human skin is excluded (ceiling, lower part of the wall under the shelves).
The choice of wood species depends on personal preferences and financial capabilities, but it is important to select the material from the options suitable for use in the bath. These include: traditional linden, aspen, alder, oak, cedar, larch (mainly for the washing department), ash, as well as exotic breeds wood - abachi, hemlock, etc.

Preparatory stage
The walls in the bath need high-quality internal insulation. First of all, a roll is attached to the wall. waterproofing material- it is mounted by pressing the battens with rails.
Mats of non-combustible fibrous insulation are laid between the elements of the crate - they are fastened by surprise, for which the size of the mat should be 2-3 cm larger than the distance between the laths of the crate.
A layer of foil vapor barrier is laid on top of the cotton wool. The canvases are fastened with an overlap of 10-12 cm, the joints are glued with aluminum tape. For fastening a heat-reflecting vapor barrier film, a construction stapler is used.
If used as a heater mineral wool foil-coated, installation of a vapor barrier membrane is not required. The mats are fastened with the foil side towards the lining of the lining.
Narrow slats 20 mm thick are stuffed along the crate - a counter-lattice, thanks to which there will remain between the insulation layer and the sheathing air gap for ventilation.
At the stage of preparation for finishing the bath with clapboard, it is required to take care of ventilation - provide appropriate holes near the stove, one at a level of 150-300 mm from floor covering, the second - under the ceiling. Air ducts are mounted from corrugated aluminum pipe, valves are installed on the holes to adjust the air flow.

The principle of fastening the skin
The premises are trimmed from the inside with clapboard in two ways: the slats are placed vertically or horizontally. Each of the mounting methods has its own characteristics:
- Vertical laying. It is quick and easy to install, condensate easily rolls down through the slots on the back of the planks (but also easily rises through the capillaries of the wood), the tongue-and-groove lock is protected from moisture penetration. Due to the vertical arrangement of the slats, it is easier for heated air to circulate inside the steam room.
- Horizontal laying. When fastened with a spike upwards, the lock is also protected from moisture ingress, air circulation between the casing and the insulation is better due to the fact that the laths of the crate are arranged vertically. With a horizontal arrangement of the lining, if necessary, it is possible to replace planks damaged by water located near the floor without touching the rest of the skin.
The vertical fastening of the lining is suitable for saunas with dry steam, the horizontal one is more functional for a Russian bath with high humidity. But in general, the choice is determined by personal preferences.
Lathing installation
Sheathing the bath from the inside, the first thing they do is mount the crate under the lining. Used for cladding frame wooden beam, treated with fire-retardant impregnation. Please note: the timber should not be pine or spruce (this wood emits pungent odors of resin when heated), the composition for protective treatment selected specialized, non-selective harmful substances at high temperatures.

If the lining is mounted vertically, the laths of the crate are mounted horizontally; a vertical frame is required for horizontally directed sheathing. The fastening step of the elements is 40-60 cm.
Before the stage of installation of the casing, it is necessary to lay the wiring to the installation sites of the lamps, to the socket for the electric sauna stove, etc. The wires are mounted in moisture-proof non-combustible corrugated casings.
Installation of lining
The lining of the bath from the inside is carried out using hidden fasteners, because:
- it is easy to get burned on the open caps of metal fasteners;
- low-quality hardware rusts under the influence of moisture and stains spoil the appearance of wood;
- open fastening (for safety, the hats are sunk into the wood) worsens the appearance of the room.
Kleimers and small carnations are used as hidden fasteners. If it is decided to use self-tapping screws, then it is recommended to close the holes into which the heads are recessed with wooden plugs, which complicates installation.
ceiling lining
Considering how to properly sheathe bath room, you should pay attention to the order of work. First of all, the ceiling is finished, since the wall strips must rest against the horizontal cladding.

Planks are mounted starting from the wall with front door. Between the ends of the finishing elements and the walls there should be a gap of 40-50 mm, which is necessary to compensate for the thermal expansion of wood (the ceiling heats up the most, as it rises hot air) and for good ventilation between cladding and walls.
The slats are fastened to the clamps. The last board is fastened with finishing nails without a hat, which are driven in with a hammer so as not to damage the wooden plank.
wall cladding
Installation of lining begins from one of the corners of the room. The fastening of the boards is standard: the edge of the first board is fixed with hidden nails, the kleimers press the edge of the groove to the crate, the comb of the next element is inserted into the groove.
The upper ends are adjusted to the ceiling point-blank. Between the floor and wall sheathing in the steam room, it is necessary to leave a gap of 20-30 mm to prevent rotting of the lower part of the sheathing. At vertical mounting lining moisture rises through the capillaries by 40-50 cm, with horizontal - by 20-25 cm.
Finishing the washing compartment from the inside with clapboard, the gap between the floor and the sheathing is increased to 40-50 mm.
Sheathing in the steam room should not rest against adjacent walls - a gap is needed to compensate for the expansion of wood under the influence of temperature and high humidity. Also, the lamellas themselves should not be joined as tightly as possible, point-blank.

To create the necessary gap between the slats, the following method is used:
- The crest of the bar is driven into the groove of the previous one until it stops.
- Marks are made along the seam line with a sharp object.
- The bar moves a few millimeters relative to the marks.
- The verticality of the lamella is checked, after which it can be fixed with clamps.
If you join the seams of the ceiling and wall cladding, finishing the bath inside the clapboard will look spectacular.
Installation of additional elements
The outer and inner corners, skirting boards are fixed using finishing nails without caps, which are recessed into the wood. Places of installation of fasteners are polished sandpaper so that no roughness remains.
The slopes of the doorway can also be sheathed with clapboard, cutting it to size. For framing the openings, platbands are used from the same wood as the door.

If the bath is installed wooden windows, for the design of slopes, you can use the lining, the gaps between the junction of the wall sheathing to the window opening in this case are closed decorative strips or a flashing for lining.
Finishing near the stove in the steam room
Lining is a combustible material and it should not be adjacent to sauna stove. The corner at the stove or part of the wall around the built-in stove is lined with stone or brick, or a screen made of sheet metal, under which a non-combustible sheet heat insulator is laid.
Also, wooden cladding should not be allowed to come into contact with chimney- in the place where the chimney passes through the wall or ceiling, a “coupling” is mounted from a non-combustible fibrous heat insulator and a metal apron is attached.
Final work
Finishing the bath inside the clapboard includes the stage of material processing special formulations, preventing wood decay, discoloration under the influence of external factors.
The steam room and washing room trimmed with wood, the dressing room is treated with compositions on water based or wax based. The environmental friendliness of protective equipment is important.
Lamps are mounted on the ceiling or walls, covered with decorative wooden gratings. Ventilation holes supplied with valves - they are also easy to install with your own hands.

Shrink finish features
How to sheathe a bath inside with a clapboard with your own hands, if the log house was built recently? For complete shrinkage wooden bath it takes at least 3 years, but you want to start using it as soon as possible. To solve the problem, apply special technology sliding mounting inner lining.
When arranging the frame of the crate, sliding guides are used - metal elements in the form of corners with a slot allow the sheathing to move when the frame shrinks. This eliminates the risk of deformation of the inner lining.
Between the ceiling and wall sheathing leave a gap of 20-30 mm for shrinkage. The gap is covered with a plinth fixed to the ceiling.
To sheathe a bath with clapboard without unnecessary financial expenses, it is recommended:
- apply material different sort and species - for the dressing room, the requirements for the type of lining are much lower, the use of cheaper coniferous, including 2 grades, is allowed;
- buy lining of different lengths - short lamellas are cheaper, and where long slats are not required, you can use them;
- to finish the sink, use alternative inexpensive options finishes, including PVC panels.

Competent choice finishing material and compliance with the installation technology of the inner lining make it possible to do the finishing of the bath with your own hands, saving on the involvement of specialists - the services of professionals require an increase in the budget for construction.
The interior decoration of the bath, especially the steam room, is one of the most important elements of the interior. The most popular material for this is lining, the use of which will achieve optimal combination appearance and high performance characteristics of the material.
Quite a long time ago, the range of wood species was determined, which, as a rule, are used in interior decoration baths:
- Linden. Along with aspen, it is the most popular material used for bath interiors. Possesses high resistance to humidity, keeping color and structure of material. In addition, it has characteristics due to which linden is used in the manufacture of benches, ladles, shelves used in the bath, as well as doors to the steam room.
- Aspen. Soft and pliable material with equally high resistance to water and steam. Special attention it is necessary to pay attention to the proper drying of aspen, after which its density and strength increase significantly.
- Cedar. The most expensive of the materials used in the decoration. Less linden and aspen heats up, does not emit resins, like pine, which prevents skin burns.
- Pine. Cheap option softwood wood, rarely used in a steam room, and much more often - in a dressing room or rest room.
Technology Definition
In fact, almost always the skin technology is the same. Unless there are two options for the location of the lining - vertical and horizontal.
In most cases, the second method is used, since it is more convenient in the production of finishing work and operation.

Execution of work

Lathing device
A beam with a thickness slightly larger than that of the insulation used is used (as a heat-insulating material, as a rule, mineral wool is used). It is installed perpendicular to the chosen direction of the lining in increments of approximately 45-55 cm. If the walls are uneven, it is necessary to use linings from the same type of wood or some material of sufficient density. The crate is attached to the wall with screws with plastic dowels or self-tapping screws made of galvanized metal.

Insulation laying
In most cases, as mentioned above, mineral wool is used, which is presented on the market with the most various kinds and modifications. The main rule for laying insulation is the absence of gaps between the material in order to avoid the formation of cold bridges.
Video instruction:
Sometimes mineral wool does not fit at all - if there is no need for additional insulation, and the crate is made only for fastening the lining.
Vapor barrier device
Can be used glassine, roofing felt or plain polyethylene film. The strips are attached with a stapler for furniture work with a mandatory overlap of at least 5-7 cm. For greater reliability, the joints are additionally glued with adhesive tape or tape, as wide as possible.

Ventilation device
The favorable microclimate in the bath largely depends on correct operation ventilation. For her normal functioning when installing insulation, it is necessary to provide ventilation holes.
Installation of lining on the walls of the steam room
Fastening is carried out necessarily using a hidden method, using self-tapping screws, clamps or nails.

This is necessary in order to:
- avoid the possibility of contact with a heated hardware;
- prevent its contact with steam or water, and as a result, prevent corrosion, which can also spoil the surface of the lining
The device for covering the walls of the bath from the lining
Standard technology is used, during the production of work on which the following points must be taken into account.
- The fastening of the lining is carried out with self-tapping screws made of galvanized steel into a spike, while drilling holes must first be performed to avoid chipping. It is allowed to use fastening with nails or kleimers (special staples for wood).
- The coating device starts from the corner, which is most difficult to access. This is due to the fact that the last board will need to be adjusted both in length and in width, which is almost impossible to do with insufficient access to the place of its installation.

- Corners are finished with wooden plinth, which is fastened with stainless steel nails.
- It should not be forgotten that all wooden structures must be treated with an antiseptic composition.
The device for covering the ceiling of the steam room from the lining

The device for covering the ceiling from the lining, as a rule, starts from the entrance. For fastening, only clamps or nails are used. This is due to a sufficient serious load from the mass of the material. When installing the last boards, a countersunk nail without a hat is used, which is driven in with a doboynik. To give a pleasant appearance, the clogging site of this nail is processed with sandpaper. It should be taken into account the need to leave a gap of 4-5 cm between the ends of the lining and the wall of the bath for normal ventilation. In addition, it is necessary to provide the opportunity for the design to "play", since the temperature under the ceiling will be the highest.
Correct gap between boards
The coating looks the most attractive, where all joints are made of the same type.

This is easy to achieve by marking the boards as they are set up, and by using a level to keep them horizontal or vertical. The wall covering must closely adjoin the ceiling covering.
Sheathing of door and window slopes with clapboard
When finishing doors, you must first prepare the boards of the desired length. Doorways are finished with platbands.


Benefits of using lining
- Versatility (can be used on any structures - floor, wall, ceiling);
- Relatively long service life;
- High aesthetic qualities. Lining, like no other material, allows you to preserve the spirit of the bath, which is associated, first of all, with wood and wood materials;

- Protection of finished structures from high humidity and reduction of heat loss.
- In order to answer the question of how to sheathe a bath with a clapboard with your own hands, you must clearly and consistently go through the following steps: Choosing a material
- Technology Definition
- Execution of work


