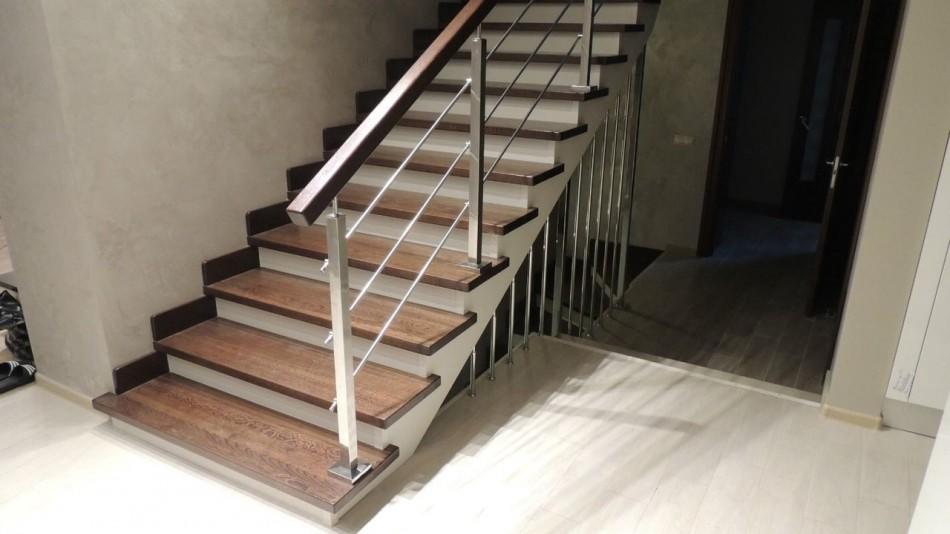
The second floor allows you to significantly increase the area of the house without increasing the space it occupies, but without a staircase it is impossible to get to the second floor. In this article we will talk about various options staircases that are used in brick, stone, block or wooden houses, and we will also describe the sequence of actions for building a simple but beautiful single-flight staircase with decorative railings.
Types of stairs
All stairs connecting the first and second floors can be divided into:
- Type of spans:
- single-march;
- multi-march.
- Shape:
- straight;
- screw;
- corner;
- curly.
- Material:
- wooden;
- metal;
- combined.
Choosing the type of staircase

The choice of staircase type is influenced by many factors, such as floor height, ability to create complex designs from various materials, the presence of free space around the future staircase and many others. If you decide to make a ladder yourself, then first of all you should evaluate your skills as a carpenter and welder; this will help you choose the material from which the ladder will be made. If you are a good welder, you can make a ladder of any complexity from metal and any other materials. If you are a good carpenter, you can build a wooden staircase of any complexity. Not all people have such talents, so don’t despair if you don’t really know how to cook or carpenter, this won’t stop you from creating a simple, but beautiful and reliable staircase connecting the first and second floors.

Having decided on the material from which you will build the staircase, proceed to choosing its design. Below we provide a list of basic requirements that must be taken into account when choosing the type and size of a staircase; this will allow not only to build it, but also to make the staircase comfortable and safe:
- staircase angle 30–45 degrees;
- if there is a cover above the stairs, then the distance from any step to it should be the same and be 2–2.2 meters; if there is no cover, then the distance to any obstacle at any point should not be less than 2 meters;
- the railings must be rigidly fixed and their height is 80–100 cm;
- the optimal width of the stairs is 1 meter;
- optimal step depth 30 cm;
- optimal height steps 15 cm;
- There must be sufficient free space in front of the lower and upper steps of the stairs (at least 2 m²).

One of the main parameters that influences the choice of the type of staircase is its elevation angle, which is 30–45 degrees (optimally 40 degrees). At an angle of 45 degrees, the length of the space occupied by the stairs will be equal to the height of the floor plus 1–2 meters. The additional distance is necessary to make the stairs convenient to use, because you will not only have to walk on them, but also carry furniture. If there is such free space - optimal choice– one marching staircase. Its advantage is its small width - with a step width of 1 meter, the width of the stairs is outside the railing does not exceed 120 cm. If there is no free space of this length, you will have to build a multi-flight, screw or corner staircase, which are much more difficult to manufacture. In addition, the width of free space for spiral or multi-flight staircases is approximately 2.5 times the width of the steps, and the length of each flight with spans reaches the height of the floor. Width spiral staircase is 2.5–3.5 meters, this is due to the need to use wider steps, moreover, it is the most complex and expensive to manufacture.
Construction of a wooden single-flight staircase
Below we will describe the construction of a staircase with a step width of 1 meter, an elevation angle of 45 degrees and a height of 3 meters from the floor of the first floor to the floor of the second floor. This staircase provides a comfortable and safe climb to the second floor, looks very beautiful and is relatively easy to manufacture. It can be installed either in brick or stone, or in wooden house with wooden floors on the first and second floors. You can purchase all the materials for its manufacture at the nearest construction or hardware store, and there you can also buy all the necessary tools.
Tools and materials
For work you will need the following materials:
- planed board 50x250 mm (two pieces of 5 meters each);
- block 50x50 mm (12–15 meters);
- bolts 11–13 cm long, 5–8 mm in diameter, nuts and 2 washers for each (108 pieces of bolts and nuts, 216 washers);
- planed board 35x150 mm (40 meters);
- planed board 35x115 mm (22 meters);
- turned balusters 100–110 cm high and 50 mm in diameter (26–32 pcs);
- support pillars with a cross-section of 10x10 cm and a length of 100–110 cm; you can use balusters of appropriate size (4 pcs);
- straight embossed railings 50–80 mm wide (15 meters);
- steel corners with shelves 10 cm long (12 pcs);
- anchor bolts, nails and screws of various sizes;
- wood putty;
- parquet varnish;
- acetone or solvent;
- wood glue.
You will also need the following tools:
- jigsaw;
- sander;
- screwdriver with a cross-shaped bit;
- wood hacksaw;
- drill with perforation mode and a set of drills;
- feather drill with a diameter of 20mm;
- hand cutter or milling machine;
- set of chisels;
- wrenches corresponding to bolts and nuts;
- square;
- protractor;
- pencil;
- roulette,
- hammer and mallet;
- sandpaper;
- brush;
- rubber gloves, respirator and safety glasses.
Manufacturing and installation of stairs

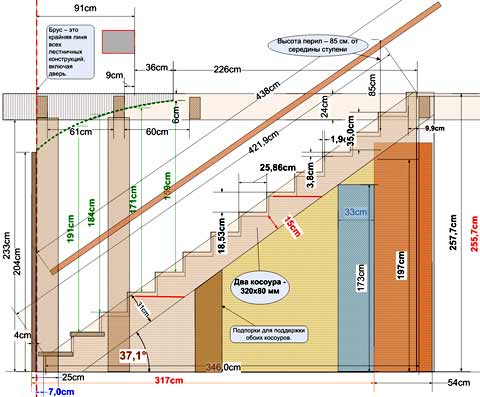
When planning to install a staircase, make sure that the floors of the first and second floors do not require repairs, because otherwise they may not withstand the load and collapse, causing not only the staircase to fall, but also the person on it. Then measure the exact distance between the floor of the first floor and the floor of the second floor, then use the Pythagorean theorem to find the length of the stringer (bearing board) of the stairs. With a height of exactly 300 cm, the length of the stringer is 424 cm. If you are not satisfied with the angle of 45 degrees, then carry out the calculations yourself; school knowledge is enough for this. After all, the staircase forms right triangle, where the vertical leg is the height, the horizontal leg is the space occupied by the stairs, and the hypotenuse is the length of the stringer.
After this, calculate the number of steps.
Remember, if there are more than 18 steps, it is advisable to use a different staircase design, because a stringer without supports will not be able to provide the required rigidity.
Having decided on the calculations, mark the stringer boards, the angles of which should correspond to the angle of installation of the stairs, taking into account the total length of these parts. Make no mistake, because if you make a mistake, you will have to either increase the angle of the stairs or buy new stringer boards. Having marked and double-checked everything, cut the ends of the boards and apply them to the installation site of the future staircase to make sure that you have not mixed up anything. Both boards must be at the required angle and adjacent to the surface of the floor of the first floor and the end of the floor of the second floor without gaps.

Remove the stringer boards and start marking the steps. We offer the simplest method of attaching steps, which does not reduce the strength of the stringer and does not require special carpentry skills, just enough attention, caution and diligence. Steps made from two 35x150 mm boards will be supported by 50x50 mm bars attached to the stringer, and in front of the steps will be covered by risers - vertical boards measuring 35x115 mm. The steps will be attached using self-tapping screws, and the risers using nails. If you don’t mind self-tapping screws 70–80 mm long, then the risers can be attached to the stringer with their help. As a result, the steps are 26.5 cm deep and 15 cm high, which ensures high comfort while going up or down stairs.

Before you start marking, imagine the structure of each stage, then sketch it. If you were able to imagine and sketch them, start marking them. Determine the length of the bars so that they do not interfere with the risers and do not protrude from the back side of the stringer. Then mark the position of the bars taking into account the height of the steps. Remember, the first step should start with a riser resting on the floor. Once you've finished marking, make a template for drilling holes in the stringer and the bars, or mark all the holes manually on both the stringer and the bars. Set aside all work with the stairs for 1-2 days, then double-check all the markings; if there are no errors, drill holes for installing bolts in the stringers and bars. When all the holes are ready, drill holes for washers from the outer surface of the stringers so that the bolts do not stick out above the surface of the board. This will not only increase the safety of the staircase, because no one will be scratched by protruding bolts, but will also make it more beautiful.

Despite the fact that many carpenters assemble stairs of this design using nails, we recommend using bolts and nuts. Nails required size(120–150 mm), if handled improperly, the bars often split, which is why they have to be changed frequently. This especially often occurs when bending nails from the side of the bars. If you hit nails from the side of the bars, bending them onto the stringer, then the latter will have to be sheathed with veneer or plywood, which increases the complexity and cost of the work, because unlike smooth round holes, bent nails are very difficult to putty. Having finished installing the bars, begin marking the boards of the steps and risers. The length of the riser and back board is 100 mm, the length of the front board is 110 mm. This is necessary so that the steps look embedded into the stringer, because such a design looks more beautiful and reliable. All boards must be cut at a 90 degree angle.
Having finished cutting, milling machine or hand cutter Finish the top front edge of the front board to give it a rounded or curly shape, as a step with a clearly defined top front corner is unsightly. If you are unable to carry out this work yourself, contact your nearest carpentry shop or furniture workshop, for a small fee everything will be processed quickly and easily for you necessary boards. After this, mark and cut the outer boards so that they evenly protrude above the stringer. The next stage of work will be the installation of balusters and railings on the stringer; for this, round tenons with a diameter of 20 mm and a depth of 3–5 cm are cut at the ends of the balusters, and in the stringer and bottom side the railings are drilled with corresponding holes. All holes and tenons must be made taking into account the angle of inclination of the stringer. When everything is ready, the stringer, balusters and railings are assembled into one structure, first dry, then, if everything is fine, they are assembled with glue. The next stage is the installation of stringers and adjacent end balusters. For fastening to joists and floor surfaces use metal corners and powerful screws. Then risers and steps are installed and secured. When the entire staircase is ready, the horizontal parts of the railing are installed, then the entire structure is sanded, cleaned of dust and varnished in several layers.
Low-rise construction, when it comes to residential buildings, implies the construction of at least two-level buildings. Therefore, to move to the second floor you cannot do without an internal staircase. Purchasing a ready-made kit, firstly, will be quite expensive (at least 35,000 rubles), and secondly, it must be adapted to the specific premises, or engage in their reconstruction (redevelopment). And this means additional costs and time.
In most cases, it is more expedient to make the stairs to the second floor with your own hands, especially since the time frame will be approximately the same. The simplest and inexpensive option- wood construction. This article will explain in detail all the nuances of choosing lumber, drawing up a drawing of a staircase and the features of its assembly.
In relation to a private house, the two most common are the spiral staircase and the marching staircase. The first option is quite complicated, and it is unlikely that you will be able to implement it yourself without practical skills and experience in this area. We'll have to do specific engineering calculations, which means you can’t do without the help of a professional at least at this stage of preparation. Focusing only on diagrams available on the Internet is not entirely correct. They do not take into account the specifics of a particular structure, so they will definitely have to be processed taking into account the specifics of its dimensions, layout and a number of other factors. And the installation of a spiral staircase itself, especially a wooden one, is far from a simple process.

For DIY assembly optimal solution– marching wooden staircase. Based on the height of the first floor room, there can be one or two spans (rotating structure).

But in details, even completely identical stairs can differ greatly. And this is easily explained by the fact that making it yourself involves an element of creativity. Since all private houses differ in many respects (dimensions, ceiling heights, layout, internal filling), then follow some unified standard- the matter is hopeless. By the way, the author has already drawn the reader’s attention to this. Therefore further – only general recommendations, which will help you competently draw up a drawing of a wooden staircase, taking into account all the features of the structure, and install it locally.
General information
There are several options for the execution of flight stairs. Their main varieties are shown in the figures below. It is not difficult to decide which modification to choose for installation yourself, knowing all the features of the house and the premises of the first and second floors.

When describing any product or prefabricated structure, one cannot do without special terminology. The following pictures explain well what the main elements of the staircase are called.

Preparation of materials
- When choosing a wood type, if you focus on a reasonable quality/price combination, it is recommended to give preference to pine or larch. The latter is even better, as it is less susceptible to rotting. In addition, as liquid is absorbed, it only becomes stronger. Since in any living space there will definitely be fumes - this is more than relevant, especially if there is a kitchen in the adjacent room. All other species - cedar, oak and a number of others - are unlikely to belong to budget options wooden stairs.
- The durability of the structure largely depends on the degree of drying of the lumber. If the wood is not sufficiently processed in this regard, then such a staircase will “lead” quite quickly. Drying boards with your own hands is both a troublesome and complicated process. You will need not only a place to store them, but also knowledge of all the features of the technique. We will have to ensure constant temperature, high-quality ventilation, and so on. The conclusion is clear - it is not advisable to save on material for a wooden staircase. That is, if you purchase boards, then only high degree dryers, although they are more expensive.

Calculation of the main parameters of the stairs

Width
When determining this parameter, you should focus on such points. Firstly, will it be convenient to move up the stairs at the same time, towards each other? Secondly, will it be possible to move large loads (furniture, furniture) from floor to floor? household appliances and so on). For a private home recommended width of internal stairs – 130±20.

Stair height
When calculating this parameter, inexperienced “home craftsmen” are guided by the ceiling of the room on the first floor. This is not true. When drawing up a staircase drawing, not only this parameter is taken into account, but also the total thickness of the ceiling and floor of the second room (together with finishing). That is, the last step should be on the same level as it.

Span height
This refers to the distance between the steps and the ceiling of the second floor. It is clear that moving up the stairs, constantly bending your head, is not an option for saving space. Mostly, masters focus on 200. This is enough, since rarely anyone’s height exceeds this value.

The steepness of a wooden staircase
The optimal slope is 40±5º. Exceeding this value will complicate the climb to the second floor for elderly people, small children, as well as those whose physical capabilities are limited for some reason. But a flatter design also has a number of disadvantages. The consumption of wood increases, and much more space for its installation will be needed. Here you need to choose the most suitable one for specific house option.

steps
- Tread. You should focus on a person’s foot size 45, then everyone will be comfortable walking up the stairs. Based on this, the recommended width of steps is within 28±2.
- Riser. The optimal value, regardless of design features wooden stairs, 18±2. It will be convenient for both children and tall people to move around it.
- Number of steps. This requires calculation. The distance between adjacent ones is determined simply - the thickness of their boards + risers. When a fractional value is obtained, it is rounded to the nearest whole value. All that remains is to divide the height of the stairs by it.

What to consider:
- The dimensions of all steps of the flight of stairs must be identical. That is, it is enough to make calculations for only one.
- If there are more than 18 steps, then it is recommended to provide a platform in the staircase design (hence, at least 2 flights). It is called differently - viewing, rotating, intermediate - but it needs to be mounted. Another question is where exactly should it be located - strictly in the center of the flight, closer to the beginning of the stairs? It’s worth thinking about here, taking into account the features of the house and the convenience of moving to the second floor.

Stair length
This last stage calculations. Initial data – parameters of steps and their number. As practice shows, when you draw up a drawing of a staircase yourself, it often does not fit effective length to the first floor room. What should I do? There are several options:
- Add one march. This solution is more complicated, since it will be necessary to install an additional platform, and, therefore, re-do the basic calculations.
- Provide several turning (winder) steps in the staircase design. The option is simpler and more convenient to do it yourself. This is what is most often implemented.

Features of installing a wooden staircase
Regardless of its design, all basic technological operations identical. If you understand the nuances of constructing a single-flight staircase, then assembling it according to any other scheme will not be difficult.
Specifics of preparation of components
Steps. For them, board sections are selected that do not have any defects in the form of chips, cracks, or curvatures. Their recommended thickness, taking into account the expected loads, is 35±5. It is no longer practical, since both material consumption and the total weight of the structure increase. Less is undesirable for safety reasons when moving up stairs (taking into account the loads being carried).

At the stage of preparing the steps, it is necessary to round off the sharp edges of the board fragments to eliminate the risk of injury. In addition, their front surface and ends must be carefully polished - no chips, burrs, and so on. It will come in handy for you here. The length of the steps is selected depending on the chosen design of the wooden staircase. But their projections beyond the stringers by more than 3 (cm) are undesirable.
Risers. They are not load-bearing elements, and often play only a decorative role. You can save a little on them by using a 10 or 15 board. By the way, some wooden stairs can be assembled without them. Such structures look even more impressive, and, in addition, cleaning the spans is greatly simplified.
Stringers. These are supporting elements for the entire staircase, so lumber for them should be chosen especially carefully. Particular attention is paid to the equality of all parameters. Both stringers must be like “twin brothers”, otherwise the staircase after assembly will turn out to be asymmetrical, with distortions, curvatures, and so on. The pictures show some options for stringers.

The feasibility of making fencing elements with your own hands is questionable. It’s good if it is possible to process balusters and handrails using machine tools. Otherwise, it is better to purchase ready-made samples. Taking into account the fact that they (especially in a side view) are what first catch your eye, such costs are completely justified.
The nuances of installing a wooden staircase
Fastening stringers. Fixing the outer one on the wall is only possible if the base is strong enough (a house made of brick, timber, etc.). In other cases, the entire staircase structure is mounted on racks.
To prevent movement of the lower part, a support block is installed on the floor of the first floor. The top of the span is attached to the ceiling itself (you will need to make a cutout in the beam along its width) or “fastened” to it with anchor bolts. The stringers themselves must also be fastened together so that they do not “lead” during the drying process of the wood. For example, like this.

Risers. If it is decided to use them in the staircase design, then they are attached to stringers.
Steps. To avoid mistakes, their installation begins from the bottom of the structure. Side mounts– on support beams, if there are risers, then at least at one point (in the center) on them.
Balusters. First, only two are mounted - upper and lower. A cord is stretched between them. Using it as a guide, it is easy to install along the flights of stairs and align all the others.
Fastening handrails. When it comes to wooden stairs, this does not a priori mean that these elements must also be made of wood. Making them from it with your own hands is quite difficult. Here you will need not only experience, but also the appropriate tool. Options for handrails are plastic or metal.
Final stage
After checking the symmetry of the structure and the reliability of all connections, a number of measures are carried out:
- Grinding of all structural parts.
- Impregnation with special compounds (against fire, rot, wood-boring insects).
- Surface design. The painting option is not for a private home. It is advisable to treat the stairs with a tinting composition, and on top or with a wax-containing solution. But this is at the discretion of the owner, depending on the overall style of decoration of the room.
Today, the construction of a private house is not limited to one floor, so it is necessary to build a staircase to the second floor in order to be able to gain convenient access. It is quite possible to build a staircase from various materials yourself, the most important thing is to carefully carry out all the required calculations, since otherwise this design can become dangerous and unreliable.
Construction of an internal staircase in a private country house– the process is quite complicated, but quite doable.
When constructing a staircase you must:
- Consider the interior of the house;
- Make all required calculations;
- Choose a design that will suit all parameters.
To easily select the most appropriate option, you should first schematically draw the staircase that should be in the house or find a ready-made option that will best suit all your needs and adapt it to your needs. Before choosing a staircase model for a private home, it is important to correctly calculate all the available design parameters. Many people wonder what is the best staircase to make.

Most often, stairs in a residential building are made from materials such as:
- Tree;
- Concrete;
- Metal.
According to its configuration, the staircase can be straight, spiral or rotary. In addition, there are also combined options. Concrete products are considered the most durable and durable, however, it takes quite a lot of time to prepare a solid base and manufacture the structure. Metal structure can be made quite simply, you just need to know the rules of working with welding, and a wooden staircase can be very easily made by yourself, the most important thing is to read the step-by-step instructions for its manufacture.
The easiest way is to make a straight flight of stairs, since it has a small number of parts and takes up absolutely little space. Screw designs are characterized by the fact that they require a small area; they look very elegant, however, they are not always convenient to use.
A staircase of several flights is considered a rather complex structure, which is problematic to build. This design is ideal for a home where there is a significant distance between floors.
Instructions for making a simple wooden staircase
The simplest design is considered to be a simple one-flight staircase.
It consists of:
- Kosourov;
- Railing;
- Tread;
- Riser.
To calculate the height, you need to take the distance between floors and add the thickness of the floors. In order to quickly calculate what the length of the span and base should be, you should initially decide on the parameters of the steps. If small children live in the house, the optimal height of the steps will be 15 centimeters, and in all other cases it should be equal to 20 centimeters. It is not worth making the risers higher, as the rise will be less comfortable.

Optimal width The steps should be 20-30 centimeters, since if they are wider, then the entire structure will take up much more space, which may not be entirely convenient.
Exists step by step instructions manufacturing a staircase, which must be adhered to, as this will allow for a fairly high-quality and durable construction. To make a staircase, it is necessary to select durable and strong wood, since all elements of the staircase must withstand not only total weight structures, but also people. It is necessary to cut out a template from durable cardboard that will correspond to all the parameters of the future staircase, and then use this template to make wooden elements for the stairs. Then you need to collect all the elements of the staircase and treat them with antiseptic solutions, coat them with paint or varnish.
How to make a staircase quickly and easily from concrete
If the house has concrete floors second floor, then you can arrange a concrete simple stairs, which will be durable, and with correct processing will look very beautiful. You can make a completely concrete staircase in the house, or fill only the stringer with concrete, and make everything else from other materials.
To produce such a staircase you will need:
- Waterproof plywood;
- Durable timber;
- Fittings;
- Self-tapping screws;
- Concrete solution.

Construction concrete stairs requires special attention, so everything must be carefully calculated, since the base must be very strong. You need to start by assembling the formwork, which must be done according to all available drawings and taking into account the fact that there should be absolutely no gaps.
The finished formwork must be placed between floors and secured with wooden beams. After this, it is necessary to lay reinforcement inside the frame and fill the prepared base with concrete mortar.
It is necessary to fill the frame with mortar immediately, otherwise the solidity of the finished structure may be damaged. When the concrete has hardened sufficiently well, the formwork can be removed and the steps can be periodically watered with water to avoid cracking of the concrete. The structure must dry thoroughly and then you can begin finishing the stairs. You can decorate the finished structure with a variety of materials, in particular you can use wood, stone, tiles and many other materials.
Quick and easy: building a staircase in a private country house made of metal
Homemade ones look quite interesting and original, however, to make them you need to put in a little effort and take into account all the features of working with this material. To install a metal staircase, you must first prepare some materials and tools.
In particular:
- Steel channel;
- Metal corners;
- Welding machine;
- Sheet metal;
- File.

Forged stairs have excellent aesthetic and operational properties. Read more about forged stairs in the material on our website:.
To build a staircase, you must begin by cutting the channel into pieces and assembling the frame from them. Weld corners to the side edges of the frame at equal intervals, which will be equal to the height of the steps. All corners must be located strictly parallel to one another. The upper ends of the frame are firmly fixed and attached to the ceiling of the upper floor, and the lower ends are secured to the floor. Then the steps made of sheet iron are welded, as well as the railings. At the final stage, the finished structure is treated with special anti-corrosion mixtures. In order not to redo the structure, it is necessary to carry out all stages sequentially and strictly follow all the rules of its construction.
Tips on how to make your own staircase in a private country house: screw-type construction
The spiral staircase, which takes up quite a bit of space, looks quite interesting and original. free space. This is a compact design that can be placed even in a small area. The spiral staircase can go from the first floor or from the garage, which is very convenient. The most famous and widespread method of installing spiral staircases is step-by-step stringing of steps onto a central base. The steps can be triangular or trapezoidal.
To build a spiral staircase you need to take:
- Steel pipe;
- Wooden slats;
- Welding machine;
- Corners for steps;
- File;
- Primer.

The pipe will act as a central post, so its length must fully correspond to the existing distance between floors. For greater stability, it is necessary to concrete the pipe near the base. To make steps it is necessary to use templates made from wooden slats. They must be glued together in such a way that they form steps with the given parameters. Each step must be attached to its own pre-prepared cylinder, carefully sanded, primed and painted.
If necessary and for greater convenience, the spiral staircase can be converted to a straight structure. Before installing a permanent staircase, a temporary structure is installed.
What types of construction can there be?
If you have firmly decided to build a staircase in a private country house, you should initially determine what kind of design it should be.

In particular, it is quite possible to distinguish such types of structures as:
- On stringers;
- On pain;
- Screw.
The most popular are staircases with stringers, as they are suitable for rooms of different sizes and stylistic solutions. This device is very durable and guarantees safety during its operation. Many people prefer to make a staircase on rails, the peculiarity of which is that all structural elements are fastened together using special bolts and pins. If necessary, you can very easily repair it and completely disassemble it.
DIY staircase to the second floor (video)
It is quite possible to make a staircase in a private country house yourself, the most important thing is to strictly follow all the rules and requirements.
Details: do-it-yourself staircase to the second floor (photo examples)


Today, more and more people are trying to expand the space in apartments and houses. The second floor has long been no longer considered a whim. A staircase structure allows you to connect several floors, the construction of which should be thought about at the beginning of construction or renovation. The ladder must be safe and reliable to use. This especially applies to the option made independently.
The staircase structure can be assembled independently from ready-made elements that can be purchased at a specialized store. Many people choose to build their own staircase. This requires a particularly careful and thoughtful approach.
At independent work above the stairs, it is important to make the correct calculations, since any mistake can lead to injuries and falls.
If we are making a staircase ourselves, we should also think about its design. It is important that the design fits into general style in the interior. It can complement it or become the main design element of the decor.

What does the staircase consist of:
- Step. It consists of two simple elements: vertical (riser) and horizontal (tread). The step can rest on a step, or it can act as an independent element.
- Support. It may consist of a bowstring that supports the steps on both sides, and a stringer that supports the steps at the bottom.
- Railing. Support element which ensures safe movement. IN staircase design it may be missing.
- Balusters. A functional and decorative detail that serves as a support for the railing.
- Rack. Used to secure elements of a screw structure.
- Boltsy. Supporting parts that attach to the wall and steps.
Knowing the structure of the staircase, you can easily make it yourself. While working on the stairs, a temporary stepladder can serve as a means of movement between floors.
Types of stairs: how to make a staircase on the second floor with your own hands
There are three types of stairs. Each of them has its own characteristics and characteristics. Which staircase to choose is up to each owner to decide for himself.
The choice of the type of staircase is influenced by many factors: the area of the apartment or house, functional features structures, load on the stairs and general interior premises.
Before choosing steps, it is important to decide where best to place them. It can be located in the center of the room, or it can be in the corner. This will save space in an apartment or house with small area.
2.jpg)
Types of stairs:
- Marching. Convenient and safest design. The only drawback is that it takes up a lot of space. The staircase can be open or closed, straight or rotary, circular.
- Screw. The design looks beautiful and saves space, but is considered the most dangerous looking stairs For a house with several floors, a staircase with a post and wedge-shaped steps is suitable.
- On the Bolts. This ladder is secured with bolts. Such designs have beautiful and stylish design. Such structures are placed against the wall.
For houses with a large area, it is best to choose marching models. But for an apartment, house or garage with a small area it is ideal screw design. All types of stairs can be made from a variety of materials: wood, metal, stone, glass, plastic.
Requirements for stairs to the house: 2nd floor
Homemade stairs can be dangerous if even the slightest mistake was made during their design. You can calculate the distance, angle of inclination and potential load on the stairs using special formulas. On preparatory stage It’s better to carefully calculate all the parameters, then the building will be easy to use and will reliably serve for many years.
When making your own stairs, you need to take into account the number of people using the structure, as well as the presence of children and elderly people in the house.
You should carefully study the requirements for the construction and installation of stairs. Of course, it’s easier to purchase a ready-made structure that remains to be assembled. But if the owner decides to do everything himself from A to Z, then it is important to follow the following requirements.

Requirements for the staircase structure:
- Determine the width and height of the steps.
- Calculate the angle of inclination of the steps.
- Choose reliable way fastening the structure.
- Maintain the correct spacing between balusters. If there are children in the house, then it should not exceed 100 by 200 mm.
- The width of the steps should suit the foot size of the person using the stairs. The optimal width is 200-300 mm.
- Follow the recommendations for loading the ladder.
- The external texture of the steps must be safe and prevent slipping.
To avoid falls and injuries, you should maintain correct distance between spans. Fasteners must be made of high-quality and reliable materials.
How to build a staircase to the second floor with your own hands: parameters
Before building a house with several floors, it is important to decide on the type of staircase structure, as well as draw up a staircase design and strictly follow it. Depending on the type of structure, it is important to decide where to place the stairs. After all the calculations and manufacturing of the main elements, all that remains is to securely fasten the structure.
The calculations are based on the height of the room and the length of the part of the wall to which the staircase will adjoin. These values are reduced to scale and a drawing is made based on them.

What to consider in the parameters:
- Comfortable tread width;
- Height of risers;
- Dimensions of the stringer;
- The width of the stairs.
After the calculations have been made, you can begin to manufacture the structural parts. Mainly for self-made use wood. It is important that it is of high quality and well dried.
Details: how to build a staircase to the second floor
The most simple design for self-production - a marching staircase on stringers. This design can be placed either in the center of the room or in the corner.
The construction of the staircase will be completed correctly only if all calculations are made correctly, from calculating the location to the width of the staircase span.
The reliability and strength of the stairs will depend on the quality of the stringers. If the staircase is made of wood, it must be solid, without cracks or knots. It is important to ensure that the wood is sufficiently thick.
Step by step instructions:
- By preliminary calculations cut out the stringers.
- Calculate the width of the step surface. They should be neat, with rounded, safe edges.
- To support the stringers, risers can be made. They must be made of high-quality and reliable material.
It is better to equip the stairs with purchased balusters and handrails. If there are children in the house, then a pair of balusters are installed on the steps. IN the usual version You can completely get by with one supporting element.
Concrete structure: how to pour a staircase to the second floor
Making a concrete staircase using technology is similar to pouring concrete on a porch. Before starting the main stage of work, the builder must do everything necessary calculations: the number of steps, their height and the load they can withstand. In order to concrete structure was reliable, we should start making a frame.
If the staircase is massive, then the frame must be made of very reliable and durable wood.
After the frame is made, it is necessary to make a special ceiling. The formwork for the steps must be securely attached - this will protect the frame from deformation. It is best to use metal fasteners to secure the formwork.

Step by step filling:
- To make the structure durable, you need to lay it on the bottom of the frame. reinforced frame made of metal.
- The cells between the parts should not be located too close.
- To make a metal frame, the rods rest against holes in the wall.
- Experts advise pouring concrete from the first stage.
When pouring, it is important to pay attention to the fact that the concrete needs to be stirred from time to time. If this is not done, inhomogeneity may appear in it, which will disrupt the design, and it will have to be redone. The formwork can only be removed ten days after pouring.
DIY staircase to the second floor (video)
Building a staircase yourself will not be difficult, as long as you first study the instructions and familiarize yourself with all the difficulties and features. It is important to decide on the type of structure and materials from which the staircase will be made. So that the ladder is reliable and durable, as well as convenient to use and has a beautiful appearance, you need to take care of the accuracy and correctness of all calculations.
IN two-story house it is necessary to place a comfortable, safe and beautiful staircase. You can invite craftsmen or assemble it from a ready-made kit, but we will tell you how to design and install it yourself.
Types of stairs - classification by shape
Stairs to the second floor in a private house differ in their shape. Several designs are used: with marches and helical ones. The first can be straight, rotating 90°, 180° or 360°. Screw ones are compact, but they are inconvenient to use, especially for small children and the elderly. Marches are convenient, but take up a significant portion usable area, especially straight ones. The space underneath is often used as utility rooms. The easiest way to build a flight of stairs.
It includes one or two flights with steps evenly spaced. Their number is 3–15, if there is more than one march. On average, there are 8–11 steps on each flight, with platforms between them. If a staircase with one flight of steps has more steps, it is also recommended to install platforms to increase strength. The steps are made open or closed, with risers. Open ones are convenient when the width is insufficient.
Marching stairs can be made with small turns, less than 90°, and are called rotary. At turns, winder steps are often installed instead of a platform.
Staircases with bolts – long rods with threads at the ends – are popular. They serve to fasten steps and fencing the structure, which is mounted in the wall. They are lightweight and aerial view, but actually very strong and reliable. The structure can be stretched over the entire wall, or it can be built compact. Due to the nature of the mounting, it is located only against the wall. It can be assembled from ready-made elements; it is better to entrust installation to professionals.
They are difficult to make, but they take up little space; they can be installed anywhere, even in the middle of the living room. Many people do this: the staircase is aesthetically attractive and becomes a decoration of the room. Known various designs these products, but for two-story buildings a model with a stand and wedge-shaped steps is better suited. The stand is attached to the floor and ceiling, and there are steps to it in a spiral. There is a handrail on the side, repeating the screw shape of the product. Balusters are attached to the handrails and steps.
Materials used - advantages and disadvantages
In addition to the shape, the material of the stairs plays an important role. The most available material with many advantages is wood. The fashion for it has not gone away for centuries. Wood products are durable, beautiful, and decorate your home for many years. To maintain the appearance, it should be updated every few years. decorative coating. May not be used paint coating, but to emphasize the structure of natural wood.
Between floors they are often arranged as a basis for fastening parts made of other materials. Wood, marble, and glass are used for steps. Bare metal is acceptable for the entire structure, but contact with it in a cool room is unpleasant. Metal stairs with glass railings look beautiful - light and airy. Glass and metal go well with wooden parts from beech, teak, maple, cedar.
A new word in the manufacture of stairs is the use of special impact-resistant glass. It can withstand heavy loads and is completely safe to use. The design with a glass staircase only wins with its grace and elegance. It is very effective to use neon bulbs for illumination.

We select materials in accordance with the chosen interior style. For classical minimalism and baroque, metal is suitable. Modern and Scandinavian styles prefer glass. Concrete and marble are characteristic of the loft and eclectic style. Concrete is exceptionally durable; specialists make amazing things of incredible beauty from it.
Features of the product - what parts does the staircase consist of?
The design of the staircase includes many details. Some of them are necessarily present in all products, others are specific and are used only in certain types. Even the simplest interfloor structure cannot do without supports and steps. The step has two parts: one of them is located horizontally, the other – vertically. The horizontal one is called a tread, the vertical one is called a riser. Risers play the role of support for walking, but in some cases they can be done without them.
Marches of a series of steps are installed on supports. Two types are used: bowstring and stringer - beams that differ in location. The string is placed so that it secures the steps from the end, and the stringer supports it from below. The supports are made of thick material: 50–70 mm. The stringers have the shape of a file, steps are placed on the horizontal platform, and risers are placed on the vertical platform. There can be one central one, when the steps rest on the wall, or two. The grooves in the bowstrings for the steps and risers are cut out according to the template. Beams are tied together with wooden or metal ties.

Stairs almost always have railings, although they are not required. But for older people they are simply necessary. The railings are complemented with balusters - vertical supports between them and the steps. They are often not just a functional element, but play a role decorative decoration. They are made from various materials, different shapes. If there are small children in the house, balusters must be installed to protect them from accidental falls.
For individual designs details that are unique to them are used. Spiral staircases cannot do without a stand. It is executed from steel pipe or wooden, serves as the basis for the entire product. On some models, bolts - special threaded pins - are used to attach the steps to the wall.
Preparation for design - choice of type, fastening, dimensions
When starting production, they first decide which type of product is best to use, taking into account the existing conditions. For a private house, the following staircase options are possible:
- 1. Direct – easy to calculate and install, convenient to use. Requires large space.
- 2. Turning with two or three flights and platforms between them. Rotating flights of stairs by 90, 180 or 360 degrees allows you to save space.
- 3. Rotary winders - similar to the previous option. The role of the platforms is played by steps, additionally up to 2 m 2 of area is saved.
- 4. Screw - very compact, but not very convenient to use. Recommended for rooms with a small area.
We continue construction by selecting fastenings:
- bolts - mounted on the wall, the design is elegant, but can withstand significant loads;
- stand – used in spiral or rotary structures as an additional fastening;
- bowstring - steps are installed in the internal grooves of the beam, the ends are closed;
- kosour – upper part the beam has a figured profile to support steps on it, the ends are open.

- opening height between finished floors first and second floors;
- the width of the opening, which, in addition to rectangular, can be round or oval, which is determined by the product option;
- height from the ground floor floor to the ceiling.
Calculations - building codes and formulas
Using the example of a flight of stairs, we will show how to design a product. To avoid making mistakes, you should familiarize yourself with building codes for the construction of stairs. They have been developed over many years of practice and guarantee the safety and ease of use of the product. Basic standards that should be followed when performing all calculations in the future:
- the slope of the marches is no more than 45°;
- width not less than 90 cm;
- the height of the steps does not exceed 20 cm, the depth is not less than 25 cm;
- the dimensions of all steps are the same;
- fencing with minimum height 90 cm;
- placement of balusters in a house with small children every 10–12 cm.
In rotating structures, the dimensions of the interflight platforms are at least 75 cm, and the winder steps, if used instead of platforms, are at least 20 cm wide.
Further work on the project continues on paper. We draw a plan of the first floor indicating all dimensions. On it we mark various ledges, niches, windows, doors, communications. When designing, we try to ensure that they are not blocked by supporting structures. We indicate the starting point of the march on the first floor and the exit to the second. We try to put it down as possible more sizes, which will facilitate future installation of the product.
Next we work with the measurements that we completed earlier. We calculate the number of steps: divide the height of the opening (the distance between the floors of the first and second floors) by the height of one step. Example: opening 290 cm, step 18 cm. Dividing, we get 16 steps.

Let's find out the length of the product: multiply the number of treads (we have 16) by their optimal depth - 25 cm. As a result, we get 4 meters. The length is such that small room There may not be enough space. If you divide it into 2 flights of 8 steps, you will need, taking into account minimum size platforms 75 cm, almost half the area.
Finally, we find out the length of the supports, it doesn’t matter whether it’s for stringers or bowstrings. We apply the Pythagorean theorem: c 2 =a 2 b 2. IN in this case a – product length (4 m), b – opening (2.9 m). You need to find out c – the length of the supports. Add squares a and b: 16 8.41 = 24.41. We take the square root of 24.41, we get 4.94 m - this is the required length of one support. If you make 2 marches, the length will be 3.5 m.
We put all calculations on the drawing.
A simple solution - a straight flight of stairs on stringers
It is easier to mount it yourself on stringers with one straight flight. True, at the base its length will be at least 4 meters, and the span will exceed five. But if the size of the room allows, it will become a decoration of the house. Calculations for the product are given above; we will tell you how to make parts and assemble the structure with your own hands.
For stringers we take a dry blank from the board hard rocks. We draw a template on cardboard or thin plywood, taking into account the shape of the protrusion and the angle of inclination. We apply it to the beam and cut the fastener. At the ends of the stringers we cut out grooves for fastening to the upper floor beam and the lower beam. We process the grooves sandpaper to remove hangnails. In a prepared place on the floor to anchor bolts We attach the support beam. For attaching stringers to ceiling beam you can install anchors on it or simply connect it using the cutting method.

To make the steps, we use a dry board with a thickness after processing of 35 mm or more; for risers, 20 mm is sufficient. The risers can be installed not along the edge of the board, but slightly deeper, then you should not cut a wider board. As an option, it is possible not to use risers, the design will be lighter. We select the length of the parts taking into account the width of the flight plus the railing. We cut off the edges on the deeds, grind the workpieces. First, the riser is attached to the stringers, then the deed. We use wood glue and self-tapping screws. Glue is needed so that the stairs do not creak when walking.
Let's start making the railings. They consist of handrails and balusters. For balusters we use square bars; if possible, we sharpen them lathe or buy beautiful carved ones. They are installed on steps, usually with one baluster for each. We fasten with self-tapping screws, the caps of which are covered with decorative plugs.

The assembly is completed, we began to apply paints and varnishes that will simultaneously protect the wood from moisture and perform decorative functions. First, we polish the assembled product again, removing the smallest burrs and burrs. For painting we use paint, varnish or a protective colorless composition, or tinting agent. We choose paints and varnishes that do not have the ability to create a smooth surface. It is easy to get injured on slippery steps.
Spiral staircase - ready-made solution with drawings
A spiral staircase for self-production should be different simple installation and be safe. The width of the steps plays a decisive role in preventing injuries. They are winder in spiral structures; there are no intermediate platforms. There are several methods of fastening: on walls, on stringers, on rails. They are quite complex for calculations and installation. The best and most reliable way for the home is to mount it to a rack.
The structure is made of wood or metal. Wooden product, coated with varnish, looks very beautiful and gives comfort. Any hard wood can be used. For handrails it is better to use a combination of wood and metal. For steps they also use, in addition to wood, metal, artificial marble, glass. Perfect for a stand metal pipe. The steps are attached to it using couplings, bolts or welding, depending on the material of the steps. Brick, concrete, and wood are also used for the central pillar. The main thing is that it can withstand the load.
It should be observed so that it is comfortable and safe. One of the most important is the distance between the step on which a person stands and the one above his head. To avoid hitting your head, it should be 2 meters. The width of the staircase is chosen to be at least 90 cm; for dimensions larger than 1.5 m, a stringer will be required along the edge. The staircase opening should be 10 cm wider than the diameter of the staircase at each edge, so as not to scratch your hands when using the railing when exiting to the second floor. Below are drawings for calculating a spiral staircase

The best type of spiral staircase is one with a metal central support made from a pipe with a diameter of 50 mm. Here are step-by-step instructions for making it:
- 1. Install the support vertically, checking with a plumb line and level. TO wooden floor We fasten it with bolts, using fasteners, and pour it into concrete. Fastening in this way will ensure the reliability of the entire product.
- 2. Take another pipe a few larger diameter to cut cartridges from it. We cut them perpendicularly to a height of 23–26 cm. The sleeves should fit tightly onto the rack. If you couldn’t find a pipe for the sleeve required diameter, you can weld rings for sealing.
- 3. Then we start making the steps. They should be the same. To achieve this, we make a conductor from chipboard and a pipe equal in diameter to the sleeve.
- 4. Laying profile pipe into the conductor and connect it by welding - the base for the platform comes out. Then we connect all the bases to the sleeves by welding at the same distance from their edges. To maintain the distance, we use a conductor.
- 5. We weld a bracket to the lower part of the base from the front side, equal in height to the distance between adjacent steps. You can make and weld risers, which is somewhat more complicated.
- 6. We string the sleeves with metal platforms onto the stand and fan them out. We weld the bracket going from the upper tread to the lower one.
- 7. We weld the sleeves together, install the railings with balusters. The method of fastening depends on the material from which they are made. It is possible to use metal, wood, plastic or a combination thereof.
- 8. Having assembled all the elements, we clean the welding seams and cover the entire structure with nitro enamel. We cover the wooden parts with paint, if the texture is rich - with colorless varnish or tinting agent.
For a person with basic construction experience, it is not difficult to create interfloor stairs, and the pleasure from the result will be great.


