Growing climbing flowers is impossible without providing them with reliable support. Any supports are used in this capacity: pillars, fences, stretched threads, etc. However, the most spectacular spectacle can be obtained by forming a tandem of climbing plants with special architectural elements. One of the most popular such structures is the arch - an arched structure on two supports. Despite the highest decorative qualities, its design is very simple, so an arch for flowers in the country can be made with your own hands. Let's consider 3 options for its manufacture from different materials.
Simple model arches with a height of 2130 mm and a width of 1830 mm are created from two reinforcing sections bent into arcs, connected to each other by metal rings. The arch for flowers is made by hand without the use of welding; thin wire is used to connect the parts.
The metal arch looks like a light, weightless structure entwined with greenery and flowers
The distance between the arched arcuate sections is 31-32 cm. To hold them in place, they are dug into the ground at least 40-45 cm. A distance of 15 cm is maintained between the connecting cross-ring rings (d = 30 cm).

Schematic representation of a metal arch
List of materials for making a metal arch:
- fittings (rod) d=10 mm, length 6 m - 2 pcs.;
- fittings (rod) d=6 mm, length 0.94 m - 9 pcs.;
- soft wire;
- primer, enamel for painting;
- pins for the template - reinforcement d=10 mm, length 0.25 m - 10 pcs.;
- rope L=0.9 m.
Step-by-step manufacturing scheme:
1. First of all, you will need to bend pieces of reinforcement d = 10 mm to obtain an arched opening. To do this, you can use a simple template of 0.25 m long pins driven into the ground along the calculated contour of the arch.

Cut the reinforcement into pins using a hacksaw
The outline is drawn directly on the ground as follows: a rod is driven into the ground, a rope L = 0.9 m is tied to it and, taking the free end in the hand, a semicircle is drawn with paint or chalk. Then, starting from the top point of the semicircle, the pins are driven into the ground.

Drawing a semicircle using a rod, string and paint
The resulting template is very easy to use. In order to give the arch an arched shape, the reinforcement d = 10 mm is bent around the driven pins. The bend will be smoother if a strong, but flexible material. A strip of siding, a chipboard strip, etc. will do.

Bending reinforcement is a labor-intensive process, which is easier to handle with two people and an assistant.
2. In this arch model, metal rings are used to connect the reinforcement sections. They are made from reinforcement d=6 mm thinner than the main sections.
From a bunch of reinforcement, cut 9 pieces of 94 cm each and form rings from them using a pipe bender. If you do not have this tool, the design of the arch can be simplified and instead of rings, connect the arched sections with straight rods. Such an arch will look simpler than the original version, but it will also be quite functional.

Forming rings from reinforcement using a pipe bender
3. The bent main sections of the arch are installed in the ground, deepening the reinforcement by 40-45 cm.

4. At a distance of 61 cm from the bottom of the arch, metal rings are tied with soft wire, keeping a distance of 15-20 cm between them. They will allow you to connect the arched sections together and fix the shape of the arch.

Attaching rings to metal sections of the arch
5. To protect the arch from corrosion, all metal parts of the product are coated with a primer and then a layer oil paint.
Option #2. Wooden arch made of timber
A traditional wooden arch made of timber is the simplest and inexpensive structure that fits into the design of any garden. This garden arch for flowers, 2.2 m high, consists of two vertical frames, two inclined and one horizontal parts.

An easy-to-make wooden arch will help divide the garden space into functional areas
Materials required for construction:
- timber 40x50 mm, length 2 m – 4 pcs.;
- timber 40x50 mm, length 0.35 m – 4 pcs.;
- timber 40x50 mm, length 0.65 m – 2 pcs.;
- wooden planks 35x20 mm, length 0.65 m – 24 pcs.;
- wooden planks 35x20 mm, length 2 m – 2 pcs.;
- metal corner, length 0.25 m – 4 pcs.;
- screws or nails;
- primer, paint.
Construction plan wooden arch:
1. Make two vertical frames. Each frame consists of two vertical supports of 2 m each, two crossbars of 0.65 m each and one strip in the middle, 2 m long.

2. Assemble the side of the arch. 35x20 mm strips 0.65 m long are stuffed onto the frame in increments of 0.2 m. The edges of the planks are cut at 45°, the unevenness is sanded sandpaper or a sander.
3. Attached to vertical posts metal corners. Subsequently, when installed in the ground, they will play the role of a foundation and will be able to hold the structure in a given position.
4. Cut out the bars for the top of the arch. Inclined bars 0.35 cm long - 4 pcs., upper horizontal bars 0.65 m long - 2 pcs. They are fastened together with self-tapping screws.
5. Upper part the arches are connected to the sidewalls.

The arch is completely assembled on the ground, and then lifted and installed vertically on permanent place
6. Dig holes at the site where the arch supports are installed. Metal corners are fixed in the ground, setting the arch level. In order to wooden structure lasted longer, stones can be placed under the supports.

7. A primer is applied to wooden surfaces, then a layer of varnish or paint.

A layer of varnish protects the wood from corrosion and increases decorative properties arches
Option #3. Arch with gabion base
A convenient support for climbing flowers will be a wooden arch, the sides and rounded top of which are formed from galvanized mesh. Another unexpected detail of this design is the foundation of two massive gabions. They firmly hold the arch supports, eliminating the need to fill concrete foundation or dig posts into the ground.

Unusual arched design - a combination of beams, mesh and gabions
Materials used:
- beam 65x45 mm, length 1800 mm (4 pcs.) – vertical supports;
- beam 65x45 mm, length 800 mm (2 pcs.) – transverse beams;
- timber 21x10 mm, length 1380 mm (8 pcs.) – slats for creating grooves;
- sheets of galvanized mesh, width 500 mm, length 1800 mm (2 pcs.) - for the sides and top of the arch;
- metal mesh double torsion – for the manufacture of gabions;
- galvanized wire;
- screws.
Stages of gabion arch production:
1. Two gabions measuring 100x50x50 cm are made from meshes. Each gabion consists of three boxes: two for the base (they will be used to install wooden supports arches), one – unifying, smaller in size. The gabion parts are connected with strong galvanized wire.

The gabion box is made of durable mesh, ideally from a special, so-called “gabion” mesh.
2. On each cross beam, a router is used to make through slots 4 mm wide and 500 mm long. The trellis mesh will be inserted into this groove in the future.

Cutting a through groove along the crossbar beam
3. Vertical posts are fixed on the sides cross beams using screws.

Screw connection of crossbars and vertical racks arches
4. Triangular brackets are attached to the posts and crossbars to provide rigidity to the structure.

Attaching the bracket to the crossbar and support increases the strength of the structure
5. On vertical supports the groove for fastening the mesh is formed by two wooden slats. They are secured with a screw connection at the top and bottom of the support bars.

Two slats are fixed along each support at a short distance from each other (3-4 mm). This allows you to create a groove for attaching the mesh to the side parts of the supports
6. The mesh is inserted into the grooves formed by the rails in the support posts and pulled out through a slot in the horizontal cross member.

The mesh is installed in grooves on the crossbar and side supports
7. Install the arch support posts into the gabion boxes.
8. Gabions are filled with stones: basalt, granite, limestone, glass blocks etc. At the same time, they strive to fix the support posts as tightly as possible so that they cannot move during operation.

9. To obtain a rounded top of the arch, the mesh sheets are bent towards each other and tied in the middle with steel wire.

When the arch is ready, it doesn’t matter whether it is metal or wooden, climbing flowers are planted near it. Therefore, do not worry about minor construction defects! Massive lashes of climbing roses, clematis, annual morning glory or sweet peas will hide all the design errors often made in the process of independent production.
Regardless of the design option for your site, a garden arch will be one of the main elements of its decoration. Despite the fact that this kind of structure is designed to support climbing plants and emphasize their beauty, the arch itself is an excellent tool landscape design. Light, openwork structures that rise above the surrounding environment cannot fail to attract attention. Let's discuss how to build a garden arch with your own hands.
Garden arch - worthy decoration any gardenBusiness card of your site
In order for the arch to decorate the garden plot, it is important to choose the place for its installation with skill. A similar construction can be denoted separate zone yard For example, install an arch for climbing plants over the path between the utility area and the general area of the site, as in the photo.
The arch at the entrance to the courtyard looks interesting, welcoming everyone. This type of construction must be made with high quality and decent design, as it will act as the calling card of the entire farmstead. Forged construction may be quite appropriate for such a case.

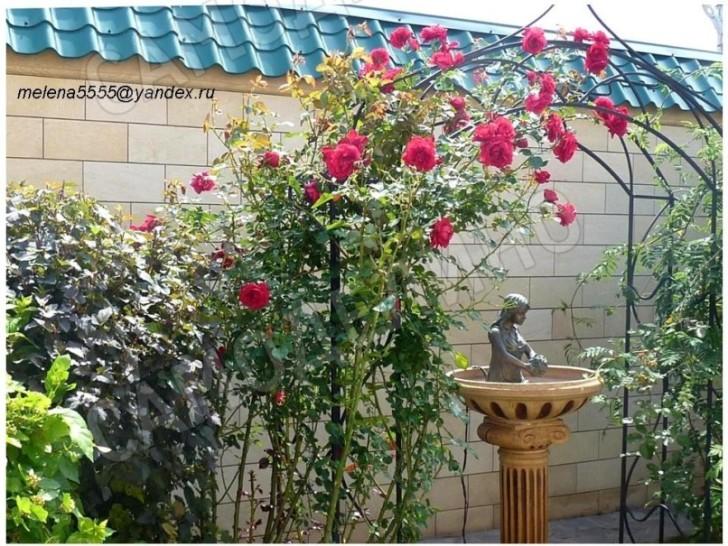 An elegant metal arch supports roses above the fountain sculpture
 Somewhere in the depths of the garden there may be an arch, the main purpose of which will be to support climbing roses or grapes. It can be made from reinforcement or wood.
Designers propose to make a kind of enfilade of several flower arches standing behind each other. When the climbing plants completely entwine the frame, you will get a tunnel leading to a gazebo in the garden or to a waterfall with a lake. They can be used as supports for grapes, climbing roses, and other flowers.
There is one more point that is important to pay attention to - the accuracy of the design. It can be assumed that the plants will hide asymmetrical support elements, protruding or uneven parts of the reinforcement from prying eyes. However, in winter period And early spring, when the plants have not yet woken up, the arch will stand without shelter. It is worth thinking about how the quality of the design will affect the appearance of the yard.
 This arch separates the vegetable garden and common territory plot
 Types of arches
It is easy to assume that such supports are most often metal, including forged or wooden. Practice shows that in fact, garden supports can be made from a wide variety of materials. Let's look at the most current options.
Lightweight heavy metal structures
Steel reinforcement is used quite often when creating arches. Steel supports quite durable - they can withstand the significant weight of plants with flowers or grapes, as well as gusts of wind. At the same time, welded structures have an impressive appearance - they do not clutter up the space, and from the outside they appear openwork and light.
 A mesh arch filled with soil: very interesting!
 Metal arches can be made in various options. The simplest method is an arc made of a metal rod, the ends of which are fixed in the ground or attached to separate supports. Such an arch is unstable and difficult to make accurately. A slightly more complicated version of such a product looks more effective: two arcs of the same type that are connected to each other. As a connector, pieces of rod welded to reinforcement arcs or wire can be used.
Most difficult option, but also quite aesthetic - forged structures. However, it will not be possible to make such a support with your own hands if you do not have experience and tools. It is best to order such work from a professional.
 The forged arch is spectacular even in winter time
 U metal structures there is one significant drawback - they begin to rust over time. To avoid corrosion, it is necessary to use a frame with a special coating or paint the arch, but this will have to be done annually.
The accessible charm of warm wood
Wood is also a popular material for creating an arch. It is from this that it is easiest to create a structure yourself. The main obstacle when working with wood is the difficulty in creating an arched top. In this regard, wooden supports are made U-shaped or in the form of a triangle.
The simplest version of a wooden arch is two supports, between which a crossbar is fixed. More complex options are a combination of two or more simple designs.
The tree has a well-known disadvantage: it is susceptible to rotting. You can combat this feature by covering the boards with stain and painting them different colors, coated with varnish. There are also special antiseptic compounds that prevent rotting.

 A wooden arch divides the site into zones
 Convenient and modern plastic pipes
Today, garden arches made from plastic pipes which are used for plumbing. This is a durable material - it is not subject to rotting or corrosion. Craftsmen make such structures on their own, especially if they have experience working with plastic.
An arch is made according to the same principle as from metal. It’s quite easy to bend the plastic in the right place, and a special one is used to connect the parts. welding machine. The finished products are relatively durable and also successfully perform their functions. You can purchase ready-made plastic structures.
Flight of fancy and other materials
Creative people have learned to use the most different materials to create garden arches. Sometimes you can see brick supports, arches formed from powerful roots, lamp posts, sculptural compositions, tree trunks entwined with roses. Arches are also popular today unusual shape– round, domed, twisted. All this can be done with your own hands if you show imagination and put in a little effort.
Master class on making a wooden arch

 DIY wooden arch
 The garden arch that you see in the photo is a connecting element general design with pergola and trellis. The entire structure divides the yard into a common and utility zone. The arch itself also serves as a support for the climbing roses.  To build the wooden arch I used the following materials:
- timber with a section of 60X40mm;
-shanks for shovels with a diameter of 40mm;
-wood screws 4.2x76mm (black, rare pitch);
- impregnation for wood “Pinotex”;
- yacht varnish;
- galvanized box with a section of 60X60mm;
-cement and sand.
 Back view of the arch
 The design has following parameters: height 2m, width 2m, depth 0.8m. All parts were coated with impregnation and two layers of varnish before assembly. Four seasons of the arch's life have shown that the arch has to be varnished once every two years. Sometimes it is necessary to sand the darkened wood and re-coat it with Pinotex before varnishing. Then the entire structure always looks like new.
To install the supports, I dug four holes 0.4 m deep. At the ends of the 4 beams that will be in concrete, I put pieces of galvanized profile 60X60mm (I bought one fence post) and secured them with self-tapping screws. Since the timber is thinner, we had to fill the gap with a 10mm thick strip of plywood. It is easier to use special galvanized thrust bearings, but it was not possible to acquire them quickly. I set four beams vertically and in height using a level, temporarily fastened them with slats and screws, and concreted them.
 This is what a support in the ground looks like
 After the solution hardened, I connected the top of the supports first with transverse and then longitudinal beams. I wanted to provide a higher passage, so I added one more longitudinal beam on each side of the arch. All connections were made with self-tapping screws. In order not to load the screwdriver too often, the beam closest to the screw was pre-drilled with a diameter of 4 mm.

 Installation of longitudinal beam
 On the “roof” of the arch I attached two more (four in total) transverse beams. Then he tied them together with several crossbars. This way the design looks more interesting, and the long beams will not “sink” from moisture.

 Arch top design
 All that remains is to cut and secure the ladder of shovels on the side walls of the trellis. Of course, you first need to mark with a ruler and pencil. I was diligent enough to treat all the ends of the parts with impregnation before installing them. But the places where the parts are joined do not “lose their face” over time, and the wood does not deteriorate.
 Sidewall design
 To cut the cuttings at the same angle, I first drew a template on a board and was guided by it when cutting. For these purposes, you can use a miter box.

 Fastening the cross members
 The result was a fairly rigid structure and no drawings were required. In any case, the roses like it.
DIY metal arch
 DIY rebar arch
 We propose to build a support consisting of two pieces of reinforcement bent in the shape of an arc. We will connect both lines of arcs with rigid wire. Introducing step by step instructions construction structures:
- First you should think about what the dimensions of the finished support should be. From practice, for an arch 200 cm high you will need 2 rods about 6 meters long. In this case, the width of the structure is assumed to be approximately 1.8 meters. The step between the arcs will be 30-50cm. To fasten them together you will need pieces of wire of the same size.
- To bend the rods correctly, you need to prepare a template. The drawing is drawn directly on the ground using a peg and cord. The twine is tied to a peg, the required length is measured and an arc is drawn.
- Next, the already bent pieces of the frame should be connected to each other with pieces of wire or reinforcement. They can be welded in a simple way in the form of a ladder, or make them intersect, forming rhombuses or other shapes. First, they are welded along the edges of the frame (at the edges of the arcs and in the center), then the remaining space is filled with segments.
- Mark the place where the support will be installed. At those points where the “legs” of the structure should be, holes are dug. Pipes are inserted into them, the diameter of which will allow the ends of the arcs to be placed inside. The pipes are then filled with concrete. After the solution has hardened, you can install the arch.
If the structure will spend the winter on the site, it is welded to the pipes. If the arch must be removable, its lower parts are fixed in the pipes using wedges. After installation is completed, the arch is coated with paint.

 Green arches camouflage the structure among plants
 As you can see, almost all the garden arches that are presented in our article can be made independently. We talked about the principles of working with metal, but you can make an arch from plastic pipes, or build it from stone or brick.
Decoratively designed flower beds or installed where necessary, arches for flowers in the country can significantly change general view site, place accents. Anyone can make their garden beautiful and cozy. We always strive to arrange the territory of our stay with comfort, not forgetting about the aesthetic side. For many of us, the dacha is not only a source of organic vegetables and fruits, but a place where the soul and body rest.
What is a flower arch
The arch represents the oldest architectural element, relevant at all times, successfully used today by landscape designers. With its help, you can harmoniously zone the space, create an atmosphere of relaxation, comfort, and add a certain touch of romance local area. Arches are installed at the entrance to the garden, used to decorate paths, combined with gazebos, placing tables and benches inside for relaxation.
The general perception of this decorative element largely depends on the type of construction and the material from which it is made. Strength, stability, along with an attractive appearance at any time of the year are the main requirements for the construction of arches. For their manufacture, wood, stone, plastic, brick, forged fragments, and metal are used.
DIY flower arches, photo:

A country arch can be of any shape: three-dimensional (pergola), trellis, consisting of many arches, trellis - it all depends on your imagination. Forged structures look impressive; sometimes weaving plants should be thinned out so that the beauty of the work itself and the grace of the lines are visible.

When erecting this structure, it must be taken into account that its height should be higher than human height, and its width should be more than 1 meter. In terms of its size and modification, the arch should look harmonious against the background of the house and other buildings. A garden arch for flowers can be easily erected with your own hands; we will look at some examples here.
General requirements:
- The material for manufacturing must be reliable and withstand the pressure of winds, snow, and other weather conditions.
- It should always look beautiful: spring, summer, autumn, winter - it should look equally aesthetically pleasing with or without plants.
- Its size must correspond to the height of all family members. The nuance that it will subsequently be entwined with plants should also be taken into account when determining the dimensions.
Arches can be roughly divided by shape, by material of manufacture, and by purpose. They can be rectangular, semicircular, triangular, in the form of canopies, etc.
Making an arch with your own hands
Arches made of brick or stone are the most durable. If anyone can build a structure made of bricks, then for decorative masonry you will have to hire professionals.
The simplest option could be a curved iron rod - a frame that will be entwined with climbing plants. It is better to degrease any metal parts first and then paint them.
A wooden arch is more preferable for perennial plants, since during frost it does not become as cold as metal. If the arch consists of wooden fragments, then it is better to fasten them together using galvanized materials. Wood fits harmoniously into any style; if desired, you can create an entire ensemble, including a gazebo, decorative fences, and trellises.

A simple example of a wooden arch can be a structure consisting of staircases located opposite each other (elements resembling ordinary stairs), fastened at the top with a wooden lintel.
 Flexible varieties of flowers or shrubs will look great on it. Over time, the stems of plants become coarser, woody, and take on the shape specified by the arch.
A metal flower arch can be made of metal rods or fittings.

For load-bearing arches you can use reinforcement with a 10 mm cross-section, for transverse fragments a little thinner - 6 mm. Two main arcs are made, and between them, to give rigidity and stability, cross members are installed. These connections can be of various shapes: curved rings, snakes, straight pieces of iron rod welded crosswise. These connecting parts can be welded to the supporting base using a welding machine or securely screwed with flexible metal wire. They are located one after another - the distance between them is approximately 20-30 cm.
The depth of immersion in the ground is 40-60 cm. In the same way, you can make a series of arches that will be located one after another. Subsequently, they will look like a flower tunnel.
To work you will need construction tools:
- pipe bender;
- hacksaw for metal;
- pliers;
- wire cutters;
- wire;
- roulette;
- hammer;
- level;
- V in some cases welding machine.
Sometimes it is quite difficult to achieve the same symmetry of the arcs, but this is not a big problem. Subsequently, this structure will be entwined with plants and flowers that will hide minor flaws.
How to make a flower arch with your own hands from plastic pipes? To achieve this goal, you don’t have to be a specialist; it’s enough to know the specifics of working with the material and follow simple recommendations.

Swipe correct measurements, calculate the plan future design, first draw an arch on paper. The main structure consists of fragments of plastic water pipe, which are connected using fittings. To reliably weld parts, you will also need a special soldering iron with attachments.
The process of creating such an arch:

- In accordance with the agreed dimensions, the pipe is cut into fragments.
- Adapters of suitable size (diameter) are selected.
- The joints are degreased.
- The required parts are put on the soldering iron nozzle, heated to certain temperature, after which they are connected to adapters. The connecting points can only be touched after final cooling.
- If there is no “iron”, you can use a suitable glue. The outer surface of one part, as well as the inner surface of the adapter, are covered with glue. It is held for a certain time, after which the parts are connected and turned a little.
- When all parts are securely fastened together, the structure can be installed. In order for your arch to withstand gusts of wind and other natural “attacks”, the depressions in the soil for it must be at least 40-50 cm.
- We install the arch, fill the installation sites with soil, and compact them thoroughly.
It is better to put plastic arches in the shed with the onset of winter, since frost has a destructive effect on the material. They are moisture resistant and more practical compared to wood or metal, which can rot or corrode over time.

The guarantee for the use of plastic pipes is approximately 50 years; such an arch can be manufactured and installed relatively quickly. Low cost is also an additional advantage.
Flowers, plants for the arch
When thinking about what flowers to plant for an arch, the first thought that comes to mind is climbing roses. This garden design very convenient for growing these flowers: it gives the shoots the desired shape, the best way demonstrates the beauty and characteristics of the variety. When choosing colors it is important to consider climatic features region, plant varieties, so that the arched structure looks attractive at any time of the year.
Suitable for this purpose are annual and perennials, which should be planted as close as possible to the base of the arch. Since perennials fully reveal their decorative qualities 1-2 years after planting, climbing annuals can be planted next to them - morning glory, sweet pea, kobeya, nasturtium. You can hang a flowerpot with hanging petunias, begonias. Decoration annual plants will help brighten up the waiting time when or climbing rose They will gain strength and grow in their permanent place.

Climbing roses are considered classics of garden decoration; they are voluminous and have a rich color palette, have a magical aroma, they do not need troublesome care. The bush is planted at the base of the arch, and then the shoots are tied to the structure as they grow. Before winter, roses are covered with appropriate covering materials to prevent them from freezing.
Before you make an arch with your own hands for flowers, think about the material for its manufacture. Roses, for example, are very sensitive to cold. To prevent the stems from being damaged by contact with cold metal, a plastic or wooden arch will be more appropriate for them.
Evergreen ivy is attractive with its lush emerald foliage, it is resilient, does not require special care, and will decorate your arch even in winter. It grows slowly, so you will have to be patient before waiting for the results.
Lush-leaved maiden grapes are also frost-resistant, easy to care for, and grow in the sun or shade. It is enough to trim it with scissors sometimes in order to always have beautiful arch. You can simply plant it near the structure, and then it itself, clinging to its antennae, will entwine it.


Clematis is not inferior in beauty to roses, it is distinguished by dense, long-lasting flowering up to late autumn. Requires care, loves fertile soil, regular watering, fertilizing. However, the end justifies the means. Possessing rich color scheme clematis are very beautiful. Some varieties have an amazing aroma. They need to be planted at a distance of 20-30 cm from the arch, not close together.
Campsis is a tree-like vine, characterized by its unpretentious nature and rapid growth.

In July, large bright orange and yellow “gramophones” appear among the lush foliage, which delight the eye with their beauty until the onset of the first frost. In frosts above -20°C, it is necessary to cover with spruce branches, film or covering material - for reliability.
Honeysuckle is a climbing arch flower with a variety of colors and a sweet aroma.


It blooms throughout the summer, grows in any soil, in partial shade or sun, and has dense, lush foliage. Some varieties, such as Henry's honeysuckle, remain green even in winter. You should know that the fruits of some species of this plant are poisonous.
Hops require virtually no maintenance. It grows well when warm weather, stretching up to 10 meters, entwining the arched structure in literally a year. This plant is attractive for its small yellow cones, which are used to treat nervous disorders (infusions, decoctions). A decoction of hop cones has long been used to strengthen and grow hair, and also as a diuretic. Thus, hops planted near the arch will not only decorate your summer cottage plot, but also provide health benefits.
Actinidia kolomikta is a winter-hardy vine that produces flowers by the end of May. The white flowers of this plant have an incredible aroma, somewhat reminiscent of lilies of the valley and lemon. The foliage also deserves attention - young leaves initially have a bronze tint, then they turn green, begin to turn white at the tip, and then turn into crimson. With open pollination, actinidia may bear fruits (50-70% probability) that can be eaten. The green berries of actinidia are somewhat reminiscent of olives and have a rich vitamin composition.
According to gardeners, bougainvillea is considered the best plant for shady areas. Loves a warm climate, abundant watering, fertile, well-drained soil. The creeping shoots of this plant can reach 10 meters in length. It blooms profusely with white, purple, orange, crimson flowers, which can have different shapes. From April to September it needs phosphorus fertilizing, which must be applied 3 times a month.
Arches for flowers at the dacha allow you to advantageously present all the advantages of the site, giving it a romantic touch and an atmosphere of mystery. Despite the simplicity of the design, the aesthetics of the arches are undeniable and in demand both today and centuries ago. Depending on the purpose of the installation, the arch can be a main or additional design element and serve as a support for climbing plants. With the help of this decorative structure, you can make your site individual, unlike the others.


 Morning glory Quamoclitus pinnate or Ruby stars

If you decide to improve your plot, then you can use many different options - from laying out flower beds and planting ornamental shrubs to more entertaining solutions. A garden arch at the dacha looks very interesting - anyone can make such a structure with their own hands, the main thing is to choose the material with which it is most convenient for you to work. In this review we will look at the most popular and in demand options among summer residents.
Main design options
First, let's look at some types of arches from which you can choose best option, which will organically fit into your site and become one of the original touches of the entire setting:
| Prefabricated Metal Garden Arches | The popularity of such products is due to their very high strength and durability; a circle, square, hexagon, reinforcement, strip or forged elements. Disadvantages include labor-intensive manufacturing and the need to protect elements from corrosion. |
| Garden arches and pergolas made of wood | The biggest advantage is the low price and availability of the material, and it is also easy to work with, which is very important in cases where the assembly is done by hand. The main disadvantage can be considered poor resistance to moisture, so periodic painting or treatment with protective compounds is required |
| Wicker structures | A very original and unusual option, and it’s also easy to make yourself. Either metal or wooden posts are used to create a frame, between which flexible rods are woven. Again, for proper reliability it is necessary to protect the structure from moisture |
| Purchased plastic garden arches | This option has gained quite a lot of popularity due to its low cost and ease of use. They are sold ready-made and do not require complex instructions or availability to assemble them. special tool. In addition, plastic is not afraid of moisture and is not subject to corrosion. |
Advice!
When choosing plastic products, you should pay close attention to the quality of the material, since very often on the market there are structures made from compositions that quickly become unusable.
The surface must be smooth and durable, without changes in color or visible flaws.

Review of manufacturing features of some options
If you decide to make arches for the garden with your own hands, then the information presented in this section will help you better understand the technology of manufacturing structures and help you organize the work process correctly. We will touch on the most popular solutions and describe them in the form of simple step-by-step descriptions.
Wooden buildings

Garden wooden arches can be made in several ways, but we will look at the simplest of them.
First you need to stock up necessary tool and materials:
- Beams for racks, most often 4 pieces are required, but if the arch is of increased length, the quantity will increase accordingly. The cross-section of the timber can be different, the main thing is that it is quite strong and does not succumb to deformation under the influence unfavorable conditions. Most often, the choice is made on products with a cross-section of 10x10 cm.
- To decorate the roof, a board with a thickness of about 25 mm or more is used; you can even use the remains that have accumulated after or outbuildings.
- For the arch you will need several slats and a piece of moisture-resistant plywood or oriented strand board. You can make an arch simply from plywood, but in this case its thickness must be at least 10 mm.

- If garden arches for roses are being made, then it is best to stuff slats between the posts to create a lattice with a cell of 10-15 cm; it is very convenient for climbing plants to entwine this type of structure.
- The following tools will be needed: a hacksaw or a special electric saw, a plane or grinder(you can get by with sandpaper), nails or screws (in this case you will need a screwdriver). Measuring devices are also needed: tape measure, ruler and pencil for marking.
Important!
All materials must be dry, since excess moisture leads to deformation of the finished products, which deteriorates the quality and appearance of the arch.
The workflow goes as follows:
- First, the posts are cut off and reinforced into the ground, and it is important to place them evenly and at the same distance from each other. The wood is treated with compounds that protect it from mold and pests.
- Next, arched elements are made; the easiest way is to make them from a thick piece of plywood. The desired shape is drawn on the material, after which it is cut out with a jigsaw; you can do the same using a furniture board.
- After this, all parts of the arch are fastened with bars, and the decorative elements which may be the most different forms and sizes. Assembled structure attached to the posts.
- Lastly, the grate is filled between the racks; thin slats are used for this.

Metal products
Metal garden arches are less popular due to the fact that working with the material is much more difficult. But in some cases, this option is the most preferable due to its high strength and the possibility of constructing lightweight but very durable structures.

Let's consider what you need to stock up on before starting work:
- First of all, you need to purchase a sufficient amount of basic material. This can be either round timber or profiled metal, as well as pipes of a wide variety of sections. From different options various metal garden arches are obtained.
- You will also need a welding machine; nowadays there are many compact options, which simplifies the work. In order not to specifically buy equipment, you can rent it; this service is common almost everywhere.
- To cut elements and clean them, it is best to purchase a grinder and a set of appropriate cutting and grinding discs.
- To protect finished products, it is necessary to use paint; it is best if it is a composition with anti-corrosion additives, this provides more reliable protection.

The work process is organized as follows:
- First, a specific project is selected, which indicates all the dimensions of the future product. After that, the metal is cut into pieces of the required size.
- To obtain neat bends, it is recommended to use a special device - a pipe bender; it is used to make not only arches, but also small decorative elements in the form of rings, curls, etc.

- After all the elements are prepared, you can begin welding the structure. If you do not have experience in carrying out such work, it is better to hire a specialist.
- The last stage is installation (the racks can be concreted for strength) and painting of the products; within a day, metal garden arches are completely ready for use - you can plant plants and attach decorative elements.
It is worth noting that great value It also has the right one, planted near the arch; climbing crops with abundant flowering are best suited.
Conclusion
A garden arch is a simple element that will be an excellent decoration for a site, and, if desired, will serve as a place to relax. The video in this article will clearly show some of the features of the workflow.


Almost every owner land plot I want to equip it, make the area beautiful, pleasant for work and relaxation.
In addition to a residential building, a bathhouse, and outbuildings, I want to improve the area, plant a garden or vegetable garden, or maybe both, so that a beautiful and interesting landscape will delight all family members and surprise guests.
How can you decorate the area? Various garden arches for plants are especially decorative.
Types of garden arches and pergolas
These structures can be classified according to the material from which they are made:
- wooden;
- metal;
- plastic;
- stone;
- mixed.
The shape of the support for climbing plants can be made as follows:
- arches (curvilinear vaulted structure);
- pergolas (volumetric arch made of interconnected repeating elements);
- trellises (lattice structure supporting plants);
- trellis (several gratings connected together);
- complex shape.
By location on the site:
- separately standing structure– compositional vertical accent;
- a group of arches is a kind of flower corridor;
- a wall of trellises covering the utility part of the garden;
- structures in the form of a gazebo designed for relaxation.
Where to install an arch for flowers in the country?
You have probably already built a house and located outbuildings, planned the site, and divided it into zones. Where can you install a flower arch to decorate your garden?

Firstly, such a design can be installed in the form entrance group to the site, in front of the gate, inviting you to enter the territory.

Or it can become a kind of entrance to the garden, separated from the rest of the territory by a small fence.

Several arches connected to each other by horizontal connections are called a pergola. The pergola can be installed along the garden path leading to the recreation area.

If the site area is not very large, installing arches and pergolas is not possible, and you definitely want to plant climbing plants, then help will come simple design- trellis. A wooden lattice will not take up much space; it can also be attached to the wall of the house.

Several trellises framing a bench (trellis) will create a pleasant shadow on a sunny day - an excellent place for solitude with an interesting book. Having completed the additional overlap, we get a cozy gazebo entwined with beautiful plants. You can simply stretch the wire or secure the poles between the walls. The plants will wrap around the walls and close together, forming a “green ceiling”.
Everyone is familiar with the extremely simple design for growing legumes: rods (stakes) installed vertically, tied at the top in the form of a hut - a simple trellis. The structure can be made of wood or metal from scrap materials.

But the producers gardening tools don't stand still. Metal portable trellises have recently appeared on sale; their cost depends on the complexity of the design. You can buy such a design from 250 rubles.

Factory-made metal mesh arches for the garden can be purchased for 400-900 rubles, the cost is more complex design much higher: 1100-4000 rubles.

The cost of a wooden arch also depends on the complexity of the design: simple gratings cost 50-400 rubles, complex ones - from 600 rubles. and higher. Many wooden pergolas are sold complete with a bench; all that remains is to install it in the garden, plant ornamental plants and after some time enjoy the result.

You can purchase a cheaper design - a plastic collapsible arch. It is usually dismantled for the winter period so that the plastic is not destroyed by temperature changes and frost.
Plants for a garden arch
To create a beautiful composition, climbing perennials are planted, such as climbing rose, clematis, Chinese lemongrass, various varieties grapes, tall bushes of honeysuckle, kobeya, as well as annuals: ivy, hops, sweet peas, codonopsis from the bellflower family, morning glory, climbing nasturtium.

You can decorate arches beautifully flowering plants and plants with lush greenery and decorative fruits. The lashes of climbing plants reach 3-4 meters. With the help of arches and pergolas, they are given the desired shape, decorating the garden with beautiful compositions.

Choose plants according to your climatic conditions. Some types of plants, such as climbing roses, are recommended to be covered for the winter, as they are very sensitive to severe frosts. For the same reason, you need to take a serious approach to the choice of construction material.

A metal pergola can damage the stems of some plants during frosty periods. In this case, wood is preferable.
How to make a garden arch with your own hands?
For a skilled craftsman, making and installing a garden arch or pergola with your own hands is not difficult. But even a beginner can cope with this task.
To make a simple wooden pergola we will need 4-6 wooden poles(1) with a cross-section of 75x75 or 100x100 mm and a height of 2 - 2.2 m, which will be installed vertically as supports. We attach transverse side beams (2) to the supports, to which the crossbars in turn are attached. Can be used as crossbars edged board cross section 20x200 mm.

To install the pillars, you need to dig holes deep 0.5 – 1.2 m (depending on the characteristics of the soil in your area). For structural reliability, it is better to concrete the pillars, having previously treated the buried part of the pillar: coat it with bitumen and wrap it waterproofing material(roofing felt or roofing felt). Don't forget to check the verticality of the supports using a building level.
Additionally, you can stretch fishing line or twine between the posts, or fill slats in the form of a lattice for better growth plants. All elements of a wooden arch must be treated with an antiseptic to avoid damage to the wood.
I love it simple form pergolas can be decorated with additional carved elements, painted in the desired color with exterior paint, if necessary.
Each of us deserves to live beautifully. And it doesn’t matter at all what your income is, the main thing is desire. Create cozy corner Everyone can do it in the garden, you just need to have a great desire for this and a little knowledge in this area.


, Islam, Judaism How do temples of different religions differ")


