There is no oven without a chimney. The removal of carbon monoxide and smoke from the furnace is a necessary condition for the correct operation of the stove. What to make a pipe from and how to arrange it so that it serves for a long time and does not create additional problems? An experienced stove-maker will answer without hesitation - from the same material as the stove itself. This is due to the fact that different materials have different coefficients of thermal expansion. And if brick and metal are simultaneously heated during the furnace, then a gap will form at the place of their connection over time. Smoke begins to seep through the gap, this disrupts the smooth operation of the stove, and also poses a serious threat to the life and health of households. Therefore, if you want to build a chimney for a brick oven, you need to do this also from bricks.
What is a brick chimney and where is it used
Chimneys are used to remove the gaseous products of combustion in stoves, fireplaces and heating boilers. Smoke, carbon monoxide and soot under the action of traction are carried out of the furnace into the chimney and removed to the outside. As they move, they cool down, giving off heat to the walls of the chimney.

To remove combustion products from a brick oven, it is necessary to build a chimney from the same material, i.e. from brick
Unlike metal pipes, brick has:

But a brick chimney also has a rather significant minus. In country houses and country cottages, it is not possible to fold cylindrical pipes, which are ideal for the passage of hot gases. The internal section of a square or rectangular shape creates obstacles for the expiration of smoke. As a result, a layer of soot quickly forms on the inner walls, which reduces traction. Accordingly, they have to be cleaned more often than metal ones.
The design of the chimney and the principle of operation
The classic chimney design is a vertical tower, inside of which there is a through hole connecting the furnace firebox with an open space outside the house. According to the laws of physics, air pressure decreases as you move away from the surface of the earth. As a result, a draft arises inside the pipe - the desire of the air mass to move from bottom to top. If air access from below is blocked, the thrust disappears. Therefore, a smoke damper or a view must be installed in the chimney, with which it is possible to regulate the draft.

With the help of a damper, you can adjust the size of the smoke channel, and therefore the draft
Since the pipe is operated in residential buildings, it should not pose a fire hazard, therefore, the laying is carried out taking into account maximum protection against possible fire. Among the stove-makers, a certain terminology has been established, which reflects the structure and functional purpose of the individual elements of the pipe.

In some cases, a combined pipe design is practiced. Brickwork ends in the attic and then a metal or asbestos pipe is mounted to it, which goes to the roof. In this case, there is no need for an otter, neck and head, which saves a lot of time and money. At the same time, we must not forget that the cross-sectional area of \u200b\u200ba metal pipe should not differ from the cross-section of a brick one in a smaller direction. The combination of a stainless steel pipe nested in an asbestos pipe has proven itself well.

In the upper part of the chimney, where the temperature of the flue gases is not so high, it is possible to make a transition from a brick pipe to a metal one.
In both cases, the upper hole must be closed with an umbrella (or deflector), which will prevent direct rain and snow from entering the pipe.
Calculation of the main parameters of the pipe
All calculations for the chimney must be carried out at the design stage of the furnace project. The project must be carried out by a qualified engineer or craftsman who is well versed in all the nuances of the furnace business. It is impossible to plan the dimensions of the pipe in isolation from the dimensions of the furnace and heat exchanger. Everything is interconnected and must correspond to one goal - the coordinated work of furnace equipment.
If during the construction of the fireplace there is no “body” of the stove, and the firebox is directly connected to the chimney, then in the Russian stove there are additional heating passages in the walls, and it is impossible not to make allowances for this. The presence of passages changes the draft and lengthens the path of the flue gases several times. Accordingly, the chimney must create a greater vacuum so that the movement of gases is accelerated, and soot does not settle inside the duct. A separate topic may be the calculation of the parameters of the chimney in the sauna stove. It is important here that the draft is not excessive, and the burning fuel has time to give off heat inside the steam room.
The task of the stove-maker is to take into account not only internal, but also external factors - the location of the pipe in relation to the roof, the characteristics of the local climate, and even the influence of the landscape.

Chimney draft can be affected by nearby tall buildings and trees, as well as the wrong choice of chimney height.
For gas heating systems, due to their increased fire hazard, the calculation of the parameters of the chimney is carried out by specialists who develop the boiler. Dimensions are indicated in the technical data sheet and are mandatory.
In private construction, where the furnace is predominantly fired with solid fuel (wood, coal, peat or fuel briquettes), the following rules can be followed to ensure the correct operation of any furnace:
- the internal cross-sectional area of a rectangular chimney in closed-type furnaces should not exceed the cross-sectional area of the blower;
- the internal cross-sectional area of the pipe in open-type stoves and fireplaces is calculated in a ratio of 1:10 in relation to the firebox.
It is believed that if the chimney structure has a rectangular shape, the ratio of the short side to the long side should be 1:2. In this case, the minimum allowable size of the channel section is 14 x 14 cm.

The size of the wall of the brick chimney channel should not be less than 14 cm
An important factor is the height of the pipe. Correct calculation allows:
- optimize the operation of the chimney and achieve the best efficiency indicators for heat transfer;
- ensure the safe operation of the heater, eliminate the leakage of harmful gases due to weak draft;
- ensure fire safety - with excessive draft, sparks and sheaves of flame can fly out of the pipe.
In the general case, the height is determined in accordance with SNiP 2.04.05–91:
- the minimum distance from the grate to the top of the chimney (excluding the protective umbrella) is 5 m;
- the optimal distance is 6 m.
Such parameters provide stable draft, i.e. the design of the chimney allows you to create a pressure drop sufficient to operate the stove at any time of the year. But in each particular case, you must also consider:

There is such an unpleasant phenomenon as reverse thrust. This term refers to the movement of smoke in the pipe in the opposite direction - from the chimney into the room. There may be several reasons for this, but the main one is the incorrect position of the chimney. As a rule - underestimated.

An error in choosing the height of the chimney often leads to back draft
Excess draft can always be eliminated by adjusting the air flow in the ash pan and flue dampers. Insufficient traction is exacerbated in several ways:
- Pipe extension.
- Cleaning the inner surface of the chimney channel.
- Installing a deflector.
The deflector not only increases draft, but also protects the chimney channel from moisture, debris and birds and bats.

According to experts, by installing a deflector on a chimney, traction can be increased by 15–20%
Video: how to calculate the height of the chimney
You will learn about which pipe is better to choose for a chimney, as well as the advantages and disadvantages of materials in our material:.
Making a brick chimney with your own hands
Knowing the features of the chimney device and having a ready-made project on hand, you can proceed with the independent construction of the chimney channel.
Materials and tools needed for the construction of the chimney
For self-construction of a chimney, you will need the following tools:
- trowel and mason's hammer;
- hydraulic level, plumb (or building laser level);
- construction bucket for mixing mortar;
- building rule, stitching;
- electric mixer (you can use a conventional drill with a nozzle);
- measuring instruments - tape measure, ruler.

Building a chimney requires standard mason tools
In the process of masonry, smaller building elements need to be made from bricks - brick plates, a quarter of a brick, a half, etc. An experienced bricklayer copes with the task with one measured blow of a hammer. A novice stove-maker who does not have such skills can use a grinder with a diamond disc. With its help, cutting of any required shape becomes easily accessible, although accompanied by a large amount of dust.
Some stove makers successfully use a template made of wood or metal for masonry. The template allows you to strictly adhere to the dimensions, which is especially important for the inner hole of the pipe.
In addition, you will need materials:
- red brick (by no means white - silicate) solid, hollow, fireclay, clinker;
- cement mixture (can be ready-made or prepared independently from sand, cement and clay);
- a set of smoke dampers or views;
- sheet metal or roofing.
Preparatory work before making a chimney
Before the immediate start of work on laying a brick pipe, it is necessary to carry out certain preparatory work:

During operation, hands come into contact with chemically aggressive solutions - it is recommended to use protective gloves to protect them.
When performing work on the roof, personal safety measures must be observed, as well as the use of scaffolding and rope insurance.
There should always be a first aid kit on the construction site with first aid for injuries and bleeding. Sometimes the chimney is not located in the center of the room, but is in contact with the bearing wall. This situation is often observed in the construction of fireplaces. In this case, you can use the wall structure of the chimney. It is pre-mounted during the construction of the main wall. It is appropriate to note here that among stove-makers, a classification of chimneys according to design features has been adopted:
- Brick overhead. Chimneys installed directly on the stove masonry.
- Brick indigenous. Pipes located separately from the furnace, standing on a separate foundation. They are in the form of a stand.
- Prefabricated. Individual blocks made of refractory concrete, which are stacked at the chimney installation site.
- Wall. Built into a load-bearing wall, significantly save space and volume of premises. However, it should be borne in mind that it is undesirable to mount wall pipes in external walls. Contact with cold outside air dramatically reduces the efficiency of such a chimney in terms of heat transfer.
In wooden houses, the places where the pipe adjoins the combustible elements of the building are accompanied by a thickening of 1–1.5 bricks. To avoid ignition, the joints are additionally laid with asbestos or felt sheets. Felt is pre-soaked in a liquid clay solution.
Step-by-step instructions for building a brick chimney
The construction of the chimney consists in laying brickwork in strict accordance with the plan for the location of the material in each row - in order. This plan must be drawn up during the preparation of the project for the construction of a chimney channel.

Each row of chimney masonry has a strictly defined arrangement of bricks.
We can only add that for the best bonding of bricks with mortar, it is recommended to adhere to the following installation settings:
- The solution is applied in a layer of 1.5–2 cm, the brick is wetted and coated with a solution. After installation in place of the masonry, the brick is pressed down so that the final thickness of the seam is 1 cm.

When laying each brick, it is necessary to check its position horizontally and vertically, and also maintain a joint thickness of 1 cm
- In the course of laying (after 5-6 rows), it is recommended to do a mop - grouting between bricks inside the chimney channel. The smooth inner surface will ensure good passage of exhaust gases, reduce the risk of soot deposits. Grouting can be done with a damp cloth.

Internal seams are leveled and rubbed with mortar along the masonry
- The installation of the smoke damper is usually carried out between the second and third row of bricks. But this rule is not rigid - you can adjust the installation location according to the situation. Immediately after installation, the valve is closed so that the cement mortar does not fall into the furnace.

A separate valve is placed on each smoke channel
- In the outer masonry - on the roof - a mortar with increased strength and moisture resistance characteristics is used. To do this, the proportion of the batch is changed, increasing the content of cement (instead of 1/4 they make 1/3). Moreover, cement is selected grade M 500 or M 600. For the head, it is often not a cement-sand composition, but a cement-clay one. It is made by adding 1 liter of cement to 10 liters of sand-clay mortar, which is used for laying the furnace.

When using hollow bricks, the internal cavities are filled with cement mortar
- It is important to keep the solution clean. It is unacceptable to get garbage into it, especially of organic origin.
- Straight sections of the chimney are laid out on a plumb line. To do this, strong silk threads are pulled in each corner and aligned vertically. The right angle is controlled with a square every 4-5 rows.

It is convenient to control the vertical position of the chimney walls with the help of cords stretched in each of the four corners
Video: DIY fireplace chimney
Features of the operation of brick chimneys
After the construction of the chimney is completed and the pipe has been successfully put into operation, it is advisable to familiarize yourself with the features of using a brick stove. In order for the heating unit to serve for a long time and without accidents, simple but important rules must be observed.
- The main enemy of a brick is sudden changes in temperature. It is better to drown more often, but for short periods of time. For one furnace it is not recommended to make more than 2 bookmarks of fuel. This is especially true of coal, the combustion temperature of which exceeds 1000 degrees.
- Timely cleaning of the pipe from soot indefinitely extends the life of the chimney channel.
- If cracks appear on the furnace body and the chimney in particular, measures should be taken immediately to eliminate them. Launched cracks tend to progress rapidly and pose a threat not only to the integrity of the brickwork, but also to human health. Through small cracks, carbon monoxide penetrates into the living room, which is colorless and odorless, but is poisonous to all living things.
- The slightest malfunction in the doors of the firebox or blower (ash chamber) first significantly reduces the heat transfer of the furnace, and then leads to an avalanche-like accumulation of soot on the chimney channels. Having found a loosely closing door, view or valve, they should be repaired or replaced immediately.
- At least once a year it is necessary to carry out preventive maintenance of the furnace. It is best to do this at the end of summer, before the start of the heating season. The daily preventive procedure includes opening the blower door for 15–20 minutes. This simple action will allow you to briefly create maximum traction, which will pull the soot deposited on the walls into the external environment.
- The use of damp firewood adversely affects the cleanliness of smoky channels, especially in winter. It is more rational to use fuel briquettes, the humidity of which is much lower. Firewood should be harvested ahead of time - drying wood in a natural way is a long process (from a year to two).
Chimney cleaning and repair
To clean the pipe, both traditional methods and modern ones, based on the achievements of technical progress, are used.
From time immemorial, people whose profession was called a chimney sweep were engaged in the maintenance of furnaces. Today, finding a professional chimney sweep is problematic. They were replaced by chemicals, which, however, are also often called "Chimney Sweep".
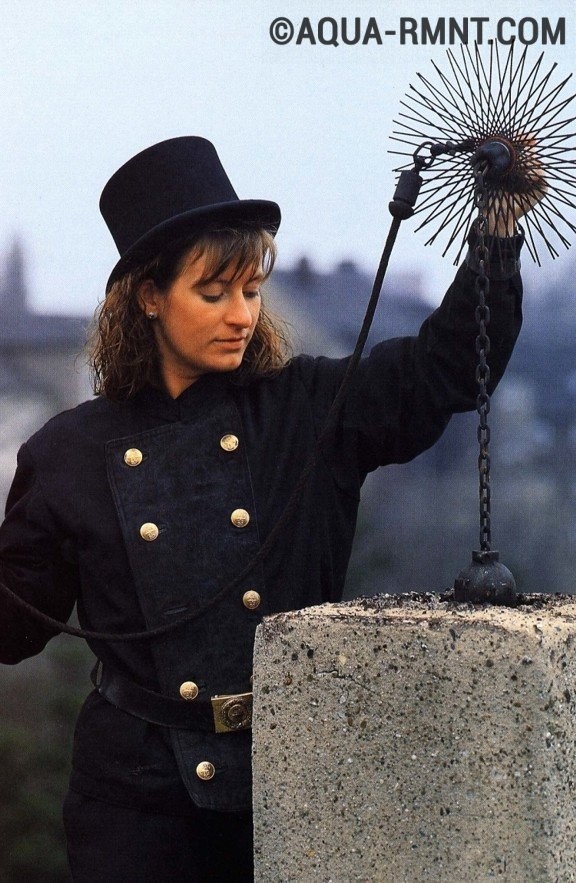
It is very difficult to find a professional chimney sweep today, this profession is a thing of the past
So, a tool called "Chimney Sweep Log" has proven itself well. It contains salts of copper sulfate and other active chemical compounds. Burning in the furnace, the vapors of these substances interact with the soot deposited on the walls of the pipe. Under the action of heat, the reaction continues for several weeks and leads to the fact that the solid structure of soot crumbles and, falling back into the furnace, burns out. According to manufacturers, the use of "miracle log" twice a year allows you to completely remove soot from the pipe. The consequence of this is good traction and a high percentage of heat transfer from the furnace.

Manufacturers of the Log Chimney Sweeper claim that its use twice a year allows you to completely clean the chimney of soot
From folk remedies, one can note such effective methods of prevention as burning salt or soda once every 2 months (about 0.5 kg per furnace). The powder is poured into the combustion chamber at the moment when the firewood is well flared up and the temperature is maximum. After that, you need to tightly close all the doors, as the reaction can be quite violent.
Dry aspen firewood helps to clean the chimney well. The fact is that the aspen burns with a large release of heat, the flames are long and penetrate deep into the passages.
If there is no aspen or soda, you can use potato peels. To do this, you need to accumulate about half a bucket of potato peel. When burned in a furnace, the released substances bind soot and cause it to burn to the end.

The combustion temperature of aspen firewood reaches 800 degrees, so the soot on the walls of the chimney burns out
When performing work on the installation of chimneys, especially at the site of installation of the neck, otter and head, safety standards should be carefully observed. If you work carefully and follow the necessary instructions and technologies, it is quite possible to fold a brick chimney with your own hands.
Believe that the correct scheme, the design of the chimney is very important.
I myself encountered this when the stove began to smoke in a freshly built sauna due to an incorrect calculation of the height of the pipe above the ridge, the smoke was so strong that the expensive lining was covered with a layer of black soot in a few months, which of course was not pleasing.
A stove, a fireplace, a heating boiler, and even an ordinary gas water heater have one thing in common: they require the disposal of air saturated with combustion products. Attention to this topic is the key not only to comfort, but also to safety.
Fuel costs, the ratio of produced and lost heat, indoor air purity and fire safety depend on the correct design and construction of the chimney. When creating a duct for the removal of combustion products, you must be guided by building codes, the instructions of the equipment manufacturer and common sense. First, we will talk about the general requirements for a chimney and what not to do. And then we will consider the features and subtleties of the operation of individual structures.
Correct chimney
The fundamental characteristic of the chimney is its material. Recently, chimneys made of acid-resistant stainless steel with the addition of molybdenum have become increasingly popular. But for fireplaces and stoves, in which flue gases do not have high acidity, good old brick can also be used.
The optimal shape of the chimney is a cylinder. The more obstacles in the path of smoke caused by angularity, the more difficult it is for it to pass and the more soot will be deposited on the walls.
Dimensions are determined by the diameter and height of the structure.
The first characteristic is calculated based on the power of the equipment, the width of its outlet, the number and nature of obstacles in the path of smoke. The height of the chimney is calculated in accordance with building codes, taking into account the height of the building, the type of roof and the dimensions of neighboring buildings (diagram). When designing, it is important to comply with the requirements for horizontal sections of the chimney. Their length should not exceed 1 m, because warm air moves vertically, not horizontally. Failure to comply with this requirement will cause poor traction and increased soot deposits in this area.
Connecting a boiler or fireplace insert to a chimney is often associated with a diameter mismatch problem. In such cases, a reduction adapter is used. The equipment connection zone with the chimney is treated with a special sealant. The subsequent assembly of the chimney from the pipes is carried out along the course of the condensate, that is, with expansion upwards. This will prevent condensate from reaching the outer wall of the pipe.
A brick chimney is assembled in accordance with the project. Each fireplace and each stove requires its own masonry, which is prescribed in layers. The general wish is this: minimize the roughness on the inner walls and monitor the tightness of the building.
If the house has an old brick chimney and they want to use it for a gas boiler, a sleeve should be made. An acid-resistant steel pipe is installed in the old chimney, leaving a technical gap between the new pipe and the masonry. When creating most chimneys, tees are used. They need to take into account the corners of the outlet and provide inspection doors. One of the main requirements of gas boilers is the construction of a condensate outlet. This can be a vertical condensate collector or a tee with a watering can. It is important that water vapor is properly removed.
Insulation of the chimney ensures the safety of both himself and the house. Insulation allows you to accelerate the heating of the pipe and reduce the formation of condensate. If the pipe passes near combustible materials, then insulation will save them. When laying the chimney through the ceilings, it is necessary to comply with all fire regulations, depending on the material of the ceiling and the temperature of the pipe.
It is better if the surfaces of the walls and ceiling located near the chimney channel are finished with non-combustible materials. Otherwise, they will have to be covered with a metal sheet with a layer of non-combustible material.
The part of the chimney pipe that goes outside must be protected from the wind and additionally fixed. Protection from atmospheric precipitation and debris is provided by deflectors, nets and even weather vanes. However, it must be remembered that such protection is not suitable in all cases. If for a fireplace and a stove a cap is the norm, then for gas equipment it is a violation of the security of the system.
On a note:
What are weathervanes made of?
The weather vane can be made of plastic and even plywood. However, only metal is suitable for serious products. Flat weathercocks are made of stainless steel or steel roofing sheet coated with powdered enamel, special paints or polymers. Volumetric, as a rule, are made of copper. Forged
copies. The variety of weather vanes is limited only by the imagination of their manufacturers. Traditions also play a significant role. In ancient China and Japan, for example, weathercocks were made in the form of dragons, which at the same time protected houses from evil spirits. In Europe, family coats of arms, flags, signs of the zodiac, as well as figurines of angels, fairy-tale creatures, animals, etc., were often erected on the roof. Today, like hundreds of years ago, weathercocks with a cockerel, a symbol of vigilance and a talisman against theft and fires, are especially popular.
Wrong chimney
Mistakes made in the chimney business can be fraught with serious consequences, so it is important to comply with all building codes and requirements. Some consequences of improper design will cause costly rework, while others can cause fire or poisoning by combustion products.
Experts do not recommend using materials that are not intended for these purposes, such as asbestos and aluminum. If we are talking about a gas boiler, then brick is not the best option. An acidic environment can destroy it in a few years. And altering the chimney is not the most pleasant prospect.
Changing the diameter of the chimney during operation without the involvement of a specialist will at least reduce the efficiency of the system. The load on the base of the chimney must not exceed a value that can lead to the destruction of the building.
Combining several installations into one chimney network is possible only if there are supporting engineering calculations made by a specialized specialist.
Among the most dangerous mistakes are:
- insufficient thermal insulation of the chimney, leading to charring or ignition of adjacent materials;
- the use of ventilation ducts for smoke removal or the unifying protection of two channels with one fungus. This error causes the destruction of the ventilation system, as a result of which smoke enters the house;
- modification and unauthorized repair without preliminary calculations.
The device of a technically correct and functional chimney is not an easy task. Each case has its own nuances and requires consultation with a specialist, at least at the design stage.
Chimneys for stoves
SNiP Heating, ventilation and air conditioning - fundamental rules and instructions for designing a furnace heating system. He talks about all the requirements for both the stove and the chimney.
So, one stove should be provided for heating no more than three rooms located on the same floor. In two-story buildings, two-story stoves with separate fireboxes and chimneys for each floor are allowed. The use of wooden beams in the ceiling between the upper and lower tiers of the furnace is unacceptable.
In addition, you cannot:
- arrange artificial exhaust ventilation, not compensated by the corresponding supply;
- remove smoke into the ventilation ducts by installing ventilation grilles on the smoke ducts.
Stoves, as a rule, should be placed against internal walls and partitions made of non-combustible materials. Smoke channels can be placed in external walls made of non-combustible materials, if necessary, insulated from the outside to prevent moisture condensation from exhaust gases. In the absence of walls in which flue ducts can be placed, wall-mounted or root chimneys should be used to remove smoke.
For each furnace, as a rule, a separate chimney or a separate channel is provided. It is possible to connect two furnaces located on the same floor to one pipe. When connecting two pipes, it is necessary to provide for cuts with a thickness of 0.12 m and a height of at least 1 m from the bottom of the pipe connection. As well as consistent installation for tight valves, and on the channels of the livers, working on coal or peat, - one valve With a hole with a diameter of 15 mm.
Chimneys must be designed vertically without ledges.
And at the base of pipes made of clay bricks with walls at least 120 mm thick or from heat-resistant concrete at least 60 mm thick - provide pockets 250 mm deep with cleaning holes, sealed with bricks on the edge with clay mortar and equipped with doors.
Permissible deviations of pipes from the vertical by 30 °, with a slope of not more than 1 m.
Inclined sections must be smooth, with a constant cross section and an area not less than the sectional area of the vertical sections.
Chimneys on buildings with roofs made of combustible materials must be equipped with spark arresters made of metal mesh with holes no larger than 5 × 5 mm.
Structures made of combustible or slow-burning materials adjacent to furnaces, chimneys and ventilation ducts located next to chimneys must be protected from fire by cuttings made of non-combustible materials, and the gaps between ceilings, walls, partitions and cuttings must be filled with non-combustible materials.
The distance between the top of the furnace ceiling and the protected combustible ceiling depends on the nature of combustion and is 250-700 mm. With an unprotected ceiling - 350 and 1000 mm. For a metal furnace with insulated ceiling - 800 mm. with uninsulated - 1200 mm.
The distance from brick or concrete chimneys to combustible and slow-burning parts of the roof must be at least 130 mm, from ceramic pipes without insulation - 250 mm. and in case of thermal insulation with non-combustible or hardly combustible materials with a heat transfer resistance of 0.3 m2 ° C / W-130 mm.
Chimneys for fireplaces
The requirements for a chimney for a fireplace echo those for stoves. The fuel is the same, and the principle of operation of the systems is similar. For example, fireplaces can be used for heating. If we are not talking about large-scale heating, you can limit yourself to a radiator pipe - a special device made of plates that increase the heat transfer area. You can regulate the intensity of combustion by controlling the air exchange. Alternatively, a slide gate is used.
As with other chimney designs, the smoke from the fireplace must be removed in the simplest possible way. It is better if it is a straight vertical chimney (more than 6 m high) or more complex, but with bends with an angle of less than 45 °. If it is necessary to use a knee, a tee is installed to facilitate access for subsequent cleanings.
In addition to the shape, the location of the chimney and the appropriate degree of thermal insulation are important. Smoke heats the chimney, which means that wall materials and ceilings must be protected from fire. If a sandwich chimney (multilayer) passes near plastic or wood, they are insulated with basalt-based material. The place where the chimney passes should also be protected from the cold. For example, it is not allowed to place a single-wall pipe (made of stainless steel with a thickness of 0.5-0.6 mm) on the street. Protect the chimney with a fungus or a weather vane installed at the end.
Chimney for solid fuel boilers
Solid fuel boilers are close to both stoves with fireplaces and gas boilers. They are united with the former by one of the possible types of fuel (wood) and the frequent need for cleaning from ashes, with the latter by the similarity in the distribution of thermal energy for heating. The solid fuel boiler connection diagram is generally suitable for other systems. Knowing their requirements, you can adapt this scheme, for example, remove the deflector when it comes to gas equipment.
Chimney for baths and saunas
The firebox and chimney of the sauna need thermal insulation. The floors are insulated by analogy with the described chimneys, and the wall material near the firebox is covered with metal sheets.
Excess heat generated by the chimney can be used for business. A popular option for increasing efficiency is a metal mesh into which stones are poured. They envelop the hot chimney and glow. Another useful addition can be a combustion intensity regulator.
The chimney draft must maintain combustion at the required level, without releasing all the heat to the street, and create a temperature of 70-80 ° C in the room. It is clear that the ingress of smoke into the steam room is out of the question.
Chimney for gas boilers and water heaters
Few developers study building codes and understand the "classic" requirements for exhaust ducts in general and for gas boiler ducts in particular. Practice shows that even the fundamental requirements and norms are not observed. But when building or repairing, first of all, it is necessary to solve technical issues.
The chimney for a gas boiler must:
- Comply with SNiPs
- Have your own channel - It is allowed to connect two devices to one channel, but at a distance of at least 750 mm;
- be sealed. Leakage of carbon monoxide is unacceptable (laying a brick chimney does not guarantee reliable gas insulation);
- Be resistant to condensation. Modern high-performance boilers produce 1-3 thousand liters of condensate per year. Due to the low temperature of the outlet gases (it rarely exceeds 100 ° C), the condensate does not evaporate, but flows down the walls of the chimney, penetrating into the brick and destroying it;
- Don't reduce traction. The ideal section for any exhaust duct is round. A rough, uneven inner surface of the channel impairs traction. In addition, the cross section of the channel must be no less than the cross section of the gas outlet
pipes on the connected device. For example, if the cross-sectional diameter of the outlet on a gas boiler is 150 mm, then the cross-sectional diameter of the exhaust duct must be at least 150 mm;
but to be warm. There is less condensation in the warm duct; - Go straight to the sky, without visors and coverings.
All these requirements are easy to take into account at the stage of construction or repair, but it is very difficult to correct shortcomings during operation.
COAXIAL CHIMNEY
It is easy to guess that the smoke discharged to the street consists of air taken from the room. Accordingly, its stocks need to be replenished, for example, take it from the street. This means that the supply air will be fresh, but cold.
Some systems allow you to solve the problem of removing useful air. Forced draft boilers with a built-in fan are equipped with a coaxial chimney, which compares favorably with multi-meter pipes.
This chimney has two pipes. Fresh air from the street enters one of them to maintain combustion, and smoke comes out of the other. The system is completely closed, that is, the air from the room does not participate in the operation of the boiler. Air supply and exhaust are optionally carried out through one chimney, divided into two parts. There are also models with separate pipes. Often, coaxial chimneys are horizontal, although, if necessary, they also make a vertical outlet.
How to clean a chimney?
It is considered that the pipe needs to be cleaned if the soot layer on its inner surface is thicker than 2 mm. If the soot deposits are very dense, the first step is to use a scraper for cleaning. Then comes the turn of a stiff brush with a long multi-link handle. The length of the latter is changed in accordance with the course of cleaning - from the top of the chimney to the bottom.
In order to get as little soot into the room as possible, the furnace hole is covered with plastic wrap or a thick sheet during cleaning. In addition, we advise you to prevent drafts and cover the furniture.
Used for cleaning and chemicals. Most often these are powders or “miracle logs”. Burning in the furnace, such substances emit a non-toxic gas, under the influence of which soot lags behind the walls of the chimney. It should be noted that it is very difficult to clean a heavily polluted chimney with "chemistry", it is best to combine chemical and mechanical cleaning.
People recommend once a year to heat the stove or fireplace well with aspen wood. When aspen burns, the flame reaches a great height and burns out the soot from the chimney. However, this advice is only suitable if there is not too much accumulated in the chimney. Otherwise, a fire cannot be ruled out. In addition, potato peelings can be burned in the furnace: the resulting steam effectively fights soot deposits.
Diameter (section) of the chimney
The minimum cross-section of smoke channels depending on the heat output of the furnace, mm:
- 140×140 - up to 3.5 kW;
- 140 m 200 - 3.5-5.2 kW;
- 140×270-5.2-7.2 kW.
The cross-sectional area of the round smoke ducts must not be less than the area of the said rectangular ducts.
Chimney height
The chimney must rise at least
- 0.5 M ABOVE the ridge of the roof when the pipe is located at a distance of up to 1.5 m from the ridge;
- Be not lower than the roof ridge when the chimney is located at a distance of 1.5 - 3 m FROM THE RIDGE;
- Be not lower than the line drawn from the ridge down at an angle of 10 ° to the horizon, when the chimney is located at a distance of more than 3 m from the ridge;
- For flat roofs, a chimney above 1 m is required.
- Regardless of the angle of inclination of the roof, chimneys that are 1.5 m above its level must be additionally fixed with braces on the bracket
Chimneys and chimneys
When calculating the height of a pipe, several aspects must be taken into account. The higher the pipe, the better draft it provides, but passing through a high pipe, the gases cool and form condensate, which leads to a decrease in draft and smoke in the room.
To ensure reliable draft, the chimney must be at least 5 m high, and if for some reason this is not possible, an electric exhauster is used. The minimum height of the upper part of the chimney above the roof ridge depends on how far the pipe axis is from the ridge.
In this case, the pipe in any case should rise above the roof surface by at least half a meter.
So, if the axis of the chimney is from the ridge at a distance of up to 1.5 m, then the pipe should rise above the ridge by 0.5 m. If the distance from the chimney to the ridge is from 1.5 to 3 m, then the upper part of the pipe can be located flush with a skate. If the distance from the pipe to the ridge is more than 3 m, it is allowed to build a chimney below the roof ridge at an angle of 10 degrees to the horizon.
Not everything is simple and with the internal section of the chimney, which must correspond to the size of the firebox. Through a pipe that is too narrow, the smoke does not have time to go out, and the stove begins to smoke. Through too large a cross section, the gases pass slowly, cool quickly, which leads to condensate settling and a decrease in thrust.
Pipe characteristics
The material for the construction of the stove chimney must ensure high heat resistance of the future pipe, because it must withstand a constant temperature of +500 ° C, and also withstand heat up to +1,000 ° C for half an hour. While the flue gases passing through the pipe are heated to a temperature not exceeding +300 ° C, a thermal stability margin is necessary, since soot can ignite inside the chimney, the combustion temperature of which is much higher.
Also, according to the requirements, the outer side of the pipe should not heat up more than +90°C, and in case of contact with flammable structures - more than +65°C. Among other things, the upper part of the pipe that goes outside must withstand winter frosts, and the material of the chimney must be resistant to the chemical composition of flue gases.
The traditional chimney has long been made of bricks. This material fully complies with the requirements for chimneys. In fireplace chimneys, the temperature is higher than in stove chimneys, and reaches + 400 ° C, therefore it is recommended to build chimneys of chimneys from heat-resistant bricks. However, furnace work requires skill, and the considerable weight of a brick pipe leads to the need for increased strength of the foundation under the fireplace or stove. All this often forces us to look for alternative materials for the manufacture of chimneys and chimneys.
Sometimes asbestos-cement pipes are used for this purpose. They are inexpensive, light weight, and easy to install. However, asbestos cement also has disadvantages: at high temperatures, pipes can crack, and insufficient heat resistance and rapid heating of the surface contribute to the creation of a fire hazard. Therefore, asbestos-cement pipes are more often used in small country houses, summer kitchens, and when arranging areas for barbecues and barbecues.
Steel pipes are also far from ideal. When installing such a chimney, it is necessary to ensure that the surface of the pipe is insulated with non-combustible material, since the metal heats up so much that it can cause a fire. Abundant condensate, leading to corrosion, makes black steel pipes short-lived, they fail relatively quickly and require replacement. Stainless steel is resistant to corrosion and has higher strength characteristics, but pipes made from it will cost significantly more.
Sandwich chimneys
Sandwich chimneys are becoming increasingly popular. Prefabricated, they meet the necessary requirements for resistance to high temperatures and oxidation.
Manufacturers produce reliable and safe sandwich pipes of various diameters, which allows you to choose the right option. They are easily assembled from meter lengths and mounted right on the spot.
Due to their three-layer structure, such pipes have excellent performance and at the same time weigh little, which not only facilitates the installation process, but also allows you to significantly save on the foundation for a fireplace or stove. The inside of stainless steel is covered with heat-insulating material, which is covered with galvanized steel on top.
With undeniable advantages, sandwich pipes also have disadvantages, among which the main ones are high cost and imperfect tightness due to the composite design of such chimneys. It is no coincidence that the manufacturer, as a rule, is limited to a 10-year warranty period, after which one should be puzzled by the replacement of the pipe.
In this regard, modular chimneys compare favorably with a longer service life (about 30 years), not too different from sandwich pipes in terms of price. Prefabricated modular pipes meet all the necessary requirements, which are provided by a three-layer structure: a layer of thermal insulation is also laid between the inner refractory side and the outer shell of lightweight concrete.
Decent place for a chimney
The most effective option for the location of the chimney is to place it in one of the internal walls. Then the heat of the stove will work to the maximum to heat the room, and the vertical chimney will provide the best draft.
The location of the chimney on the outside greatly facilitates its installation, since it will not be necessary to remove the pipe through the floors and the roof, which is associated with great hassle. In addition, this option is less flammable. The disadvantages of such a placement of the chimney are the not very presentable appearance of the pipe, the need for additional space and the mandatory thermal insulation of the entire part located outside to prevent it from cooling and condensate.
TOOLS FOR MASTERS AND WOMEN, AND GOODS FOR THE HOUSE IS VERY CHEAP. FREE SHIPPING. WE RECOMMEND - 100% VERIFIED REVIEW. Installing an outdoor chimneyAn outdoor chimney can be...
The function of chimneys for wood stoves is to remove smoke and other combustion products from the room. And in order for this element of the heating system to successfully cope with the task, it is necessary to comply with a number of important requirements during its arrangement. What are the rules for building a smoke outlet for a wood-burning stove will be discussed in our today's article. But first we will talk about the classification of wood stoves.
Classification of wood stoves
Wood burning stoves differ from each other in such parameters as:
- material;
- principle of operation;
- design features.
Wood burning stoves in terms of material
Most often, wood stoves are made of cast iron, steel or brick. The surface of these heaters is smooth and quite attractive in appearance, so they fit well into the interior of any room.
The furnace, made of metal, is equipped with a special refractory glass door, which allows you to control the combustion process and add fuel in time.
Cast iron stoves are a kind of rarity, now they are very rare, mainly in villages. Such devices are beautiful, they exude antiquity and some kind of rural romance.
Brick ovens are a "classic of the genre." It is they who are built in our country most often in the form of high, almost to the ceiling, structures lined with tiles. Such heating devices heat up for a long time, but they also cool down for a long time, keeping the temperature in the room comfortable for living for a long time. Therefore, it is worth knowing what are its features.
Advice! In order to achieve maximum heat transfer from a wood stove, it is better to install it near the inner wall of the room.
Types of stoves according to the principle of operation
- traditional devices operating up to 5 hours;
- long-burning stoves, structurally more complex and capable of heating a room for a long period of time. This is made possible by controlling the intensity of combustion by adjusting the air supply.
Types of furnaces depending on design features
If you look at wood stoves in terms of their design, the classification will be as follows:
- heating;
- heating and cooking;
- fireplaces;
- ovens with a water circuit.
As the name implies, wood-fired heating stoves are used exclusively for heating indoor air. The second variety, that is, heating and cooking stoves, allow you to heat the room and cook. Fireplaces are not just a heating device, they are a real decoration of the interior, a kind of “zest”, the central element of the room, where it is so pleasant to gather with the whole family and share news.
Devices with a water circuit are used for space heating and hot water. Such devices are especially popular in places where there is no centralized hot water supply.

It is better to place the chimney closer to the ridge. If this is not possible, you can mount it in an external wall, additionally protecting it with a layer of thermal insulation to prevent freezing during the cold season.
When choosing a material for the manufacture of a pipe, its properties such as fire resistance, resistance to corrosion and aggressive media should be at the forefront. It is also necessary to correctly select the shape of the chimney, since the traction force depends on it. The optimal solution is a chimney with a circular cross section, because if the cross section is square, the draft decreases, and soot will accumulate in the corners. Take care about .
Advice! To improve draft, make a chimney for a wood-burning stove with a round section.
To ensure easy timely maintenance of the chimney, it is advised to make its inner surface smooth. Soot accumulates less on it, which prevents the release of combustion products and can even lead to a fire.
Those parts of the smoke duct that are in contact with the floor elements must be finished with metal plates in order to increase the level of fire safety. If wooden buildings are located near the outer part of the chimney, a spark arrester is indispensable.
What not to do when arranging a chimney for a wood stove
It is not necessary to equip several furnaces with a common chimney. Each heater must have its own pipe.
Advice! A common chimney for several heaters is only allowed if they are on the same floor. However, it is necessary to provide for two cuts and valves.
Smoke must not be expelled into ventilation ducts.
Arrangement together with a chimney is unacceptable.
conclusions
As you can see, there is nothing difficult in building a chimney for a wood-burning stove. The main thing is to follow the rules listed above, and the heater will serve you for decades!
Related videos
The chimney is one of the most important elements of the entire structure of the house, especially for devices such as stoves, heating boilers, fireplaces, gas water heaters. The purpose of chimneys is to remove the product of combustion in a safe way, ensuring the cleanliness of the air in the room, freshness, and safety. In addition, the normal operation of such devices also depends on how well the chimney is designed, what material it is made of, and what are the conditions for its operation. At the same time, the question of how to properly make a chimney is one of the most important.
The chimney is one of the most important safety features of the whole house.
In our article, we will consider what types of chimneys are, what materials they can be built from and in what way, we will learn about the requirements for such a system and installation.
Types of chimneys
Today, the installation of a wide variety of types of chimney pipes is used, which may have different characteristics. Some of them are very cheap and easy to install even with your own hands, but there are also more expensive, complex systems, the installation of which requires the participation of specialists.
Among these types of chimneys, it is necessary to highlight the following:

- Brick, which are the most popular. This is the traditional way of arranging a pipe, which is most often found in large estates and old houses.
- Steel chimneys, often stainless steel, although galvanized steel may also be used. Recently, pipes made of acid-resistant steel with molybdenum additives have become in demand.
- Ceramic chimneys are a complex structure made of ceramic, steel or concrete layer.
- Other materials such as glass, fireclay, etc.
In addition, chimneys can be divided into:
- mounted, that is, installed on furnaces, this is the most used method;
- indigenous, that is, free-standing near furnaces;
- wall, passing through the main walls of the house.
Recently, coaxial chimneys have been made, arranged according to the “pipe in pipe” principle.
But they are used in the household very rarely. They work as follows: outside air is taken in through the outer pipe, and all combustion products are removed through the inner pipe. Installing such a chimney for a private house allows you to do without an additional ventilation system, which is very beneficial.
Chimney Requirements

Chimney draft must be monitored at all stages of installation.
When asked how it is right, you must follow these requirements:
- any design must comply with SNiPs;
- only one device is connected to one channel, but in rare cases two are allowed, the distance between them should not be less than 7.5 meters;
- the chimney must be airtight, leakage of combustion products is unacceptable in any case;
- it is necessary to provide protection against condensate during the device, which can drain along the inner walls, damaging the pipe material;
- installation should provide for careful control of traction;
- the outlet of the chimney should always look only at the sky; no covers, visors, etc. can be installed above it.
Chimneys: from asbestos to brick
A modern chimney can be made from a wide variety of materials; ceramic and glass pipes are no longer surprising, which do their job much better than traditional brick ones. Consider individual types of pipes, options for their device, advantages.
Asbestos cement pipes

Asbestos-cement pipes are considered the most economical.
A couple of decades ago, asbestos cement chimneys were the most popular, this material was extremely cheap. Their installation is possible for stoves, fireplaces, heating networks. But of the pluses, only the low price can be noted, otherwise, this is far from the best option. The fact is that the maximum temperature of the combustion products can be only 300 degrees, which is often simply not enough.
Of the shortcomings, the following should be noted:
- installation only for vertical sections;
- difficult installation, since the weight of the pipe is large;
- the joints of such a chimney are not airtight, which is simply unacceptable for a private house;
- condensate is absorbed into the walls of such a pipe, which makes them of poor quality;
- high unreliability and danger - pipes burst at high temperatures;
- almost everything can be connected to an asbestos chimney, but boilers require tees, cleaning hatches, and steam traps.
Steel chimneys
How to install a chimney so that it is simple and reliable? The answer is simple: steel chimneys are not only very durable and reliable, but also relatively easy to install. But even here there are some nuances: simple steel products are subject to corrosion, their service life reaches only 3-4 years. Therefore, it is recommended to take galvanized pipes, stainless steel chimneys.
These pipes provide:
- tightness;
- simple maintenance;
- excellent traction due to the smooth inner surface;
- overcoming the threshold of condensate formation;
- fire safety;
- relatively easy installation.
Of the minuses, it should be noted that metal chimneys are expensive, the design often requires the presence of a specialist, in many cases insulation is required, that is, a sandwich pipe is made.
brick structures

Brick chimneys have always been the most popular in the construction of brick houses.
Brick chimneys, which are often installed on the roof, are traditional. They are not only attractive, but also functional, but they are categorically not suitable as a flue! The fact is that under the influence of condensate, the brick collapses very quickly, it absorbs moisture, and at the same time spoils the interior decoration of the walls. If you make such a chimney without preparation and special knowledge, then it can become very dangerous!
When installing, it is necessary to comply with quite a few requirements, one of which concerns the height of the pipe, more precisely that part of it that protrudes above the roof. The height depends on the distance that exists between the pipe and the ridge. Of the requirements, it is necessary to note the following:
- installation of a brick chimney is possible only if its walls are at least 10 cm;
- above and below the passage of the roof by about 15 cm in the chimney there should not be any joints, which is important for ensuring safety;
- the cross-sectional area of the channel should not change throughout the entire length, as this may adversely affect the thrust;
- when choosing the type of brick, it is necessary to take into account the temperature of the combustion products, the power of the thermal device, the installation scheme;
- the bend should not be more than 30 degrees.
Fireclay pipes
For several years, chimneys made of such material as fireclay have been offered on the market. Their shell is made of concrete or steel, the inner tube is made of ceramics. Such systems have already gained popularity due to their reliability. The cake of such a chimney consists of the following layers:
- internal fireclay (ceramic) pipe for the removal of combustion products and gases;
- special insulating layer of basalt wool;
- the outer casing of the system is made of steel or lightweight concrete (foam concrete).
Of the minuses, it should be noted that the price is quite high, but it fully pays off with simple installation and the highest quality and reliability.
The efficiency and safety of a heating device that generates heat by burning a particular fuel largely depends on the parameters and condition of the chimney. Today, many companies are engaged in the production of insulated steel models, but not all users are ready to put up with their high cost and relatively short service life. Often, homeowners decide to build a chimney pipe using traditional technology, that is, from brick, with their own hands. To do this, you need to follow some rules and know which materials are best to use.
Strengths and weaknesses of a brick chimney
Brick chimneys can be used at any facility, be it a boiler room or a private house. With the advent of prefabricated steel "sandwiches", they have become less popular, but are still used quite widely. This is due to the following advantages:
- a brick chimney is cheaper than a "sandwich";
- lasts longer: about 30 years;
- is an important architectural element and visually blends perfectly with certain types of roofing, such as tiles.
But this design also has a lot of disadvantages:
- In terms of complexity and duration, the construction of such a chimney is inferior to the installation of a “sandwich”, and special transport will be required to deliver materials.
- A brick chimney has a significant weight, so it has to be provided with a reliable foundation.
- It has a rectangular shape in diameter, although a round section is most suitable. In the corners, turbulences are formed that prevent the normal outflow of gases and thus worsen traction.
- The inner surface of a brick chimney, even when finished with plaster, remains rough, as a result of which it becomes covered with soot faster.
Unlike stainless steel, brick is quickly destroyed by acidic condensate. The latter is formed if the temperature of the flue gases during their movement through the pipe has time to drop below 90 degrees. Therefore, when connecting a modern economical boiler with low-temperature exhaust or a stove operated in smoldering mode (heat generators of the Professor Butakov, Bullerjan, Breneran brands) to a brick chimney, it is necessary to carry out its sleeve, that is, install a stainless steel pipe inside.
Elements of a brick chimney
The design of the chimney is very simple.
The flue duct is protected from above by a cone-shaped part - an umbrella or a cap (1), which prevents precipitation, dust and small debris from getting inside. The upper element of the pipe - the head (2) - is wider than its main part. Thanks to this, it is possible to reduce the amount of moisture that enters during rain on the lower area - the neck (3).
Above the roof there is another widening - an otter (5). Thanks to him, atmospheric moisture does not get into the gap between the chimney and the roofing (6). A slope (4) is formed on the otter with the help of a cement mortar, along which the water that has fallen on the pipe runs. To prevent the rafters (7) and battens (8) from igniting from contact with the hot surface of the chimney, they are wrapped with heat-insulating material.
The section of the chimney that crosses the attic is called the riser (9). In its lower part, just at the level of the attic floor, there is another widening - fluff (10).
Note! All three widenings - the head, the otter and the fluff - are made only due to the thickening of the wall, while the channel cross section always remains constant. An otter with fluff, as well as other elements of the chimney installed at the intersection of the roof or ceiling, are called cuttings.
The thick fluff walls protect the wooden floor elements (11) from excessive heat, which could cause them to ignite.
The chimney can be made without fluff. Then, in the zone of the floor passage around the pipe, a steel box is mounted, which is subsequently filled with a bulk heat insulator - expanded clay, sand or vermiculite. The thickness of this layer should be 100–150 mm. But experienced users do not recommend using this cutting option: the insulating filler pours through the cracks.
The fluff is additionally lined with an effective non-combustible heat insulator (12). Previously, asbestos was used everywhere in this capacity, but after the discovery of carcinogenic properties in it, they try not to use this material. A harmless but more expensive alternative is basalt board.
The lowest section of the chimney is also called the neck (14). It has a valve (13) through which the draft can be adjusted.
Depending on the construction method, the chimney can be one of the following types:
- Nasadnaya. The furnace itself serves as the basis for such a design. To withstand the impressive weight of the chimney, its walls must be two bricks thick.
- Root. Such a chimney stands on a separate foundation and is not part of any heat generating installation. The flue pipe of the furnace or boiler is connected to it through a horizontal tunnel - a reversible sleeve.
- Wall. Chimneys of this type are channels in load-bearing walls. In order to save heat, internal walls are usually used, on both sides of which there are heated rooms.
In a vertical brick chimney, draft is formed naturally, that is, due to convection. A prerequisite for the formation of an upward flow is the temperature difference between the ambient air and the exhaust gases: the larger it is, the stronger the draft is formed in the pipe. Therefore, for the normal functioning of the chimney, it is very important to take care of its insulation.
Calculation of the main parameters
At the design stage, it is necessary to determine the height of the chimney and the cross-sectional dimensions of the flue duct. The task of the calculation is to provide the optimal traction force. It should be sufficient to ensure that the required amount of air enters the furnace and all combustion products are removed to the fullest extent, and at the same time not too large so that hot gases have time to give up their heat.
Height
The height of the chimney must be selected taking into account the following requirements:
- The minimum height difference between the grate and the top of the head is 5 m.
- If the roof is covered with combustible material, such as shingles, the chimney cap must rise at least 1.5 m above it.
- For roofs with non-combustible coating, the minimum distance to the top is 0.5 m.
The ridge of a pitched roof or a flat parapet in windy weather should not create support over the chimney. To do this, you must adhere to the following rules:
- if the pipe is located closer than 1.5 m in relation to the ridge or parapet, then it should rise above this element by at least 0.5 m;
- when moving away from the ridge or parapet at a distance of 1.5 to 3 m, the pipe head can be at the same height as this element;
- at a distance of more than 3 m, the top of the head can be placed below the ridge, at a height drawn through it, of an inclined line with an angle of 10 degrees relative to the horizontal.
If there is a higher building near the house, then the chimney should be erected 0.5 m above its roof.
Section dimensions
If a furnace or boiler is to be connected to the chimney, then the dimensions of the section should be determined depending on the power of the heat generator:
- up to 3.5 kW: the channel is made half a brick in size - 140x140 mm;
- from 3.5 to 5.2 kW: 140x200 mm;
- from 5.2 to 7 kW: 200x270 mm;
- over 7 kW: in two bricks - 270x270 mm.
The power of factory-made heat generators is indicated in the passport. If the stove or boiler is homemade, this parameter has to be determined independently. The calculation is carried out according to the formula:
W \u003d Vt * 0.63 * * 0.8 * E / t,
- W - heat generator power, kW;
- Vt - the volume of the furnace, m 3;
- 0.63 - average load factor of the furnace;
- 0.8 is an average coefficient showing what part of the fuel burns out in full;
- E is the calorific value of the fuel, kWh / m 3;
- T is the burning time of one fuel load, h.
Usually they take T = 1 hour - approximately during this time a portion of fuel burns out during normal combustion.
The calorific value E depends on the type of wood and its moisture content. The averages are:
- for poplar: at a moisture content of 12% E - 1856 kWh / cu. m, at a humidity of 25 and 50% - respectively 1448 and 636 kWh / m 3;
- for spruce: at a humidity of 12, 25 and 50%, respectively, 2088, 1629 and 715 kWh / m 3;
- for pine: respectively, 2413, 1882 and 826 kWh / m 3;
- for birch: respectively, 3016, 2352 and 1033 kW * h / m 3;
- for oak: respectively, 3758, 2932 and 1287 kWh / m 3.
For fireplaces, the calculation is somewhat different. Here, the cross-sectional area of the chimney depends on the size of the furnace window: F = k * A.
- F - cross-sectional area of the smoke channel, cm 2 ;
- K - coefficient of proportionality, depending on the height of the chimney and the shape of its cross section;
- A - the area of the furnace window, cm 2.
The coefficient K is equal to the following values:
- with a chimney height of 5 m: for a circular section - 0.112, for a square one - 0.124, for a rectangular one - 0.132;
- 6 m: 0.105, 0.116, 0.123;
- 7 m: 0.1, 0.11, 0.117;
- 8 m: 0.095, 0.105, 0.112;
- 9 m: 0.091, 0.101, 0.106;
- 10 m: 0.087, 0.097, 0.102;
- 11 m: 0.089, 0.094, 0.098.
For intermediate heights, the K factor can be determined from a special graph.
The actual dimensions of the chimney channel tend to be close to the calculated ones. But they are selected taking into account the standard sizes of bricks, blocks or cylindrical parts.
Materials and tools
A brick chimney is operated in conditions of significant temperature fluctuations, therefore it should be built from the highest quality bricks. Compliance with this rule will also determine how safe the structure will be: if the brick does not crack, it means that poisonous gases and sparks that can cause a fire will not enter the room.
Types of brick
The pipe is erected from solid ceramic bricks with refractory properties of grades from M150 to M200. Depending on the quality, this material is divided into three grades.
First grade
In the manufacture of such bricks, the temperature and holding time during firing ideally match the type of clay. You can recognize it by the following signs:
- blocks have a bright red color, a yellowish tint is possible;
- the body of the brick does not have pores and inclusions visible to the eye;
- all edges are even and smooth, there are no crumbled areas on the edges;
- tapping with a light hammer or other metal object gives a clear and sonorous sound.
Second grade
Such a brick is unburnt. Here are the signs that are typical for him:
- blocks have a pale orange slightly saturated color;
- numerous pores are visible on the surface;
- the sound when tapped is deaf and short;
- on the edges and ribs there may be defects in the form of scuffs and crumbled areas.
Bricks of the 2nd grade are characterized by low heat capacity, frost resistance and density.
Third grade
- blocks have a deep dark red color, come across almost brown;
- when tapped, they give a too sonorous sound;
- edges and edges contain defects in the form of chips and scuffs;
- the structure is porous.
Such a brick does not have frost resistance, does not hold heat and is too fragile.
The chimney should be built of bricks of the first grade. Second-rate should not be used at all, and third-rate can be used to make foundations for free-standing pipes.
What solution is needed
The requirements for the quality of the mortar are as high as for bricks. Under any temperature, weather and mechanical influences, it must ensure the tightness of the masonry throughout the entire service life. Since individual sections of the chimney operate in different conditions, the solutions used during its laying are different.
If the pipe being erected is a root pipe, then its first two rows (zone No. 3), located under the floor, should be placed on a cement-sand mortar (3-4 parts of sand per 1 part of cement). To make the mixture more plastic, you can add 0.5 parts of lime to it.
The upstream sections of the chimney, up to and including the fluff, have an internal temperature of 355 to 400 degrees, so a clay-sand mortar is used in their construction. If the fluff ends under the ceiling (zone No. 8), and the cutting is made of bulk material (zone No. 9), then the use of this mixture also applies to the rows in the cutting.
The riser, otter and chimney neck (zone 10), which do not heat up much, but are subject to wind loads, should be laid with lime mortar. The same composition can also be used when arranging the head (zone No. 11), but the usual cement-sand mixture is also suitable for this section.
Clay for the solution should be taken medium-fat. It should not have a strong odor, as this is a sign of the presence of organic impurities that cause cracks in the mortar.
The absence of organic matter is also desirable for sand. This requirement is met by mountain sand, as well as its cheaper replacement from crushed brick. The latter can be ceramic and fireclay. Since the chimney is built from ceramic bricks, the same sand should be used.
In addition to these materials, special purchased items will be required - a cleaning door, a valve and a cap. The gaps between the brickwork and the metal products mounted in it are sealed with asbestos cord or basalt cardboard.
Tools
The most common tools will be used:
- Master OK;
- pick hammer;
- plumb.
Do not do without the building level.
Preparatory work
If a root chimney is being built, then construction work should begin with a reinforced concrete foundation. Its minimum height is 30 cm, while the sole must be located below the freezing depth of the soil. The foundation of the chimney should not have a rigid connection with the foundation of the building, since both objects shrink differently.
Some masters soak the brick before starting work. This makes sense, since when dry, the blocks will actively absorb water from the solution and the masonry will be fragile. But keep in mind that the masonry of the soaked brick dries for a long time, so choose a technique in accordance with the time of year and weather conditions - the brick must dry before the first frost.
Sand must be thoroughly cleaned of impurities by sifting through a sieve with a cell of 1x1 mm, and then rinsed. It is better to rub the clay through a sieve after soaking. The lime used must be slaked.
Solutions are prepared according to the following recipe:
- Clay-sand: sand, fireclay and ordinary clay are mixed in a ratio of 4: 1: 1.
- Lime: sand, lime and cement grade M400 are combined in a ratio of 2.5: 1: 0.5.
- Cement-sand: sand and cement grade M400 are mixed in a ratio of 3:1 or 4:1.
Clay is soaked for 12-14 hours, stirring from time to time and adding, if necessary, water. Then sand is added to it. The above recipe is designed for clay of medium fat content, but it is advisable to check this parameter in advance in the following way:
- Take 5 small portions of clay of the same mass.
- In 4 portions, sand is added in an amount of 10, 25, 75 and 100% of the volume of clay, and one is left in its pure form. For obviously oily clay, the amount of sand in portions is 50, 100, 150 and 200%. Each of the test pieces should be mixed until homogeneous and then, by gradual addition of water, made into a solution with the consistency of a thick dough. Properly prepared mixture should not stick to your hands.
- From each portion, several balls with a diameter of 4-5 cm are made and the same number of plates with a thickness of 2 to 3 cm.
- Then they are subjected to drying for 10–12 days in a room with a constant room temperature and without drafts.
The result is determined, considering the solution suitable for work that satisfies two requirements:
- products made from it did not crack after drying (this happens with high fat content);
- balls dropped from a height of 1 m do not crumble (this would indicate insufficient fat content).
The tested solution is prepared in sufficient volume (2-3 buckets are required for 100 bricks), while adding enough water so that the mixture easily slides off the trowel.
How to lay out a chimney with your own hands: step by step instructions
If materials and tools are prepared, construction work can begin:
- Approximately two rows to the ceiling, they begin to spread the fluff. If there are several channels in the chimney, then the bricks blocking them should be partially recessed into one of the outer walls.
- Spread the first two rows especially carefully. They set the tone for the entire structure, so they must be perfectly even and strictly horizontal. If a mounted pipe is placed, then from the first rows it is erected on a clay-sand mortar, which is applied with a layer 8–9 mm thick, and when the block is put in place, it is compressed to a thickness of 6–7 mm.
- Following the order, erect the neck of the chimney. The seams must be bandaged so that the masonry does not crack into separate layers.
- From the inside, the seams are rubbed with mortar (so that the inner surface of the chimney is as smooth as possible).
- The duration of fluffing is determined taking into account the expected settlement of structures:
With each row, the wall thickness in the fluff is increased by 30–35 mm. To do this, cut brick plates of different thicknesses. So, for example, in the 1st row of fluff, in addition to whole blocks, the number of which has increased from 5 to 6, longitudinal and transverse halves (2 each) and several quarters are used. Cut bricks must be laid so that the rough cut looks inside the masonry, and not into the chimney. A row of fluff, which will be flush with the ceiling, must be isolated from the wooden elements with strips of asbestos or basalt cardboard. Then they return to the original dimensions of the chimney - this will be the first row of the riser. At this stage, using a plumb line, you need to determine the projection of the chimney onto the roof and make a hole in it for it. In waterproofing and vapor barrier films, not a hole is made, but a cruciform incision. After that, the resulting petals are bent in such a way that the functionality of this element is not impaired. Row after row lay out the riser, trying to make it absolutely vertical (controlled by a plumb line).
Otter formation
The riser ends next, half the height, protruding above the lower edge of the hole in the roof. Those that are at the level of wooden rafters and battens must be insulated with asbestos or basalt strips.
The otter starts next. Like fluff, it gradually expands, but unevenly, and taking into account the different heights of the edges of the hole in the roof. Further, the dimensions of the chimney again return to their original values - the neck of the furnace begins.
The last stage is the device of the head of two rows. The first row is made with a widening of 30–40 mm in all directions. The second row - according to the usual scheme, while on the ledge of the lower row an inclined surface is laid out with a concrete solution.
An umbrella is attached to the ledge of the head. The clearance between its bottom and top of the head should be 150–200 mm.
If the roofing material is combustible and a solid fuel heat generator is connected to the chimney, a spark arrester (metal mesh) must be installed on the head.
The gap between the pipe and the roof must be sealed.
The "steps" of the otter are smoothed with a solution so that an inclined surface is formed, after which the entire outer part of the chimney must be treated with a waterproofing compound.
Insulation of a brick chimney
The cheapest way to insulate a chimney is to coat its surface with a solution based on lime and slag. First, a reinforcing mesh is attached to the chimney, then a solution is applied layer by layer, making the mixture thicker each time. The number of layers is from 3 to 5. As a result, the coating has a thickness of 40 mm.
After the plaster dries, cracks may appear on it, which must be covered up. Next, the chimney is whitewashed with a solution of chalk or lime.
A more expensive, but more effective option for insulation is associated with the use of basalt wool with a density of 30–50 kg / m 3. Since the walls of the chimney are flat, it is best to use this insulation in the form of rigid plates, and not soft panels (mats).
To install basalt wool on the chimney, you need to fix the metal profile frame with dowels. The insulation is placed in the frame, after which it can be fixed with a stretched nylon cord or screwed to the brickwork with special dish-shaped dowels that have a large diameter cap (to prevent material from being squeezed through).
A vapor-tight film is laid over the basalt wool (this heat insulator absorbs water well), and then it is plastered with an ordinary cement-sand mortar over a reinforcing mesh or sheathed with tin (can be galvanized).
Sleeve installation
Chimney lining is carried out in the following sequence:
- In the connection area of the boiler or furnace, the chimney masonry is dismantled to a height sufficient to install the longest part of the steel liner. Usually this is a condensate trap.
- Consistently install all the elements of the liner (sleeve), starting from the topmost. As the installation progresses, the parts to be installed move upwards, making room for subsequent ones. Each element has hooks that can be hooked on with a rope passed through the top hole.
- After installing the sleeve, the space between it and the walls of the chimney is filled with a non-combustible heat insulator.
At the end, the opening in the chimney is again laid with bricks.
Chimney cleaning
A layer of soot deposited inside the chimney not only reduces its cross section, but also increases the likelihood of a fire, since it can ignite. Sometimes it is even specially burned out, but this cleaning method is very dangerous. It is more correct to remove soot by a combination of two methods:
- Mechanical involves the use of brushes and scrapers on long stackable holders, as well as weights on a strong cord, which is passed into the chimney from above.
- Chemical: in the furnace, along with ordinary fuel, a special agent is burned, for example, Chimney Sweep Log (sold in hardware stores). It contains many substances - coal wax, ammonium sulfate, zinc chloride, etc. The gas released during the combustion of this agent forms a coating on the walls of the chimney, which prevents soot from subsequently sticking to them.
The second method is used as a preventive.
Video: laying a brick pipe
At first glance, the chimney seems to be an extremely simple design. However, at each stage of its construction - from the choice of materials to the installation of thermal insulation - a balanced and deliberate approach is required. Following the recommendations of experts, you can build a solid and safe structure that will last for many years.


