A wooden summer shower for a summer residence is a small building on the site, but the significance and benefits of which are undeniable. It is difficult to do without a shower in the warm season. Besides, country shower can be attributed to a way to save the family budget, since the water in the tank or barrel is heated by the sun.
Any material is suitable for the construction of an outdoor shower, but wood will be the most organic and inexpensive.
Of course, you can buy ready-made wooden shower, but if the budget is limited, then it will be right to make it from improvised materials. Edged boards and timber, as a rule, are available on the site in the form of residues after the construction of a house or outbuildings, if not in in full, then partially. Consider step by step all the stages of building a simple outdoor shower design.
How to make a wooden shower with your own hands
First you need to choose the right place, so that it is illuminated by the sun for as long as possible, and provide an elevation. If the terrain does not allow you to install a shower at a height, you need to make a small embankment to organize the flow of water.
The second point is to prepare the material. To build an outdoor shower, you can use the most affordable and relatively cheap material on the farm - wood (boards, timber), preferably conifers.
The advantages of wood as a material for making a shower:
- ecological clean;
- accessible;
- aesthetic;
- easy to process.
A significant minus of wood is susceptibility to moisture and bugs (eliminated through additional processing and periodic maintenance).
Schemes and drawings of a wooden shower for a summer residence
A summer shower made of wood is so simple that drawings for its manufacture are practically not needed. But, in order to understand the construction, we give a few examples:


As can be seen from the drawings, the construction of a wooden shower is not particularly difficult. But before you start, you need to consider the following:
- lighting. They use a summer shower not only during the day, but also in the evening. Therefore, it is necessary to provide lighting - natural or electric. These can be windows in the wall, open openings or electric lamps. Most often, a country wooden shower is simply left without a roof;
- ventilation. A completely enclosed wood shower needs ventilation. To do this, it is necessary to provide ventilation hatches;
- heating. In order to be able to use the shower in early spring or late autumn, when the intensity of the sun and the length of daylight hours are not enough to naturally heat the water, many provide additional water heating. Among the popular heating methods are: installing a stove or column, installing a boiler (electric water heater), adding a shower room to the house and connecting to a central water supply, using a boiler.
Tip: using a water heater it is better to divide the water tank into two halves or use two tanks and a mixer.
When equipping a heated wooden shower, take care of safety, use the wire of the required section, isolate it from moisture, etc.
- locker room. To keep clothes dry, you can leave them outside the shower, or you can make a wooden shower for a summer house with a dressing room. Moreover, users are advised not to do two separate rooms, but simply separate the shower with a curtain. This will allow you not to waste time, area and material on construction and leave more space for swimming;
- bath accessories. For storage, it is enough to make simple wooden shelves. But their location needs to be considered. They should be close to reach out with your hand, and not interfere with taking water procedures.

Construction of a country wooden shower
The manufacture of a summer shower made of wood is carried out in several stages:
Shower drain device
A wooden shower is afraid of moisture, so you need to take care of the quick drainage of water from the shower in the country. This is especially true for indoor spaces.
The simplest shower drain is to drain water directly into the soil under your feet. But soon a small swamp will form near such a shower, attracting insects and creating an unpleasant smell, and a unkempt appearance.
 Properly organized drainage system a shower or drain consists of a floor, a drain and a septic tank.
Septic tank or drain hole should be located at least 3-4 meters from the shower and exceed the volume of the tank by 2 times.
A drain for a summer shower, a simple option is a ditch, the bottom of which is sent with PVC film. But it's better to use plastic pipe through which the waste water goes into the septic tank.
Wooden shower floor
Two common options:
- wooden floor in the shower. To operate such a floor, you need to do it under the shower drainage system. To do this, you need to dig a recess equal to the area of \u200b\u200bthe shower to a depth of 300 mm. The pit is filled with rubble and sand. Top mounted wooden pallet or lattice;
- concrete floor. In this case, a deeper recess is dug - up to 400 mm. A pillow of crushed stone and fine gravel is laid on the bottom, and concrete is poured on top. So that the water can freely leave the shower, you need to pour concrete at an angle, and use a pipe to drain.
Tip: If in the future you plan to make a wooden shower for a heated cottage, use a concrete floor.
Construction of a wooden shower frame
Since the shower will be made of wood, the same material will be used for the frame.
Considering that the water tank located at the top of the shower will be quite heavy (when full), and the shower structure itself is subject to wind load, it is better to choose a bar with a section of 100x100 mm for the racks.
Tip: if you plan to hang wooden door it is better to immediately provide additional racks. They are buried in the ground at a certain distance from each other. The gap is equal to the width of the doors plus the width of the door frame, plus a gap of 2-3 cm.
To install vertical racks, you need to drill (or dig) holes up to 1 m deep. The depth depends on the location of the shower. If in a fenced area you can 0.5m. A sand and gravel pillow is laid at the bottom of the pit, and racks are installed. In order for the tree to last longer, it must be pre-treated with resin, machine oil, drying oil or wrapped in roofing material. Next, the racks are concreted.
To protect the racks, you can install metal blanks with a size equal to the parameters of a bar or cylinder, concrete them. Then hammer a tree into them.
Tip: the front struts should be made 50-100 mm longer than the rear ones. Thus, during rain, water from the roof will flow towards the back wall of the shower.
After the concrete has dried (solidified), you can proceed to further construction.
 All racks, set strictly according to the level, are connected by the upper and lower trim.
Advice. To do top harness easier, you can assemble the frame on the ground, install it on supports from above and fix it with capercaillie bolts.
The material was prepared for the site www.site
Please note, when planning a slatted wooden floor, the bottom trim will serve as a support for the logs, so it needs to be well fixed. With a concrete field, the lower trim serves to fasten the wood trim.
A roof is covered on the upper trim, and a tank is installed.
Building a wooden shower with your own hands - video
- the tank must be chosen in a dark color, it will attract Sun rays;
- wall thickness affects the rate of heating;
Advice. To make the tank heat up faster, cover it with a sheet of glass or make a polycarbonate greenhouse.
- the tank must be resistant to frost. Otherwise, it will have to be removed for the winter;
- for safety, place the tank behind or to the side of the cab;
- when planning a heated shower, give preference to a metal tank;
Tip: installing a float in the tank will allow you to take water from the top of the tank, it warms up better there.
- to refresh one person needs at least 20 liters. Consider this when choosing the volume of the tank;
Advice. To ensure the best water pressure in the summer shower, the tank must be installed vertically. If the heating rate is important, install the tank horizontally.
Installation of the tank does not create difficulties, the main thing is to securely fix it on the roof. Before installation, you need to make a hole in the bottom of the tank (barrel) for a watering can with a tap (if it is not provided by the manufacturer).
Tip: the water tank must be periodically cleaned and an antiseptic (for example, potassium permanganate) added.
Wall cladding and door installation
The walls of the summer shower are sewn up with prepared boards. The door is hung last. Following the logic of construction, it should be wooden. But wood often “leads” from moisture, so many people advise using a film curtain as a door. Of course, if you have a capital summer shower, then it is better to take care of installing a high-quality wooden door.
 This is the part of the work in which you can involve children. Lacquered, painted in one color or in all colors of the rainbow, it will add zest to the overall appearance site.
Additionally, a summer shower can be decorated with flower pots or climbing plants can be planted near it.
Photo of a wooden shower for ideas and inspiration


Conclusion
Now that you know how to build a DIY wooden shower, don't hesitate to get started building and treat yourself to a few minutes of fun after a hard day!
The construction of a summer shower for a summer residence is not complete without questions related to the choice of material and the determination of the size of the structure. In addition, I want the building to be heated. This will make it possible to swim on cold days when the water in the tank does not have time to warm up from the sun. An important issue is the organization of drainage and drainage. dirty water. Today we will look at how to build a summer shower with our own hands, and we will try to address all the questions of interest.
A country shower is so simple that it does not require a detailed diagram. Usually withstand standard sizes booths 1000x1000x2200 mm. It is impossible to build a booth below, since part of the height will be taken by a wooden pallet, plus a watering can above your head. But the width and depth of the structure, it is desirable to individually select the physique of the owners. For example, an obese person in a small booth will be cramped, so the dimensions will have to be increased.

Drawing of a simple summer shower for a summer residence
If you decide to cultivate the building, build a dressing room with a dressing room, install benches and a table in it, drawings will already be needed here. Draw what you want to build, specify all dimensions. Composing detailed diagram Please consider the following points:

Wooden shower cubicle
Building a cabin out of wood is the most common option due to its ease of construction. Wood - ecologically pure material, easy to process. Its only drawback is susceptibility to moisture and bugs, so it requires additional processing. To build a wooden shower for a summer residence, you will need boards and timber, preferably from coniferous trees. You can, of course, use oak or larch. The material made from these types of wood is more durable, but it is more difficult to process. Having decided on the material, get to work:
- Since we are building a wooden shower, we will make the frame from wood. The main load on the racks will create a tank of water. If its volume is about 200 liters, then the main racks must be installed from a bar with a section of 100x100 mm. To fix the door, install additional racks made of timber with a section of 50x50 mm. The distance between them is equal to the width of the doors themselves with the door frame.
- under everything vertical racks dig holes 80 mm deep. Fill the bottom of the pits with a 100 mm layer of crushed stone and sand.
- To make the tree rot less in the ground, grease the edges of the timber with bitumen or machine oil. Top wrap with two layers of roofing material. Insert the posts into the pits, level them with a plumb line and concrete.

- Another method to extend the life of the posts is to cast metal bushings. They can be made from pieces of a metal pipe with a diameter of 100 mm. When the concrete hardens, the edges square bar chop with an ax to the size of the inner diameter of the pipes and install them in concrete bushings. Under the door pillars, similarly concrete bushings from a pipe of a smaller diameter.
- When installing vertical racks, make the front ones from the side of the doors 100 mm higher than the rear ones. The difference in height will help build a pitched roof.

- Connect the exposed racks around the perimeter from below and from above with horizontal jumpers, securing them with bolts. If you plan to make the floor in the form of a wooden lattice, reinforce the lower lintels with metal mounting corners. The jumpers will be supports for the logs and must support the weight of a person.
- Now you need to make a frame for the tank from wooden jumpers fixed on top of the frame. A tank filled with water made of any material has an impressive weight, so the frame under it must be made strong.

Flat water tank for water installed on the roof of the shower
- Sheathe the sides of the cabin frame with a sanded board. Make a door from a board 20-25 mm thick. Cut it to the required length, lay it in a row and sew it with cross bars. Knock down from a board 40-50 mm thick door frame and fix the door to it with hinges. Now the whole structure can be bolted to the door pillars.
- Treat the finished booth with an antiseptic and cover with drying oil or varnish. Cover the door from the inside with a film so that water does not get on it.

Options wooden cabins for a summer shower
Polycarbonate cabin
It is easier to build a polycarbonate booth than a wooden one, but you will need welding experience. The fact is that for polycarbonate it is necessary to weld a frame from a metal profile. For racks, a profile with a section of 40x60 mm will go, and a smaller section can be used for strapping. The use of a wooden frame for polycarbonate is not desirable, since both materials tend to "play" from changes in weather conditions. From this, polycarbonate sheets can be deformed.

The process of manufacturing a metal frame for polycarbonate is similar wooden structure. Concrete the main racks, and then weld the upper and lower jumpers. Three jumpers must be made in the middle of the frame so that the polycarbonate sheets do not sag. The fourth is not needed. She will interfere with the doors. From above, weld the frame under the tank. Make a frame for the door from a profile with a section of 20x20 mm and fix it with hinges to the rack. Paint the entire structure with waterproof paint.

For sheathing, use opaque polycarbonate honeycomb sheets, 6-10 mm thick. Cut a large sheet into fragments according to the size of the booth circular saw. Fix the resulting polycarbonate plates to the frame with self-tapping screws with a thermal washer. The door is also sheathed with a sheet of polycarbonate. Bolt the handle and latch to the frame.

Polycarbonate shower option with dressing room

Shower tank
Cabin made of corrugated board
A good option for giving would be to build a cabin from corrugated board. Lightweight, durable and durable material will serve long years. For a metal profile, both a metal and a wooden frame are suitable, but always with additional transverse bars. Sheets of corrugated board are soft, and additional emphasis they won't bother. We build any of the frames for the metal profile in the same way as the above options. In any case, weld the door frame from a metal profile.

Fastening the corrugated board is done with galvanized self-tapping screws with a sealing washer through one wave. First fix the sheets of corrugated board on the side walls, then sheathe the door. If you need to cut the material, use scissors or a special disc with teeth on the grinder so as not to burn when cutting polymer coating corrugated board.
Cabin made of bricks
The construction of a brick cabin in the country requires the construction of a foundation. To do this, it is enough to dig a trench 200 mm wide and 400 mm deep along the perimeter of the future structure. Fill the trench with bricks and pour liquid concrete to seep through between them. A week after the concrete has set, start laying bricks on the cement mortar. Don't forget to install a box for the door. The door itself can be made of wood or a frame can be welded from a profile and sewn up with a sheet of corrugated board. On the last masonry, wall in across the building wooden bars, preferably the thickness of the brick. They will lay the roof and fix the tank.

Installing the roof and tank
The material for the roof will need to be hard. Slate or corrugated board is well suited. Having secured roofing material, drill a hole in the center of the roof. Place the tank on top so that the water supply tube passes through the hole. Screw the tap and watering can onto the tube.
The optimal tank capacity for a country shower is 200 liters. In the store you can buy a plastic or galvanized tank or make it yourself by welding from stainless steel. Any container with a neck for pouring water will serve as a tank. To make a shower for a cottage with heated water, mount a heating element with a power of 2 kW in a metal tank. Paint the top with black paint. The dark color attracts the sun's rays, and the water will heat up faster.

Scheme of the device of the tank for a summer shower with heating
If you install wood-burning titanium in a cabin in the country house, then in addition to hot water, you will get a heated room. Then you will need to install a second tank with cold water next to it.
Arrangement of the floor and drainage
The floor and drainage of the shower for giving can be done in two ways:

Summer shower in a country house
In the presence of free space, country shower can be built in the house. To do this, it is better to purchase a shower stall in the store. AT concrete floor make a hole and install acrylic pallet according to the product instructions. Connect the siphon on the pallet with a corrugated hose to the sewer. Seal the joints of the pallet to the floor with sealant. Next, according to the instructions, assemble the frame from the profile, install the doors, bring the cold and hot water from the boiler.
As you can see, you can build a summer shower with your own hands in the country from almost any material. The main thing is to prepare drawings, material, tools and show aspiration.
In contact with
If it is not possible to conduct hot water in a private house or in country house, then in this case it would be advisable to build an outdoor shower.
How to build a summer shower with your own hands from wood?
To build a wooden shower in the country with your own hands, you can follow the following instructions:
First you need to choose appropriate place for building a building. When choosing, it should be borne in mind that such a country shower will be constantly exposed to moisture both inside and outside.
Tip: it is better to build such a structure in a well-ventilated area. This is necessary so that the wood dries faster. Also, do not plant bushes, trees and tall plants, as they retain moisture, do not allow air to circulate, and as a result, prevent the drying of the wood from which the country shower is made.
Production earthworks. For a shower, we dig a hole 1x1 m in size, 40 cm deep. We lay a layer of rubble on the bottom of the pit, which will help the soapy water soak into the soil faster. Next, cinder blocks should be laid out in the corners. They must be leveled.

Next, we proceed to frame manufacturing. To do this, we take boards whose thickness is 30 mm and a width of 15 cm. A base measuring 1x1 m will be made from them. 4 beams with a section of 70x100 mm are attached to this base. For ligation of the frame, lateral and two cross bridges that fit into slots. They also serve as a reinforcement for the roof, on which a hundred-liter tank will be installed.


Works on frame sheathing. For these purposes, you can use lining, blockhouse or false timber. The gaps between the grooves should be two to three millimeters. This is necessary so that the timber can expand freely when regularly wet. In our case, a material imitating logs was used for shower cladding.


do-it-yourself shower step-by-step instruction. A photo


Finishing work. Before painting, it is necessary to prime the wood. For these purposes, a bioprotective antifungal impregnation is suitable, after drying of which the surface is painted with a front acrylic water-borne varnish in at least 3 layers.

The next stage in the construction of a soul in the country is tank installation for water.

building a shower in the country. A photo


Tip: for a summer shower, it is advisable to use a tank with a minimum volume of one hundred liters.
You can build such a wooden shower in the country with your own hands in one or two days.
building a shower in the country with your own hands. Video
Do-it-yourself summer shower
For the construction, it is necessary to prepare the following materials:
- timber;
- fasteners (self-tapping screws);
- shower kit, which includes a bracket, a mixer, a curved pipe, an adapter and a nozzle;
- rubber hose.
How to build a summer shower in the country with your own hands?
Construction order:
Drafting drawings. For such a structure, it will be necessary to make a wooden pallet in the shape of a circle from dense wood. We will have cardboard as a template. required size. First you need to lay the cardboard on a flat surface and fix it with tape. Next, using measuring devices, draw a circle with two squares located inside. According to this template, the construction of a wooden floor will be carried out.


do-it-yourself summer shower drawings
Construction pallet. The floor will be three-layer. The order of the base for the floor is as follows:

Works on pipe installation. Connect all the elements that are in the shower set.


do-it-yourself summer shower step by step instructions. Video
do-it-yourself summer shower step by step instructions. Video instruction
Summer shower for giving from pipes and polycarbonate
This option attracts with its low cost, resistance of materials to the action of sunlight and moisture, as well as ease of processing.

The procedure for the construction of the foundation and floor
Before you start building a polycarbonate outdoor shower, you need to decide on its location. For such a structure, an inconspicuous place with flat surface away from wells and wells.
Site preparation. To do this, we fill it with sand and ram it.

Drill or dig four holes into which posts for the foundation will be inserted.

Lay a layer at the bottom of the hole rubble 10-12 cm thick.

Install pipes made of plastic, used for laying sewers. We make them inside and out.

do-it-yourself summer shower step by step instructions. A photo

In the central part it is necessary to dig drainage pit and fill it with rubble.


We also cover the area around the blind area with rubble.

From a bar with a section of 100x150 mm we make base for the construction and attach it to the foundation posts. For these purposes, it is necessary to drill holes in the cement and insert plugs into them.


It is also necessary to fasten jumpers to the frame with self-tapping screws and strengthen the structure steel corners. Between the pipe and the beam we lay waterproofing.


Tip: before installing the jumpers, you need to try on the pallet, as it will subsequently be installed between them. Therefore, if necessary, it will be necessary to adjust the frame to the dimensions of the pallet.


Next, you need to remove the floor height from the timber 50x50 along the entire perimeter and after that you can proceed to the device floor covering . The result should be a base with a built-in pallet.


The order of the construction of walls and roofs
Let's start building wooden frame soul. At this stage, it is necessary to provide a doorway. In our case, the height of the walls will be 2.5 meters.


summer shower made of polycarbonate step by step instructions. A photo

A solid one is attached to the rafters crate.

Making a layer waterproofing from roofing felt or bikrost.

From the sides we produce sheathing finished board.

For coverage roofing use soft tiles.

After that, we process the entire wooden frame wood stain two coats, and then varnish in two or three coats. For such a structure as a half-carbonate summer shower, about 7.5 liters of stain will be needed.


Frame cladding polycarbonate With outer side. For these purposes, it is recommended to use special thermal washers, for which it is necessary to cut holes on polycarbonate using a cutter.


Door made in the form of a wooden frame. Its height is two meters. To give rigidity, jumpers and jibs are used. Next, the door frame is painted, hung on hinges and lined with polycarbonate.


After that hang water heating ba k, faucets, curtains, hooks, rugs and other accessories.


At the bottom of the pallet it is necessary to bring the drain into drainage pipe , inserted 20-30 cm into the crushed stone base.


At the final stage we produce entrance improvement in the country shower. To do this, we dig a hole, fill the foundation with concrete and lay reinforcement in it. After the concrete has gained strength, we lay bricks on it, on which steps made of wood will be installed. You can decorate if you want. To do this, you need cement and stones.


Attach steps.

Do-it-yourself shower for giving
The first thing to do before starting construction is to decide on location summer soul. For such a structure, a well-lit, calm, slightly elevated place is suitable.

Tip: it is desirable that the shower is not located too close to the buildings and is built in the same style as them.
Stages of building a soul in the country
Drafting project. It is planned to build a shower consisting of two small spaces. Minimum size bathing compartments should be 100x100 cm, changing rooms - 60x100 cm. In our case optimal size soul - 200x150 cm.
At the chosen site mark out the rectangle dimensions 140x190 cm. We drive pipes in the corners. The foundation for the shower will be piled from two-meter asbestos-cement pipes, the diameter of which is 90-100 mm. They must be buried in dug holes to a depth of about 1.5 m. 20-30 cm should remain above the ground. After that, drainage and a drain system are arranged.

Summer shower project. A photo
To organize the flow of water is done waterproof layer. It can be made from PVC film or roofing material, which must be laid on an inclined surface. Alternatively, a reinforced concrete screed can be made.

Making the top and bottom strapping frame.

Plank floor covering.
Tip: In order for water to flow out of the shower cabin, it is recommended to install floorboards with gaps that are 10 mm wide.

The shower room should be separated from the dressing room by a high threshold and curtain.
Finishing work. Outside, the country shower is sheathed with clapboard or siding, moisture-resistant plywood, fiberboard, etc. Inside, for finishing, materials that are not afraid of moisture should also be used.
It is necessary to install a water tank on the roof, the water heater is installed indoors.

Hozblok with a do-it-yourself shower

The order of construction of the structure:
After you have chosen a suitable place for the construction of a shower, you can proceed to earthworks: dig out foundation pit, fill it with PGS and lay out point brick foundation.


After the foundation is ready, you can proceed to the device wooden frame designs. For these purposes, a beam is used.


For plating shower on the sides and back in this project, a board with a thickness of 10 mm was used. A window and door opening should be provided in front.


Device roof frame from wooden beam. In this project, window openings should be provided on the folding roof.


Corners should be lined with boards.


Can be used for roofing shingles.


The door is made from boards. Handles for doors and steps can also be sawn out of wood.


All wooden elements necessary paint paint or varnish.
Bench arrangement, installation shower tray, wall cladding with plastic, fastening hooks, etc.


Summer shower projects for a summer residence
Project No. 1
For the shower, you can also use not only a wooden frame, but also a metal one. This design can be installed directly on the ground. A curtain is used as a door in this project.

Project No. 2
The shower can be made from wavy sheet metal, which can be bent in a semicircle. For this option, there is no need to install a water heater. It will be enough to connect to the water supply.

Project No. 3
Such a summer shower made of pipes is lined with white plastic on the outside, and brown on the inside. The shower cubicle can be erected on a paved concrete pad. For this option, you will need a water heater.

Project No. 4
As a floor in such a shower, you can use wood flooring. Inside the room is lined with blue plastic. Instead of a roof, a wooden lattice is used.

Project No. 5
The base of this shower is made of metal pipes. Brown corrugated board was used for wall cladding. The roof is also made of corrugated board. Light enters the shower room through the holes between the wall and the roof.

Project No. 6
For the manufacture of this shower, red polycarbonate was used. For this option, there is no need to install a tank on the roof. To use such a shower, you will need to connect it to the water supply.

Project No. 7
The frame of such a shower is made of metal pipes, painted in Blue colour. Plastic was used for wall cladding white color. A metal structure was made for the tank.

Example #8
shower in rural style. The frame is made from dry tree trunks. Branches are used for cladding. Logs are fixed on top of the structure, on which a water tank is installed.

Project No. 9
The frame for such a shower is made of metal elements. Floor and wall cladding - varnished wood. Such a summer shower does not have a door and a water tank.

The summer shower is one of the significant buildings on suburban area. How to equip a shower in the country with your own hands, building a reliable and durable design with a minimum financial investments? Guided by the advice of the master, you can easily cope with the task.
In the hot months, the presence of a summer shower is one of the conditions for a comfortable stay in a suburban area. The shower gives you the opportunity to freshen up after a hard day, removing the accumulated fatigue and energizing for new things.

Summer shower of a simple layout at their summer cottage
There is nothing complicated in building a shower in the country with your own hands. You just need to sketch a drawing and decide on the size of the future structure, prepare necessary materials and take some free time.
Outdoor shower design
There are many options for arranging a summer shower. It might turn out simple design of a wooden frame with a small tank on the roof and with a curtain to protect from the wind and prying eyes. Or a full cabin with strong walls and a roof capable of supporting a heavy barrel filled with water.

Summer shower design options
But in any case, an outdoor shower should be comfortable and spacious. Thinking over the dimensions of the future shower stall, keep in mind that it is necessary to provide a place protected from water splashes for storing bath accessories and hanging clothes. This will require from 40 to 60 cm of floor space.
According to the experience of the masters who have already built a shower in the country with their own hands, for a comfortable adoption of water procedures, there is a sufficient room with a size of 160x100 cm or 190x140 cm and a height of 2.5-5 meters.
Tip: A small drawing or a simple drawing will help you correctly calculate the required volume. building materials preventing unnecessary expenses.
Site selection
The design of the summer shower assumes that the water will be heated from solar heat. Therefore, it is better to allocate a well-lit area for the installation of a shower cabin, where the sun's rays will actively warm up the water tank throughout the daylight hours.

The best place to build a shower would be sunny place
When choosing a place, it is worth considering the convenience of water supply, ensuring, if possible, automatic filling of the tank.
It would be wise to take care in advance about the flow of water by placing the structure on a natural elevation, or by making a small embankment for this so that after washing it enters the septic tank or sump.
Foundation preparation
When building a lightweight frame structure laying the foundation is not at all necessary, but during the construction of a stationary summer shower, this stage of work cannot be bypassed.
To carry out the work you will need:
- Roulette and level;
- Pegs and lace;
- Bayonet shovel;
- garden drill;
- Pieces of roofing material;
- Metal grid;
- Crushed stone and sand;
- cement mortar.

Preparing the base for the summer shower
The dimensions of the foundation depend on the building materials from which the building will be built. For the construction of a shower from cinder block or brick for arrangement slab foundation digging a pit about 15 cm deep will be required.
The work is carried out in several stages. Having decided on the place for arranging the summer shower, they prepare the site:
- With the help of a tape measure, pegs and a cord, a site of the required size is marked out.
- In the designated area, a layer of turf is removed with a depth of 15 cm.
- Level the base of the pit.
- The bottom of the pit is lined with a "cushion" of sand and poured with mortar, creating a flat surface.
Tip: If you plan to use a wooden or metal carcass, before pouring the base, it is necessary to prepare a place for racks by installing sticks of the desired diameter vertically wrapped with roofing material.
Foundation laying
When performing a floor screed, it is better to use a level and guides, because only a horizontal surface can become a reliable basis for the entire structure. At this stage of construction, it is also worth taking care of arranging the drain, in parallel with the concrete tie, by completing a gutter reinforced with a metal mesh.

The foundation for the construction of a capital summer shower
Using columnar or pile foundation under the frame summer shower, you don’t have to dig a pit. It is enough to make holes about 1 meter deep using a garden drill at the place of installation of the support pillars.
It is necessary to insert metal racks into them, the height of which is 1.2 m, and D = 90 mm, so that the racks rise above the ground by 20 cm. :3 and wait until it acquires the necessary strength.
Important: To prolong the service life metal poles, the ends buried in the ground must be pre-treated with used engine oil.
Drain arrangement
A septic tank for a summer shower is best placed not under the shower cabin, but at a short distance from it. This will prevent it from flooding with large volumes of water, thereby preventing the destruction of the foundation and soil.
For its arrangement, they dig a hole about 2 meters deep, decorating the walls with brick or cinder block masonry. Some craftsmen use car tires for this purpose, laying them on top of each other in the form of a well. To ready septic tank a gutter is brought to drain the water and covered with a shield knocked down from wooden boards.

Option for arranging a drain for a summer shower
It is better to arrange the walls of the gutter for water drainage with a waterproof material: roofing material, hydrostekloizol or ordinary PVC film. It is placed under a slope so that the drain is directed towards the drainage tank.
In the shower stall itself, a metal or enameled tray, which without much hassle can be purchased at any specialized store. From it, water will flow directly into the gutter.
Tip: You can partially solve the issue of soil drainage by planting moisture-loving perennials near the shower stall, such as a bathing suit, buzulnik, hazel grouse, iris, loosestrife.
Frame erection
A summer shower made of beams or boards is one of the most popular options for a building that is needed in the household. For the construction of the structure, it is better to use conifers, the main advantage of which is:
- high density;
- moisture resistance;
- High resin content;
- Ability to withstand heavy loads.

Beam shower frame
For the construction of the frame, bars of 100x100 mm are used. First, the lower frame is assembled, fixing it with bolted connection to support pillars or screw piles. When mounting, it is better to use long bolts with full coincidence of the axes.
Installed vertically wooden poles, perform the upper strapping. To give the structure additional stability, the side frames are fixed with spacers.
Planed coniferous wood is excellent as a sheathing. It has a presentable appearance and harmoniously fits into the surrounding landscape.
Important: To extend the life of wood, it is desirable to treat it with an antiseptic and water-repellent composition, or simply coat it with 1-2 layers of varnish for outdoor use.

Building the walls of a wooden summer shower
Special seals will help to ensure a snug fit of the door. The door to the booth also needs to be painted or proliferated.
For interior decoration booths can be used plastic panels, oilcloth or linoleum. Photo from interesting options designs can be viewed online.
Barrel installation
When choosing a barrel of the required volume, they are usually guided by the formula that up to 40 liters of water is enough for one person. To equip a summer shower for a family of three or four, it is enough to install a 200-liter barrel. If you choose between plastic and metal container, it is worth noting that plastic is lighter in weight, but metal (painted in dark color) heats up faster.

Various water supply schemes natural heating
A little trick: To ensure faster heating of water, the outer surface of the roof under the barrel can be lined with reflective material such as galvanizing or foil.
The container is laid on the roof and fixed with straps. It remains only to choose desired scheme water supply to the cabin:
- cut two holes for filling with water and connecting a faucet with a diffuser, fill the container and enjoy water procedures.
- the pedal scheme is similar to the first one, but water is supplied using a pedal and not a valve, as in the first case.
The second option is more complex, but at the same time very economical. water enters the shower dosed and at the right time, which is very convenient. Both options with natural water heating. It is also possible to connect electric water heating. The presence of an electric heater in a barrel entails the rejection of a barrel from plain plastic(it is better to use metal) and the inclusion in the circuit of another container for supplying cold water.

Scheme for arranging a tank for a summer shower
Cold water will save a lot of electricity, because washing only with heated water is not very practical and convenient, because there is no way to adjust the temperature of the water supply. You will also need a mixer or some kind of circuit with two taps and the need for electricity supply. Although electricity is desirable anyway, it is necessary to light the shower.
Building a shower in the country: video
Naturally heated shower: video
Summer shower in the country: photo


In hot weather, a summer shower for a summer residence is not a luxury, but a necessary one. outbuilding. The shower makes it possible to freshen up, wash off the dirt after garden work. The presence of a shower on the site ensures a comfortable stay in the country, especially if there is no nearby reservoir suitable for swimming. When designing a country shower, its size, materials used and the place where you plan to build it are taken into account. The cabin should be quite spacious so that it can comfortably accommodate everything you need and move freely. Comfortable Height shower - 2.5 m, the most common cabins, the size of which is 190/140 mm and 160/100 mm. Want more details?!
For a garden summer shower, it is better to choose a sunny place away from other buildings. In the sun, the water heats up quickly, which is convenient if you plan to build an unheated shower. If the tank is painted black, the water will heat up faster. Consider also the fact that the water supply to the shower is convenient, preferably automated. Climbing up the ladder with a bucket of water to fill the tank is not the best way.
So, the place for the shower is chosen. Now you need to prepare the base - remove upper layer soil, level the site and fill it with sand. For creating right foundation markings are made with the help of pegs hammered in the corners and a rope stretched over them.
The shower may be lightweight construction, and can be a capital building. The type of foundation depends on the materials used. If the shower is brick, use concrete foundation, the depth of which should be at least 30 cm. Before proceeding with the pouring, a place is prepared for the pipes - you need to lay a log wrapped with roofing felt. The base is poured with concrete using guides and a level so that it is even. When the base is ready, laying can be done. A brick shower will be more hygienic and aesthetic if it is tiled. But this is an expensive labor intensive option.
Option # 1 - a budget frame summer tarp shower
This option will allow you to build a summer country shower without resorting to high costs. After all, if you come to the dacha only in the summer, you can get by with a simplified version. For example, build a canvas shower using a metal frame.
A metal frame will require the most cost, but it will still cost much less than a brick. For construction frame shower you will need: tarpaulin (3/5 m), metallic profile(18 m, 40/25 mm), a plastic shower tank, preferably black (volume 50-100 l), a shower head, a ½ squeegee and a faucet with such a thread. Parts such as a watering can, nuts, squeegee, faucet, gaskets and washers are very popular materials, which is why they are often sold in one set, which is especially convenient.
It is not difficult to build a tarpaulin shower, it is convenient and functional, the tarpaulin can be removed for the winter, the frame can be covered with cellophane so that it does not rust
Similar to this design - a shower for giving from flat slate. It has exactly the same frame, but in this case the profile replaces the square (40/40 mm).
Water from the base in the shower should drain towards the drain pipe, and a shield (usually made of wood) is placed on top, on which a person stands and performs hygiene procedures.

If you don’t want to build a shower yourself, you can buy a ready-made one - for example, with a polycarbonate cabin, or completely open, and enjoy water treatments right in the garden
Advice. Better stock make water with a waterproof layer - lay a PVC film, hydrostekloizol or roofing felt on an inclined embankment. The slope is made in such a way that the drain from the shower is directed towards the trench or drainage tank. Well, if the drain is ventilated, it dispels unpleasant odors.
The problem of water flow today can be successfully solved using a septic tank. When installing a septic tank, do not place it directly under the shower. In the summer, when large volumes of water are consumed, the septic tank may flood and the drainage work poorly, resulting in unpleasant odors. It is better to arrange a drain at a distance of several meters from the shower, place a septic tank nearby.
Advice. Plants that grow well in moist soil will be appropriate near the shower - they will perform a drainage function.
Option # 2 - solid construction on a pile foundation
When quite high altitude the shower structure must have a stable base. To build a summer shower of a strong structure, you can make a pile foundation from pipes. Pipes should be 2 meters high (diameter 100 mm), holes of one and a half meters deep must be drilled in the ground under them. Above the soil level, the pipe should rise by about 30 cm. The dimensions of the beam for the frame are 100/100 mm.

In order to drill holes for supports, you can call a team that installs fences, the work will take about half an hour
On the ground, a rectangle is measured according to the size of the soul, foundation supports are installed in the corners. The next step is the installation of the beam and the bandaging of the pillars. It is convenient to assemble the frame on the ground and fasten the structure with long bolts. Then a dressing is done inside the frame structure - these will be the logs of the floor in the shower. Rigid elements are placed between adjacent pillars in the thickness of the wall.
The floor can be made with gaps between the boards to drain water. But sometimes you have to take a shower in cool weather, and blowing air into the cracks will not add comfort. You can also install a tray, the water from which will drain through a hose. More convenient would be a shower consisting of a dressing room and a bathing area, which can be separated by a bathtub curtain. At the same time, the locker room should be separated by a threshold to avoid water leakage.
As an outer upholstery, lining, sheets of moisture-resistant plywood, and fiberboard are most often used. If all the buildings on the site are made in the same style, the shower should not differ too much from them.
If you expect to use the shower outside of the hot summer weather, it needs to be insulated. It is most convenient to use polystyrene foam for this. As an interior finish, waterproof materials should be used - plastic, PVC film, linoleum. wood paneling needs to be sanded and painted.

A water tank is installed on the roof of the structure. It can be connected to the water supply or filled with a pump. It is good to equip the barrel with a plumbing valve that will shut off the water when the container is full.
In order for the water in the tank to heat up better, you can make a frame for the tank that acts as a greenhouse. It is made according to the size of the container from a bar and covered with a film. In such a frame, the water in the barrel will remain warm even if the sun hides. The wind will also not cause a decrease in its temperature.
As they say, it's better to see once:
A selection of diagrams and examples of a shower device
The drawings of the summer shower below will help you choose right size, pick up suitable material, visualize what kind of shower you want to see in your area.

Shower trim options different materials: boards, clapboard, moisture resistant wood paneling, different types tanks

There are simple devices that allow you to use the shower more comfortably: a - the float intake will take warm water from the top layer; b - a tap driven by a foot pedal (a fishing line from the pedal is thrown through the block, it is connected to the retractable spring and to the tap that opens at a right angle, which will save water); c - an improved scheme for connecting the heater to the water tank will allow the water to warm up and circulate evenly
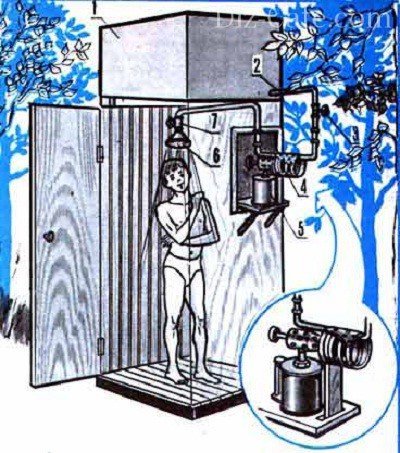
Heated summer shower: 1 - tank, 2 - pipe, 3 - tap for supplying water from the tank, 4, 5 - blowtorch, 6 - a watering can, 7 - a tap for supplying water from a watering can
The choice of design, materials, work on the drawing - important points which should be given attention so that the process of creating a soul is continuous and error-free.


