The bathroom is a room with a special microclimate. Thanks to constant use hot and cold water, as well as the active formation of steam, quite high humidity is observed in it.
If you started major renovation, remember: before producing finishing in the bathroom, it is necessary to carry out a set of measures to protect the floor and walls from moisture. Poor waterproofing of the bathroom is fraught with unpleasant consequences, from the appearance of fungus or destruction by expensive ceramic tiles before fire hazards arise - short circuit electrical wiring due to water ingress.
Bathroom waterproofing: types of materials
As a rule, special materials are used as internal waterproofing, which, depending on the application technology, are divided into two types:
Pasting. Film rolled materials bitumen-based, which are attached to the base by fusing or gluing (self-adhesive). Currently, roll materials for bathroom waterproofing are not very popular due to a number of disadvantages: complexity technological process(the base should be as dry and level as possible), the unpleasant smell of bitumen, which does not disappear from the room for a long time, as well as the ability to raise the floor level by up to 5 cm (this is not suitable for bathrooms of a certain layout).
Coatings. More modern and comfortable look protective coating. for the bathroom is presented in completely ready-to-use or dry mixtures that just need to be diluted with water. Bitumen-polymer or bitumen-rubber mastic is applied to the surface using a tool. After complete drying, finishing work is carried out.
Due to its consistency, the waterproofing material can be applied without problems to both horizontal and vertical surfaces, creating a durable monolithic coating in problem areas (joint of walls, joint of wall and floor, threshold).
What places require the mandatory use of waterproofing?
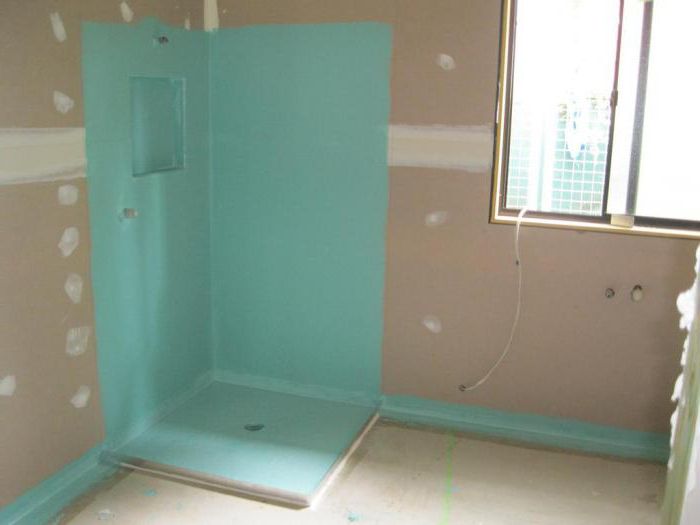
First of all, you should take care of protecting areas exposed to direct contact with water: the sink apron, shower areas, bathtubs, and toilets. Liquid waterproofing under tiles is also an integral element of high-quality floor repairs. Mastic must be applied to the entire area, since this part of the bathroom is most vulnerable to moisture. Reliable protective layer will help to avoid problems with neighbors below in case of unexpected flooding, will provide optimal conditions for laying ceramic tiles and will be the key to comfort and coziness in the house.
Waterproofing the bathroom floor
Protecting the floor from moisture requires more effort compared to waterproofing walls due to the concentration of communication and plumbing components (especially if the bathroom is combined). At the same time the best option are coating compositions, since rolled materials must be carefully measured and adjusted in size to the areas where the pipes adjoin.
Waterproofing the floor in the bathroom: materials and stages of work
Preparation. The base is cleaned of dirt and dust, and it is advisable to use a vacuum cleaner. The cement screed is tapped with a hammer to check for cracks and areas of separation from the floor. If there are any, the screed is removed without regret and a new one is installed.
Primer. The prepared surface is thoroughly dust-free using two layers of liquid soil.
Application of the composition. The first layer of liquid waterproofing should be applied to the corner joints of the walls and floor. After complete drying, the corners are glued with rubber tape. Next, the entire floor area is covered with the composition using a wide brush, paint roller or sprayer, ensuring continuous application.
In this case, along with the floor, partial waterproofing of the bathroom walls to a height of 20 to 50 cm is required. Sewerage and water supply pipes with pre-installed rubber seals it should also be coated with mastic with a coverage of up to 10 cm. Each layer of coating with a thickness of 1-3 mm should be dried for 24 hours.
After the last layer has completely dried, final priming, installation of heated floors and final decorative finishing can be carried out using.
Why do you need internal waterproofing of walls?
Even with good ventilation system condensation forms on the walls, which, penetrating into the seams of the tiles, exposes it appearance and durability to severe tests. The coating gradually becomes brittle and collapses. In addition, dark spots appear on the tiles and in the joints between the tiles - fungus and mold.
These bacteria are extremely harmful to human health due to their active release into environment a large number of spores. Entering the body through the respiratory tract, their waste products can lead to various allergic reactions, asthma, migraines and even cancer.
In addition, black mold is very tenacious and difficult to remove. mechanically. After superficial cleaning (including with powerful chlorine-containing compounds), it sprouts again and again. The only right solution is the device reliable waterproofing walls Moisture-proof materials for laying tiles can prevent the problem from occurring itself, extending the life of the coating for a long time and preserving the health of all family members.
Stages of waterproofing walls in the bathroom
Preparation. The walls are thoroughly cleaned of dust, remnants of old finishing materials and dried. The joint between the bathroom and the wall is degreased with a special liquid and sealed using a thin line of silicone mastic, which is then smoothed with a spatula or simply a finger dipped in a soapy solution. Instead of silicone sealant Self-adhesive cord can be used, but it provides less reliable protection.
Primer. The surface of the walls is treated several times with a deep penetration antifungal primer.
Applying bathroom waterproofing under tiles. It is carried out by analogy with the floor: the composition is applied with a brush, roller or spray, thoroughly drying each layer for at least 24 hours. Particular attention is paid to the corners of the bathroom.
After 24 hours from the moment of applying the last layer, the walls are thoroughly primed again, then fine finishing ceramic tiles.
Bathroom waterproofing: materials from Sika
Sika offers high-quality mineral-based products to protect various concrete surfaces from moisture:
Sikalastic®-152;


Universal formulations varying degrees elasticity are made from environmentally friendly raw materials and fully comply with current GOST standards (scans of certificates are presented on the website).
Advantages coating waterproofing Sika:
high degree of adhesion to concrete, stone, brick;
good vapor permeability(allows the surface to breathe);
resistance to impact low temperatures;
Possibility of application on wet or vertical surfaces without slipping;
absence of solvents;
long period of maintaining the viability of the solution (30 minutes at a temperature of 23°);
time before commissioning – 7 days.
To purchase liquid waterproofing for floors and walls, contact your nearest Sika representative or leave a request on the website.
The bathroom in an apartment (or house) is a room that has a rather specific operating mode. Condensation that appears as a result of temperature fluctuations, splashes, accidentally spilled water - all these factors constantly and systematically test the strength of wall and floor cladding and penetrate into technological seams.
Water, accumulating at the joints of structures under the tiles, in the areas of connection and passage of pipes, creates the most comfortable conditions for the residence and reproduction of entire colonies of fungi and bacteria. The results of long-term exposure to these “tenants” are damaged walls and ceilings of the premises itself, and poisoning of the owners with toxins. In order to avoid all these horrors, mandatory waterproofing of the bathroom under the tiles is required. What is best for these purposes? This is worth thinking about thoroughly.
The most popular materials
Water has destructive power. And, probably, as long as humanity has existed, it has been resisting water element. To date, there are a variety of types most in demand by consumers are given below:
Plates, panels for creating a water-repellent facing layer;
Flexible materials that can be fused or glued;
Painting materials and paste mixtures for coating (walls and bathroom floors treated in this way are covered with a layer of waterproofing up to 1.5 cm thick);
Sprayed compounds form foam-cement or foam barriers to water;
Special plaster is waterproofing and at the same time leveling vertical surfaces;
Materials saturated with hydrophobic components and reinforcing fiber;
Impregnations and injections that can change the structure of porous building materials (the consequence is increased moisture-proof properties and strength).
Selection criteria
Depending on technical characteristics the room in which the work will be carried out, choose the type of one, or better yet, two materials that work well in tandem. It can be quite difficult (especially for a non-specialist) to decide on the options that will optimally solve the problem of waterproofing a bathroom. However, the following must be kept in mind:
Moisture protection of sanitary premises in a house does not require the same powerful waterproofing as the foundation of a building;
It must be borne in mind that if you waterproof the bathroom yourself, the technology should not be too complicated;
The price of the issue also matters, since consumables can be very, very expensive.
By comparing all these factors, as a rule, we can conclude that coating and pasting will be the most suitable for waterproofing a bathroom and toilet. To perform these types of work, today a wide variety of materials and finished products are produced, differing from each other in composition, price and technology.
Determining the scope of work
There are a great variety of options for carrying out moisture protection work in sanitary premises. There are no fewer of them than the materials known and available today that are used to waterproof a bathroom under tiles. What is better, what to give preference to?
There are three fundamental factors that determine the work areas and the area to be processed. In the bathroom from destructive impact water can be protected:
Only a horizontal surface (floor), necessarily forming small sides (≈ 10 cm) along the walls;
Floor and areas around sanitary equipment (bathtubs, showers, washbasins, etc.);
The floor and walls are complete, with partitions processed along the entire height.
The need to give preference in advance to one type of waterproofing is related to the method in which the water-repellent barrier will be created. The same material can be applied horizontally and vertically to surfaces in completely different ways.
Waterproofing by coating
This is a single or multi-layer coating with a thickness of 1 mm to several centimeters, which is created by applying a plastic composition to a surface protected from moisture.

If waterproofing a bathroom is carried out by coating, the following types of materials are used:
Painting agents that create a thin protective film on the surface: diluted to liquid state bitumen, the same type of mastic, water-repellent compounds for treating wooden and metal structures(varnishes, paints). On vertical surfaces such materials are applied in two layers using a brush or roller. The composition is simply poured onto the floor and evenly distributed using a squeegee scraper.
Bitumen mastics, paste-like compositions are based on the same with the addition of modifying additives that minimize toxicity and increase elasticity and strength characteristics.
Coating waterproofing, which creates a continuous, seamless surface on the treated area, should be preferred in cases where screeding is required in the bathroom.
Basic principles of coating
First you need to remove all construction debris and clean the surface of old, previously applied coatings, varnishes, paints and oils, and repair any existing damage. Next, it is necessary to widen all joints of slabs, panels, and the connecting lines of walls and ceilings by at least 2 cm. The finished longitudinal grooves are degreased, and a self-adhesive waterproofing cord is placed in them (the floating floor in the bathroom is also treated). Next, according to the instructions, a special sealing tape is glued over the cord. The next stage is the actual coating of the surfaces planned for treatment. The process ends with plastering for leveling and pouring the screed.
It is permissible to replace the waterproofing cord with silicone mass, packaged in tubes. The process of filling the grooves with silicone must be continuous; the resulting excess is cut off with a spatula.
Waterproofing by gluing
Adhesive waterproofing can be called any waterproof coating mounted from several layers of special materials (film, sheets, rolls) using special adhesives. Laying any overlap is a necessary condition in order to succeed high-quality waterproofing bathroom under tiles.

What is better to choose as a gluing factor? They often use the good old method of heating the edges of the materials being glued together with a gas torch. However, this is not very safe.
Against, modern market saturated with different kinds adhesive compositions. There are even some that do not require heating before use. One of the newest is the polyurethane mastic “Unigex-2”. The entire preparation technology consists of mixing two components and the glue is ready for use. Using a spatula, it is applied to the edge of the sheet, and the next sheet of coating is laid overlapping. This glue also has the properties of a sealant.
Pros and cons of pasting
Before waterproofing a bathroom using the gluing method, you need to evaluate the positive and negative aspects this process. Of course, the attractive side is the budget price. One of the negative aspects is that you should pay attention to the fact that you will need to take preliminary measurements and then cut the material.

Further, the protected surface should not have large differences in height - 2 mm per 2 meters of length is acceptable. The weld-on option will require the use of a torch, and the work will be quite complex, since most bathrooms occupy a small area. In addition to all of the above, it should be noted that laying sheets of material and thoroughly aligning corners are quite labor-intensive processes. Without the proper skills, the waterproofing material can be overheated with a burner or torn when forming a corner.
Work technology
What work needs to be done before waterproofing a bathroom under tiles? What is better - to do everything yourself or to invite a specialist? Naturally, if you have the skills, it will be cheaper to do everything yourself.
First, the surfaces are leveled and the screed and plaster are completely dry. Next, remove all debris (dust, debris, etc.) and cover the surfaces twice with soil. Then all butt seams are waterproofed and, if necessary, mastic or polymer glue is applied. The materials are cut according to preliminary measurements and allowed to rest for at least a day.
Next, you can begin the gluing process. The first sheet is glued in a way that is convenient for the master. It doesn’t matter where the work will start. The edges of each subsequent sheet are coated with glue and overlapped (no more than 20 cm) on the previous sheet. After finishing the first layer, sides are formed to protect the areas of the bathroom, shower, sink, etc. Waterproofing on the walls is glued from the bottom up. The strips of the second layer of waterproofing are glued across the previous one.
Waterproofing sanitary premises in a wooden house
Bathroom waterproofing wooden house has its own special specificity. Wood is not friendly with water, and if waterproofing is not taken care of properly, mold will quickly appear in the bathroom, the wooden interior parts will be deformed and quickly become unusable.

Since the floors of the home are made of wood, it is important to pay attention to their treatment with moisture-proofing agents. You also need to remember about careful treatment of the ceiling, on which, condensing, warm steam settles in the form of water droplets.
For waterproofing work in wooden houses, special water-repellent varnish coatings are most often used, which effectively protect natural wood from deformation.
Price range
As for capital investments, it is certainly more profitable to purchase and use coating materials for repairs. waterproofing materials, the price of which is significantly lower than for pasting ones. For example, a package of 15 kg of bitumen insulating mastic will cost the consumer 240-250 rubles. If you keep in mind that to install a waterproofing layer 2 mm thick you will need 3.2 kg of material per square meter. surfaces, it becomes clear that this method is very, very economical. And if you also take into account that the work can be done independently, fortunately, no special skills are required and you don’t have to invite a specialist (and don’t have to pay extra money), then from the point of view of financial investments this method of waterproofing looks more than attractive.
You can purchase mastic with improved characteristics, which include materials from the Technonikol company. A package of 20 kg will cost the consumer 1200 - 1300 rubles. This cost will also not lead to a financial crisis in each individual family, and the bathroom will be reliably protected from leaks and floods.
Is there an alternative?
The classic version of a tiled floor in the bathroom is becoming a thing of the past. Today, modern coatings such as self-leveling or 3D floors and anti-slip “Stone Carpet” coatings are in increasing demand.

All these floors themselves are ideal waterproofing materials, the properties (water-repellent) of which are ensured by their monolithic structure and strength. However, the installation of such coatings will require quite serious financial investments. If there are any, everything is fine - you can create ultra-modern design in the bathroom. Otherwise, good old tiles on the floor and walls will create an atmosphere of coziness and comfort.
Both during the construction and renovation of a bathroom, preliminary waterproofing of the bathroom floor under the tiles is very important, especially if there are rooms below and you want to avoid their flooding in the event of a possible communications failure. Let's look at a number of materials that are commonly used for this purpose.
Why is waterproofing done under cladding?
Imagine that during water procedures a certain amount of water splashed out of the bathroom onto the floor and in such a situation ask yourself whether waterproofing is needed in the bathroom under the tiles. There are no floors that are completely impervious to liquid; there are often gaps at the joints between slabs and minor cracks near communication pipes passing through the floors. Accordingly, water will easily seep down, and if this happens in the apartment, the decoration of the neighbors’ premises may be seriously damaged. Well, in a private house, the damage will be caused to you, which is also unpleasant. Waterproofing will prevent such a situation, and if high rapids you will have enough time to react before the water rushes into the hallway.
When flooding the rooms located on the floor below, water can flow through channels made for electrical wiring and cause a short circuit and, as a result, a fire.
But flooding is not the only problem that can arise from frequently getting wet floor tiles. Seeping between the seams of the cladding, where the tile grouting is not done well enough, water begins to gradually saturate and then destroy the concrete, regardless of whether it is treated with soil or not. Therefore, it is advisable to first thoroughly coat concrete surfaces with coating mixtures or special films in order to isolate them from possible moisture ingress. Water can get under the tile even with good grouting, in places where it adjoins communications or along the edge of the cladding along the walls. In this case, dampness will be an ideal environment for the appearance of mold, which is harmful to both building materials and the health of residents. Waterproofing can solve this problem too.
How to use waterproofing correctly - main treatment areas
It is necessary to protect not only the floor, but also partially the walls from moisture penetration. As a rule, the most problematic areas are considered to be those corners of the room where the baseboards are located, that is, along the perimeter walls. Therefore, when treating with waterproofing, it is recommended to cover vertical surfaces at least 10 centimeters, and preferably 0.3 meters upward. However, there are areas that require special attention. In particular, in places where pipes pass through ceilings, be it water supply or sewerage. Waterproofing should be applied especially carefully around communications. If it is a mastic coating or pasty plaster mixture, then in several layers.

It is also necessary to waterproof the walls of the bathroom where the plumbing will be installed so that water does not get under the tiles. It often happens during water procedures that your hand accidentally clamps the faucet tap and the stream hits the wall. It is in such situations that moisture flowing down the tiles can get under the cladding where it is not made particularly well. Therefore, it is recommended to cover with waterproofing the entire area where water may accidentally or inevitably, such as when turning on the shower, get in. This is 50 centimeters to the sides and up from the sink, 0.5 meters to the sides from the bathtub and from it up to the ceiling. You should not bypass the water closet, since condensation often accumulates on the tank, and the possibility of a leak cannot be ruled out.
Materials used as waterproofing
If you are planning to protect your bathroom ceiling from penetrating moisture, you have quite a large choice. Today, there are several types of waterproofing materials: coating mastic compositions, paste plaster polymer cement mixtures and films for pasting in roll format. There are also separate penetrating compounds that, after drying, close microcracks and voids between grains in concrete, providing a sufficient degree of moisture resistance. As a separate material, we can mention sprayed waterproofing made on the basis of liquid rubber.
Among other things, special aqua panels are used as an additional insulating coating, which cover the floor and, partially, the walls. Any of the listed materials is already applied or glued on top, which provides multi-layer waterproofing in combination with primers for concrete surfaces. Coating compositions are made on the basis of mastics, including bitumen, and also latex is used as the main component; very fine fines are added in combination with it or separately from it. crumb rubber. A number of roll materials also have a bitumen base. Cement compositions necessarily supplemented with plasticizers, often polymer. Let's take a look existing options more details.
Mastic compositions - varieties, features of use
Compositions for coating surfaces can be applied with a roller or brush, that is, their consistency is quite liquid. These are so-called mastic waterproofing mixtures, which are produced on the basis of bitumen resins or polymers. There are compositions with latex as a plasticizer. It is quite easy to treat floors and walls with them, they have excellent adhesion and often there is no need to even specially prime the surfaces, just clean them from dust and dirt. Some mixtures can only be used with an organic solvent.

A special mesh with a hydrobarrier strip is laid on top of the coating in the corners, and it is better to choose options specifically for the corners, after which another layer of mastic composition is applied. This provides the most reliable waterproofing.
The main requirement for such coatings is that they should be used to cover the floor and walls with moderate air humidity and at a temperature of 20 degrees or higher. This is a definite disadvantage, since it is necessary to create certain conditions for work. Cold makes these mixtures hard and brittle, especially if the curing process occurs at low temperatures. Another drawback is that the applied waterproofing takes a very long time to dry, especially since the layer must be quite thick. The advantages of such compositions include quite low price, which allows them to be used in large volumes of work. In addition, they are easy to find on sale, and the choice is quite extensive.
Polymer-cement compositions - use cases, advantages and disadvantages
The simplest solution is to do concrete screed, adding to mortar, but this option still will not solve the problem with joints near the walls, where you need to leave some gap when pouring. Therefore, special paste-like compositions based on cement with the addition of polymers or other plasticizers are much more effective. This is dry waterproofing for the bathroom in paper bags, which need to be diluted with water, after which a thick paste is obtained. Its advantage is that cement provides strength after drying, and polymers, penetrating into any cracks and microcracks, create a film to isolate the ceiling from water.

Like mastic compositions, cement mixtures are available and very inexpensive. This is their main advantage. In addition, another advantage is the ease of processing surfaces with mixtures; a regular spatula is used for this. The polymer-cement composition is diluted to the consistency of thick sour cream, after which it is applied in portions to the floor and walls and smoothed. It is more convenient to treat areas where pipes pass through the ceiling with a brush, rubbing the mixture into the cracks. The composition begins to harden within 5 minutes, but for the polymerization process to be completely completed, at least a day must pass before further finishing can begin. Such a long drying time is a significant drawback.
Rolled waterproofing - a small analysis of existing options
Perhaps the fastest way to handle the treatment of the floor and walls in the bathroom is with the help of special films or other materials sold in rolls. Among them there are those that are applied by heating, or self-adhesive. The second type is more convenient; it is enough to remove the special protective coating to reveal the adhesive layer. The most affordable option is weldable materials with bitumen impregnation, such as roofing felt and roofing felt, which need to be heated open flame, for example, with a gasoline or gas burner, until the mass on the back side becomes sufficiently sticky. The main disadvantage of this type is a pungent odor that does not disappear from the room for a long time. Also, the disadvantages include fragility. The main advantage is low cost.
Self-adhesive materials are in some ways more convenient because they do not require much effort. As already mentioned, the protection is torn off and that’s it, you can carefully apply it to the surface. However, difficulties arise when gluing those places where communications pass. It is not recommended to cut the membranes, and if you press them as they are, folds may form. As an option, you can combine films with mastic compositions, this will allow you to isolate difficult areas well. Bituminous ones only need to be heated to form neat joints, so it is difficult to judge which bathroom waterproofing under tiles is more convenient and which is best to use. But self-adhesive roll materials have an undoubted advantage - they are very durable, and in relation to the quality the price does not seem too high.
Ceramic tiles are the most popular option flooring for the bathroom. It does not absorb water and is not destroyed under its influence. But the grout used to seal the seams between the tiles is not an absolutely airtight composition, and water seeps down through the seams, as well as chips and microcracks in the tile itself.
Contact with moisture is undesirable for concrete or wooden subfloors. And if the pipes laid above the tiles or hidden under them burst, or the floor is flooded with a large amount of water, not only the ceilings, but the ceilings and walls of the neighbors below will suffer. Therefore, the floors in the bathroom must be waterproofed, the main task is to choose suitable waterproofing under the tiles.
Methods for waterproofing floors under tiles
 Bathroom floor tiles are laid with a special adhesive; not all waterproofing materials can be applied to it. There are 2 options for waterproofing floors under tiles:
- The waterproofing layer is covered with a layer of thin screed, and the tiles are glued onto it
- Use a waterproofing compound that has adhesion to tile adhesive
In the bathroom, roll (pasting) or coating waterproofing is most often performed. Painting waterproofing with varnishes, enamels, liquid mastics gives short-term results. For concrete foundations penetrating waterproofing is well suited; such compositions change the structure of concrete from the inside, making it resistant to moisture.
Compositions for penetrating (impregnating) waterproofing are quite expensive; this solution is resorted to when even a slight rise in the floor level is undesirable. If the height of the floor is not critical, penetrating waterproofing can be supplemented with coating or adhesive; this is expensive, but the maximum effective method.
Waterproofing the floor is necessary in any wet rooms, including in the bathhouse; the features of its implementation are described
Coating waterproofing
 Coating insulation is good because it allows you to create a monolithic coating without seams, eliminating leaks. Usually, when waterproofing a floor, the walls are approached by 20 cm, creating a so-called trough.
In addition to the walls directly above the floor, it is recommended to waterproof the walls at the junction points plumbing equipment, with a distance of 50 cm in all directions from the edges of the plumbing. If the pipes are hidden in a plumbing closet, waterproofing the walls inside is mandatory. Sometimes waterproofing of floors and walls is carried out with different compounds.
For the bathroom floor you can use the following coating compositions:
- Bitumen-polymer mastics(Slavyanka, Technoprok, Elastomix) are non-toxic, highly elastic and resistant to aggressive environments. You can’t glue tiles directly onto them; you need to make a screed
- Bitumen-latex compositions(VIVALSEAL BIT-WM, TechnoNIKOL No. 33) also require a layer of screed to be applied on top
- Cement-polymer composition s (Ceresit CR 66) are ideal for waterproofing concrete floors and walls; tiles can be glued directly onto them. Such mixtures are used not only for preventive waterproofing, but also for quickly eliminating leaks
- Latex waterproofing(Mira 4400 multicoat, Knauf Flachendicht) is suitable for concrete and wood, smooth and rough substrates, can be applied to horizontal and vertical surfaces. The tiles can be laid directly on the waterproofing layer using waterproof glue; dispersion compositions are not suitable
- One-component polymer masses(Izofol, Ceresit CL 51) are applied in 2-3 layers with an interval of 6-24 hours. Since the compounds are applied in a thin layer, untreated areas may remain. To facilitate quality control of work, it is recommended to use mastics different colors. Finishing layer mastic is sprinkled with clean sand of a fraction of 0.3-0.8 mm, after hardening, its excess is removed with a brush. As a result, the surface acquires the roughness necessary for adhesion with.
To lay tiles over cement-polymer waterproofing, it is recommended to use adhesive of the same brand as the waterproofing mixture.
 Purely bitumen mastics They are usually not used in bathrooms due to high toxicity. In addition, hot bitumen cannot be applied indoors. And cold-applied bitumen enters chemical reaction with a concrete base.
 Coating waterproofing is convenient because the surface for applying such compounds does not need to be perfectly leveled. But thorough cleaning of contaminants and priming with a suitable composition are necessary. The thickness of the coating waterproofing layer, depending on the material used, varies from several millimeters to several centimeters.
Typically, coating is carried out in several layers, alternating the direction of application of the mixture. The next layer can be applied only after the previous one has dried.
Roll waterproofing
 Rolled materials are suitable for waterproofing concrete and wooden bases and are easy to use on large areas, allow you to do the job quickly, without taking breaks between layers.
Most often, roofing felt or more modern rolled materials based on fiberglass, fiberglass (euroroofing felt) are used in the bathroom. They are extremely resistant to rotting, durable, but more expensive than roofing felt, and fiberglass is also quite delicate and can tear during careless installation.
From a variety of rolled and sheet materials It is highly not recommended to use polyethylene film to waterproof the bathroom floor. It is vapor-proof; if you lay such a film under the floor, the bathroom will always be damp and stuffy. In addition, the film is the least durable material and is easily damaged when pouring the screed.
Installation of roll or sheet materials is carried out in 3 ways:
- Flooring with or without mechanical fasteners - an inconvenient and not very reliable method
- Deposition– requires the use of a heat gun (a gas burner cannot be used at home for safety reasons), a rather labor-intensive method, although it provides reliable results
- Sticker- the most convenient and popular method when doing work with your own hands.
There are mastic. Some mastics are applied cold, others are heated. Before gluing the roll waterproofing, the mastic can be applied in 2 layers, alternating the direction of application of the layers and waiting for the previous one to dry.
Waterproofing materials are laid with an overlap of 50-10 cm and an overlap of 20 cm on the walls; no air bubbles should form between the waterproofing and the floor, as well as in areas of overlap. The air is first expelled by moving a spatula from the center of the canvas to the edges, then the roofing material and fiberglass are rolled with a massive roller.
The joints are sealed with mastic, and when laying the deposited materials, they are welded. It is difficult to ensure a tight fit of rolled materials in the corners, so the joints of the floor and walls are pre-sealed using a special cord or tape (Bentonite, Guerlain).
It is necessary to pour a layer of screed on top of the roofing felt for laying the tiles, and cover the bottom of the walls with plaster. If the rolled materials were laid on a wooden base, it is recommended to first install the logs, cover them with a layer of waterproofing, pour expanded clay between them, and then carry out work on top of it reinforced screed for laying tiles.
More modern roll materials, for example, waterproofing Technoelast Barrier Light with top layer made of non-woven polypropylene from TechnoNIKOL, are a ready-made base for laying tiles.
Video
The procedure for waterproofing a floor under tiles with polyurethane mastic
Bathroom tiling: priming and waterproofing the base, laying tiles, grouting joints
Bottom line
You need to choose a method of waterproofing the floor under the tiles in the bathroom, taking into account the nature of the base, the height of the ceilings in the room, and financial capabilities. The least labor-intensive method of waterproofing a concrete base is treatment with a deep penetration compound with penetrating additives, for wooden bases this method is not suitable.
Roll waterproofing can be laid over wooden and concrete bases, but a screed may be required under the tiles on top of such waterproofing. Sometimes it is more expedient to purchase more expensive modern materials instead of traditional roofing felt in order to avoid unnecessary work.
Of the materials for coating waterproofing, cement-polymer, one-component polymer and latex compositions allow you to lay tiles directly on the waterproofing layer, you just need to select the appropriate adhesive. When using bitumen-polymer, bitumen-latex compounds, a thin screed is made under the tiles.
The bathroom in any home is the room with the most high level, it is in it that warm steam accumulates. Lack of quality will lead to the appearance of mold and an unpleasant odor. The most important action when performing tiling work is waterproofing the bathroom underneath. An analysis of the options and their characteristics will tell you what is best to choose.
The use of high-quality and reliable materials for waterproofing will allow you to create any tile design that will last for a long time
This finishing method can protect against moisture and the appearance of wet spots. Also increases service life finishing coating floors and walls, and prevents damage to the concrete base. For installation in the bathroom you will need the most moisture-proof and durable materials.
Read in the article
Waterproofing a bathroom under tiles: which is better and which method is preferable?
Good quality bathroom floors require durable materials. On the base of the floor, such a covering is made with a certain offset on the walls. When finishing walls, similar protection is necessary in the area of other plumbing fixtures.

When choosing a waterproofing option, you should consider the following criteria:
- the bathroom does not require such a strong force;
- the price of material options, which can vary greatly;
- The installation process technology should not be too complicated.
Mixtures for moisture protection can be one-component, which are diluted with water, and two-component, which are created using a polymer emulsion.

Types of waterproofing bathroom floors under tiles
When looking at materials for waterproofing a bathroom floor, it is worth considering that there are two main types. This is a coating, represented by mastics, various pastes and solutions. And the second one, the pasting one, consists of film coatings, roll type.
Useful information! If the room is too low and the floor level cannot be raised, then impregnations are recommended, which are liquid formulations. They are distributed on the base and form a special film that protects against moisture.
 The diagram shows where the waterproofing layer goes
 Coating waterproofing
You can prevent moisture by using coating waterproofing for the bathroom under. Apply the following types liquid coatings:
- Cement-polymer products are a universal remedy. This mixture sets well and is characterized by excellent adhesion;
- bitumen-polymer mastics contain special latex fillers, organic solvents and plasticizers;
- budget option bitumen waterproofing is considered;
- To modern materials refers to acrylic mastic.

Modern options are characterized by excellent waterproofing properties and provide complete protection from moisture. The main advantage of such materials is the content of fillers and plasticizers, which give the material more elasticity and strength. This coating is characterized by simplicity of design, long service life, and the floor does not need to be carefully leveled before treatment.

Applying such waterproofing requires a special technique. Before work, you need to sweep the floor well. Then the base is primed using a roller. To prevent liquid from penetrating into the space between the floor and walls, they should be covered with a special sealing tape. Rollers are used to distribute the mastic over the entire area, and brushes are used for hard-to-reach areas.
Useful advice! After applying the protective coating, you need to leave time to dry. In this case, you should ventilate the room and ensure that dust does not penetrate into the treated area. You cannot step on the floor.

Pasting option
When deciding which bathroom waterproofing to choose for tiles and choosing what is best to use, you should try the laminated type of moisture insulation. Roll-type materials are different. To create the fused method, a gas burner is used, so it can only be used in a room where no one lives. To install it, bitumen is melted, which emits a persistent odor. It is better to use self-adhesive and fiberglass-reinforced waterproofing materials.
 This type of insulation is produced in rolls
 This option is suitable for indoors standard sizes and equipped. Pasted waterproofing is considered a budget option, but requires some skills in construction. With this method, you need to pay attention to gluing the joints between the floor and the walls.

- prepare a surface on which there should be no cracks, pits or tubercles;
- the surface is cleared of debris and well primed with a bitumen primer;
- Based on the measurements taken, the material is cut. In this case, it is worth making allowances for the walls of 20 cm;
- after laying the coating over the entire surface, you can go over the entire surface with a roller to remove all bubbles;
- voids and joints must be treated with bitumen-based sealant.

If pipes are installed before installation, they are coated with a special sealed compound at the points of contact with the waterproofing layer. In this case, the pipes are placed in rubber sleeves. After installing the waterproofing, a screed is made.
Plaster variety
Plaster waterproofing of bathroom walls is popular. For this option, products with polymer components are used that improve the characteristics of the materials. High-quality options include products from the Ceresit and Knauf brands, which are recommended for use in the bathroom. When selecting waterproofing, you should give preference to products certain company. Knauf contains synthesized latex, which gives the coating more elasticity.

Before distributing the mixture, the surface is cleaned and treated, and voids and joint areas are sealed with special tape. Then the composition is prepared and distributed onto the prepared base. Plaster solutions applied using rollers. After drying, another layer is distributed in the opposite direction.
Cast waterproofing
When planning how to waterproof your bathroom, you should try the cast option. Installation is carried out using the cold or hot pour method.

Asphalt concrete or bitumen is used as a material for hot waterproofing. This coating is characterized by increased resistance to bending, reliability and elasticity. Pouring is done on a previously prepared surface where joints and seams were sealed. This method is used in private houses, and not in apartments.
The coating is carried out in several stages:
- the floor surface is cleaned and cracks are filled with a special sealant;
- the floor is dried using gas burners And ;
- primer is made using hot bitumen;
- the area is allocated by the formwork design;
- the mass for waterproofing is heated; the hot solution is poured evenly and distributed using a squeegee.

Several layers of this type of fill can be used. For apartments, cast bathroom waterproofing under tiles is also used. What is best for this will be advised by professional advice. Cast coating can be done using a cold method. In this case, liquid glass or rubber is used.
Liquid rubber
One of the effective options liquid waterproofing For the bathroom, liquid rubber is considered. It is made from polymer and bitumen additives. Calcium chloride is used as a fixing agent.

Durable coating is applied in different ways:
- filling technology is produced without any equipment and allows you to fill small cracks;
- spraying is considered a more labor-intensive technique, since it requires a special device that helps apply the solution under pressure;
- The painting technique is performed in the same way as the usual coating option.

After treatment, a film is formed that protects the surface from moisture.
Review of some types and costs
There are different materials for waterproofing a bathroom in a wooden house or any other. By review individual models you can choose the best option.
| Image | Brand | Characteristics | Cost, rub. |
 |
| 2 243 | |
 |
| 1 040 | |
 |
| 420 | |
 | Mastic creates a waterproof film. Contains no solvents and is odorless. | 2 600 | |
 |
| 3 790 | |
 |
| 580 | |
 |
| 1 890 | |
 |
| 5 340 |
Technology Features
A special approach is required for wooden coverings. Wood quickly absorbs moisture, so it is necessary to insulate this coating well. In this case, a two-component waterproofing solution is used. To do this, liquid rubber is mixed with an activating component. The resulting composition is applied to the surface using a roller. After the layer has dried, a second layer is applied.

You need to remember that the adhesive properties of such a floor are low, so to increase adhesion it is necessary to lay reinforced mesh.

When using any waterproofing, first perform preparatory work. Old paint is removed from the walls, floors are leveled and dust and debris are removed. There is no need to make perfectly smooth floors before installing waterproofing. Small irregularities will be covered with a layer of waterproofing. Leveling should be done when there are significant differences in height. After clearing the surface, the floors are primed in several layers. The primer composition is distributed using a roller in even strokes.
Even with coating waterproofing, additional processing of corners, joints and connections is required. In this case, all cracks and joints are eliminated with sealing tape, and rubber plugs are put on the pipes. Similar type moisture protection can be done independently. The dry mixture is diluted with water or a polymer emulsion. The finished mastic should resemble liquid plasticine.

The mastic dries within 24 hours. During this time, you cannot walk on the floor, spill water or place any objects. After 24 hours, the finishing coating is laid.
High-quality waterproofing will allow you not to worry about moisture accumulation and leaks. High humidity will not cause any harm to such finishing. And even with a small flood, the water will not cause much damage.
 Simple sections")