Frame structures performed well enough in modern construction- today, buildings on a lightweight basis can be found almost everywhere. As outer skin for buildings frame type OSB sheets are most often used, which are distinguished by their lightness, affordable price and high level thermal insulation.
Can be used for upholstery various materials– abundance modern technologies makes it possible to realize almost any idea. However, with traditional finishes, the situation is somewhat different - the combination with wood will not benefit all finishing materials. In this regard, lovers of monolithic finishes quite reasonably wonder if it is possible to plaster an OSB board?

Originally applied exclusively to solid, fixed structures - brick walls, concrete, blocks, etc. Plastering surfaces on a movable wooden base until recently, it has not been practiced, since without preparatory work this action will lead to disastrous results.
In this article, you will be given step-by-step instruction, through which you will learn how to plaster the OSB slab with your own hands. In it you will find a description of the most important points, which will help you avoid serious mistakes in the process of plaster formation.
Strengthening the structure

It is advisable to think about choosing a coating even at the stage of skin formation in order to be able to prepare the surface as much as possible for future work. In this case, it is necessary to pay attention to the assembly of the supporting frame and / or battens, which will serve as the basis for the installation. OSB sheets.
location frequency load-bearing elements must comply with building regulations - it is highly undesirable to reduce their number and increase the distance between them.
The installation of the sheets themselves must also be carried out as reliably as possible in order to exclude strong mobility of the elements. The main enemy of the plastered surface is vibration and the movable structure of the base - when forming the skin, it is necessary to smooth out these negative factors as much as possible.
Note! In this case, it means strengthening the structure within the limits of building codes and prescribed technologies. Sacrifice expansion joints or others necessary elements for the sake of strength it is impossible.
Surface preparation

OSB is a wood-based product that is formed from chips and chips. As such, wood is not used as a base for stucco, as it absorbs water and then repels the stucco.
Without preliminary preparation, the plastered surface will become covered with cracks almost immediately. Before plastering the OSB board, it is necessary to create an insulating layer between the plaster and the sheathing.
There are two ways to prepare the surface - installation of insulation or upholstery with kraft paper / bituminous cardboard. Let's take a closer look at both technologies.
Insulation installation
As a material for external insulation of OSB sheets, polystyrene foam boards are used, which have sufficient strength and are completely waterproof. Ease polystyrene foam insulation allows installation on glue base, which in this case is the only available option.
In general, the installation process is as follows:

- Sheets should be cleaned of dust, they should not be wet or greasy - if necessary, the sheathing is treated with white spirit to degrease the surface. oil stains, a large number of dust or dirt can significantly reduce the degree of adhesion of the insulation to OSB sheets;
- The adhesive composition is applied to the insulation using a calibration spatula so that the adhesive covers the entire surface of the sheet. Then the sheet is pressed against the skin - in order for the glue to fill the voids, it is necessary to lightly press on the insulation. After the entire structure is pasted over with insulation, it is necessary to wait for the glue to dry completely and only then proceed to the next stage;
- Reinforcement is installed on the insulation in the form of a plastic or fiberglass mesh with 6x6 mm cells - they have a self-adhesive base and you will not have problems with installation.
Upholstery

First of all, the joints between the sheets are smeared elastic sealant, after which the surface is covered with kraft paper or bitumen cardboard, which are fixed with a stapler. Reinforcement in the form of a fiberglass or plastic mesh is glued onto the surface prepared in this way, after which
Plaster, in this case, is used to create the last layer, which largely determines the design of the premises. These mixtures are called decorative plaster. For wooden surfaces it is recommended to use formulations that have high adhesion. This is about plaster mixes on the polymer base. A layer of such plaster "breathes" and prevents the formation of fungi and mold. The plaster layer contributes to a significant reduction in sound transmission and heat retention. It is environmentally friendly and absolutely safe. The wall covered with plaster looks absolutely homogeneous. Joints between plates and other defects are hidden. Such a coating will last more than twenty-five years.
Plaster mixtures are sold ready-made or dry. Dry varieties should be diluted with water or other reagent before application, in accordance with the instructions.
It is very important to make sure that OSB boards rigidly fixed and not subject to movement. Only after that you can start working.
Otherwise, the plaster may crack and begin to flake in places.
Decorative OSB plaster indoors. Types, characteristics.
Decorative plaster can be classified according to two parameters: by the composition of the filler and by the type of binder components. According to the type of filler, Venetian, structural, textured and flock can be distinguished.
Venetian plaster when applied, it can form a smooth surface. It contains an admixture of the smallest marble chips. This gives the surface a mirror finish.
Structural mixture has small impurities of quartz and other components. The surface is rough. Its main difference is that when applied to the wall, multi-colored spots appear on it.
Textured plaster may have different kind and include impurities of any suitable material. It can be small stones, pieces of mica, silk fibers or other fabric. Wall panels coated with this mixture have a pronounced texture, which is determined by the filler.
The hardest thing to work on seems to be flock mix. But it is very advantageous in design. The fact is that it consists of three layers - the main one, the layer with flocks and the lacquer coating. Pieces of dried acrylic paint are used as flocks.
Types of decorative plaster for OSB indoors by composition
According to the presence of different binders in the mixture, textured plaster can be divided into the following types:
- mineral
- acrylic
- silicone
- silicate
AT mineral plaster cement acts as a binder. It is not very suitable for OSB, as it is afraid of impact when it hardens. Although the finished layer only gets stronger over time, it lacks a certain plasticity. In case of accidental impact, a piece of the coating may separate from the wall.
Acrylic plaster Made from acrylic resin. Compared to the previous mixture, it has lower strength and service life. Has many color solutions. You can color the mixture yourself by adding a special color paste. It is quite suitable for application to the prepared OSB surface.
Synthetic resins serve as a binder for silicone decorative plaster . It is very plastic and can be easily applied to the wall. Silicone plaster is resistant to moisture, vapor permeable and has an antiseptic effect. There are many color varieties. This kind textured plaster perfectly fits into the solution of the task.
silicate plaster stands out in that liquid glass is used to create an astringent effect. The hardened surface has increased strength, moisture resistance, vapor permeability and antifungal effects. Such plaster will last for a long time, up to fifty years or more. This option can also be used to work with the OSB.
Textured plaster relief for OSB in the house
According to the shape of the surface relief, the most famous types of textured plaster are: “lamb”, “bark beetle” and “fur coat”.
"Lamb" has a fine-grained structure, due to the filler of small raw pebbles.
Plastered surface "Lamb".
"Bark beetle" resembles a tree that has been attacked by bark beetles.
 Plastered surface "Bark beetle"
"Fur coat" has a smoother surface compared to the first option, since the filler in this case is cement.
Plastered surface "Fur coat"
Alternative to elastic plaster
The most widely used oil-adhesive putty. Supplied ready-made or concentrated. Derived mixtures:
- drying oil or Oil paint- binder component of the composition;
- CMC glue forms a strong connection between the plaster and the osb board;
- chalk as a mineral filler;
- desiccants to speed up the drying of drying oil;
- plasticizers soften the composition, facilitate the application and leveling of putty;
- water is introduced in small quantities to prevent the mixture from drying out during storage.
Nitro-fillers are applied in a thin layer. Used to treat minor damage or for decorative purposes. They have a pungent odor. Work is carried out in well-ventilated areas. Solvents act as a basis. Fillers: iron minium, koalin, zinc white. Surface finishing is required: painting or wallpapering.
There is another way to apply plaster to the surface of an oriented strand board: thin sheets of polyurethane foam are glued to the surface and plastered with cement, lime or gypsum-based mixtures.
Application technology
After acquiring all the necessary materials, you can immediately get to work. It is worth noting that smallpox putty is carried out in the same way, regardless of whether the surface will be painted or wallpapered. Puttying OSB is in the following sequence:
- Apply primer in 2 coats. Depending on the type of mixture, the drying time varies from 4 to 12 hours.
- Puttying. Work should take place in a room with a positive temperature and an allowable humidity of 60%. For maximum effect putty mixtures are applied in 3 layers.
- Grinding. After the putty is completely dry, the surface is sanded to remove possible defects and making it smooth. You also need to carefully remove the dust formed on the surface.
- Reinforcement. Overlapping material required.
- Alignment. An adhesive solution is applied to the surface, after which the coating is leveled. Next, you can plaster or glue wallpaper.
Puttying process
If we talk about whether it is possible to putty OSB boards, it must be borne in mind that for these purposes it is preferable to choose specialized compounds that do not contain water.
putty osb walls allows you to make them suitable for painting, as well as for pasting vinyl, non-woven or liquid wallpaper.
The article states full information about how to putty the OSB board, tips on choosing materials and application rules. This finish is not necessary at all, but it will help protect the base from moisture and allow you to make a beautiful high-quality decorative coating.
Now you know how to putty OSB boards profitably and in a pretty way. short term. Compliance with the described recommendations will allow for high-quality puttying of OSB boards, with a guarantee of a long service life and maintaining a beautiful appearance.
OSB preparation and puttying technique (2 videos)
Necessary tools and putty work (36 photos)
When working with OSB boards, first of all, you need to remember that more than 90% of these products are made of wood. Therefore, quality OSB finishing slabs is associated with the use of materials typical for working with solid wooden surfaces. Plates lend themselves to almost any finish: they can be glued, painted, putty, varnished and even, subject to certain rules, plastered. All processing methods have their own characteristics, so each should be analyzed separately.
How to putty OSB
It is very good if the plates are not installed yet. Then you can prime their ends, which absorb moisture abundantly. When the installation has already been completed, it will no longer be possible to do this. In the process of preparing the slabs, they need to be sanded. This is the only way to achieve a noticeable increase in adhesion. In any case, it is desirable to coat all seams with sealant.
Advice! Do you want to save your time? Then it is worth buying OSB already polished. The price difference is not that big, but for interior decoration living rooms they are more comfortable. This must be taken into account when wallpapering is supposed to be done.
 To protect the OSB from moisture, as well as better adhesion, it is imperative that the boards be well primed before puttying.
Now you can proceed directly to the application of putty.
- A polymer primer is applied. It does not need to be spared, it forms a protective film on the surface, which prevents resins from escaping. It is important to dry the surface well, this can take from three to five hours.
- Then a thin layer of putty is applied. You can use a large spatula for this. All excess must be removed and the surface leveled. For greater effect, puttying is done in different directions. The first layer is horizontal, the second is vertical. The temperature in the room should be exceptionally positive.
- You need to wait until everything dries well. You can start sanding. To do this, use sandpaper. All existing defects must be eliminated. This is important if no further processing is planned before applying a decorative coating. All dust must be wiped off.
- For greater effect, you can use a painting canvas. But that's not always justified. But if possible, it will be useful. Then sticker wallpaper on the OSB plate will be even easier.
When all the steps have been completed, you can engage in decorative coating. You need to decide for yourself which method to give preference to, it can be a wallpaper sticker, painting or something else.
OSB boards are a material that has solved a large number of problems. With many advantages, it appealed to both professional builders and simple home craftsmen. This material, with all its advantages, needs additional processing. For its putty, it is better to use specialized compounds. They should not include water. Strict observance of all application rules will allow you to create a flat surface that will not cause disturbance. And then you can successfully paste the wallpaper.
Positive and negative sides of OSB boards
The advantages of OSB boards are an indisputable plus of this material and include:
- strength/reliability. OSB boards are distinguished by their strength due to the technology of their manufacture. Namely, a clear direction of the chips in one direction several times increases the reliability of the product;
- moisture resistance. Thanks to the processing of the plates, OSB perfectly resists moisture, does not rot and does not swell under the influence of water;
- ease of processing. OSB installation plates are not difficult and are perfectly carried out by the forces of one untrained person;
- resistance to natural influences. OSB boards are not afraid of insects or fungi, due to the impregnation of the material with natural oils. Also, the plates are resistant to mice trying to gnaw their way through OSB walls;
- fire resistance. OSB boards are not affected by fire, so such walls are not afraid of fires.
Of course, even such a functional material was not without drawbacks. It is only one - the difficulty in processing the surface of the plates with paints. But in the following paragraphs of the article, you will see that this problem is solved simply and elegantly.
Plate coloring
Material such as OSB can be painted with water-based or oily compositions applied with a brush, spray or roller.
The question often arises, is it possible to paint the OSB board with water-based compounds? It is possible, but this will slightly increase the shape of the sheet (swelling is possible), so it is highly desirable to use OSB 3. If you paint on one side only, this may lead to a slight bend in the panel. That's why water-based paints it is worth processing the plate when appearance not important. In opposite situations, it is necessary to use oil formulations. What are the features?
1. Any paint tends to spread at sharp corners. Therefore, before painting, they must be rounded off by light grinding (with a radius of at least 3 mm)
This is especially important for OSB used in exterior decoration.
 Before painting the OSB, the perimeter is first painted
When processing panels that are outside, it is necessary to use paints intended for use on outdoors. At the same time, the manufacturer's recommendations for painting wooden surfaces should be followed.
2. Edges. Their surface is more porous than the plate plane. The result is greater absorption, ie. moisture absorption
Therefore, one should pay increased attention edge sealing. Moreover, this operation must be carried out before priming and applying the main coating.
 Painted OSB floor
3. Padding. If you decide to treat the plates with an antiseptic, flame retardant impregnation, then you should carefully read the instructions - some of these chemicals may contain a high alkali content, which will require the use of a special primer.
4. Layers of paint. The opinion that the thicker the layer, the better it will protect the surface, is not entirely true. It is better to apply several thin coatings than one thick one. In this case, each layer must be thoroughly dried.
- the edges must be processed before the assembly of the structure (rounded and sealed);
- if water-based sealing compounds are used, then in the future, due to swelling, mandatory grinding will be required. Therefore, it is better to use solvent-based formulations (for initial processing);
- when using transparent dyes, it is necessary to use those that prevent the penetration of ultraviolet rays (i.e. inhibitors must be present in the composition of such materials);
- slabs must be fixed in such a way that potential areas of moisture accumulation cannot arise;
- it is necessary to cover the dye on both sides equally;
- 45 degree end connection is not recommended (due to sharp edges). If the finish provides that the edges will be visible after completion of the work, then they must be filled with cellulose (wooden) filler, then sanded and primed.
What is so remarkable OSB-plates
The abbreviated name OSB is actually a Russian sound English abbreviation OSB stands for oriented strand board. Translated into Russian, this expression means "oriented strand board" (OSB). And this means that the most correct name of the material that characterizes it functional features, is OSB, but builders often call it still OSB.
The slabs are formed from many layers of wood chips pressed together with high pressure and high temperature. An adhesive is laid between the layers, in the role of which synthetic resins act. These OSB components are supplemented with boric acid and synthetic wax, which are also included in its composition.
Chips in product layers in different directions. For example, in one layer longitudinal laying is used, and in the next - transverse. This order makes the plate more resistant to various mechanical stresses.

At first glance, slabs look aesthetically pleasing, but such a surface is not practical. Therefore, its additional improvement with putty is necessary. The main thing is that the surface of the plate is leveled by puttying, which makes it possible to stick on the prepared layer of wallpaper or cover it with paints and varnishes. Second positive result puttying is an extension of the life of the ceiling and walls.
Like any wood product (the content of wood chips in OSB is 80-90%), the board has the ability to absorb moisture. This property leads many to doubt the advisability of OSB puttying. Still, paint and wallpaper glue can later provoke swelling and deformation of the base. This problem is solved by abandoning the use of water-based formulations. The absence of water will eliminate the threat of swelling of the canvas.
Important! The degree of moisture resistance of OSB depends on its brand. The most stable in this respect is OSP-3
Such a plate is intended for installation in a room with high humidity.

Along with what was said earlier, it is worth noting that many people prefer the look of the natural structure of wood and wonder if the surface can be left particle boards unchanged. Yes, it is quite possible, but this design is more suitable for a country house or utility room. In this case, it would be appropriate to varnish the panels.
2 What should be the primer
There are no specially designed formulations for OSB. Conventional solutions are used, subject to certain requirements. Immediately exclude preparations containing water. After application, it is absorbed into the material, it begins to swell. Use only a primer designed for wooden surfaces. These are compositions with an acrylic, glyptal or gypsum base. They take into account the moment that putty will be applied, so alkyd products are not used - they are good for painting.
Primer for OSB boards - universal, deep penetration. Acrylic - the most suitable of them, used for painting and puttying. For an unheated room, additives are added that prevent the development of the fungus. Some formulations, such as EuroPrimer, already contain such additives. Sold in a concentrated form, diluted before use according to the instructions.

The slabs contain resins and other substances that sometimes show through the finish and spoil the work done. To eliminate such a nuisance, a rather sophisticated technology is used. First, an insulating paint is applied (example: Aqua-Deck E. L. F.), then a dispersion putty containing synthetic resin. Allow to dry for 12 hours and stick a special material for bonding cracks in the putty: Variovlies A 50 Basic. After such preparation, no spots will appear.
In some cases, an adhesive primer is used - Betonkontakt. It differs from other compositions in the content of quartz sand, which makes the surface uneven, but with slight irregularities. It is used when decorative plaster or tile is planned as a finish. Thanks to the unusual filler, adhesion is significantly improved. When applied with a poppy brush or a long-haired roller, other tools do not provide an even distribution of the composition over the slab.
Before use, all soils are recommended to be mixed, but in the case of Betonokontakt, this is a very important operation. Quartz sand settles quickly, if the process is not carried out very carefully, the mixture will turn out to be heterogeneous. Moreover, during operation, this procedure is repeated every 10 minutes, only under such conditions the coating will be of high quality.
- acrylic-based varnish for wooden surfaces, which is diluted with a solvent in a ratio of 1:10;
- latex - after drying, a thin film is formed that prevents the penetration of resins;
- alkyd varnish, diluted to over liquid state white spirit.
In addition to choosing the right primer, it is important to apply it according to the technology:
- 1. Plates are cleaned. Dried dirt is wiped off with a damp cloth, the rest is removed with a vacuum cleaner or a broom.
- 2. Close up the joints. It is possible to use acrylic sealant or polyurethane foam. The excess is removed with a knife, and the sealant is processed with sandpaper.
- 3. The prepared composition is applied to the OSB. Usually they start from the joints, process with special care, then move on to the rest of the surface.
The quality of priming depends on the patience of the master. Do not immediately apply a thick layer, the effect of this will not be. It is recommended to repeat the operation three times, carefully distributing the drug over the surface. Allow to dry thoroughly each time. How much time will pass depends on the air temperature and the properties of the composition and the thickness of the layer. You'll have to be patient, do something else, but the quality will be excellent.

Before puttying, the surface is first sanded and then primed. For the work, the material is selected based on a number of requirements, namely:
- Primer selection. It is necessary to prime with special mixtures intended for wood processing. As a rule, these are compositions based on drying oil or glyptal varnish that do not contain water. Priming mixtures are primarily used to process the end parts of the OSB even before the sheets are installed, since after this it is very problematic to do so. A primer will help prevent stains from resins and other substances contained in the material.
- Choice of putty. Stop your choice is on the compositions intended for finishing wooden bases. Walls should be puttied in several layers, horizontally and vertically, which will provide a more even surface. It is also worth remembering that in order to avoid the occurrence of cracks after drying, it is recommended to reinforce the surface with elastic materials, for example, non-woven fabric.
Advice! It is preferable to buy already polished plates, the price of which is not much higher, but the finishing work will be much faster.
Plaster on OSB sheets, to be or not to be
When building a house, you often have to think about saving money, or conservation of construction for a certain period. One of these ways to save or take a break to save money can be plastering the facades of a frame house.
The plastering of the facades of wooden houses became widespread in our country after the fire of 1812, and was often used until the beginning of the 20th century. Then this method of finishing facades was almost forgotten. But in the USA it was used until the 70s of the last century, until plastic siding appeared on the construction market.
Today there are two ways to apply the plaster mix on the facade of the house. The first, and most common, external walls houses are pasted over with foam sheets and a plaster mixture is already applied to them. At the same time, the thermal insulation and energy-saving characteristics of the house are improved.
The second way is plastering directly on the sheets of the outer skin of the house. Unfortunately, if you are not a fan of the fakferkh style (when imitating the fakferkh, the seams are closed with flashings), then this finishing method can be considered only as a temporary one. As practice shows for 5-7 years, even if everything is done with high quality and correctly, cracks will appear at the joints of the outer skin sheets, which will spoil the appearance of the facades. But plastering on osb sheets of outer skin is an excellent way out in order to take a “pause” and save up funds for finishing with facing bricks, fiber cement siding, thermal panels with clinker finish or other high value materials.
So, how to apply the plaster mixture directly on the OSB sheets of the outer skin of the house? Already on initial stage we must try to reduce the joints of the sheets to a minimum - one of the ways to use OSB sheets for external cladding, format 1250 x 2800. It is also desirable to cut window and door openings in whole OSB sheets, and not use the remnants of the material around them.
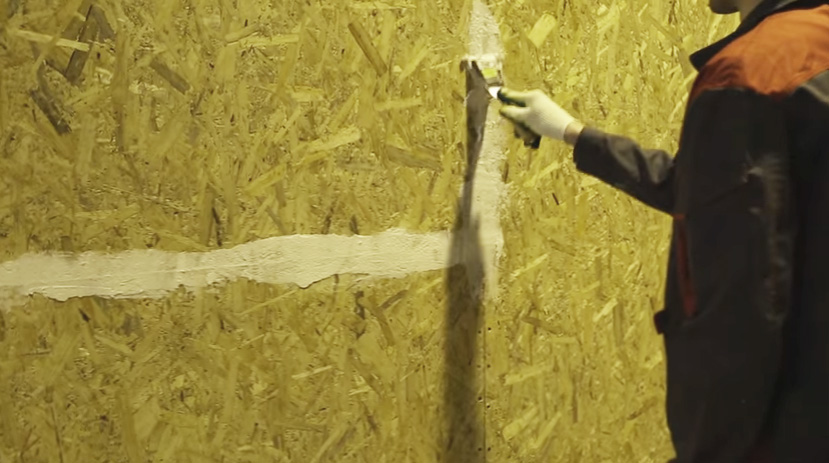
Step 1. We pass all the joints of the OSB sheets with a frost-resistant sealant, put a self-adhesive “serpyanka” over the seams, and putty.
Step 2. We prime all walls
It is important that the primer allows the walls to "breathe" and does not isolate water vapor inside the house, for example, you can use the Knauf-Tifengrunt primer or similar for this.
Step.3. We apply a thin first layer on pre-primed sheets of outer skin, spread a fiberglass mesh on top, slightly sink it into the first layer (additionally, the mesh can be “shoot” with a construction stapler). Then we apply a second layer of plaster mixture.
Step 4. Coloring the facades in the selected color. The paint used for facades should also not isolate water vapor in the wall.
Plaster on OSB sheets, to be or not to be? When building a house, you often have to think about saving money, or conservation of construction for a certain period. One of these ways to save or take a break to save money can be plastering the facades of a frame house.
Source:
Polymer compositions for plastering
The fastest way to apply plaster on the surface of OSB boards is to use polymer compositions based on acrylic or latex synthetic resin. They are available in the form of ready-made solutions. After opening the container, everything must be used very quickly. Because the plaster sets quickly and it will not work to dilute or restore the initial consistency.

Now let's figure out how to plaster the OSB slab in this way.
- Grinding. To do this, choose coarse sandpaper. At the same time, all elements that protrude beyond the surface of the plate and are poorly connected to it are removed.
- Primer. After grinding, the slab is cleaned of dust and covered with a deep penetration primer designed for wooden surfaces. This will not only protect the wood from moisture, but also increase adhesion, which means that the plaster solution will be easier to lay down.
- If irregularities remain on the OSB plate or there are gaps at the joints, then after the soil has dried, they are treated with acrylic sealant. The composition is sent to the unevenness and carefully leveled with a spatula. This process will allow the use of less polymer plaster.
- Plastering. After the sealing layer dries, proceed to the application of the finished composition. The solution is applied to the wall and leveled until a layer 5 mm thick is obtained. You need to work quickly.
The polymer layer of plaster does not require painting, but if desired, the owner can change the color of the finish at any time. This method of decorating OSB boards is expensive, but its service life, over 25 years, makes it possible to level this disadvantage.
The compositions that are used for plastering slabs harden very quickly, so if the owner does not have experience in this area, then it is better to use the work of a professional team.
Is it possible to paint and how to paint osb slabs
The type of paint is selected based on the operating conditions of the material: indoors or outdoors, the degree of load (floor, walls), the effect of moisture, sun, sub-zero temperatures. For painting non-plastered and non-plastered surfaces, the following paints are used:
- Oil paints Coloray, Syntilor and others. They have good viscosity and adhesion to wood, suitable for painting OSB both inside and outside the house, updating the painted surface will be required in 2-3 years;
- Alkyd enamels Tikkurila, Farbex and Enamel. Used for painting outside and inside buildings, they are absorbed into the surface, creating a stronger bond with wood;

How to paint osb. A photo
Advice. To reduce material costs, use factory-ground boards. Their cost is slightly higher than unpolished products, but finishing work will take less Supplies, time and effort.
Since wood tends to absorb moisture and swell, the question arises whether it is possible to paint OSB board with paints on water based. If the plate has already been treated with varnish, drying oil or primer, then it can be painted with water-based acrylic, silicone or silicate paint. If the slab does not have a waterproof coating, it should be applied independently, and the OSB should be painted only after the primer has dried. This type of paint is used for internal works and has the main advantage - they do not emit harmful fumes and can be used in residential areas, including children's rooms.
Another water-based paint used on wood is AQUACOAT. It dries quickly, forms a coating resistant to abrasion, and does not have a strong odor. Inside, painted walls and ceilings are updated based on aesthetic considerations, but can last up to 15 years without repair. The floor is painted depending on mechanical loads, but the coating should not be brought to complete abrasion in order to prevent damage to the surface of the wood board.
There are three ways to paint the osb plate after leveling with putty: with a brush, roller or from a spray gun. If the surface is painted for the first time, the paint is applied first with a brush, and after drying with a roller or spray gun. This method allows you to get a perfectly flat surface without streaks and streaks.
Execution sequence
 How to putty walls from OSB? Some procedures are recommended to be done even before the installation of the plates. In particular, prime the ends of the boards, as they absorb moisture the most. After installation, this will not work.
Another preparatory stage is grinding the surface with sandpaper or wire brush. It will also increase the adhesion between the sheet and the covering material. If you do not want to spend time and effort on this, it is better to purchase plates already polished in the factory. It will cost a little more. When everything is ready, you can get to work. By this time, all seams should be sealed and leveled.
- Application of a polymer primer designed to create a protective film on the surface. It will prevent the appearance of stains formed by resins and other substances contained in the OSB. This layer must be dried for at least 4 hours, depending on the type of primer.
- Puttying. It is carried out in 2 stages - a small amount of putty composition is applied to the wall with a steel spatula, and the excess is removed with the next movement. The layer is quite thin and even. It is desirable to carry out puttying in 2 layers - one in the vertical direction, the second in the horizontal direction. So the surface will be more even. This should be done in a room with a humidity of no more than 60% and only at positive air temperature.
- After complete drying, proceed to leveling the surface with sandpaper. At this stage, it is necessary to eliminate all existing defects. Before proceeding to the next step, the walls must be thoroughly cleaned of the resulting dust.
- Reinforcement with non-woven canvas or any other roll material intended for this. The sheets are overlapped, and then a double incision is made in the place of thickening and the excess is removed. This layer will protect against the formation of cracks that appear when the building shrinks.
After that, you can proceed to the decorative finish, whether it be painting, wallpapering or plastering.
So that when preparing the wall there are no problems, and it does not swell from moisture, it is necessary to choose the right mixture. We have already found out how to putty OSB - with plastic compounds based on polymers, oils, glue, resins or latex. clear and phased implementation all the recommendations will allow you to create a perfectly flat and smooth surface that will last for many more years.
3 Requirements for putty and its choice
- 1. Acrylic. Levels any surface, including OSB.
- 2. Nitro putty. Quick-drying composition containing cellulose, resin, plasticizers, fillers. Before use, dilute with solvents recommended by the manufacturer.
- 3. Oil-adhesives - in the composition of varnishes, glue, additives, oil and plasticizers Dissolve with drying oil.
- 4. Gypsum with polymers. They are considered the best for working with wooden surfaces.
- 5. Dispersion with synthetic resin. Highly elastic, used for finishing plaster.
The listed types of putties must have certain properties
Before buying, it is recommended to read the instructions on the package and pay attention to the characteristics. Among these, a very high degree of adhesion is of particular importance, because not every compound will adhere to the resinous surface.
In preparation for use, it is important to achieve a uniform consistency. Coating requirements include strength and sandability
If it is necessary to putty not large areas, then the cost of the compositions is not particularly sensitive. When finishing the whole house built according to frame technology, it hits the budget. There is a recipe for self-production of the composition, which is used by some craftsmen. It consists of inexpensive components:
- oils: 2.8 kg of linseed and 0.6 kg of turpentine;
- 0.3 kg of ground pumice;
- 0.2 kg of gelatin and the same amount of casein;
- 170 ml of ammonia solution;
- 3 liters of water. Pumice is ground into dust, the mass is poured into linseed oil and stirred until a homogeneous consistency. Pour in turpentine oil and stir again. When the mixture is infused for 10 minutes, add everything else. They heat it in a water bath, stir, insist, repeat again until they achieve uniformity.
Making putty with your own hands
The cost of putty compositions of factory production is not too high. However, if you need to process large areas, including walls, floors, ceilings, then total cost alignment may not be so small. Therefore, some craftsmen decide to make wood putties on their own.
To create a putty composition, you will need the following components:
- linseed oil - 280 g;
- turpentine oil - 60 g;
- ground pumice - 30 g;
- gelatin - 20 g;
- casein - 20 g;
- ammonia solution (18%) - 17 g;
- water - 300 g.
First, grind the pumice to a state of dust. Then pour the resulting mass into a container with linseed oil and stir until you get a uniform consistency. Next, pour turpentine oil into the same bowl and stir the mixture well again.
Let the mixed mass brew for several minutes, after which we add the rest of the components from the list. The solution is prepared in a water bath, then stirred and infused again. After the last settling, the mixture is ready for use.
And a little about the secrets of the Author
Have you ever experienced unbearable joint pain? And you know firsthand what it is:
- inability to move easily and comfortably;
- discomfort when going up and down stairs;
- unpleasant crunch, clicking not of their own free will;
- pain during or after exercise;
- inflammation in the joints and swelling;
- causeless and sometimes unbearable aching pain in the joints ...
Now answer the question: does it suit you? Can such pain be endured? And how much money have you already “leaked” for ineffective treatment? That's right - it's time to end this! Do you agree? That is why we decided to publish an exclusive, in which he revealed the secrets of getting rid of joint pain, arthritis and arthrosis.
Attention, only TODAY!
Plaster OSB Resin Board
With the advent plaster compositions on a polymer basis with high adhesion to wood, the problem of how to plaster OSB from the outside has lost its relevance. The elastic mixture effortlessly lays a thin layer on the base of the plate, tightens small irregularities. A semblance of a rubber shell is formed, resistant to mechanical and atmospheric influences.
Suitable for indoor and exterior finish. Tinted with acrylic dyes. Technical requirements standardized:
- withstands 10% linear stretch (compression) square meter coatings;
- water permeability 1 sq.m. no more than 8 grams per hour;
- operating temperature range from -50°C to +60°C;
- 150 freezing cycles without loss of quality;
- preservation of properties for at least 25 years;
- 24 hours for the applied composition to dry;
- consumption 2 - 2.5 kg of the mixture per 1 sq.m.
Plastering on osb with elastic putty is performed in the following sequence:
- the plate is cleaned with coarse sandpaper. This removes protruding wood fibers that have a weak connection with the base;
- to increase adhesion, the cleaned surface is primed with an appropriate agent;
- after the primer has dried, the irregularities are filled with acrylic sealant and smoothed out with a spatula moistened with soapy water. This will save the instrument from sticking to the composition;
- the composition is applied to the prepared surface and leveled until a layer up to 5 mm thick is obtained. The plaster on the osb slab on the facade is applied with maximum thickness, isolating the room from cold and moisture leaks. For decorative finishing of interior walls, 1.5 - 2 mm is enough.
OSB facade plaster is especially practical using decorative polymer compositions:
- bright colors will decorate any facade;
- color scheme for the entire thickness of the layer will hide surface damage;
- The building will receive additional external protection.
The high cost of composite compositions forces the developer to look for alternatives. Plastering OSB boards on the outside is possible with the use of oil-adhesive mixtures and nitro putty.
Work order
The surface is being prepared for painting or wallpapering, the humidity in the room should not exceed 60%, and the air temperature should not be lower than +200C. It is necessary to start performing puttying work after the primer has completely dried on the surface of the plate.
If you have to stick heavy wallpaper, then in without fail perform reinforcement. For this purpose, fiberglass or nylon reinforcing mesh is used. Fixing the reinforcing material is possible directly on the putty, and if you decide to use fiberglass, you can glue it with wallpaper glue designed to fix non-woven wallpaper.
Fixation of reinforcing fabrics is carried out strictly butt-to-butt.
Already after applying the first layer of putty, the surface of the plate becomes absolutely even, but preparation for painting requires the creation of a second (finish) layer.
Cloths of reinforcing mesh or fiberglass are glued with an overlap, later a cut is made and excess material is removed. Thus, a quality butt joint is obtained. If an adhesive composition was used for fixing, then further work is started after it dries.
A layer of putty on an adhesive basis is applied to the reinforced surface. The layer thickness should not exceed 0.2 cm. In rare cases, puttying is permissible with the creation of a layer 0.5 cm thick.
After the first layer of putty dries (after 3-4 hours), you can use an ordinary spatula to knock off the scars and sagging remaining on the surface and proceed to apply the second finishing layer. Its thickness does not exceed 0.2 cm.
An important condition for the quality of work is the processing of the surface of one wall without stopping. This will avoid the appearance of a sharp boundary between the layers and facilitate the final processing of the created surface. After 10-12 hours after completion of work, you can start grinding. This will require sandpaper or mesh coated with fine abrasive components.
More video process:
Performing work on puttying OSB boards is not particularly difficult. The quality of the created surface depends not only on the skill of the master, but also on the right putty.
By purchasing desired composition, all the requirements and recommendations of qualified craftsmen should be taken into account.
Frame structures have proven themselves quite well in modern construction - today, buildings on a lightweight basis can be found almost everywhere. How to paint decorative plaster under a stone? OSB sheets are most often used as external cladding for frame-type buildings, which are distinguished by lightness, affordable price and a high level of thermal insulation.
Plastering on OSB and painting
Good alternative to siding. I am making my workshop, one wall is made of CSS sheets, I found a solution for it ...
Plaster for OSB boards - exterior of the building
For wall decoration with OSB sheathing you can use various materials - the abundance of modern technologies makes it possible to realize almost any idea. However, with traditional finishes, the situation is somewhat different - the combination with wood will not benefit all finishing materials. In this regard, lovers of monolithic finishes quite reasonably wonder if it is possible to plaster an OSB board?
Facade plaster according to OSB - application of mortar
Initially cement-sand plaster applied exclusively to solid, fixedly mounted structures - brick walls, concrete, blocks, etc. Plastering surfaces on a movable wooden base has not been practiced until recently, since without preparatory work this action will lead to disastrous results.
Advertising
In this article, you will be provided with step-by-step instructions, through which you will learn how to plaster an OSB slab with your own hands. In it you will find a description of the most important points that will help you avoid serious mistakes in the process of plaster formation.
Strengthening the structure

sheathing OSB frame photo sheets
It is advisable to think about choosing a coating even at the stage of skin formation in order to be able to prepare the surface as much as possible for future work. In this case, it is necessary to pay attention to the assembly of the supporting frame and / or battens, which will serve as the basis for installing OSB sheets.
The frequency of the location of the bearing elements must comply with building regulations - it is highly undesirable to reduce their number and increase the distance between them.
The installation of the sheets themselves must also be carried out as reliably as possible in order to exclude strong mobility of the elements. The main enemy of the plastered surface is vibration and the movable structure of the base - when forming the skin, it is necessary to smooth out these negative factors as much as possible.
Note! In this case, it means strengthening the structure within the limits of building codes and prescribed technologies. It is impossible to sacrifice expansion joints or other necessary elements for the sake of strength.
Surface preparation

Surface preparation for plaster
OSB is a wood-based product that is formed from chips and chips. As such, wood is not used as a base for stucco, as it absorbs water and then repels the stucco.
Without preliminary preparation, the plastered surface will become covered with cracks almost immediately. Before plastering the OSB board, it is necessary to create an insulating layer between the plaster and the sheathing.
There are two ways to prepare the surface - installation of insulation or upholstery with kraft paper / bituminous cardboard. Let's take a closer look at both technologies.
Insulation installation
As a material for external insulation of OSB sheets, polystyrene foam boards are used, which have sufficient strength and are completely waterproof. The lightness of polystyrene foam insulation allows its installation on an adhesive basis, which in this case is the only available option.
In general, the installation process is as follows:

- Sheets should be cleaned of dust, they should not be wet or greasy - if necessary, the skin is treated with white spirit to degrease surface. Oil stains, a large amount of dust or dirt can significantly reduce the degree of adhesion of the insulation to OSB sheets;
- The adhesive composition is applied to the insulation using a calibration spatula so that the adhesive covers the entire surface of the sheet. How to make decorative molding on the wall of putty? Then the sheet is pressed against the skin - in order for the glue to fill the voids, it is necessary to lightly press on the insulation. After the entire structure is pasted over with insulation, it is necessary to wait for the glue to dry completely and only then proceed to the next stage;
- Reinforcement is installed on the insulation in the form of a plastic or fiberglass mesh with 6x6 mm cells - they have a self-adhesive base and you will not have problems with installation.
Upholstery

First of all, the joints between the sheets are smeared with an elastic sealant, after which the surface is covered with kraft paper or bitumen cardboard, which are fixed with a stapler. Reinforcement in the form of a fiberglass or plastic mesh is glued onto the surface prepared in this way, after which the walls are ready for applying the plaster.
The undoubted advantage of this method is the cost-effectiveness of the process, however, the absence of a heater will adversely affect thermal insulation characteristics building. This shortcoming can be partially compensated by internal insulation.
Plaster surface

The plastering process is carried out according to standard technology, with a few exceptions.
- Plastering is carried out by means of spatulas, since the surface is subject to vibration, it will be problematic to throw the solution with a bucket;
- The plaster on the OSB plate is carried out in layers - in the first layer it is necessary to "drown the reinforcing network, let it dry and only then continue working.
Decorative plaster on OSB makes it possible to give the frame building a monolithic look, making it as similar as possible to a brick structure. More detailed information on this topic you can get by watching the video in this article.
Additional Information:
AT frame housing construction OSB boards are widely used. Those located on the street require protection from external influences of the atmosphere. Inside the living quarters, the surface is finished in different ways: wallpaper is pasted, painted, varnished.
When using some options, it is required to putty the OSB in order to create a perfectly even base, to protect the wood from the harmful effects of the products used, moisture.
When working with OSB boards, first of all, you need to remember that more than 90% of these products are made of wood. That's why quality finish OSB boards are associated with the use of materials typical for working with solid wood surfaces.
Plates lend themselves to almost any finish: they can be glued, painted, putty, varnished and even, subject to certain rules, plastered. All processing methods have their own characteristics, so each should be analyzed separately.
Plaster, in this case, is used to create the last layer, which largely determines the design of the premises. These mixtures are called decorative plaster. For wooden surfaces, it is recommended to use compounds that have high adhesion.
We are talking about polymer-based plaster mixtures. A layer of such plaster "breathes" and prevents the formation of fungi and mold. The plaster layer contributes to a significant reduction in sound transmission and heat retention.
How to apply decorative plaster on osb plate? It is environmentally friendly and absolutely safe. The wall covered with plaster looks absolutely homogeneous. Joints between plates and other defects are hidden.
Such a coating will last more than twenty-five years.
- the surface must be coated with an adhesive before work;
- the solution applied to the surface with a spatula should not be thinner than three millimeters;
- the use of a reinforcing mesh after applying the first layer;
- surface coating adhesive composition after the first layer has dried.
Sealing indoors (not recommended), if surface plastering is not required, is carried out using sickle tape, which is embedded in a small layer of putty. But before that, the place of its installation must be deepened with an angle grinder with a petal emery wheel so that protruding humps do not form at the joints. Before applying the putty, the prepared surface must be primed twice with a deep penetration primer and allowed to dry.
The second way is plastering directly on the sheets of the outer skin of the house. Unfortunately, if you are not a fan of the fakferkh style (when imitating the fakferkh, the seams are closed with flashings), then this finishing method can be considered only as a temporary one. As practice shows for 5-7 years, even if everything is done with high quality and correctly, cracks will appear at the joints of the outer skin sheets, which will spoil the appearance of the facades.
But plastering on osb sheets of outer skin is an excellent way to take a “pause” and save money for finishing with facing bricks, fiber cement siding, thermal panels with clinker finishes or other materials that have a high cost.
Oriented Strand Board (OSB), aka OSB (OSB or OSBI) is great for construction. These plates are increasingly used in housing construction. This is especially true for the construction of frame houses. They are used both for cladding facades from the outside, and for arranging interior space inside. Therefore, the question of which method to prefer for interior decoration is relevant for every homeowner.
The main types of interior decoration
As a finish for interior spaces, the walls of which are made of OSB, you can use different methods. The choice is always up to the owners. Short list Finishing work that is suitable for OSB is given below:
- wallpapering
- painting
- varnishing
- decorative putty and decorative plaster
- gluing tiles or ceramic tiles
All listed species finishes have one common feature. The OSB surface must be prepared in a certain way before the top coat can be applied.
The weak point of oriented strand boards is essentially only one. This is the ability to absorb and gradually accumulate moisture. Over time, swelling and deformation of the entire plate or part of it occurs. Therefore, the OSB surface must be isolated from the impact high humidity. And here many people have a question: is it better to putty OSB walls or cover them with a layer of plaster?
Initially, the puttying process is used to seal the joints between the plates and to level the walls. This layer serves as the basis for applying paint, wallpapering partitions and, oddly enough, for the final layer of plaster. So the conclusion suggests itself quite definite: putty is an element of the rough finish of the premises.
So plaster interior walls from OSB is quite possible. This, along with others, is a fairly common finishing method that designers often use. It should be added that the use of a conventional sand-cement mixture in this case is not recommended. There are special varieties of plaster that are designed for interior work with OSB panels.
What plaster is used for OSB indoors
Plaster, in this case, is used to create the last layer, which largely determines the design of the premises. These mixtures are called decorative plaster. For wooden surfaces, it is recommended to use compounds that have high adhesion. We are talking about polymer-based plaster mixtures. A layer of such plaster "breathes" and prevents the formation of fungi and mold. The plaster layer contributes to a significant reduction in sound transmission and heat retention. It is environmentally friendly and absolutely safe. The wall covered with plaster looks absolutely homogeneous. Joints between plates and other defects are hidden. Such a coating will last more than twenty-five years.
Plaster mixtures are sold ready-made or dry. Dry varieties should be diluted with water or other reagent before application, in accordance with the instructions. It is very important to make sure that the OSB boards are rigidly fixed and not subject to movement. Only after that you can start working. Otherwise, the plaster may crack and begin to flake in places.
Decorative OSB plaster indoors. Types, characteristics.
Decorative plaster can be classified according to two parameters: by the composition of the filler and by the type of binder components. According to the type of filler, Venetian, structural, textured and flock can be distinguished.
Venetian plaster when applied, it can form a smooth surface. It contains an admixture of the smallest marble chips. This gives the surface a mirror finish.
Structural mixture has small impurities of quartz and other components. The surface is rough. Its main difference is that when applied to the wall, multi-colored spots appear on it.
Textured plaster may have a different appearance and include impurities of any suitable material. It can be small stones, pieces of mica, silk fibers or other fabric. Wall panels coated with this mixture have a pronounced texture, which is determined by the filler.
The hardest thing to work on seems to be flock mix. But it is very advantageous in design. The fact is that it consists of three layers - the main one, the layer with flocks and the lacquer coating. Pieces of dried acrylic paint are used as flocks.
Types of decorative plaster for OSB indoors by composition
According to the presence of different binders in the mixture, textured plaster can be divided into the following types:
- mineral
- acrylic
- silicone
- silicate
AT mineral plaster cement acts as a binder. It is not very suitable for OSB, as it is afraid of impact when it hardens. Although the finished layer only gets stronger over time, it lacks a certain plasticity. In case of accidental impact, a piece of the coating may separate from the wall.
Acrylic plaster Made from acrylic resin. Compared to the previous mixture, it has lower strength and service life. Has many color options. You can color the mixture yourself by adding a special color paste. It is quite suitable for application to the prepared OSB surface.
Synthetic resins serve as a binder for silicone decorative plaster. It is very plastic and can be easily applied to the wall. Silicone plaster is resistant to moisture, vapor permeable and has an antiseptic effect. There are many color varieties. This type of textured plaster fits perfectly into the solution of the task.
silicate plaster stands out in that liquid glass is used to create an astringent effect. The hardened surface has increased strength, moisture resistance, vapor permeability and antifungal effects. Such plaster will last for a long time, up to fifty years or more. This option can also be used to work with the OSB.
Textured plaster relief for OSB in the house
According to the shape of the surface relief, the most famous types of textured plaster are: “lamb”, “bark beetle” and “fur coat”.
"Lamb" has a fine-grained structure, due to the filler of small raw pebbles.
Plastered surface "Lamb".
"Bark beetle" resembles a tree that has been attacked by bark beetles.
 Plastered surface "Bark beetle"
 "Fur coat" has a smoother surface compared to the first option, since the filler in this case is cement.
 Plastered surface "Fur coat"
 OSB surface preparation
As already mentioned, the decoration of walls and ceilings from OSB sheets indoors takes place in two stages. The first, draft, includes the preparation of the facade of the slabs for top coat. The second, finishing, consists in applying plaster to the prepared base.
Surface preparation begins with sealing the seams between the plates. For this, it is advisable to use acrylic or silicone sealant . After completing this operation, it is recommended to get rid of all visible irregularities and defects with the help of grinder. If this is not possible, then you can walk along the walls with ordinary sandpaper.
 Seal joints with sealant.
 The walls should be cleaned of dust with a vacuum cleaner. For ceilings, all processes are similar. If necessary, wipe the surface with white spirit. After that, the first layer of primer is applied. Best to apply acrylic primer with additives that improve its properties . The primers of the adhesive class have also proven themselves well. They contain fine quartz chips, which helps to keep the putty on the walls. After complete hardening of the first layer of soil, the operation should be repeated.
Next up is wall plastering. For OSB panels, there are specially designed mixtures. It is better to use adhesive-based putty compositions. Before applying the composition, a special metal or plastic mesh, which contributes to a better fit of the putty. Fastening is easiest to do with a construction stapler. Then the first layer of putty is applied. The mesh should be completely hidden under the mixture. To create perfect flat surface you can putty the wall a second time when the first layer dries.
The following two videos show the preparation process visually.
You can learn more about the intricacies of choosing putty, preparing the base and puttying in a separate article:.
After that, you can think of applying a decorative coating, be it wallpaper, paint, or decorative plaster.
Applying decorative plaster indoors
The selected mixture is prepared in the same way as it is written on the package. Work is not much different from puttying. However, it takes some skill to get the wall surface to look the way it was intended.
A flat spatula is used to apply the mixture, as shown in the figure. The plaster is carefully applied in several layers. The thickness of the layer is small, within one and a half - five millimeters. As a rule, two or three layers are sufficient. It is very important to ensure that before applying the next layer, the previous one has dried and gained strength.
 Applying plaster to the prepared surface
 This is the basic scheme of work on plastering internal surfaces from OSB. It should be noted that each type of decorative plaster has its own nuances when applied. This type of finish is relatively inexpensive. And if everything is done correctly, then the resulting interior will satisfy the most demanding taste and will last for many years.
 An example of Venetian plaster with a pattern.
 The subject of numerous discussions of those who build houses or make repairs with their own hands, was the question of whether it is possible to plaster OSB slabs without spending additional materials and effort.
Plaster - great way improve and strengthen residential buildings erected using frame technology, equip and insulate walls.
Expensive building materials can be successfully replaced wood boards OSB. The practice of using them for exterior walls has become widespread.
The popularity of using OSB boards
 OSB is a popular material in the construction of frame houses
 OSB slabs for exterior facade and residential premises are an excellent alternative, affordable and affordable. positive and negative sides any type of building and each building material has.
Lightness and thermal insulation properties slabs made from layers of wood shavings are an undeniable advantage, but, according to builders, such walls require additional decorative finishing.
Detailed information about each type of waterproofing layer should be carefully studied. It is advisable to consult with experts. Sometimes the savings building materials today, translates into significant spending in a short time.


