brick ovens for the home is often the only way arrange heating at home, in the country or in the cottage. In brick heating stoves, the maximum efficiency reaches 85%: this is a consequence of the fact that their design does not include “heat consumers”, which take a lot of heat energy.
- Brick ovens for the home
brick heating furnaces quite simple to manufacture and operate. The reason for these qualities is a narrow scope - for space heating (they are not intended for cooking, etc.).
Brick ovens for the home are also sometimes called "Dutch".
Brick ovens for the home
In houses and cottages, "Dutch women" are most often used, in which the thickness of the walls is equal to half a brick. If you heat such stoves from one to two times during the day, you can easily provide comfortable temperature conditions in a medium-sized room.

Taking into account the dimensions of heating furnaces, they use two main methods of smoke circulation:
- in the "Dutch" of small size, where the firebox and the stove itself have common walls, location smoke channels bell type is carried out at the top;
- for large ovens combined system smoke circulation, in which the location of the smoke channels is carried out from the sides of the firebox and on top of it.
Dutch stove for a corner house
Another type of heating stoves - "Dutch" corner type. Since they have angular shape, then these furnaces are characterized by the fact that they occupy less space, which makes it possible to significantly increase usable area rooms by placing the stove in a corner.

Corner brick ovens are often installed because it is not possible to make a rectangular foundation.
To warm up 2 storey building or a cottage, use two-story brick heating stoves. On each floor, an autonomous stove is installed, which has its own firebox.

The structure of modern heating furnaces includes a grate. With the help of this solution, it became possible to deliver oxygen to the place of combustion of firewood, in the volumes that are necessary to ensure combustion. This is the reason that the combustion of fuel occurs at an intense pace, and with more uniformity. New smoke exhaust systems provide an opportunity to reduce the length of smoke channels. The smoke enters the stove chimney before being cooled down by the excess air.

The above has made it possible to make modern heating stoves more compact, reduce the time spent on the furnace, and also improve efficiency.
The scheme of laying a stove for a house is the first thing a person who decides to equip heating with a stove in his home will need. In this material, we will consider what schemes for laying home brick ovens exist, what are their features and differences.

Laying a stone stove can be done in the following ways:
- 1. undercut;
- 2. with empty seams;
When arranging the stove according to the first method, plastering the stove is not required, since all joints are filled with mortar. The wall thickness of the kiln determines the way the bricks are laid. The walls are laid out with a thickness of one brick, and half a brick. Sometimes, you can find masonry in 3.4 bricks.
For work on the arrangement of the furnace, it is imperative to use oven bricks. It is also called "red brick", full-bodied. Under no circumstances use bricks that were taken from any dismantled building, expanded clay blocks or slotted bricks.
Laying the first row is done simply with a brick, without using a mortar. The brick is leveled, the front wall is determined, the places where all the doors will be located. These operations can be called the last "estimate". When these actions are performed, the bricks lie down with the mortar.

After that, begin to lay the corners. The next stage, according to the advice of experts, is the arrangement of the contour of the entire stove. Using plumb lines, a twine is stretched from the ceiling to the corners of the stove. With the help of these vertical lines, you can easily navigate during the work.


Given the model of the stove you have chosen, you should determine the areas in which they will be located: a blower, a combustion chamber, an ash pan. The door under the blower is installed when the third row of bricks is laid out, after one row an ash pan is laid out.
After that, there is an arrangement of the firebox. Each door is attached with burnt wire. When you get to laying out the vault, you will need to cut the bricks. A calculation will be required to ensure a good docking of the bricks with each other. The laying of the vault begins after the second row of bricks is laid after the firebox door.

For lining the combustion chamber, special refractory bricks are used. Because the facing brick and masonry bricks have different temperature characteristics, then the installation of the cladding to the furnace itself should not be done rigidly. During the installation of the chimney pipe, care should be taken to equip a special valve, the adjustment of which should be carried out smoothly and without difficulty.
Brick ovens for home - video instruction
Stove heating as a way of heating private households is still popular. Since it is quite difficult to find a professional stove-maker, many owners of suburban real estate are forced to master the construction of brick ovens with their own hands.
To build heating unit in accordance with all the rules and regulations, homeowners will need to stock up on relevant knowledge and skills, prepare tools and purchase building materials for a significant amount.
Types of ovens
A do-it-yourself brick stove for the home can be:
- Russian;
- Swedish
- Dutch.
Furnaces are also distinguished:
- bath;
- garden;
- heating;
- heating and cooking;
- fireplaces.
Russian oven
Among stove-makers, it is considered the most multifunctional brick construction. It is equipped with a place to relax, called a couch. Under it is a cooking chamber - a furnace or crucible, under which there is a blower. It should provide continuous burning solid fuel. Such do-it-yourself brick ovens for the home also have a niche for kitchen utensils and keeping cooked food hot.

The standard dimensions of this type of furnace units are: 2 meters high, 2.5 meters long and 1.5 meters wide. Due to its impressive size, the Russian stove is able to heat living space, the area of \u200b\u200bwhich exceeds 40 "squares". But it also has a big drawback - it requires a lot of solid fuel to function.
swedish stove
Its dimensions are more compact compared to the Russian stove. The height of the Swedish brick structure is approximately 2 meters, and the length and width are no more than a meter. This small do-it-yourself brick oven is intended for:
- for space heating;
- for cooking food.

Above the furnace of the Swedish unit, a cast-iron stove is placed on 2 burners, and an oven is placed on the side. In the process of building a stove in the kitchen, a stove is built, and the rest of it is equipped in another room.
A serious design flaw is the high degree of fire hazard. To prevent fire, the Swedish stove is equipped with dampers.
dutch oven
This type of furnace units owes its appearance to Russian stove-makers, it was they who invented it. The "Dutch" is intended for heat supply of premises. The stove is very compact and has a high degree of heat transfer. It will take 10 hours to completely warm up a cold room with it.

During the off-season, a do-it-yourself Dutch brick stove is able to retain heat for a day. Her structural device provides high heat transfer due to the winding chimney. In addition, the stove has a capacious firebox.
"Dutch" is erected only with the use of oven bricks, which accumulate heat quickly and release it gradually. This building material for the construction of furnaces is very expensive.
How to lay out the oven and what is needed for this
Having considered the projects of furnaces and having made a choice, you can proceed to the next stage. In addition to design, furnace design must meet the requirements fire safety, therefore, the stage of preparation for its construction is so important, which involves:
- Development detailed diagram masonry oven with or without stove.
- Determination of the installation site of the structure.
- Choice of materials.
- A selection of tools.
- Preparation of construction cost estimates.
In addition to the above activities, you need to determine the number of auxiliary workers, and perhaps they are not needed.

The final result of construction depends on how well the project of a house with stove heating is developed. Now you can not develop schemes - do-it-yourself furnace drawings, but purchase ready-made documentation. When choosing such a project, it is necessary to verify the reliability of the figures indicated in it, and it will not hurt to make sure that there is a step-by-step detailed description of the construction.
When choosing the location of the furnace, first of all, pay attention to the area of \u200b\u200bthe room and the design of the furnace. Since the process of laying out a brick oven in a country house or in a house has many nuances, experienced stove-makers advise novice craftsmen to build reduced models of future units.
Thanks to this, you can prepare for the upcoming laying and minimize errors and miscalculations. When are chosen complex structures stoves - laying stoves with your own hands for inexperienced craftsmen can be overwhelming. In this case, you should seek help from professionals.
Selection and purchase of building materials
Regardless of what type of furnace is to be built, the same materials are used - these are bricks, clay, sand. The main attention should be paid to the choice of bricks.
4 types of bricks for the construction of furnace units are offered for sale:
- manual molding;
- ceramic;
- refractory;
- silicate.

For lining the unit use ceramic products. It is advisable to purchase brick M-250 or M-500, which is more expensive, but more homogeneous than cheap products. It is able to withstand repeated heating-cooling cycles. Expensive brick has another advantage - excellent forming properties and decorative qualities.
Sand, when a brick stove for a summer residence or private household is built with your own hands, must be taken clean, without debris and various impurities, and therefore it must be sifted through a sieve.
Clay for furnace units is normal, skinny or oily. The proportions of mortar preparation and the bricklaying technology depend on which variety it is chosen. Stove makers prefer to use clay that has a normal fat content.
Instrument preparation
To fold the stove with your own hands in a country house or in a residential building, you will need different instruments: construction, measuring and auxiliary.
From building tools needed:
- for cutting bricks - grinder;
- for sifting sand - a metal sieve with a cell of no more than 2 millimeters;
- shovel;
- to seal the solution - jointing;
- for laying the mixture - combined kerma;
- perforator plus mixer nozzle to it;
- for cutting bricks - a hammer-pick.

You also need to prepare measuring tools:
- tape measure at least 5 meters long;
- to control verticality - plumb;
- a wooden stove ruler about a meter long;
- to check the evenness of laying - the rule (there can be no gaps between it and the wall);
- building and flexible levels.
To supporting tools include buckets, containers, etc.
Arrangement of the base for a brick oven
When we put the stove with our own hands, first of all, they provide a distance between the chimney and the roof covering, equal to at least 15 centimeters. Then you can start marking the foundation, which should exceed the parameters of the furnace structure in all directions by 15 centimeters.
It is better to form it when arranging a common house foundation. In order for the stove to serve for a long time, its foundation should not be connected with the foundation of the household. The point is that they natural shrinkage differs due to the different degree of loading.

First, the foundation pit is poured with concrete, and then the foundation for the furnace is built of bricks. Pre-install wooden formwork.
When the base is ready, its upper level should be 19 centimeters below the floor surface. The foundation is not built for the fireplace, but the load on the floor of the upper floors is calculated. The base will certainly be waterproofed using roofing material or roofing felt.
Brick oven for home
First of all, you need to study the drawings of the stove with your own hands made of bricks. Then they prepare the solution and lay the first row with a spatula and trowel. Often, novice home craftsmen are sure that they should not "spare" the solution. In fact, on the contrary - the thinner the layer, the stronger the brickwork will be.

The work is carried out as follows:
- With one hand hold the brick on weight.
- Applying light blows, make a mark of the place of the chip.
- Holding the brick in weight, perform its sharp and precise cutting into pieces according to the marked marks.
- When they build a wood-burning stove for a summer residence or at home with their own hands, the first row must be laid out impeccably. First, the outer row of bricks is laid, then the middle, and the seams are carefully filled with mortar, preventing the formation of voids.
- The initial rows are built from the whole material, while the vertical seams should not coincide. But then the bricks need to be cut. They are laid with the chopped side inside the structure array. This point is important in the construction of chimney channels and the firebox. The fact is that chips will be a place where soot accumulates, clogging the chimney.
Features of the construction of arches and vaults with their own hands
When arches and vaults are being built, they also use the drawings of a brick oven with their own hands for a summer residence or other structure. Bricks are laid according to the technology of gradual lapping, and at least two rows thick.
The thickness of such an overlap cannot be less than 2 rows. For the opening of the firebox, a “castle” layout or masonry using the “jumper” method is used - bricks are installed vertically on a metal corner. A metal product can be exchanged for a wooden frame.

For the construction of the pipe, silicate brick is used, which can withstand temperature extremes and precipitation. It is resistant to the acidic environment formed by the contact of smoke and water vapor. It is important that there are no bumps and chips in the chimney. When the furnace design is ready, after 2 - 3 weeks a control furnace is carried out.
Large and small do-it-yourself brick ovens in private homes are popular. But the main thing is to build the unit correctly so that it lasts for decades.
Despite the modern abundance of heating and kitchen equipment, many owners do not represent a private house without an oven - and this is absolutely correct. Even if it is planned to create an autonomous heating system, then the stove will also be useful. For example, in order to save money in the spring or autumn, when full-fledged heating is no longer needed, but you don’t want to breed excessive dampness in the house either. By heating the stove once a day or every two days, the rooms can maintain an optimal balance of humidity and heat.
Fold the oven with your own hands step-by-step instruction which has intricate configurations - for a beginner it will be quite difficult. Therefore, if there is no experience in the furnace business, then it is better to choose an affordable ordering option that will be easy to figure out.
When choosing a model, it is necessary to take into account not only the simplicity of the circuit, but also the heat transfer and functionality of the furnace, since there are furnaces that do not provide all the functions. Heat transfer is selected depending on the area that the heating structure should heat.
There are a lot of models of stoves, as experienced stove-makers, working on one of them, make their own adjustments to its design, and thanks to this, new and new options appear. heater. And to stop at one of the types of furnaces, you need to know what they are in terms of functionality.
Prices for fireclay bricks for laying furnaces
fireclay brick
Types of brick ovens
There are t Three main types are heating and cooking, cooking and simply heating without additional built-in elements.
- The heating and cooking stove can have not only hob, but an oven and a tank for warming water, as well as a drying niche. In addition, such a structure is able to heat one or two rooms of a certain area.

Such ovens are often built into the wall, turning the hob and firebox towards the kitchen, and the back wall towards living room. Thus, the stove performs a triple function - it works as a partition, food is cooked on it, and it provides dry heat to the bedroom or living room.
- work only for heating, and most often have a compact size. Such a stove is installed precisely in order to maintain a balance of moisture and heat in the house in autumn or spring, when it is too early to turn on heating system or have not turned on the central one yet.
It is good to install such an oven, for example, in the country, if there is a device on which you can cook food. If the power supply in the holiday village is often turned off, then it is better to choose a building with a hob for installation.
- The cooking version of the stove can also serve for heating, if you need to heat a small area. The device is perfect for country house or for a small building for permanent residence.
With such a stove and a supply of firewood, you can not worry that the house will be cold and damp, and the family will be left without dinner or hot tea when the electricity or gas is turned off.
It should be noted that any type of furnace can be compact or massive. The choice of the size of the furnace structure depends on the area of \u200b\u200bthe house or room, as well as the place that is allocated for construction.
Choosing a place to install the oven
When choosing a place for the construction of a furnace, it is necessary to provide for the nuances that are important not only for creating comfortable operating conditions, but also for reasons of fire safety. It is especially important to consider location stoves in an already built house, since the chimney should not stumble when it is erected on beams attic floor or at rafter legs roofs.
The stove is installed at the inner bearing wall, in the middle of the room or built into a wall located inside the house.
- It is not recommended to build a furnace near outer wall, as it will quickly cool down, and the effectiveness of its use will be significantly reduced.
- in the middle big room the oven is installed if it is necessary to divide the room into two zones. Moreover, with a beautiful decorative trim it will become a decoration of the house and can become one of the elements for the interior that will emphasize a certain style.
- When building a stove into a partition between rooms, it is imperative to provide for its isolation from combustible wall materials using heat-resistant asbestos sheets or special drywall.
- The space allocated for the stove should be 120 ÷ 150 mm larger than its base in each direction, since the perimeter of the foundation always slightly exceeds the size of the stove.
- In order to make it easier to determine the size, you need to choose a model to which the ordering scheme is attached.
When the model is selected and the installation site is determined, you can proceed to the acquisition of materials and preparation of all necessary tools. The quantity and range of materials for each of the models is selected individually, but the tools used in masonry are always the same.
Tools to get the job done
For the process of building a furnace, you will need the following fixtures and tools:

A) A pickaxe is used for hewing and splitting bricks.
B) The furnace hammer has the same functions as the pick, but, in addition, it is convenient for them to remove the dried mortar that has protruded beyond the masonry.
C) The rule is used to level the concrete on the foundation surface. Often it is made independently from a perfectly flat planed board.
D) A wooden spatula is used for grinding and mixing the clay solution.
D) Level - essential tool, as it will help to maintain the evenness of the rows, both in the horizontal and vertical direction.
E) A brush of bast is used to remove sand and hardened mortar from the internal surfaces of the furnace.
G) Pliers are used to cut off and bend steel wire when installing and fixing cast iron structural elements.
H) Lead scriber is used for marking when decorating the stove with tiles.
I) Stukalce - a piece of pipe used to fit tiles.
K) Scriber-rod for markings.
K) The rasp is used to grind lumps and remove sagging on the finished masonry.
M) The construction angle is necessary to remove the internal and outside corners 90 degrees.
H) A plumb bob is used to check the verticality of the walls.
A) A rubber mallet is used for tapping bricks laid in a row.
P) A chisel is needed for parsing old masonry and cracking bricks.
P) Trowels or trowels are used to remove excess mortar and apply it to the rows of bricks during masonry.
C) Jointing will be needed if the stove is not lined finishing material, and the seams between the rows will be neatly shaped.
In addition, you will need two containers for mortar and water, as well as a sieve for sand, if the solution is made independently.

The laying of the upper rows will be easier if there are "goats"
For the convenience of carrying out work, you need to have scaffolds, which are called “goats” in another way. It is convenient to stand on them, carrying out masonry at a height, especially since the size of the working platform provides a place for installing a container with a solution.
Arrangement of the foundation for the furnace
- The foundation for the furnace is usually laid together with the general foundation for the entire structure, but they should not be interconnected, since one of them may damage the other if deformed or shrinkage.
- If the furnace will be built in an already built on a belt or column foundation house that has wooden floor, then you will have to open the coating and build the base for the furnace from the ground.
- If chosen compact model stoves, and a slab foundation is arranged under the house, then the heating structure can be erected directly on itby making a waterproofing gasket.

If the foundation sun still, you will have to equip it from scratch, you need to remember that it must have the same shape as the base of the furnace, but protrude beyond it by 120 ÷ 150 mm in each direction.
- on wooden semi marked out the contour of the foundation, a part of the boardwalk is sawn according to the markings.
- Further, a foundation pit is being dug in the ground of the underground right size, with a depth of 450÷500 mm.
- The soil at the bottom of the pit is well compacted, and a sand bed is made on it, which is moistened with water and also compacted to a thickness of 80 ÷ 100 mm.

Pit under the furnace foundation with a sand and gravel "cushion"
- After that, roofing material can be laid around the perimeter of the pit, which will perform the function of waterproofing and formwork, if it is temporarily reinforced with boards or bricks. After curing concrete mortar the formwork is removed from the foundation.
Instead of roofing felt, formwork made of boards covered from the inside with a polyethylene sheet can be used.
It should be noted right away that it is better if the concrete base for the furnace rises 70 ÷ 100 mm above the floor. In this way, bricks can be saved and the joining of the floor surface and the side walls of the foundation can be simplified.
- A layer of crushed stone of the same thickness is poured on top of the sand and is also well compacted.
- The next step at the bottom of the pit is installed reinforcing gratemade of metal wire or finished mesh. The elements of the lattice are interconnected by means of a twist of wire.

Foundation reinforcement - option
- The first layer of mortar is poured into the prepared pit. It may consist of gravel, sand and cement— 1:2:1 or gravel and cement 3:1. This layer should take up approximately ⅓ of the space to be filled.
- After pouring the first layer, immediately knead and pour the second, consisting of sand and cement in proportions of 3: 1.
The second layer is poured to such a height that 50 mm remain to the top, which will be required for the upper leveling layer of the foundation.
If necessary, for the top layer of concrete, the formwork can be expanded, and then laid on top of the poured mortar reinforcing mesh having cells of 70÷80 mm.

- Then the last one is poured upper layer solution and leveled using the rule.
The foundation is left for the maturation of concrete for 27÷30 days. It is advisable to moisten it daily with water and then cover it with plastic wrap - this will help make the concrete more monolithic and durable.

On the finished foundation, after removing the formwork, two or three layers of roofing material are laid, which will protect the brickwork of the furnace from capillary moisture coming from the ground or from the underground.
After that, you can proceed to the main work - laying the furnace.
A few recommendations for masonry work
- Before starting laying bricks on the mortar, the whole structure rises dry from the brick, but each of the rows must be laid out strictly in accordance with the ordering scheme.
Experienced stove-makers advise dry pre-laying to all craftsmen who take up the construction of a stove for the first time. This event is necessary in order to understand the location of all internal channels and not to commit blunders when fitting bricks in each of the rows.
For laying dry, you need to stock up wooden slats, which will determine the thickness of the seam between the bricks. Usually their thickness is 5-7 mm. The same rail will need to be used for the main masonry, already carried out with a solution. Such a "calibration" of the thickness of the seam is especially necessary if the laying is done "for jointing", and must be flawless.
This process is carried out slowly, thoughtfully, since it is very important to understand how the smoke will be removed from the furnace, and how it will enter the chimney.
- Having lifted the structure dry before laying the pipe, it is carefully dismantled. If at the same time the bricks were adjusted to size, then each row can be folded into a separate pile by marking the number of the row and the place in it on the bricks with a marker.
- Performing the main masonry, each of the rows is also first laid out dry, and then, after carefully fitting all the details, it is mounted on the mortar.
- When the main masonry is done, two measuring rails are laid on the edges of the previous row to maintain the exact thickness of the seam. Then the solution is applied with a layer of 10 ÷ 12 mm. A brick is laid on top of the mortar, pressed, and, if necessary, tapped rubber mallet until the brick rests on the measuring rail. The excess protruding solution is selected with a trowel.

- The slats are pulled out of the masonry after the installation of the third ÷ fourth row above them, and then used again. Therefore, you need to prepare several pairs of these auxiliary elements.
- After pulling out the slats, the seams are carefully filled with mortar and immediately “embroidered”.
- When laying on the mortar, each of the rows is checked using the building level for compliance with the horizontal and vertical planes.
Compliance with these nuances will help simplify the process of building any furnace, avoid "fatal" errors that may lead to the need to redo all the work.
Heating and cooking oven with a drying chamber designed by Yu. Proskurin
As mentioned above, there is a large number of different models ovens. In this publication, one of the compact and functional options, which can be set to small house, as it does not take up much space, but is able to heat a room with an area of 16 ÷ 17 m².
Yu. Proskurin's furnace design is a double-turn heating and cooking version equipped with a single-burner stove and a drying chamber designed for drying vegetables and fruits, medicinal herbs, mushrooms, etc.
If desired, a box can be installed in the niche of the drying chamber oven suitable size.
The furnace has dimensions (excluding the height of the chimney) 750 × 630 × 2070 mm. Its heat transfer is 1700 kcal/h. The design provides for two operating modes - summer and winter, which is very important both for fuel economy and for the ability to heat the stove and cook food, without melting all constructions in the summer.
List of required materials
In order to build such a heating structure, you will need the following materials:
| Name of materials and elements | Quantity (piece) | Element dimensions (mm) |
|---|---|---|
| Red brick M-200 (excluding pipe laying) | 281 to 285 | - |
| Fireclay bricks refractory grade Sh-8 | 82-85 | - |
| Furnace door | 1 | 210×250 |
| Doors for cleaning channels | 2 | 140×140 |
| Blower door | 1 | 140×250 |
| Summer damper for chimney | 1 | 130×130 |
| Firebox valve | 1 | 130×130 |
| Stove valve | 1 | 130×130 |
| grate | 1 | 200×300 |
| Single burner hob | 1 | 410×340 |
| steel strip | 1 | 40×260×5 |
| 1 | 40×350×5 | |
| 1 | 40×360×5 | |
| steel corner | 1 | 40×40×635 |
| 3 | 40×40×510 | |
| 4 | 40×40×350 | |
| roofing iron | 1 | 380×310 |
| Pre-furnace metal sheet | 1 | 500×700 |
In addition, clay, sand, cement, crushed stone, gravel, marl and an oven box are required for work, if decided, install an oven instead of a drying niche.
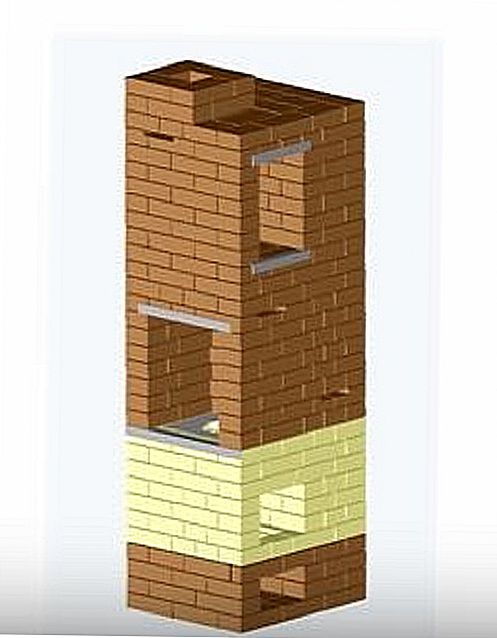
Scheme-ordering the construction of a furnace designed by Yu. Proskurin
| Illustration | Brief description of the operation to be performed |
|---|---|
 | The first row is laid out in a continuous plane, observing the location of the bricks. It is very important to lay this row perfectly evenly in all respects, since the quality of the masonry of the entire structure will depend on it. |
 | In the second row, a blower (ash) chamber and the base of two vertical channels are formed. On the same row, the doors of the blower and cleaning chambers are installed. |
 | On the metal doors there are special ears, into which pieces of steel wire are threaded and twisted - they will then be embedded in the seams between the bricks. Temporarily, until they are completely fixed, the doors are supported by bricks on one or both sides. |
 | On the third row, the formation of the blower chamber and the lower part of the chamber of vertical channels continues. At the same time, there is a fixing on both sides of the installed doors. |
 | On the fourth row, the doors of the blower and cleaning chambers are completely covered with bricks. The common chamber of the vertical channels is divided in two, so instead of one large hole, two are formed, having a length of ⅔ of a brick and a width of half a brick. |
 | The fifth row is fully laid out with fireclay bricks. A hole is formed above the ash chamber with seat for grate. To do this, a part of the brick is cut out, from the side with which it should be turned to the hole above the blower chamber. |
 | The grate is mounted on the same row. It is planted on a clay solution or laid freely, without a solution. There should be a distance of 4-5 mm between it and the brick. |
 | On the sixth row, the formation of the combustion chamber and vertical channels continues. |
 | In addition, a furnace door is installed on the same row, the frame of which must be wrapped or overlaid with asbestos before installation, which, when the metal is heated, will allow it to expand without stress and damage. |
 | The seventh and eighth rows are laid out according to the order, the formation of the firebox and vertical channels continues on them. |
 | On the ninth row, the furnace door is covered with bricks. Moreover, in order to remove the load from the ceiling from the door, the side and third bricks from the edge are ground off on one side, and a brick is installed between them, hewn on both sides. |
 | On the tenth row, the fuel chamber and the first vertical channel are combined - this is done so that hot smoke from the furnace is directed precisely into this created hole. For a smooth flow of smoke, the protruding corner of the solid brick enclosing the second vertical channel is cut off. |
 | On the eleventh row, the masonry follows the scheme, except that cutouts are made on the edges of the bricks framing the combustion chamber, which will form a recess for mounting a single-burner hob. |
 | Then, on the same row, asbestos strips are laid on the cuts made on the bricks, and the slab panel is mounted on them. From the side of the formation of the cooking niche, a steel corner is installed. |
 | The 12th row is laid out from red brick, and in the future all the masonry comes from it. Two vertical channels are again formed, and a niche is being formed around the hob. |
 | The 13th row is laid according to the scheme, but in the front of the first vertical channel a place is formed for installing the summer-winter valve. After that, a valve is mounted on a clay-sand mortar. |
 | From the 14th to the 17th row, the laying is carried out according to the same principle - a cooking niche and channels are formed. |
 | On the 18th row steel corners there is an overlap of the cooking niche. One of them is mounted on the edge of the niche, the second - at a distance of a brick from the first, and the third is pressed against the second with the back side. This is done in order to make it convenient to carry out the laying of the next row. |
 | On the 19th row, the cooking niche is completely covered, with the exception of the formation of an opening for the steam exhaust channel and a place for installing a valve. To do this, cutouts are made on the bricks into which the valve is mounted. |
 | 20 row is laid out according to the scheme. The formation of two vertical channels and a steam exhaust hole continues on it. Moreover, if you look closely, you can see that one of the bricks forming the first vertical channel is cramped. |
 | On the 21st row, the first vertical channel and the steam exhaust channel are combined with the help of the hollow space left. In this row, almost all bricks are placed only along the walls of the perimeter of the structure. Only the second vertical channel is protected. |
 | In the same row, the resulting cavity is covered with metal strips, which are laid according to the scheme shown in the figure. |
 | Further, a sheet of roofing iron is laid on the steel strips, with the help of which a chimney hole is organized, located on the opposite side from the steam exhaust hole. |
 | On the 22nd row, laying is done on top of the roofing sheet. A hole for the chimney and two holes for vertical channels are left. In the place where the drying niche will be formed, a piece of a corner is laid, which will protect the brick on the edge of the chamber from damage and make the edge of the niche more accurate. |
 | 23 row - formed drying chamber, and its back wall is made of brick, installed on its side. It will isolate the chamber from the opening of the chimney channel. |
 | On the 24th row, the walls of the drying chamber, the chimney and two vertical channels are formed. |
 | 25 row - work continues according to the scheme. Second brick rear wall The camera is installed in the same way as the first one. |
 | On the 26th row, preparations are underway to combine two vertical channels, so the inner bricks in both holes are grinded at a slight angle. |
 | 27 row - the first and second channels are combined with masonry. For them, a common cleaning door is installed. The rest of the work goes according to the scheme. |
 | On the 28th row, the drying chamber is covered with three pieces of corners according to the same principle as the overlapping of the cooking niche was done. The vertical channels are combined into one wide one, and the cleaning door is fixed with side bricks. |
 | On the 29th row, the drying chamber and vertical channels are completely blocked. A hole in the chimney channel is left, which is lined with bricks with cut out mounting grooves for the chimney valve. After laying the row, a frame with a valve is installed on the clay-sand mortar. |
 | On the 30th row, the entire surface of the furnace is completely covered. Only the chimney hole is left, which should be half a brick in size. |
 | 31-32 row - the formation of the chimney begins. |
This figure shows the oven in section. The diagram clearly shows all the internal channels through which heated air will circulate.
Do-it-yourself brickwork for heating a house and a summer residenceTo build a stove for a brick house with your own hands is quite within the power of even a novice bricklayer. Due to the abundance and availability of information, it is enough just to choose the appropriate design with order and detailed description all stages of work, be patient and do the masonry carefully and carefully. Let us consider in detail how to build a brick oven with your own hands.
The furnace starts from the foundation
Even a small do-it-yourself brick oven laid out in a country house or in a bathhouse weighs more than a ton. Therefore, you need to put it not on the floor, but on your own foundation.
The upper cut of the foundation coincides with the level of the subfloor. Need to pay Special attention in order to upper plane was perfectly horizontal. This will avoid skewing the masonry and greatly simplify the work of the stove-setter.
Two layers of roofing material, glassine or a durable building film are laid on the foundation for waterproofing. Laid on top of the waterproofing steel sheet and a layer of heat insulator (so that heat does not go into the foundation). On all this "pie" for the future brick oven, bricks of the first layer of masonry are laid with their own hands.
Preparation of mortar for oven masonry
Unlike an ordinary wall, a do-it-yourself brick stove is built not on cement, but on clay-sand mortar. Compositions of solutions for fireclay and ceramic brick differ considerably.
The solution for fireclay bricks is prepared on the basis of white kaolin or fireclay marl. Minerals are characterized by high refractoriness and withstand temperatures above 1500 degrees. Dry masonry mixture for the preparation of refractory masonry mortar is usually purchased in retail chains.
The mortar for ceramic bricks is prepared on the basis of ordinary clay, which can be found in your area. Clay for ovens is also sold in many building supermarkets.
For 100 pcs. brick will need about 40 kg of clay. The proportions of clay and sand are determined by trial batches. This is done as follows:
- Clay is soaked for a day in cold water.
- The batch is divided into 5 parts and a quarter, half, three quarters or an equal weight part of sand is added to each, respectively.
- All the resulting samples are kneaded again until completely homogeneous and allowed to stand for 3-4 hours to remove excess moisture.
We test samples:
- roll them into sausages 1-1.5 cm thick and wrap around any round object with a diameter of 5 cm.
- In the case when cracks of more than 2 mm have formed on the sample, the solution is not suitable.
- With a crack depth of up to 2 mm, the solution is suitable for those parts of the furnace where the heating temperature does not exceed 300 degrees.
- If the surface of the sample is not cracked or covered with a fine mesh, such a solution is quite suitable for making a do-it-yourself oven.
Since the cost of sand is much lower than the cost of good kiln clay, the essence of the samples is to determine the maximum possible proportion of filler in the solution.
Do-it-yourself brick oven for home video
Brick laying technology
The scheme of the furnace provided below is distinguished by its simplicity and very high availability of repetition at a high percentage successful result. A do-it-yourself brick oven is small and suitable as a heat source for one room or a small garden house. The area allotted for the furnace is only 0.4 square meters. m. A very small amount of brick is used for construction, so it has a very small weight.
The laying of the furnace begins with the first row. To ensure perfect horizontal plane under the brick, you can pour a thin layer of washed river or mountain sand. Sand will smooth out the difference in the thickness of the bricks, and at the same time will act as an additional heat insulator.
The basics of choosing a building material
The thickness of the mortar between the bricks should be 2-3 mm. A thicker seam quickly crumbles. For masonry, you need to choose the most even bricks with the same size- as irregularities cannot be compensated with mortar!
On the second row, we install the blower door. To compensate for thermal expansion, it is wrapped around the perimeter with an asbestos cord. The door is fastened with steel wire fixed in the masonry. So that the wire does not interfere, grooves are cut out in the brick with a grinder under it.
The third row is laid out already from fireclay bricks. Grid-irons are placed on it after the clay has set.
The laying of the furnaces of the fourth row is laid on edge. If the grate does not fit into the free space, the brick must be cut in place, providing gaps of 3 mm on all sides.
When laying a brick oven, it is important to know!
The rear "knock-out" brick is placed without mortar. It is needed to clean the channels.
On the fifth row, similarly to the blower, a furnace door is installed. The fifth row is laid out flat, and these protruding bricks play the role of an external heat exchanger.
The seventh - ninth rows are laid out flat again. Cast iron is laid over the ninth row. hob. Asbestos or fiberglass cord is also used for laying between metal and brick.
Application of cord for sealing masonry
Without sealing cord smoke will enter the room, and the clay solution will quickly crumble from the thermal expansion of the cast-iron plate.
The last three rows form a place for installing a light chimney. On the penultimate row, a metal valve is installed. It should also be separated from the stone with an asbestos cord.
After complete drying of the masonry, the "knock-out" brick is pulled out and removed from the channel construction garbage. So that the sand from under the stove does not spill out, a plinth is nailed along its perimeter.
Brick ovens for giving video
Choosing pipes for the chimney
Any metal or asbestos-cement pipe with a channel of about 200 square meters will serve as a chimney for this stove. cm, which corresponds to 11.5 cm of diameter for round section. The height of the upper edge of the pipe above the level of the grate of the combustion chamber is at least 4 m. The height of the part protruding above the roof is at least half a meter. If the stove smokes during the first starts, the pipe can be extended by 25-50 cm.
Finishing a brick oven
Do-it-yourself ready-made laying of the furnace is whitewashed on the outside with a simple chalk whitewash or thin plaster. Fatty milk can be added to the water as a binder. And ordinary blue will help prevent the appearance of yellowness.
If you decide how to fold a higher-level furnace, choose one of the available upgrade options:
- wrapping decorative facade brick or stove tiles;
- outer metal screen;
- decorative stitching or painting of seams with heat-resistant paint.
Laying with bricks and tiles should be foreseen in advance, since during the construction process, the outer elements are tied with masonry. This work requires great experience and it is better to entrust it to professional stove-makers. It is better to install a metal screen not close, but at some distance from the furnace body. Then it will play the role of an air convector, which will significantly increase the rate of heating the room.
Outcome
Knowing how to build a stove in a house with your own hands, you can provide affordable heating any small space. The experience gained during the first construction will become the basis for further improvement of this sought-after skill.
This article contains an understandable, very detailed photo instruction for laying a brick oven with your own hands, tips on how not to make a mistake when choosing the necessary materials and how to properly place the stove in a private house for optimal heating of a larger area.
Options for installing a stove in the house
The placement of the stove depends entirely on what exactly the owners expect from it. If it is installed in the house small area and will be used as a fireplace for friendly gatherings, you can use the first scheme. Such a stove is a good option for barbecue on the grill or shish kebabs.
Options for placing a brick oven
The second scheme is for a solid quadrature house. AT this case the front side of the fireplace stove opens into the living room, the stove walls heat both bedrooms, and the heat in the remaining rooms is maintained by heat exchange.
The third scheme with a stove for heating and cooking is a budget housing option for a bachelor or a small family. Pluses - a warm couch and the possibility of placing a dryer in the hallway.
Important: it is worth taking care of external insulation at home, because it greatly increases the efficiency of stove heating.
Selection of bricks, sand, mortar
In order for the oven to serve for a long time, you need to correctly select all the materials. Bricks are of three types:
- Ceramic - can be used to build a furnace.
- Silicate - not suitable at all in this case, even double M150.
- Refractory - ideal, but they are more often covered only with a firebox and fireplaces, varieties: fireclay, refractory bricks, etc.

Tip: when choosing a brick for the stove, you need to completely abandon its hollow types.
The solution is made from clay. Red clay is suitable if the stove is made of red brick; when using fireclay, special fireclay clay is required. Some stove-setters still make their own solution from river sand with a grain of 1-1.5 mm, clay (in a ratio of 2.5: 1) and water in the old fashioned way. It is advisable to use an angular quarry sand without foreign inclusions and the so-called greasy clay. However, it is easier and more reliable to buy ready-made oven mixture in the store, having prepared it according to the instructions.
From the fittings, you need to purchase grates, blower and furnace doors, soot cleaners, valves or dampers.
Preparation, list of tools
Before starting work, you need to determine and mark out the place that the new stove will take.
The chimney pipe must be no closer than 15 cm from the roof rafters.
If you are laying for the first time, professional stove-makers advise you to practice in advance by making a model of the future furnace from the prepared brick. Naturally, without solution. It minimizes possible risks in real laying, allowing you to learn from your mistakes, which can still be corrected in the layout.
The furnace foundation requires preliminary waterproofing, in area it must exceed the area of \u200b\u200bthe stove.
During the laying of a new row, it is necessary to control the absolute verticality of the walls.

For the construction of a brick oven, the following tools are needed:
- plumb;
- trowel;
- roulette;
- putty knife;
- Bulgarian;
- knitting wire;
- building level;
- metal strips, corners;
- containers for cement and clay mortar.
Step-by-step instructions with a photo for laying the stove
Different stove-makers have their own masonry technologies and their own secrets that have come with years of experience. Here is information about enough easy way creating a fireplace stove for heating two-story house, the process will not seem extremely difficult even for beginner stove-makers.
Foundation masonry
Base row brickwork will serve as the foundation. It is carried out with any brick, some stove-makers even fill this level with rubble.

When laying the base row, cement mortar is used.

The foundation is completely filled with mortar, the layer is leveled.

The erection of the furnace body
The first oven row is marked. The horizontal, from which they repel when marking, is the wall of the room.

Where the fireplace is planned to be placed, a grate is placed. From this row, the bricks are already laid on the furnace mortar.

An important stage of work is the scrupulous alignment of each new row by level.

Second row laying. The stove wall closest to the wall of the room is reinforced with an additional brick to increase fire safety.
The place where it will be located in the 2nd row remains empty, the rest of the furnace is completely laid. A door is mounted through which the owners will clean out the ashes.

The door is installed on the solution, leveled. For a more reliable fixation, it is fixed with a wire that must be laid between the bricks.


The lattice is laid not on a simple, but on refractory brick. In order for it to lie on the same level as the bricks, holes are cut out in fireclay bricks.

The size of the brick is easily adjusted - the excess is measured and carefully cut off.

The large door is mounted next to the installed grate.

The large oven door is similarly fixed with wire fasteners.

The first furnace row is placed exactly above the fireplace, it is strengthened metal corners and strip or thick tin. So that the masonry can lie on them, it is cut with a grinder, then the slots are brought manually to the desired size.

The next brick row is laid.

On refractory bricks on a par with brick row the fireplace grate is laid.

The door is fixed, the brick is strictly adjusted to it.

The firebox of the new stove with a fireplace is ready.

Fire-resistant fireclay bricks are placed over the furnace furnace.

The body of the stove is built.
Creating a chimney
The place left under the chimney is divided into wells. The design requires reinforcement with metal plates.

fit brick wells chimney.

Soot cleaners are mounted above the furnace roof.

The wells are again divided, the first rows of walls should be reinforced with strips of metal.

After strengthening, the ceiling of the furnace body is erected. The space related to the chimney remains empty.

The cornice of the body is laid out, then the chimneys are laid.

The final stage of work on the first floor. The stove is located at the bottom left, the smoke inside the chimneys moves in a spiral and exits at the top left. The final separation of the wells is closed with a tin sheet. In order to compensate for the pressure inside the fireplace stove, 2 brick rows are laid on the tin.

Two chimneys stretch to the second floor of the house - from the fireplace and the stove itself, they are separated from each other. Each chimney requires a separate damper.

Floor level of the second floor. Waterproofing is mounted here, the chimney is again reinforced with metal corners. In order to save money and not build a heating stove on the second floor, the chimney of the stove under construction is again divided. The smoke will go through it like a snake, having time to warm up the room. In order for the chimney to warm up much faster, it is laid in the area of \u200b\u200bthe second floor with a thickness of 1/4 or 1/2 bricks.

A hole for the stove chimney is carefully sawn out in the roof.

Before bringing the chimney to the roof, it is reinforced with metal corners.

If the chimney is located in close proximity to the roof ridge, it must be laid out above the ridge by at least 0.5 meters. If further, then the height of the chimney is allowed, equal to the height of the ridge, but not lower. In this case, the wind increases the stove draft, lifting the smoke up.

Even a small oven in the house is a cosiness and comfort. Larger stoves require more skill and additional materials, however, the principle of their construction is similar to the above method.


 in the near future - forecasts and expert opinions")


 in the near future - forecasts and expert opinions")


