Learn how to quickly turn a cardboard box into a fake fireplace, make it out of plywood, drywall. How to sew New Year's socks to decorate the portal with them.
Do-it-yourself artificial fireplace from boxes

Pressed paper containers will help create a home that will cost almost nothing.
For this you will need:
- 10 identical cardboard boxes;
- scotch;
- glue;
- White paper;
- polystyrene, paper, paints or self-adhesive film with a "brick" pattern.
Next 4 other boxes arrange in the same way. The resulting 2 fireplace portal posts you need to connect with a cross element from the boxes at the top with adhesive tape. She will also help to wrap the workpiece with paper.
Facing an artificial fireplace can be done in several ways. Cut rectangular sheets of thick paper, cover them with red paint. When it dries, glue it to the front of the fireplace.
You can cut and decorate foam sheets in the same way. If you have a self-adhesive film on the farm, use it.
Put candles in the fireplace niche (taking fire safety precautions) and see how cozy your home will become. With a garland in the hearth, artificial fireplaces look mysterious and romantic.
If you bought a plasma, don't throw away the box. It also makes stylish fireplaces that look great! From such a container with a sharp construction knife, you need to cut off the bottom and make a horizontal cut in the center on the front panel, stepping back 20 cm from above.
Tuck one and the other side of the sidewall inward, fix them with glue. If you don't have a solid box, but you do have sheets of cardboard, use those.
Now it's time to decorate the fake fireplace to make it look like a real one. Glue the styrofoam stucco elements. You can use a white rubber-based sealant. Squeezing a small stream from a tube in a construction gun, feel like real sculptors.
It is better to apply all sorts of curls to a file or a transparent film, under which lies a drawing of the elements, but you can also immediately onto the fireplace portal. It is even easier to draw them with a marker or pencil directly on the cardboard surface. Of course, if there is no adhesive tape on it, extraneous images.
And here is another imitation of a fireplace, which can also be made from cardboard. For such a symbol of the hearth, you will need:
- a rectangular box, for example, from under a flat-panel TV;
- ruler;
- plywood sheet;
- cardboard;
- PVA glue;
- white and gold paint;
- drawing paper;
- polystyrene foam and skirting boards from this material;
- masking tape;
- special adhesive for PVC.
Cut out a rectangular element from cardboard, put it horizontally into the firebox. Cut out a tabletop from a sheet of plywood. If you do not have this material, cut it out of thick cardboard.
Cover it with white paper. Decorate with foam skirting boards. From the same material, cut out several rectangular elements, glue them on a false fireplace. Decorate the hearth with gold paint, let it decorate the room.
How to make an artificial plywood portal

If you want to make a durable thing, then take denser materials. The drawing will help you make the exact details. For work, take:
- plywood;
- bars;
- self-tapping screws;
- hacksaw;
- screwdriver or screwdriver.
This, the second part of the portal, will be located against the wall. It is almost the same as the first one, but 2 vertical bars are nailed on top. Now attach the inner sheets of plywood, then the outer ones. You can decorate a false fireplace or leave it that way.
Installation of an artificial hearth made of drywall

A plasterboard fireplace looks very stylish. To make it, you need the following materials: drywall, fasteners, drywall profile, paint, finishing materials, putty.
And these tools will help you make a stylish drywall fireplace.
- screwdriver;
- aluminum profile;
- metal scissors;
- perforator;
- plumb;
- level;
- putty knife;
- pencil;
- ruler;
- brush.
There are markings on the wall, attach an aluminum profile here. It will play the role of a supporting structure. Based on the dimensions of the drawing, attach the frame to the wall with anchors, and then the protruding elements. Sheathe the frame with plasterboard sheets.
Now you can start finishing. Before painting, it is necessary to carefully putty the artificial fireplace, let this layer dry, prime, and after a while apply the finishing putty. You also need to go through it with a primer.
Now it's time to apply acrylic or water-based paint. Finishing the fireplace may be different. If you want to glue artificial stone or tiles on the portal, then the design must have sufficient rigidity.
The hearth looks beautiful, which is decorated with Venetian plaster, putty is applied using a special technology so that this material looks like granite, wood or crocodile skin.
You can use this portal as an artificial fireplace by putting light bulbs or decorative firewood in the hearth. The latter is easy to do yourself. Take a thick branch or a thin tree trunk. Saw it on firewood 22-25 cm long. Paint their ends. To do this, you can use not one, but several shades.
If you reliably isolate the inner surface of the portal with a heat-insulating material, you can install an electric fireplace panel inside it. Then the hearth will not only decorate, but also heat the room.
Such fireplaces can be decorated with boots, which are hung up for the New Year and gifts are placed in them. If you want a holiday atmosphere to reign not only in winter, but also at other times, you can leave this fireplace decor element on it.
What socks to sew for a fireplace

You can hang these socks on the fireplace portal. If you bought ready-made boots for gifts, you can decorate them yourself by sticking a wavy white braid or, for example, sewing on buttons, brooches.
If you want to sew socks with your own hands, then you can stop at a very interesting option. Such New Year's boots are created from ribbons on the front side and lining.
Enlarge the drawing of the boot and redraw it on a piece of paper. Then attach the pattern to the plain fabric folded in half, cut it out. This is a lining.
For the front side, sew the ribbons into a single fabric. Fold it in half, attach it to the pattern, cut along its borders. Now sew 2 boots - from ribbons and plain fabric. This white sock must be inserted into the colored one so that the seams are inside.
Tuck the sock on top, bending this edge inward, hem, sew a loop of thread, for which you will hang the sock on the fireplace portal. It can be decorated with a boot, where the name of the child will be written. Then all the children will know exactly where his gift lies.
To make such a thing with your own hands, take:
- plain canvas;
- crayon;
- fabric application;
- synthetic winterizer;
- scissors;
- wide braid.
If you have a thick fabric such as felt, then use only that. If the canvas is thin, sew the boot from the lining fabric separately, stitch it inside the main one.
Write the child's name first in chalk, and then with contour paints. You can also decorate a fireplace with such a garland of socks. To do this, you first need to sew a few boots, then sew a ribbon or rope to them.
To do this, sew a loop to each, then combine the socks. Put sweets for children inside and hang on the fireplace portal. Here's how to make it from simple materials and decorate it for the New Year or another day with gift boots.
The fireplace has always been a symbol of the hearth. Many cultures around the world have myths, legends and rituals associated with this item. But if there is no way to build a real one, then there is nothing left but to make a false fireplace with your own hands. This option is also suitable for city residents who, in the conditions of an apartment, cannot afford the construction of this facility.
The role of the fireplace in interior design
In a city apartment, conditions do not allow installing a fireplace. In addition, its construction is a rather laborious and costly process, so not every owner of a private house is able to build a fireplace. But there is an easier option - imitation.
It is possible to make a false fireplace with your own hands, without having special skills and means. Of course, you can also offer the purchase of a finished fireplace, for example, a decorative imitation powered by electricity or with heating elements. However, these devices are quite expensive. Making your own has several benefits:
- Firstly, it allows you to save the family budget. Since consumables do not require significant investments and are available to everyone.
- Secondly, in this case, it becomes possible to create a unique piece of furniture that will fully meet the needs and desires of the owner.
- Thirdly, things created by one's own hands carry a special energy of warmth and love that will surround all household members and guests of the house.
False fireplaces can perform various functions. The main task of the object is decoration. However, such structures can also mask heating radiators, in addition, they can be an artificial source of heat or frame other interior elements. In any case, a false fireplace is a multifunctional object.
Structure classification
Each room has its own characteristics, so it is worthwhile to analyze the possibilities of building a structure taking them into account. Depending on the purpose and method of construction, fireplace imitations are classified:
- Reliable imitations are designs that completely copy the original. In this case, not only the external signs of the fireplace are imitated, but also the basic principles of the object. For example, you can make a brick or drywall fireplace with a stone finish, and place a heating element inside. Such a composition will provide a complete imitation of the hearth. This is a rather expensive method, but the result is worth it.
- The conditional fireplace is a lightweight structure protruding from the wall. The building can be decorated to your liking. Usually, candles are placed in the firebox hole or filled with decorative elements, such as firewood or large crystals of Himalayan salt.
- The symbolic false object is performed arbitrarily, using any materials at hand. It can be a drawing or a mural on the wall in the form of a hearth, or a lightweight construction made of cardboard or foam.
The choice of type depends on the interior, budget and preferences of the owner. The available space in the room also plays an important role.
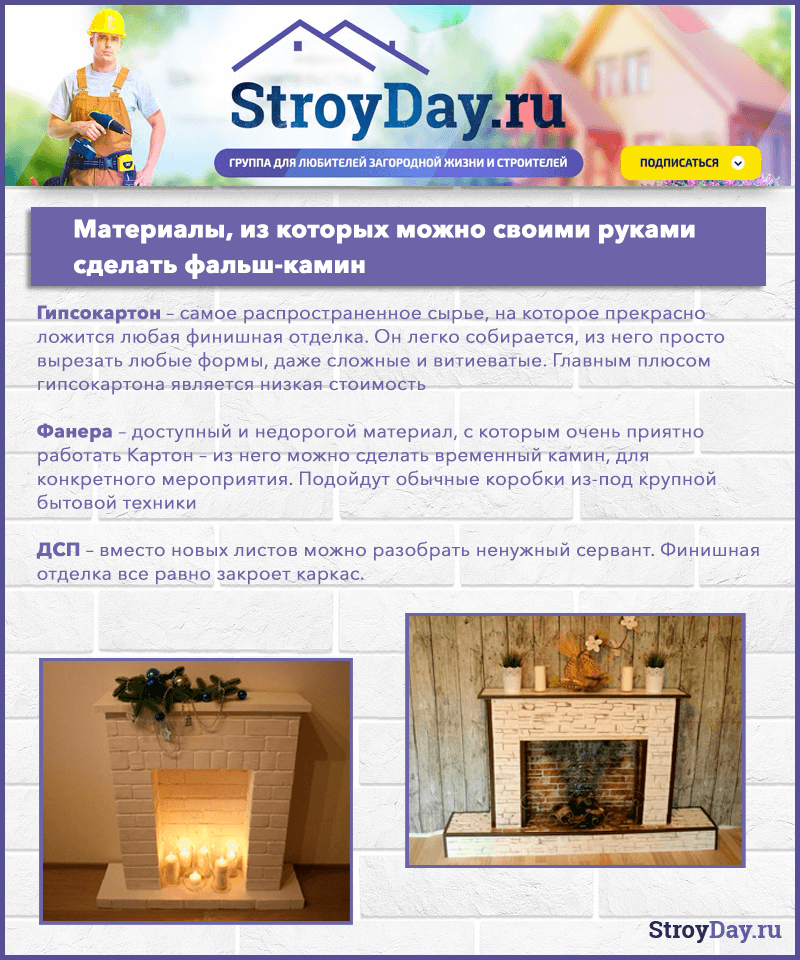
Materials used
At the beginning of work, people usually think about what a fireplace can be made of. In fact, everything is simple. False fireplaces are made from simple materials. Which are distinguished by low cost, and in some cases, are waiting for their fate on the balcony or in the closet. Materials used in the manufacture of an artificial hearth:

Materials that have served their purpose can also go into action. For example, you can use old furniture as an object frame or old appliances (TV, washing machine). Competent decoration will breathe a second life into things gathering dust in a change house.
Imitation polyurethane
This is a simple method that does not require investment and labor. To do this, you need to purchase a ready-made portal for a polyurethane fireplace in a hardware store. In this case, it is worth taking seriously the choice of an object that should match the style of the room and have an appropriate size. An electric fireplace can be mounted in a polyurethane structure. However, it is worth taking care of the quality of ventilation and safe connection to the electrical network in advance. The moment of correspondence between the electric fireplace and the portal opening is important.
Otherwise, when making such an imitation, difficulties should not arise.. For the construction you will need materials:
- Ready portal made of polyurethane;
- Glue;
- putty;
- Finishing materials (decorative stone or brick, tiles).
After all the materials have been prepared, you can proceed directly to the manufacture of a polyurethane fireplace imitation. This process is pretty simple.:
- First of all, you need to choose a place for installation. The best option would be the side wall of the room. The fireplace should be located so that it does not interfere with the passage and does not clutter up the room.
- If the hearth is equipped with an electric heating element, lighting, then you need to take care of the presence of wiring or sockets in the immediate vicinity of the object.
- The frame is made of wooden or aluminum carriers, the walls are made of light and dense material (plywood or drywall).
- The polyurethane portal is installed in the frame hole and fixed with contact adhesive. The gaps are carefully puttied.
- The last step is decoration. Finishing with artificial stone or tiles is carried out according to the instructions for using the source material. As a decor, you can install a mantel made of wood or stone.
Such portals are also made of wood. But they are much more expensive. However, you can find real masterpieces, for example, additionally equipped with a built-in bar or other useful elements.
plywood construction
Such art objects are used to hide the flaws of the room.. For example, it may be an unaesthetic heating radiator, a niche.
The first step in the process is planning. To save time and money, it is recommended to draw up a design drawing taking into account the dimensions of the structure. After that, blanks for the frame of an artificial fireplace are cut out of the timber. The structure is assembled directly on site using a screwdriver, following the instructions of the sketch. Then the frame is sheathed with plywood. The fireplace can be supplemented with a podium or a shelf. An imitation of a firebox is mounted on the back wall. External walls are decorated with decorative film or wallpaper.
This design is mobile. It is not fixed to the wall, so you can always move it to another place and get access to the wall. Large stones or candles can be placed in the opening of the firebox.
You can make your own decorative grille. To do this, you need a copper profile or aluminum wire. The wire is given a decorative shape and painted with gold, silver or bronze paint. Attach the grate to the body of the fireplace with a thin copper wire.
Such an artificial fireplace will not only mask the flaws, but also become an interior decoration.
The second life of old furniture
The most budget option is a fireplace from old furniture. Surely everyone has an old sideboard or closet. Do not rush to send them to the landfill. On the basis of the cabinet, you can create a design element of the interior. For this, it is necessary:
- Plywood;
- Electric jigsaw;
- grinder;
- Screwdriver;
- Acrylic based paint;
- putty;
- Ribbon with LEDs;
- Decorative elements (stucco molding, plaster decorative stone, balusters).
Having prepared materials and tools, it is necessary to draw up a sketch of the future fireplace. Only after that proceed with the assembly. The main stages of the process:

At minimal cost, it is possible to get a stylish vintage piece of furniture. It will decorate the room and create an atmosphere of mystery from an old fairy tale.
It is not difficult to build an artificial fireplace at home. Attention, the desire to create and efficiency - that's what you need to enjoy the uniqueness and warmth of an art object created by yourself.
A warm fireplace with crackling firewood inside is an interior element from films and books, which is almost impossible to see in real life. However, modern craftsmen were able to come up with a worthy alternative, which in appearance is in no way inferior to the original - this is a false fireplace. To create it, you do not have to have special skills, you just need to put a little imagination and effort. We will talk about how to make a false fireplace with your own hands in this article.
Varieties of decorative fireplaces
A false fireplace in the interior plays a leading role, but it is important that it blends beautifully with the entire decor of the room, organically fitting into the design. Therefore, before you make a false fireplace with your own hands, you need to decide on the style of the future design fixture.

- Classic. More than others, the classic is the hearth of a square or rectangular shape. It is often decorated with stucco, bas-reliefs, as well as artificial stones that look like jewelry. Finishing this type of fireplace is best done with tiles imitating marble or brick.

- Country style. It is characterized by rough materials. Imitation is performed as simply as possible, and any leafy flowers are not appropriate in this case.

- Modern. For it, you can use any glossy surface with a reflective effect. And for a high-tech style, a designer product with sharp corners and mirror details will fit perfectly.

Drywall artificial fireplace
Many people think that it is difficult to make a false plasterboard fireplace on your own. You will see that this is not the case by studying the proposed master class with a detailed description of the process.

The process of making a drywall fireplace
This material can be purchased at any building materials store, and the price for it is acceptable. To make a decorative false fireplace, you need:
- drywall sheets;
- metallic profile;
- self-tapping screws (for metal) and a screwdriver;
- level;
- roulette
- dowels;
- facing materials (optional).

To your attention, step-by-step instructions for installing an artificial false fireplace:
- On an ordinary sheet of A3 paper or whatman paper, draw a sketch of the future fireplace in a reduced size. To simplify, the drawings can be found on the Internet, and download the option you like. For beginners, we advise you to start with simple forms, without aiming at complex models. Then find a suitable wall in the house, and transfer the markings to it, observing the scale. Mark those places on the wall where the hearth frame will subsequently be located. The corner false fireplace will first have to be fully assembled, and then mounted on the wall, and in other situations, you can start assembling the frame base directly on the wall.
- Cut the strips of the metal profile, based on the marks applied to the wall. You can assemble the back wall by attaching profiles to one another with self-tapping screws. The resulting frame is attached to the wall surface strictly according to the marks using dowels (if the wall is plastered).
- Gradually assemble the frame completely, be sure to refer to the drawing, otherwise you will easily get confused and the product will turn out to be uneven. For greater stability of the hearth on the side and back walls, attach transverse jumpers from the same profile every 30 cm to the main frame.
- It's time for drywall. To cut it, you can use a clerical knife, a jigsaw or a hacksaw, and in their absence, a durable sharp knife will do. Accurately measure each area of the frame where the part will subsequently be attached, and transfer the dimensions to the drywall.
- Cut out the pieces and screw them to the base with 25mm self-tapping screws. At this stage, the base of the decorative hearth is ready.

How to veneer a drywall hearth
Finishing false fireplaces is quite straightforward.
- It can be ennobled with paint or decorative tiles. Depending on the type of cladding chosen, the preparation of the plasterboard frame will be different.
- For painting on the frame, you need to screw in the screws harder so that their caps do not stick out. Also remember that the base is first primed, then puttied, and then painted.

- When preparing the base for the tile, you must definitely pay attention to what is written on the adhesive package. You can’t immediately try to overwrite the seams, start this process only a day after the end of the work, so that the glue has time to grab and dry.
- In addition, you may need a shelf. You can buy an ordinary wooden plank or a step from a ladder at any hardware store. The original gypsum stucco molding is also purchased there, the cost of 2 half-columns + 2 half-bases is approximately 2000 rubles.

Plasterboard decoration
The drywall hearth is quite durable, so you can give it more naturalness with the help of ordinary building materials.
Suitable for firebox:
- tile;
- artificial brick;
- mirror panels.
The upper part can also be decorated, as well as a decorative shelf that can easily withstand the load of a couple of books of candles or figurines.

An ornate or lattice metal fence is perfect for such an element of the interior.

Decorative hearth made of cardboard
Cardboard is a simple and affordable material that is useful for making a cozy hearth. The most budgetary is a false fireplace made of boxes, but it can be made from cardboard of any origin. It is important that the density of the material is high. In our case, we will make an artificial fireplace with our own hands from a large box of household appliances. Then it will be more stable.

Remember that such cheap materials will allow you to create an elegant fireplace in the living room for the New Year, thereby organizing a beautiful photo zone for the whole family. For creativity you will need:
- capacious cardboard box;
- sharp knife;
- ruler;
- simple pencil;
- scissors;
- construction tape;
- double-sided construction adhesive tape;
- large stapler;
- wallpaper with brick print for decor.

Step by step process instruction:
- Choose the product sketch you like and transfer it to the box.
- The extra parts from the box should be cut off, the sides of the reamer should be fixed together with a stapler, and all joints of the sides should be glued with construction tape.
- Using a knife, you should cut through the outlines of the firebox, and also glue its edges with tape.
- The prepared base can already be mounted on the wall. Do this with double-sided tape.
- Cut the wallpaper and paste over the fireplace with it. If you don't want to fool around, buy a self-adhesive with a brick pattern. However, remember that the wallpaper will look more natural.
- To decorate the top, cut out a shelf from the same cardboard, or purchase a beautiful piece from foam.

How to simulate a flame
It is not so difficult to make a fireplace inexpensively and in an original way, it is much more difficult to achieve an imitation of a warm and cozy flame inside it.
- The best option is to buy a special electrical device that is inserted inside. The price of the issue is about 11,000 - 15,000 rubles. The built-in appliance produces an image of burning firewood, and a corresponding light crackling sound.

- You can also repeat Pinocchio's trick with a photo. That is, just stick a beautiful photo of burning firebrands on the base. It is better to focus on a small picture, placing it on the back of the firebox.

- As an option, decorate a fake product with light bulbs or New Year's garlands. To enhance the effect, wrap real firewood with a garland with yellow LED bulbs that do not heat up.

- For the drywall option, a mirror firebox with ordinary candles placed there is acceptable. The tongues of flame will reflect beautifully off the mirrors, creating a reflection effect.
- Another interesting move is to place an ordinary table lamp in the niche of the firebox, and seal the opening with a translucent yellow or orange film. However, in this case, consider where it is better to hide the wire in order to turn the lamp off and on as needed.

Important! Remember about fire safety, do not leave candles unattended, install limiters if there are small children or animals in the house.
Interesting solutions for decorating a fireplace
The decorative hearth, first of all, is designed to please the eye, so it is not at all necessary to equip it with logs and put a poker next to it. Modern designers offer many interesting ideas for decorating.

- A classic of the genre is the clock on the mantelpiece. Why break with tradition? In the case when the room has an imitation of a hearth, decorators suggest placing the clock in a niche or in a firebox. In addition, it will not be superfluous to place figurines or books on the shelf.

- Real flowers are usually not placed near a real “home fire”, as it will be hot for them, but it is quite possible to decorate a decorative analogue with indoor flowers and spruce twigs.

- For gourmets, use a niche as a bottle bar.
As you have noticed, the manufacture of original author's fireplaces does not require a lot of time and money. What options would you prefer? Share your opinion in the comments.
Video: Do-it-yourself decorative fireplace from cardboard boxes
For a long time there were no detailed step-by-step technologies from me, but I decided to correct myself and talk about how to make a beautiful decorative fireplace from an old closet and decorate it in a cool way. It will be a great decoration for your home!
DIY decorative fireplace - side view
It was decided to use boards that remained after the dismantling of the old cabinet as the starting material for the construction of the fireplace. The second alternative to chipboard boards was drywall sheets, but I decided to abandon this idea, because. then I would have to build a frame from a metal profile, but due to the lack of skills in working with a metal profile, I decided to do without it. You could also try to make a decorative fireplace out of boxes, but then it would not turn out so strong and durable.
By the way, the site portal already has a step-by-step guide on how to make a beautiful one using a metal profile. In addition, the same article talks about fireplace decor options, so read a very interesting material!
Drawing of the future fireplace
So, with the source material, we decided it will be a chipboard board from the cabinet. Now let's talk about the dimensions of the boards that will need to be cut. In order not to fully describe the sawing process and dimensions, I am attaching a photograph with a drawing of the future fireplace.

Drawing description:
- Tabletop width - 100 cm.
- The length of the tabletop is 25 cm.
- The height of the side, rear and front boards is 115 cm.
- The width of the fireplace is 95 cm.
- The length of the fireplace on the side is 22 cm.
- The width of the front boards located on the sides is 30 cm.
- The width of the front middle - from above - 35 cm, height 45 cm.
- The width of the front middle - from below - 35 cm, height 30 cm.
- Dimensions of the "furnace" - width 35 cm, height 45 cm.
- Inner wall 1 - width 15 cm, height 40 cm.
- Inner wall 2 - width 15 cm, length 35 cm.
In the next photo you can see a cabinet that was dismantled and taken to the garage where my husband cut the boards into its constituent structural elements.
 An old cabinet is a great material for a fireplace
 You can file the elements of which the future fireplace will consist using an electric jigsaw, but please note that all elements must be clearly marked with a pencil and a ruler (you do not need to rely on the eye). By the way, if it is difficult for you to cut the boards yourself, then you can order the elements at the furniture factory, having previously provided the dimensions. If you bring your own boards, it will come out cheaper, about 200 rubles for 1 element.
Do-it-yourself decorative New Year's fireplace: step by step instructions
After all the constituent elements are ready, the most intriguing part of the work comes. The intrigue lies in the fact that if miscalculations were made at the previous step, then at the assembly stage, the structure will not assemble into a single component and some elements will have to be cut out again.
Assembling the back wall
The back wall in my case consists of 2 elements, it so happened that we failed to cut out a single component 95 cm wide and 115 cm high. But this is not a problem, because. you can fasten 2 boards with a bar, and putty the joints between the boards with decorative plaster, which remained in our house after the repair.

Sequence of work:
- We file the bars for attaching the rear walls to them;
- We fix the back walls with self-tapping screws;

We fasten the side ribs to the back wall
We figured out the back wall, pay attention to the previous photo, I deliberately left a few centimeters from the sides in order to attach the side ribs to the back wall “butt”. The sequence of operation is also quite simple:
- We fasten the side ribs to the bars with self-tapping screws.
- We fasten additional bars to the side ribs for attaching the front wall and cover.

We assemble the front (front) side of the fireplace
The front side consists of 4 components, including:
- Front top beam;
- two sides;
- Bottom beam;
The width of the “firebox” hole is 35 cm wide and 40 cm high. I draw your attention to the fact that later I regretted a little about the small dimensions of the hole in the fireplace, so I suggest you increase the furnace hole to 40 by 40 cm or 40 by 50 cm. This will give a more aesthetic look to your fireplace.
Decorative fireplace prices
decorative fireplace
Please note that in order to fix our hole with the “firebox”, we will have to fix 4 bars on the back cover, and attach the inner walls to them.


Fasten the top cover to the frame of the fireplace
Well, the frame is almost ready with the exception of some details. What is missing? Correctly! The top cover is missing. That is what needs to be attached. The dimensions of the top cover differ from the dimensions of the fireplace, because it should protrude 5-10 cm from all sides. Its size is 100 cm wide and 25 cm high. Next, consider an example of its attachment to the frame in the photo below.

The frame of our decorative fireplace is assembled. The next step is its decoration. In fact, the decorative design of the fireplace is the topic of a separate article in which you need to describe all the points, but for your convenience, I will try to reflect in this material all the main points on the decoration of the fireplace.
Find out how to do it yourself in an article on our portal.
Finishing a decorative fireplace with your own hands
When the fireplace is ready, it's time for creativity, here everyone can try themselves as a designer. I really liked the role of the designer, I decided to decorate the fireplace with the help of decorative stucco molding, which I myself decided to paint.
So, here is a list of steps I want to take to make my fireplace look like in the picture:
- Plastering the fireplace at the joints of the boards and at the places where self-tapping screws are screwed in.
- Painting the fireplace with white water-based paint.
- Sticking moldings to the fireplace.
- Decorating the "firebox" with mirrors and LED strip.
Fireplace plaster

When the fireplace is plastered, there is a waiting time. The plaster needs to be given time - 2-3 hours to dry, and then we will need to sand the fireplace with fine sandpaper.

After painting the fireplace, you need to give the fireplace 10-12 hours to dry. At this time, you can do the decoration of stucco.
For painting the fireplace, I recommend using water-based paint, because. It is this type of paint that has such qualities as: cheapness, lack of smell. It is the second argument that is decisive in this choice of the type of paint, because. if you are doing repairs in the apartment during the cold season, then leaving the fireplace to dry on the balcony will not work, and the smell of paint in the apartment may make you dizzy.
Please note that it will be necessary to paint the fireplace with water-based paint in two layers. This is done in order to completely paint over all the elements.


Fireplace decor
As I noted above, I decided to choose plaster moldings as decorative elements. It is sold in hardware stores and has long earned respect from people in creative professions. I would like to note right away that if your main task is to make an economical version of a decorative fireplace, then foam plastic decor elements will be a good alternative to stucco molding.
I did not use them, because. It seemed to me that the stucco molding looks somewhat more expressive when painted. In addition, if you paint the foam with ordinary paint, then it is likely that it will dissolve under the influence of chemistry.

The next material that I used to finish the fireplace is a ceiling plinth (not made of foam), but made of the same material as the stucco (most likely it is a hard mounting foam). The plinth is useful for decorating the firebox of our fireplace; the photo below will show a sample design of the firebox.
In addition, decorative bricks were used to decorate the firebox, the cost of decorative bricks (decorative stone) is about 600 rubles per box, but I left it after (my husband wrote about this technology).

The process of finishing the fireplace insert with decorative stone:
- From the outside, carefully apply glue (in my case, Bergauf) to the outside of the decorative stone;
- We apply a decorative stone to the side wall of the fireplace;
- We fix the decorative stone by pressing the hand and wait 10-20 seconds until the glue “grabs”;
- Using a similar technology, we cover the second wall of the furnace and the bottom.

Making a fireplace insert with LED strip
I continue finishing the fireplace. The next material I will be using is LED strip. LED strip can be purchased at almost any electrical store. I decided to use a red LED strip, because. it is the red color that will emphasize the unforgettable atmosphere of warmth and comfort that looks like burning firewood.
I will attach the LED strip to the corners of the firebox. Before you fix the LED strip in the fireplace, of course, you need to assemble it into a circuit in the following order: socket, cable, transformer, LED strip.
LED strip prices
LED Strip Light
When connecting the LED strip, observe the polarity.
 Photo - stuccoed fireplace


On this, my step-by-step photo report on how to make a decorative fireplace with your own hands has come to an end. If you like my work, then please put likes under this material.
Good luck with your work and a beautiful fireplace!
If a few years ago an artificial fireplace was a symbol of luxury and an element of an elite interior, today this kind of design is available to almost everyone. Moreover, you can assemble an artificial fireplace with your own hands in the shortest possible time. First you need to choose the best material specifically for your interior, and then equip the decorative fireplace in accordance with simple and understandable instructions.
An artificial fireplace can be built from a wide variety of materials. First of all, think about how exactly the finished artificial fireplace should look like. Choose the appropriate style, dimensions, shape and decor elements.

Then take a close look at your pantry. It is possible that you still have enough of some material suitable for arranging an artificial fireplace. For the rest, be guided by your own preferences, not forgetting to take into account the important characteristics of each available material.

If a traditional wood-burning fireplace needs to be lined with exceptionally high-quality bricks with high refractory properties, then absolutely any brick can be used to lay out an artificial fireplace - even facing, at least some colored decorative, at least ordinary silicate.

You can immediately embroider the masonry seams and your fireplace will take on an attractive appearance. In the end, it remains only to install a mantelpiece. Brick faux fireplaces are best suited for country-style rooms.
Consider the fact that the finished structure of the material in question will have a fairly large weight, so before starting work, objectively evaluate the quality and reliability of the existing floors.

Fans of eco-friendly materials should pay attention to wood structures. You can use parquet, unedged and edged boards. To give an aesthetic appearance, the wood is covered with stain or varnish. The fireplace itself is best placed on a platform made in the form of a pre-furnace sheet.
Wood is a lightweight material, so the dimensions and shape of such an artificial fireplace for the home can be almost anything, completely to your taste. To connect the boards in the case of assembling a small structure, it is allowed to use glue. If the device is quite massive, use self-tapping screws, or even better - a complex connection of self-tapping screws and glue.

If you wish, you can come to the nearest furniture store, buy ready-made shields there and lay out an artificial fireplace from them. Suitable high-quality MDF and chipboard. Plywood works well too.
Previously, the plates can be painted in the desired color or pasted over with a decorative film. A fireplace portal of the desired size and configuration is easily assembled from ready-made shields.
Chipboard can even be tiled with a tile or decorative stone. Here already focus on your preferences and available budget.
Do-it-yourself wood fireplace
Boards, furniture panels and plates - all this is attached in approximately the same way.
First stage. Assemble the frame of the artificial fireplace. It is best to use a galvanized profile for this.

First sketch at least an elementary drawing of the future fireplace, indicating the main dimensions. Cut the profile into pieces of the desired size using a hacksaw or special scissors.
Attach the vertical posts of the frame to the floor and walls with a screwdriver and self-tapping screws. Attach horizontal bars to the uprights for greater stability.
In the process of planning the step between the racks of the frame, pay attention to the dimensions of the selected material for sheathing, i.e. width of boards, wood boards, boards, etc.
Second phase. Try on the cladding boards to the frame. Trim the bottom, top, or edge boards as needed to fill the entire space nicely.
Third stage. Attach the trim to the frame with self-tapping screws. An electric screwdriver will help you with this. Screw the self-tapping screws so that their heads go into the wood a little, and in the future they are not noticeable after finishing.

Fourth stage. Close the mounting points of the fasteners with decorative caps. Paint the skin, varnish it, or use another finishing material to your taste.

Fifth stage. Install a fireplace mantel. On it you can place various decorations.

Do you have experience working with metal products? Then it will not be difficult for you to make a wonderful metal artificial fireplace. This design will look truly stylish and original.
The shape and other design features depend solely on your personal preferences. Metal fireplaces fit best in high-tech interiors and other modern styles.

Metal faux fireplaces are more difficult to assemble than their counterparts made from other materials. Therefore, you need to take the work as responsibly as possible and do everything in full accordance with the recommendations received.
The first stage is the preparation of the plan. Determine the preferred shape of the fireplace, the optimal dimensions of the structure, think over the decorative finish. Display all your ideas on paper with important dimensions.
The second stage is marking work. Place marks on the wall to place the fasteners. If possible, try to make the markup as accurate as possible, observing all levels.
The third stage is the assembly of structural elements. The support of such an artificial fireplace will be an aluminum profile frame. Cut the profile into pieces of the desired size and attach them to the wall in accordance with the markings previously applied.
Dial the frame and attach it to the wall with anchors.
Perform the installation of protruding structural elements. Sheathe the frame with sheets of the selected material. Usually aluminum or stainless steel is used for sheathing. To get a more spectacular and beautiful design, you can use metal sheets of different colors.
For example, you can make the main faces from a light material, and the ends from a dark one, or vice versa. With proper execution, this technique allows you to abandon the finishing of the fireplace. Or you can sheathe the frame with the most ordinary sheet metal, and then simply paint it in the desired color.
The fourth stage is the installation of equipment. Place an artificial fire in the assembled base.
If the fireplace you have chosen is not just a decoration, but also gives heat, before installing it, fix a layer of heat-insulating material on the internal metal walls of the base. Mineral wool heaters are perfect.


The most popular and easiest to implement option. The only difficulty for a beginner may arise at the stage of constructing a metal frame, you just need to practice a little.
Drywall is extremely easy to process and install. You can effortlessly cut the sheet into blanks of the required shape, bend drywall and perform other necessary actions.
Do-it-yourself drywall fireplace
First stage. Make a frame using wooden beams or metal profiles. Assemble a box measuring 130x120x30 cm from drywall sheets. The box should be without bottom and back walls. Use a sharp knife or hacksaw to cut drywall. Glue the parts of the box with mounting glue.


Second phase. Prepare a drywall base measuring 150x40x20 cm. Install the finished “foundation” near the wall. For added security, glue the box to the floor with mounting adhesive.
Third stage. Glue the previously assembled fireplace structure to the "foundation". Install a suitable sized mantel on top.
Fourth stage. Make a decorative chimney measuring 80x15 cm from drywall and wooden planks (frame). Determine the height yourself - from the mantelpiece to the ceiling surface. Glue the chimney to the wall and directly to the fireplace. Do this part of the design at your discretion, if you wish, you can do without it.
Fifth stage. Carefully glue the ceiling plinth to the "foundation" and the main part of the structure. In the case of the main part of the structure, the plinth should be glued under the mantelpiece. Here it is better to place it in steps, using products of different widths to get a beautiful smooth transition.
Sixth stage. Install your artificial fire inside the drywall construction.
Seventh stage. Finish the artificial fireplace. Here, do as you please. For finishing, you can use water-dispersed paint, wallpaper, foam tiles and other suitable materials.

Fireplace trim. Possible variant
Pay attention to the proper decoration of the surrounding space. The wall near the fireplace should be in harmony with it in style.


Artificial fireplaces lined with stone look very elegant, stylish and expensive. Decorative tiles will bring a unique charm to the surroundings and will become a worthy decoration of almost any interior.
Do-it-yourself decorative stone fireplace
Artificial fireplaces with stone cladding look truly chic. At the same time, the stone can be attached to almost any surface - even to brick, even to drywall, even to any kind of other materials. The main thing is that the base is able to withstand the weight of the finish.
First step. Thoroughly clean the base of any dirt. If the stone will be attached to the brickwork, first deepen the seams between the building elements using any sharp object.
Second step. Fix the masonry mesh on the entire surface to be tiled.
Third step. "Try on" the lining elements dry. It is most convenient to do this on the floor or some other plane. Simply transfer the projection of the fireplace to the surface and lay out the cladding elements on it. So you can adjust the stones in shape, color and other indicators.

Fourth step. Proceed to fastening the cladding elements. To obtain the highest quality and durable coating, start facing with the installation of the thickest tiles. You will be guided by them and will be able to understand which layer of glue to apply to thinner stones.

Fasten the first tile in the lower corner. Completely lay out the corner and proceed to the device of the upper horizontal row of cladding. Stones will be attached in the direction from the top of the fireplace to its base. For fixing tiles, it is recommended to use an adhesive specially developed for such materials.
Usually glue dries 2-3 days. Check the exact time in the instructions for your tool. Wait for the glue to dry completely and grout the seams. First make sure that the grout you choose does not leave marks on your cladding. This can be done on some third-party piece of stone.
Decide on the most suitable material for your case and start arranging an artificial fireplace.
If none of the considered materials suits you, you can show your imagination and create a truly original design. For example, some masters make beautiful hearths from large aquariums. It is enough to fill the bottom of the container with pebbles and install a biofireplace in it.
Successful work!
Video - DIY artificial fireplace


 in the configuration?")


