Everyone dreams of expanding the usable area of their home. But the area of the house does not always allow for the installation of, for example, an extension. One of best solutions in this case - the construction of an attic roof - additional footage with minimal investment.
This roof is built quite easily and quickly. And by enlisting the help of a few friends, you can save on labor.
To build an attic roof yourself, you need to equip yourself with as much knowledge as possible in this area. Read more about the design of the attic roof. So, attic roofs are:

− 1 level - the building has remote consoles, a large area and vertical windows. An attic with a single-level roof extends beyond the level of one of the sides of the house;
− in 2 levels - a project with a mixed type of support. This type of roof is the most complex at all stages of construction; it is designed together with the house;
− gable – one-level attic superstructures, easy to install. The main disadvantage is small area and low ceilings;
− gable broken lines - buildings with 4 pitched planes at different angles. Somewhat more complicated than the previous option, but among the advantages is a full-fledged interior room.
Various designs of mansard roofs are almost no different from standard pitched roofs and include the following elements:
- roof – appearance and protection from precipitation;
- sheathing – base for roofing and insulation materials;
- horse - crown truss structure;
- rafters - inclined stiffening ribs of the entire structure;
- Mauerlat - base beams for installing the rafter system;
- diagonal bevels - connections for longitudinal beams and vertical posts;
- internal beams - supports for ridge girders and/or rafters for structural stability;
- insulation – a structure made of layers of steam, hydro, heat and sound insulation.

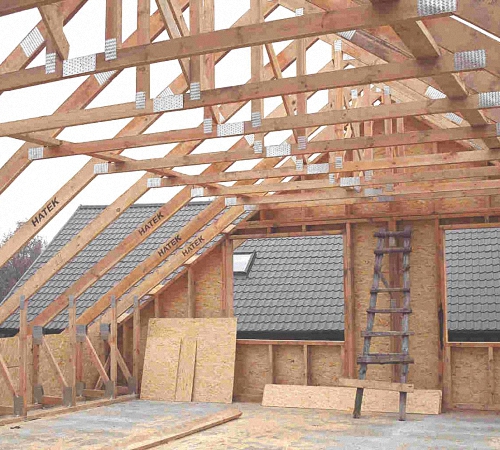
Mansard roof in a private house - photo during construction
For the construction, for example, slate roof you will need this type:
- wood - beams (15, 12, 10), unedged boards, boards 40-50mm by 150mm;
- nails - 80 and slate;
- wire – annealed (3-4mm) and for stretch marks;
- slate;
- insulation;
- hydrobarrier.
You most likely won’t even have to buy tools for building an attic roof:
- roulette;
- axe;
- hammer;
- construction stapler;
- plumb line;
- hacksaw.
The angle of the roof allows precipitation to be discharged, but takes away the height of the room. That is, the smaller the angle of inclination, the larger the area of the room itself. The usable area of the attic is partially reduced due to roof insulation. Read which ones exist and how to install them correctly.
Mansard roof construction technology
The technology for constructing a mansard roof has some subtleties:
− the thickness of the rafters must be more than 250 mm. This is necessary for comfortable installation of a 20 cm insulating layer. The rafters can be made from laminated veneer lumber;
− for thermal insulation it is better to use foamed polystyrene or glass - they retain their properties even when humidity increases;
− between the heat-insulating layer and the roof it is necessary to install ventilation in all the rules - with hoods and vents, so that air circulates freely under the surface of the building;
For a roof to be of high quality and reliable, it must have excellent ventilation, thermal insulation, and a high-quality rafter structure made of treated wood.
− the inner side of the thermal insulation needs a vapor barrier layer over the entire surface;
− a layer of hydro- and, if necessary, sound insulation is laid under the roof on the outside of the rafters;
− wood for the entire structure must be treated with special agents against microorganisms and fire, in accordance with the requirements of SNiP;

− if the attic roof is installed in windy areas, it is worth reducing its angle of inclination;
− if the house is located in a quiet, windless place, you need to increase the angle of inclination;
− such roofs are covered with ceramic tiles or slate. Metal, due to its low thermal insulation properties, is not recommended;
− for thermal insulation it is necessary to use non-combustible materials;
− the attic roof provides for a staircase.
The external staircase will not take up the space of the house, but the attic can only be accessed from the street. The internal one is much more convenient, but takes up space in the house. To solve this problem, you can install a ceiling ladder on a hinged joint or a screw structure. And how to choose one for the second floor according to GOST, read our instructions.
Phased construction of an attic roof
Before erecting a roof you must:
- Conduct an examination of the building to identify the maximum load for the walls and foundation.
- Develop an attic project.
- Obtain permission documents:
- from city authorities for construction and reconstruction;
- expert opinion about the house;
- permission from all owners.

Rafters of a sloping mansard roof - diagram
After designing the roof and the preparatory process, you can begin construction:
- We lay and fasten the mauerlat around the perimeter of the house - 100 by 100 timber.
- We install the frame. Supports rafter structure the frame racks will serve. To construct it, take a beam with a cross-section similar to the cross-section of the longitudinal beams. Vertical posts are placed along the edges of the building and attached to the longitudinal beams using angles and self-tapping screws. We make a jumper on top of each rack.
- We install the remaining arches. Between the two arches formed at the previous stage of installation, we stretch the cord strictly horizontally. The remaining arches are installed with a guide to the cord and a pitch for the rafters. We connect the arches with stamped corners or nail plates as lintels.
- Let's move on to the rafters. We cut their upper ends at a certain angle. At the bases of the beams we cut out grooves for mounting on the Mauerlat. The rafters are fixed to the base structure. Then, according to the template, we cut the upper rafters and also install them in their places. Also check out more detailed information for the attic.
- We install the sheathing with boards or sheets of plywood.
- We lay a layer of vapor and thermal insulation. The layers are installed from the inside of the rafters. We stuff the sheathing over the insulation.
- We install a layer of waterproofing on the outside of the rafters.
- The last step will be installation roofing from the selected material. The roofing layer is mounted on top of the waterproofing.
- Don't forget about ventilation windows and window openings. Of course, a window can only be installed in the gables, but two windows are unlikely to provide sufficient lighting.
How much will it cost to build a mansard roof?
Let's consider the prices for materials for the attic roof, taking into account that the construction will be done independently.
The price of insulation (mineral wool) depends on the density per cubic meter and the base:
- on fiberglass - 1400-2500 rubles. per cubic meter;
- on basalt fiber– 1100-2000 rub. per cubic meter;
- on jute fiber – 10-16 rubles. per linear meter.
Roofing materials do not differ much in price:
- bitumen shingles - about 340 rubles. per square;
- metal tiles - about 250 rubles. per square.
Calculations of the final cost of the building are made based on the area of the attic roof.
Video
About the construction of an attic roof with your own hands in the video. There is a clear overview of the technology itself and some useful tips.
A mansard roof is an ideal solution for expanding the area of a house. Having enlisted the support of several people and armed with the knowledge of building a structure, you can as soon as possible build a functional and reliable attic roof for many years of use.
Construction of an attic is a very important process that is performed both at the design stage of the entire house and after its construction. This room provides its owners with additional square meters of living space. Let's look at the features of the attic construction below.
Construction of an attic: project and its development
The attic is a rather difficult part of the building to construct. It is preferable to design it at the stage of building the house itself. Because building a residential attic on a finished building is not always possible. First of all, due to the fact that the attic space has considerable weight, and therefore loads the foundation.

The construction of an attic consists of a certain kind of stages, such as:
- attic construction drawings;
- dismantling old roofing materials, if the attic is being built on an already completed building;
- strengthening the walls on the upper floor, strengthening the foundation, if necessary;
- walling attic room;
- construction of the roof, its insulation, waterproofing and finishing;
- installation of window structures;
- interior finishing works.
Compliance with everyone technological nuances in the construction of an attic, will allow you to get a reliable and durable building.
The first and most important stage is drawing up a project for the attic space. At this stage, you should take into account such features as the size of the room, the material used in its construction, the roof and the level of its slope and many other nuances.

There are three ways to design an attic. The first is the most budgetary, drawing up the project manually. However, minimal design experience is required to carry out this operation. The second way is to use ready-made project documentation However, it is not a fact that someone’s attic design will be completely suitable for your home, so you will still have to make some adjustments to it. The third way is to contact specialized organizations that, in the shortest possible time, will help you draw up an attic project that is ideal for your home.
In progress independent design wall loads on the building, its appearance and finishing materials used both inside and outside the building should be taken into account. In addition, in mandatory The load from the building on the foundation should be taken into account; it may need to be strengthened. If the attic is too heavy, there is a risk of deformation or cracks in the house.
Experts will help you choose the optimal building materials, which, on the one hand, will ensure the attic's durability in operation, and on the other hand, will help reduce its load on the base of the entire building.
In addition, after drawing up the project, it must be agreed upon with special government agencies. If you have a competent project, this process It will go by pretty quickly.
Do-it-yourself attic construction in the house
We invite you to familiarize yourself with the option of constructing an attic in an already built and commissioned residential building. In this case, the first step is to dismantle the old roof. Thus, it will be possible to expand the under-roof space and increase the safety of the building under construction.
To dismantle the roof, it is not necessary to hire specialists; all work can be done with your own hands. To do this, you must first get rid of the external roofing finishing material. Next, you need to completely remove the sheathing and rafter system.
After this, it is necessary to strengthen the walls on the adjacent floor, since the attic will exert a certain pressure on them. The design features of the attic exert pressure not only on the surface of the base of the building, but also on its walls. Therefore, first of all, before constructing an attic, it is necessary to strengthen the walls close to it. To do this, you should use special calculations, according to which this process is carried out and the strength level of old walls is determined.
The next stage is insulation and waterproofing of the attic floor, which is also the ceiling on the previous floor. With the help of these actions it will be possible to ensure a healthy atmosphere in the room. To insulate the attic, you can use various thermal insulation materials in the form of polystyrene foam, mineral wool, etc.
Construction of the attic photo:

Next follows the process of erecting walls in the attic. The walls are made in accordance with the project developed in advance. Most often, wood or timber is used to build walls. To insulate the attic, it is recommended to use mineral wool or expanded polystyrene. Choosing material for external and interior decoration walls, try to give preference to materials with a high level of fire safety.
The next process is the construction of the roof. IN in this case, calculating the correct roof slope angle is very important. Since a roof that is too flat will negatively affect the ease of use of the attic space. Please note that the roof must be properly waterproofed, since if there is the slightest leak on its surface, moisture enters the attic.
In addition, the shape of the roof should be as simple as possible; the presence of broken and shaped elements will only complicate the process of their construction. Also important is the issue of insulating the attic space. For these purposes, various types are used building materials. When choosing insulation for the attic, try to give preference to materials that do not absorb moisture and are resistant to frost, temperature changes and rodents. In addition, the thermal insulation material should not allow heat to escape from the room.
It is best to focus on carrying out internal thermal insulation work. To create it, follow a number of steps:
- install finishing in the form of plasterboard or plywood base;
- form a vapor barrier layer; special films are used for these purposes;
- lay thermal insulation material - the ideal solution is mineral wool;
- ensure proper waterproofing of the roof using a special type of membrane;
- lay external finishing roofing material.
To erect a roof, you will also need to install a rafter system and install sheathing, the installation step of which depends on the type of roofing material. After the roof installation is completed, windows should be installed.
In order to ensure quality lighting In the room, several windows should be installed in it, the size of which directly depends on the size of the attic itself. The window in the attic ceiling must be of high quality. It must be resistant to precipitation, wind, temperature changes. In addition, with the help of window structures, high-quality ventilation of the attic is ensured.
Further actions for the construction of the attic are related to the internal finishing works, heating organization, decoration and design of the premises. Strict adherence to all recommendations for attic construction will help ensure long-term operation of this room.

Frame attic construction technology
Frame attic - great solution for any home, garage and even bathhouse. Among the advantages of frame-type attics, we note:
- lightness of the structure, so it does not load the main building, there is no need for additional strengthening of the walls and foundation;
- affordable cost of the attic - in comparison with its stone options;
- high level of thermal insulation and sound insulation;
- the possibility of constructing an attic of almost any shape and configuration;
- ease of implementation construction work, since the materials for the construction are quite light and special equipment is not required to lift them to the surface of the house.
Construction frame attic allows you to get a finished building with excellent thermal and sound insulation performance. In addition, the roof will remain completely intact, and the usable area of the room will increase significantly.
A simpler process is to build an attic on a building that has not yet been erected. Construction of an attic on an already finished house requires dismantling the old one roofing. Work should begin by studying the characteristics of the soil on the site and determining load-bearing capacity foundation. If the foundation is not able to support the attic, then a series of works will be required to strengthen it.
Next, you should inspect the walls of the house for their susceptibility to additional loads. In this case, if necessary, it is necessary to strengthen the walls. After this, the old roof is dismantled and the ceiling is strengthened.
Construction wooden attic consists of the following stages:
- production of frame system;
- installation of walls;
- insulation of attic walls;
- installation work related to the installation of the roof;
- finishing the attic with roofing materials and insulating the roof;
- interior decoration of the attic.
In addition, the construction of an attic involves the installation of window and door structures, the manufacture and installation of stairs, etc.
In order to construct an attic from timber, you should prepare an edged board, plywood, screws and the timber itself. Frame structure The height should be comfortable for the average person to move around. The optimal height of the attic is at least two meters. The height of the ridge zone should be about 350 cm.
The easiest way is to assemble the frame on the ground and then lift it onto the roof. The top beam or frame frame will act as a hearth in the attic. To fix the frame structure on the surface of the house, special boards or plywood are used. In this way it is possible to obtain a special platform. The knots and quality of fastening depend on the material from which the attic walls are made. Self-tapping screws are used to connect the timber at the top of the structure. After production frame walls the roof should be thermally insulated and waterproofed. After this, the external and interior lining walls, windows and doors are installed, interior finishing work is carried out.

When planning an attic, you should carefully analyze the general condition of the main building. The attic can be one room or will consist of several rooms. At the design stage, you should also take into account the design and shape of the windows, as well as their location.
The attic should be constructed from light, but at the same time durable materials. Since materials should easily rise to the roof and place minimal load on the base of the building.
The most optimal materials for the construction of an attic - wood or steel profile. An attic made of stone or concrete will load the main building. Roof finishing materials should also be light, but at the same time durable and reliable. It is preferable to use bitumen shingles or piece metal for roofing. For interior wall decoration and leveling, we recommend using plasterboard.
Since the attic is located above the main building, it is in greater contact with cold air. Therefore, proper thermal insulation of this room should be ensured. Heated air in the room should not penetrate through the insulation. In addition, in order to prevent moisture from entering the room, it is necessary to ensure its waterproofing.
In relation to design features attic, it consists of a rafter system, which is installed in increments of sixty centimeters. To fill the gaps between the rafter system, it is recommended to install thermal insulation materials, such as mineral wool, inside them. It is possible to lay the insulation in one, two or even three layers. To calculate the total thickness thermal insulation material, the overall heat loss coefficient in the room should be taken into account. To protect the roof from inside the room, a vapor barrier should be installed. Next, you should finish the roof using plasterboard, lining or finishing panels.
Do not forget to leave a ventilation gap, the main function of which will be to get rid of excess moisture in the under-roof space. The width of this gap directly depends on the type of roofing material. A vapor-permeable wind barrier should be installed on the outside of the heat-insulating material.
Excellent vapor barrier material is a film made of polyethylene, glassine or roofing felt. The insulation is laid with an overlap of 15 cm. Construction tape is used to seal the seams. Please note that foil waterproofing is laid with a foil covering inside the room. Thus, the foil will reflect the heat that comes from the room.
Construction of the attic video:
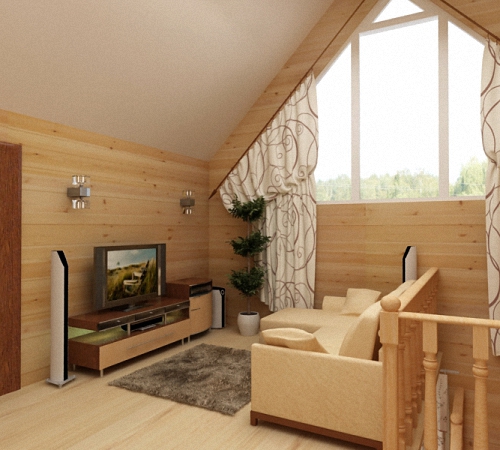
Attic premises in a country residential building or country house on garden plot It is most convenient to arrange it under a roof with two slopes.
Uncomplicated the rafter structure can be completed independently, without lifting mechanisms and complex instruments.
The space under the traditional for wooden and brick houses gable the roof is most often used as a cold attic space.
However, at low cost and properly installed roof insulation, the attic can be turned into cozy room, bedroom, children's room, and even living room. From choice the type of room under the roof will depend
In small areas country houses the construction of a gable roof with an attic solves the problem of shortage residential premises.
Features of a gable roof with an attic
To define the design gable roof should be taken into account:
- House layout;
- Dimensions;
- Wall thickness;
- The presence of a load-bearing longitudinal wall.
In addition to construction factors, the choice of roof configuration is influenced by climatic features of the location of the building.
For houses with a width of up to 6 m located in a temperate climate zone, choose a gable roof with a hanging rafter structure and a slope angle of at least 400 degrees.
A smaller angle of inclination will not allow you to arrange an attic room with a sufficient ceiling height. In addition, the steeper the roof, the less snow and water on it will be delayed. From a roof mounted at an angle 450 degrees, snowflakes slide under their own weight.
The principle of the rafter system
Supporting roof structure with hanging rafters does not require complex calculations and design solutions. The diagram shows that the rafters of a gable roof with an attic are installed in the form triangular arches along the entire length of the house with a step that depends on the weight of the roofing material with sheathing and insulating materials. Frontal the surfaces are a continuation of the walls of the house and are made of the same material.
Important! For the attic room, during the construction of gables, window openings are provided.
Principle hanging rafters based on spacer system. The rafter legs rest on each other at the top point and are tightened with a crossbar, which is fixed at the height of the attic ceiling. Puff is performed to balance the thrust load acting on the walls of the house. At the bottom, the rafters are rigidly attached to the Mauerlat - wooden foundation for the roof truss structure.
Mauerlat is located along the perimeter houses, on the upper bases of the walls. Such a foundation is made by continuous laying of timber 100 on 150 mm or 150 on 150 mm for waterproofing.
If the length of the beam is not enough for laying in one cut along the entire wall, it is connected in two parts in the center of the fence, driving the fastenings at an angle 450 degrees. Attach the Mauerlat to the base of the wall closer to its inner edge anchor bolts and stilettos.
To the Mauerlat metal corners attach vertical supports for installation rafter legs, on which cuts are made for better emphasis on the mauerlat beam.
Determination of structural dimensions
Length rafter beams can be determined without calculations. To do this:
- In the center the front wall is installed vertically temporary support with tied twine on the intended one;
- Leg-split taken to the corner of the house, thus determining slope size roofs. Add to this value 60 cm on eaves overhang and get the size rafter beam.
Calculated dimensions of the hanging truss structure of a gable roof for a house with a width 6 m indicated on drawing.
We define number of rafter arches. To do this:
- We divide length buildings on distance between supports. For small country house optimal step installation of rafters – 1 m. If the length of the house is 8 m, then the number of arched structures will be:
8/1 + 1 = 9 , and the distance between them: 8/9 = 0.9 m.
Installation of truss structure
After determining the amount of consumables, proceed to installation rafter system of a gable mansard roof. It can be done with your own hands:
- A triangular truss is assembled from two beams and a tie. If the roof slope is 450 degrees, then at the top point the beams rest on each other at an angle of 900 . The upper connection is fixed with a metal plate. Tightening bolt fastened with self-tapping screws at the height of the expected attic ceiling;
- Rafter structure lift to the installation height and attached to a temporary support on the front wall. The rafter legs rest against Mauerlat cut in places and screwed to pre-installed supports. Under the rafters they put wooden corners;
- Plumb check vertical installation of the farm;
- Likewise install a rafter arch on the opposite front wall;
- Between the tops of the outer arches pulling the twine or nailed run for installation of intermediate trusses. To better fix the vertical position of the arches, the rafters are temporarily fastened together with boards;
- Installing a skate and begin lathing the rafter structure.
Advice! To increase the reliability of the structure, a tie bolt is installed on both sides of the truss. Fastening is done with bolts.
Important! After installing the truss structure, air ducts and chimneys should be removed from the roof.
Roof lathing and waterproofing
 To strengthen rafter structure and creating a base for roofing material is installed on the rafters sheathing.
For step-by-step lathing under, corrugated sheets, slate or metal tiles, use a board coniferous species tree. Can be used 40x50, 50x50, 50x60 mm but he will weigh down roof structure.
Now let's consider types of waterproofing for a gable roof. For a gable roof, the following is suitable as a water barrier:
- Bituminous roll material– traditional, inexpensive, but short-lived roofing waterproofing;
- Reinforced film– polyethylene, reinforced synthetic thread, creates a waterproof barrier between roofing material And wooden structure roofs;
- Waterproofing film– perforated polyethylene, which has the unique ability to allow moisture evaporation from the insulation to pass through, but does not allow water to pass inside;
- Anti-condensation film designed to protect metal roofing materials from condensation. The outer layer of the film is made of geotextile, which perfectly absorbs moisture, and the bottom polymer layer does not allow water to pass through wooden elements roofs.
Start laying roll waterproofing from lower the edges of the slope. Subsequent rows are overlapped.
Installation of sheathing
Installation of gable roof sheathing - step by step process. The installation steps are as follows:
- The waterproofing layer is attached to the rafters with galvanized brackets with a slight sag for under-roof ventilation;
- To install the sheathing, wooden slats are nailed to the rafters on top of the waterproofing; the sheathing lamellas are fastened with self-tapping screws;
- A cornice is attached to the lower edge of the rafters;
- Through 30 cm the next line of sheathing is installed from the eaves;
- Rows of sheathing are attached parallel to the cornice in increments 60 cm;
- The wooden lamellas of the sheathing are connected at the intersection with the rafters;
- An additional row is installed on 10 cm below the roof ridge;
- Wind trims are fixed to the end rafters;
- Compare the diagonals of the roof slopes.
After lathing the truss structure, they begin external cladding roofs with roofing material.

Roofing materials and their fastening
 For the top covering of a gable roof, modern roofing materials are used - ondulin, corrugated sheets, and metal tiles.
In addition to strength and durability, they differ easy weight, therefore suitable for cladding attic roofs.
The roofing sheets are attached to the sheathing with self-tapping screws, starting from the bottom row.
The amount of material is calculated based on the area of the roof slopes with a coefficient 1,2 for overlapping fastening.Before the shelter starts smooth surfaces, aprons made of metal of suitable thickness or special blanks are installed around chimneys and air ducts.
In conclusion roofing works ridge elements and end strips are attached.
Advice! It is necessary to glue a sealing tape under the ridge covering, which will prevent water from getting under the roof sheathing.
The roof is insulated from the inside and a vapor barrier layer is laid.
Thermal and vapor insulation of a gable roof of an attic room
Insulation The attic roof is made by laying a heat-insulating layer in the recesses between the rafters. Used as thermal insulation mineral wool, which has low weight, good vapor permeability and low thermal conductivity.
To avoid mineral wool getting wet due to condensation, it is covered with "breathable" layer of vapor barrier. Perforated polyethylene films, anti-condensation multilayer coatings and diffuse membranes cope well with the task of vapor insulation of the inner surface of the roof.
The vapor barrier is laid across the rafters, along the entire length premises, with lanes overlapping for at least 10 cm. The seams are taped with a special tape. The film is stapled to the rafters using a stapler.
At the final stage of constructing the attic space, internal the surface of a gable roof is sheathed with sheets of plywood, plasterboard, clapboard or other decorative coating.
Read more about how and how to insulate an attic roof correctly.
Subject to the basic rules for constructing a gable roof, taking into account the advice of specialists on the selection and fastening of building and insulating materials, the installation of the attic room is carried out independently. A warm, well-ventilated attic will serve as additional living space and improve the microclimate of the entire house.
Look video about the installation of the rafter system of a gable mansard roof:
Surely, sooner or later, every owner of a private house comes up with the idea of arranging attic roof- the so-called attic. It allows you to expand the space of the building, thereby preserving the treasured meters of the site itself. In addition, if you show a little imagination when building and decorating this part of the house, then the non-standard and attractive appearance will delight not only guests, but also ordinary passers-by. You can learn how to correctly combine all construction safety requirements and an individual design concept from this article.


What is it?
Many people associate the image of an attic with bohemian creative life Paris, whose representatives were writers, musicians and artists, lived on the highest, dimly lit and unheated floors. IN literally these were utility premises that only the poor could afford.
Today, the presence and design of an attic roof speaks of the owner’s wealth and sense of taste. The architectural geometry of the roof, unusual combinations of window openings and balconies will not only highlight private house among others, but will also functionally increase the living space, eliminating the cost of another floor.


The room can also affect the reduction of heat loss in the building. Officially, according to all standards, the attic must have a height of at least 2.5 m from the floor level, otherwise it will be considered an attic.
When building a mansard roof in Russian conditions, you should remember the features natural conditions– quite frosty winters with frequent changes temperatures require special attention to the quality of insulation of the attic room.


Device Features
The design features of the attic require adherence to certain rules:
- soundproof;
- reliable insulation and vapor barrier;
- no stretch marks or bevels;
- ventilation gap;
- functional and aesthetic combination with the overall exterior of the house.


At the same time, compliance with all the rules does not limit the choice of various designs of the structure itself: single-pitched, gable, broken, two-level, conical roofs, with or without a balcony, mid-turn or balcony dormer windows. There are many variations. For reliability and safety, it is important to choose the type of roof, calculate the dimensions, and the amount of insulation and roofing materials.

Comfortable stay in the attic directly depends on thermal insulation, which will allow you to enjoy a slight coolness in the summer and keep warm in the winter. Let's consider a method for laying the “pie” of an attic roof, which will serve not only as insulation and the base of the roof, but also as protection from the roof. All surfaces inside the attic floor - the ceiling, floor and walls - must be insulated. It is important to first draw up a plan for the attic with all communications and an indication of the thermal conductivity of the materials from which the building and load-bearing coverings are constructed. Only after this is the selection and calculation of insulation made.


Particular attention should be paid to the indispensable presence and exact sequence of each layer of the attic insulation “pie”:
- vapor barrier layer;
- insulation;
- ventilation gap;
- waterproofing material;
- roofing covering.
In this list, a layer of insulation and ventilation are especially important. The following materials can be used as insulation.
Foam plastic
A modern, sought-after material with low density but high strength. It is soundproof, does not corrode and does not attract dust. However, a significant drawback is the high flammability and release of toxic substances. If we choose this insulation, then the foam layer must be protected by at least 3 cm of a fire-resistant structure, for example, two-layer plasterboard. In addition, polystyrene foam is susceptible to rodent influence.


Mineral wool
The most common material for attic insulation. Among her characteristic features– resistance to temperature changes, fire safety, high sound and heat insulation, harmlessness from an environmental point of view. You can purchase it in the form of a roll, slab or mat. The latter is recommended as attic insulation. The material definitely needs good ventilation.


Polyurethane foam
The main advantages are strength, long-term use, not susceptible to moisture, mold, suitable for any surface, non-toxic. But all the advantages hide the high cost and the work of exclusively specialists with the equipment.


It must be remembered that the thickness of the insulation layer is determined depending on the climate zone.
To insulate the attic you will need:
- waterproofing film;
- insulation material;
- vapor barrier;
- mounting tape;
- cord (nylon);
- nails;
- hammer;
- pliers;
- sharp knife.


Thermal insulation of a room is directly related to quality, type and size skylights, their structures are usually placed between the roof rafters to avoid expensive reconstructions. Therefore, when choosing, it is important to focus on the available dimensions. Among other things, you need to take into account the height of the slopes, the total area and purpose of the room.
Standard sizes Dormer windows are considered to be 78x118, 78x140, 78x160 cm and larger ones - 94x140, 114x118 and 114x140 cm.


If the rafters are set closer than the established frame standards, it will likely be necessary to have the window made to order, which will of course have an impact on costs.
According to the method of opening, roof windows are divided into:
- mid-rotation structures;
- with side axis;
- raised axis of rotation;
- with lower axis;
- a combined axis that allows you to rotate the sash 180º.
The most popular option among Russian summer residents is with a central axis of rotation. The advantages are ease of use (such windows are easy to clean).


A separate variety is represented by remote-controlled windows, which will be convenient if the location does not allow you to reach them yourself. They are often equipped with rain sensors.

Depending on the model, several types of windows can be distinguished.
- Vertical. They are mounted in a special so-called attic “birdhouse”, which is why you have to slightly change the roof structure. However, they guarantee a large amount of light.
- Balcony attics. They are two doors, when opened, one rises, the lower one moves forward, forming a miniature parapet. Just like the previous model, they require high costs.


It should be noted that if load-bearing walls are possible, you can also make a hanging balcony, which can be located either on columns that serve as a decoration in front of the entrance, or you can move the pediment (part end wall between the roof slopes and the eaves) of the attic floor from load-bearing wall, and make the roof of the ledge by extending the roof to the level of the outer wall.


- Extensions. Decorative top elements windows. They fit perfectly into the design and most often have a round, semicircular or triangular shape.

- Light tunnel. It combines a reflective tunnel into the room and a lampshade directly in the room itself, which evenly diffuses the light.
- Cornice models. They are located at right angles in the gap between the wall and the roof.
- Glazed bay window. Quite an exotic and expensive glazing model. The structure extends beyond the plane of the wall.


Presenters Russian manufacturers high-quality roof windows – Velux, Fakro, Roto. Velux models are slightly more expensive. For example, a window measuring 78 cm will cost 21-24 thousand rubles, a wider window will cost from 26 thousand.

Also, don’t forget about some additional useful accessories:
- blackout curtains;
- roller shutters, blinds;
- heat-absorbing mesh;
- mosquito nets.


According to established standards, the glazed area must be at least 10% of the floor area.
Advantages and Disadvantages
The advantages of the attic floor can rightfully be considered:
- Economical. The attic allows you to reduce the cost of heating the room. The air space between the floor and ceiling of the attic prevents generated heat from escaping through the roof. The low thermal conductivity of air allows more heat to be stored on the ground floor.
- Savings on adding another floor or increasing living space by expanding the foundation are also obvious. The attic allows you to get constructive additional space at minimal cost.
- Aesthetic appeal. Undoubtedly, the attic, with its complexity and expressiveness of the roof, gives the building a harmonious, architectural and complete look.
- Construction speed. Such an extension will not last for several years, as often happens with the expansion of the foundation. Installation can be completed within a week.


In addition to the advantages, there are also disadvantages.
- Savings on heating and replacing the second floor with an attic will cost a pretty penny in the future. The premises require the installation of specialized windows, which are much more expensive than regular ones.
- Sloping ceilings reduce the height of walls.


- The vulnerability of the structure is due to the fact that the attic takes on all the main “blows” of nature, and therefore needs increased attention and periodic inspection. If repairs or replacement of insulation are necessary, damage to the finish along with the vapor barrier cannot be avoided.
- A complex coal roof leads to the formation of difficult-to-ventilate areas, which negatively affects the quality of the coating.
- Individual requirements for hydro- and thermal insulation.

Problems that you may encounter when building an attic:
Undoubtedly ideal option for the attic it will be included in the project drawing even before the start of construction work on the house. But often the idea of an attic comes with the need to expand useful living space after a certain period of use. In this case, one has to face the choice of the type of structure. There are different types of mansard roofs.

Single-pitch
An ordinary, simple attic with one roof corner and one full wall, which allows you to expand the area. The most successful tilt angle in this option is in the region of 35°-45°. Otherwise, this may lead to the accumulation of large amounts of snow. The ramp is placed on the windy side. In this case, window frames can be placed both on an inclined roof surface and on the main vertical wall. However, this design is not used so often, since due to the norms for wall heights of more than 2.5 m, the slope turns out to be very steep. And this requires strengthening the rafter frame and, therefore, extra costs. However, such a roof looks rather unconventional.


Gable
More rational and best option due to the uniform rise of the ceiling, in contrast to the lean-to model. The two roof slopes are located at the same angle to the walls. For a rational distribution of space, 45° is enough. It is also divided into subtypes: symmetrical with a ridge above the middle of the house and asymmetrical with an offset relative to the center. The pediments in this version are straight, and the room takes the shape of a trapezoid. Such an attic can be equipped with a balcony at the end, and the design of the structure itself allows you to get rid of the “cubism” typical of the house. However, this also seems to be a significant disadvantage, limiting the area of the attic space on the sides. As an exit, you can provide this space for storage rooms or cabinets.


Broken
The most common type when building an attic without the involvement of specialists. In fact, it is the same gable structure, but constructed from two parts located at different slopes. An advantage of the broken shape can be considered the ability to avoid the formation of uninhabitable “dead” zones at the junction of walls and ceilings, as in gable construction. By reducing the angle of inclination, the height of the walls increases. And the presence of two slopes allows you to reduce the load on the roof.

When choosing this option, it is important to pay attention to the special fracture rafter system.
With remote consoles
This design provides for the displacement of the vertical wall of the attic to the edge of the facade of the house or beyond. This feature allows you to significantly expand the area of the room. The rafters are reinforced with struts and rest on floor beams that protrude beyond the load-bearing walls. The vertical wall provides freedom for imagination in choosing window design.


Two-level
This type of attic is designed exclusively together with the dwelling and is considered the most complex structure. It consists of several rooms at different levels and is not some separate part of the building, but a full-fledged room in the structure of the whole house. With this design, you get not a one-story attic, but two additional mini-floors. Special attention requires a preliminary calculation of the load on the walls and rafter system.


Multi-gable roof
The intricacy of the design is expressed in a whole complex of angular protrusions. The non-standard appearance, the strength of the truss structure and the absence of sediment accumulation take precedence over design difficulties and increased calculations. However, such characteristics require the work of exclusively specialized personnel. And the cost of such a mansard roof significantly exceeds the prices of other types of structures.


Four-slope
This type of roof design is considered the most attractive. In addition, it is very convenient to maintain - almost no precipitation accumulates on it, and due to the inclined design, the wind does not carry heavy load, as a result of which such a roof will last longer. However, during construction you will have to spend a lot of money on insulating such an attic. But there won’t be much useful living space due to the sloping ceiling on all four sides.


hip
They are a typical variant of a hipped roof type. A comfortable and spacious space is obtained by increasing the area of the two facade slopes of the house, made in the shape of a trapezoid. Hips are the slopes from the end of the building in the form of triangles. The half-hip design consists of slopes that do not reach from the ridge to the cornice. This type of roofing is used infrequently, since the rafter system is one of the most expensive and complex.


Tent
Suitable option For square shape Houses. The roof in this design consists of slopes with identical parameters and requires installation by specialists. Among the options are 4 or more slopes, in the shape of a dome or pyramid.

Asymmetrical
It is obtained by lengthening one of the roof surfaces. This attic looks very unusual both outside and inside. Behind the seemingly simplicity of shifting the roof lies a detailed calculation of the load parameters on each wall. The living space in such a room will be distributed unevenly depending on the side and angle of the roof.


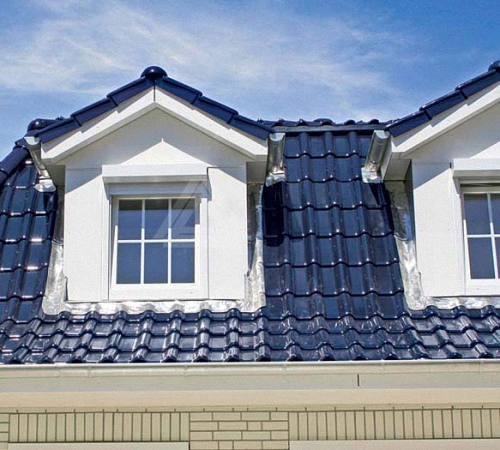
With "cuckoo"
“Cuckoos” in this case are small protrusions in the shape of a triangle, where windows are most often located. Moreover, on one slope there may be several such structures with individual rafter systems. The shape of the structure can be completely different, both single- and four-slope.


L-shaped
Quite inexpensive option roofs with a non-standard appearance. Most often, two are used for this gable roofs, docking with each other at right angles, which is the most difficult structural unit. Of course, such models are mainly used in buildings of a similar shape.


Having listed the main forms of attic structures, it should be added that combinations of such roofs are also possible. For example, a single slope can be erected as a broken line. The most important thing is to comply with all operational and design requirements during construction.
Shapes and sizes
The construction of the attic floor also has variability in terms of implementing the various architectural forms of the room itself. The geometry of the attic room can be triangular or broken, cubic or L-shaped, symmetrical or asymmetrical, one-story or two-level, occupy the entire space of the house, only part of it, or even moved beyond the load-bearing walls with support on columns. There are many alternatives. A complex design requires correct calculations of dimensions and drawing up a construction plan.


Calculating the exact parameters of the attic floor area involves a number of preliminary calculations. To draw up a project, you need to schematically divide the space into simple geometric shapes: trapezoids, rectangles, parallelograms, squares, triangles and, having calculated the area of each of them, add up the results. This principle applies to almost all attic structures. And if all height standards (at least 2.5 m) for the attic are met, then the floor area must be at least 16 m².

It should be noted that in addition to the established height parameters, where such calculations are possible, there are attics of other sizes:
- attic ranging from 0.8 to 1.5 m;
- semi-attic less than 0.8 m.
In such cases or when the slope of the roof is quite significant, the following formula is applied:
P = AxL+2Bx0.7L
P = L (A+1.4B),
where P is area;
L – length of the attic plane;
A – floor width for walls above 1.1 m;
B – floor width for walls above 0.8 m.
Useful living area is calculated by points on the ceiling located 90 cm perpendicular to the floor. The remaining part is considered a “dead” zone.

Such formulas allow you to both calculate the strength and weight of the structure and determine the amount and type of material used.
Thanks to modern technologies, today it is quite possible to calculate the parameters of a mansard roof online. To do this, you will need to enter data about the type of attic, the rafter frame diagram, roofing material and insulation.


Rafter system
The converted rafter system is key difference mansard roofs from others. This already heavy structure can withstand the weight of the roof, floor beams, the load of the attic floor, and precipitation. Therefore, only one that meets all requirements can be considered a reliable and durable system.


One of the basic rules is that the system must provide for uniform distribution of pressure on the base and load-bearing walls.
Only high-quality, well-dried and antiseptic-treated wood is used. Optimal parameters rafters – 100×100 mm in cross-section, they will create a structure resistant to weather conditions.


Inserting a tree into the lower crown is strictly prohibited. The slope of the rafters is in the range from 30°–60°. To secure them, exclusively rigid metal materials(corners, staples, nails).
Particular care should be taken to calculate the pitch of the rafters, since the choice of the width of the insulation and the size of the windows located between the two rafters depend on this. It is worth adding that the width of the step between them should be 3 cm less than the width of the insulation to reduce waste.
All of the above requirements are met regardless of the choice of one of the types of rafter system design, which comes in the following types.
Hanging
It is economical and practical. This design is based on side walls structures, and rafter legs They are fastened with horizontal jumpers for rigidity - crossbars, which also serve as the basis for the ceiling. The advantage is the location of the main elements of the system outside the used part of the room, which allows you to expand the usable space.

When installing such a system, you should pay attention to the following:
- the supports of the roof overhang should not fall on the bottom, extended beyond the load-bearing walls, rafters;
- to stiffen the roof, a wind board should be nailed between the ridge and the mauerlat;
- The moisture content of the rafter wood should not be more than 15%. Otherwise, the system may lose stability. If such material is still used, then it is better to connect it using bolts, which can be tightened if necessary.
Layered
Used in attics with a load-bearing partition in the center of the room, which provides additional support. Most often, this system is used for large areas of the house and heavy roofing materials. The design principle consists of laying a plank on the internal walls, protruding instead of a mauerlat, and installing a special rack to support the ridge girder.

Features of the arrangement of the layered system:
- the thickness of each element is from 5 cm;
- all nodes are smooth and located exclusively in the proper places according to the design;
- the connection of the Mauerlat and the rafter leg is strictly horizontal;
- symmetry in the position of racks and struts;
- reliable and high-quality ventilation;
- waterproofing at the junction of nodes and masonry;
- the length of the rafter leg without support is up to 4.5 m.


The independent design of the rafter system requires the fulfillment of a certain order and requirements:
- Fastening the mauerlat (the base of the rafter system according to the area of the house). The strength of the fastening with the lower slings will protect against “roof failure” in the literal sense of this expression. The material used is dry treated timber with a cross section of 150x100 mm. The Mauerlat transfers some of the load of the rafter system onto the walls.
- The base of beams is laid horizontally, always using a level. Attached to walls using bolts or staples.
- The waterproofing layer is located on the crowns, columns of the frame building or on brickwork. You can use roofing felt, roofing felt, bitumen.


- Frame supports. Ideally even vertical and horizontal posts are fastened with staples or nails to long beams, and insulation is laid between the vertical ones. Before continuing work, it is necessary to check the racks for mobility - they should not become loose. Otherwise, they are strengthened using braces or ties.
- The purlins hold the rafter legs together. There is a ridge girder on top, and side girders on the side. If the length of the rafter legs is less than 8 m, it is not necessary to install a ridge. An element that performs its functions can be guy ropes that secure the attic ceiling.
- The final stage of constructing the system is attaching the sheathing.
Unconditional importance for roofing system has a sheathing that takes on its entire load.
It consists of beams laid perpendicular to the legs of the rafters. And it is used here various material depending on the type of coating: boards, timber, plywood, timber. Although usually a 40–50 mm edged board is used for this. Soft types of cover suggest continuous sheathing, and with harder materials, a distance between boards of 25–40 cm is provided.


All rafters are connected at the highest point of the roof - the ridge. The ridge gives the entire structure rigidity and stability. Therefore, it is obvious that the duration of operation of the entire roof depends on the reliability of this part of the system.
The connection of the rafters, and, consequently, the formation of the ridge, occurs using the following fasteners:
- overlap is formed by laying rafters on top of each other and connecting them with through fasteners;
- cutting into half a tree as a result of laying rafters, in which half the thickness and fastening are selected at the edges;
- Trimming the end sides of the beams involves laying the rafters on top of each other and trimming them in a mirror image at one angle.


In the ridge area, the rafters are secured with plates made of wood or metal, metal corners, staples, brackets, wooden wedges, and nail plates. During the construction of the rafter system, such an important part of the house as the cornice is installed. To do this, either the length of the rafters is increased, or a filly is used.
Among his primary tasks:
- protecting walls from moisture and dirt;
- partially eliminates the ingress of water and snow from the roof onto the foundation of the building, preventing erosion;
- harmonious and finished look of the overall roof structure of the house.


Construction requirements
Designing an attic floor involves meeting the following requirements:
- the relationship between the communications of the attic and the entire house;
- the selected material for the attic must be technically and harmoniously combined with the building material;

- compliance of the additional floor plan with the building design;
- compliance with safety rules when carrying out work with the presence of people in residential premises;
- strict adherence to fire safety regulations;
- compliance of the light-transparent fencing with the overall concept of the building style.
Installation technology
The assembly of all elements of the attic room occurs in the following order:
- It is better to calculate the strength of a building with the involvement of specialists;
- preparation of the attic and roof project can also take place with the participation of qualified people or on the basis of a ready-made option;
- dismantling the old roof if the building is no longer being rebuilt;


- production of rafters wooden frame– one of the most difficult points in the construction of an attic;
- it is necessary to ensure the accuracy of the construction using a cord stretched between the arches, which ideally should be in a horizontal position;
- fixing the arches to each other with nail plates or stamping corners;
- vapor barrier material on the inside of the rafter system, secured with construction staples;
- a layer of insulation that fits tightly to the rafters;
- installation of the sheathing on the insulation material is carried out using wooden blocks;

- waterproofing is laid on the outside of the rafter system - often polyethylene film is used for this, and another layer of boards is placed on top of this layer;


- For natural ventilation the spaces under the roof are equipped with special cavities between the hydro- and heat-insulating layers in the eaves area, which are located in the upper part of the ridge;
- covering the frame with roofing material depending on the preferences of the home owner.
Among the options finishing coating The following options can be considered:
- Metal tiles are used not only because of their attractive appearance. This material is excellent value for money. Durable, light both in installation and in weight. It withstands shocks reliably, but at the same time transmits all sounds well, which is the main drawback.

The attic is an excellent opportunity to increase the total and usable area of the house. It is installed in the attic and is quite suitable for living, provided that it is designed correctly. The rafter system of the attic roof, drawings of which can be found in this material, is the basis of the entire structure. And it is precisely this that needs to be given the closest attention when designing.

Mansard roof rafter system - drawings
An attic is a room located directly under the roof. Its facade is partially or completely formed by the roof surfaces (according to SNiP 2.08.01-89).
SNiP 2.08.01-89. Residential buildings. Downloadable file (click the link to open the PDF in a new window).
It is a full-fledged residential floor; there can be one or several rooms, depending on the design parameters.
Note! The word "attic" comes from France. It was the French architect who, in 1630, came up with the idea of usefully arranging attic spaces. And this man’s name was Francois Mansart - hence the name of this type of superstructure.
The peculiarity of attic roofs is not only the special design of the rafter system, but also the need for detailed consideration of other aspects - insulation, moisture and vapor barriers, etc. Since due to the attic, the load on the foundation and walls of the building itself usually increases, then predominantly all of it elements are built from lightweight materials. That is, it is recommended to use wood to create a rafter system; lightweight materials are used as insulation.

The attic can be of impressive size and occupy the entire area of the building, but within its walls. Sometimes it is installed only on part of the floors, and then the rear ones are covered by a regular roof.

Very often the attic is used in individual construction, because it is an opportunity to increase living space home, make it warmer (heat loss through the roof is reduced by an average of 7-9%). And the costs of arranging an attic will be much less than building a full floor.
In general, building an attic is not very difficult and you can cope with the task yourself. The main thing is to correctly calculate wind, snow and other types of load.

Prices for timber
Types of attics
The design of the attic will directly depend on the shape of the roof that is intended to be installed. After all, part of the walls of this room will be formed by the roof slopes. Depending on this, there are several types of mansard roofs.
Perhaps the simplest option for arranging the roof itself and the attic floor. This roof has only one slope, which rests on the multi-level walls of the building. Thus, the slope angle is formed. By the way, it should not go beyond the strictly limited limits - 35-45 degrees (if the slope is less, then snow will constantly accumulate on the roof). winter time, which will significantly increase the load on the entire house and will cause the installation of additional supports in the already small attic). The rafter system here is extremely simple.

Note! The rafter structure will not require additional supports if the distance between two walls located opposite each other does not exceed 4.5 m.
Such attic roofs look original, despite the simplicity of their design. Usually, a fairly large window is made on the side of the high wall of the attic, which allows you to get a well-lit room.

Mansard roof with two slopes
This option is also relatively simple to implement and is therefore widely used. The main thing is that the height of the roof itself allows you to arrange a living space underneath it. The rafter system of this roof looks like a regular gable roof; it can be asymmetrical or symmetrical depending on the location of the ridge.

The gables are usually simple and straight, and the room inside will have the shape of a trapezoid or square (the latter option is only possible if the attic space is spacious enough). The height of the ceilings near the walls should not be more than 1.5 m; above that there is a sloping cone-shaped ceiling.
The main disadvantage of a gable roof in terms of arranging an attic is the loss of most of the free space. That is, the lion's share of the room is cut off by the roof slopes. Of course, this free space is usually used as a storage space, but this aspect has a very significant effect on the size of the attic.

Broken mansard roofs
In fact, this is also a kind of gable roof, but its slopes have two parts, located at different angles relative to the ceilings. Due to this, you can get a fairly spacious attic floor, which will be equal in area to almost a full second floor (it will be only 15% smaller than the lower floor). The height from ceiling to floor will be the same throughout the attic and will be about 2.2-2.3 m.

Broken mansard roof - drawing
However, this design involves the construction of a rather complex rafter system. And not every novice master will be able to cope with this task. However, despite this, the option sloping roof quite common.

Hip roofs, mansard roofs
Such a roof involves the creation of the most complex type of rafter system, requiring the most accurate and painstaking calculations. The surface of the roof itself will have a fairly large area, which is why you will have to spend a lot of money on other materials - insulation, hydro- and vapor barrier films etc. But in general, the attic turns out to be quite spacious, although parts of the usable area are cut off.

But such a roof has maximum resistance to snow and wind loads. Overhangs can be quite large and will be ready to protect the walls of the building from the effects of precipitation. Such attic roofs look very attractive.
Attention! When arranging a hipped roof, it is important to take care of the need to strengthen the layered rafters - they are the ones who experience the maximum load.


Attic roof rafter system
When settling in mansard roof The rafter system can be made of layered or hanging elements. In the first option, the rafters are installed so that they form a triangle with even edges. In this case, the support is carried out on the mauerlat fixed along the perimeter of the walls, on additional supports installed under the rafters, and the connection of two boards in the ridge area also serves as a support point.
When installing hanging type rafters, supports in the form of additional beams are not provided. They rest only on the walls of the house. Pulls may be used. In this case, the rafters themselves work in bending and compression.

Hanging and layered rafters - example drawing
Creating a rafter system when building an attic is a primary task. It is first important to correctly calculate it and take into account all the subtleties of its construction. To understand what will be discussed, you need to familiarize yourself with its main elements.
Table. Main details of the rafter system.
| Element | Description |
|---|---|
| Mauerlat | This is a beam (or board) that is fixed on the upper end of the load-bearing wall of the building. The rafter legs will be attached to it. It plays the role of a support and will transfer the entire load from the roof to the walls of the building. |
| Rack | Any vertically located beam that acts as a support for the rafter legs. |
| Floors | This is a series of beams laid horizontally to form the floor of the attic floor. They also play the role of the ceiling of the first floor of the building. |
| Rigel | These beams are located horizontally and are additional strengthening and supporting elements for rafters. May also be called "puffs". |
| Rafters | Also called “rafter legs”. They form the frame of the roof and give it its shape. Moisture-proof materials, sheathing and roofing will be attached to them on top. |
| Lathing | Many blocks or sheets of plywood that are attached to the rafters. It is on them that the roofing material will be directly fixed. |
| Suspension | A board that helps distribute the load. Installed under the bolt or tightening. |
| filly | The board that forms the roof overhang is fixed at the bottom of the rafter leg. |

Prices for construction boards
Construction boards
Required calculations
In order to avoid mistakes when designing an attic, it is important to carry out a number of preliminary calculations. Depending on the chosen type of rafter system and type of roof, they may differ. The easiest way is to use a special program, but you can try to do all the calculations manually.
It is important to determine the area of the final roof, the dimensions of the attic, and the width of the floors. The calculation is made based on the following data:
- length and width of the house;
- volumes of precipitation in winter and summer (this will help determine the required roof slope angle);
- the width of the joints between parts of the floors.

An example of calculating the pitch of rafters in the program "Rafters 1.1"
Let's consider an example calculation: the length of the house is 12 m, the width is 3 m. The amount of precipitation in the area indicates that the required roof slope angle should be about 40 degrees. The calculation is made using the formula Hk = L x tgA, where Hk – required height, L – ½ the width of the building, tgА – tangent of the angle. Total: Nl = 3/2 x tg40 = 1.26. This means that the recommended roof height should be 1.26 m.
Note! Most often, when installing attic roofs, owners opt for broken rafter systems. The methodology for calculating parameters in this case can be found in SNiP 2.08.01-89 and TKP 45-5.05-146-2009.


