Do you want your home to look new without large investments? Then excellent and, most importantly, modern version is finishing the facade with siding. It is used for finishing a wide variety of buildings: the facade of a bathhouse, garage, house and others. It prevents direct sunlight from hitting the walls, protects from rain, protects the house from temperature changes, and is also an excellent wind protection. Moreover, it is easy to operate. It can be easily cleaned by washing and wiping with a damp cloth. These are just some of the benefits of choosing wall siding. Now let's look at how to install siding with your own hands, find out what tools you will need for this, and how to prepare for the work.
Tools and equipment
Before starting preparatory work, you should make sure that you have all the tools. To install siding you will need:
- tin scissors,
- Bulgarian,
- sharp knife,
- hammer drill,
- punch,
- jigsaw,
- stapler,
- level,
- hammer,
- roulette,
- safety glasses.

In addition to the tools, you should purchase all building materials in advance. In addition to the siding itself and its components, you need to stock up on nails, screws, staples, etc. Now that you have everything at hand, you can begin the preparatory work.
Preparatory work

Please note that you cannot install the siding yourself. Therefore, take care of a reliable partner. Together, using a water level (or its laser variation), you can mark the facade. An exact mark is made at each corner of the building.
Pay attention! It is extremely important that the last mark matches the first mark. If the marks do not match, then the measurements are inaccurate. Accordingly, the procedure must be repeated. If you ignore this, you will end up with uneven walls.
Then you need to find the highest mark using the base as a guide. Next, a mark is placed at each corner from the base, which will show the level of the first strip.
We make sheathing for siding
One of important stages work is the manufacture of sheathing. For this you can use wooden blocks.
Pay attention! If the siding will be laid horizontally, then the sheathing should be installed only vertically, and vice versa.

To make the frame, it is necessary to prepare a sufficient quantity of bars with a cross-section of 50×50 mm and 25×80 mm. When purchasing, make sure that they are perfectly level, otherwise after installing the siding the wall will repeat the shape " sea wave" When installing the lathing, you need to ensure the distance between the bars, which should be 30-40 cm. If you want to pre-insulate the facade, then the lathing is first made according to the width of the insulation. The frame for the insulation will be made perpendicular to the sheathing for the siding. It is also necessary to cover the windows with wooden blocks. After laying the insulation, the surface must be covered with a waterproofing film using a stapler. This film must be laid with an overlap of ten centimeters wide.
When everything is ready, you can begin making the frame directly for the siding. You can also use a metal profile for this. This has its advantages. For example, wooden blocks need to be treated with an antiseptic against corrosion. Moreover, under the influence of weather conditions, the bars can become deformed or dry out. Because of this, the siding may not hold up well. Regarding metal profile, then he is not in danger.
Siding installation. Technology
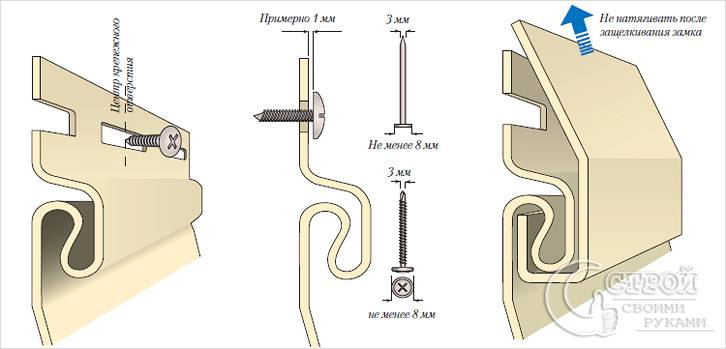
When installing siding, one mandatory condition must be met. It is to ensure that the siding moves under the influence of temperature changes. For this purpose, nails should be driven into the provided holes in the center. It is also important to drive nails carefully. Do not use excessive force to drive them in.
Pay attention! Do not nail the nail head close to the sheathing panel. It is recommended to leave a gap of 1.5 mm. This also applies to self-tapping screws if you use them to secure siding.
Under no circumstances should the panel be allowed to stretch. Otherwise, the subsequent panel may become uneven, resulting in warping. There can be a distance of up to 400 mm between nails.
Sequence of installation work
Finishing the window opening

The first step is to line the window opening. For this purpose, you should take the window trim and cut it to the desired size.

The strip, which is mounted on the inner perimeter of the slope, is installed to the final strip. To begin with, the plank is installed on the lower slope, then on the side slope, and only lastly on the upper slope.
Installation of basement siding

Before installing siding on the facade, first decide whether it will be installed on the plinth. If yes, then this work needs to be done first. For this, a starting bar is set. It is extremely important to install it exactly horizontally. To accurately fit the first panel to the corner, its edge is trimmed. Next, the next panel is installed. When it comes to the last panel, it needs to be cut so that there is a small gap between the panel and the corner.
Installing siding on a wall

The first step is to mark the base ebb line using a level. It is on top of it that the starting bar will be installed. Next, the H-profile is mounted. It is necessary for beautiful joining of siding. Some decide to do without it. However, over time, dust can accumulate there, and moisture can also accumulate there.
Accordingly, the joint will be visible. Moreover, with strong gusts of wind, this joint may not withstand and tear off. For this reason, it is best to use an H-profile to connect siding. Next, the assembly of the panels begins. Naturally, installation begins with the lower starting strip, onto which the next regular strip is snapped. And so row after row, until the very top. As for the last row, the last panel must be adjusted to the exact size.
This method is used to install siding panels. The main advantage of the technology is that this work can be done without the help of specialists.
If you have already done this work, you can share your opinion. You may have encountered some problems while working, tell us how you dealt with them. If you have questions, please ask us.
Video
This is how it works correct installation siding:
And this typical mistakes installation:
Photo


Siding is a dry type exterior finishing and is suitable for most types of residential and commercial buildings, especially those made of foam concrete and sandwich panels. Her light weight will not put a significant load on the foundation, so this cladding is also used on old wooden houses.
The growing popularity of siding is explained not only by its low price, but also by its durability, because it will not crumble over time, like plaster, simple care, excellent protective properties and a rich selection of shades and textures. The undoubted advantage of siding is that you can give a modern look to even an old house with your own hands, significantly saving on the services of builders.
Tools and materials
Before covering your house with siding, you should check the availability the following tools:
- or a fine-toothed saw, metal scissors,
- screwdriver and screwdriver,
- hammer,
- tape measure, square and level (a laser tape measure will greatly simplify the work),
- a stepladder that is high enough to reach the roof of the house.

Siding manufacturers offer a full range of elements and panels for covering a house, even complex configuration. As a rule, the buyer should indicate the area of the walls of the house and their dimensions, the type of roof and the number of windows, and the seller himself will calculate required quantity of certain parts, a schematic plan of the house from the outside will facilitate this process.
Knowing some points will help you control or check the calculation. So, the components for installing siding include the following elements:
- External corner - the height of this element is 3 m, and if the house is one-story, it is worth using entire elements for each external corner of the house; if the height of the walls is more than 3 m, then sum up the length of all external corners in meters and divide it by 3, taking into account that there should be a margin for margin when joining. Corners are used not only for decorative purposes, but also due to the fact that the ends of the siding must be closed.
- Internal angles are calculated using the same principle. If the roof eaves are finished with siding, internal corners are also used in the areas where it connects to the wall. In cases where the finishing of the cornice was done earlier or will not be done at all, use a finishing strip.
- To finish the cornice, elements such as soffits and wind boards are used.
- The required length of the starting strip is equal to the perimeter of the house minus the width of the doors and gables.
- In areas connecting extensions, height differences and roofs of different levels, a J-profile is used.
- The perimeter of the windows is covered with a window strip; it must be taken with a reserve so that the joining points are not visible. Also, to frame the windows, flashings are needed, which also should not have visible joints.
- A drain plate or drip sills are installed around the perimeter of the base if its width of 40 cm is not enough.
- If the length of the house wall is more than 3.66 m - the standard length of siding panels - the connection is made using an H-profile. It is necessary to think about the location of its installation so that the proportions of the building are maintained.
- The number of siding panels themselves is approximately calculated using the formula: “((area of all walls of the house – area of windows and doors)/panel area)*1.10”. A reserve of 10% is needed to cover scraps and waste.
- For installation, it is preferable to use galvanized self-tapping screws 25-35 mm long, since their use makes it easier to maintain the recommended gap of 1 mm. For 1 sq.m. Approximately 2 self-tapping screws are consumed, they should also be taken with a reserve. If possible, then you should choose self-tapping screws with a rubberized head, which will definitely not leave rusty stains after a few years.
Preparatory work
Before covering with siding it is necessary to carry out preparatory work. First, all protruding parts are dismantled: doors, trim, grilles, etc. Seal or foam all the cracks in the walls, around windows and doors. The walls of an old house are cleaned of dirt and dust, chipped plaster and paint, mold and rotten areas. Wooden houses are treated with antiseptics and antipyretics; foam concrete walls can be treated with a deep penetration primer.

Installation of sheathing
The first step is to mount the sheathing from a metal profile or wooden slats, since it is strictly forbidden to attach the panels directly to the wall. Galvanized profile is the only option for metal siding and for brick and concrete walls. As a profile, you can use a CD profile for drywall. If the vinyl profile is attached to wood or frame house, you can use 60*40 mm slats with a residual moisture content of 15-20%, treated with an antiseptic and thoroughly dried.
Using a tape measure and level, mark straight lines on the walls of the house so as to obtain a closed contour. Having carefully measured the distance in the corners of the house from this line to the base, they find the minimum, and, putting it down, draw another contour. Subsequently, a starting bar is installed along this line, and if it deviates from the level, the cladding panels will warp.

Then, using U-shaped fasteners, vertical guides are mounted, starting from the corners. It is necessary to ensure that they fit tightly to the wall, for which you can put pieces of wood or dense foam. The distance between them is 30-40 cm; in those places where the siding will bear additional load, for example, street lamps, as well as near corners, windows and doors, you need to add guides. The vertical guides should not be connected by anything so that there are no obstacles to ventilation, since the lack of air flow will lead to the appearance of mold.
Waterproofing and insulation
For wooden aerated concrete walls installation is required, and a layer of insulation is optional. As a material, preference should be given to a water- and wind-proof membrane. If insulation is not performed, then the film is fixed directly to the wall of the house in order to maintain the distance necessary for ventilation of the siding. When installing an insulating layer, waterproofing is laid over it, and then the sheathing is rebuilt to provide a gap for ventilation.

Fastening the guide elements
Installation begins by installing the drainage system on the base, placing its upper edge along the previously marked line. It is a rigid structure and is easier to keep level than a flexible starter bar. Then a series of corner profiles. They must be firmly secured with self-tapping screws in the upper part of the first hole. Subsequent screws are screwed into the middle of the hole.
If it is necessary to increase the length, the upper profile should be laid overlapping the lower one with an overlap of several centimeters. Then, along the previously marked line, a starting bar is attached to the top of the drainage system. It should be 5 mm above the bottom edge of the corner profile.

They fasten around the windows window trims or J-profiles so that the outer bottom edge is a few centimeters lower than the inner one. Door openings are edged with J-profiles. The corners of these elements can be filed at 45 degrees, or they can be overlapped, placing the top planks on the side ones.
At vertical installation H-profiles in advance designated places, level is used. As with installing others vertical elements, you need to leave a gap of 5-6 mm to the cornice and base so that the planks do not bend when expanding. A finishing strip is installed under the roof or where the area provided for siding ends.

Installation of panels
When all the guide elements are installed, you can proceed directly to the installation of the panels. The first row is attached to the starting bar until the lock clicks from below; at the top, the panel is secured with self-tapping screws in the center of oblong holes every 40 cm. All other panels are installed according to the same principle, row by row rising to the roof or window. You should not pull the panel up and fasten it rigidly; it should move slightly to the sides. The top row of siding ends with a finishing strip.

What should you consider?
Rule #1. Under no circumstances should siding panels be firmly secured. The material from which they are made contracts when cold and expands when heated, length fluctuations can reach 1%. This is what causes the elongated shape of the mounting holes. The fasteners cannot be screwed or driven through the panel, but only into the center of a special hole, and the screw is not screwed in all the way, with a gap of 1 mm between the plates and the head. If this rule is violated, the siding may simply burst under extreme heat.
Rule #2. There should be a gap of about 10mm between the slats and the guides (when installed in hot weather- less) so that the siding does not bend when expanding. When covering a house in the summer, it is worth protecting the material from the sun.
Rule #3. Siding can be installed at any time of the year, but please note that at temperatures below -10 degrees, elements may crack when cut, so you should be careful and use a grinder.
With the help of siding, subject to the rules and installation technology, you can update your house and protect it from atmospheric influences for 30-40 years, this is exactly the service life that manufacturers promise.
Many people, even having superficial construction skills and knowing the technology for installing this material, will be able to cover a building with vinyl siding. It’s not for nothing that this method of decoration leads among others, and not only due to its aesthetic and attractive appearance, low cost, long service life, and also ease of installation.
Siding Installation Tools
 To carry out installation work facing material You will need the following equipment:
- A knife for cutting siding is used as follows: first, a strip is drawn on the panel, along which it is bent and unbent several times, then broken. You can also cut material with a grinder, but only at low power
- Jigsaw
- Drill or hammer drill
- Screwdriver
- Level
- Roulette
- Bulgarian
- Hammer
- Marker or chalk for marking
Selection and calculation of component materials
 Manufacturers of vinyl siding also produce all necessary component material for its installation:
- External and internal corners for cladding the corners of a house with standard length 3 m. To calculate the required quantity, the total footage around the perimeter of the building corners is measured and calculated, which is divided by 3. It is better not to use short trims so as not to spoil the appearance of the building
- Starting bar has a length of 3.8 m and is calculated by subtracting the length from the perimeter of the house doorways
- The J-profile will be needed in places where extensions are attached to the building (length 3.8 m)
- Window frame(length 3 m), calculated by summing the perimeters of window openings
- Window sills are installed if necessary
- The finishing strip connects the roof eaves to the house
- The H-profile closes the joining gaps between the siding strips, is installed vertically, calculated by dividing the building perimeter by the length of the siding panel
- The drain strip is installed under the window openings
- The platband is mounted as a covering for any openings that are flush with the walls
You will also need galvanized self-tapping screws with a press washer 25-30 cm long. Their number is calculated based on the area of the walls: 20 pcs per 1 m².
 Component materials for vinyl siding
 Calculation of the amount of siding
Two options are used:
- The area of the walls of the house is calculated, from which the areas of all openings are subtracted. The resulting value must be divided by the area of one siding panel
- A drawing of the house is made and the required number of planks is calculated individually. This method is more economical, since it is immediately clear where will he go installation of scraps
 Calculation of wall area for subsequent calculation of siding
  Today, the market offers a large assortment of siding from different companies. One of the popular Russian companies is Grand Line. Vinyl is different high quality. This material is highly resistant to impact as well as UV radiation.
Siding from the Nordside company is gaining increasing popularity. Read more about Northside siding. The material of this company has a wide range of colors. Northside siding does not collapse, is not affected by moisture, does not rot, does not rust, and the paint does not fade.
Preparatory stage
 The advantage of this type of material is that it does not require preliminary leveling of the walls. It is enough just to clean the surface from dirt or previous cladding, remove protruding elements (plinths, trim, gutters, etc.).
If cracks are found on the surface of the walls, they are sealed with cement mortar to prevent the accumulation of moisture in winter period.
Important! Wooden walls are cleaned of mold and fungi and treated with deep penetration primer and an antiseptic.
The surface on which the facing material is installed must be absolutely dry; this requirement is set by the siding installation technology.
Installation of sheathing under siding
 The lathing is made according to the principle:
- When laying siding horizontally, wooden or aluminum profile stuffed vertically
- Wooden blocks should have a cross-section of 20-40 mm. Lathing made of galvanized profile will cost 30% more, but it will be more reliable and durable
- The distance between the profile (bars) should be 30-40 cm. They are set to the level
- First, a guide is placed on the left corner of the wall, then a bearing horizontal one at the bottom, the next vertical one in the right corner. All openings are additionally tied
- When making the sheathing, the location of drains, lamps and other communications is taken into account. To do this, additional guides are mounted on the sheathing.
- The frame is attached to the wall using dowels (if the walls are made of brick, shell), self-tapping screws (wooden surfaces)
Carrying out insulation and waterproofing measures
Insulation (foam, mineral wool) fits into the crate. The main thing to consider is that you need to leave space for a ventilated space between the wall surface and the facing material to prevent rotting processes.
 The insulation is covered on top with a water barrier, installed vertically or horizontally with an overlap of 10 cm. The waterproofing is attached to the wooden sheathing with a stapler. The joints can be sealed with tape.
After carrying out heat and waterproofing measures, a frame is made directly under the siding. The principle of the lathing remains the same: a metal profile or wooden slats are packed in increments of 30-40 cm, and all openings are additionally framed.
Installation instructions for vinyl siding
 Installation of vinyl siding involves the following sequence:
- Installation of corner strips
- Attaching the starting bar
- Installation of J-profile as finishing edges of siding
- Trim around window openings
- Facing siding panels
- Installing the finishing strip
 The installation of the starting bar takes place around the perimeter of the structure; it is important to set it carefully. Fastening with self-tapping screws is used in increments of 25-30 cm, and perpendicular to the surface. The fastener is screwed strictly into the middle of the oval-shaped hole to prevent bending of the material. The main thing is that the self-tapping screw does not go all the way into the strip, that is, there is a gap of 1 mm between its head and the siding (for convenience, you can apply a coin). In the middle of the joining of two starting strips, a gap of 5-7 mm is required.
Window and door openings located in the same plane as the wall are sheathed with a wide J-profile (platband), into which the siding is subsequently inserted.
If there are slopes, then decoration is reduced to finishing with siding using an angular profile. Moreover, first the lower slope is lined (if there is no ebb), then the side slopes with a shift to the center of the opening to prevent the upper panel from coming out of grip in the winter, and finally the upper one.
When installing, the siding panels must fit into the starter strip and snap into place.. Then only the material is fixed with hardware. Fastening of the facing material occurs under constant level checking. For convenience, you can pull the rope.
The finishing strip is attached at the top under the roof itself, further from it the value is measured to the last siding panel. The adjusted strip is bent in an arc and placed under the finishing panel.
Vinyl siding installation cost
 ? The cost of installation work on siding depends on the following factors:
- Prices for starting materials, including the manufacture of lathing, insulation, waterproofing, type of fasteners
- Number of door and window openings
- Depending on the building material (brick, wood)
- With or without insulation
Video about installing vinyl siding
Vinyl siding installation technology.
Vinyl siding installation. Installation of vertical and horizontal siding, installation of soffit.
How to install vinyl siding yourself.
– an excellent material for cladding a house. At its affordable price, it has many positive operational and technical characteristics.
You are invited detailed instructions By self-installation siding. The guide is universal. Following its provisions, you can complete the finishing with any type that involves installation on the sheathing: fiber cement, wood, metal, vinyl, etc.

Installing the sheathing
Siding is best attached to pre-installed sheathing. We work in the following order.
The first stage - choosing the material

The frame can be assembled from wooden beam or metal profile. Metal products are stronger and more durable. In addition, metal lathing is much easier to attach to an uneven base.
Find out and also familiarize yourself with the calculation algorithm with an emphasis on possible nuances.
Installation of profiles is carried out in half-meter increments. Suspensions are used for mounting to the wall. This technique will allow you to level out differences in the surface and secure the frame elements at a level.

Wooden sheathing is cheaper. When choosing this option, pay attention to the condition of the wood. It is prohibited to:
- the material has peeled off;
- was deformed;
- had bluish spots and traces of rot, etc.
Elements of wooden sheathing must be impregnated with fire retardant and antiseptic. If the house is built from wooden elements, the walls should also be treated with the listed preparations.

Stage two - preparing the base
The sheathing is easiest to attach to a flat base. First of all, we remove any parts that may interfere. These are all kinds of tiles, bars, platbands, gutters, etc.
The third stage - installing guides
Siding is best mounted horizontally. In this case, we fix the bars or sheathing profiles vertically.
To attach the guides to wooden walls, we use nails or self-tapping screws. If the house is built of concrete blocks or bricks, we fasten it with dowels, having previously drilled holes for them in the wall of the house.
We align each rail by level.
Important! If you plan to do exterior work, it is best to install the siding sheathing after all insulation work has been completed. In this case there will be two lathing: for insulating materials and for cladding. In this case, the slats of the two frames should be placed parallel to each other.


You can, of course, try to lay insulating layers after attaching the siding sheathing, but this is not very convenient.

Mounting J-profiles
The starting guides must be secured perfectly, because... The quality of the entire cladding depends on the correct installation.

First step. Take a level and find the lowest point on the sheathing. We step back 50 mm from it and put a mark. To do this, screw a little self-tapping screw into the rail.
Second step. We consistently move around the building and continue to place marks with self-tapping screws to fix the starting profiles. We also screw screws into the corners of the house.
Third step. We stretch the ropes between the corner marks.
Fourth step. We mark the boundaries of installation of corner profiles on the slats. We take the profile itself and apply it to the corner frame structure and put marks along the edges using a pencil.

Important! We leave a 1-centimeter gap between the profiles to compensate for temperature deformations.
Leave a gap between the starting guides and the nail strips.

To avoid making a 6 mm indentation, you can cut off parts of the nail strips so that they do not rest against the J-profile during temperature changes.

Important! Starter profiles must be mounted strictly horizontally! Correct deviations as long as necessary.
If you install guides that deviate from the level, the siding will also warp. It will be extremely difficult to correct this in the future.
Prices for profile mounts
Profile fastenings
We install external corner profiles

First step. We mark the soffits. We need to see where the edges of these elements will be located in the future.
Second step. We apply the guide to the corner of the frame. We do this with a 3mm gap to the soffit or roof. We fasten the profile with self-tapping screws.
Place the bottom border of the element 0.6 cm below the edge of the starting profile.
Third step. Checking the vertical installation. If there are no deviations, we fix the bottom, and then the remaining places. Experts do not recommend placing fasteners in corner elements too often.

If the house is higher than 300 cm, the profiles will need to be placed one on top of the other. To do this, we trim the top profile. As a result, there should be a 9 mm gap between the planks of the joining elements. When laying the elements, maintain an overlap of 2.5 cm.


Important! We join the profiles at the same level on each side of the house.
If the base has a protruding structure, shorten the profile so that there is a 6 mm gap between it and the base.
Useful advice! Instead of a corner profile, it is allowed to install 2 J-elements (starting). This way you can save money. But this solution also has its drawback - the corner will not be as tight as when using a special corner profile. If you decide to use this method, first glue the wall around a similar corner with a strip of rolled waterproofing material.

We install internal corner profiles
The installation procedure for these elements does not differ significantly from the installation technology external corners– between the profile and the soffit we leave a gap of 3 mm, and lower the lower end of the profile below the J-bar by 0.6 cm.
If there is a protruding base or other element protruding from below general level, then we also leave a 6 mm gap between it and the profile - it is impossible for the profile of the internal corner to rest against it.
There are 3 methods of arrangement internal corners, see picture.

If the wall height is more than 300 cm, we join the profiles together. The technology is the same as for arranging external corners.

We leave a 9 mm gap between the slats, carefully cutting off excess material. overlap top element on the lower one - 2.5 cm. We install fasteners in 4-centimeter increments, placing them strictly in the center of the holes intended for this. The exception is the highest point. Here the fasteners need to be installed at the top of the hole.
We install frames of openings

For most inexperienced craftsmen, difficulties arise precisely at the stage of framing and doorways. The order of work will vary depending on how the openings are arranged in relation to the plane of the wall.
Openings in the same plane with the facade

In this case, we do the following.
First step. We waterproof openings.
Second step. We attach platbands or J-profiles to the openings. We equip each opening using 4 platbands: a pair of vertical and a pair of horizontal.
Third step. Connecting profiles.

To make the connection of the platbands as neat as possible, we do this:

The platband at the bottom is connected in exactly the same way, only the bridges will need to be cut and bent on the side elements for their further laying on the profile below.
Openings are recessed into the facade


When installing near-window profiles, we follow the same recommendations as when installing platbands, i.e. We create cuts on the profile corresponding to the depth of the opening, and then bend the bridges and insert them into the finishing elements.
Take the time to understand the principles of bending such bridges. We make them so that they cover the joint of the cladding elements. As a result, moisture will not be able to penetrate inside.

Installing the first panel

We start cladding from the least noticeable wall of the building. This way we can practice and work out all sorts of inaccuracies.

First step. We insert the first cladding panel into the corner profile and into the locking connection of the starting strip.
Important! We leave a 6 mm temperature gap between the first cladding element and the lower part of the corner profile lock.
Second step. Attach the panel to the sheathing.
It is important to maintain the dimensions of technological indents. If the cladding is carried out in warm weather, we maintain a 6 mm gap; if in cold weather, we increase the gap to 9 mm. When installing panel trims, the indents can be reduced.

Extending panels

We build up the cladding elements with an overlap or using an H-profile.
When attaching panels with overlap, you must first shorten the locks cladding panels and mounting frames so that the resulting overlap is 2.5 cm long.

Installation of the H-profile is carried out similarly corner elements– at the top we retreat 0.3 cm from the soffit, at the bottom we lower it by 0.6 cm in relation to the starting profile.
Important! We leave a 6mm gap between the H-profile and any obstacles on the house.
Installing the rest of the siding

We continue covering the house with siding. The operating technology is similar to the procedure for attaching the first panel.
Important! Every 2-3 rows we check the horizontality of the cladding using a level.
Having reached the opening, we remove the unnecessary piece of the panel falling on the opening.
We ensure reliable fastening of the panels using “hooks”. For this we need a punch.

We install an additional finishing profile at the bottom of the opening. This will allow the cladding to be leveled.

Installation under the roof

Under roofing structure We attach the J-profile.
We work in the following order.
First step. We measure the distance between the bottom of the lock of the finishing element and the lock of the penultimate facing panel.
Second step. We subtract a 1-2 mm indent from the resulting measurement.
Third step. We mark the whole panel, cut off its upper part with the locking connection.
Fourth step. We create “hooks” in the upper part of the element in 20-centimeter increments. To do this, we make cuts and bend them to the front side.
Fifth step. We insert the trimmed element into the penultimate siding panel. With a slight upward movement, snap the inserted element into lock connection finishing profile.

We mount the pediment
We sheathe the pediment around the perimeter. All fasteners, except the top one, are installed in the center of the holes. We install the upper fastening element at the top of the hole. It can be sheathed either with profiles for arranging internal corners or with a starting profile.

The installation procedure is similar to fastening wall panels. We trim the edges of the elements and connect them to the locks of the receiving profiles. We remember the 6 mm indentation when installing in warm weather and 9 mm when performing work in winter.
We fasten the last element of the gable cladding directly through the panel material - this can only be done here.

The cladding is complete.
Find out how, and review the calculations and step by step guide, from our new article.
In order for the finishing of the house with panels to be as successful as possible, you need to know certain subtleties performing such work. There is a list general recommendations for any siding, as well as separate tips for panels made from a specific material.
Now you can perform it yourself at the highest level.

| Name (model) | Benefits | Length x width x thickness, mm | Quantity per package, pcs. |
|---|---|---|---|
| Vinyl Siding "Canada Plus" | 1. Coloring in dark colors performed using the “Cool Color” method (heat absorption), which involves the use of masterbatches. 2. Excellent appearance remains unchanged even when exposed to high and low temperatures, the range of which ranges from -50°C to +60°C. 3. Retains shock resistance even if the temperature environment drops to -20 - 60°C. 4. Not susceptible to microbiological corrosion (fungi, mold). | 3660 x 230 x 1.1 | 20 |
| Acrylic Siding "Canada Plus" | Among other useful qualities acrylic siding“Canada Plus” is worth highlighting: Increased resistance to direct influences ultraviolet rays; Excellent tolerance to acidic and alkaline solutions, as well as various fats; Good tolerance to washing with chemical detergents; High degree of deformation resistance (perfectly tolerates temperatures up to 75°-80° C). | 3660 x 230 x 1.1 | 20 |
| "Alta-Siding" – Vinyl Siding | "Alta siding" is: one of the safest finishing materials on the Russian market; frost resistance and the ability to maintain strength even at very low temperatures(from -20 to -60°C); resistance to significant temperature changes and exposure external environment; durability: the service life of Alta-siding is up to 30 years; resistance to aggressive substances (can be used to clean siding detergents); non-susceptibility to infection by mold fungi. | 3660 x 230 x 1.1 | 20 |
| Facade metal siding INSI | INSI siding is made of galvanized steel coated with a layer polymer composition, which means it inherits all the advantages of this material: resistance to temperature changes (-50°C - +80°C) and mechanical damage; long service life with preservation of original properties (about 50 years); environmental friendliness; non-flammability; Possibility of installation both horizontally and vertically; protection of the building from overheating (in a ventilated facade system); and when choosing one of two new colors (alder or rosewood) - a complete imitation of the appearance. | Length up to 6000, width up to 200, thickness 0.5 | - |
Happy work!
Siding prices
Video - Do-it-yourself siding installation
Any owner of a private home certainly wants his home to have an attractive appearance. What to do in order to change its appearance in better side? What material would be most suitable for this? Solving these problems today is quite easy.
To do this, you just need to use modern building material - siding. It is quite affordable and has a number of advantages. In addition, you can install the siding yourself. Such work will not require special skills and knowledge.
Innovative material
The word "siding" means a material intended for covering various surfaces. At the same time, its main functions are aesthetic and protective. Once upon a time, an ordinary board was used for this, which was processed accordingly. And only much later panels appeared on the construction market, which we call siding. They began to be produced from a variety of materials.
Siding has gained immense popularity due to its strength and lightness, durability and attractive appearance. But that's not all. Such panels are very comfortable material for fastening. And this sometimes acts as a determining factor for those who study the question of how to install siding in order to do the work themselves.

Typically, all panels, regardless of the raw materials from which they are made, have certain dimensions. Their length reaches 6 m, width ranges from 10 to 30 cm, and thickness is 1-10 cm. Dimensions different from these can only be produced by a company that has small production. Sometimes panels are made to order. However, in this case their cost will be slightly higher.
The profile of siding panels can be made in two versions. This is a “ship plank” or “herringbone”. They provide, respectively, a double or single fracture. But for installation this does not matter.
All siding panels are covered with a protective layer, made either by painting or by applying a polymer film.
A huge advantage of this material is its wonderful performance, as well as maintainability. After the owner finishes the house with these panels, he can forever forget about impregnating the wood with special compounds, tinting the facade and other similar work. And to eliminate damage in the most short terms It is enough to simply replace 1-2 products, which does not require any preparatory measures.
Siding classification
There are some types of panels designed for finishing individual buildings. This is the following siding:
- Wooden. In my own way appearance it looks more like traditional clapboard. That’s what they call it – “laminated lining”.
- Vinyl. This siding is the most popular among owners individual houses and at the same time the cheapest. It is made from polyvinyl chloride or acrylic. Such panels imitate brick, wood or natural stone. For those who decided to change appearance your home, it is worth keeping in mind that vinyl panels are easily damaged at very low temperatures. How to install this type of siding? The peculiarity of finishing with vinyl panels is that working with them is possible only with sufficient warm weather. In addition, due to the fact that vinyl siding does not reduce heat loss, the enclosed surface will require insulation.
- Aluminum. This siding is characterized by its low weight and increased resistance to negative influence liquid media It is perfect for cladding needs. large areas. In this regard, it can also be used for high-rise buildings.
- Metal. This type of siding is so-called galvanized. Protective layer Polyester, pural or powder coating are used for it.
- Cement. This building material contains cement mixed with cellulose. To install it you will need enough robust design, since such siding has a lot of weight.
- Ceramic. This is one of the new types of panels designed for cladding buildings. Experts believe ceramic siding the best option among similar building materials, located in the middle price range.
- Basement. This type of panels is used to finish the lower part of the building. Such products are quite durable. After all, it is the basement of the house that is most susceptible to temperature changes, when in the summer it is heated by the blind area, and in the winter it is cooled by the soil and snow.
Tools
How to install siding yourself? Step by step instructions, which will help the owner in these works, in the first paragraph indicates the need to check the availability of the following tools:
- grinders or saws with fine teeth;
- metal scissors;
- screwdriver and screwdriver;
- hammer;
- roulette;
- square;
- level (you can take a laser tape measure, which will greatly simplify the work);
- stepladders that will allow you to reach the roof of the building.

Materials
Siding manufacturers offer a full range of panels and elements with which you can sheathe a house with even a complex configuration. The buyer, as a rule, indicates only the area of the walls of the house, their dimensions, type of roof, and the number of windows. The information obtained allows the seller to calculate the required number of necessary elements.
What are the components needed to install siding?
- Outer corner. It is used both for decorative purposes and to cover the ends of siding.
- Inner corner. They are used in areas where siding joins the wall.
- Wind board and soffits. They are installed when finishing the cornice.
- Starting bar. Its length is calculated based on the perimeter of the house minus the width of the doors and gables.
- L-profile. It is necessary in areas where there is a difference in roofs or heights, as well as where extensions are connected.
- Window slat. It covers the perimeter of the windows.
- Low tides. They are also used to frame windows.
- Drains or drain strip. These elements are installed around the perimeter of the base.
- The siding panels themselves.
- Galvanized screws (25-35 mm) or nails, which will be used for installation.

Preparatory work
What do you need to do to install siding yourself? The step-by-step instructions introduce us to these steps and indicate that some preparation will be required directly on the job site. First of all, you will need to dismantle all protruding elements of the building. These can be grilles and trims, doors. Next, you will need to seal all existing cracks in the walls, around windows, etc. To do this, you can take polyurethane foam or cement mortar. If the house is old, then its walls must be cleaned of dust and dirt, mold and paint, chipped plaster, and rotten areas. Wooden houses on preparatory stage installation is treated with antipyretics and antiseptics. Walls made of foam concrete are coated using a deep penetration primer.
Lathing material
It is worth keeping in mind that the siding itself is not attached directly to the walls. That is why at the first stage of installation you will need to build a sheathing. This is a special frame on which the panels will be attached. Installation of siding without sheathing is possible only if the walls of the house are wooden and at the same time have a perfectly flat and smooth surface. If the wall of the house is poorly leveled, which usually happens, then you will need to build a sheathing from wooden slats or a metal profile. This will be the basis for the cladding panels.

How to install metal siding? The only option for this type of panel is a galvanized profile. It is also used for concrete and brick walls. A CD profile designed for drywall can be used as such a material.
How to install vinyl siding? For this type of panels used for wood or frame house, it is necessary to prepare a sheathing of slats measuring 60 x 40 mm, the residual moisture of which is in the range of 15-20%. They must first not only be dried, but also treated with an antiseptic.
Frame arrangement
To install the sheathing, you will need to draw straight lines on the walls of the house, thus obtaining a closed contour. To ensure that they are horizontal and even, a level and tape measure are used. After this, the distances in the corners of the house to the base are measured from this line and, having found the smallest of them, a second contour is drawn. It is along the bottom line that the starting bar will subsequently pass.
At the next stage, the vertical components of the sheathing are installed. This work must be started from the corners. It is worth keeping in mind that the sheathing must fit snugly against the walls of the house, for which purpose pieces of dense foam or wood are sometimes placed under it.
Insulation and waterproofing
How to install siding? If the panels are installed on aerated concrete or wooden walls, then a mandatory stage of work will be the installation of waterproofing. Insulation can be laid at the request of the owner.
The most popular waterproofing material in lately is a moisture and windproof membrane. If the walls are not insulated, then the film will need to be fixed directly to the facade of the house. This will save the space needed for siding ventilation. If an insulating layer is installed, then waterproofing should be laid on top of it. Afterwards, a sheathing is constructed to provide a ventilation gap.
Installation of J-profiles
How to attach the starter siding strip? This guide piece must be installed perfectly level. The quality of the entire facing surface will subsequently depend on its correct horizontal position. How to properly install this strip? To do this, you should use step-by-step instructions:
- Take a level and find the lowest point on the sheathing. After this, stepping back 50 mm upward from it, put a mark, which will serve as a self-tapping screw slightly screwed into the rail.
- Consistently move around the building and continue placing the marks necessary to fix the starting strips. In addition, self-tapping screws must be screwed into the corners of the house.
- Moving further along the line, leave a 6 mm horizontal gap from the planned edge of the corner profiles.
After all this work has been carried out, the starting guide for the siding panels is fixed to the frame slats with self-tapping screws or nails.
Installation of a spillway
How to install siding? Work on paneling a house should begin with the installation of a drain. It is necessary to protect the base. The upper edge of the drain, which is a hinged strip, should be located along the previously marked lower line on the facade of the house. This design is quite rigid. That is why its installation will not be difficult.
Installation of corner profiles
How to install vinyl siding? After completing the sheathing and installing the drain over the base, the turn of the corner profiles comes. They are rigidly fixed along a strictly vertical line. If you follow the instructions for installing siding, then the upper edge of the corner profile will need to be positioned 5-6 mm from the eaves. The lower one, on the contrary, should fall 7-8 mm from the established starting bar. Installation of siding corners, if one strip is not enough, is done with an overlap.
The fasteners should be made in such a way that the upper part floats over the lower part. Corner profile fastened with nails or self-tapping screws at intervals of 20-40 centimeters.
Framing openings
Most inexperienced craftsmen find this stage of work the most difficult. However, to complete it, it is enough to carefully study the siding installation instructions.
J-profiles or window trims should be secured so that their outer bottom edge is slightly lower than the inner one. When framing doors, the corners of the elements are filed at an angle of 45 degrees or overlapped when the top planks are overlapped with the side ones.
Siding fastening
After carrying out all the above work, you can begin to directly cover the house with panels. It is worth keeping in mind that vinyl siding should only be attached to the special holes it has. It is not recommended to pierce the panel with nails and screws. Otherwise, the service life of the product will be significantly reduced.

Attaching siding to wooden sheathing. His first row must be connected to the starting bar. You need to wait for the lock to click from below, and attach the panel to the top with self-tapping screws. All other rows are installed according to the same principle. After installing the last panel, you need to attach the finishing strip to the sheathing.
Some owners, in order to give their home a more attractive look, decide to install basement siding on its facade.

How to install these panels? Such work is similar to that described above for building facades. The fasteners for siding are the same - nails or screws.


