The corner plaster with a grid is used in construction quite often. It greatly facilitates the finishing of corners and allows you to make a high-quality plane.
Today we will tell you how to use plaster corner with a grid and where. You can also watch the video in this article and the photo, where everything will be shown clearly.
The technique of performing plaster work
The plaster mesh corner is made in two versions, this is for the outer and inner corner. Also, the material of manufacture can be plastic or metal. The choice will depend on the shape and material of the finished plane.
All work can be completely done with your own hands, then its price will not be significant. Let's now consider different variants work.
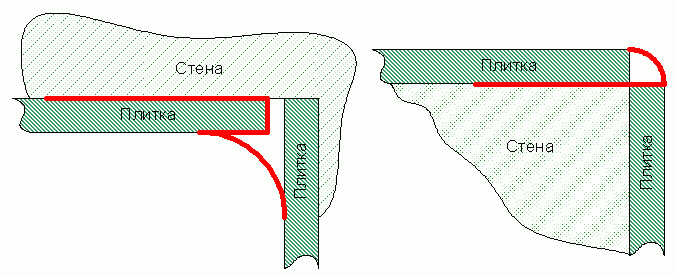
Interior corner finishing

When carrying out work on plastering walls, interior corners are finished in two ways:
- Docking of processed and lined walls,
- Carrying out work on plastering two walls at the same time.
Attention: Corner plaster mesh will be used in both versions. It will allow you to maintain the direction of the angle in a geometrically correct form and significantly strengthen it.
- Spraying and a layer of primer (see What is a primer for: technological nuances of finishing work) is carried out according to the classical method, leveling is carried out using the rule, starting from the corner and further along the wall. Then they begin to form an angle, for which markings in the form of scratches are made on the surface of the solution.
- A grater or trowel must be applied with an edge to a previously plastered wall. The angle should be approximately 30 - 40 degrees. Then you need to bring it to the inner corner, lay it on the newly lined wall surface and rub it. Movement should be up and down. After that, the tool should be laid with its base on a freshly plastered surface, pressed against the lined wall with an edge.
- Making movements with significant pressure, they clean it from plaster mixture. It is necessary to wait for the primer to harden, and then apply the final layer on its surface - the coating.
- The smoothing of the final layer of the covering is carried out using a grater made of wood or foam. In this case, care must be taken not to form bubbles, recesses and protrusions. It is important to achieve an even coverage of the entire wall.
At the final stage of processing the corner, the grater must be held so that its lower edge lies on the lined side, and the corner slightly touches the newly plastered surface. - The tool must be driven up and down the entire length of the corner. The result of the measures taken will be a strictly verified edge between two combined walls.
- According to the same technique, two joining walls are processed.
Attention: To smooth the mortar, it is worth purchasing an angled spatula. This will allow you to maintain the correct corner geometry.
Finishing the outer corners
The processing of external corners is carried out in two ways. They are suitable for repair work and for construction.

So:
- The first processing method uses an angular profile made of metal. This allows you to simultaneously plaster both combined walls, while achieving high corner strength.
- In the second method of processing, the work is divided into two stages. Both sides of the corner are plastered in turn.
Attention: The corner-protective plaster mesh profile makes it possible to obtain without much effort outer corner walls, characterized by high strength and a flat surface.
- Both sides metal profile attached to its central part and are grids. Their thickness depends on the rail model. Fix the profile with a regular solution and allow it to harden. After that, a primer layer is applied.
- Corner rail can be installed on a small layer of plaster. To do this, apply the solution, starting from the floor and up to the ceiling. This will simplify the work of leveling the profile. Any metal corner profile can be easily shortened if required.
- Shelves – grids can be easily cut with metal shears, and cut the central part with a saw. The installed rail can be used as a beacon when smoothing the primer layer.
The frozen solution is cut using a steel trowel.
Any repairs involving ceramic tiles involves the use of special devices that allow you to quickly cope with the joining of the ends of the elements. Quite simple and easy to handle corners for tiles, they significantly speed up the process of installing tiles.
Through such details, evenness of the coating at the joints is achieved. tiles. In addition, they provide masking of defects in the ceramic itself, which could occur during trimming. Corners have different sizes, in length can reach up to 2.5 m. Such elements make the coating more perfect, and the room more stylish.
What is this article about
Varieties of corner elements
In accordance with the type of joint being processed, the use of a particular type of corner will also be determined. For example, quite often the outer joint of a ceramic coating experiences mechanical damage. For this reason, it needs to be strengthened. With better strength and resistance at the corner, tiles can more easily cope with the resulting loads that are inevitable in a residential area. It is also important to note the safety of operation of closed traumatic joints. This is especially true for those who have small family members living in the house. So they will not be threatened by the sharp edges of ceramics, which were protected in advance.
Sometimes corners are called by another term - trims. This name of building parts can be seen in the description of the products of some brands.
Regardless of the name, all corners for ceramic cladding are divided into types according to the type of material and purpose (for internal or external joints). In addition, there is a difference between parts designed for vertical and horizontal installation.
The need to use
Some do not see much point in installing tile corners, as they do not fully understand the meaning of their use. In this connection, understanding this issue is extremely important. The obviousness and benefit of using corner pieces for tiles lies in the following reasons:

- To mask the inaccuracies of 45-degree sawn tiled ends. After installing the corner profiles, the need for sawing the tiles completely disappears;
- The presence in the corner structure of a special groove for inserting tiled elements allows you to hide irregularities, makes the joint neat and beautiful;
- Such a decorative element gives elegance to the ceramic canvas. For example, a corner matched to a tone darker, combined with tiles of a slightly lighter shade, is an excellent design move;
- An important role is given to the corner fasteners in rooms with a complex layout, with a large number of turns and joints. The corner profile greatly facilitates the decoration of such premises, makes it possible to tile complex surfaces.
Choosing the Right Option
The choice of a suitable product is based on the thickness of the tile itself. On sale there are similar building elements numbered from 6 to 12. Each designation indicates how much distance there is from the edge of the corner to the base.
The recommendations of experts boil down to the fact that the choice of trim is carried out according to this rule - its size should exceed the thickness of the tile by 1 mm. For example, if a tile with a thickness of 8 mm is purchased as a cladding, then for the corner processing of the coating, you need to purchase a “nine” profile-corner (that is, a size of 9 mm).
Before going to the store, you need to decide on the number and type of elements needed for subsequent repair work. Moreover, work can be performed using tiles different thickness what to consider when buying trims.
The number of corner profiles is calculated based on the dimensions of the product and the sum of the lengths of the outer joints to be processed.
The choice of trims is also carried out according to the required color. In specialized stores, a range of profiles in different color scheme very wide. Which is quite good, especially when using colored ceramic tiles. Therefore, it would be useful to take a ceramic sample of the coating with you before going to the store in order to more accurately determine the color there. Precisely because of the need for combined color design experts recommend purchasing a corner profile together with a tile.
Classification of products by type of material
Corners for tiles can be made from several materials, which underlies their division into several types according to this feature.

- Plastic. These types of elements are made of PVC profile. The main advantages are lightness, elasticity of products. They are easy to use and waterproof. Samples should be selected that do not bend during laying, otherwise the entire tile will be broken. They strengthen, insulate, decorate the finish;
- Metal. When using heavy large-sized rectangular tiles, metal corners are the most good decision. Their reliability determines the ability to withstand the loads of heavy elements. They are demanding on the evenness of the coating, as they are difficult to bend. In this connection, before laying, they are checked for evenness, if deviations are detected, they are eliminated. This is done by simply pressing on the surface at the point of curvature with a general sagging of the material.
These products are available in brass or stainless steel. From above they are complemented by a chrome or nickel coating, they can be painted in silver, gold, etc. shades.

- Aluminum. These are light, durable and simple, relatively cheap analogues. They are easy to match the design of the coating. The stores are presented in a wide range;
- Ceramic. Their functions are similar to those that distinguish aluminum products. Outwardly, they may look like an imitation of the pattern of a certain collection. There are options that reproduce the pattern of the tiles themselves with their design.
Design features
The use of corner elements implies awareness of their design characteristics.
By type of construction, corner elements are divided into 3 varieties:
- soft;
- semi-rigid;
- tough.
Aluminum or metal belong to the rigid type. In the unpainted version, they are presented in a gray tonal range. Their price is higher than that of plastic ones, which is due to the higher cost of raw materials.
Semi-rigid are PVC products. They have some flexibility. The common shade is white. They do come in any color though. A rare exception is black products.
Soft options have a PVC base and silicone edges. Their convenience implies successful use on smooth and embossed tiled surfaces. Has a wide range of colors. Minus - more expensive in cost in comparison with analogues. However, the price for them is lower than for rigid ones, but higher than for semi-rigid ones.
Installation of corner structures
Until now, the opinions of tilers differ as to what needs to be done first - lay a ceramic coating or install a corner profile. Some of them try to fix the trims first by leveling the trims according to the horizontal and vertical. And only after that they proceed to laying the tile and trimming its joined parts.

Others act differently - first they lay ceramic tiles on the surface to be tiled. And already on top of the finished ceramic cloth impose corners. This option is technically considered simpler. However, it is important to observe such a nuance here - carefully control the correct fixation of trims. Despite this, a better and more accurate coating is created when approaching with the initial fastening of the corner structure.
The recommendations of experts boil down to the thoroughness of marking and sawing the joints of tiled elements in order to ensure clear compatibility in difficult corners. From the degree of quality of this work will develop general impression from all repairs in the room.
Here the use of additional devices plays an important role. For example, to mark angles by 45 degrees, use a universal or school triangle. For the accuracy of calculations, the whole baggage of school knowledge in mathematics, especially in geometry, is useful. Mounting the tile, all the time check the accuracy of the location of the trim. If its position is lost, the errors are immediately corrected. Only a responsible approach to business allows you to achieve a good result from the implementation of tile work.
After the installation is completed, after waiting for the glue to dry completely (which takes about a day), the work is checked for defects. which are removed immediately.
Such an insignificant detail in the entire installation and tiling process, as an outer metal corner for tiles, is in fact an important component that allows solving many problems of residents in the future.
Modern tile corners only seem to be a simple and not always necessary decorative element. With them right choice and high-quality installation, laying tiles is much faster, and the resistance of the entire surface to mechanical and hydraulic testing increases significantly.
Why install fittings when laying on tiles
Functionality of plastic and metal corners for tiles are very diverse. It's safe to say that uh These elements are among the most underestimated when working with ceramic tiles - just look at the list of operational benefits from using corners:
- Ease of laying tiles at joints and corners. As you know, this stage of work is always associated with trimming facing ceramics, whether it is tiling a porch or installing it in sanitary facilities. Without corners, you need to cut tiles perfectly accurately - with them, the "run-up" of the dimensions of the tiles can be measured in centimeters, depending on the dimensions of the decorative elements.
- Low labor intensity of "corner tiling". for long service and attractive design the mating of ceramics should be carried out with chamfering at 45˚, and for this you will have to grind the wrong side of each tile on a grinder or emery machine, manually such a procedure will require many tedious hours of monotonous work.
- The outer corner, lined according to the above procedure, will be sharp. So sharp that it will be easy for even adults to get hurt on it. For children, sharpened tiles are a serious danger, especially given the constant humidity of the floors in the bathroom. Installing any corner is guaranteed to eliminate such a risk factor.
- Insulation of joints from moisture. In any tiled surface, there will definitely be mounting slots - in the corners they are the most difficult to seal. Over time, any fugue or solution tends to crumble and fly out, which fungus, mold and colonies of moisture-loving microorganisms are only happy about, but you can’t say the same about the owners of a recently renovated bathroom or kitchen.
- The corner of the tile lined with metal or even plastic becomes much stronger for mechanical tests - accidental impacts, sudden movements when installing massive plumbing, etc.
- Decorative variations of such a finish of ceramic joints and turns are also very significant - the number of colors and textures of corners for tiles is measured in dozens.
Corner finishing of corners and joints of ceramic cladding is relevant primarily for bathrooms, kitchens and toilets, but it is also used for original repairs in halls, corridors and even in living rooms. The work is similar to installing a joint between laminate and tile, except for less impact and mechanical strength overhead connections.
Aluminum, plastic or ceramic - which one to choose
There are several types of corners for facing tiles on the market.
This is a unique list.
- aluminum - made of special alloys;
- plastic - made of polymers, flexible enough, which gives a plus during installation;
- ceramic - the most expensive of tile fittings.
Corners should be chosen, taking into account the required length, width, color. When choosing a material, pay attention to quality, design and ease of processing.
Photo gallery: types of decorative fittings for ceramic tiles
Installation of plastic corner fittings is simple, but it also has its own secrets. Easiest to cover with plastic outer joint- due to its light weight, it will adhere to any waterproof sealant, work can be done on an already laid tile. The flexibility of the plastic also plays a beneficial role, allowing you to bend the finishing fittings, repeating the slight irregularities of the mounted ceramics.
Corner set up is easy
However, there is another way to install corners for tiles made of plastic and aluminum, it is used for horizontal turns - when designing shelves for bathrooms, aprons, "boots", etc. The method provides for the removal of the lower part of the structure, with high horizontal accuracy and subsequent installation immediately corner and top tile. The corner element has a wide bottom shelf, which is located between the top tile and base surface, i.e. immured in solution. In the same way, the internal corners, with cemented fittings.
Metal one-sided and two-sided fittings can play the role of beacons when installed on the vertical corners of the repaired room, both external and internal. This method of finishing is fundamentally different from the finishing sticker of the corners, because with it the decorative corners are at the same time guides, beacons for the entire tile.
Consider the case of a comprehensive renovation in the bathroom, with ceiling cladding with plastic panels, and walls and floors with tiles. We will assume that old finish successfully deleted and new plumbing already installed, connected and tested. Before installing plastic and ceramics, the shower and sink will have to be taken out - they will only interfere finishing work. new bath it will not be possible to endure with all the desire, so it should be carefully covered with thick cellophane.
Pay special attention to all drain holes so that construction debris does not get into them - both in the bathroom itself and those intended for the shower cabin and sink.
It is unwise to nail slats next to freshly laid ceramics. Myself plastic ceiling it is mounted after laying the tiles on the walls, but the frame for it is nailed in advance: strictly according to the level, exactly horizontally, from rails of considerable width - it is necessary to take into account the thickness of the tiles and mortar on the walls.
It is preceded by a thorough measurement of the floor and walls with the search for the deepest points. One of common mistakes pre-installation of corners for tiles, external and internal, just lies in the wrong mounting clearance. Or it turns out to be too large, and then it is required preliminary plaster wall surfaces. Or, on the contrary, as the ceramic surface grows, there is not enough space for the last tiles, and you have to cut the wall, which is even worse.
Measurements need to be taken first.
Installation of corners is carried out from the ceiling to the surface of the finished floor. Each element is fastened in at least 3-4 places per meter, fastening is carried out with self-tapping screws to plastic plugs hammered into the walls. It is very important to accurately orient each beacon-corner. It should not just be located strictly vertically.
The corner must be installed strictly vertically without gaps
The outer shelves of each corner must be placed parallel to the "neighbor" on the same wall. Therefore, self-tapping screws are first “baited”, and only after reaching the required accuracy are they tightened. At the same time, you can mount the same corners to the floor - this will give a finished look to the design of the entire room and facilitate the tiling stage of its decoration.
The corner must be firmly pressed against the tile
Laying tiles on even beacons-corners is a pleasure. Work begins from above, where the whole tile looks attractive. It is much more preferable to cut the bottom row than to expose "trimmings" at the top. A fishing line is stretched for each parallel row, and the tiles march along it, like trained soldiers on a parade ground. With a sufficient width of the shelves, trimming the final tiles can even be done with wire cutters, since all the irregularities will be hidden by decorative corners.
Video: installing plastic corners for facing tiles
Of course, you can lay out the walls and floor with tiles without corners at all. Or limit yourself to decoration with plastic skirting boards at the final stage of finishing. But corners will provide long-term reliability and give a neat appearance, protecting the cladding from all adversity and protecting you from sharp ceramics.
Tiling is not complete with the use of ceramics alone. The finished look and operational reliability also depend on other materials. Corners for tiles (they are also called layout for tiles) are one of them. They mask imperfections, decorate corners and protect tiles from chips, fungus and mold.
Today, the use of tile layouts is often abandoned in favor of more decorative way- Grinding corners at 45 degrees. Monolithic laying is appropriate when using expensive ceramics; in this case, the tile corner may not look very presentable. And yet, tile layouts are still in the lead. Moreover, in some cases, one cannot do without them, for example, when facing steps (anti-slip profile) or an apron. On dangerous outdoor corners in the bathroom, where you can easily slip, it is better to install a plastic corner than to leave sharp corner from sawn tiles.
Corners for tiles come in all sorts of shades and various forms. When facing, you may need an external profile for tiles, internal and for stairs. Let's consider each option in more detail.
Quick article navigation
Outside corners
Most popular type. Used when facing external corners. On sale, mainly, there are sizes of 7, 9, 11 mm (with a length of 2.5 m). One side is a groove for tiles, the other serves as a decoration and protection of the plates from impacts and chips. The hidden part is perforated for better adhesion of the layout for tiles and ceramics. Produce decorative elements from:
- plastic;
- aluminum;
- brass and other materials;

Installation of corners
Profiles for tiles are mounted when one of the two walls that form the outer corner is already ready. Sometimes trims (layouts for tiles) are left for the end of the work. This happens under unforeseen circumstances: there were problems with the delivery, there was a marriage, etc. However, this situation requires advanced qualifications and more serious calculations from the tiler. The slightest inaccuracy can lead to redevelopment or resignation to flaws.
Proceeding to the next wall, from the back side of the already finished one, a groove for the layout for the tiles is started. The product must match the size of the tile. A tile will not fit into a smaller format corner, and a larger trim will force you to use more glue and will hang out.
If the tile does not fit into the corner, grind off the reverse side with a grinder (3-5 cm from the edge).

To start laying the next wall, and the tile corner did not slip, it is attached to adhesive tape or tile glue is used. The perforated side should be parallel to the tile to allow the perpendicular ceramic to lie flat and tight. Be sure to fill the joints with glue - voids deprive the design of functional meaning. Without a trained eye, it is better to spend time squeezing out the excess mixture than to put up with hollowness.
The video shows the installation of the layout using the example of a difficult place - slopes with a double outer corner:
http://www.youtube.com/watch?v=b-9JPxPx2ks
Trimming corners
If the ceiling is suspended and lies on the tile, cut the layouts for the tiles, do not leave yourself or others the need to continue trimming.
A separate discussion deserves the installation of trims in the area of door and window openings (or in similar situations). To arrange the elements perpendicularly, you need to cut their edges at an angle of 45 degrees. Do this very carefully, otherwise there will be gaps or profiles for the tiles and will not lie at all without bends or burrs.

Cut layouts for tiles with a metal blade or a grinder. Better first, since the method involves the possibility of using a miter box. And without this tool, it is very difficult to achieve the required angles. In any case, precise trimming is not possible without practice, and this is not as easy as it seems at first glance. Sometimes the geometry involves combinations of trims, for example, horizontal corners for a tile and a vertical one are joined at one point. It takes skill to masterfully juggle compliance with the requirements for cladding and installation of profiles.
Corner repair
It happens that you no longer like the layout for tiles, or maybe the profile for ceramic tiles was damaged. In such cases, repairs are needed, but how to remove the trim, and even more so, install a new one? This is tedious, but doable:
- carefully, so as not to damage the tile, cut off the old outdoor corner for tiles;
- prepare a new one;
- cut the back of the trim;
- if necessary, level the place under the profile without touching the space under the tile;
- glue the layout with liquid nails or silicone;
Internal corners
Unlike external ones, these are not very common. To decorate the outer corners, you need to trim the tiles or decorate with profiles. Internal ones are not required, because without them the interior does not suffer at all. Still, a certain percentage of people feel sympathy for them, so consider them. 
They represent a little more complex structure, consisting of:
- groove;
- perforated rib;
- front concave part;
As in the previous case, mount the layout under the tiles, facing one of the walls. In fact, it's easier to cut off the back and glue the corners to the silicone. This simplifies the installation process:
- easier to glue
- work can be done at the end of the cladding;
Using both types of corners, before grouting the joints, it is necessary to clean the joints between the profiles and the tiles from glue. If the profile is plastic, be careful not to scratch it or cut off the layer.
Design options for internal corners:
Stair corners

The use of profiles on stairs is controversial. The question concerns the aesthetics and durability of the cladding. Layouts on the steps are of two types:
- ordinary - similar to wall ones;
- invoices;
The first do not carry great functionality, they serve decorative purposes. However, their use undermines the solidity of the structure, the risers are half a centimeter away from the covering plates. On the one hand, tile layouts provide a certain protection of the joints, but on the other hand, as a result, they lead to a decrease in the life of the stairs. They allow the possibility of accumulation of water, which, due to temperature fluctuations, gradually destroys the integrity of the steps.
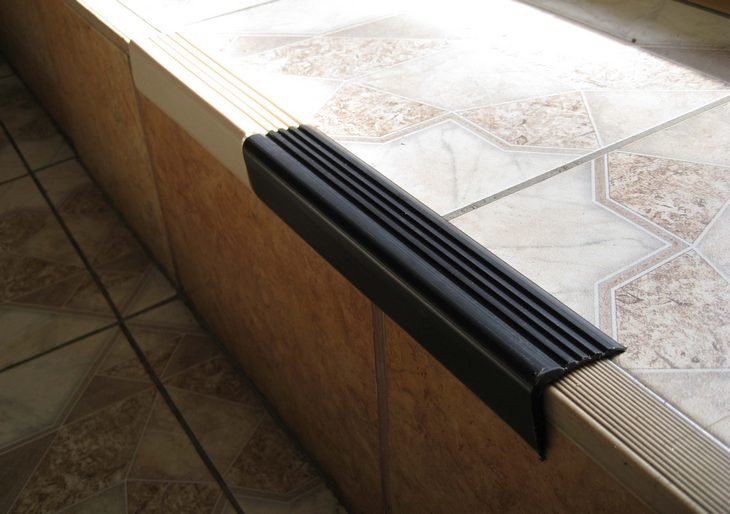
Overlay profiles provide slip resistance and, unlike simple ones, are often necessary. It is important to understand the nuance of operation: water accumulating near the corners negatively affects the cladding. To avoid this, it is not recommended to mount with a continuous web. Make drainage gaps between tile layouts, and the staircase will last much longer.
When installing on steps, we are talking about metallic materials, no plastic.
Other corners
Profiles are required when installing thresholds and at the junctions of dissimilar materials. There are many variations, as a rule, they are mounted mechanically- with fasteners. The installation is tied to the edges of the tile, so be careful not to chip the tile.
Sometimes layouts for tiles are needed when arranging a low winding step. For such cases, there are corners with a flat working part and a combed back side, which allows you to smoothly bend the profile. It is important not to violate the border of the "painless" bend.
We considered options for corners for tiles. Despite their collective-farm appearance, you should still not abandon them in traumatic places and inexpensive repairs.
comments powered by HyperCommentsCorners play a bigger role in the interior than it might seem at first glance. It is enough to look at their uneven or “erased” surfaces, so that it immediately becomes clear: no one will call such a neat finish. decorative corners on the corners of the walls, the slopes of the door and window openings began to be used everywhere during repairs only in last years. Until then, the materials that covered the joints simply changed more often than the rest of the finish.
You can appreciate the transforming effect of a decorative element even in an empty room without furniture. According to the type of location, they are classified into two types:
Also, elements are classified into those that are superimposed on outer sides corners and those that are inserted into the internal ones. The latter may have semicircular shapes that "soften" the finish. You can make a corner with your own hands, or purchase it in a specialized store. Products are made mainly of plastic, MDF, but there are also more durable metal, stone options. Polyurethane effectively imitates various natural materials: wood, marble, sandstone, brick. Plastic corners are used not only as a decor, but also as a durable finishing element that will outlive wallpaper or other less durable wall surface coating. There is also a “mystical” component to the question. According to Feng Shui, the “junctions” of the walls are considered energy breaks that create an imbalance and negatively affect the perception of the situation, so their edges are decorated with corners, “smooth out” the sharpness.
What are decorative corners for?
Corners most often “touch” people passing by with their shoulders, elbows and carried objects. Accordingly, it is this part of the wall that is erased and scratched more than the rest. To protect the joint from mechanical impact, a decorative corner is attached to it - a special type of finishing materials, a special "overlay". It is designed to perform two functions:
- Decorate the finish;
- Protect the "sensitive" area.
In addition, the decoration using these elements looks neater, and the interior seems finished. With the help of the material, color and size, you can emphasize the features of the style used in the design of the room.
When to apply
The corner part of the wall is covered with decorative elements in several cases:
- If the corner has visually noticeable defects: curvature, "dimples" or protrusions that have not been corrected with plaster;
- When the protruding part interferes with the passage or is located next to the "pedestrian" zone. Accordingly, it will constantly be touched, washed, scratched. With time mechanical damage become noticeable and adversely affect the sensitive wall finish and its appearance;
- If without them the interior does not look complete;
- To prevent the destruction of the outer corner of the building and give the exterior a neat appearance.
The installation of elements usually completes the repair: they are in literally become the final touch in the design.
Size of plastic corners
The standard size range of PVC corners starts from 10x10 mm and ends at 50x50 mm. Between them, a gradation with a difference of 5 mm is used. Parts of non-traditional sizes are made to order. Between the two guides of the decorative element, an angle of 90 degrees is observed, at which all planes of the apartment should intersect. If you got housing with “curved” walls, then you need to take appropriate measurements and contact the master with a request to make individual details.
Types of decorative corners on the walls
Corners are universal finishing elements. They are glued in bathrooms, kitchens, bedrooms, balconies, offices and living rooms. Decoration is carried out using several types of elements:
- Arched, for plasterboard partitions;
- For ceramic tiles. The same category includes profile strips for the bathroom;
- Corners made of natural and artificial stone;
- Options made of wood;
- Special guides for siding (exterior design);
- Corners for ceiling and floor "joints";
- Textured options;
- For external and internal corners;
- Corners for openings of doors and windows.
Each of the types is combined with a certain wall decoration and organically merges into specific styles. Not only walls are decorated with corners, but also fireplaces, stoves, furniture, “boxes” for masking communications and pipes.
Arched
Arched corners are used under plaster or glued on top of an already finished surface. "Internal" elements provide smooth straight lines. Corners for semicircular partitions are characterized by increased flexibility, which allows them to be tightly bent to the curved surfaces of the base. If the decorative wall has a strict rectangular or square shape, then the decorative elements can be selected from standard plastic options designed for simple walls.
For ceramic tiles
Ceramic tiles are used for walls and floors in kitchens and bathrooms. At the corners, the tile joints are tightly sealed, they do not let water through, but they collect dust, dirt and grease (in the cooking area). Also, it is these places that are usually used by bacteria and fungi to organize their "hotbed". Microorganisms will not get under properly processed seams, but they may well arrange a comfortable “housing” for themselves on their surface. When cleaning tiles Special attention It is advised to focus on these areas. The overlay of the corners allows you to reduce the scope of work and make the place of convergence of the walls reliably protected from the adherence of dirt particles. In addition, the decorative element will competently mask uneven tile sections, and options that contrast with the color of the tile will add chic to the room. Corners are divided into two types:
- Internal. They are used to decorate the joints between walls and ceilings, floors, shower cabins, that is, “depressed” corners. Usually they have a convex or concave shape (fillet);
- Outdoor. Used in the processing of protrusions.
Popular plastic for decorating tiles is not used, since the main coating can compete with polyurethane in terms of durability and strength. We also need all the finishing elements to “grow old” in approximately the same way, otherwise, due to the corner that has become unusable, the tile will have to be “disturbed” once again. To decorate tiled surfaces metal and ceramics are used.
There are so-called "tape" corners. They are made of flexible plastic, are available in "bobbins", have high flexibility, and are easily replaced if necessary. This option is ideal for quick repairs.
For outside and inside corners
Separately, the elements are classified into external and internal. The former are used to decorate protruding surface joints. The latter are used less often in "concave" corners. The latter are not so in dire need of protection, so the overlays are only needed to decorate the finish. Internal corners usually have a semicircular concave or convex shape.
textured corners
Textured options differ in color and pattern. They are usually made of plastic. Often the corners imitate a certain material: bricks, marble or granite surfaces, porous stone, wood (wenge, cork, oak, cherry). A variety of shades allows you to choose a contrasting or background option for a particular interior.
Wooden
Wooden corners are usually made of thin MDF boards, bamboo, cork or veneer. In terms of lightness, the materials are not inferior to plastic. MDF is flexible, and a decorative layer with a protective film against damage is applied to the surface of the compressed sawdust. In veneer versions, the element is made from thin wood cuts, that is, it is more natural and has a natural pattern. Solid wood corners are denser. Glued to the surface, they will protrude slightly on it.
Not recommended to use natural wood in bathrooms and kitchens. Before attaching the material, it should be covered with a layer of varnish. wooden elements most often made independently. Unfortunately, a cracked corner can be deformed, and from hard hit give crack. For the natural beauty of the decorated surface, you will have to “pay” with a lower service life.
Corners for ceilings and skirting boards
Ceiling and floor plinths at the junctions of individual modules have a very unsightly appearance. No matter how carefully the sections are processed, they will slightly shake the aesthetic picture of the interior. For their disguise, decorative corners are used. By appearance they are different from wall options: They look like small overlays that are designed to cover a small area. For ceiling plinths with stucco in classic styles acquire special corners with monograms, repeating each bend of the connected straight lines. On the ceilings, the use of elements is not mandatory, which cannot be said about the floors. Here, skirting boards are constantly in contact with the feet of guests and household members. Their "joints" can loosen, fray and become completely unusable. Corners will save skirting boards from rapid wear.
AT design compositions the lower decorative elements sometimes overlap with the upper ones. This solution ensures the integrity of the composition, so the ceiling and floor plinths often have the same shape, respectively, and the corners for decorating them are identical.
natural stone corners
Decorative elements made of natural stone are usually used to decorate the facades of houses. Due to the strength of the material, they serve as excellent protection against the destruction of the building. However, with the popularization of the industrial loft, brick and masonry became an organic addition not only to the exterior, but also to the interior of the house. Such corners will necessarily "protrude" slightly above the surface. You should choose flat stones that will provide a neat look for the whole structure. Hold them together cement mortar, that is, the corner will be monumental and installed for a dozen years. Combine elements with plasterboard walls, relief plaster and wooden lining.
artificial stone corners
Corners made of artificial stone are classified as cheaper and practical options. As a rule, imitation is made of plastic. It repeats not only the color, but also the “rough” texture of the surface. PVC is flexible, often goes beyond the "boundaries" of the corner and crawls onto the wall itself. This solution is used in order to create the illusion of natural scenery, because real masonry is usually not adjusted to the ruler. Combine a corner with wallpaper and the same plastic panels.
It's important to know. The most budgetary imitation of stone on the corners are dense wallpapers. Curly pieces are cut out of them along the contours of the pebbles and glued to the joint. Such an element will not protect the surface from scratches and damage, but it will cope with the decorative task.
Options for using a corner profile for finishing corners
The corner profile is used to decorate the following elements:
- "Natural" joints between walls that are in a vertical plane;
- Door and window slopes;
- Places of "convergence" of ceilings, floors and walls in horizontal planes with a concave shape;
- Corners of decorative partitions, including arched openings;
- Joints between shower cabins, fireplaces and other "monumental" (not involving movement) interior objects and walls, floors.
A decorative element can "smooth out" any "seam" at the junction of finishing materials. If earlier it was necessary to carefully process the sections so that they retain a beautiful aesthetic appearance, now irregularities and chips are allowed on them, which the corner will mask.
Finishing the slopes of doors and windows
Double-glazed windows usually come with special corners that complete the installation of the window. Door sets also often include trims and architraves. If the corners are left without additional protection, then you will have to pick up and glue it yourself. The element will protect the slopes from damage and smooth the junction of the two different materials. For example, the end of the wallpaper will begin to wear off and peel off over time. No matter how smoothly you cut the finishing material on the slope, it will look untidy without additional coverage. AT doorways slopes can be scratched by furniture that is carried through them.
The best option would be to use PVC corners. If necessary, it is easy to replace, and the surface texture can imitate any natural materials. By choosing a special shade, you can create an illusory transitional border between the color of the wallpaper and window frame or doorway. Less commonly used corners made of veneer or bamboo.
arched doorways
Arched openings, as a rule, have one of classical forms: with a semicircle on top. Not every material can repeat its contours. For example, solid wood corners can only be used to decorate straight lines. Smooth transitions are decorated with elements made of flexible plastic, MDF, veneer or bamboo. All of the above options will easily follow the contours of the arch, and complete the design of the doorway.
How to stick a plastic corner yourself
In addition to decorative corners, you will also need a fastening composition. For narrow elements, it is not recommended to use glue, the excess of which cannot be removed from the surface without a trace. The joint before the procedure must first be cleaned of dirt and residues of wallpaper or protruding pieces finishing material. No corners will save an excessively uneven and bumpy surface. Then the wall is measured. Measurements are accurately transferred to a piece of corner. It is better to cut the material with a hacksaw with fine teeth. Do not forget about the joints between the corners themselves (in doorways, windows): two straight lines should end with cuts at an angle of 45 degrees. The “wrong side” of the prepared material is smeared with glue and applied to the wall. Hands firmly press the corner to the surface and hold until the fastening composition "grabs"
Conclusion
There is another type of decorative corners that decorate furniture (sofas, wardrobes, beds, cabinets). It is used, as a rule, to protect the joints of MDF or Chipboard boards, which are especially susceptible to damage and begin to crumble over time. Special silicone corners save the little fingers of the household from constant impacts on these surfaces. In interior design, the use of these elements usually completes repairs. Their installation is similar finishing touches brushes on an almost finished canvas, when the artist, moving away from the easel, evaluates his creation with a critical eye and corrects individual areas so that the composition becomes complete. Decorative corners have become an indispensable element in the design of the room, which emphasizes its accuracy and beauty.


 Constellation Scorpio description")


