Of course, today everyone has the opportunity to buy any furniture in the store, including a table. But why not make it yourself, with your own hands?
This is not as difficult as it might seem at first glance. In addition, you have the opportunity to make such a table that will ideally fit in size and appearance to the interior of your kitchen or other room.
In addition, do-it-yourself furniture is not only saving money, but also some kind of, but a reason for pride, since not every man knows how to make something these days.
What are the tables
If you decide from the boards with your own hands, then you need to figure out what types of tables are, and decide what exactly you need.
The simplest is an ordinary table with four legs, a table top and a frame. It will not be difficult to make it even for those who are not experienced in woodworking.
If you are experienced enough in this matter, you can make the dining table round or oval, decorate it with carvings, paintings, or burn patterns and patterns on the surface.
More difficult option is from planks. In fact, this is the same ordinary table, but rather thick and long crossbars are attached to its legs, on which seat boards are laid on top. So we get a table with benches on both sides. Such furniture is well suited for both the kitchen and for installation in the courtyard of a private house or cottage.
If in the room free place there is only in the corner - do it corner table, which will fit perfectly into this unoccupied space. It may not be as convenient to dine behind it as at a classic table, but you can put a TV, microwave or kettle on it - there will be enough space there.
 Another interesting option can become a window sill table.
In fact, this is the same window sill, but significantly expanded and adapted, for example, for a convenient workplace for a student.
The advantage of this solution is that the table will be well lit for most of the day.
There is also a minus: sitting at such a table in winter, you will have to rest your feet on a very warm, even hot radiator, which is not very convenient.
Materials and tools
 Buying everything you need to make a table with your own hands is quite simple and will not amount to great work, nor high costs. The main material for dining table is a tree, more precisely:
- Boards 25 to 50 mm thick, 100–150 mm wide, quite long.
The thicker the material for the tabletop, frame and legs, the heavier, but at the same time more durable they will be.
Choose boards from good tree, without any defects. - Bar. It is necessary for the manufacture of table legs, so choose thick enough and strong samples. The beam can be replaced with the same boards, if you arrange them with the letter "G", or use purchased aluminum table legs. You can also use balusters (curly carved wooden posts that support the railing on some stairs) as legs.
- Chipboard or plywood sheets, which can be used as countertop materials. Choose samples that are thick and strong enough to withstand daily stress.
 As with the materials and Do-it-yourself tools and fasteners are easy to get, they are in most homes. If something is missing, you can buy it at the nearest hardware store.
- pencil, corner, roulette and ruler;
- jigsaw or hacksaw on wood;
- screwdriver with a set of nozzles and drills;
- plane, if it is necessary to pre-treat the boards from irregularities and defects;
- kit self-tapping screws, furniture bolts and nuts;
- sandpaper or Sander;
- varnish or stain, roller or tassel for processing the finished table.
Attention! When working with a jigsaw, always remember the safety rules and keep small children or pets away!
simple plank kitchen table
 First we need to make a countertop.
There are several options here:
- cut out chipboard sheet or plywood of the desired size piece with a jigsaw;
- Lay several fairly wide boards and subsequently fix them on the frame;
- Take a large number of relatively narrow boards, place them side up and glue them together with wood glue.
The result is a fairly thick, heavy and durable countertop.
Stages of work
Step 1. Collecting from boards countertop.


Step 2 We make a frame from boards or their wooden bars. In size, it can be made equal to the tabletop or with a slight indentation, about 2–2.5 centimeters on each side of the table. Having fastened the parts of the frame with screws, connect the frame with the tabletop with them.
Step 3 After we with put together the frame and the tabletop, half the table is ready. It remains to make only his legs. If a beam is used for this, drill two holes in it under furniture bolts. Moreover, they can be made both on the one hand, one above the other, and on two different ones for more secure fastening to the frame.
Important! Carefully check the length of the table legs, they should not differ from each other. Otherwise, the table will stand unevenly and stagger. If you do not want it to spoil the floor material, fix rubber “shoes” at the bottom of the legs.
After that, make similar holes in the table frame and fasten the legs and frame with bolts and nuts. Also, the legs can be fixed from above, using screws, but over time, this fastening may weaken.
 If you want to make table legs out of boards, fold two boards into an "L" shape on the outer or inner corner frames and secure them with the same furniture bolts or screws.
To prevent the legs from loosening, connect the folded boards together at the bottom and middle parts with screws or nails.
That's all, simple and reliable, do-it-yourself, ready!
Advice: Before proceeding, do simple drawing, preferably from several sides. Constantly check the dimensions of the parts. Some parts of the same size can be sawn out at the same time if you fix the boards or timber with clamps.
pallet table
 wooden pallets are widely used in stores and warehouses as pallets for goods.
If you wish, you can get a few pieces for free and use them as a basis for making an original and unusual kitchen table.
If at least one side of the pallet surface is solid, then you no longer need to make a countertop, it is ready.
You just need to process it and, if desired, round the corners.
Note! Since initially the pallets are intended for warehouses, no one is engaged in their grinding and cleaning. Therefore, before making a table out of them, carefully sand them and remove all burrs. Irregularities and defects of the boards can be hidden with putty.
Stages of work
Step 1. Most of the pallets are open and there is plenty of space between the boards. distance, due to which to use the surface of the pallet as countertop not too convenient. There are two ways to solve this problem: either boards appropriate size and to fix with their screws between the boards of the pallet, or install a sheet on top plywood or chipboard.


Step 2 As for ordinary table, table legs from pallets can be made from timber or boards. The best thing fasten them with thick enough and strong pallet beam with nails, screws or furniture bolts.


To prevent the legs from loosening, connect them to each other with crossbars.
A table for a summer cottage is not just a piece of furniture, it is a ritual place where all household members invariably gather. In the summer, no one expresses a desire to go into the house to drink tea or have lunch. On the fresh air and the appetite is better, and the food is tastier. In order not to carry furniture from home for gatherings, you can do outdoor table for giving with their own hands, at the same time taking care of the benches.
garden table with built-in bench
The country table does not imply the complexity of the design, so there will be no problems with its assembly, even for individuals who are far from carpentry and creative work. We will present you some very simple and at the same time original ideas its creation, perhaps some of the proposed by us, will decorate your site.
Material for a country table
Do-it-yourself table for giving: interesting ideas
Conclusion
Photo gallery - do-it-yourself table for giving:

the table for giving should be durable
Outdoor furniture is subjected to serious tests, so it must be made from durable materials. Specifically for the table, you can take:
- A rock.
- Wood.
- Metal.
- Handy materials.
The tables from the latter look especially interesting. But first things first.
Wooden table

outdoor dining set
Choosing the material Special attention pay attention to the type of wood. Board board - strife and use, in our case, not all are suitable. Flexible and easy to work conifers unfortunately they won't fit. In addition to the fact that they need special impregnation, because they are too flammable, the resin they release will also spoil the tablecloth and dishes.
The necessary elements must be sought among hardwood blanks. On the countertop it is necessary to collect boards with a thickness of 30-50 mm. For greater strength, they are stuffed on the frame. The legs of the structure can be saddled straight or X-shaped. It is important to process all the details well so that there is no danger of driving a splinter while wiping the table. Mandatory processing of the finished product with protective impregnations.

folding wooden table at the cottage with their own hands
In order to make a table “for centuries”, varnish it, and do it, as they say, without sparing the brush. The composition must be literally rubbed into the wood, and this will be possible only if you slightly heat it in a water bath. Lacquer coating is made in three layers.
stone table

a round table and benches made of stone will last for decades
If you want to make a monolithic structure that boggles the imagination and creates a special mood for meals, try working with stone. You can create a table of this type for a summer residence with your own hands or buy a finished product. Shops offer granite and marble options in a wide range. There you can also pick up benches made of the same material as a set for them.

to inspire life in old table, it is enough to tile the countertop with tiles
It will not be cheap, but if you really want to have such a luxury in the garden as a stone table, try to reduce the price of it. Lay out the bases of the benches and the table yourself. For this, it will fit perfectly:
- Flagstone.
- Brick.
- modern blocks.
- Regular cobblestone.

stone stump table
These materials will be much easier to fit into general concept garden and combine them in existing buildings. On the tabletop, seats and backs it is quite possible to take fake diamond. The view from this, the composition will not lose.
metal tables
Those who are "friends" with iron and have at hand welding machine, may be of interest metal furniture. Products are elegant and aesthetic, with openwork decor inserts. The metal table will also need to be protected from early destruction. This is done by priming the metal before the final painting.

round table for summer cottage stone countertop and figured metal legs
Forged tables will satisfy the needs of respectable owners, but it is unrealistic to make them with your own hands. Similar designs are ordered by professionals. Forging requires the conditions of a forge. However, given that products of this type can be wonderfully combined with wood, stone, glass, you can only purchase a forged table base and complete it with a table top yourself.
Do-it-yourself table for giving: interesting ideas

stylization of a table and chairs under a mushroom meadow will create a certain zest in the landscape design of a summer cottage
If you are determined to work on creating a country table yourself and are ready to make it non-standard, look at the "unnecessary" things in each barn. Perhaps among them there are items that can become consumables for creativity.
Mixed assortment
Not less than practical option country table, along with wooden, metal, rattan, stone products, is a team of all sorts of "hodgepodge". This creation will become a multicolored "character" of your garden and will never go unnoticed. What to make it from? You will not believe! Starting materials will serve you:
- Broken flower stand.
- Metal barrel lid.
- Colored plastic scraps or round glass.

a set of timber
Take a piece of paper and try to draw a circular pattern on it in the spirit of Moroccan style. Enlarge the creation to the required size. A photocopier will help you do this quickly.
We put the resulting blank under the glass and draw lines with a copper contour. Let it dry for a day or less. The recommended drying time is indicated by the manufacturer.

it is enough to decorate the side parts of the bench and chairs with wheels to get original garden furniture for a summer residence
Now it's the turn of painting the marked glass with stained glass paints. The main thing here is that the colors are evenly located inside the area allotted to them. If you have never worked with specific paints, it makes sense to practice on a separate piece of glass in order to understand how much you need to take for high-quality coloring of fragments. The completed painting must also be thoroughly dried.
Finished glass can be additionally decorated with elements drawn with a copper outline.
Cover the barrel lid with white paint, which will hide traces of rust, and proceed to the preparation of the main part of the countertop.

table for giving from a vazyanka of firewood
metal part flower stand, which will serve as a supportdo-it-yourself table for a summer residencemust be primed, painted acrylic paint in copper color and partially patinated.
After the footboard is ready, glue the points of contact with the glass with a window seal. This is necessary for its best fastening.
Now the final stage. Gather all the parts together: put the glass top in the lid and put the composition on the stand.
It may not be very comfortable to dine at such a table, but it will be very pleasant to drink coffee in the evening cool.

decorating an ordinary stump with a mosaic, you can get an original table
pallet models
After the construction of a country house, you probably still have at least a few pallets on which packed bricks were brought or building mixtures. You do not even suspect what kind of magic wand it is for finishing the dacha. With their help, the table will be ready in a few hours, and it will have such a look that it will not be a shame to put it not only in the garden, but also in home interior. At the same time, note that you will not even incur special financial costs.

pallet garden table
A do-it-yourself table made from pallets can be designed in several ways. For example, for the most simple option you will need:
- Screwdriver.
- Brushes.
- Sandpaper.
- Swivel wheels.
- Colored antiseptic stain.
- Screws.

mobile table for giving from pallets
The first step is to sand the pallet. At the first stage of removing the rough layer, use coarse-grained sandpaper, fine-grained sandpaper will be required for final processing. If there is a grinder in use, which is equipped with grinding wheel, use it instead of rolls sandpaper. This will speed up the preparation process.

master class for making a table for a summer house with your own hands
Turn the pallet over and attach small swivel wheels to the bottom. This is done with ordinary screws. For greater reliability of fastening, place under the last washers that can be removed from similar screws used for working with metal tiles. Don't disregard this advice. Wheel bases have enough big holes, and a screw without a lining will not be able to fix the part to a wooden surface with high quality.

step by step table making process
Now it remains to open the finished product with a wax-containing antiseptic. If you want to highlight the tree structure use transparent composition. To give color, stain is required. You can style the table:
- under oak;
- larch;
- rosewood;
- nut;
- pine.
A low wide table would be appropriate on the veranda, in attic room, bath interior.

without additional processing, the table will last at least two seasons
If you want to make the summer recreation area more comfortable, make not just a table from pallets, but a whole set of country furniture, supplementing it with permanently fixed benches. Such a kit can be made portable and, if necessary, moved from the barbecue, say, to the pool or to the pergola.

bright pallet table for the whole family
A creative option for a country environment would be a pallet, transformed into a countertop and equipped with vintage legs left over from an old dresser, table, cabinet. This detail needs to be highlighted in a contrasting color.
You can use such furniture in the bedroom, gazebo, on the terrace.
Reel table

vertical planks allow you to place various items
“The coil is heavy in itself, but it is easy to construct a lightweight version from it. table for giving and again, do it yourself »
A cable spool is also an excellent material for creating cottage design. Look at it - it's almost a finished table! A little decor and it's ready to use. The easiest way to decorate the coil is with twisted twine. To do this, simply wrap it tightly around its trunk. The upper disk of the structure is ground and varnished. If you want to add functionality to the product, install vertical rails around the circumference. They can also be decorated with a rope. With the advent of the crossbars, you can store the necessary items under the table.

reel table with umbrella mount
The coil is heavy in itself, but it is easy to construct a lightweight version of the table for giving and, again, do it yourself. You will only need the top disc from the product, which will act as a countertop. The frame frame for its installation can be made of metal.
If in shady garden there is a stump of a suitable height and strength, then it can also be converted into an impromptu table with the help of a reel disk. This idea will be good not only for the playground, it is also rational to use it when organizing a relaxation corner for adults. By sawing a wooden disk in half, it will be possible to assemble original armchairs, which can also be put on stump legs. Get a good garden set.

the reel table can be decorated with any pattern
Wood table?
Why not? Such a brutal option can become a decoration for a barbecue area and even a living room. Work is nothing. Finding the old thick log, impregnate it with a stain and align the lower part, giving the product stability.

stump table on wheels
No less easy to manufacture and attractive in design is a mobile hemp table. By the way, its functionality can be expanded if you are not too lazy to sew a foam seat on it, which will allow you to easily transform the structure into a comfortable pouf.
Not in short supply in the country and chopped firewood. Of these, it is also not a problem to quickly build a comfortable table design for a summer cottage with your own hands. Gather flat base and fasten the split bars into the countertop with a belt tie. Put it all on its feet and enjoy communication with primitive nature in full.

table for a living room cottage from an old log
Tire garden composition
Do not rush to get rid of old tires. They can be used to make a magnificent landscape decor with extended functionality: use the table not just as a table, but the pouf next to it not only as a pouf, but arrange inside them a place for garden tools, For example.

table and chairs are made in a single design style from old tires
Paint the tires in a color acceptable to you, dry, fold in a column, fastening the elements silicone sealant or other suitable compound.
Now take care of the countertop and seat. The first one is nice to make from durable plastic or cut them out of wood. For a pouffe, also saw out a plywood disc of a slightly smaller diameter than that of tires, glue foam rubber to it and cover it with a cloth. Removable parts are ready.
Distillation table

movable table made of old boiled wood with a wooden top
Did you find grandmother's brew in the bins? Fabulous! We transform it into a mobile storage table. We equip the bottom with wheels, and for the upper part we assemble a countertop from the boards. Having cut the boards to size, we collect them together on transverse strips, the length of which should correspond to the diameter of the welding. This will help the countertop to stay firmly in place, and not move out of the way and not turn over at the slightest load. There will be enough space inside the impromptu table to organize a mini-bar.
By the same principle, empty boxes, barrels, etc. can be converted into useful items.

original table with large metal wheels instead of legs and built-in benches
Conclusion
As you can see, assembling a table for a summer residence with your own hands is a very exciting and absolutely not labor-intensive activity. Here, even beginners do not have to be afraid to spoil something, because, initially unsuitable for direct use, objects and elements are used. Try your hand at an unusual business for you. Perhaps the final results will be an incentive not to stop there, but to go further. From the materials presented, you can make many more unusual and necessary things in the country everyday life!
Photo gallery - do-it-yourself table for giving:


For those who live in big cities, country cottage area It is a kind of paradise. fragrant herbs, fresh air, the smell of a fire and a must great house where you feel comfortable and at home. Special comfort country house and plot on outdoors gives furniture, made by oneself to one's own taste, which can enliven the space. In this article we will tell you how to make a table for giving with your own hands.
Agree, it's still easier than making a sofa or wardrobe. To implement your plan, you do not need to specially study or invite specialists. To work, you need inspiration, and prepare the necessary materials.
preliminary stage
Important is appearance finished product. When you make a table for the dacha with your own hands, do not neglect it.
It will be nice to observe the admiration and surprise of the guests to whom you declare that you made it yourself.

- Its main basis is wooden table top. As a rule, ready-made shields or wide boards are used for this.
- An important factor is also the selected type of wood from which you decide to make a table:
| Conifers |
|
| Deciduous |
|
- In addition to the tabletop, the table must have legs. You can make them from wooden shield or buy ready-made.
Tip: if you can't find them in the store, look at the shelves where they sell auxiliary materials for the manufacture of stairs - 4 pieces of metal or wood balusters can be quite useful to you.
Factory blanks will add some gloss and chic to your table.

Training
First you need to determine where you will install the furniture, whether you plan to take it out of the house. For example, good decision for country house will be narrow and long table, which will ensure the freedom of movement of people around the room.

Materials and tools
- The boards are tongue-and-groove. They will create a tight connection and help protect the table from liquid getting into the slots. You can also use a pair of ready-made wooden shields, 2000x300 mm in size.
Tip: to ensure the stability of the table to loads, select the thickness of the boards at about 30 mm.
When choosing a material, make sure that the boards or boards are even, they must fit exactly to each other, this will save time on individual measurements and cutting.
- Rails for fasteners - 3 pieces. They are needed for the stability of the structure. Most suitable size- 2000x100 mm with a thickness of 28 mm.
- Table legs (finished) or balusters, their price depends on the quality of the material.
- Hacksaw.
- Self-tapping screws.
- Electric drill. Please note that this tool must be available. You will definitely need it, so if you don’t have your own, then rent it or ask for temporary use.
Tip: if there are power outages in your area, renting a diesel generator for a summer residence will help solve the problem.
- Polyurethane varnish. You can choose between glossy and matte. The second shows the structure of the tree well. Instead, you can use natural oils that will protect the wood from external factors.

In the photo - country diesel generator
- Good quality brushes.
- Sanding machine. Its absence will greatly complicate the work.
- Sandpaper with fine and coarse fraction. This will make it possible to provide the table with the desired smoothness.
Process
Below is a step by step guide:
- Connect the boards or boards and lay them with the outer side down. At this stage, it is necessary to monitor the docking so that the country table is even.
- Attach shields or boards. Position the slats along the long sides. This will allow them to be strengthened and fixed along short boards. To ensure the stability of the table, additionally fix the boards (or shields) with the help of rails in the center in one or two places.
- Be careful when fixing rails. Screw the screws slowly, without changing the degree of pressure, angle and intensity. Otherwise, the shield or rail will break, which will affect the quality of the product.
- Fasten the table legs at a distance of 50-70 mm from the edge. With the help of an additional rail, strengthen the attachment point so that the support does not deform after a while. This will allow the table to look perfect for a long time. Fasten the legs also slowly.
- Turn the table over and remove debris and sawdust, sand all the roughness with sandpaper and a grinder. Dry the table thoroughly with a dry cloth.
decoration
Building a country table yourself is not all.
Now you need to start finishing, and, if you want, decorating.
- Cover the entire surface of the table polyurethane varnish. (See also the article.)
- Then you need to let it dry for a day.
- Carefully inspect the surface of the table, sand it again with sandpaper and varnish it a second time.
- If you wish, then you can paint the table, for example, with acrylic paint.
- Once the surface is completely dry, the product can be used for its intended purpose.
Conclusion
This article details one of the ways self-manufacturing country table made of wood. Although at first glance the work seems difficult, in fact the process is quite exciting, which will make it possible to make good, solid furniture for little money. The video in this article will help you find more information on this topic.

OLYMPUS DIGITAL CAMERA 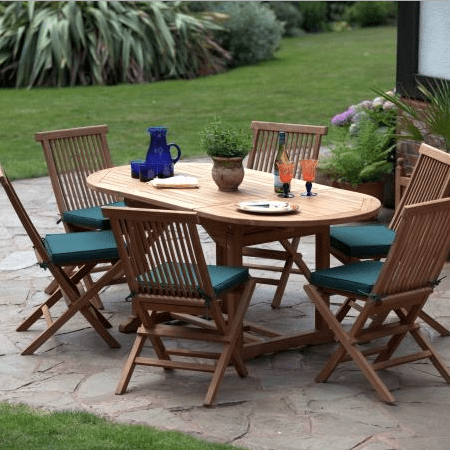

The garden table is an integral part of any country interior. On the modern market This product is presented in a wide range - these are products made of metal, plastic, natural stone and of course classic version, garden tables made of wood. In this article, we will talk about positive qualities common options and give accessible instructions for assembling the table with your own hands.
The tree is always relevant
Majority garden furniture always made from wood. Almost every person who at least superficially owns a hacksaw and planer can make a table for the garden with their own hands. The whole process comes down to connecting a small number of planed planks and giving the furniture a marketable appearance.
A few words about the choice of material
If you want your product to serve you faithfully for many years, then it is better to make a garden table from strong hardwood. Certainly the most the best option is oak, but the price here, even at cost, will be considerable. Therefore, as a rule, more affordable larch, aspen, birch, linden or acacia wood is used.

Tip: conifers can be used for manufacturing, but they should be well prepared and covered beforehand protective compounds. Otherwise, the abundance of resin can adversely affect the quality of the coating and your clothes.
For countertops, the quality and type of wood is especially important, so experts recommend not saving and buying a good grooved board, the increase in costs will be minimal, but the appearance will please you. Wooden garden table it is advisable to collect from a well-dried forest, so that subsequently the details do not lead.
In addition, the tabletop and some individual parts can be made of thick waterproof plywood or USB board. chipboard(chipboard) is less suitable, as this material is afraid high humidity and won't last long in the garden.

Self assembly
Assembly instructions can be very diverse, everyone chooses what he likes best.
The photo and video in this article presents several interesting and available technologies, we will tell about the simplest, in our opinion, installation option.
- As mentioned earlier, it is better to assemble the countertop from a grooved board, so it will be completely monolithic.. In this case, the joints should be glued with ordinary furniture glue for wood. AT this case we are talking about a solid product, designed for a family of 6 - 8 people.
- Comfortable design height for a standard dining table is 700 - 750 mm. We will make the dimensions of the top plate 930x1450 mm. For a countertop, a board thickness of 20 mm is sufficient, but a countertop 40 mm thick will look more solid and solid.
- The boards are joined on a flat, horizontal surface and knocked down with nails or self-tapping screws, two or three perpendicularly located bars 50x50 mm. The bars are fixed at a distance of 300 mm from the edge.

Tip: since the wood is quite dense and thick, it is better to grease the self-tapping screws with soap before screwing in. Then they will enter the array much easier.
- Next, we move on to the arrangement of the legs. Boards with a section of 50x150 mm and a length of 650 mm will be used as legs. They will be joined at the ends, therefore, in order to reduce the length of the fixing bolts or self-tapping screws, 1 sample is made in the middle on each leg about 70 mm deep and about 150 - 200 mm long.
- The legs are joined at the ends, and the selected grooves should be with outside on the same level. A stiffening rib is inserted between two pairs of legs, the function of which is performed by a board 50x150 mm, about 1 m long.
- From above, the legs are attached to the planks that fix the tabletop boards.. In the lower part, to increase the area of \u200b\u200bsupport, two boards are knocked to the legs, all of the same section 50x150 mm. Long slightly less than the width of the countertop.

Important: the entire structure, with the exception of the tabletop, can be made collapsible; for this, furniture bolts with a diameter of 6 mm are used. Or collect all long screws but then the table will not understand.
Do not forget that wooden garden tables will be used outdoors, so all wood should be covered with protective compounds. Often one coat of stain is used to bring out the beauty of the texture and two coats of waterproof varnish.

Important: all wood, even before assembly, needs to be planed and cleaned grinder or with sandpaper. With sharp corners chamfer should be removed so as not to subsequently drive a splinter.
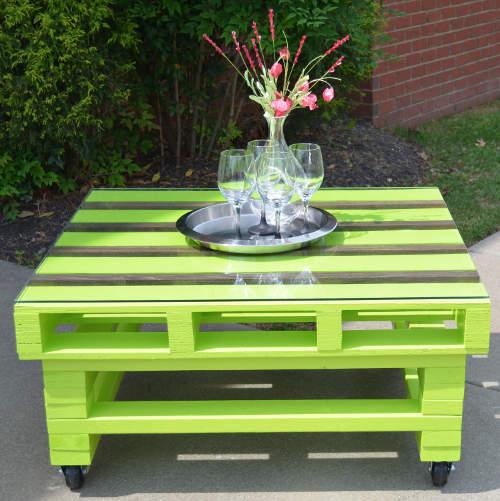
Alternative designs
Easy coffee table quite possible to collect from wooden pallets. For this you will need 2 pallets. The top row of boards should be torn off, supplemented with the missing ones and knocked down end-to-end, more tightly.
Thus, you will get a monolithic countertop. To increase the height, 4 bars from the same pallets are inserted between the pallets. It is advisable to install furniture wheels from below.


Plastic garden tables are used everywhere, their price is quite affordable. They are durable, have a neat appearance and are usually quickly disassembled. But plastic rarely fits in natural interior country cottage. artificial materials, for the most part, have already managed to get bored in the city, in addition, such products cannot boast of durability.

Quite another matter garden forged tables, often they are true masterpieces of furniture art. Of course, to make such beauty with your own hands is only possible narrow circle real specialists, and therefore the price of such products, frankly, bites.
Do-it-yourself stone garden tables are quite problematic to make. Alternatively, you can fold the brick cabinets and install a countertop purchased in advance on top. You can also use a large piece of slate as a countertop, but such installation will require remarkable physical effort.

Table option.
Conclusion

Often it is not so important that you have a wooden stone or metal garden table installed. Any design can be successfully entered into landscape design dachas, the main thing is to do it with love, because you are doing it for yourself.


")


