The choice of one design or another largely determines the possibility of using the attic as an additional living space, resolves the issue of the need for insulation and determines the type of roofing covering.
A flat roof is a specific option that does not allow the attic to be equipped as a living space (due to its absence).
But it offers a lot of possibilities for using the territory as an auxiliary site, a place for placing equipment or as a private recreation area, separate from the external space.
A flat roof can provide many interesting possibilities in this regard, but there are limitations to its use.
The main feature of a flat roof is its almost horizontal surface. such surfaces are low - up to 8 degrees, it is needed only for drainage of rain or melt water.
According to the conditions of the plane location, there is practically zero wind load (with correct device without hanging edges) at maximum snow cover.
At the same time, the roof structure has a complex multi-layer structure, ensuring the tightness of the coating and the working condition of the insulation.
The most favorable operating conditions for flat roofs:
- Small amounts of snow in winter. It is most suitable for use in regions with warm or little snowy winters, when removing snow from the roof does not cause difficulties.
- Wind force does not have a significant effect on the roof, therefore, the construction of such roofs in areas with strong or gusty winds is permissible.
For areas with cold and snowy winters, the use of flat roofs is only recommended for small commercial buildings having a relatively small area.
The use of flat roofs on residential buildings is more common in southern regions, where there is no problem with high snow pressure in winter.
Flat roof
The structure of the roofing pie
Some specific, classic composition roofing pie There is no such thing as a flat roof. Layer structure most often based on the following factors:
- Roof purpose;
- Floor type;
- Roofing material.
The decisive factor that determines the composition of the roof from the very beginning of construction is the purpose of the roof. It depends on it what material is needed for the construction of the floor, how exactly it will be insulated, what type of in this case optimal material coverings.
Insulation of a flat roof made of soft roofing is done from the outside, since this method is much more convenient and reliable in terms of the tightness of the cake.
The general insulation technology looks like this:
- Base (concrete, wooden floor);
- Vapor barrier film;
- A layer of insulation;
- Top layer waterproofing;
- Roofing.
This - general plan, in practice it is often supplemented or complicated for the purpose of more reliable protection against water penetration or the formation of cold bridges.

Roofing pie
One of the options for installing a flat roof is inversion roofing. This is relative new look pie designs that take into account the disadvantages of conventional options.
The fact is that a common problem with flat roofs is water seeping through the insulation into the ceiling and the appearance of stains and streaks.
To eliminate this phenomenon, inversion roofing is used when A reliable waterproofing carpet (often multi-layered) is installed between the ceiling and the insulation..
The composition of the pie is built as follows:
- Overlap;
- The waterproofing preparation layer is usually a construction primer;
- Waterproofing carpet;
- Geotextile layer;
- Insulation (optimally extruded polystyrene foam);
- Top layer of geotextile;
- Ballast fill layer of gravel.
If necessary, a rigid covering can be laid on top of the ballast layer to maintain uniform ballast thickness and ease of movement.

Inversion roofing cake
Is the roof based on wood or concrete?
 Wood or concrete can be used as a base for a flat roof. Both options are acceptable, but not interchangeable.
So, wooden base is used for small buildings, most often for economic purposes.
If there is no heating, then such a roof is not insulated, a simple rafter system is made and laid on top roof covering . However, wooden floors are also used for residential buildings.
This is due to the desire to lighten the roof and remove excess load from the walls (for example, with the frame construction method).
CAREFULLY!
This option imposes certain restrictions on the functionality of the roof, excluding the presence of heavy equipment, a large number of people, etc. on it.
More often, for the roofs of residential buildings used, a concrete slab is used as a base. This overlap has a number of significant advantages:
- Reliability;
- No noticeable deformation from loads;
- Penetration of moisture into the material will not cause rotting;
- Finishing a concrete floor is easier than finishing a wooden floor.
Since it is produced outside, the lower surface of the concrete floor (the ceiling of the upper floor) will be open, which allows you to use any available type of finishing - from simple painting to installing a stretch ceiling.
If the ceiling is made of wood (beams), then the finishing should be done taking into account possible deformation- “sagging” of the ceiling due to existing loads.
Sectional photo of the roof basics:
Wooden base

Concrete base
Flat roofs: arrangement of private houses
The composition of the roofing cake is never chosen at random. The main selection criterion is general purpose roofs:
- Lightweight. The roof serves only as protection from precipitation. Mainly used for auxiliary buildings for utility purposes;
- Exploited. Such a roof serves as a platform for placing various equipment, for creating recreation areas, small greenhouses, swimming pools, etc.;
- Green. On such a roof there is a lawn with grass, plants, etc. Serves as a mini-square for relaxation.
Depending on the purpose of the roof, the type of ceiling is selected, which, in turn, largely determines the optimal type of roofing material. Therefore, the composition of the roofing cake may have its own individual characteristics.
So, for a flat roof of an outbuilding it will be enough:
- Rafters;
- Lathing;
- Roofing covering (metal profile, etc.).

Lightweight roof
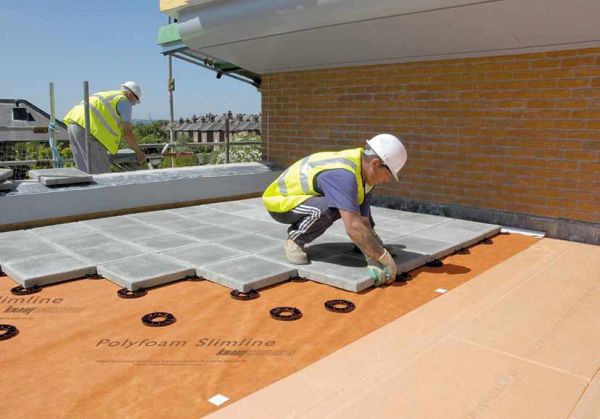
For a used roof, which is used as a platform for installation solar panels, satellite television dishes or other equipment, the composition is much more complex:
- Concrete floor slab;
- Cement screed that forms a slope for water drainage;
- Waterproofing layer;
- Drainage material that removes water from under the upper layers;
- Insulation layer;
- Geotextile layer;
- Sand preparation layer;
- Paving slabs.
In this case, the outer covering is paving slabs, as a durable and cheap material.
ATTENTION!
At the same time, rain or melt water can quite easily penetrate the insulation layer, so it must be resistant to moisture, impermeable to water, or, as an option, painlessly pass water through the drainage layer to the drain.

Operable roof
Pie diagram for creating a green roof:
- Concrete floor slab;
- Layer ;
- Multilayer waterproofing carpet;
- Insulation;
- . It consists of a separating layer of reinforced screed, a double layer of technoplast (EPP and Green), and a geodrainage roll layer;
- Layer of soil with plantings.
In this case, there is a multi-stage waterproofing system that reliably cuts off the insulation material from the top soil layer. This cutoff, at first glance, is too complicated, necessary to guarantee the creation of a reliable barrier to water.
The soil is an active accumulator of moisture, which will certainly seep into the lower layers, so the complexity of the composition of the pie is fully justified.

Green roof
How to cover a flat roof
 The material for covering a flat roof is selected based on its purpose.
Unused surfaces are most often covered with roofing felt and the joints are sealed with liquid bitumen.
IN lately appeared large quantity similar materials with improved characteristics that make it possible to more reliably protect the roofing pie.
Operated surfaces require more rigid and durable coating . At the same time, the task of hermetically sealing the insulation from external influences is not removed, so most often a sand-cement cushion and a working layer - paving slabs - are laid on top of the soft roof.
Coating
Installation of a used flat roof
How to make a flat roof? First of all, you need to decide on the basic parameters - roof type, structure, etc. Let's consider the option of installing a serviceable flat roof with a concrete floor and external drainage using gutters:
- The surface of the ceiling is covered with a layer of slope-forming concrete screed(decline). To save concrete, a layer of gravel is first poured on a slope, after which a screed is laid on top. Since this stage refers to “wet” work, then It is recommended to cover the surface of the ceiling with a layer of primer or similar material.
- Laying vapor-waterproofing. As a material, you can use various fused films or roll membranes. Laying with overlap, seal the joints with tape.
- Insulation layer. Either stone mineral wool or extruded polystyrene foam is used. The insulation is laid in several layers, minimum 2 layers. This requirement is caused by the need to prevent the penetration of cold through cracks in the joints of the insulation.
- On top of the insulating layer a layer of waterproofing is laid.
- Filling the ballast layer - gravel, sand, etc.. The role of this layer is double: protecting the film coating and draining water coming from melting snow or precipitation in the summer.
- On top of the ballast layer if necessary, a layer of paving slabs can be laid for ease of walking on the surface. In this case, you will need an additional sandy preparatory layer, a direct substrate for the tiles.
The indicated sequence is one of the options; there are many similar methods that are equivalent in results, but differ in details.
The installation of a flat roof, traditionally considered an accessory of auxiliary buildings, can be carried out in such a way that the roof surface turns into an additional platform that can be used for various needs.
Depending on the climatic conditions of the area, the surface of a flat roof is turned into a green lawn, a technical area for placing equipment, or a recreation area.
All roofing options require careful arrangement and expensive materials. The quality of the result directly depends on the qualifications of the people performing the work and on the financial capabilities of the home owner.
But don't forget that you can build a flat roof with your own hands.
Investments in an equipped, usable flat roof will only be worthwhile in regions with short, mild winters and low average monthly precipitation. All other issues can be resolved and do not cause serious problems.


Waterproofing

Insulation
Useful video
In this video you will learn what the structure of a flat roof made of fused materials is:
One of the practical and fairly simple structures to install is a flat roof. Despite many years of construction experience, such roofs still remain exclusive on the market. Flat coating has many advantages, including ease of DIY assembly.
What types of flat roofs are there, what is their difference?
Flat roofs are:
- exploited and unexploited;
- traditional and inversion;
- breathable;
- green.
Let's take a closer look at each type.
- Operable roof. The main feature of the coating is to prevent defects in the waterproofing layer using corrugated sheets or concrete screed. As insulation, you should select a material that can withstand high compressive loads. When using an insulator that is not rigid enough, you can achieve the required strength by creating another layer of screed. In conditions of shortage of free space, flat roofs are widely used for arranging summer cafes, parking, and recreation areas. The structure of the roof in use is presented:

- Unused roof. It differs from the previous type of structure in its simplicity of arrangement, low requirements for the base and insulation. The only disadvantage of such a roof is its short service life.
- Traditional roof. The coating consists of several layers, which includes a vapor barrier laid on top of the base. This film provides protection for insulation (foam or mineral wool) from moisture.
In a traditional roof, all layers are in the usual order
- Inversion design. A distinctive feature is the laying of insulation over the waterproofing film, which guarantees its protection from sources of negative influence. The insulation is selected that does not lose its properties even when the humidity level increases, for example, panels made of extruded polystyrene. An inversion roof can be used as a functional roof - it can be a green lawn or a pedestrian area.
In an inversion roof, the insulation is laid on a waterproofing layer
- Roof with breathable coating. This type of roof prevents the formation of steam in the heat-insulating layers and does not require dismantling the old covering, since it can be installed as an additional main carpet.
Breathable roof covering prevents condensation
- Roof with landscaping. The lack of lawns near the house can be compensated by arranging a lawn or a whole park on a flat roof. The planning of such a coating is carried out at the design stage of the building, which is explained by the need to calculate the reinforcement under the load exerted by the soil layer. Green roof installation diagram:

According to the type of use, a green roof can be extensive, when only lawn grass, and intense, when flowers, shrubs, and trees grow on the roof.
Identifying the advantages and disadvantages of using flat roofs
With proper installation and laying of the waterproofing layer, a flat roof has positive qualities:
- allows you to save on building materials due to a smaller construction area;
- erected much faster than other types of roofs;
- Maintenance and repair are quite simple;
- ensures the creation additional area for example, sports complexes, recreation areas, flower beds;
- allows the use of paving stones or paving slabs.
The special structure makes the roof more vulnerable to negative climatic conditions, giving it a number of disadvantages:
- the formation of leaks during the melting of a large volume of snow cover;
- need to create drainage system;
- problems arise in the operation of the drain: blockages form, it freezes in winter;
- need for snow removal;
- the need for periodic inspection to prevent moisture from penetrating into the insulation layer;
- need for quick repair in case of roof leakage.
Video: what is good about a flat roof
What you need to know when installing a flat structure
There are certain rules for installing a flat roof:
- Horizontal laying without a slight slope is not allowed. Minimum value angle - 5 degrees, which will ensure independent precipitation. To create a slope, in addition to the coating itself, a bedding made of expanded clay or slag should be used. You should not make a slope of 10 degrees or more - it will not allow the heat-insulating layer to be laid evenly.
- For vapor barrier, a bitumen-polymer membrane with fiberglass reinforcement or a vapor barrier film is used.
- At the edges, the vapor barrier is attached above the insulation with mandatory sealing of the seams.
- Thermal insulation material is placed on top of the vapor barrier film, and above it is a bitumen waterproofing carpet. When using expanded clay as insulation, it is necessary to pour a cement screed with further installation of a two-layer waterproofing.
There cannot be a perfectly flat roof on a residential building; it must be equipped with a slight slope
Sequence of roof installation on wooden beams
After completing the assembly of the load-bearing walls, you can attach the main floor beams to anchor bolts, taking into account a gap of 0.5–1 m. They are selected according to the calculated weight of the roof and the average annual precipitation. Beams can have a section of 150x150 mm or 100x100 mm.
The process itself takes place in several stages:
- On top of the supporting structure it is equipped continuous sheathing(without cracks or gaps) from edged boards 20–25 mm.
- At the next stage it is laid polymer waterproofing so that each top layer is overlapped with the previous one and taped.
- Then the thermal insulation is installed. The best option is to use fiberglass insulation mats or sheets of extruded polystyrene foam. To avoid the appearance of condensation and destruction of this layer in the future, the material should be tightly fastened together. In addition, unsewn cracks can become a source of cold bridges.
- Installation of moisture-resistant plywood or OSB boards. Roofing material is laid on top of this covering. You can choose any, for example, soft tiles.
Features of the rafter system
The purpose of the truss structure is to distribute the roof load across the support points. Flat roofing can be erected on rafters three types fastenings:
- Hanging rafter system. It is suitable if there is no support between the side beams. The structure is assembled on the ground and then transported to the log house. Pine, reinforced concrete and metal elements are used for work. The rafters are taken with a section of 5x15 cm, the lathing - 5x5 cm
- Layered system. The rafters are laid at an angle to the external walls at a distance of 60–140 cm from each other. The upper part of the structure rests on a beam reinforced with racks and struts. As a rule, such a structure is suitable for the construction of outbuildings.
- Sliding rafter structure. Installed on houses that undergo shrinkage during the first year of operation (for example, made of timber). Assembly is carried out to the ridge log so that the rafters are overlapped or end-to-end. To avoid sagging roofing system and deformations of the log house rafter legs freely fixed to the Mauerlat.
How larger sizes roof, the greater the slope of the rafters should be
Video: covering a flat roof
Performing calculations
When executing installation work, as with any construction project, it is necessary to operate with basic data.
Snow load
For the calculation there is a generally accepted formula: Q=G*S, where Q is the snow load, G is the mass of snow in kg/sq.m (the value can be taken from the snow cover level table), S is a coefficient determined from the angle of inclination of the roof:
- when tilted up to 25 degrees S=1;
- at a tilt of 25–60 degrees S=0.7;
- when tilting from 60 degrees, you can ignore the level snow load, since sediment retention on such a slope is unlikely.
An example of calculating the amount of snow load when a house is located in Russia with Q equal to 180 kg/m 2.
The roof slope is 23 degrees, which gives a maximum snow load Q=180*1=180 kg/m2.
To lay the foundation correctly, you need to know the entire mass of the snow cover using the formula M=Q*S, where M is the mass of snow, S is the area of the roof.
IN in this example area is 150 m2.
When calculating the full load from precipitation in winter, it turns out M=180*150=27000 kg or 27 tons.
Roof area
Flat roofs, as a rule, coincide in area with the area of the house or the under-roof part.
Water intake funnels
One funnel can serve up to 200 m2 of roofing; the distance between them should be more than 50 cm, and the diameter drainpipe- from 10 cm. Regardless of the area of the roof, there must be at least two funnels on it, otherwise flooding or clogging of the system is possible.
To correctly determine the number of water intake funnels, it is necessary to operate with data on the intensity and frequency of precipitation.
Structure of a flat roof roofing pie
Construction of the structure is allowed in two ways:

Installation of roof waterproofing
Waterproofing work, regardless of the type of flat roof, is the same and is carried out taking into account a number of requirements:
- the roof structure should have a slight slope for free drainage of precipitation;
- the waterproofing layer is laid in the form of a solid and homogeneous sheet;
- the throughput of the drainage system should be as high as possible;
- The waterproofing near the communications outlet must be slightly raised.
To arrange a flat roof, you can use different materials:

Video: DIY flat roof waterproofing
Laying insulation on a flat roof
Choose insulation from among the practical and practical ones presented today inexpensive materials it won't be difficult:

Any craftsman can independently insulate a roof, regardless of the material chosen, according to the diagram presented:
- Selection and calculation of insulation. During installation, the slabs are cut into pieces the right size, so it is recommended to take extra material.
- Preparing the base for insulation: cleaning, laying vapor barrier.
- Laying the material. To avoid the formation of condensation, it is recommended to install the insulation at a distance of 2 cm from the film or use anti-condensation material. To attach the thermal insulation material to the base, bitumen mastic, special glue, and liquid nails are suitable, although ordinary nails can also be used.
- Sealing joints. In order to eliminate inter-tile cracks and gaps, you will need polyurethane foam.
Treatment of wooden roofs against fire
The creation of a fire retardant coating on roof structures is carried out using the following methods:
- constructive - involves the use of fire-resistant heat insulators, screens, partitions;
- mechanical processing method - applying special compounds to wooden elements to slow down or prevent the combustion process. As a rule, such products also have antiseptic properties.
The main tasks of fire retardants are:
- making structures resistant to fire;
- creating clear boundaries of flame spread;
- reducing the level of smoke formation and the release of toxic substances.
There are two types of impregnations:
- Intumescent - under the influence of heat they swell and create a kind of solid fire-resistant shield.
- Non-intumescent - highly fire-resistant varnish-painting compositions, which, due to their thin layer, prevent the roofing material from catching fire.
All wooden elements of a flat roof must be coated with fire retardant impregnations.
For processing wooden elements It is recommended to use salt impregnations (the protection lasts for about 2–4 years) or organic mixtures (the fire resistance effect lasts about 17 years). If it is necessary to emphasize the natural structure of wood, protective varnishes and paints can be used. Due to the coating with impregnations and water-based products, the wood does not ignite, but becomes charred.
Maximum protection is deep roof treatment performed under high pressure, as a result of which a new surface is formed that is not susceptible to the destructive effects of flame.
One of dangerous consequences fire is deformation and collapse metal structures, so applying protective agent especially necessary in crowded places. So, steel parts roofs are plastered or painted with intumescent agents. Due to the layer of plaster, the metal does not heat up, maintaining its load-bearing capacity. The disadvantage of this method is the fragility of the coating and low resistance to mechanical damage. A better analogue is painting, when the coating creates a thick layer under strong heating that does not allow the roof structure to heat up for 0.3–2.5 hours.
Metal roofing material is fire resistant
When choosing a treatment method, you should take into account the characteristics of roofing materials. So, if tiles are laid on the roof, then at the time of a fire only smoke will appear, and the covering will crack. Roofing material based on bitumen-polymer is dangerous due to rapid flammability and the spread of fire to nearby surfaces.
Thus, despite the simplicity of this work, when installing it yourself, it is necessary to take into account the characteristics of the region in which the roof is used, its rafter system and the roofing pie. If all recommendations are followed, the design will be durable and resistant to negative influences in the form climate change, precipitation, mechanical loads, fire.
Ventilation features
Regardless of the design, the roof must be well ventilated, otherwise problems cannot be avoided that can cause damage to the roof. Ventilation is a system that allows you to keep each layer of the roofing cake from moisture. In this case, you must follow certain rules:
- For proper air exchange, an aerator is used - a metal or plastic pipe, which is located at certain points throughout the entire roof area.
- It is necessary to install cone-shaped umbrellas that protect the roof from precipitation. Unnecessary moisture is removed due to the pressure difference.
Installation of aerators
The main function of these devices is to remove excess moisture and remove moist air outside. They can be installed both during the construction of the roof and during operation. In some cases, installing an aerator is a preventative measure to prevent rotting of the roof's outer covering.
The flat roof ventilation system must be equipped with aerators
The number of these parts on the roof depends on its area, the volume of condensate and moisture, and the condition of the roof. It is necessary to increase them in the case of installing a roof over specific premises, such as a bathhouse or a swimming pool.
The ventilation process itself is ensured by special pipes. These are also polyethylene aerators with a diameter of 6 to 12 cm. Their special feature is the presence of umbrellas.
The aerator installation process is as follows:
- You must first check the condition of the insulation. If this is necessary, the material must be replaced.
- Lubricate the lower part of the aerator with mastic and then attach it to the base of the roof. Carefully secure the skirt with several self-tapping screws.
- The junction of the aerators must be sealed with waterproofing material.
Ventilation duct for a flat roof with a superstructure
In the case of a flat roof with a superstructure, the ventilation outlets must be mounted vertically. This way they will be able to direct air flows, create draft, and protect the roof ventilation system from rain and snow. The peculiarity of a flat roof with a superstructure is that its ventilation system does not have connections using adapters. Additionally, you can install an electric fan. It works so silently and efficiently that you will not hear any sound from it.
Aerators can be equipped with electric fans
Lightning protection mesh down conductor
Every home needs lightning protection. In the case of a flat roof, all work is carried out according to the following scheme:
- An air terminal is used in the form of a mesh, which can be made of round steel with a diameter of 6–8 mm.
- The tap is a metal conductor made of wire with a cross-section of 6 mm, which must be connected to ground. Underground part It is recommended to make it from rolled steel with a diameter of 10 mm. You can also use pipes and fittings as a down conductor. If there are several of these parts, then they need to be installed at a distance of 25 m from each other.
- If the flat roof is covered with metal material, then the lightning rod system can be supplemented with a steel sheathing, which simply needs to be connected to the roof. This system is only relevant for seam roofs.
A mesh lightning rod is suitable for a flat roof.
The mesh lightning rod system can be installed both during the process of arranging the roof and during the laying of the covering. The first option is recommended when using non-combustible insulation. In this case, the mesh is placed under the waterproofing. The second option has no restrictions, but such a lightning rod affects not only appearance home, as well as the necessary technical characteristics of the roof. To do this, simply lay the mesh on the roof surface and secure it with special holders. Remember the need ventilation gap if you use flammable materials.
Rules for the construction of lightning protection mesh:
- the branches must be folded perpendicularly, and cells with equal sides should be formed;
- the distance between them should be a maximum of 12 m; when installing a roof over a garage, this parameter is 5 m;
- When installing devices that rise above the level of the lightning rod, they must contain additional rods in their design.
Fix metal parts better than welding.
It is advisable to connect the receiver branches to each side of the down conductor.
A down conductor must be on every roof
Drainage
The drainage system for a flat roof consists of pipes, connecting elements and funnels. It can be external or internal. For a flat roof, the second option is often chosen. All gutters should be installed at an angle greater than 3 degrees towards the center of the house. It is recommended to lay drain pipes on top of the insulation, and funnels under the waterproofing layer.
The drainage system consists of gutters and funnels
A flat roof should have at least three funnels. One of them is the main one, the other two are connected to the riser and storm drain.
The internal system can have a different design:
- gravity flow collects water from the entire roof and only then discharges it through pipes; it has a slope;
- siphon means the use of special devices that, thanks to rarefied pressure, absorb water and direct it into the sewer riser.
There are certain rules for installing a drainage system for a flat roof:
- Gutters should be located in the lowest places of the roof.
- The slope from the funnel should be at least 5 degrees at a distance of 50 cm; for this it is recommended to reduce the thickness of the insulation or use a leveling screed. To install drainage funnels, it is recommended to take a wooden beam, which must be fixed to the base of the roof, and then treated with antiseptic solutions.
- Diameter horizontal pipes should be no more than 7.5 cm.
- If the funnel is located above the freezing level, an electric heating device is required.
Protects the cornice from the negative effects of water.
The drip line prevents the negative effects of moisture on the roof eaves
Install the drip line along the edges of the roof, while pointing it down. Additionally, this element can be coated with polymer.
The installation process is as follows:
- Install the flashing parallel to the eaves, placing it under the sheathing board. For fastening, you can use nails or screws.
- You can also install a dropper on the front board. This method is suitable for roofs with minimum angle tilt, but remember that such a system may not withstand snow loads.
- The drip tip and the gutter should be as close as possible to each other.
Roofing options
For a flat roof, it is necessary to choose materials that meet increased requirements, in particular, this applies to:
- strength;
- light weight;
- good warm sound insulation;
- resistance to solar radiation, frost, high temperature, fungi and mold, fire;
- long service life;
- efficiency;
- ease of care.
Corrugated sheet
Installation is carried out directly on the floor beams. Allows you to reduce financial costs for installation reinforced concrete covering thanks to the use of the own load-bearing capacity of the profiled sheet. In some cases, concreting can be completely abandoned.
The reliability of such a roof can be increased if the voids between the waves are filled with any non-flammable porous material.
Laying corrugated sheets does not require sheathing
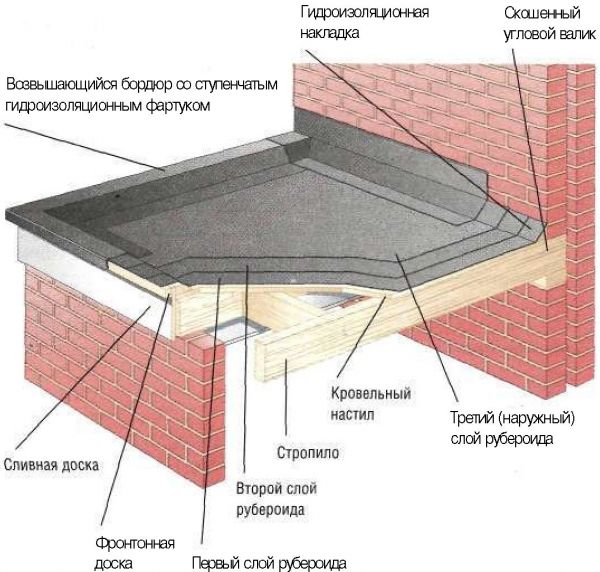
Ruberoid
This type of roofing requires a special roofing pie:
- First you need to perform a rollover. Gravel is ideal for this purpose.
Roof slope can be done in different ways
- Next, you can install a drainage system.
- The insulation layer is protected with a vapor barrier membrane, on top of which the thermal insulation material is laid. You can put mineral wool or expanded polystyrene under the roofing felt.
The easiest way to install slab or roll insulation
- Place sagging waterproofing material on the insulation.
- You can mount a solid plywood base, flat slate, wood or concrete. This sheathing must be coated with a primer.
- Now you can lay the roofing material. There are two ways to install roofing felt. Lap laying involves laying the material so that it ends on a vertical surface. The next canvas must be laid in a manner adjacent to the previous one. The amount of overlap varies between 10–15 cm. The next method is to install roofing felt in a fork. In this case, the material is attached to the rail, the connection point is covered with metal aprons.
The number of layers depends on the area and slope of the roof (the smaller it is, the more layers are needed). You can use a gas torch for installation, but be careful not to burn the material. To do this, it is recommended to direct the flame down the roll, which results in the formation of molten bitumen protruding beyond the edges.
They can be used not only for building houses, but also for arranging roofing structures. Moreover, this can be either the construction of a new house or the replacement of the roof of an old building. The material from which the walls were built has no role; the panels can easily be mounted on absolutely any structure. The main advantages of sip panels:
- no need for insulation and vapor barrier;
- good sound insulation properties;
- high energy efficiency;
- increased strength.
We also need to remember the disadvantages:
- a ventilation system is required due to the tightness of the cracks;
- Before laying the protective material, it is necessary to seal the external joints.
A roof made of sip panels does not require insulation
The masonry of sip panels is carried out parallel to the Mauerlat. The angle of inclination of such a roof should be at least 5 degrees, but only if there is no attic.
The construction of sip panels requires additional covering with other roofing materials, for example, metal tiles or ondulin.
Video: is it possible to make a roof from sip panels
PVC roofing
PVC membrane is a plasticized polymer that can give special strength to the roof due to reinforcement with ether fiber.
PVC roofing has good waterproofing properties
The advantage of this material is its elasticity and resistance to constant temperature changes. But it should not be used with bitumen-based materials.
Installation is carried out in several stages:
- It is necessary to remove the old waterproofing and then lay new material in compliance with all rules.
- Now you can install the membrane film; this can be done on any base.
There are three mounting methods:
- The first is to use warm welding, that is, with heated air. This guarantees the strength of the seam. This procedure can be done specially welding machine, with which you need to process the edges of the film, after which the roofing material can be fixed on the roof. You can also use special tapes with a double-sided adhesive base.
- The second type of fastening is suitable for roofs with a slope of no more than 15 degrees. Fixation occurs only around the perimeter and at junctions. After this, ballast weighing more than 50 kg per 1 m 2 is used. To do this, you can take pebbles, crushed stone, concrete block, paving slabs and any other heavy object.
- Mechanical method. It can be chosen when the presence of additional load on the supporting structure is unacceptable, as well as in cases where there are no drains and parapets. The fastening proceeds as follows. Telescopic fasteners are installed along the perimeter, which can be plastic umbrellas with a large hat and a metal anchor. If the roof slope is greater than 10 degrees, disc holders can be used. The elements are placed at a distance of 2 m. At the junction points, it is recommended to use two rows of fasteners.
Video: do-it-yourself PVC flat roof
Cellular polycarbonate
For furnishing residential premises, it is recommended to choose material with the greatest thickness. The peculiarity of installation is that there is a need to install rafters in meter increments. A frame is also required, which can be made of carbonate or metal profiles. They, in turn, are recommended to be protected from dust and dirt. The profile can be fastened with self-tapping screws directly to the rafters.
Now you can attach the polycarbonate sheets. To do this, you can use fixing profiles and simple self-tapping screws. It is recommended to drill a hole in advance that is larger than the diameter of the screw. It is not recommended to screw these elements in too tightly, otherwise there is a risk of damage to the material due to changes in temperature conditions.
Polycarbonate can be classified as a fragile material, so it is recommended to be quite careful when working with it. Certain rules must be followed:
- The leaf channels should be parallel to the slope.
- Work must be carried out on a smooth surface using sharpened tools.
- The film can only be removed after cutting.
Main nodes
The reliability of the structure largely depends on the correct arrangement of the junction points building structures. This applies to parapets, walls, pipes, ventilation elements.
Cornice knot
The eaves are a roof element that can provide a long service life by increasing the strength of the edges. It must be covered with roofing material on top, and siding or wood can be used to finish the bottom. When the cornice is located at the very bottom of the slope, the following functions are assigned to it:
- giving harmony and logical completeness to the architectural appearance;
- ensuring walls are protected from high humidity, foundation blind areas from the flow of melt water.
The minimum width of the cornice should be 50 cm. This parameter depends on the amount of precipitation in a particular region.
The cornice is designed to protect the edge of the roof
Cold roof units
Their purpose is to ensure insulation of the transition from a horizontal to a vertical surface, as well as sealing seams.
To create nodes cold roof need to:
- Install the strip at the junction points, using a sealant. This is necessary to prevent dust and moisture from entering the roofing pie.
- Make a groove in the wall into which you need to insert the strip into the groove, then secure the system with dowels and a layer of sealant.
- Now it needs to be connected to the roofing material using self-tapping screws. If the roof is covered with corrugated board or slate, then you need to screw the fasteners into the most protruding point of the wave.
Connections to the parapet
The junction with the parapet requires enhanced waterproofing through the use of rolled roofing; it must be laid with an approach to a vertical surface, and the presence of a special support must be ensured. If you install roofing material without it, a cavity may form, which will cause mechanical damage and violation of the tightness of the coating. Therefore, it is necessary to provide support at an angle of 45 degrees between the base of the roof and the parapet. This can be a cement-sand screed or a wooden block.
The parapet performs a protective function
The waterproofing layer must be glued to the base of the roof, to this side and to the parapet, using heated bitumen mastic.
Before it dries, insert the edge of the waterproofing layer into the prepared groove. This part of the material can then be secured with a metal strip and dowels. Treat the joint area with sealant.
Features of flat roof maintenance
There are certain requirements for the installation of a flat roof.
Heating
There come times when solar heat not enough for the snow and icicles to turn into water. Therefore heating is required. There are several options for arranging this system for a flat roof:
- use of self-regulating cables;
- installation of resistive heating elements.
Their difference lies in the operating principle of the adjustment and heating elements. In the first case, these are two copper conductors connected to each other plastic plate, which is the heating element. Such a system independently regulates the amount of heat emitted. The lower the air temperature, the lower the resistance of the connecting element, which means the greater the current strength and the amount of heat generated.
Heating a flat roof prevents snow retention and icing
When using resistive heating elements, heat is transferred through its conductive core. The main advantage of such a system is affordable price, however, it is worth remembering that there is no automatic regulation temperature.
Snow removal
If the angle of inclination of the slopes is insufficient, there is a high probability of snow deposits, which can lead to roof leakage, faster wear, and the formation of icicles on the eaves.
You need to remove snow from a flat roof in a timely manner.
In winter, snow removal must be carried out regularly, since even during a thaw, with a sharp drop in temperature, the gutters can freeze, which will lead to deformation and damage to the system.
There are several ways to get rid of icicles:
- ultrasound;
- laser device;
- chemicals.
The advantages of these methods are that the presence of a person on the roof is not required, which makes the process of removing snow and icicles safer.
As preventive measures You can use special compounds that prevent roof icing:
- synthetic rubber;
- organic silicon;
- fluoroplastic mixture.
These products reduce the adhesion of ice to the roofing material.
The roof is the most important element of the structure of a house, which is why its installation requires certain professional skills. Installation errors are unacceptable; they can be too expensive.
Often, when constructing private houses, preference is given to a pitched roof, but there are also buildings with a flat roof, and the result is very interesting architectural objects. If you decide to build this structure, you need to be prepared for some difficulties. There are pros and cons of a flat roof, and the nuances of its installation.
Pros and cons of a flat roof
It is worth noting from the very beginning that a flat roof for a private house is not a perfectly horizontal surface. It also has a slope, only a small one (from 1 to 5 degrees). The following main advantages of the roof can be identified:
- the ceiling of the upper floor will serve as a supporting structure for the roof;
- the same height of the space under the roof will allow it to be used as a full-fledged room;
- gives the house an original look;
- the possibility of using the roof surface (for example, you can arrange a summer playground there);
- simplifies repair work and makes it safer.

The disadvantages include:
- strict requirements for the waterproofing layer of the roofing pie;
- the need to install an internal drain;
- high degree of snow load.

From the above it follows that a flat roof is good decision, provided that everything roofing work will be carried out efficiently and the requirements will be taken into account.


Base for flat roof installation
What the ceiling of the upper floor will be like directly depends on the structural features of the ceiling throughout the house. As a rule, it is performed using the same material as the ceiling between floors.

The most common options are prefabricated or monolithic reinforced concrete floors, floors made of profiled sheets with metal support beams.

An option with a wooden floor is also possible. The fundamental difference from the overlap between floors is the presence of laid insulation and high-quality waterproofing.

Roofing pie options
The type of roofing pie is determined by the nature of its location and purpose. It can be performed in a classic version or made inverse.

A classic roof has the following composition: ceiling, slope made of concrete or expanded clay concrete, vapor barrier, thermal insulation material, roof covering with high degree protection from moisture (mainly bituminous materials).

In an inversion design, the arrangement is different: ceiling, slope, multi-layer waterproofing, thermal insulation material, vapor barrier and, finally, a pressure layer. The latter can be made from concrete slabs, gravel, ceramic tiles etc.


The name inversion roofing was given due to the mirror arrangement of the layers of hydro- and vapor barrier in relation to the insulation (unlike the classic version).

This type of roofing is ideal for used roofs. However, the complexity of the technology makes such roofs a rare exception in the field of private construction.

The technology itself is expensive, since the massiveness of the structure makes it necessary to create a durable ceiling for the upper floor.

Load-bearing structures require detailed calculations at the design stage, and the multi-layer structure of the cake entails significant costs.

Below we will only consider classic version roofing pie, which is often used to equip modern houses with a flat roof.

Roofing material
The material for the roof, namely vapor barrier, waterproofing, insulation and the coating itself, must be selected of high quality.

Vapor barrier is carried out with special membranes, not perforated films. It is undesirable to use polyethylene as waterproofing, since the material does not have the proper reliability.


Insulation for installing a flat roof is selected taking into account the snow load, as well as the load emanating from people working on the roof during repairs.

The insulation must be durable and resistant to wet environments. This can be expanded polystyrene, mineral wool with high density, expanded clay.

The efficiency of the latter is not so high, therefore, when choosing it as insulation, it is necessary to achieve a large thickness of the layer being laid. This increases the load on the supporting structures.

The coating is made from roll materials: roofing felt, linochrome, waterproofing, etc., self-leveling mastics are also used. Rolled material is considered the most optimal for use when arranging a flat roof.

Roofing technology
The flat roof design involves the following workflow steps. The slope of the roof, albeit small, is achieved by creating a slope.


In this case, you can use bulk material (expanded clay), foam concrete (it is advisable to contact specialists), and insulation material. The slope is covered with a waterproofing layer on top, after which the process of laying the roof covering begins.

The next step is laying the first layer. The roll is rolled out, then heated with a gas burner and glued to the base.

It is important to ensure that the panels overlap each other and that the material is applied to all vertical roof objects (parapets, pipes, etc.).

Three layers of underlayment and one finishing layer are laid on a flat roof.

The coating installation stage is a labor-intensive process, especially if it is necessary to use adhesive mastic.

For drainage installations, overhead gutters and an internal drainage system are used.

If all the work related to the roof arrangement is completed correctly, you will have an excellent opportunity to proudly declare the originality of your residential creation. And the photo taken of a house with a flat roof will join the ranks of original design solutions on the Internet.

Photos of houses with a flat roof


During the construction of urban high-rise buildings and industrial facilities, the basis of a flat roof is usually a reinforced concrete slab. But for private houses, especially frame and wooden ones, such a choice is most often unacceptable. In this case, a flat roof is constructed according to wooden beams. Its main advantage is light weight, reducing the load on the walls and foundation.
The installation of such a roof is simpler and cheaper than using heavy reinforced concrete slabs. But the functionality is the same. Therefore, this option of a flat roof is often chosen by those who want to build it with their own hands.
The main share of such roofs falls on private houses and cottages, whose owners value futuristic style, convenience and practicality. Also - for covering verandas, terraces, balconies, garages. As a rule, all these buildings are wooden or frame, requiring lightweight design roofs. But this is not a mandatory rule. The wall material can be anything - brick, aerated concrete, foam concrete, etc. In this case, wooden beams often crash into the mauerlat - a wooden beam that runs along the perimeter of the walls and is connected to them using anchor bolts or hairpins.
Flat roofing is especially attractive to developers because its horizontal surface can be used as usable area. Moreover, this is possible even for a roof with wooden beams at its base.
Of course, you shouldn’t use the freed up meters for a parking lot, swimming pool or tennis court. Still, such projects require a more monumental foundation. But open terrace, observation deck, home greenhouse, wooden beams can easily withstand. The main thing is to make the calculation correctly and not skimp on the thickness of the lumber.
Types of flat roofs on beams
On wooden floors you can build flat roof the following types:
- unexploited;
- exploited;
- inversion
That is, all possible types - without restrictions.

Unused roof– ordinary, completed with a waterproofing finishing coating. It is intended solely to protect the premises from conditions environment and does not set itself other goals. It is forbidden to use it as a place of rest, move in large groups, or install terrace furniture and flowerpots. The covering of such a roof is designed for the fact that 1-2 people will periodically climb onto it, solely for maintenance of the structure.
Operable roof- already more interesting and more complex. In addition to its direct protective functions, such a roof plays the role of additional usable space for the homeowner. The design pie ends not with waterproofing (prone to damage), but with a protective covering - paving stones, decking, wooden flooring, paving slabs, turf layer, crushed stone or gravel.
Inversion roof– inverted roofing, a qualitatively different option. It can be either exploited or unexploited. Its peculiarity is the inverted order of placing layers in the pie. If in a conventional roof the waterproofing is laid on top of the insulation, then in an inversion roof the opposite is true. The waterproofing lies under the insulation, and the vapor barrier is completely excluded from the structure of the cake. Due to this, the waterproofing is protected from the street environment and its service life is increased.
However, under the influence of unfavorable street conditions, insulation appears, so in the composition of inversion roofs the choice of this type isolation is limited. Only EPS (extruded polystyrene foam) and nothing more! This material has virtually zero water absorption, high density and strength. On top of the EPS in inversion roofs is loaded with washed gravel, paving stones, paving slabs or a turf layer.
An interesting option for exploited roofs (including inversion ones) is green roof . It can also be supported on wooden beams. The pie of such a roof ends with a soil layer on which plants are planted. There are other elements that are not used for other types of roofs: a drainage layer (gravel, expanded clay, crushed pumice or geomats), a filtration layer (geotextile).
Flat roof frame on a wooden base
The frame of the described roofs is made of wooden beams laid like an interfloor ceiling. Full-size timber lumber or composite lumber (laminated veneer lumber) can be used. Often beams are made from boards with a section of 100x150 mm.
The beams are laid with support on the walls, similarly interfloor ceilings. If the building is wooden or frame, then the beams rest on upper crown logs or top harness. If it is brick or block, then on a pre-fixed Mauerlat. A timber with a cross section of 150x150 mm or 150x100 mm is usually used as a Mauerlat. It is mounted on the upper chord of the walls using anchors or studs. To protect the wooden Mauerlat from the wall material, 1-2 layers of waterproofing (roofing felt) are laid between them.
Cuts are made on the beams under the Mauerlat, they are laid and secured with metal corners or nails. The pitch between the beams is maintained at 50-120 mm (depending on the calculated load).
When installing beams, it is important to ensure a roof slope of 1-6°. Despite the fact that the roof is called flat, it is not absolutely horizontal. A slight slope is necessary to ensure that water moves towards the drain and thus prevents it from stagnating.
You can create the required slope in the following ways:
- Immediately lay the beams with the required slope. Then, if there is supposed to be a device under the roof in the room horizontal ceiling, it is made suspended or sewn onto a horizontal sheathing.
- Lay the beams horizontally, and nail wooden plates of different heights to them to maintain the required angle.
- Lay the beams horizontally and form the angle using different thicknesses thermal insulation laid on top of the frame.
- Use beams with unequal allowance in height.
Most often, the first option is used, that is, the beams are immediately laid with a slope. The easiest way to do this is to attach a strong beam or board along the top of the load-bearing wall, which will raise the frame(s) on one side. Instead of a transverse purlin, you can also install short radial beams extending from the central double diagonal beam.

Flat roof pie: what's inside?
A flat roof pie on a wooden frame can have a different structure. There are many design options, many of them are posted on the Internet. And they will all work!
Option #1. Roof with insulation over beams
Flat roof insulation layers can be laid over the beams. For example, a proven working option (classic roofing with insulation):
- floor beams;
- vapor barrier;
- waterproofing material – polymer membrane.
When using EPPS insulation and PVC membranes simultaneously in the structure, a separating layer (geotextile, fiberglass) must be laid between them. The fact is that these two materials are incompatible and when they come into direct contact, the PVC is destroyed.

The polymer membrane is fixed to the insulation mechanical method or loaded with ballast. Crushed stone or gravel (for all types of roofs), paving stones (for maintained roofs), and soil (for green maintained roofs) are used as ballast. However, when choosing ballast, you should soberly assess the reliability wooden frame, its maximum load.
If the final coating is to use a weld-on waterproofing or an EPDM membrane with adhesive fixation, a change is made to the scheme discussed above. It consists in laying sheets of plywood, OSB or DSP between the insulation and waterproofing.
This results in the following diagram:
- floor beams;
- lathing (if necessary);
- continuous cladding made of plywood, CBPB, OSB;
- vapor barrier;
- insulation – EPPS, mineral wool;
- plywood sheets, OSB, DSP;
- waterproofing material.
Installation of a built-up roof traditionally requires the use of a gas burner, therefore, according to existing fire standards, it is not allowed wooden structures. Therefore, they act as follows. The first layer of waterproofing is nailed or glued to wooden base, and the second layer is fused as it should be. It is also convenient to use euroroofing felt with a special adhesive base, for which it is recommended cold installation without heating with a burner.
The installation of a membrane roof on a wooden base is shown in the video:
Option #2. Roof with interbeam insulation
Another principle of assembling a flat roof pie is associated with laying insulation in the space between the beams. This option is more convenient than the first if EPDM membranes with adhesive fixation or fused roofing are used as waterproofing.
The following roofing pie scheme is often used:
- floor beams;
- vapor barrier (between beams);
- insulation (between beams);
- lathing (if necessary);
- continuous cladding made of plywood, CBPB, OSB;
- waterproofing.
In principle, a similar system is used in the formation of classic pitched roofs.

Option #3. Roof with internal insulation
In this case, sheets of plywood, OSB or DSP are sewn onto the supporting structure (beams), and waterproofing is laid over them. The remaining insulating layers of the roofing pie are sewn on the side of the room.
A rough ceiling (made of boards or sheet materials), to it, perpendicular load-bearing beams, screw the slats in increments of 40 cm. Place between the slats polystyrene foam boards, gluing them to mastic or glue. Hemmed to the insulating layer vapor barrier film. Cover the insulation cake with a finished ceiling.
Or you can go against all “traditional” solutions and build an inversion roof on beams. Due to the fact that the waterproofing will be covered with insulation, that is, protected from loads, exposure to oxygen, UV rays and precipitation, its service life is significantly increased.
When constructing an inversion roof, you can use the following diagram (from bottom to top):
- beams;
- continuous sheathing;
- waterproofing;
- separating layer (when using PVC membrane as waterproofing);
- EPPS insulation;
- separating layer – geotextile;
- ballast, paving slabs, decking, etc.
The principle of inversion roofing is often used to install green roofs. For example, you can do this:

What topcoat should I use?
The wooden base of a flat roof, along with its advantages, also has features with a minus sign. This is an increased fire hazard and low load-bearing capacity (compared to reinforced concrete slabs).
To waterproof such a roof, it is advisable to use materials that do not require hot installation. Ideally, polymer membranes. When choosing built-up bitumen-polymer coatings (from the Euroroofing felt series), the first layer of material is installed mechanically, and the second - by fusing. In order to minimize the possibility of fire in structures during installation, it is recommended to use non-combustible CBPB boards as continuous cladding (on which the waterproofing is laid).
When constructing serviceable and ballasted roofs, it should also be remembered that excessive load for wooden base can be fatal. Therefore, if the load-bearing capacity of the beams used is small, lightweight materials should be selected for the finishing coating - decking, deck boards, rubber paving slabs (rubber mats), etc.


 Simple sections")