I haven't posted here in a while! And you can find a lot of good reasons for this ... And the main reason is that he was doing what they say on the radio - the wrong "format"! And now, not in my opinion, but out of necessity, I started repairing the bathroom. Previously, repairs were made in 2005, this date is solely for the purpose of understanding what was then available from the available technologies and materials. I think some ideas are still relevant today! For this reason, I decided to post several articles, so to speak, in reverse order, i.e. during parsing...
This first article is devoted to the issue of bending plastic panels when sheathing rooms in the corners. I think that this issue may be well known to many, but there will also be those who simply did not think about such an option for resolving the issue, but went exclusively through the path that our industry offers and bought various corners provided for these purposes. In my opinion, the option I proposed, firstly, will save money (do not buy corners), secondly, it looks more aesthetically pleasing, and thirdly, it allows you to maintain the integrity of the structure. Maybe someone else will come up with positive qualities, I think these are quite enough!
And so, consider the plastic panel itself! (for demonstration I used clippings, fragments - in short, garbage)
To create an internal corner, it is enough to simply make a cut along the entire length of the panel from the "wrong side" of the required segment, which will further form the corner. The cut can be made with a simple construction knife. The panel is cut quite easily and simply.

As practice has shown, although a simple cut is enough, it is still better in a pair to completely “select material” from this segment - as in the photo below. This is due to the fact that when bent, the edges of the cut plastic can interfere with each other ... !!! Not required, but highly recommended!

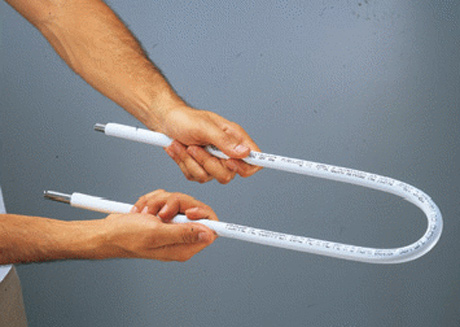
You need to bend carefully, with smooth movements, gradually along the entire length so that the panel does not break in this place. A fairly large angle can be achieved.

For the outer corner, it is required to "select material", no longer from one segment. This is due to the fact that the cut edges are superimposed here and they begin to abut and do not allow the panel to bend.

If you do everything right slowly and carefully, then you can achieve these results !!!
EXTERIOR ANGLE

OUTSIDE CORNER

Attention, a smooth and good angle will turn out if the walls that you sheathe / paste over with panels also display normal angles !!!
Agree, it is rather tedious to finish the walls with plastic on a pre-built metal and wooden frame. In addition, this method of wall decoration reduces the volume of the room. And although we are talking about some 3-4cm on each side, they still significantly make the room smaller. There are other disadvantages of the frame method of wall cladding with plastic - PVC panels are not able to pass moisture and its vapors, as a result of which dampness, rotting and, as a result, the appearance of fungus form behind such a false wall. An alternative to the frame technology of wall cladding with plastic is the installation of panels on glue - this method is devoid of almost all the disadvantages described above. We will deal with it in the most detailed way.
Conditions under which it is possible to clad walls with plastic using glue
Yes, you heard right. Not every wall can be pasted over with plastic PVC panels. There are not so many conditions under which plastic is able to adhere well to the surface to be lined, but their failure to comply will lead to a waste of money and time.
Firstly, it is the evenness of the walls. We are not talking about an ideal surface that does not have the slightest curvature - permissible drops, pits and bumps should not exceed 5 mm. If there are more, then the plastic will either not stick or break in places of large depressions.
Secondly, the quality of the surface. It's no secret that no glue will stick to a dusty, dirty and greasy surface. Therefore, before proceeding with the gluing of plastic panels, the walls must be cleaned with high quality - wash off the whitewash with water, remove dust with a primer, and clean the grease with detergents.
What glue to choose for plastic PVC panels
 In principle, wall cladding with plastic can be carried out using different adhesive compositions - some craftsmen use hot-melt adhesive for this purpose, which is applied with a special gun, others resort to contact glue such as “liquid nails”, and still others use mounting foam for mounting PVC panels, devoid of ability to expand.
In principle, all of the above adhesive compositions cope with the tasks assigned to them by almost 100%, but some of them have their drawbacks. In particular, we are talking about hot glue. The fact is that plastic has a considerable coefficient of thermal expansion - the use of a rigidly fixing adhesive that deprives the panels of a small free play leads to a gradual lagging of the panels from the walls. This does not happen immediately, but in the next couple of years, hot melt adhesive will show its failure to hold the panels for a long time and reliably.
It is for this reason that it is better to install plastic on walls with liquid nails or non-expanding polyurethane sealant.
This type of adhesive has sufficient plasticity so that during the cooling and heating cycles of the plastic, it does not come off the surface. It is this adhesive for PVC panels that most craftsmen who value their reputation use.
The technology of mounting PVC panels on glue
The process of cladding walls with plastic using glue, as in principle, and all finishing work, begins with high-quality surface preparation. As mentioned above, it is cleaned of dust, dirt and grease, after which it is abundantly primed. This approach to business is a common truth for every master who respects his work.
Additional work may need to be done before cleaning and priming the walls. It's all about the approach of the builders of the past era to their work - most of the corners of rooms such as the bathroom and the bathroom were made rounded. They will have to be slightly trimmed with a puncher. If this is not possible for any reason, then you will have to repeat the turns of the walls with an accuracy of a millimeter.
 Do you know how to bend a plastic panel along its entire length without breaking it? You certainly won’t need to warm it with a powerful hair dryer - the back side of the panel is cut between the stiffeners and gently bent. Thus, you can make almost any internal and even external corner. When forming the outer corners, one slot will not be enough - you will have to cut an oblique segment one and a half to two stiffeners wide. In principle, if the walls and corners are even, then you can abandon this idea, preferring the factory corner joints. In the case of wall angles larger than 90˚, you can't imagine better than bending the panel.
Okay, now let's get down to business, and first we will prepare the starting strip, which will cultivate the connection of plastic with the floor. You can do without it, but only if your plans include the installation of skirting boards. The same applies to the ceiling - if you plan to install a plastic suspension system, then you can refuse to install the starting profile under the ceiling.
 Now the panel itself. It is cut in accordance with the height of the room, its back side is cleaned of dust with a damp cloth. Only then can glue be applied to it. Depending on the curvature of the walls, the adhesive can be applied in several ways. If the walls can be called ideal, then the application of the adhesive composition is carried out in strips along the perimeter and in the middle of the strip, but if the walls have curvature, then it is better to apply the glue pointwise, in large drops. This approach to business will guarantee that even in the depressions the panel will stick to the wall surface with high quality.
 The greased panel with glue is applied to the wall. If we are talking about using liquid nails, then it taps and comes off - such glue needs to be weathered a little (5-7 minutes), this will make it more rigid and will not allow the panel to lag behind the wall until the glue is completely dry. With polyurethane sealant, such numbers do not work - in the process of hardening of this glue, the plastic strip will have to be periodically pressed against the surface to be lined. So whatever one may say, it is hard to find something better than liquid nails for gluing plastic PVC panels.
Here is the answer to the question of how to fix plastic to the wall with glue. It is in this way that their adhesive installation is performed. And finally, a little advice on the formation of external and internal corners. To be honest, there is no point in bothering with them and using factory connections. The best option is to line them with ordinary plastic corners that do not have grooves for inserting panels into them. They are simply glued onto transparent silicone, and its excess is removed with a damp cloth. Depending on the curvature of the corners, you can choose the width of such inserts in the range from 20 to 50 mm.
Many are wondering how to bend PVC plastic pipes on their own. Indeed, in the process of installing heating and water supply systems, one often has to deal with pipe deformation, but many, not knowing how to do this, acquire a lot of unnecessary components, with the help of which they create bends and branching of the channel. At the same time, they spend on this almost a third of the allocated budget for the creation of the entire pipeline. A more rational and inexpensive way is to bend PVC pipes.
So, in order to bend a PVC pipe intended for a heating and drinking water supply system, it is necessary to remember and put into practice several well-known methods of influencing plastic products using heated air and a vaporous substance. In addition, in independent construction work, there is a way to bend a PVC pipe using an included gas stove. So, about everything in more detail.

As for the manual method of bending plastic pipes, it consists in heating exactly that section of the pipe that will bend. In this case, a home stove can help, or rather, one of its burners. But, using this method of bending plastic pipes, you need to be vigilant and careful, since an open flame can damage not only the pipe, but also the person’s hands. And in more serious cases, lead to disastrous results. Therefore, there is always an alternative to everything that happens, with regards to the methods of bending PVC pipes, including.

Safer ways to create any bend and direction of a pipe intended for water supply are:
1. Plastic pipe can be bent with a hair dryer. To ensure the proper shape of the PVC pipe when it is heated, so that it does not start the melting process, it is necessary to pour into its internal cavity a material that is resistant to elevated temperatures, and whose structure has the form of fine grinding fractions. Such materials include both sand mass and salt mass. Using a construction watering can or funnel, pouring such materials into a PVC pipe will not be difficult. Naturally, one of the ends will need to be closed with a cork or barrier cap. Approximately, to fill a standard (length about 3 meters and a diameter of about 2 cm) plastic pipe designed to create a heating system or a water supply channel, you will need about one bucket of bulk material. Knowing all the calculations, you can purchase everything you need in advance and not worry about whether the available materials were enough or not.

2. Plastic pipe can be bent without the help of a hair dryer. This method involves heating bulk material (sand mass or salt mass) using an oven. To implement the plan, you will need a baking sheet and a preheated oven. After the bulk mass has warmed up to the desired temperature, using a scoop and a construction funnel, it is necessary to pour it into the internal cavity of the plastic pipe. It should be borne in mind that when choosing this method of bending a PVC pipe, you need to have a crow and a metal barrier cover.
An important nuance is the determination of the desired temperature, sufficient for bending plastic pipes, as well as PVC pipes on their own. In this case, you need to think logically. Consider this issue using the example of a water heater. So, the tank heats water, according to the recommendations in the instructions for the product, up to a maximum of 75 degrees Celsius, but it is advisable to adjust the mode and set the heating temperature to 60 degrees. This is necessary in order to avoid the formation of deposits on the walls of the tank during heating at high temperatures. So, making an analysis of the available data, we can conclude that the required heating temperature of the bulk mass must definitely be above 80 degrees. On the Internet, there is information that such masses need to be heated to at least 140 degrees and not more than 170 degrees, since this extreme temperature is considered the melting point of plastic and PVC products.
All methods of bending PVC pipes for water supply systems have been considered, and you need to make a choice only based on your wishes.
And in what ways can bending PVC pipes intended for sewer systems be achieved?
Few people know that such rigid PVC pipes with a large diameter, in general, can be bent. It must be understood that not all types of such pipes lend themselves to the bending process. Moreover, you can only bend the pipe a little, but that's something. In most cases, as practice shows, a plastic sewer pipe with a diameter of 1011 cm can be bent by a maximum of 25% with the help of a technical hair dryer. Do not worry if relief formations in the form of folds appear on the outer surface of the PVC pipe after processing with a technical hair dryer. Such formations do not prevent the passage of masses through it, and also do not create a weakening of the deformed places.

Pipes made of polyvinyl chloride or plastic, which have a diameter of 56 cm, lend themselves to unhindered creation of bends. For bending such products, a technical hair dryer is used or hot bulk materials technology is used. Before the process of creating bends, you need to go through a training exercise. No need to spare materials for honing a skill. Such training will help to achieve a good result at the end of the bending process of the desired plastic product.
The process of bending sewer pipes made of plastic or polyvinyl chloride differs little from the process of bending pipes for heating systems or water supply systems. Initially, it is necessary to heat the bulk material to 80100 degrees Celsius, and then pour it into the cavity of the plastic product. Next, you need to wait a while for the PVC pipe to warm up at the place of the intended bend. After waiting, you can begin to give it the look you need.
Today's construction technologies have reached the level of creating special flexible PVC pipes for sewerage systems. They are produced in different sizes and with different diameters. Therefore, by purchasing such a pipe, it is possible to avoid giving the pipe flexibility properties on its own. But the choice is always yours!
PVC pipes have already thoroughly and firmly entered our lives, more and more replacing the metal pipes we are used to. The result of this was that PVC pipes do not corrode, are not afraid of water, frost, and, despite their high strength, nevertheless, they are easily cut and bent to give the desired shape.
In addition to the use of PVC pipes in plumbing, they are very often used for the manufacture of various crafts.

To bend a pipe, pipe bending machines are usually used, but their prices are relatively high (from 3000 to several tens of thousands), and then - why do you need a machine if you do not set yourself the goal of doing this all the time?

As mentioned above, PVC pipes are easy to bend and you can give them the desired shape simply by hand, using just simple fixtures and tools, namely:
metal container;
cutting tool (scissors or knife);
protective gloves;
sandpaper;
gas/electric stove;
construction dryer.
In some cases, for example, to bend a pipe in several directions, you will need to make a simple fixture (template) for bending pipes, which is a plate of thick plywood or fiberboard with wooden pins inserted into it (nails or self-tapping screws can be used).

In order for the pipe to bend evenly, without wrinkles, it must be heated evenly. For this, sand is used. Measure the required amount of sand in advance, pouring it into the pipe, after sealing one end of the pipe with tape. As practice shows, for a 3-meter pipe with a diameter of 20 mm of sand, about one bucket is required.

Then pour the sand from the pipe into the prepared metal container, heat the sand to a temperature of 80-100 degrees ...

...and pour it back into the pipe again. Seal the filling hole with tape so that sand does not spill out of the pipe during operation. Attention: remember that the pipe will get hot, so don't forget to wear protective gloves!

Lay the pipe on a flat surface so that it heats up evenly. For a pipe with a diameter of 16-20 mm, this will take from 2 to 4 minutes.

Then place the pipe in the prepared template and gently bend it centimeter by centimeter in the desired directions. Do not hurry! The result of inaccurate work can be uneven deflections and even ruptures of the pipe along the outer diameter. In those and other cases, marriage is not amenable to correction. At the end of the work, leave the pipe in the template until it cools. After removing the pipe from the template, it will hold the shape you gave it.
If there is a large amount of work ahead, there is a risk that the sand will have time to cool before the work is completed. To prevent this from happening, just in case, keep a building hair dryer on hand in order to locally heat the treated section of the pipe from time to time.
In principle, you can do without heating the sand on the stove at all, using only a hair dryer, but in this case the work will be unnecessarily delayed and, moreover, with careless handling, you can overheat the pipe, and it will simply “float”. And this, again, is not eliminated marriage.
In addition to the method described, there are other ways to bend PVC pipes using other devices, for example, the so-called spring jigs. They are of two types: internal, when the conductor is inserted into the pipe, and external - here the pipe is inserted into the conductor.

You can bend PVC pipes without any tools at all, but for this you must have strong hands and strong fingers. Watch a small but very informative video on this topic below.
PVC pipes are used more and more often as a starting material for the manufacture of various crafts and homemade products. Sometimes masters give them an ornate curved shape and the final work after applying the finish coat does not even resemble the original material. In this master class, we will demonstrate this technique to you.
materials
To bend a PVC pipe you will need:
- the pipe itself;
- strong tape;
- sand;
- funnel;
- metal container;
- gas or electric stove;
- protective gloves;
- knife or scissors;
- saw or hacksaw, as well as sandpaper.
In addition, you will need a pipe bender. In this case, a piece of plywood with dowels planted in the thickness was used.
Step 1. Usually, a gas burner is used to bend pipes, but with its help it is possible to give the pipe only a slight bend and only in a small area.
It is difficult to work out significant segments of such material in this way. It takes a lot of time, moreover, pipes often bend during work, which does not look aesthetically pleasing.

To bend the pipe, as you see in the photo of the final work, it needs to be evenly heated from the inside. For this difficult operation, we use sand. So, first of all, you need to cut a piece of the required length from the PVC pipe and clean the edges of the cut.
Step 2. One end of the pipe must be sealed with tape. The tape should completely cover the hole.

Step 3. With the help of a funnel, sand must be poured into the pipe. Take it so much that the pipe is completely filled with it.

Step 4. Having measured the required amount of sand, pour it into a metal bowl and warm it up well. The sand must be hot.


Step 5. Put on protective gloves on your hands. Using the same funnel, pour the prepared sand back into the pipe.

Step 6. Cover the other end of the pipe with tape. This is necessary so that the sand does not spill out during work.

Step 7. Leave the pipe like this for a couple of minutes. During this time, it will warm up from the inside. The material will become soft and pliable.

Step 8. While the sand is still hot, you can shape the cut piece of pipe into the desired curve or shape. After that, remove the tape and pour the sand back.


 in the near future - forecasts and expert opinions")


