Most of the population of our country heat their homes with wood stoves. And if not at home, then in a bathhouse or at the dacha you will always need a supply of fuel. Grill, fireplace, stove heating, potbelly stove - all this consumes firewood. Therefore, if you often like to invite friends over for a barbecue and sit by the fireplace on a cool evening, you need to take care of a supply of firewood in advance. Building a woodshed with your own hands will protect them from dampness. And if you also embellish this structure, it can become an element decorative design plot.
Building terminology
Woodshed, woodshed, woodshed - such similar names, but structurally different buildings. First, let's define what it is:
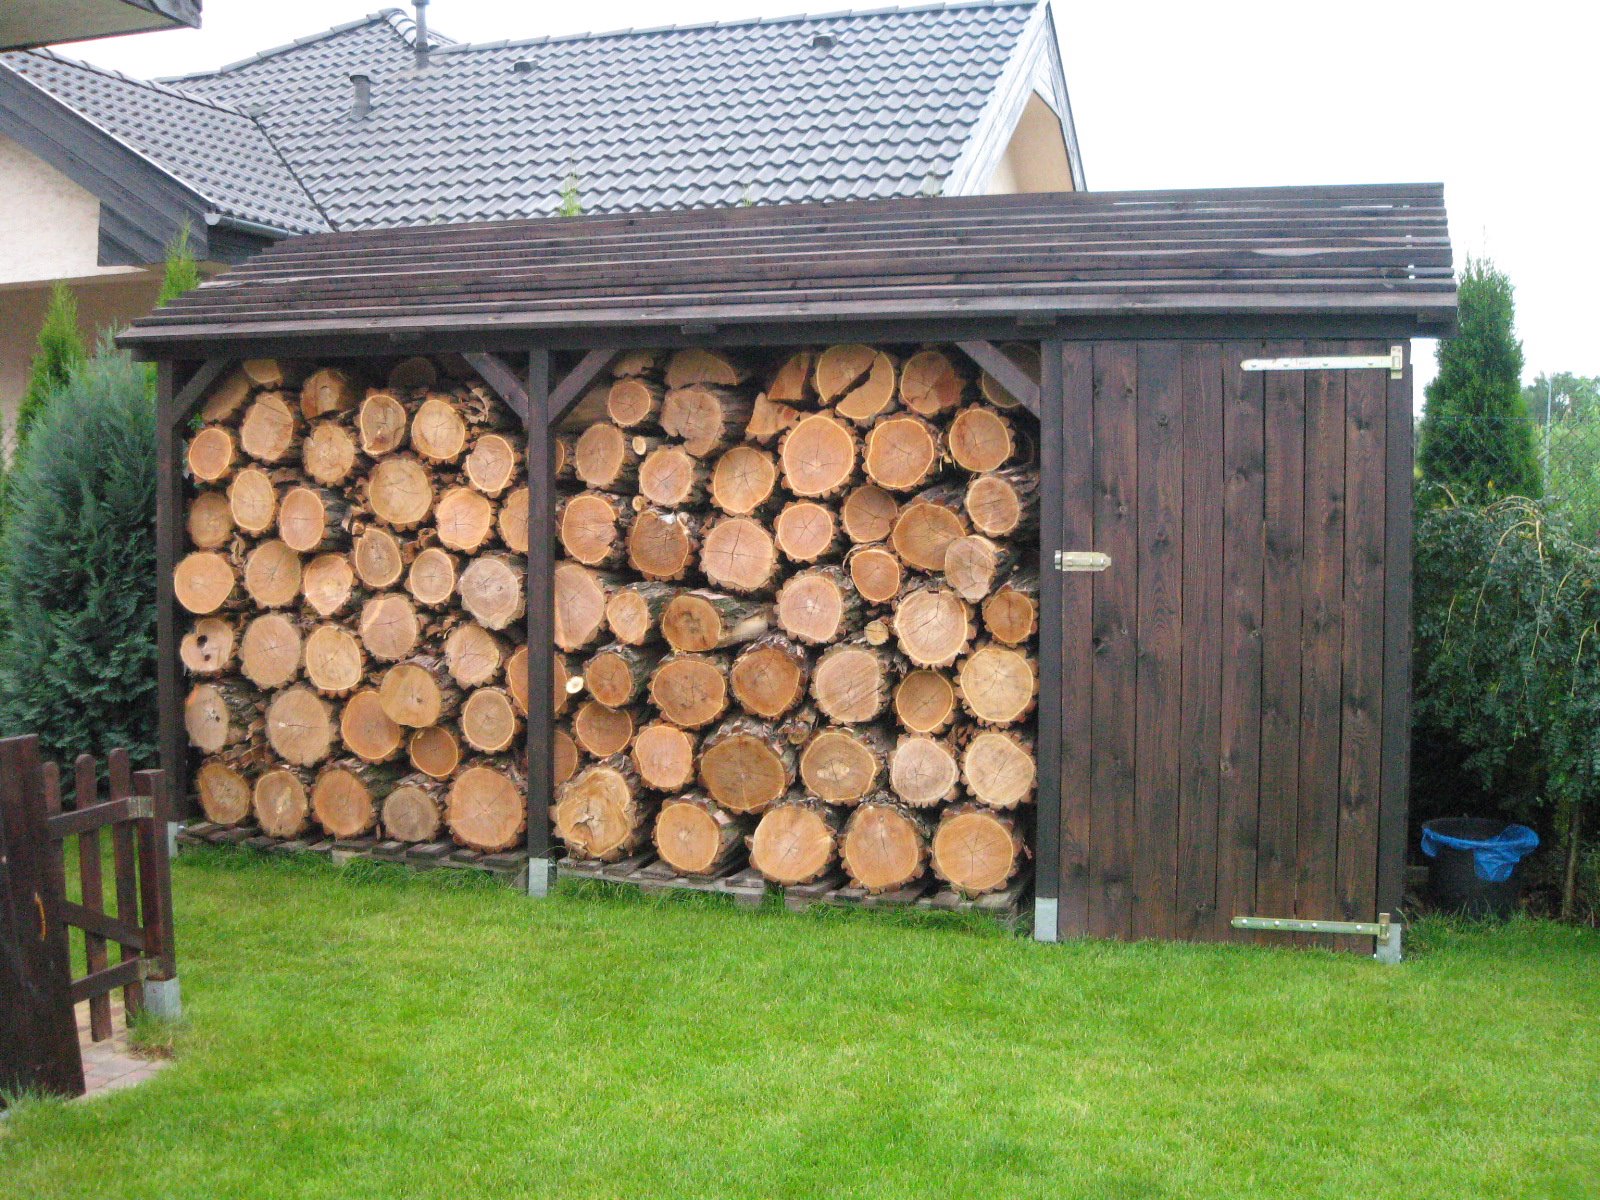
- A wood shed is a shed for storing firewood, which is built on a foundation some distance from the house. The design of this structure is equipped with a door.
- Woodshed - is a simplified woodshed. This structure is attached to the wall of the building. This method of constructing a structure is faster and simpler.
- A firewood box is a device for carrying firewood or a stand for loading fuel to the firebox. Often both of these functions are combined structurally in one product.
Requirements for woodsheds
Freshly cut trees are not suitable for burning. Therefore, it is necessary to have on the site not only a place to store firewood, but also a structure where the wood can dry well and become suitable for use in the stove. These specially erected buildings must meet the following requirements:

Choosing a construction site on the site
When choosing a place where you plan to build a firewood storage, you need to focus on its size and the purpose of using fuel. Here Some tips for building a woodshed with your own hands on the scale of a summer cottage:

To facilitate the construction of the woodshed, it is necessary to first level the site.
Making a drawing of the building
 Of course, for such a simple construction it is big project not worth it. After deciding on the location of the building, it will be enough to draw a drawing of the structure you like. It is on this basis that you can calculate the amount of material needed for construction.
And also by drawing up a drawing, you can accurately determine the area for the required supply of firewood, which will depend on several factors. So, to heat a house of 100 m2 you will need a little more than two cubic meters pine firewood or 1.7 m 3 birch.
The volume of fuel reserve is significantly influenced by the characteristics of the stove and the coefficient useful action fireplace.
Features of woodshed construction
Freshly cut firewood must remain in storage for at least one year before being used as fuel. The construction of such a room is not particularly complex, so any owner who wants to work and has basic knowledge of construction can equip it. But there are also some peculiarities of construction at all stages, from foundation to roof.
Foundation structure
 Building a strip foundation for a woodshed is not cost effective. A columnar base is sufficient. It is better to use concrete pillars, but you can also lay them out of brick. It is advisable to bury anchors in the supports, with the help of which the lower crown of the frame will be attached.
For the installation of supports, holes are dug with a depth of at least the freezing level of the soil, and a sand-crushed stone cushion is installed. For a small building, four columns along the edges of the perimeter are enough. But if a barn-type woodshed with doors is being built, then the number of supports needs to be increased. In this case, it is necessary to add at least two columns under the installation of the doorway.
Floor equipment
The opinion that it is better to make a floor in a woodshed with cracks is erroneous.

Wood debris, falling under such a covering, creates a favorable environment for the proliferation of pests, and its decay is accompanied by the release of heat, which increases the harmful greenhouse effect.
Therefore, it is better to lay the floor in the building with tongue-and-groove boards with a thickness of 40 mm or more along joists made of wooden beam section 150x75 mm. Such requirements are put forward not only to avoid littering, but also to create the necessary strength of the floor.
In order for the subfloor to be accessible for high-quality cleaning and well ventilated, the installation of a plinth is unacceptable.
An ideal, but rather labor-intensive, solution is a building without a floor, where firewood is stacked directly on monolithic foundation. In this case, the firewood will be able to age in just half a year, since such a surface is capable of retaining heat in the woodshed a little higher outside temperature, long after the onset of cold weather.
Frame and walls of the building
 The structures of woodsheds are often made of frames, like outbuildings and sheds, but simplified. The crown beams cut into half the tree only at the crosshairs and corners. All other parts of the frame are fastened roughly obliquely with nails, and then steel corners using self-tapping screws. Sheathing boards are also nailed with grooved nails or large screws. For the lower crown, a 150x150 mm beam is used, and the top and racks are made of timber with a section of 100x200 mm.
To improve ventilation, the walls are made with lattice. The width of the slots is made from 5 cm, and if there is no theft of firewood, then better than the slit increase to 10 cm.
When the sheathing is positioned horizontally, the frame is more durable, but raindrops from the edge of the board fall directly on the firewood. But the vertical direction of the sheathing better protects the logs from moisture, but does not strengthen the frame, so it is reinforced with transverse planks. Diagonal cladding is considered ideal, but it requires the use of high-quality material and is more labor-intensive to manufacture.
Making a woodshed roof
In areas with average climatic conditions, the roofs of buildings are made pitched with a slight slope (15-25 degrees). An important condition for protection from precipitation is the installation of a large overhang of up to 350 mm.
It is better to make the roof deck from galvanized sheet metal or corrugated sheet metal. Heavy roofing materials, such as slate, tiles, slate will put too much strain on the entire structure, but soft ones (bitumen shingles, ondulin) can sag on the sheathing. To prevent condensation from getting onto the logs, you can lay roofing material under the profiled sheet.
Sometimes, for aesthetic reasons, a gable roof is used to cover the woodshed. Only such gables devices cannot be tightly sewn, this impairs ventilation upper layers logs In such gables it is necessary to cut through unglazed windows or make them, just like lattice-type walls.
The nuances of building a firewood shed
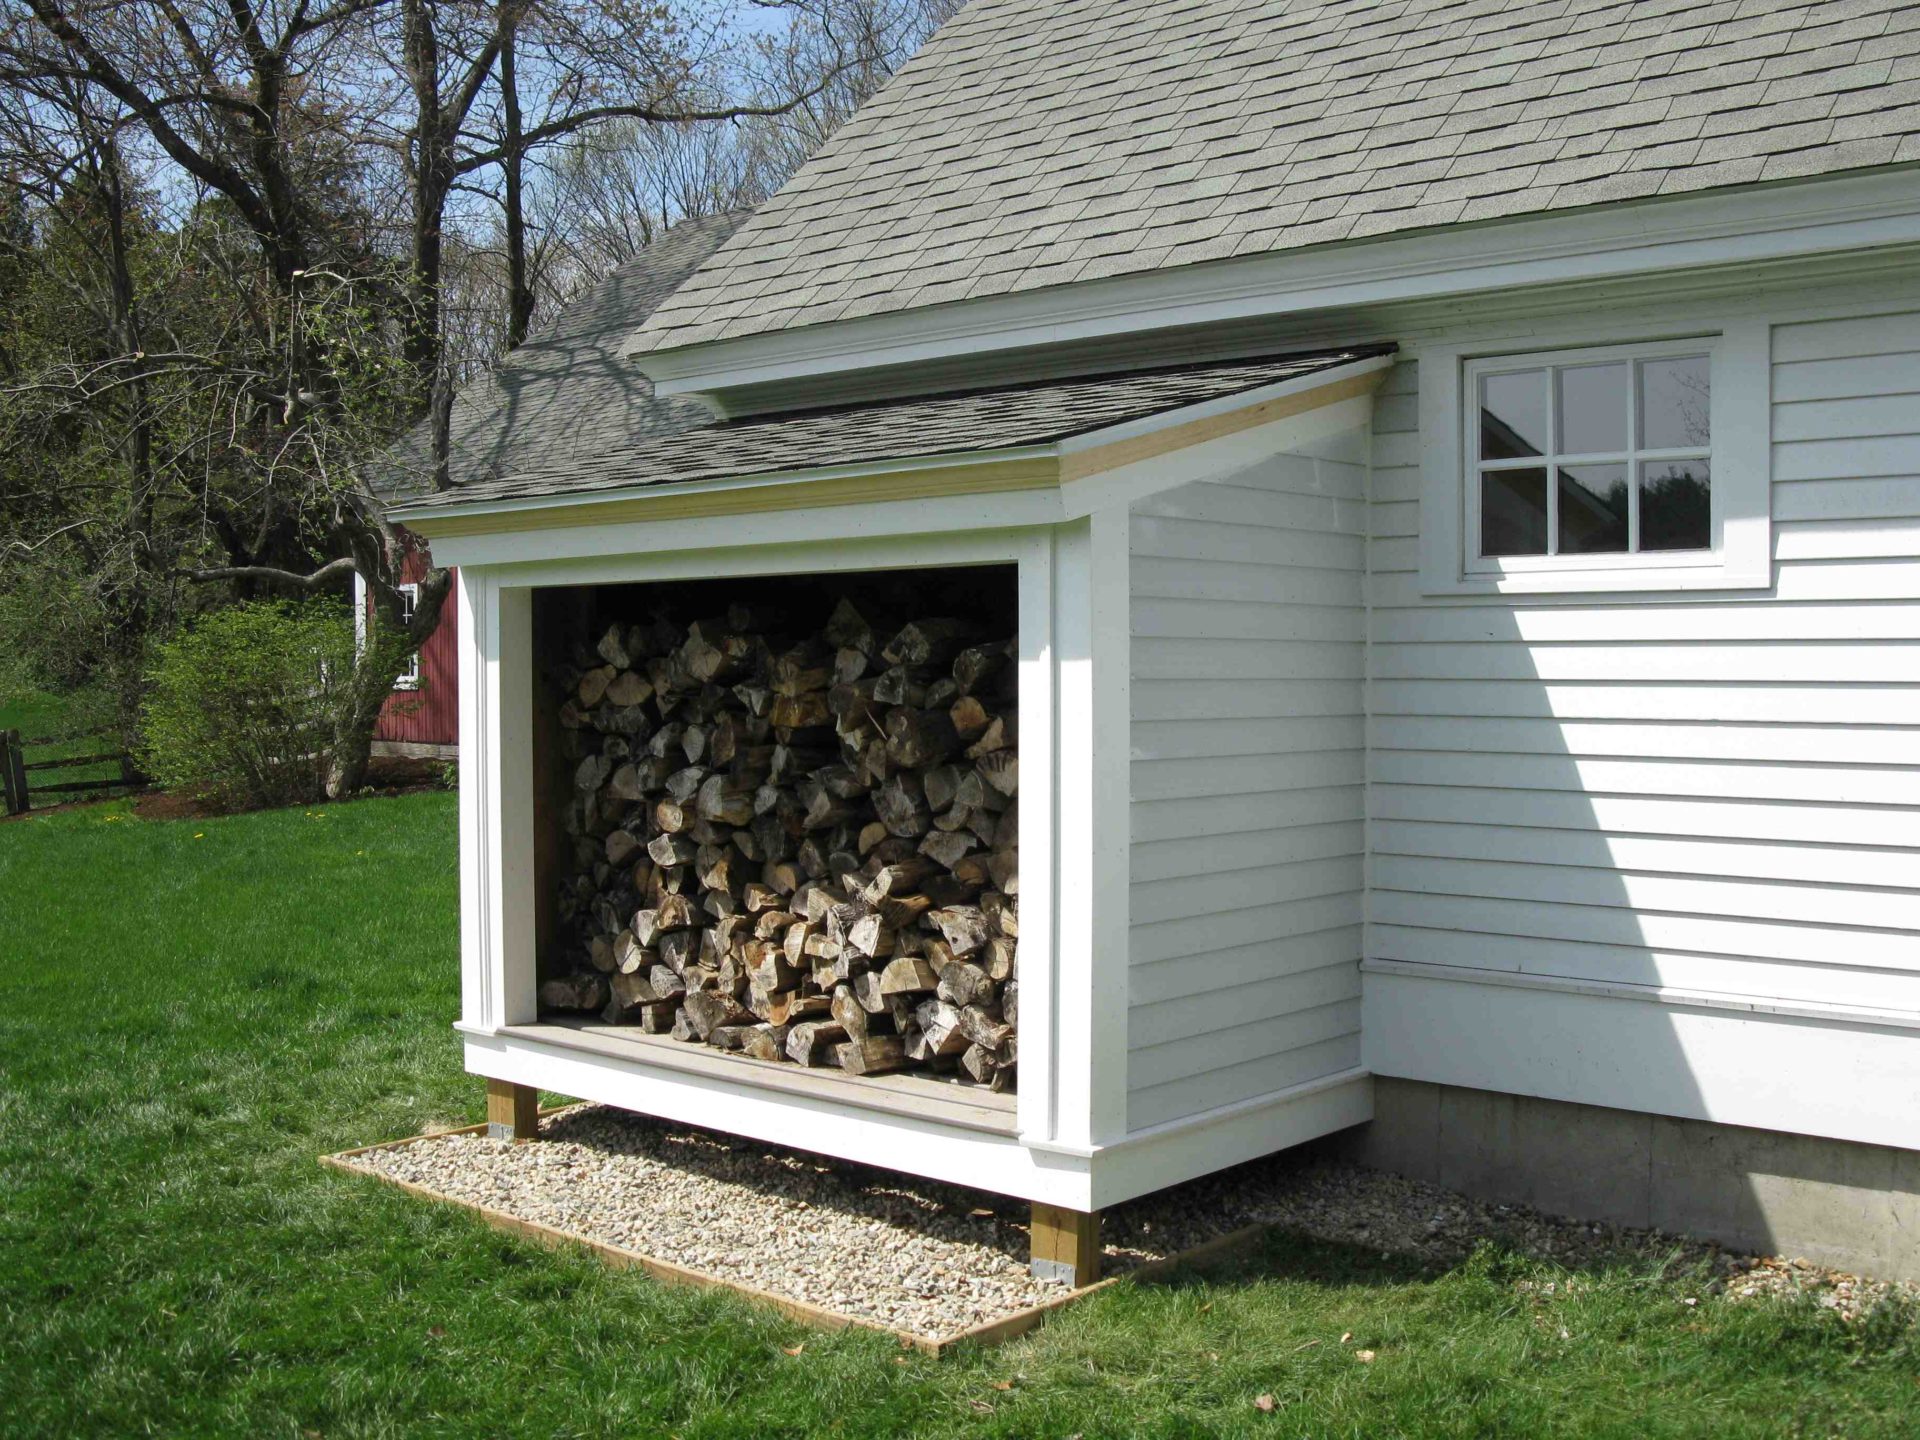
 In areas with a mild climate, where about 2-3 cubic meters of firewood are burned during the winter, it is more advisable to build a storage extension to the house or outbuilding. Do-it-yourself wooden woodsheds for a summer cottage are best erected near the northern wall of the building. The reason for this arrangement is the negative effect of sunlight on the drying of logs; natural ventilation is preferable to them.
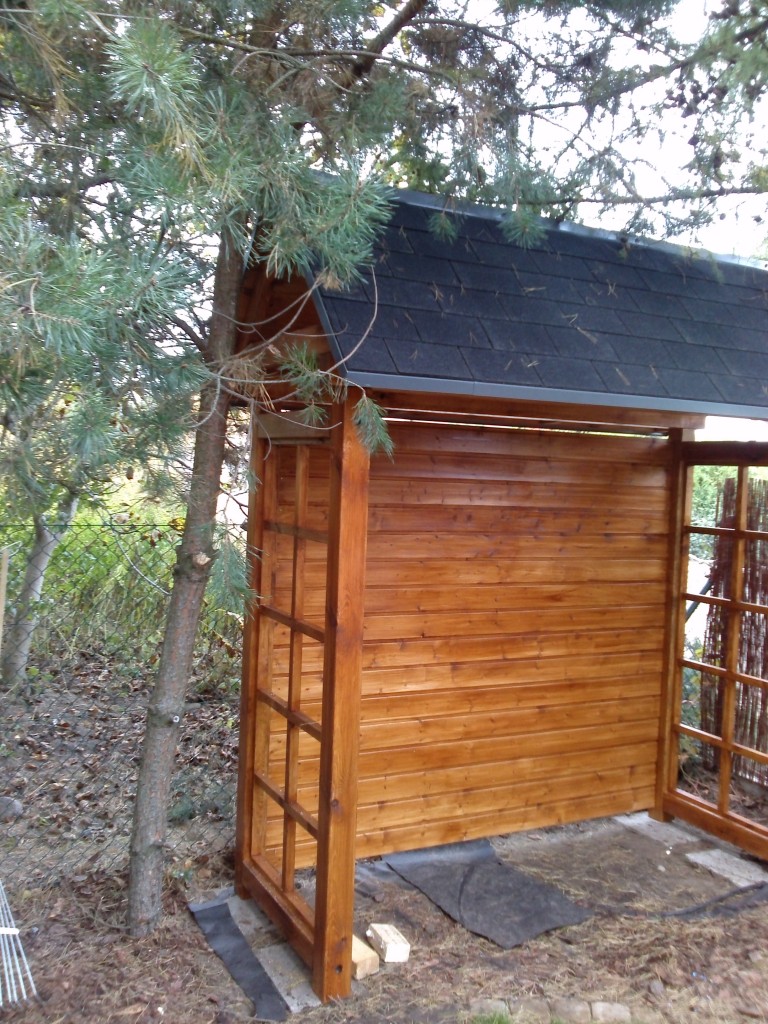
The construction of a wood shed adjacent to the main house is not much different from the construction algorithm separately worth building. But still some nuances will have to be taken into account:
- Since the structure is closely adjacent to the wall of the house, it is necessary to prevent water from entering from the roof of the main building.
- The convenience of the adjacent building is that the firewood will insulate the wall of the house.
- To prevent moisture from entering from the ground, it is imperative to install a floor.
- Additionally, closing shutter doors can protect against dampness, which also creates an attractive appearance for the entire building.
- It is convenient to equip a woodshed near the wall of the gazebo or terrace of the house.
- The durability and strength of the structure can be increased by treating wooden parts with antiseptic and protective compounds.
- To protect against bark beetles, mold and rot, a fire-resistant lining must be applied to the entire wall of the building.
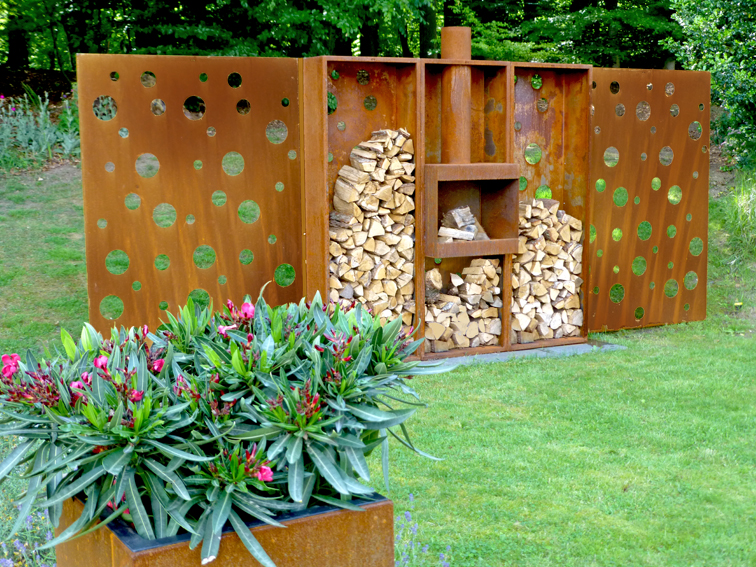
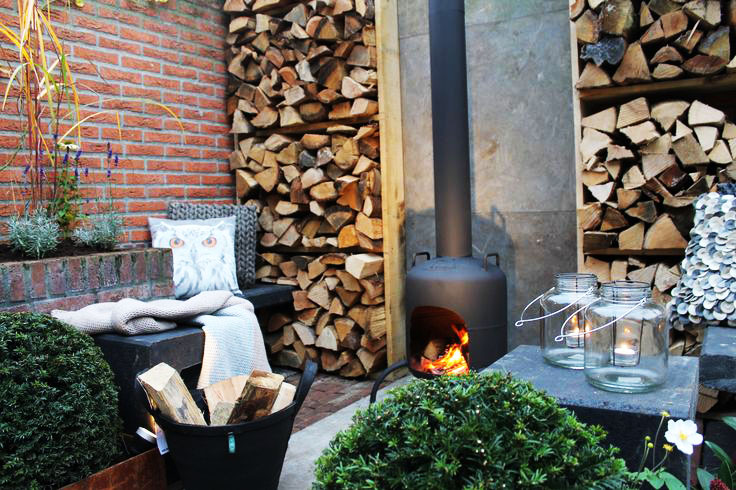
The structure covered with climbing plants looks very beautiful and original.
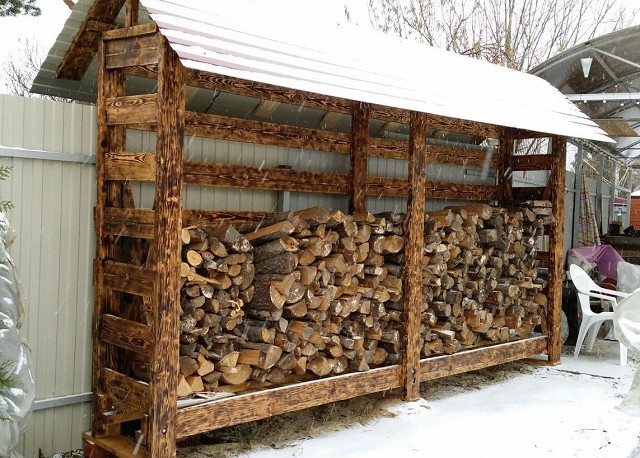
Method of placing firewood under a canopy
The easiest access to logs, which are located next to each other in a small woodshed.

In the case of loading a large batch of firewood into a large building, it is recommended to divide the entire space into several parts. Then there will be no mixing of dried logs with damp logs.
For convenient access to dry firewood, a passage is made in the center of the square building, but not all the way to the wall. No more than two rows of firewood should be left in front of the wall. In the woodshed rectangular shape The area is divided into sectors using partitions.
The height of the firewood is made regardless of its shape and reaches about two meters. This indicator allows, with an average height of a person, to load logs to the ceiling, not forgetting to leave a ventilation gap.
Making firewood
There are many options on how to make a firewood rack at your dacha with your own hands. Basically, this task comes down to arranging a storage facility for a consumable batch of logs for the fireplace. Most often, such devices are made of metal, and their shape and design largely depend on the imagination and wishes of the owner.
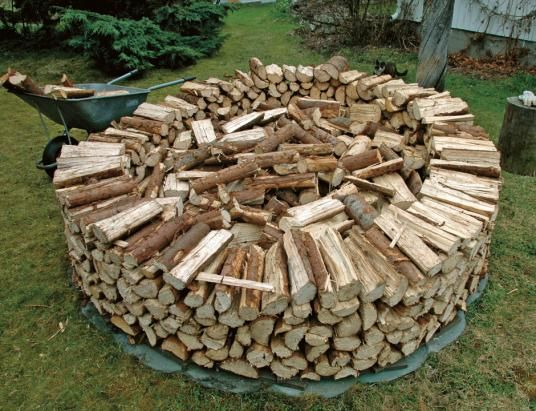
Do-it-yourself combined firewood racks, projects different capacities, complexity and convenience are also known quite a lot. Among all these options, the device made from an old barrel especially stands out.
The procedure for making a firewood box from a wooden barrel:

IN winter time The firewood holder glides perfectly through the snow with metal hoops, which greatly facilitates the delivery of firewood to the fireplace.
A firewood shed is a structure designed to store neatly stacked firewood, which you cannot do without outside the city. It allows you to store fuel so as not to take up much space and allow it to dry. It’s more convenient to create it yourself in order to guess the size and shape as much as possible, and also get a product that meets the individual needs of the owners.
Features of a homemade firewood rack
A homemade woodpile for firewood is formed in accordance with several mandatory conditions. Firewood must be protected from rain and snow, but still have the opportunity for ventilation. In addition, it is important that the chosen place is in the shade, away from open fire. Materials should not be stored directly on the ground; the floor should be made of either bricks or planks.
However, it is very bad if the floor connects directly to the ground, so it is important to maintain a gap.


The next condition is attractive appearance designs, which should be combined with the rest of the buildings on the site and the general landscape design. It is important that the building is convenient for use: the owner has the opportunity to approach it from the required side and easily obtain the required amount of firewood. In this case, the fuel material must adhere tightly and not fall apart.
Suitable location
It is important to say that some people at their dacha do not make a special woodpile, but simply store firewood under open air, covering with material that protects from water. But also for this purpose you can use an ordinary shed already existing on the site. Special street design located close to home will be much more convenient. By the way, if firewood is most often used for cooking on fresh air, then it is more logical to place the firewood closet to the stove or barbecue. The optimal location is the wall metal garage or a special area near the house. The main thing is that the firewood can be supported on three sides.


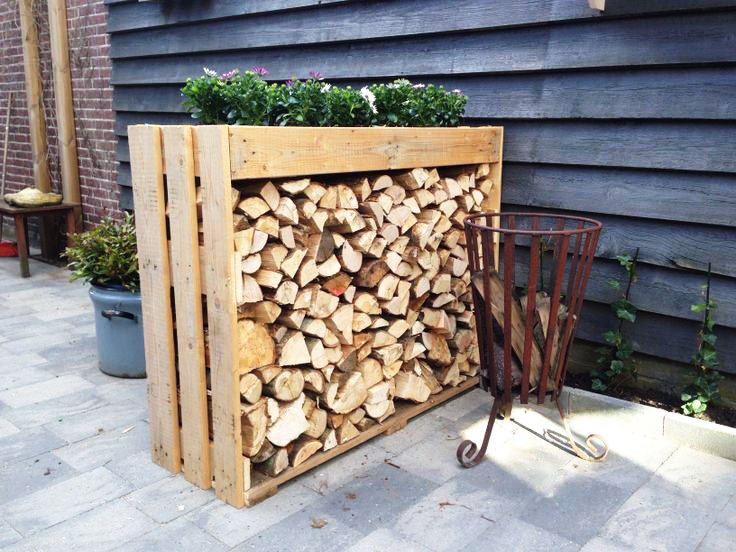
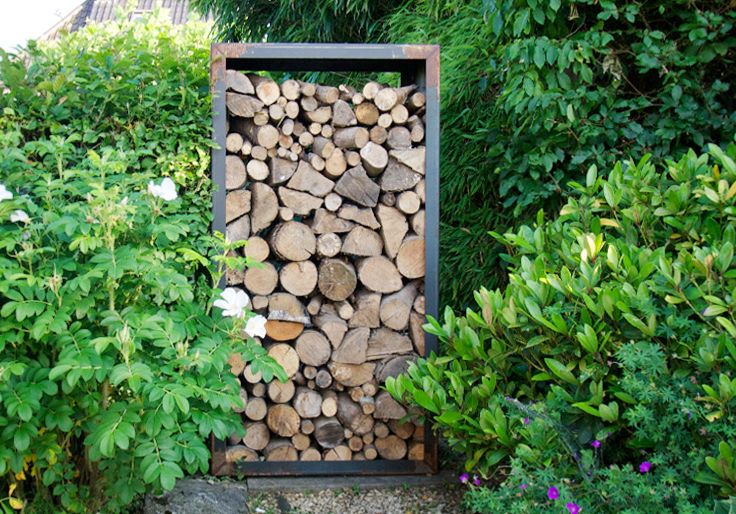
There are beautiful structures made of metal or wood that are installed indoors at home. For example, this could be a vertical firewood rack for a room with a fireplace. In this case, a decorative function is added to the wood storage function. A portable mini firewood rack is often made by hand.
Usually it stores a supply of firewood for lighting the stove, which you have to replenish when you go outside.


Which material to choose?
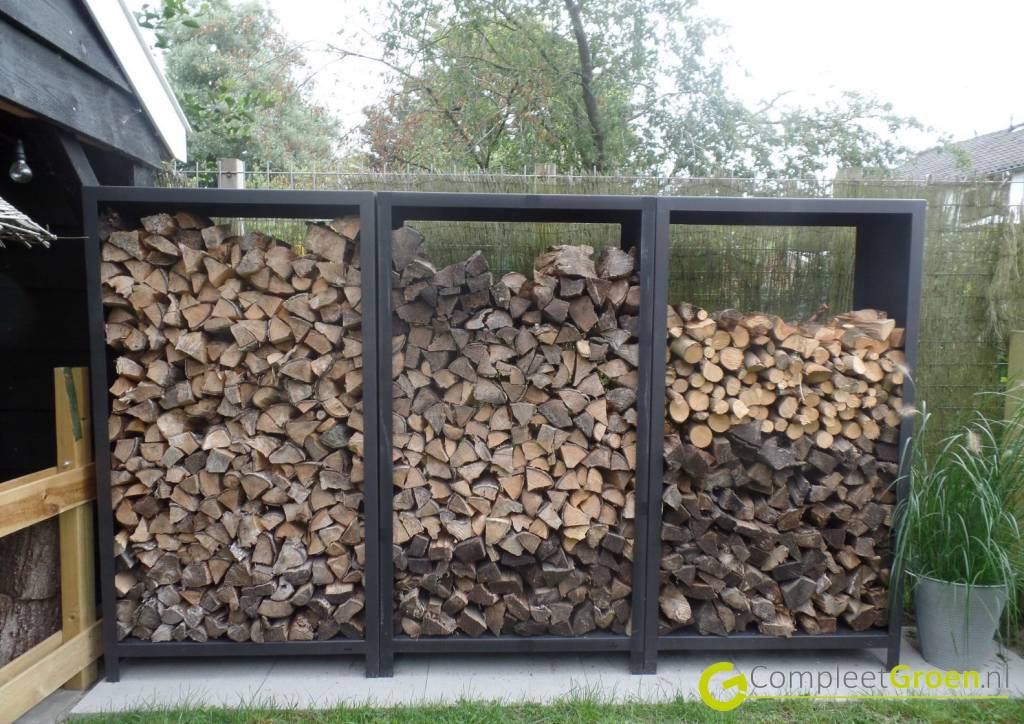
From the right choice The material will largely depend on how long and how successfully the firewood box will serve. For the street, metal is often used, which makes it possible to make a visually attractive structure that will serve for a long time and will not deteriorate from atmospheric precipitation and other weather conditions. For example, it could be a woodpile from aluminum profiles, which takes a couple of hours to make on your own. By the way, it is very convenient to use for carrying, because its low weight greatly simplifies this procedure.
Reliable and resistant products are obtained from iron or steel parts, for example, rods or pipes.


The most popular are woodpiles made from wood. If the aesthetic appeal of the issue is not too important, you can use existing materials left over from previous construction work, and do not purchase new ones. Alternatively, wooden structure can be made of pallets, pallets, beams, bars or boards. The only important condition is to pre-treat the material with a product that protects against moisture and insects. A wooden firewood rack is quickly assembled, can be used for quite a long time, weighs little and is budget-friendly.
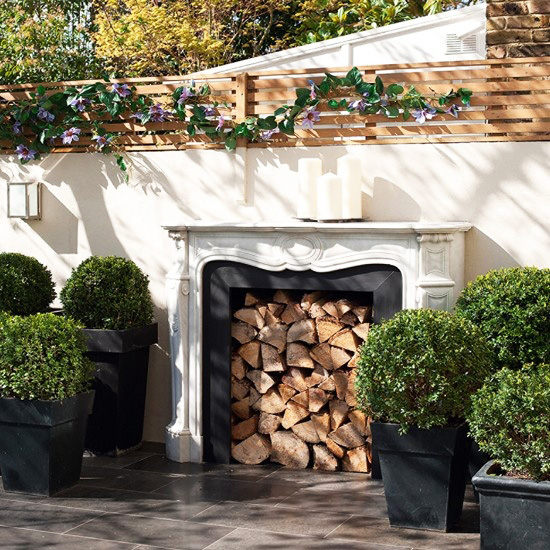
Covering a woodpile located outdoors is a must, and slate, sheets of metal, polycarbonate or even polyethylene are suitable for this purpose. By the way, the structure can even be woven from vines, if the latter grows in large quantities on the site. Separately, it is worth mentioning the woodpile built into the fireplace or stove, that is, it is a niche next to the firebox, made, as you might guess, of brick.


Decorative woodpiles, which are small in size and located in residential areas, can be forged, a regular bag made of thick cord or rope, a basket made of durable material, or even a regular one. wooden box with wheels.
How to do it yourself?
There are a large number of designs and drawings of various woodpiles on the Internet. They can vary in shape and appearance, have a frame or canopy, look like an ordinary barn with lattice walls, or be a real work of art. For large quantity of the firewood used, a barn, which can be regular or lattice, is more suitable. In the latter case, it will be possible to ensure better ventilation, which means the firewood will remain dry. In any case, you will first need to prepare the foundation - for soft soil, dig a pit, the depth of which will vary from 20 to 25 centimeters.

The resulting hole is filled with layers of gravel and sand. Next, you can build a support of six blocks: a couple should be in the middle, and the rest should be in the corners. The parameters of the standard block are 200 by 200 and 600 millimeters. At the next stage, a double layer of roofing material is laid.
To assemble the frame, you will need to use bars with parameters of 100 by 100 millimeters, pre-treated with special machine oil.


The formation of the lower trim will be facilitated by the use of screws, nails or self-tapping screws, thanks to which the blocks and bars will be connected. The strapping is strengthened with special corners, after which you can begin installing the racks - respectively, in the corners and in the middle part. In addition, you can add a couple of racks in front and one rack behind. They will be responsible for the entrance area and, accordingly, additional support. It is important to make the front pillars slightly longer and the rear pillars shorter to provide a rainwater drainage system.


Boards are nailed to the side, after which the rafters and roof frame are formed. Roofing felt and corrugated sheets are placed on top. A roof overhang distance of 35 centimeters should be maintained. The floor can be laid so that gaps of 2 to 3 centimeters remain. It will be most convenient to assemble it from boards measuring 100 by 40 millimeters. The walls, by the way, are installed at intervals of 100 millimeters.
It is necessary to cover the shed with a special solution that will protect against beetles.


A small woodpile is most often located next to the home fireplace and is made of either wood or metal. In the first case, it is recommended to take as a basis old barrel and disassemble into separate planks. Since each piece is usually bolted to a metal hoop, it will have to be cut first. The bed can be easily made from chipboard or an ordinary wide board, and the legs from wooden blocks. It is important to varnish the resulting firewood for a better appearance, as well as long-term use.

A steel woodpile is also often made independently. It is assembled from a 2-mm steel sheet and a steel rod with a cross-section of 8 mm. The sheet is bent or cut out in a semicircle, which can be done with a grinder or gas cylinder. Next, legs and handles are attached to the resulting container. For beauty, the firewood box should be painted with black or silver paint.
The presence of a large amount of wicker and the ability to process it allows you to make a wicker structure at home.


First of all, a rectangle is assembled from slats to form a frame. Then several holes are made on opposite elongated sides. A copper wire is inserted into the middle holes, transforming into handles, and a vine is inserted into the rest. Having intertwined all the twigs, you can fix the finished firewood using stain or varnish.
If you don’t have time to create a full-fledged structure, you can make a firewood stand with a support made of stakes. First of all, the surface is treated - covered with pebbles or covered with a special waterproofing material. The material should be taken rectangular so that the woodpile has four distinct corners. High supports are dug into these points, to create which ordinary logs are taken. Their thickness will depend on the amount of firewood that will be stored.
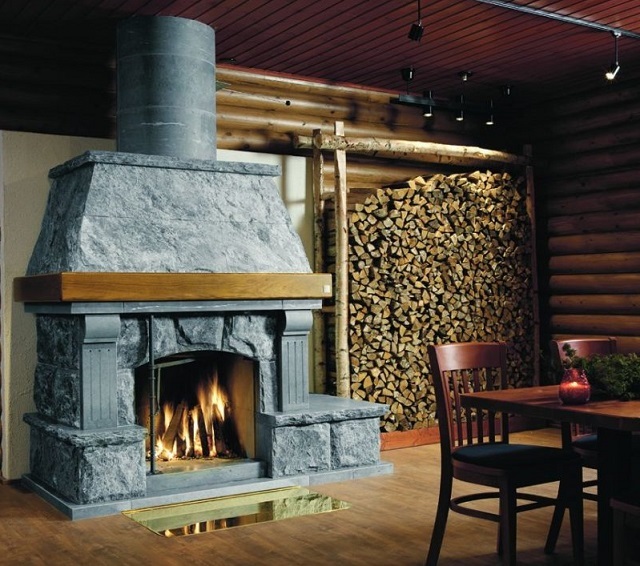
The presence of a fireplace or stove in the house involves organizing a place to store firewood both on the street and next to this heating structure. Moreover, the device for storing fuel most often has not only a functional, but also a decorative purpose. Very often it can become a real decoration for both a room and a yard.
Firewood holders for fireplaces and stoves can be made from different materials and have various configurations. These factors directly depend on the choice of homeowners and general style design of the room in which the stove is located.
Why are firewood logs needed?
Many people believe that firewood holders installed next to the fireplace perform a purely decorative function, and therefore consider them an optional element. However, they were originally intended for a completely different purpose - the final drying of firewood before loading it into the combustion chamber.

No matter what conditions the firewood is stored outdoors, before using it, it must be at room temperature for at least a day. At this time, excess moisture evaporates from the logs, due to which the heat transfer from their combustion increases significantly.
Thus, each subsequent batch of firewood is usually brought into the room and placed in the woodshed immediately after placing already dried logs in the oven (fireplace).

Therefore, manufacturers metal furnaces and fireplaces, many of their models provide special niches for drying firewood.
But in order for the wood to quickly reach the optimal state of residual moisture indoors, it is also necessary to create the correct storage conditions for it outdoors.

Therefore, chopped firewood is placed in a woodpile. It will be best if the firewood is in a ventilated shed. But if this is not possible, a firewood shed is set up for the woodpile, which should also be ventilated. Its side walls must be left open. Well, if such a structure is installed along the wall of the house or outbuilding, then a distance of at least 50 mm must be provided between the wall surface and the firewood. Of course, an outdoor firewood shed must have a roof so that water and snow minimally fall on the surface of the wood.
If the firewood box is installed in that part of the yard where no ground covering has been created, that is, on open soil, then it is recommended to raise the bottom layer of firewood by 100÷150 mm so that ground moisture does not penetrate into the wood. To do this, a shelf is installed in the lower part of the building or a layer of moisture-resistant material is laid out.
What are firewood racks made of?
Firewood racks installed outdoors can be made of either wood or metal.
However, we should not forget that wood and metal have completely different physical characteristics. When the temperature changes by metal parts Condensation forms, and this moisture can be absorbed by the firewood. Therefore, it is best to build an outdoor firewood shed from wood. You can, in principle, use both of these materials, but arrange the structure so that the firewood does not come into contact with the metal.
Wood stands installed indoors, directly next to the stove or fireplace, on the contrary, are best made of metal. This material takes on the air temperature and will help the wood dry out quickly. Since the firewood rack is installed around heating device, the metal will warm up above the general room temperature, which will also be beneficial when drying firewood.
Prices for firewood makers Vesuvius
Drovnitsa Vesuvius

One more a good option are firewood racks built into the wall, that is, built during the construction of a brick fireplace, or built later in the form plasterboard construction from fire-resistant gypsum board

Firewood niches built into the wall near the stove or fireplace, as a rule, have a large volume, which allows you to dry a lot of fuel at once. As it is used, reserves are gradually replenished. Fresh wood will bring a healthy forest aroma into the room, which will last constantly and be renewed after each new batch of firewood.

Another material that is often used for making firewood boxes is willow branches, from which baskets of various shapes are woven. The convenience of such stands lies in their low weight. So, taking a basket, you can go to the yard to get firewood from the woodpile, and then, without moving it, install a stand near the fireplace, avoiding soiling the floor.
Types of firewood used indoors
As can be understood from the information presented above, firewood racks installed in a room can be stationary and mobile, that is, portable or mobile.
Stationary firewood stands
The following options can be called stationary stands for firewood:
- made of heavy forged metal;
— built into the design of a stove or fireplace;
- woodshed, equipped in wall niche;
- attached to the wall;
- made in the form of a cabinet or cabinet.

The advantage of stationary options is that the design can have greater capacity, which will eliminate the need for constant replenishment of firewood, so a full “refueling” will last for a long time. At the same time, many models stationary firewood sheds take up a lot useful place, which is unacceptable for premises with small area. The exceptions are drying chambers, built into the fireplace or stove itself, or niches built into the wall.
Mobile firewood burners
Mobile options for firewood stands include portable firewood holders and mobile models equipped with wheels.
Portable stands can be made of light metal, wood, or woven from branches. Most often, these products have quite small dimensions.

Metal portable stands - compact in size, usually decorated with beautiful forged elements. Therefore, they will not only become a decorative detail of the interior, but will also last long time. Factory-made stands, as a rule, have an anti-corrosion coating, which helps maintain the aesthetic appearance of the products throughout the entire period of operation.

Wicker stands have an aesthetic appearance and are light weight, so they are convenient for delivering firewood to the stove. However, they quickly lose their attractiveness, since the logs not only have a certain, very considerable weight, but also uneven edges, as well as rough bark. All this damages the surfaces of the baskets and leads to their rapid wear. Therefore, they cannot be called practical.
Mobile structures are also made of metal or wood, but they can have more impressive dimensions and capacity. All thanks to the fact that wheels are installed on them.

These structures are easy to use, since they can be rolled up to the door and filled with firewood without carrying logs across the room. When loading firewood into the firebox of the heating device, the stand can also be installed in the most convenient position.
In addition, wheeled stands often have special hooks for hanging brushes, pokers and other fireplace accessories.
Prices for mobile firewood
firewood bins
You might be interested in information on how to choose a wood burning stove
Do-it-yourself firewood carrier - step by step
In order not to go outside once again during the cold season for the next batch of firewood and not to bring into the house unnecessary garbage, which is inevitable when storing logs on the floors, it is necessary to have a firewood rack.
Firewood is usually brought in by the armful, contaminating household clothes. And to make this process easier and save on washing, it will be very nice to have a portable mini-stand in your home.
The easiest way to acquire this accessory is to purchase it in a specialized store, especially since the range of these products is quite wide. On sale you can find stands made from different materials, so you have the opportunity to choose an option that will harmonize well with your general design interior
However, it is necessary to take into account that fireplace accessories are quite expensive. Therefore, many owners of houses with fireplaces prefer to make such products themselves. It should be noted that the simplest version of the carrying stand can be made by most home craftsmen, even those who do not have great experience working with complex tools. And what is important - without significant costs.

To work, you will need to prepare some tools and materials:
- The tools you will need are a grinder (grinder), welding machine, vice, hammer and two pieces metal pipe with a diameter of 30÷35 and 70÷80 mm, which will become a template for bending the rod.
- The materials required will be three reinforcing rods with a length of 1500 mm, a diameter of 7÷8 mm, as well as a sheet of metal with a thickness of 0.5÷1.0 mm and a size of 600÷800 mm. In addition, you will need a well-processed wooden stalk with a diameter of 25÷30 mm and a length of 500 mm.
When everything you need is ready, you can proceed to the work.
| Illustrations - blanks and the process of assembling them into a finished product. | Brief description of the operations performed. |
|---|---|
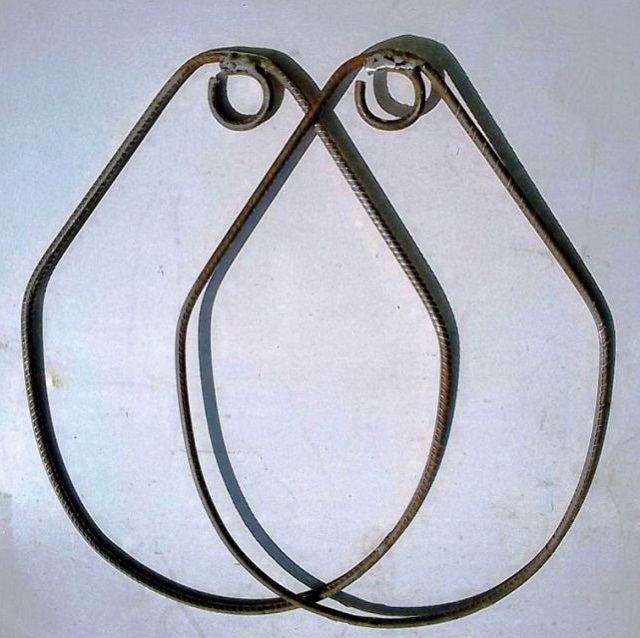
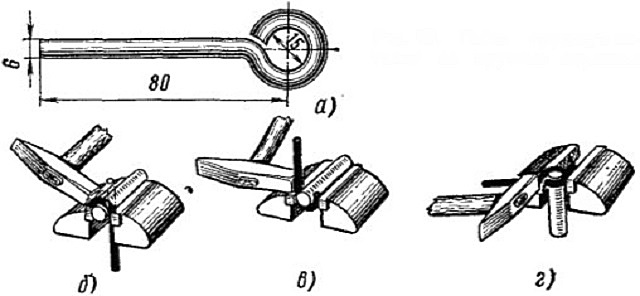 | The first step is to make two identical rings with an internal diameter of 25÷30 mm. It is better to carry out this process using a pipe bender, but this tool, as a rule, is only available to professionals. Therefore, you can use a vice, a hammer and a prepared pipe template. The reinforcing rod together with the pipe is clamped in a vice. Then, by gradually beating the rod around the pipe, it bends into a ring. After this, the excess part of the rod is cut off with a grinder. You will need 2 rings with this diameter. |
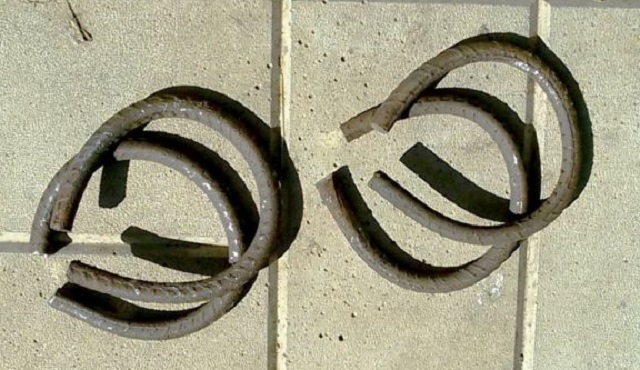 | In a similar way, four rings with an internal diameter of 70÷80 mm are made - these elements will serve as the legs of the stand. These four rings should not be closed - a gap of 10÷12 mm must be left between the ends of the rod. This gap will allow you to make some adjustments later when assembling the structure. |
 | Next, two loops are formed from the rods - pendants. They can have a round or trapezoidal shape. These blanks will form the load-bearing part of the structure. If the shape shown in the illustration is chosen, then its lower part is made in the form of a semicircle with a radius of 200 mm. To complete the semicircle, the ends of the rod go at an angle and then bend at the top, forming a semicircle with a diameter of 60 mm. In the upper part, the ends of the rod are fixed together by welding. After that, at the top, with inside loops, previously prepared rings with an internal diameter of 25÷30 mm are welded. In this case, the gap between the ends of the rod that formed the rings must remain open. These rings are designed to install the wooden handle of the firewood stand. |
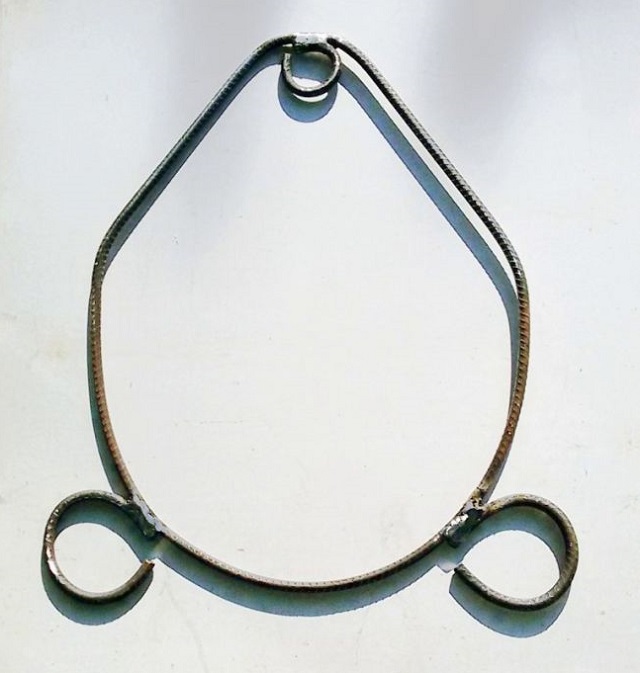 | The next step is to mark the prepared workpieces for welding the rings - the legs of the stand. The rings must be located at the same distance from the center of the semicircle, otherwise the stand will not stand level. |
 | In addition, the leg rings must be secured so that there is a gap of 25÷30 mm between the floor and the lower edge of the suspension loop. The two blanks must be absolutely identical, otherwise the design will be skewed. |
 | In the example shown, a wall from an old one was used as a pallet washing machine. The material was perfect for the stand, both in thickness and due to the presence of a high-quality professional coating, as well as rigid ribs located along the entire perimeter of the panel. The metal thickness of the panel is 0.75 mm, and the linear dimensions are 600×800 mm. |
 | The metal sheet must be bent. For this process, an edit (template) is used, which has cylindrical shape and a radius exceeding the radius of the semicircle of the lower part of the workpieces, since the sheet must stand up against them. As a template, you can use an evenly planed log, a piece of pipe large diameter or an empty gas cylinder. |
 | If a panel with rigid curved ribs along the edges is used to form a half-cylinder shaped tray, as in in this example, then grooves are marked on its long sides and cut exactly opposite each other. Their width will depend on the diameter of the reinforcing rod from which the base blanks are made. The distance between the cut gaps in this design is 300 mm. However, it can be chosen at the discretion of the master, and depending on the length of the most short logs, which are planned to be carried in a stand. |
 | As a handle for a portable stand, the master used a shovel handle, which is cut to the required length. It is important that the cutting is well processed, otherwise you can easily injure your hand or plant a splinter on it. Otherwise, wood is the best option for a handle - it is pleasant to the hands and reliable in use. |
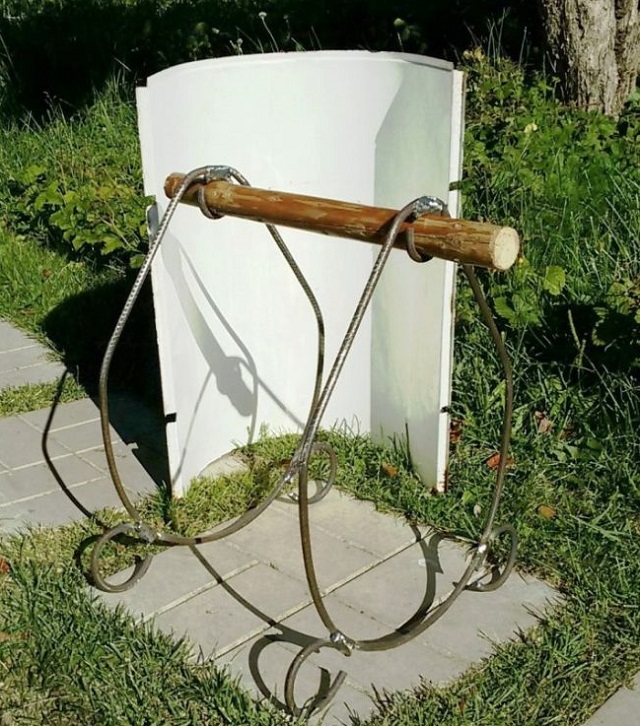 | Next, the finished handle is inserted into rings fixed to the top of the metal blanks. The distance between the workpieces should be equal to the distance between the grooves cut in the pallet panel. Having installed the handle and set the pendants at the required distance, their rings must be compressed so that the metal fits tightly to the wood. Crimping is done using a hammer. The rings should not move on the handle. |
 | The final step is to install the pallet in place. For this region bent panel are slightly brought together, then it is inserted into the curved metal hangers of the base so that the rods fit into the grooves cut in the edges of the pallet. The panel should fit into the spacer, making the structure rigid. |
 | If it is necessary to reduce the weight of the structure, the 0.75 mm thick panel can be replaced with a thinner metal sheet. This process will not be difficult to carry out, since the panel is not welded to the reinforcement elements. However, a pallet cut from a metal sheet will have sharp edges. For safety reasons, before installing it into the base, the edges along the entire perimeter of the product should be beaded, wrapping them in the form of a tube. Grooves are also cut into the flanged edges for inserting base reinforcing bars into them. |
The demonstrated version of the stand was tested in operation for heating season and proved to be a durable and comfortable design. The compact size of the firewood rack is convenient for carrying and placing the stand near the stove or fireplace. Upon completion winter period firewood rack in order to save space in utility rooms If desired, it can be disassembled into components.
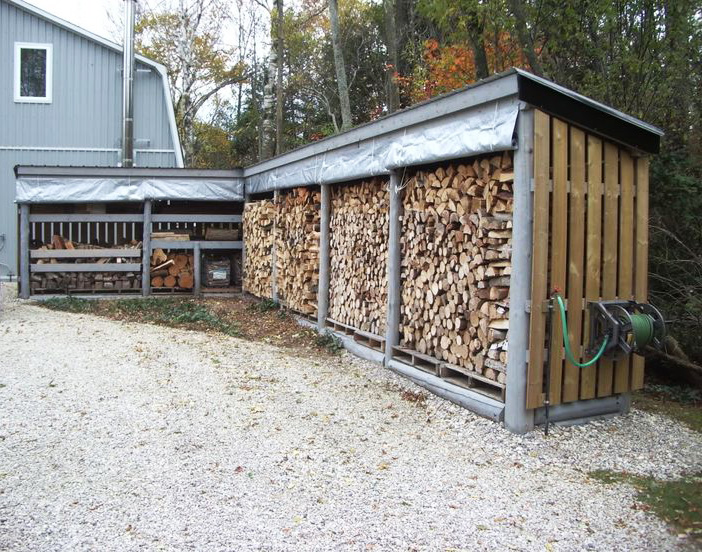
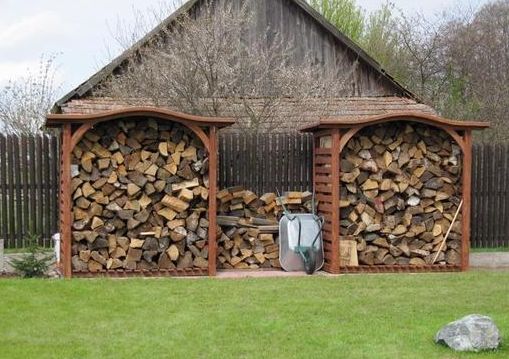
Almost all owners country houses keep supplies of firewood on their plots. They can be stored in different ways. Most often, woodsheds are created - special structures for storing natural fuel.
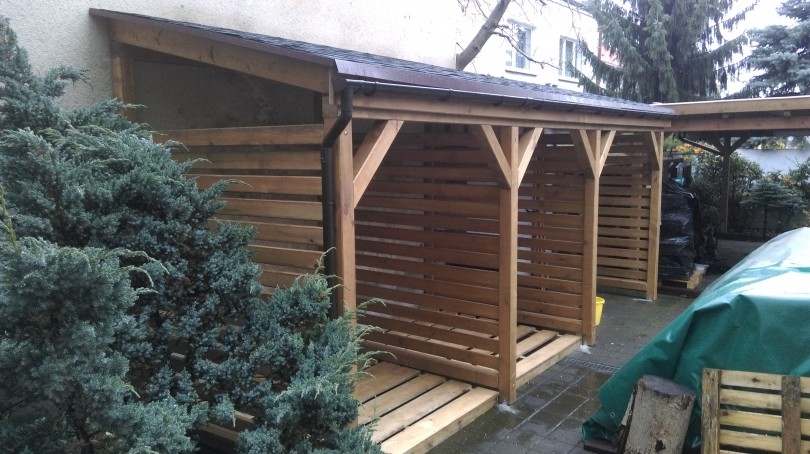
Free-standing firewood sheds with a pitched roof:


With a gable roof:


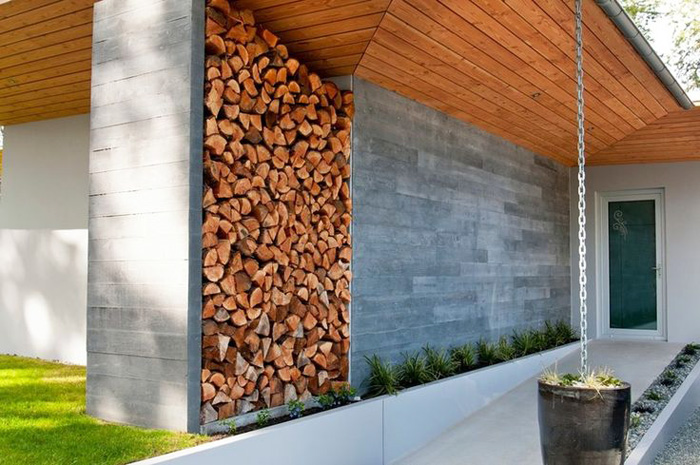
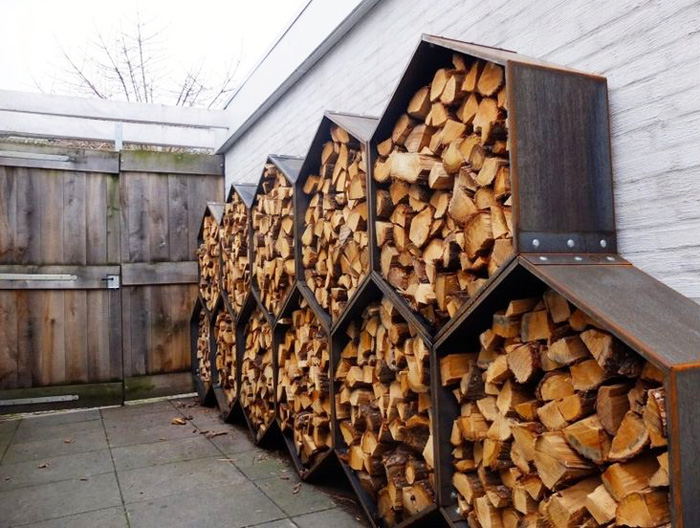
Photos of various firewood burners integrated into the wall:


What are they made of?
A wooden firewood rack for a dacha or a private home will require the following arsenal of materials:
- 6 cinder blocks. Necessary for the foundation.
- Logs or beams. The goal is the floor frame.
- Boards. The goal is to finish the floor.
- Beam for the frame.
- Boards to hold this frame.
- Boards for rafter elements roofs.
- End boards. The goal is the visor.
- Roof.
- Boards for the roof itself.
- Sets of nails.
- Metal corners.
- Self-tapping screws.
The most common material for creating woodshed walls and floors is wood. The best materials for its roof are: polycarbonate, slate or corrugated sheeting.


If the woodshed is closed, the firewood needs good ventilation.


On the list the right tools appears:
- electric drill;
- shovel;
- screwdriver;
- plumb line;
- axe;
- roulette;
- hacksaw;
- screwdriver;
- square
Types of wood burners
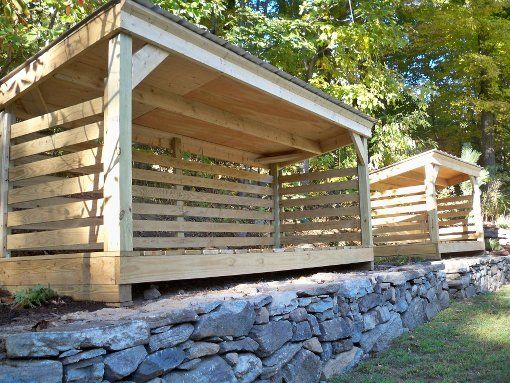
The parameters of the woodshed and its appearance are determined by the amount of firewood intended for use throughout the season. The simplest version for DIY assembly is canopy with floor and three walls. The floor here is slightly raised above the ground. This design is positioned separately on the site or attached to a utility block, bathhouse or house.


This type of firewood can be made strong and reliable with your own hands by using strong logs. Its roof is created without complex techniques: the slate rests on the floor beams.
The roof can be made more complex if desired. For example, do it with two slopes.
Options for simple but convenient canopies:


More complex, but spectacular option made of polycarbonate:

Options decorative solution gable roof free-standing woodshed:


Free-standing firewood racks with internal decorative elements; they are simply inserted when stacking firewood:


A design with a twist - convex side walls.

Miniature wood burners can easily replace a bedside table, stand, stool, bench, or wall decor element.


Options beautiful masonry firewood bins:


Place for firewood, if the supply is small, can also be provided in original places:


Lumberjack “string bag”:

Non-standard wood options:


Small woodsheds. Pros: portability and ease of manufacture.


From concrete trays:


The nuances of creating different options
Bathhouse with woodshed under one roof
According to the templates, a bathhouse with a woodshed is created on a single foundation. An extension is being built small sizes. All required communications are provided. Such a block can already be included in the bathhouse construction project. It will become another room for her. In this situation, the following criteria are imposed on the bathhouse:
- Availability of separate entrances and exits for this extension. This is how the safety of bathhouse guests develops.
- There are different water supply lines to this block, the toilet and the steam room.
- An additional heating system is being installed.
- The roof for the woodshed and the bathhouse is shared. This way its effectiveness will be maximized.
- Regular fire safety analysis.

The optimal solution is to use a ready-made personal or sample project. It can be built independently or with the assistance of specialists.


Separate wood shed
To erect this species, you need a slight elevation and a dry, shaded place. Firewood should not lose its qualities. They must be well ventilated and protected from ultraviolet radiation.
Construction work begins with the creation of a frame. If a template drawing is used for the work, then you can get a structure where firewood, various utensils and other things will be stored.
Here's how to do it right:
- Digging pillars. Suitable pole versions: wood or metal. They are covered with rubble. It is permissible to fill them with concrete. They are thoroughly compacted.
- The floor is at least 10 cm above ground level. On the bricks there are lag and roofing felt positions.
- The boards are installed with nails.
- The finished frame is being covered. Boards are used. Gaps remain between them. This way the firewood receives the necessary ventilation. Method of nailing boards: checkerboard layout or parallel to each other.
- The roof has one slope. Its edge protrudes at least 30 cm. This way the firewood receives protection from precipitation.
During the work, the wood must be processed special drugs, protecting it from mold, insects, fungi and the influence of moisture. The braided version has an excellent appearance.

Option against the wall or utility block with woodshed. It is attached to a building or utility unit. And the wall here becomes insulation. This is the main advantage of this option. Its disadvantage is that water flows down the walls and drips from the roof. Therefore, it is necessary to provide for the protection of firewood from various waters. 


First of all, there is a competent choice of location. If you concentrate the woodshed at the southern wall, the firewood will be strongly influenced by straight sun rays. The firewood will burn faster and become loose. For this reason, the best position is near the north wall. This way the firewood will still be provided with good ventilation.
How we work
The production of a firewood shed here is identical to the stages of construction of a separate version. If you have necessary materials(slate, boards, etc.), the parameters of the firewood are determined based on the parameters of the material. Firewood is stacked in it so that the wood is dried natural method, and the logs stacked in rows fixed each other.
There is a misconception that the presence of a floor in a woodshed is not necessary. In its absence, there will be no natural air flow, moisture will accumulate below, and the lower layers of firewood will become damp. Having created a high-quality floor once, it can be replaced after 15 years. And the firewood is always guaranteed to be dry. 
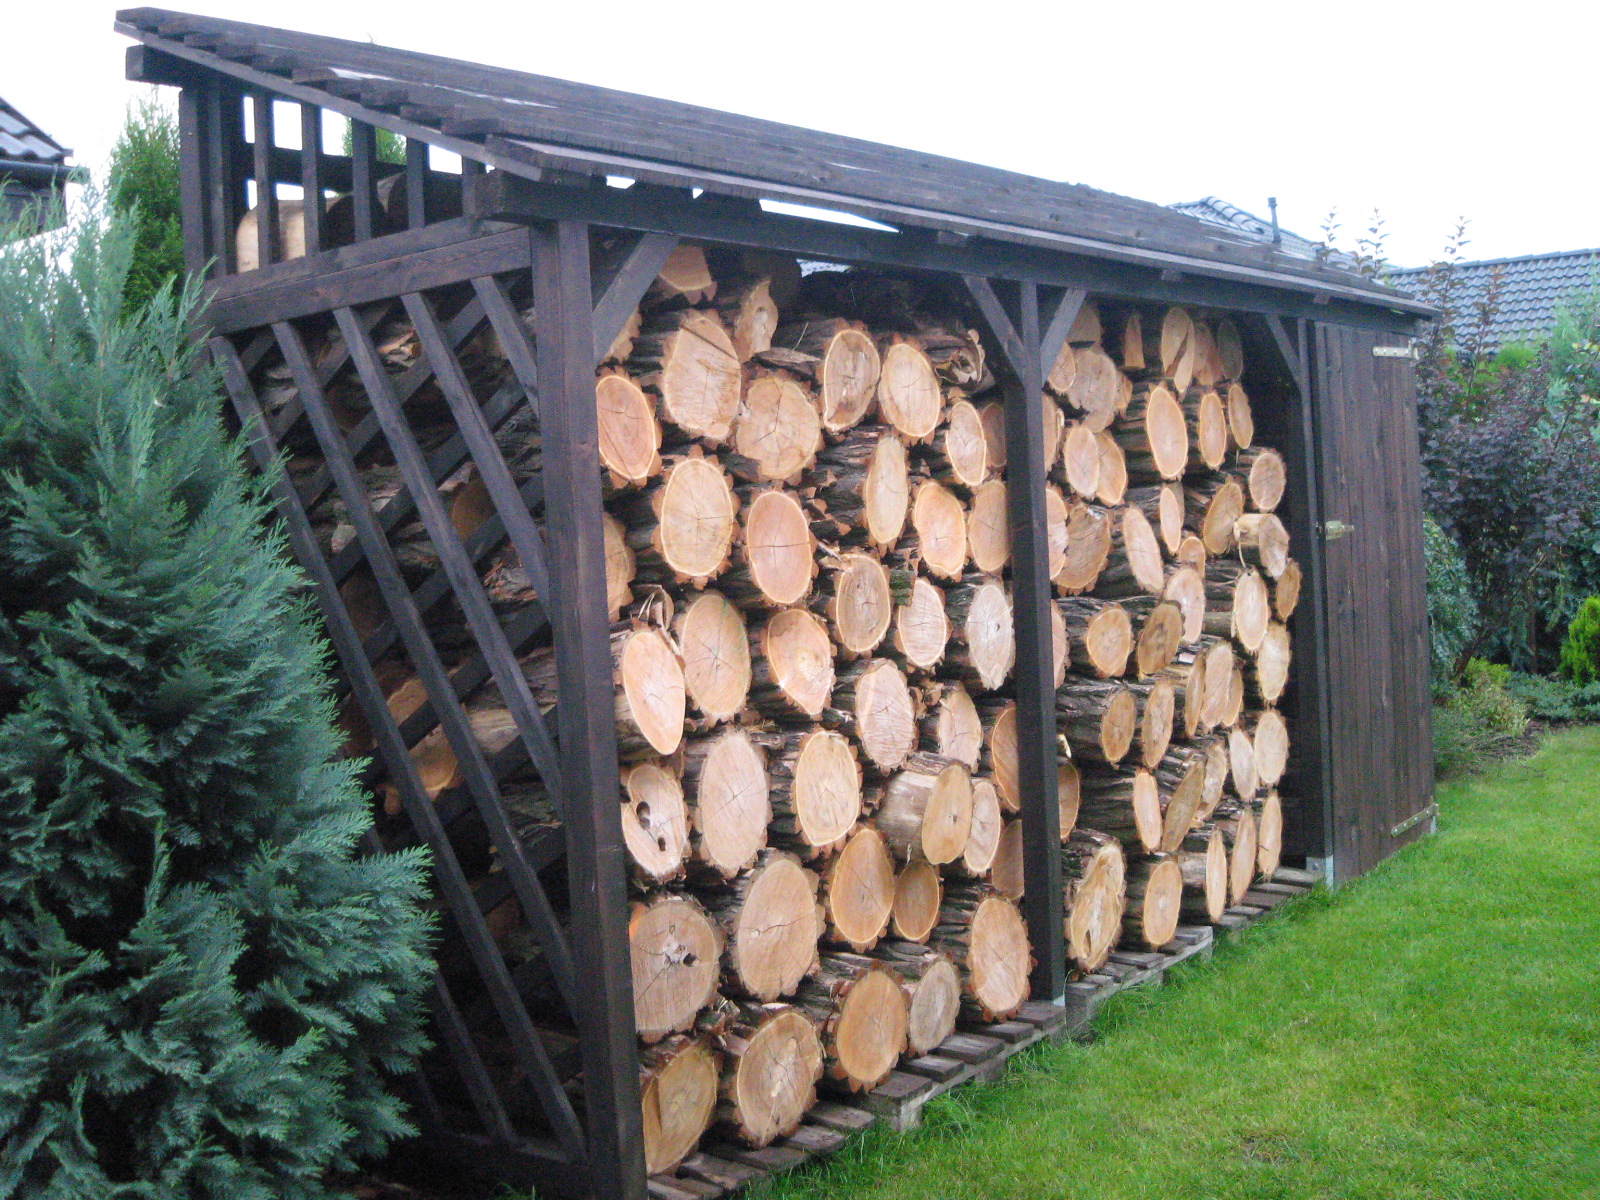
Frame firewood for a bathhouse. This is the most functional option. It is lightweight and provides high-quality air current. Such a building is well ventilated, keeping it cool inside, ensuring a quick release of moisture accumulating there. But wood does not lose its qualities.

The following configuration is acceptable here: the woodshed is not completely finished, and the cladding of one or two walls is made from a wooden lattice. Outwardly, it will look like a gazebo, and often this option is suitable for a wood burner for an (outdoor) fireplace.


If you often visit your dacha in winter, then you need to create a defense for the firewood in the form of wooden shutters.
Often, in order to save money, wooden frames are upholstered with metal. In reality this is impractical. Because of metal sheets Proper ventilation is not achieved and a greenhouse effect is formed. Therefore, it is better not to skimp here and build the entire firewood shed from wood.
Two walls can be left open. Be sure to provide ventilation slots in the board finishing.
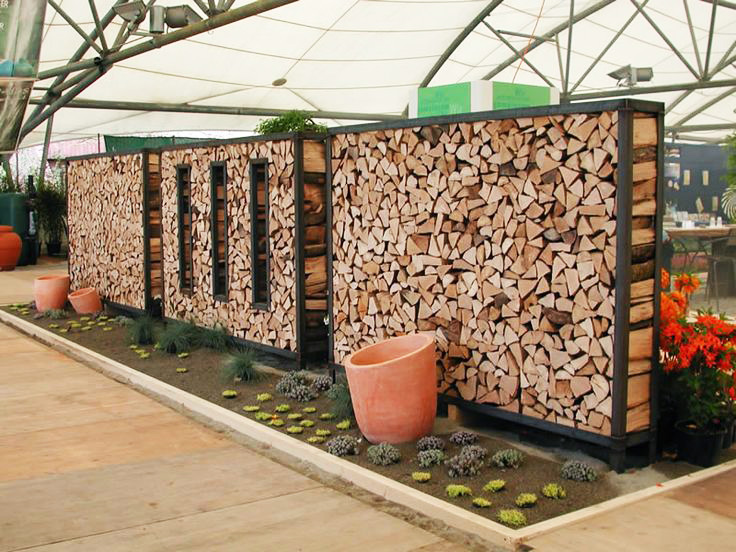
Design options for free-standing firewood sheds that support the style of the house and site. Beautiful woodsheds:

With partial painting of surfaces.

Entourage - black color. Although the design itself is extremely simple.


Stages of work:
- Digging beams into the ground. They are required for the frame. They are poured with concrete and compacted powerfully.
- The frame is carefully treated with a moisture protection agent.
- Rafters are created from boards. They are also treated with a protective agent.
- To obtain quality functional roof apply a layer of roofing material. Place the slate overlapping it. The slate should extend 20 cm beyond the edges of the walls.
Instead of slate or in combination with it, you can use ondulin. For their installation, nails with wide heads are used.
The floor is made according to the following principle: bricks, roofing felt and logs are placed at a certain distance from each other. Nice floor It is obtained from boards placed closely to each other.
To develop the rigidity of the building, braces are created along the side walls.
There is small nuance– accumulation of water on the roof of the woodshed after rains, its flow down. It is necessary to make an allotment for her. A great option here is a drainage ditch.
This woodshed can be given the same tones as other buildings on the site, and can be varnished without changing the color of the wood.


Forged
A forged firewood can be made very worthy in terms of aesthetics. To develop its attractiveness, you can use paints and varnishes, garden decorative elements, for example, lighting or different figures.

This is a portable modification. She is quite elegant. It is used to move a small amount of firewood to the combustion source. Forged versions are usually made of metal. Meet and wooden products. Such products can be purchased in special retail outlets. You can make a personal order taking into account your tastes and wishes.
The main requirements for the forged version are:
- Ease.
- Harmonious fit into the design.
- Ease of moving firewood.
Other metal options
Woodsheds combined with barbecue:


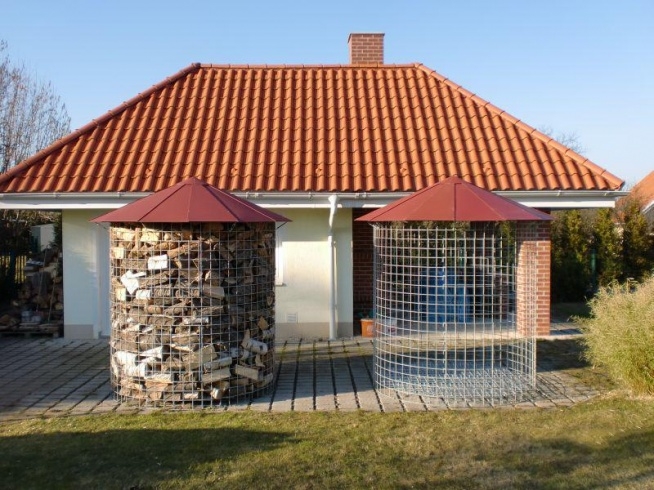
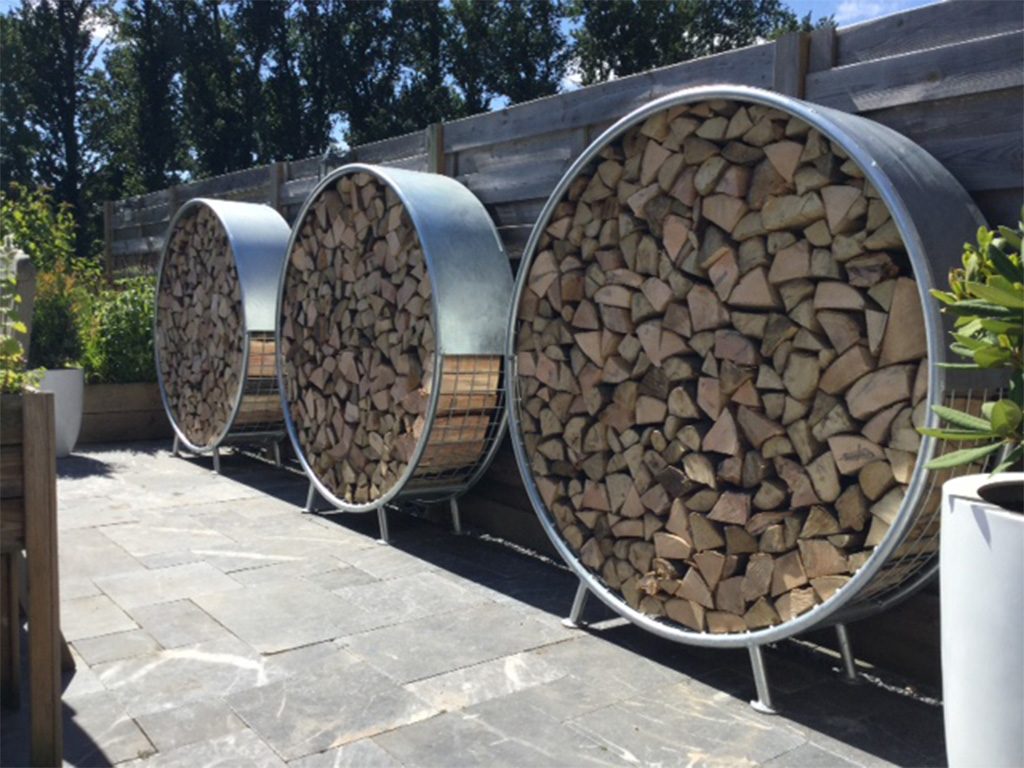
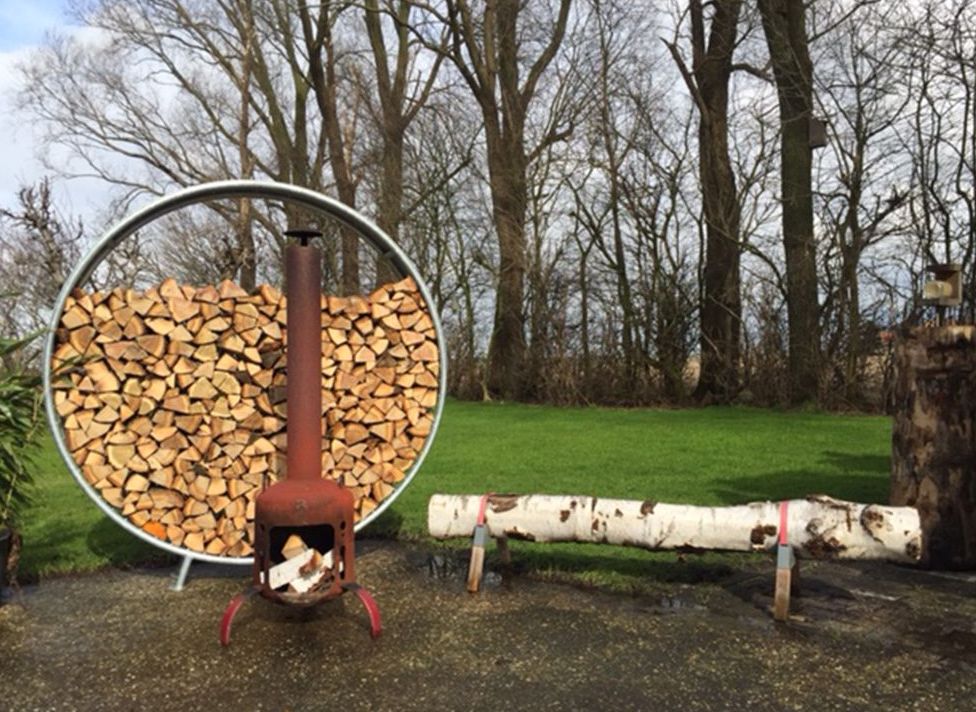
Round firewood boxes: 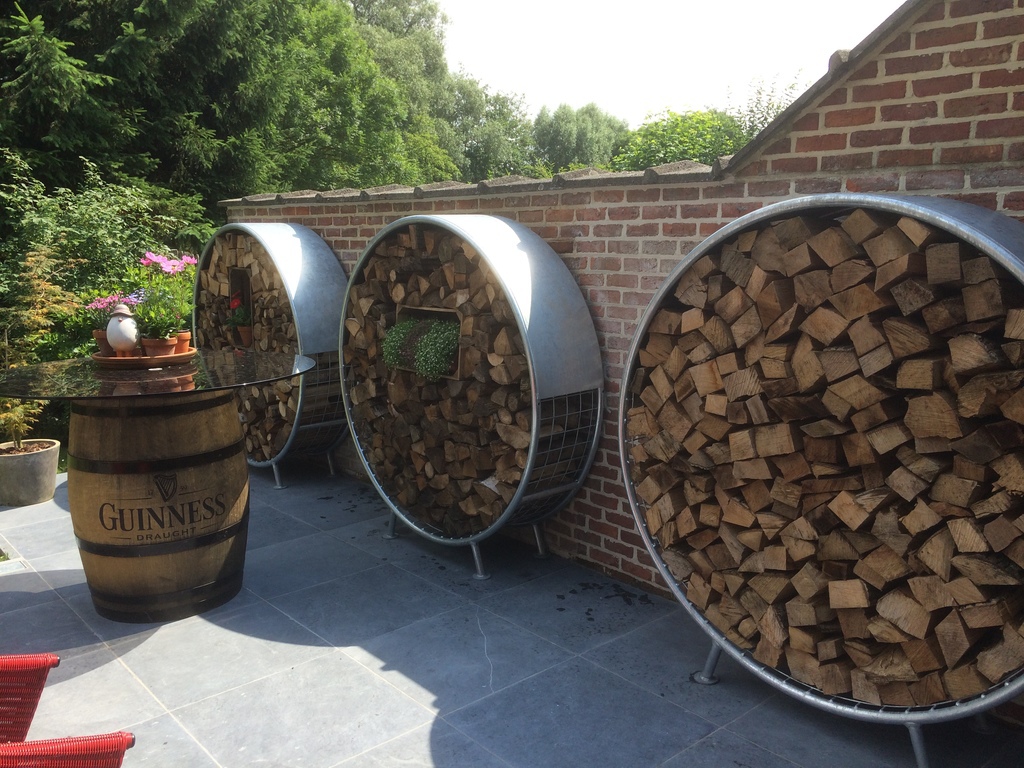


An alternative or just beautiful firewood sheds on a summer cottage
If you do not have the time to build a firewood shed yourself or you simply do not have the desire to do this work, you can use alternative options: designs of a different profile. They are excellent for storing wood supplies.
The most popular alternatives are:
- Structures from warehouses used to move various goods - pallets. Usually they are folded into a cube and attached to each other. And the top is covered with roofing felt or film.


- Not used rabbitry. The grids and doors that form its front side are removed from it. And after this you get a good woodshed for storing firewood.

- Firewood rack:

This option is reminiscent of the famous Kallax shelving unit from Ikea.
Pricing issues
The most sensitive issues here, as in other construction, are price issues. Costs are determined by the type and size of the planned woodshed. The following is some summary of the types of firewood and the costs of its construction.
- Woodshed with a bathhouse under a single roof. In different regions of the country, costs may vary significantly. They are also influenced by the types and sizes of materials used, as well as the dimensions and configuration of the planned building. The average price parameters are as follows:
- 18-20 sq.m. (bathhouse and woodshed are taken into account), material - unprocessed log, expenses: 500,000 - 600,000 rubles,
- material: foam block, gas block or brick, expenses: 900,000 – 1,000,000 rubles.
- material – laminated veneer lumber, expenses: 1,100,000 – 1,200,000 rubles.
- profiled timber, costs: 400,000 – 500,000 rubles,
- simple timber, 300,000 – 400,000 rubles.
- Forged modifications. Today their range is quite decent. The price range of these products: 4,500 – 17,500 rubles. These are average values.
- Frame versions. Here, too, a lot depends on the ideas of the owners. The creation of such structures usually costs from 8,000 to 24,000 rubles.
Results
Thus, a woodcutter is quite useful design. Building it yourself is not that difficult. You can purchase ready-made structures or use structures of a different profile, for example, adapt them to a woodshed, as in the photo below.

Instructions for self-production on video
Enough quality material for making a beautiful and not too complicated firewood log. And after searching for roof options, you can make your own original model based on the above design.
A woodshed is a special free-standing structure designed for storing and storing firewood. The choice of material and method of making a woodshed is determined by the budget established for this building and the requirements that future owner presents it to him. The most common designs are made from boards on simple frame made of vertical wooden posts covered with a pitched roof.
What should a woodcutter be like?
The main requirement that a firewood storage structure must meet is effective protection wood fuel from water coming in the form of precipitation. Since rain or snow in most cases falls vertically onto the surface of the earth, for a wood burner it will be quite enough to install pitched roof. Such a roof collects the bulk of sedimentary water and guarantees the safety of firewood for several months until it is used.
Designing a woodshed in mandatory is carried out taking into account how often and in what quantity firewood is used. If wood fuel is taken from a storage location for daily needs 1-2 times a day, then access to firewood should be free and the size of the building itself should correspond to the amount that is planned to be stored.
For example, in a GAZ-53 car, commonly known as “Lawn”, the body dimensions are 3600x2200x600 mm, and when stacked in bulk with a slide, at least 6.3 cubic meters of already chopped firewood can be placed in it. The next section contains drawings indicating exact dimensions possible buildings: from them you can more accurately calculate the volume of material that each structure can accommodate.
When it comes to wall construction, the requirements for the level of protection they provide will depend on several factors. First, you should take into account the weather conditions in a particular region. For a dry climate with little precipitation, a simple canopy without enclosing structures around the perimeter will suffice. If rains in a certain area are a regular occurrence, then it is better to take care of making light walls from horizontally packed boards with small intervals.
Regarding the frame of the woodshed, its strength is also determined by climatic characteristics and terrain. If it often blows in the area strong wind, then the structure must be equipped not only with walls that protect firewood from slanting rain, but also with a reliable frame that can guarantee the stability of the building even in very windy weather.
Depending on the level of complexity of each design element, the woodshed may look different. It is made like an ordinary mushroom with a circular roof, like a canopy resting one side on the wall of a house, garage or other building on the site, or like a small shed with light walls And columnar foundation minimum complexity.
Woodshed drawings
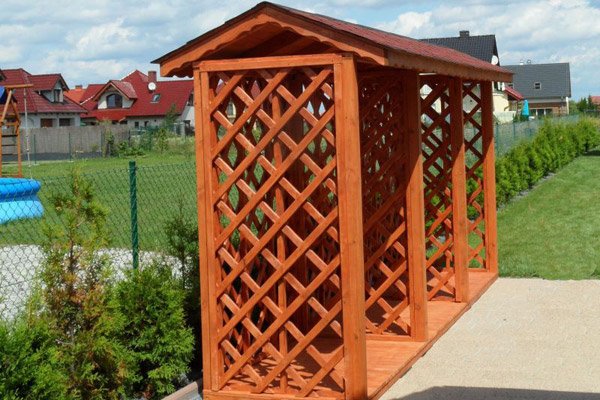
Let's first consider the drawings of a woodshed of a classical design in the form of a small free-standing covered frame with lattice walls.
The detailed technology of its construction will be described in the next section, and here, using the indicated dimensions, you can calculate the approximate volume of firewood that can be stored under the roof of such a building.
The next woodshed has compact dimensions of 1800x472x2015 mm. It is suitable for storing a small supply of firewood for a summer house or bathhouse.
The rear wall is made of one piece and can be turned to the windy side, from which oblique streams of rain are most often observed.
For the most convenient approach to firewood and simple laying of the material, the mushroom-shaped structure located below is well suited.
More complete and detailed drawing indicating each specific element of the building is available under the spoiler.
The disadvantage of such a woodshed is that the wood fuel is completely unprotected from rain from the walls. Manufacturing of this type construction will be acceptable only in areas with little rainfall.
A small woodshed that can be used for temporary storage of a small supply of firewood. It would be appropriate to place it near the barbecue, fireplace or stove so that wood fuel is always at hand.
How to make a woodshed with your own hands?
The technology for constructing such a small firewood storage is quite simple. First of all, the foundation is constructed, in in this case small ones were used for this foundation blocks. With the same success, you can use cubes made from several standard bricks held together with mortar for such a foundation.
The installation procedure begins with digging a shallow hole. Then sand 10 cm thick is poured into it, after which it is compacted, spilled with water and compacted again.
The next stage is the placement of foundation supports in prepared places with the alignment of the entire structure to the same level. Each block must be covered with roofing felt or special durable flooring. waterproofing material for protection wooden frame from penetration of groundwater.
Next, a wooden frame is made around the perimeter from 50x100 mm timber and installation cross beams floors of the same material. Then the vertical frame posts and transverse ones are installed ceiling beams along the perimeter. The racks are fixed with special jibs in the lower corners of the structure to give it strength and stability.
The photo shows how a fairly simple rafter system roof, and on top of it is mounted a sheathing made of an ordinary inch board for laying the roofing layer of metal tiles. Last stage- cladding of roof gables and exterior finishing walls made of boards with gaps for ventilation.


, Islam, Judaism How do temples of different religions differ")


