Of course, plastic windows have long won our hearts. However, for a budget way to replace windows, it is a wooden frame that is suitable. And if you decide to carry out such repairs in your country house or on the veranda, then wooden windows can be made with your own hands. When I added a veranda to my house, I immediately decided to glaze it and the option with plastic windows did not suit me. Of course, production machines assemble window frames much better and faster, but you always want to do something with your own hands. But if you follow all the rules for processing wooden material and the technology for connecting parts, then it is quite possible to achieve good results. Today we will look at step-by-step instructions for making wooden windows.
Making a wooden box

wooden box
When I decided to make a wooden window with my own hands, I thought about what kind of wood to use. From myself I want to advise you to use pine - it is quite affordable due to its cost. If you, like me, decided to try to make a wooden frame for windows yourself, then give preference to this particular material. Oak can be considered a good alternative, but it is more expensive than pine and I was afraid to use it for the first time.
Important! If you decide to experiment, then you should not immediately purchase expensive materials. It is possible that you will not succeed and the wood elements will be damaged.
Stock up on the necessary tools in advance, although many home craftsmen have all these items in constant use:
- Drill and screwdriver - a mechanized way of tightening self-tapping screws will speed up the assembly process
- glass cutter
- electric planer
- Chisel and hammer
Before buying, always check the condition of the boards. They should not have cracks or chips, protruding knots or any deformations. They must also be completely dry. Step technology:
- For my window, I chose a board measuring 150x50 mm
- In all wooden blanks he made a groove resembling the letter "G". The depth of the groove was 15 mm
- After that, I connected 4 parts together. For joints, wood glue is used, and the corners should be 90 degrees each. After the box is glued, drill holes in it for a wooden rod, which is 3 cm long. This is an additional fixation and provides 90 degree corners
- The box is inserted into the already prepared opening for the window. Everything is simple here: you drill holes into which you insert dowels, and then fix the box with self-tapping screws. I did not perform such actions - my goal was to make a window with my own hands
Important! All cracks must be filled with mounting foam. With this fixing, the mobility of the tree with a temperature difference is not taken into account.

DIY wooden windows
The wooden box is standing - we make a frame
DIY wooden windows
Step-by-step instructions for making a frame for windows with your own hands depends on what kind of window you want to make. I made a single-glass profile with 2 grooves:
- The window frame is made of a wooden beam, the size of which depends on the design of the windows. I used a 6x4 cm wooden beam, but you can take larger sizes
- If the window profile is double-glazed, then the design will have 1 more groove - 2 grooves for glass and 1 for fixing in a box
- The profile is made using a milling cutter or an electric planer - I chose 4 mm glass, and 10 mm bead
- In order to assemble the parts, they need to be cut. To get 90 degrees, cut the edges obliquely, that is, 45 degrees. Self-tapping screws should be used for high-quality fixing and immobility
As a beginner in this business, it was not immediately clear to me how the whole process takes place. The instructions for making wooden windows were written for me as if in an incomprehensible language, but having bought all the necessary materials and tools, I started work. Having considered all the drawings and photos that can be found on the Internet without any problems, it turned out that making a wooden window with your own hands is not such a difficult task.
Important! More recently, cashing was used to hide flaws in the installation of wooden windows or their thermal insulation. Now cashing plays not only a practical, but also a decorative role. Cashing is suitable for wooden houses and is used only for them. It can be carved or resemble images of animals - it all depends on the imagination of the master.
Only a little remains - we insert glass

We make wooden windows with our own hands
The most important thing in this process is the exact choice of glass dimensions. Thanks to this, cold bridges are not created, and the glasses adhere qualitatively to the wooden window frame. Deviations of 1 mm can already have negative consequences - and we do not need this.
Important! Remember safety precautions when cutting glass. You should definitely have gloves to protect your hands and goggles - protection from glass chips is a must.
You need to cut glass with a diamond glass cutter, and fine-grained sandpaper is suitable for polishing the edge. The cutting technique is very simple. It is enough to stock up on a ruler that will be longer than glass and lead along it with a glass cutter. Before you smear the edges with sealant, you need to attach a glass for fitting. If everything is successful, then sealant is applied to the grooves, after which the glass is finally inserted into the frame. After that, we use a glazing bead - it should hook both the frame and the glass, and then fix it with thin nails. If the fillers are wider, then fix them with self-tapping screws - choose thin fasteners.
On this, the manufacture of wooden windows with their own hands is completely completed and only one thing remains: the placement of wooden windows in prepared boxes. I did not need this action, but if you still decide to install, then:
- We insert the structure into the block and fix it in the grooves
- Using self-tapping screws, we fix the frame - the elements must pass through it directly into the wall
- All cracks are blown out using mounting foam and waiting for it to dry completely
- In the future, you can make slopes with your own hands in the most convenient way for you. But for wooden structures, everyone is used to using plaster, since plastic slopes will not look harmonious.
Renovation of an old wooden structure

We restore old windows with our own hands
I would like to raise another important question: how to update old wooden windows with your own hands? Despite all the defects that appear on wooden structures after many years, they remain very strong and durable. Therefore, there is not always a desire to change old window structures and spend a lot of money on it.
Usually, do-it-yourself restoration of wooden windows involves installing seals and painting frames, but in some cases a more time-consuming process is required. If gaps appear between the wooden frame and the box, seals should be used. You can use rubber, foam rubber or polyvinyl chloride. But if a skew has formed, then closing or opening the sash on the windows becomes a real problem. In order to correct the situation, you can try 2 methods: first, check the loops - maybe they have settled and it’s enough just to find a new place for them or to cut off the excess with a planer. The fact is that wood tends to swell and therefore there may be places that need to be adjusted over time.
Very often, windows do not close due to a corny thick layer of applied paint. To do this, it is necessary to remove excess layers of paintwork materials from wooden structures with sandpaper. However, the most terrible problem may seem to be rot in certain areas. Oddly enough, there is a common solution to this: using a chisel, you need to cut out the damaged area, it would be better if you grab some more usable material. Coat the resulting recess with epoxy or wood glue, then insert the new material and secure it. When the adhesive solution dries, the entire surface is processed with a grinder. The final decision will be to open the frame with varnish or paint with paintwork materials.
Results

As you can see, there is nothing wrong with making new wooden structures or updating old wooden windows. In order to do all the work yourself, it is enough to study the technology, as well as stock up on the necessary tools and wooden materials. Having chosen the right wood, you will be able to build a window structure yourself and subsequently glaze your summer house or veranda, and possibly a summer kitchen.
Modern windows are distinguished by a variety of materials, shapes and colors. The world's leading manufacturers offer frames made of aluminum, plastic and natural wood. And no matter what material is used in the production of windows, thanks to new equipment and tools, all products are equally sealed and durable. However, one negative point should be noted here - the cost of such frames is quite high.
But to buy structures that cost $ 100-300 each, just to glaze a small greenhouse, or not everyone can afford it. Therefore, the owners often have the question: “How are window frames made with their own hands?” We will try to answer it today.
We prepare the necessary tools
As practice shows, the simplest and cheapest solution would be to create a wooden window frame. The tree is very convenient to process, so even a novice master can handle this type of work. So, what materials do we need for this? First you need to find completely dry or glued wood (ordinary plywood will do). A few of its sheets will be quite enough to complete the work on creating a window frame. From the tools, prepare a saw, as well as a hammer and a chisel. Tools such as an electric planer and cutters will greatly facilitate and speed up the process of manufacturing a window frame. However, in the absence of such equipment, do-it-yourself window frames can still be made - it will just take more time and effort spent on work.

In addition, you will need glass, metal corners, wood glue, and, of course, a drawing of the future product. If you chose boards as the main material, it is best to choose a material with a section of 50x150 millimeters.
How to make a window frame with your own hands?
Here we will look at how a glued window frame is made. This material is highly reliable, durable and relatively light in weight. For glued beams - exactly what you need. You can also use a regular bar, but it is unlikely that such a product will withstand more than one season of operation.
Having prepared all the necessary tools and drawings, you can safely get to work. First, we make a window frame. To do this, a groove is cut out in a board with a section of 50x150 millimeters so that the profile of the element is similar in shape to the letter “G”. Thanks to this action, the window will be more protected from moisture and airtight.
About connection method
In the course of work, pay special attention to the method of connection. It is important to remember that poorly glued boards will not guarantee the durability of the window frame, which means that all the painstaking work will go down the drain. The most correct and reliable connection option is spikes and grooves. You can make them on a manual milling machine. If this was not at hand, you can use the old-fashioned way - cut out all the elements with a saw and a chisel.

Please note that the grooves are made only on the vertical parts. On the boards that will be placed in the horizontal direction, a spike is cut out. After both elements are made, the joints are carefully processed with wood glue. The box should be connected with the utmost care, observing the fastening angle of 90 degrees. After that, metal corners are installed in the corners of the ends. They can be purchased at any hardware store. Their main function is to firmly fix the window frame and all boards.
Before installation, wait a while until the applied adhesive is completely dry. At the same time, you can start making a wooden frame.
Beam dimensions
It is worth noting that the beam for this element should have a smaller section - instead of 50x150 mm, you need to take 50x50 mm. The first step is to create a profile. When doing this work, do not forget to leave a small gap (1-2 millimeters) between the frame and the box. After that, the profile must be sawn into blanks, in which spikes are then cut and grooves are cut. The frame boards are connected in the same way as the window frame.
Final stage
At the final stage, this element goes through the glazing process. The window frame and the frame are provided with hinges, and then both elements are treated with a special moisture-resistant agent to increase resistance to moisture.

Everything, our window is almost ready - it remains only to paint and varnish the surface.
Production of window frames from plywood
Since the factory technology for the production of window frames requires special expensive tools and equipment, it will be very problematic to make such products at home. That is why craftsmen have developed their own way of creating a profile by fastening plywood strips. For such a window frame, 4 strips are enough - they are then fastened with a rectangle. The whole production technology consists in making several rectangles from plywood strips of different widths and fixing them together. Thus, you will get the perfect puff timber of the desired configuration.

With the help of this technology, not only an ordinary blind window frame is made, but also a window with two and three glasses. A single window element is easy to make from 8 plywood strips. They eventually form two rectangles (while their widths are slightly different from each other). The strips of the second layer are cut a little narrower - this is necessary in order to fix the glass. Further, wooden (namely, all their parts) are connected using self-tapping screws. All fixing points are processed additionally with carpentry glue. Everything, window frames made of wood at this stage have been successfully made!
The designs of window frames (sashes) are very diverse. Basically, the choice of a particular design depends on the desire and taste of the owner of the future home, on traditions and opportunities.
Wood is a traditional natural material in the manufacture.
It is possible to make wooden window frames with your own hands.
Of course, this process requires certain skills and knowledge, but for those who have a great desire to do everything with their own hands, any type of construction work, even window manufacturing, is possible. Do-it-yourself window frame requires special care and precision in manufacturing from the master.
Another important factor when choosing a window design is the size of the window, the location of the building and the floor on which the future window will be located. By making window frames with your own hands, you guarantee the uniqueness and individuality of your windows.
The design of window frames is divided into the following types:
- blind bindings;
- sash (opening) - there can be a different number of sashes (from 1 to 3);
- lifting;
- sliding;
- with additional installation of a transom or vent (one or more).
Wooden casement window frames are most often made using three elements. These are two opening doors and a transom fixed above them. The transom can be deaf, opening or absent altogether.
The components of the sashes and transoms of the window are the strapping (upper, lower and side) and the sash (impost). For the corner connection of the harnesses, a double spike is used, and for the connection of the slabs with the harnesses, a single spike on glue is used, using dowels for more reliable fastening.

The manufacturing process requires certain skills and knowledge from the master, as well as accuracy and accuracy. But for those who have a great desire to do everything with their own hands, any kind of construction work is within the power.
Before you start manufacturing, prepare the necessary tools:
- thickness gauge;
- chisel;
- construction knife;
- hacksaw;
- sandpaper (for stripping);
- screwdriver or electric drill with drill bits;
- plane;
- square;
- pencil or marker;
- ruler or tape measure.
Manufacturing technology
In order to make wooden window frames, it is necessary to select bars (square or rectangular) of proper quality. They must be dry and free of knots. The quality of the manufactured frames must be at a high level, as they are of great importance in keeping the heat in the house.
- The first step is to qualitatively process the bar on one side.
- Then, using a thickness gauge, outline the risks on the second, as well as third parties. Align the fourth side according to the intended risks, using planing.
- After that, you can plan the second side. It is important to achieve right angles between the sides of the bar.
- Further, using a thickness gauge, it is necessary to mark the first and fourth sides, and then plan the third side of the bar.
- Now that all the bars have been processed in this way, you can proceed to the device of the folds. The device of the folds is carried out so that in the finished frame their location is in the same plane. Otherwise, there will not be the required degree of glass compaction.
The size of the folds depends directly on the type of seal and glass, more precisely, its thickness. If a glazing bead is used as a seal, then the folds must be made wider than when using putty as a sealant.
Another factor affecting the size of the folds is the thickness of the strapping bars themselves, as well as the slabs. Do not forget that too narrow folds will easily pass the wind.
Joints in which spikes are used are subjected to particularly careful execution, such that they allow high-density parts to go into each other, avoiding gaps and distortions. For the manufacture (cutting) of spikes, a hacksaw with a small and narrow blade is used.
When assembling the window structure, special attention should be paid to the corners of the connection of the parts. The perpendicular position is checked with a square. External sashes with a width of more than 700 mm are fastened with metal squares.
The connection can be made both from the side of the space between the panes and from the outside. If the bindings are of a summer nature, then the squares are located on the inside.
During the manufacturing process, in those places where there is a mutual adjacency of sashes and transoms, it is necessary to choose quarters that make it difficult to blow through the porches. The sashes are processed with the help of flashings, which close the gaps of the porches.

To reduce the penetration of air into the house, a seal is placed around the entire perimeter of the porch in the frame. It can be foam rubber, sponge rubber, cord, and so on.
If the frame design contains sashes, vents or transoms of an external nature, the lower trim must be made with a groove and a low tide, that is, a dropper designed to collect drops flowing down the glass.
When performing the assembly and fitting of the bindings, pay attention to a fairly tight fit of the porches between themselves and in relation to the box, more precisely, to its quarters. If this is not done, then dust will enter the house through the cracks, and in the cold season create a heat leak.
To reduce the penetration of air into the house, a seal is placed around the entire perimeter of the porch in the frame. It can be foam rubber, sponge rubber, cord, and so on. The main thing is that this sealant has such properties as elasticity, durability and strength. For the same purposes, flashings are used.
Types of window bindings
One of the types of bindings are lattice frames. They are used to perform glazing of verandas, balconies, terraces and similar premises. They are hinged, or with a window leaf built into the frame.
One of the features of such frames is the use of small glasses. The disadvantage is a small light area, since there are a large number of slabs in the design.
Another type of window frames is twin sashes. Most often they are used in civil construction. Their design implies the presence of two bindings (internal and external), which are interconnected with the help of loops and pressed using tie-screws. Such bindings are hung on common loops.
It also happens that the inner bindings are performed "deaf". In the summer, they are removed as unnecessary, and in the winter they are installed in place.
Knowing the technology of manufacturing wooden frames, you can easily decorate your home with do-it-yourself windows.
Four years ago, I published an article "Window block profile drawings (wooden double-glazed window)", where I attached a photo and drawings of wooden window profiles. Over the years, I have received several letters asking for gusset drawings or more detailed drawings. A week ago, I received another such letter, and today I will try to clarify the situation with this overview article.
Letter from a reader of ModelMen.ru
Written by: Daniel
Hello Dmitry. I am from Sevastopol (Crimea, Ukraine). I was very interested in the drawings of a wooden window with a double-glazed window. (). Now I am doing repairs in the house and did not want to put plastic windows, and very expensive wooden ones came to my mind to make them myself, I started looking for drawings on the Internet and many search engines indicate yours. You write that you developed the drawings yourself, so I wanted to ask you a question as a developer. How much the window should be smaller than the frame, i.e. if you assemble the frame, then how should the frame (height and width) be calculated so that they fit exactly to each other and do not create gaps when closing (or do not cling to each other). Is it possible to make such a window without a milling machine? How to connect the corners (butt or at 45 degrees)? Under what fittings was the window calculated? I promise that if I manage to make such a window, I will post photos of the step-by-step creation of such a window. Thanks in advance. Sincerely, Daniel.
= = = = = = = = = = = = = = = = = = = = = = = = = = = = = = = = = = = = = = = = = = =
So let's go!
Is it possible to make such a window without a milling machine?
Yes, it is possible! Moreover, such a window can be made with only a circular saw at hand. I have a modern saw blade for aluminum in my arsenal, although it was written at the time of sale that it saws wood, of course. My disk looks like this:
Specifications:
Disc diameter 255 mm.
Number of teeth 80 pcs.
Mounting hole diameter 30 mm.
Mine really has a 32 mm bore and a larger diameter, but that's not the point, it's the number of teeth! Thanks to the large number of teeth on the blade, it cuts wood exceptionally cleanly. I often asked friends to compare planed wood and sawn wood with this blade, sawn wood always won in quality. Home planers often do not give a high-quality planed surface, it turns out to be wavy, especially at the ends of the workpiece, and not everyone can afford industrial equipment.
Why am I doing all this, you can make a wooden window with a circular machine at hand and a good saw blade with a lot of teeth (soldering).
How to connect corners?
The most interesting question :) because most make a simple spike connection into one spike.

Such frames with one spike have already proven to be extremely short-lived. If you want the window to serve for a long time and withstand a large number of opening and closing cycles of the sashes, then make a spike connection in two spikes. You can of course make it in three spikes, if the thickness of the frame allows. 
The more spikes, the greater the bonding area of the parts and, accordingly, such a spike connection is several times stronger.
How to make a spike connection?
This is not as difficult as it seems at first glance, first you need to saw off four blanks to size, two vertical and two horizontal. These can be just rectangular bars or already bars with a selected profile. The length of the blanks depends on the size of the box of the window block, it is better to calculate this, of course, on the drawing.
You can even saw off the blanks to length by eye, attaching them to the finished box, but given that the frame should overlap the box. Of course, in this case, a profile must already be selected in the blanks for the frame.
Spikes and eyes are usually cut on a milling machine, but we have circumstances, there is no machine, so the same can be done on a circular saw with the help of simple devices or without them at all.
It should be noted right away that the vertical parts of a wooden window or door are always eyes, and the horizontal parts should be spikes.
For example, I will show you a video of how an uncle makes spike joints on a circular using his device.
Here's a smarter one:
In both videos, box spikes are made, they are small and there are a lot of them and it is difficult to make them without devices. If you make one or two windows, then you can get by with a simple fixture as in the first video, but without a pin, then all the work will need to be done by marking with a pencil on the workpiece.
Under what fittings was the window calculated?
To be honest, I took the fittings and the profile of a plastic window as a basis. I don’t know if there are differences between fittings for a wooden and a plastic window, but I think that having any of them you can adapt.
At the beginning of this winter, I installed a factory-made wooden window in my kitchen on my own. Below, see the photo of the window, which elements can be taken from there when developing a drawing.


Today, I would portray my profile a little differently than four years ago: 
As you can see, I increased the size of the bars to 80 mm., All the same, we have harsh winters, and I would like the heat to remain in the house, besides, a more massive frame will be stronger and look better.
In this article, I again do not give you ready-made drawings and sizes of windows, because in order to develop them, you need to have window fittings in your hands and understand how it is attached and works. Unfortunately, I have no experience with such fittings, so I cannot yet develop a finished drawing. Below I tried to visually depict how the corner stud connection should look like.

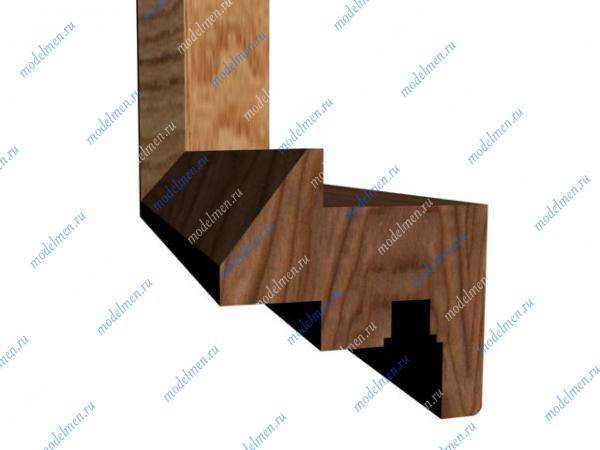


I found a few more photos on the Internet that show elements of the tenon joints of a wooden window. I hope the information I have provided will help you to independently develop a drawing of a wooden double-glazed window and bring it to life. Good luck!


Wooden windows have always been popular due to such positive properties of wood as: high heat-saving characteristics, environmental friendliness and durability.
One of the advantages is also that making wooden windows with your own hands is a completely doable task even for a non-professional.
In contact with
Classmates
Of course, now they use more, which are cheaper and also have their undeniable advantages, but still, wooden windows are classics and they will always be popular.
Material for wooden windows
The most popular material for the manufacture of a wooden window box in our latitudes is pine. It is distinguished by availability, low price and practicality. In terms of material characteristics, pine is superior to oak, but it is more expensive and therefore, for the first time, it is better to stop at pine windows.

Process of creation
The main requirements for the board are as follows. Firstly, it must be well dried, and secondly, it must not have knots and deformations. These conditions are important, since the box will experience the main loads, so its strength should not be in doubt.
Glued laminated timber box
Do-it-yourself wooden window manufacturing technology involves the use of glued laminated timber to make the box. In this case, the box has the most durable design. Glued laminated timber is a compilation of individual boards in packages and gluing them along the plane. Boards in our case will be made of pine.
The size of the board is taken 15 * 5 cm. They are interconnected by gluing. Then four holes are drilled and wooden pins are inserted into them. Such a connection will provide structural rigidity. In the opening, the box is installed motionless, using self-tapping screws and dowels, and then, the gaps between the opening and the box are blown out with mounting foam.
Tool
It is necessary to dwell briefly on the tool that will be needed to make the window.
- An electric planer needed for planing boards.
- Cutter for cutting boards.
- Rulers, angle, tape measure and some other measuring tools.
- Glue.
- Beads, thickness gauge.
- Sealant.
- Protective equipment - goggles that protect the eyes and ordinary work gloves.
If the window will be made for a dacha in which you do not live in the autumn-winter period, it will be enough to confine yourself to a thin double-glazed window.

window frames
Helpful information:
Pay attention to inexpensive windows made of Krasnaya Gorka wood: a frame made of two-layer glued laminated timber (pine) 57x60 mm, single-chamber double-glazed window.
Window frame
If you decide to carry out the manufacture of wooden windows with double-glazed windows, then you need to start with the design of the window frame. The minimum timber that you will need in order to make a frame should be 6 * 4 cm in size and will depend on the thickness of the window.
The profile for one window pane should have two rectangular folds, and a window with two panes should have one more. Frame production begins with careful processing of timber. Then, with the help of a thickness gauge, we make all the markings, after which we begin the installation of folds (grooves).
Making folds for the frame
The manufacture of folds is carried out so that when the frame is already assembled, they are in a single plane. Otherwise, the glass will be weakly sealed. In general, the dimensions of the grooves depend on the thickness of the glass and the type of seal.
Note!
If putty is used as a seal, then the folds have a smaller width than when using glazing beads.
It must be remembered that strongly narrowed folds will let the wind through. The width of the strapping beam also affects the thickness of the grooves.

Final frame assembly
The window frame is assembled in such a way that the spikes fit snugly into the grooves. For a tighter connection, a spike must be installed. To do this, you must first drill a hole according to the diameter of the spike and grease it with glue.
In addition, at the end of the frame boards, to improve the connection, you can use a key. Its appearance will resemble a double dovetail. To do this, on each of the connected ends, a hole in the form of a trapezoid is made, into which a key is then inserted. Before completing the assembly, the joints are smeared with glue, and after assembly, the remaining glue must be cleaned with a knife. In the manufacture of a window with a sash, the installation of fittings will be added to the above works.
Glass preparation
To prevent the window from blowing through, you need to carefully fit the glass to the size of the frame. To do this, you need to cut it with a diamond glass cutter. Before work, for safety, you need to wear goggles to prevent glass chips from getting into the eye and gloves, so as not to cut your hands. Glass cutting is carried out with a ruler, which should exceed the length of the glass. After we have drawn a line with a glass cutter, we move the glass to the edge of the table and, using pressure, break off the excess part. The glass should break off according to the cut.

Glass insertion
Anyone who has an idea about how to make wooden windows should know how to correctly insert a window into a frame. To begin with, let's try on the cut glass by inserting it into the frame. If the glass is cut correctly, then we take it out and begin to prepare the folds.
To do this, they need to apply sealant and insert the glass into the frame. We fix the glass with the help of the top glazing bead and fix it with a thin carnation. When using a larger glazing bead, you can use self-tapping screws to attach it to the frame.
In the manufacture of windows, which consist of two halves, another bar is installed in the center, with the same grooves. One half of the window is made with a thinner frame and attached to the main one with hinges. In addition, a handle is attached to such a frame, and a groove is also cut out for the closing mechanism.

double wooden window
Manufacturing of vents
Vents in wooden windows are an integral part and come in several types: mortise, split and sliding. The latter represent a rather complex mechanism and it is difficult to perform them on their own. The first option is made together with the window frame and here you need maximum accuracy.
The best option for window vents in wooden windows are split, which are made separately from the window, and then, finished, are inserted into the frame.
Note!
In the manufacture of a split window, the use of any special fasteners and special skills in execution is not required.
The manufacturing technology of such vents differs slightly from the order of mounting the window itself, only for smaller sizes. The difference lies in the mounting of the opening mechanism, which usually consists of hinges, and the attachment of additional fittings, in the form of a handle with a closing device.
Final work
After completing all the work, the manufacturing technology involves lubricating the window surfaces with an antiseptic. After that, the window is placed in the opening and fastened in the grooves. Then we fix it with self-tapping screws that pass through the box and fasten them to concrete. Holes in concrete are most often made using a mounting gun.
After we fixed the window, we blow out the cracks with sealant. You need to wait for it to dry, and then plaster the sealing points. The work is completed by mounting the ebb and the window sill. Thus, it can be seen that making a wooden window with your own hands is not an impossible task, and this distinguishes them favorably from metal-plastic windows.
Making wooden windows with your own hands video:
In contact with
See inaccuracies, incomplete or incorrect information? Do you know how to make an article better?
Would you like to suggest photos for publication on a topic?
Please help us make the site better! Leave a message and your contacts in the comments - we will contact you and together we will make the publication better!


