A shower stall is a great addition to an ordinary (and extraordinary) bath, and it can completely replace a cast-iron pond. Installing a shower tray with your own hands should create reliable foundation for full water procedures - durable, comfortable and safe.
Specifics of installing shower trays with your own hands
A cabin with a built-in shower can be placed in a small bathroom - however, it will not be superfluous in large plumbing apartments. Behind its walls there is hydromassage and tropical shower, music and lighting effects, a working telephone and aromatherapy, personal privacy and the romance of joint water treatments. The more functions there are, the more expensive the shower cabin and the more complex it is to install. However, the number of budget models is steadily growing; many of them no longer belong to the category of “luxury”. This applies to both the cost of the cabin itself and the cost of installation.
Yes, it is not at all necessary to install a shower tray yourself. You can purchase a turnkey cabin and experienced specialists will install it quickly and with a guarantee. This will slightly increase the repair budget, but will allow you to start enjoying the benefits of the shower right on the day of purchase. It is important to remember that shower trays are made from different materials, and some of them are not worth installing yourself.
Marble is heavy, and if there is no experience working with this stone, it can crack even at the stage of preliminary measurements. Ceramic trays are very beautiful, but they are afraid of even slight impacts - they are fraught with the destruction of ceramic beauty into many fragments. Self-installation most often means a steel or acrylic pallet - they occupy about 85% of the total market. Steel is stronger than plastic, so let's look at the secrets of installation acrylic base for the shower.
DIY acrylic shower tray installation
Most acrylic designs have obvious weak point– lack of support under the central part. No matter how strong the perimeter is, a man advances into the middle! A floor in a cabin that is cracked underfoot is dangerous not only because shower water leaks to the neighbors below, but shards of acrylic can seriously injure a person who is absolutely unprepared for such a turn of events. Therefore, the typical installation sequence is acrylic pallet is this:
Installing an acrylic shower tray with your own hands - step-by-step diagram
Step 1: preparatory
Renovations in the bathroom must be completed by the time you purchase the shower stall. This applies not only to finishing the walls with tiles or plastic - it is much more important to carefully install the sewerage system, water supply pipes and electrical wiring. Most shower cabins are connected to all three communication systems. That's why hidden electrical wiring must have high resistance to dampness and a minimum amount of “twisting”.
If the wiring fails, pull new wires under ceramic tiles it won't work without something new overhaul. It is equally important to use only high-quality pipes - both for water supply and sewer. They are tested after installation and their outlets must allow easy connection of hoses. Before installing the shower tray yourself, these mounting holes must be closed with reliable plugs.
Step 2: installation
Any shower trays (not just acrylic ones) must be set strictly at level. Their profile allows water to flow into the sewer hole only if the installation is perfectly horizontal, otherwise there will definitely be puddles in some corner after a shower. That’s why it’s so important to complete your bathroom renovation; installing a tray on a flat tiled or ceramic surface is easy and simple.
But easy and simple does not mean durable! Therefore, after installing the pan level, you cannot lean on it, and even connect the sewerage prematurely. It will be necessary to secure the central part without losing horizontal accuracy. To make this task easier, you can draw thin lines with a pencil along the wall tiles along the entire perimeter of the tray.
Step 3: Firming
The specific method of increasing the strength of the acrylic surface under our feet is related to the size of the mounting clearance. It is advisable to leave it in such a way that there is access to the sewerage system for possible cleaning and/or replacement of sewer pipes. If the clearance size is sufficient, additional elements Bricks will serve as the foundation; if it is too small, steel pipes will serve. Thick rubber should be laid on top of the pipes and bricks and the entire structure should be pushed tightly between the floor and the acrylic “ceiling”. Only after this the cabin is connected to communications.
Shower tray - do it yourself with
You can create a base for a shower without a tray at all - or rather, make it yourself rather than buy it in a store. The labor intensity of such work is much higher, but you are not limited by the size of a man-made shower. If you are not sure where to start renovating your apartment, feel free to choose the bathroom. Those who have done a good job of arranging the plumbing room will definitely not be afraid of rooms with attics and corridors.
DIY shower tray - step by step diagram
Step 1: Waterproofing and drainage
The location of the homemade cabin must be waterproofed to a height of about 30 cm. For this, sealant, fiber rubber or other compounds are used, the choice of which is more than wide. The sewer pipe is routed to the very center of the homemade pan, making it easier to drain. All sewerage elements must be carefully taped and checked for leaks before installation. Day off sewer pipe must protrude above basic level floor by 12-15 cm. Do not forget to carefully seal the pipe so that it does not get inside construction waste or other foreign objects.
Step 2: Lay out the barrier
Having installed the shower tray with your own hands, we lay out a barrier of bricks along its perimeter. The barrier line must correspond to the walls of the future cabin. The height of the brick perimeter is at least 5 cm higher than the level of the drain pipe. Sharp brick corners are unacceptable, so you will have to work with the mortar and carefully smooth them out. The solution is prepared to be moisture-resistant and durable; it can be mixed in a medium-sized container with a trowel and spatulas without using shovels - large volumes of cementing are not planned. When mixing the solution, the ratio of cement and sand is maintained at 1:1, with the obligatory addition of liquid glass for water-repellent qualities.
Step 3: Fill the floor
Pouring the floor under a homemade pallet is carried out in three stages. First, using a self-leveling cement mixture, a basic fill is made - smooth, from wall to wall, about 5-8 cm thick. After it dries, the entire surface is treated with waterproofing - Fiberpool, Decoprof etc., maybe in two layers.
When the waterproofing layer has dried, mix a solution of tile adhesive and cement mortar. It is applied in concentric circles, gradually increasing the level from the drain hole. The work is painstaking. It is necessary to maintain the same radius of curvature; a rough transition cannot be hidden under the finishing. The cement surface must be thoroughly rubbed, getting rid of rough edges and miniature steps.
Step 4: Finishing
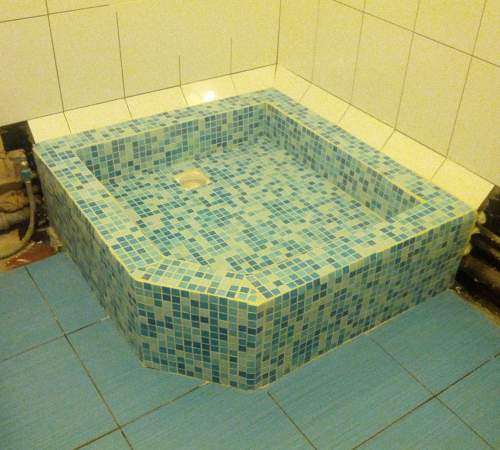
It is better to finish a cement floor with a slope using mosaics. Small mosaic elements can hide unevenness and look great for many years. Special glass mosaic for bathtubs has anti-slip properties and does not lose its original colors during use. Of course, laying a mosaic is much more difficult than tiling a porch, but no one promised that a completely homemade shower tray would be a cakewalk in renovations.
The hand-made tray for an exclusive shower stall is ready. Yes, we almost forgot - Before installing the shower tray, be sure to change plastic drain on steel or brass! Even if the plastic one is included, and the manufacturer describes its incredible strength. It is customary to walk on the pallet and shift from foot to foot - so only brass or steel will withstand the load, and it is easier to clean them as needed.
At installation of shower trays two main tasks are solved:
- providing space for placing drainage devices (siphon and drain pipe)
- ensuring the verticality of the walls of the shower stall, for which the tray serves as a foundation
Order shower tray installation depends on its type. More precisely, from the material from which it is installed.
Most modern shower cabins are equipped with . They are well suited for installation and are easy to assemble.
Acrylic shower tray with reinforcement - bottom view
1.1. Turn the tray upside down and screw in the legs. There can be from three to five. If the pallet is provided with a separate metal or plastic support frame (in addition to the reinforcement of the pallet itself), then perform this operation with the specified frame, because The holes for screwing in the legs will be made in it. Strive for the legs to be longer than the siphon drainage system and protruded from the bottom of the pallet to approximately equal lengths.
1.2. Install the drainage system. In most designs, to do this, you need to place the tray on its side, insert a connecting sleeve from the side of the bathtub (washing cavity) into the drain hole; From the bottom side, tightly push the siphon pipe onto the protruding end of the connecting sleeve. To ensure a strong connection, use glue. Seal all joints and cracks with sealants. There are options using threaded connections with gaskets - see instructions for the shower cabin.
 Adjusting the legs of the acrylic tray
 1.3. Place the tray on its feet. Make sure that the bottom of the siphon does not touch the floor. By rotating the length of the legs, achieve horizontal position top surface pallet (the one on which the walls of the shower stall will be installed). This is important, because if the cabin is installed at an angle, it will quickly begin to leak.
To ensure horizontalness, use a building level. Typically this is wooden block, into which a glass flask with an air bubble floating in it is inserted. On a strictly horizontal surface, the bubble should be placed in the center of the flask opposite the corresponding mark.
If you don't have building level, then you can check the horizontality of the pallet more in a simple way. Take a regular shallow dinner plate with smooth edges. Place it on the side of the tray and gradually fill it with water. On the side of the edge of the plate from which water will begin to flow earlier than from the others, there is a slope - this side of the pan must be raised.
Repeat this operation on all sides of the tray until the plate begins to fill evenly. Once leveled, secure the pallet legs using stoppers.
1.4. If the tray is installed in the corner of the room or against its wall, lubricate the edges touching the walls with glue and press them tightly against the wall(s). Wait for the glue to dry and additionally lubricate the junction of the walls of the room and the sides of the pallet with sealant.
1.5. Connect a drain pipe to the outlet pipe of the siphon and install the decorative casing of the pallet in place, covering its lower part along with the legs to the floor (this operation can be carried out after complete installation shower cabin).
This completes the installation of the acrylic shower tray.
If you decide to install a marble shower tray in your bathroom, see its advantages and where you can buy it.
Installation of a cast iron pan
Installing a shower tray made of cast iron is fundamentally similar to the installation of an acrylic tray. The difference is that:
2.1. The cast iron pallet is strong in itself and does not require additional reinforcement;
2.2. The legs of the cast iron pan are cast integrally with the body. Therefore, horizontal alignment is possible only by placing some objects under the legs. Let's say steel strips measured thickness (for example, a metal ruler cut into pieces).
 A cast iron pan requires almost no installation!
 In this case the question arises, how to fix a shower tray so that its legs don’t move off these plates? After all, the sides of a cast-iron pallet do not stick to the walls of the room...
The problem is solved by creating a cement frame-boss around each leg of the cast-iron pallet. To form it, you can use at least a “box” from an ordinary matchbox as formwork.
Another thing is that prefabricated factory-made shower cabins are not equipped with cast iron trays. Cast iron trays are usually used together with simpler shower enclosures in the form of screens and curtains, which do not require very precise tray geometry for installation.
 Preparing a place for a parapet for a cast iron pallet
 2.3. Sometimes the height of the legs of a cast iron pan may not be enough to place a drain siphon underneath it. In this case, the cast iron pallet will have to be lifted using a parapet. This task is not very difficult. A brick parapet is laid around the perimeter of the pallet (or a concrete collar is made), sufficient in height to place a siphon inside it. A hole or groove is left in the parapet for the passage of the outlet pipe from the siphon. A pallet is installed on this parapet; if necessary, it is adjusted in horizontal plane; the legs of the pallet are fixed with cement bosses; The visible surfaces of the parapet are covered with tiles or mosaic modules.
Installation of a steel pallet
Today, installing a shower tray made of plastic is gaining popularity. General and non-general cases of its use can be found.
- you will also find it on our website.
How to make a shower tray yourself?
The main part of the procedure is described above. Only in this case, the side of the bathtub (washing cavity) is also laid out with bricks on top of the pedestal. The drain hole of such an improvised pan is combined with the inlet pipe of the siphon. The cavity into which the siphon and drain pipe are installed is subjected to comprehensive waterproofing and is covered on top with a cement plug or brickwork. The bathtub (washing cavity), as well as the rest of the pedestal, is tiled or mosaiced.
 Homemade pallet for shower before tiling
 How to lay out a shower tray these materials? Just like any other surface. You just need to remember that when laying tiles and mosaics, you should make a slope towards the drain hole. Perhaps by varying the thickness of the adhesive layer or cement backing. Seams between tiles or mosaic modules are coated with a water-repellent composition.
This can be done beforehand using dowels or by pressing into cement screed strengthen the profiles over the sides of the pallet for subsequent installation of the cabin enclosure.
 Mosaic lining of shower tray
 How to install a shower tray
It's not enough to know how to assemble a shower tray, you need to have an idea where to put it.
Most shower trays are designed to be installed in the corner of the bathroom. But it may turn out that the distance from this corner to the inlet to the sewer or to the water pipes is too great. That's why pallets are preferred rectangular shape that they provide more freedom in the placement of the cabin: they can be placed either in a corner or against a wall, and even in the middle of the room.
 Connecting the shower tray to the sewer
 In general, since water from the water supply comes under pressure, and the distance from the cabin to the connection point to water pipe not critical; when choosing a place to install the cabin, you need to focus on the distance to the entrance to the sewer. It is set quite rigidly by the height of the legs of the pallet (pedestal). The drain pipe from the siphon to the sewer system must slope downward at a slope of 7-8 degrees for normal water flow.
Sometimes the drain hole of some pallets (especially steel ones) is located not in the bottom, but in the side walls. Accordingly, the pan must be unfolded with the sewer drain hole on the side in which it has a drain hole.
How to strengthen a shower tray
For many buyers of shower cabins, the strength of acrylic trays, even reinforced ones, seems insufficient. Steel pallets also need strengthening.
General rules for how to strengthen acrylic or steel shower tray, No. Typically, strengthening the structure comes down to placing bricks under the bottom of the pallet or installing supporting pillars. One thing is important: the surface of the supporting element should correspond as much as possible to the surface of the bottom of the pallet, and all supports should be the same height. Otherwise, it will be even worse: the supporting element will simply push through the bottom of the pallet.
 Reinforcing the shower tray with bricks
 What to do? Arrange special cement trays for pallets with careful adjustment of these structures to the configuration of the bottom of the pallet. But this kind of “monument” may turn out to be more expensive than a new shower stall, let alone a tray.
How to seal a shower tray
During installation, you may damage the shower tray. Especially if it is made of acrylic. But even through cracks up to 300 mm long can be repaired quite simply using special restoration kits. For example, "Akrol", sold in most construction stores in Moscow.
The procedure for this is as follows:
8.1. Dismantle the pallet and remove all cabin parts from it.
8.2. By thoroughly inspecting the pallet, verify the nature of the damage: through or not through.
8.3. Drill holes at both ends of the crack with a drill slightly larger diameter than the crack itself - so that it does not spread further.
8.4. If the crack is through, then glue a strip of fiberglass fabric onto it from below (on the side opposite the washing cavity) using epoxy resin.
8.5. Remove (using a drill with a cutter or simply sharp knife) chamfers 1.0-1.5 mm deep along the entire crack - to make it easier to pour the restoring solution into it.
8.6. Fill the crack with liquid acrylic with hardener.
8.7. After drying, remove the acrylic deposits near the crack with “soft” sandpaper.
Damage to steel and cast iron pallets most often involves chipped enamel. Elimination of non-through damage of this kind also involves sealing with restoration compositions. Either - epoxy resin by applying a layer of liquid enamel on top of it, or using liquid acrylic with hardener.
 It is impossible to restore a broken ceramic tray...
 Damage to ceramic (faience) pallets is most often fatal: they break when the permissible loads are exceeded or from impacts. Those who wish can try to glue them together with any glue they know, but they will not be able to restore acceptable strength and appearance.
Repairing mineral cast pallets is no different from repairing acrylic pallets.
Installation of a shower tray - price
If you don't want to bother with the question, how to assemble a shower tray, then you can invite specialists for this. For example, " Spectrum household services » (Moscow) charges 1,500 rubles for installing an acrylic shower tray with a sewer connection. But, as a rule, this service It turns out to be a complex with the assembly of the entire shower cabin, and in itself is not very popular among Muscovites. After all, anyone can screw four legs onto an acrylic vessel.
Another question if you need install shower tray original design, By individual project, and even from some unusual material. Then the lower threshold prices is determined by your ability to bargain, there is no upper limit!
The bathroom is the place where every person begins and ends their day. Therefore, it is important to make it as comfortable as possible. But not all people have the time and energy to take a bath, and installing a shower tray with your own hands becomes relevant. This is better than calling a team - both cheaper and more reliable, since real craftsmen are now worth their weight in gold.
TYPES OF SHOWER TRAYS
IN lately shower stalls and corners are gaining immense popularity. And even if there is a bathtub, many still want to install an additional shower.
This makes it possible to functionally use space in the room, receiving not only the usual flow of water for washing, but also massage, aromatherapy, music, etc. Market modern plumbing represents wide choice shower trays various forms and sizes. But how to choose the right shower tray This article will help you.
The most durable, durable and expensive pallets are made of marble and cast iron. Everyone else follows them.
But the most popular, affordable and durable are pallets made of plastic or acrylic. They can sag under weight, so during installation you need to take this nuance into account and install the pallet on a frame or adjustable legs.

Ceramic structures are particularly beautiful, but they are not resistant to mechanical damage. When choosing, you need to pay attention to the pallet special attention. If it's not durable, it won't last long, whether you install it yourself or hire a professional. Each material has a number of advantages and disadvantages, and it is difficult to say which will be better.
The most popular plumbing fixtures in recent years– acrylic. And durable, and beautiful, and affordable .
If the base tray you choose has only legs, then you will have to prepare the base for the future shower stall yourself. This will require metal pipe the required size and rubber gasket. Thus, using practically available tools, you can create a durable mount for the shower stall. Shower trays are classified by shape, material, depth and size.
PALLET INSTALLATION FEATURES
If you have taken on the task of installing a shower tray yourself, then you should familiarize yourself with some of the nuances and features of the installation work. If the pallet is installed on “original” legs, special attention should be paid to uneven floors and the legs should be twisted in accordance with these defects.
Also, a very important part of the work is the installation of a drain, as this is the key to long-term operation of the pan without repair work.

There are several ways to install the pallet:
- On metal frame
- On a plastic support
- On bricks
- On a flat surface
- On your feet
The guarantee of the quality of the work performed directly depends on preparatory stage– the installation site should be carefully prepared. If the pallet is immediately placed on the floor, then special attention should be paid to the evenness of the floor. In addition, it is important to ensure the strength of the product itself. Plastic and acrylic pallets can be deformed under weight, so they require reinforcement with polystyrene foam, polyurethane foam, bricks or concrete.

The work can be done in any of the options.
Second important point- this is a competent installation of pipes and electrical wiring, if there is a light or radio in the shower stall. The pipeline is being installed PVC pipes and connected with fittings.
The wiring must be moisture resistant and must be hidden to protect it from excess moisture. It is recommended to pull the cable directly from the shield. This is an important condition fire safety. There is a lot of controversy about the installation being level and slightly sloping towards the drain. Both installations have a right to exist and have a number of advantages and disadvantages.
When installed with a slope, additional reinforcement is required so that there is no “surprise” during washing, and the drain must be properly sealed. When installed level, most of the weight falls on the center of the structure, so it is important to pay attention to strengthening it.
INSTALLING A SHOWER TRAY WITH YOUR HANDS ON BRICKS

The bricks should be additionally secured with mortar, securing them evenly using a level
Installing a shower tray with your own hands on bricks is the easiest and most reliable way installation To ensure the strength of the structure, the bricks should be additionally secured with mortar, securing them evenly using a level.
Neglecting this advice may result in cracks and dents in the bottom due to excessive weight. And only then you need to attach the pallet to the solution, leveling it using a level and a mallet.
You can install pallets on the bricks from various materials. Steel or acrylic pallets are sometimes installed without doors or side panels, using only a protective curtain.
This budget option, perfect for a cottage or country house, where you don’t visit very often. Because installing a shower without doors at home is not very comfortable.
The steel pallet is very strong, so when installing it on bricks, only the pore material on the sides is enough. The middle can be left in limbo.
To install a tray without deepening the floor, a minimum of tools are required:
- Pliers
- Drain keys
- Screwdriver
- Wooden hammer
To secure the pallet to the bricks, use a metal frame or supporting elements. Used as a sealant polyurethane foam or silicone sealants. But remember that when high humidity silicone tends to darken, which can ruin the appearance.

To ensure that the final result is a level structure, be sure to use a building level at all stages of installing the pallet.
If it is not there, then you can use a simple method using improvised means. Take a regular plate and place it on the edge of the tray. Then gradually start pouring water into it. The edge from which water flows faster is located on a slope. Level the tray and repeat the procedure until water begins to flow out evenly from the plate.
It was already mentioned above that pallets come in different sizes:
- Semicircular 80x80cm, 90x90cm, etc.
- Rectangular pallets – 70x85 cm, 70x100cm, 70x120 cm, 80x100cm, 80x120 cm.
- Pallets square shape– 70x70 cm, 80x80 cm, 90x90 cm, etc.
- Pentagonal - 90x90cm, 100x100 cm, 120x120, etc.
Which one to install is your choice, which depends on your desires and the dimensions of the bathroom.
If you decide to make a recess in the floor, before starting installation you need to use a hammer drill to remove the tiles (if any) in the place where the shower tray is planned. The bricks should be laid along the side wall of the shower and reinforced with concrete mortar.
To be sure, you can additionally lay a few bricks in the middle so that the bottom does not deform under the weight. Don't forget about the space for the drain pipe.
The brick should be laid out level in such a way that there is a slight slope towards the drain. And if you plan to install the pallet evenly, then the support (bricks) should be placed evenly.
After this, you need to move on to the stage of installing a siphon for the pallet. A PVC tube 5 cm in diameter is perfect for this. If the location of communications requires it, then install an elbow, adapter or corrugated pipe, appropriate size. Such fittings can be purchased at any plumbing store.
For reliable joining, use sealant. After this, it is very important to check the quality of work with water. If everything is fine and the connections are not leaking, you can move on to the next step.
After installing the shower tray on the bricks, secure it with foam. All sides are laid with ceramic tiles or plastic lining. It is recommended to install a corner (plinth) between the wall and the pallet and seal it with silicone or acrylic.
Calculate the curing time of the sealant at 2 mm per day. After drying, the process of installing the pallet can be considered complete.
You can hang bathroom curtains on the sides, install curtains from tempered glass, or install side panels. It depends on your desire and capabilities.

For long-term use of the shower cabin, it is necessary to install the shower tray correctly. The technology for performing the work must be accompanied by competent installation of all structural parts. In this article we will describe the features of installing a shower tray in accordance with the rules and recommendations of specialists.
Types of pallets
The shower is an excellent addition to the bathroom, which saves free space in the room. The method of installation of the shower tray must be installed in compliance with safety regulations. Installation options depend on the type of pallets and the technology of fastening to a specific material. However, it is important to remember that not all pallets can be installed independently, and in some cases, you need to seek help from specialists.

Shower trays differ in the type of material from which they are made. So, they distinguish the following types designs:
- cast iron products;
- marble and ceramic trays;
- steel products;
- acrylic pallets.
Marble products are considered the most durable and reliable, however, their cost is quite high, so not everyone can afford such a purchase. Ceramic trays are also expensive and have excellent decorative properties, but too sensitive to various damages.
An affordable option is to install a shower tray made of acrylic materials. To install the structure, it is necessary to build a special frame that would support the pallet, because such products tend to sag under weight. The kit includes special mounting feet, as well as reinforcement parts that ensure the strength and reliability of future installation. For example, cast iron pallets are the cheapest among other types of products. The peculiarity of such pallets is their durability and reliability, which is indicated by the material used.
Aspects of pallet installation
The cost of a shower cabin depends on the variety of functionality of the product. For example, a shower with hydromassage, telephone, lighting and other effects will have a high cost. It is important to take into account the payment to workers for installation of the entire structure. The easiest way to install acrylic or steel products with your own hands.
During the installation process with your own hands, it is important to remember to level the surface under the shower so that the legs are in a vertical position. The technology for assembling the structure can be seen in the instructions for the product. They indicate the features of installing a product made of plastic or metal, and also describe tips for connecting the sewer system to the shower stall. Pallets can be installed on plastic support elements, which can be replaced with bricks.
Important to know! To insulate the shower tray, as well as to seal all voids, it is necessary to use polyurethane foam in the work. However, this method can complicate dismantling or repair work. To check correct installation shower trays, you need to stand in it with extreme caution, after which you will determine the stability and reliability of the structure.

Installation of an acrylic pallet with your own hands: features of the work
The main disadvantage acrylic products highlight the lack of support under the central part of the pallet. Thus, the surface may be damaged by careless movement. This will cause damage to the installation and damage to the human body due to splinters.
Therefore, when installing an acrylic tray, it is important to follow the sequence.
Preparatory work
During renovation work in the bathroom, special attention is paid to connecting the sewerage system and water supply. The shower stall must be connected to several systems, which include water supply and drainage, as well as electrical wiring. At the same time, the last part must have high resistance to dampness and water.
To install a shower tray for showers, you need to purchase high-quality pipes and other products to avoid leaks in the future. After installing all communication systems for the bathroom, it is important to check everything carefully, especially the water supply and operation sewer drain. All pipe openings are closed with temporary plugs at the time of installation work.
Installation process
During installation, it is important to align all pallets strictly vertically. This is due to the need for proper drainage into the sewer, only if the product is installed perfectly evenly in a horizontal position. This will prevent the formation of puddles in the shower stall. To install the tray, it is important to make a flat base of tiles or ceramics.
To properly mount the pallet, you need to secure the central part of the product, while the horizontality of the structure should not be compromised. To simplify the work, draw a contour around the entire perimeter of the pallet to establish the exact position of the product. After this, you can begin connecting sewer pipes and other elements.
Strengthening the shower tray
To ensure the installation strength of shower trays, it is necessary to measure the distance between the product and the floor. At first, it is important to leave space for the drain so that it can be cleaned or replaced later. sewer pipes. Additional support parts can be bricks or steel pipes, which depends on the design parameters.
Rubber is placed on top of the pipes or bricks, after which the supports must be pushed tightly under the base of the acrylic pallet. After this, you can connect the communication systems.

Detailed instructions for installing shower trays
Before you start installation work need to prepare necessary tool. For installation you will need the following materials:
- FUM tape;
- sealant or special glue;
- twin to the sewer network;
- If the kit does not include a siphon, then you need to buy it at any plumbing store.
1. The tray with legs must be leveled horizontally. To do this, the legs are separately unscrewed and fixed in special locking screws. If you purchased a booth without supports, then you need to fill the floor with cement mortar. The level of the base should correspond to the position of the floor in the bathroom. After this, installation work begins and finishing is done using ceramic tiles or other products.
2. It is important to fix the pallet from the wall using adhesives. Joints and fastening points must be additionally sealed with sealant. All work must be carried out carefully to avoid further flow of water between the wall and the structure. On sewer system attach a double; if there are other types of connections, install a tee.
3. All parts and joints of the pallet must be carefully sealed to avoid water leakage and destruction of the pallet.
4. It is important to install the pan above the level of the sewer pipes. This is necessary for further access to communication items for their repair or dismantling in case of breakdown or damage.
5. Finally, you need to check all attachment points. They also check the water supply and drainage. If there is a leak in some areas, it is important to tighten all connections more thoroughly. If necessary, additional insulation is carried out.
Features of installation of other types of pallets
Cheap cabin tray can be installed in different ways, for example, on a brick base, on plastic supports or metal frame. The technology for carrying out the work depends on the characteristics of the product and the materials from which it is made.
For a ceramic tray there is no need to install supports or other racks, because the structure is mounted directly on a flat floor. Mounting clearance in in this case will not happen, therefore it is important to install all communication systems efficiently and professionally. To carry out repair work or replace sewer parts, you will need to dismantle the pan. Answering the question: how to install a shower tray without legs made of ceramics, you need to attach the product using glue or a cement mixture for tiles. Lastly, install the drain hole.
To install steel or cast iron products, you need to use more reliable support elements, which are bricks. Initially, the boundaries for installing the pallet are set on the floor. After this, a cement mortar is prepared and brickwork is made. The height of the masonry must correspond to the parameters of the pallet and have the same shape. The pallet must not be in contact with the floor in order to be able to install the communication system.
Three days later, after the cement mortar has dried, you need to install a pallet. A layer of cement must be applied on top of the masonry, then the product must be applied and leveled in a horizontal position. A hose must be attached to the drain system. As facing materials tiles are used, decorative panels, mosaic and other finishing options. This is necessary to complete the installed structure.
Unlike installing a low shower tray, other products require a metal or plastic frame, making the DIY installation process simple. The work process consists of aligning the legs, installing the tray and fixing the drain hole.
At the end of installation, it is necessary to check the stability of the structure. If the pallet wobbles or is held together, then additional supporting elements need to be made such as brickwork or attaching steel pipes.

The process of making a pallet with your own hands
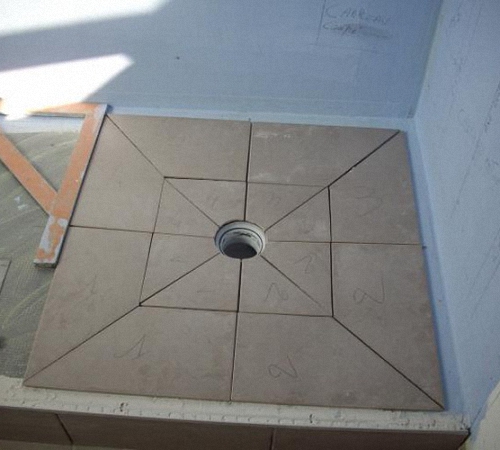
It is quite possible to install a pan with your own hands without buying similar products in plumbing stores. The main thing is to adhere to the rules and detailed instructions performance of work. The shape of the base for the shower cabin can be different, you can also use different materials for finishing, creating own design designs. The work process has the following sequence:
1. First, we designate the location of the drain and installation of the drainage system. We cover the surface of the base under the shower tray with a waterproofing layer, and the height of the wall covering should be 30 cm.
2. A brick barrier is installed along the perimeter of the structure, the height of which should be more than 5 cm above the position of the drain hole. Next, the screed is poured, which should be 6 cm below the drain point.
3. After the screed has hardened and brickwork, the barrier is covered with a layer of insulation. Filling of adhesives or cement mortar is carried out with a slight slope towards the drainage system. The technology for applying the mixture starts from the edge and moves towards the center. It is important that there are no steep angles of inclination, as this creates significant and sloppy transitions.
4. At the end of the work, the surface is finished different materials, for example, ceramic tiles, mosaics and other products at the discretion of the owners.

Features of installing sides for a shower tray
After determining the specifics of installing the shower tray, a video of which is presented at the end of the article, you can begin building the sides. If the tray has a large height, then it is necessary to build one or more steps for the shower stall. The masonry can be made of bricks with the installation of formwork, however, the type of material used does not matter, because the surface will be covered with tiles.
After laying the steps and removing the formwork, it is important to cover the surface of the sides with a primer and a layer of waterproofing. After this, the treated and correctly erected structure can be covered finishing materials. It is important that the shade and type of finish matches the appearance of the shower stall and the style of the bathroom. It is important to tile the walls behind the pallet if they are not treated with waterproof materials. As an adhesive for tiles, you need to choose waterproof products without the addition of silicone, as it darkens over time and spoils the appearance of the shower stall.

To equip a shower stall in an apartment, it is better to seek help from specialists. This will allow you to correctly distribute the load on the base, as well as lay all communication systems. It is easier to install such a structure in a private house or in a country house, where there is no danger of flooding the lower floors of the house. During the work process, it is important to fasten all parts and elements firmly and securely in order to extend the life of the shower tray.
Are you planning to purchase an expensive shower cabin for your dacha? Take your time - there may always be a cheaper option! The low cost of a product does not mean it is bad quality, one can say more - almost always it is just a simplified and minimized design. In this article, together with the website, we will study a steel shower tray, which will help you build a primitive, but quite nice shower stall.
Rectangular shower tray
Steel shower tray: advantages and disadvantages
It is generally accepted that steel enameled shower trays have no advantages and that the most attractive thing about them is the price. But this is not true, except for the low cost, of this type There are other plumbing fixtures positive qualities, which for some reason everyone is trying to forget. Yes, they have a less attractive appearance than similar acrylic products, the enamel on them can peel off due to careless handling, they are a little colder than all their other brothers, but, you see, it would not be very correct to focus on the shortcomings alone. Especially considering that they are fixable.
In addition to low cost, metal shower trays have the following positive aspects.
- Durability that no acrylic can match. If you are a massive person, then a steel pallet can carry your weight without additional supports.
- Very easy installation, which any person can master if desired - there are no subtleties or nuances here that can affect the service life of this product.
- Versatility. Such a tray can be used as a separate plumbing fixture or in conjunction with. And what’s most interesting is that choosing a factory sliding tray for such a pallet will not be difficult.
And the shortcomings mentioned above, by and large, are not shortcomings at all - only the appearance cannot be corrected. But even here, if you think carefully, you can come up with something - products of this type, as a rule, are built either into the floor or into a pedestal made specifically for it. In general, the appearance of such a shower tray depends entirely on the quality of the cladding surrounding it.
Metal pallet: types and their differences
Another thing that puts most people off from an enamel shower tray is the limited variety of shapes and design solutions. The product is simple, has no frills and is designed to fulfill its only purpose - to collect water and drain it into the system. In general, the conversation about the types of metal pallets will be short - metal pallets can be classified according to two criteria.

A visual guide to installing a shower tray can be seen in the following video.
Rectangular steel shower tray: installation technology
As mentioned above, one of the advantages of steel shower trays is its simple installation, which will be discussed further. To make the information easier to understand, we will present it in detail and point by point.
- Creating a seat for steel pallet. Installing a steel shower tray, unlike an acrylic one, requires the preparation of a special seat, which serves both as a support for the tray and as a place that hides all the communications leading to it. A rectangular pedestal of small height, the dimensions of which is slightly larger, can serve as a seat. smaller sizes the pallet itself or, if drainage communications allow, then simply a recess in the floor. As a rule, in our houses and apartments the drain pipe goes above the floor, so only a pedestal is needed. Laying it out, even without experience and relevant skills, is quite simple - it is usually made of brick. Four walls of small height are erected from this material, on which, after the mortar has dried, a metal pallet is laid.

Installing a steel shower tray
- Preparing the pallet for installation. Everything here is elementary simple - under preparatory work implied . Do everything according to the diagram supplied by the manufacturer, do not forget to check the correct installation of the sealing gaskets and everything will work out!
- The next step is to install a metal shower tray. First you need to take care of correct connection to the sewerage system - a flexible corrugated hose is usually used for these purposes. An intermediary between him and the bell sewer pipe is a rubber sealing lip. After connecting the siphon to the sewer, hurry to strengthen the pan on seat It’s not worth it - first you need to check everything carefully and make sure there are no leaks. Only after this will it be possible to begin the final installation of the pallet.
- You can secure a metal pallet in a recess or on a parapet using various adhesive compositions, but in most cases it is used either silicone-based or polyurethane foam. Here you need to look at the location - the most common way of attaching this plumbing fixture is to simply wedge it between the base and the tile. This method is only suitable if the installation of the pallet is carried out at the stage of renovation of the premises even before. If the tiles have already been laid, then the most optimal solution The issue of attaching a metal pallet will be gluing it to the base or using foam.

Steel shower tray
Basically, that's all. After the mounting foam or sealant has hardened, all that remains is to tidy up the parapet itself (if there is one, of course). Typically, the supporting brick is covered with tiles that match the walls of the room. When the finishing is completed, all that remains is to take care of the curtain, and the simple one will be ready.
As you can see, a steel shower tray is not a difficult device to install - everything is simply simple and understandable. And the disadvantage appearance, which is usually attributed to him, rather depends on the inept hands of the craftsman who lays out the pedestal and tiles it.


