A wooden floor will require significant effort during the preparation phase.
How to lay tiles on a wooden floor yourself: difficulties and features of the process
Generally speaking, ceramics are far from best option for combination with wood. This is due to different characteristics these two materials:
- Wood tends to change its size as a result of the influence of external factors: when humidity increases, the tree expands; when humidity decreases, on the contrary, it can dry out. In many cases this leads to deformation tiled covering and the appearance of cracks;
- Unlike tiles, wood is highly susceptible to various kinds of destructive processes and has a much shorter service life than ceramics. Therefore, you can often encounter a situation where, due to the destruction of the wooden substrate, you have to dismantle the tiles;
- The tile coating, together with the water-repellent glue, blocks access to the wood of oxygen, which is necessary for the full service of the tree. As a result, a significant reduction in the service life of the base;
- Only the lightest tiles can be used for laying on top. Otherwise, its weight will be too great for wooden base and over time the tile will fail.
So, is it possible to lay tiles on a wooden floor? Can. But this is a rather complicated process. If you're still confident in your decision to install ceramic tiles over wood floors, be prepared to put a lot of effort into it. But the result is worth it, so let's move on to preparing the base. Let's look at how to lay tiles on a wooden floor step by step.
Useful advice! It is strictly not recommended to lay tiles on top of a wooden floor that has not been installed for at least two years. This risks causing the tiles to crack during shrinkage.

Basic requirements for data processing construction work, look like this:
- provide oxygen access to the lower layers of the coating (wood);
- distribute permissible loads evenly over the entire surface;
- ensure the stability of the base.
In order for all these points to be met, it is necessary to plan the order of work and follow the plan. It would also be a good idea to watch various videos on how to lay tiles on a wooden floor.
Assessing the condition of the coating: is it possible to lay tiles on a wooden floor?
The first stage involves a thorough inspection and assessment of the condition of the wooden base. To do this, it is best to remove the top boards and carefully inspect all structural elements: beams, joists, each board on both sides, insulation, etc.

If there are any signs of damage, the base section must be replaced or repaired. What you should pay special attention to:
- presence of rot. There are many types of rot, so you need to carefully inspect the surface. Regardless of the type of fungi that generate this process, the wood softens, changing its color or structure. Checking for the presence of rotting elements is carried out as follows: you must insert an awl into any fragment that makes you suspicious. Easy entry is a reliable indicator of destructive processes in wood. All affected elements must be eliminated, and adjacent parts must be treated with special antiseptics for wood;
- wood-boring beetle larvae. These insects destroy wood, gnawing many passages in it. To solve the problem, the same approach is used as in the first case - replacing the damaged area and carefully treating it with a special compound.
Most of the processes destructive to wood develop as a result of high humidity. Therefore, installing tiles on a wooden floor in a bathroom requires special attention. In dry rooms, the development of fungi can occur as a result of a violation of the integrity of the heat-insulating layer. Considering these factors, it is worth carefully checking the waterproofing materials for damage. You may need to lay down an additional layer.

Useful advice! Fungal spores are present in almost any wood. The only way prevent them from ruining the floor - carry out high-quality processing antiseptics and create the most unsuitable living conditions for them.
If none of the above defects were found on your floor or you have already eliminated all existing defects, then you can lay tiles on a wooden floor.
How to lay tiles on plywood: preparatory stages of work
Before you begin preparing to lay ceramic tiles on a wooden floor, you must make sure that the distance between the joists does not exceed 50 cm. Otherwise, it is necessary to install additional supports, since otherwise the structure may not withstand the weight of the coating and fail. As useful source For information, you can use the videos presented on the Internet: how to lay tiles on a wooden floor is discussed in sufficient detail.
Useful advice! Don’t forget to treat all new ones with antiseptic agents. wooden elements.

Next, you need to check how even the logs are, for which a building level is used. As a rule, during the shrinkage process, irregularities appear due to uneven subsidence of wooden parts. All these defects must be eliminated by cutting off excess elements with a plane or, conversely, by additionally lining small pieces of bricks or any other material. If it is not possible to push the missing element under the bottom, you can stuff an additional board on top, trimming it to the required height.
After leveling, it is necessary to treat the coating against fungus and bacteria. To do this, use the product with the longest break between repeated treatments and follow all recommendations specified in the instructions.
The most common surface treatment before laying ceramic tiles on a wooden floor is hot drying oil. For high-quality protection, it must be reapplied several times (up to five). The product is a completely natural, environmentally friendly impregnation. Each subsequent layer of drying oil is applied after the previous one has completely dried. You can make sure it is dry by touching the surface - it should not be sticky.

The main thing in the process of treating with drying oil is not to let it cool down, because its antiseptic effect directly depends on the temperature: the hotter it is, the better it destroys larvae, spores and bacteria. In addition, when hot, drying oil is more liquid and can penetrate deeper into microcracks.
Useful advice! Heating drying oil is an unsafe process. Its vapors can be flammable, so placing the container on the stove is strictly prohibited. When heating the septic tank, keep it over the stove and, just in case, prepare a piece of tarpaulin that can be used to extinguish the source of fire.
How to lay tiles on a wooden floor: necessary cleaning of the boards
If all previously removed boards are in satisfactory condition, they can be reinstalled, after first cleaning them of the old varnish or paint with which they were covered. This can be done while you wait for the antiseptic solution to dry completely.

To remove varnish and paint residues from the surface of the boards, you can use the following methods:
- construction hair dryer, set to a temperature of 200-250 °C. A stream of hot air must be directed at the paint, as a result of which it will begin to swell with bubbles. To remove it, use a spatula, knife or scraper. Some sources recommend using blowtorches, but this is not a good idea. There is a high probability of overheating of wood, and, as a result, deterioration of its technical characteristics;
- chemical removers are a gel-like mass and are sold in almost all hardware stores. This remover must be applied evenly to the surface and after a while removed with a spatula along with the softened paint. The only drawback of this method is the considerable cost of the material if we are talking about processing a large floor area;
- mechanical cleaning involves peeling paint from the surface with a spatula or sandpaper without using auxiliary materials. It's cheap, but it takes a lot of time. A sanding machine will help speed up the process significantly.
If, after removing the coating, you find any defects that were not noticed before, it is better to replace the damaged areas. In addition, all boards are subject to antibacterial treatment. After the impregnation is completely absorbed, you can begin laying the subfloor under the tiles.
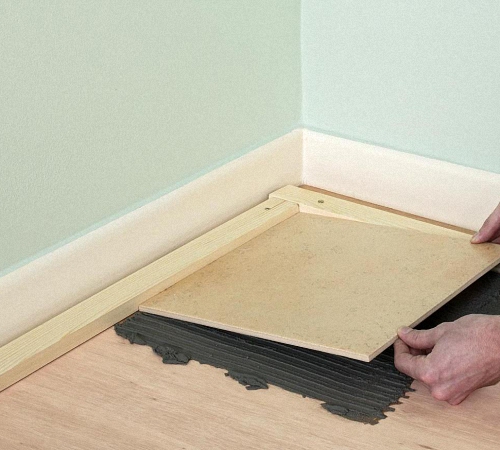
How to Lay Ceramic Tile on a Wood Floor: Laying a Subfloor
The process of laying a subfloor begins with laying an insulating layer. The material you choose should be non-hygroscopic. This will keep the area underneath the tiles dry and prevent bacteria and fungi from growing there. Also, the material must have a minimum weight in order to create as little load as possible.
Extruded propylene foam can be considered a suitable option. Due to its synthetic origin, it prevents the development of any living organisms on its surface. True, this material also has disadvantages: it does not allow air to pass through well and is quite expensive.
As an alternative, expanded clay can be used. It is natural and conducts air well. However, it has more weight and a more hygroscopic structure.
Whatever insulation you prefer, it must be laid out on top of the layer
Mineral wool was used as insulation for the flooring.
If you want a heated floor under tiles on a wooden floor, then in this case it is better to seek help from professionals. Installation of the system is quite complex and requires a certain level of skill.
When all the boards are laid and secured, they can be puttied and then leveled using grinder. All cracks must be sealed with foam. It is flexible enough to allow the wood to expand, but can also support the weight of the tiles and adhesive.
The ardor of those who want to cover a wooden floor with ceramic tiles is usually cooled by the “ice shower” of incompatibility between the base and cladding materials. Wood tends to expand and contract, changing size due to the instability of the humidity and temperature background. Floor ceramics that are too sensitive to linear movements will be rendered unusable by the zealous movement of lumber. Cracks, chips will appear, seams will crumble, elements will become detached from the base if the independent contractor does not learn how to carry out the work correctly. The listed troubles will not threaten craftsmen who have studied the secrets and rules of ceramic flooring.
Why it is undesirable to combine ceramics and wood
Covering wood floors with ceramic coating is rightfully considered not a very smart idea, because:
- There is no particular point in covering “warm” wood with “cold” tiles;
- under moisture-repellent floor ceramics, mounted on tile adhesive, the wood hardly breathes, which is why it begins to rot and collapse;
- the service life of building ceramics significantly exceeds the service life of timber and rough boards;
- durable, low-abrasion ceramics easily chip with linear expansion of adjacent elements;
- a wooden floor does not have the static quality required for laying ceramic products.
Wood may be inferior to tiles in terms of aesthetic parameters, but this is not a very convincing argument. After all, tiles are mainly used not because of the beauty of the design, but because of its sanitary and hygienic advantages. Its use as a protection for wooden floors from moisture is a controversial issue, although it may be the reason for ceramic flooring in wooden bath, in the shower room, in the kitchen or in the combined bathroom. In general, where constant wet cleaning is needed.
Let's assume there is a reason, there is material and a desire to lay a ceramic coating on a wooden base. It remains to find out how and in what ways this can be done, and choose a rational technology.
Laying floor tiles in a new home should be completely avoided, just like installing floors with new wooden floors in any other building. It is necessary to wait until the end of intensive shrinkage. This is 2-3 years at least.
How to lay ceramic tiles on a wood floor
A wood floor is a multi-layer sandwich created partially or entirely from lumber. Listing all the variations on its theme would be unnecessarily lengthy; we will consider only the most common types. To carry out work on arranging a wooden floor, home craftsmen mainly get:
- only the logs remaining after dismantling the worn out floorboards and damaged substrate;
- flooring made of moisture-resistant plywood, OSB or chipboard sheets, of course, with joists underneath;
- The plank floor is in good condition, i.e. not new (!), but slightly worn construction with floor covering.
The number of repair operations, and not the choice of arrangement scheme, depends on the condition of the “inherited” floor. Because the process of attaching ceramic components to any type of surface is carried out according to a standard algorithm; all the differences lie in preparation.
In any case, you will need to create a flat, strong and relatively static base suitable for laying ceramics. Let's look at how.

A wooden floor must be prepared for laying tiles. In the next article we will tell you several ways: .
First method: dry leveling
The most common and technologically sound method of leveling floors. At the same time, a relatively stable sublayer of moisture-resistant plywood or similar is formed sheet material, suitable for laying flooring. There is a lot to implement dry leveling various methods, such as:
- ready-made sets of adjustable floors with screw plastic supports, thanks to which you can install logs or immediately plywood sheets in a matter of hours;
- independent construction of a system of logs or point supports on top of a “strong” boardwalk with subsequent laying of sheet material;
- laying a duplicate layer of plywood on the existing plywood base;
- fastening plywood, gypsum board, OSB cut into quarters with self-tapping screws directly to the leveled floorboards.
It is clear that the final touch of dry preparation will be particle board, plywood or an analogue, thanks to which it can be applied to a wooden floor.
Sheet products of veneer pressing or wood waste cannot be considered absolutely immune to linear movements. True, they do not show the same agility as wood. However, to attach tiles over leveling sheets, you must purchase a two-component polyurethane adhesive composition, characterized by elasticity, and not ordinary tile adhesive.

Before attaching the ceramic elements, the created plywood covering sand along the seams. Then the joints between the elements are filled with sealant or glue purchased for the upcoming work, and the surface is treated with a primer impregnation compatible with it.
The advantages of dry methods of creating a substrate:
- the ability to improve insulating qualities by: polystyrene foam, mineral wool, filling expanded clay between the joists;
- minimal load on wooden floors that do not have reinforced concrete strength;
- speed of execution, absence of technological interruptions that significantly “delay” repairs.
There are some disadvantages. Dry leveling will definitely “eat up” part of the ceiling height. There will be a difference between the finished and unfinished part of the floor, which will have to be decorated as a step or small threshold.

Please note that according to building regulations floor in hygienic premises it is necessary to lower it by at least a couple of cm so that in case of emergency or accidental leaks, water does not flood the floors in adjacent rooms. So, if after dry leveling, to which the thickness of the ceramic coating should be added, the surface will rise significantly above the surrounding floor, the use of dry technology is undesirable.
Video: adjustable floor system
Method two: “wet” screed
Or a lightweight version of the traditional type of alignment. Filling the screed in an easy-to-use form is required because bearing capacity Wood floors are not enough to create a full leveling layer. There is also a specific feature: the screed on wooden floors must be cut off both from the underlying base and from the walls. Those. it should be arranged like a floating floor with a deformation gap around the perimeter and around the communications crossing the ceiling.
Thanks to the use of a floating scheme, wooden floor elements will be able to move as much as they please, and ceramics with monolithic preparation will lie motionless.

The standard thickness of the screed poured onto a wooden floor is considered to be 3 cm. It is not advisable to increase the power, because at the same time the weight will increase. It’s also not worth shortening, otherwise it will be quite reliable. Minor deviations in both directions are allowed.
The process of pouring screed on a wooden floor step by step:
- We disassemble the floor down to the timber for detailed diagnostics. All wooden components of the floor that raise the slightest doubt about reliability are dismantled and replaced with analogues. If the step between the logs is more than 50 cm, we strengthen the system by installing additional timber. There should be a gap of 1 cm between the ends of the joists and the walls of the building. All floor parts must be processed antiseptic impregnations before reassembly.
- We are constructing a flooring for future pouring. Old boards 4 cm thick will do if they are suitable for further use. The tongue and groove material does not need to be bonded. Approximately 1 cm should be left between the boards for ventilation. We do the same with unedged board in case of replacing worn floorboards. If the boards are laid tightly, then the flooring will have to be drilled ventilation holes.
- We attach quartered moisture-resistant plywood to the boards across their direction thickness of at least 12 mm or other boards made from pressed wood waste. The elements are arranged according to the principle of bricklaying, fastened with galvanized screws every 20 cm. There should be no cross-shaped joints. Gaps of approximately 3 mm must be left between the sheets.
- We cover the constructed flooring with waterproofing. It is better to use bitumen or paraffin paper, parchment or glassine. Thick polyethylene is not prohibited. To form a monolithic insulating carpet roll materials lay with overlaps and secure with tape. Along the perimeter you need to create something like sides with a min. 10 cm approach to the walls. For convenience, we also attach them to the walls with pieces of tape.
- We lay damper tape along the walls, 0.8-1.0 cm thick, 10 cm wide, we put sleeves on the pipes.
- Fill the screed with the factory leveling mixture or homemade leveling compound. To prepare it you will need 2 parts of sifted and washed coarse sand, liquid glass in the same quantity. Close homemade mixture you need one part of water without biogenic and man-made pollutants.
As soon as the poured layer has hardened, the tiles can be laid on the wooden floor with a preparation created on top of it, independent of the ceiling.

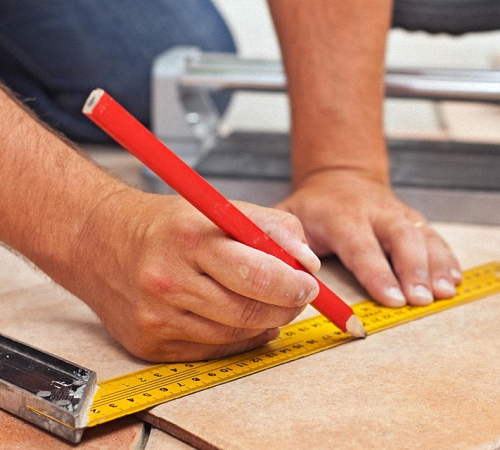
When carrying out tiling work on any premises using tiles, it is necessary to lay not only whole tiles, but also parts of them. This raises the question of how to cut the tiles so that the edges are smooth. We will tell you about the special tools with which you can do this in the material: .
Method three: express option
Consists of attaching to plank floor sheets of moisture-resistant drywall using two-component polyurethane glue, the elastic structure of which is not disturbed by wood movements.
First, the master needs to carry out an inspection of the structure and repairs, if necessary. In order to increase the rigidity of the floor, gypsum fiber board can be laid in two layers so that the seams of the top row do not coincide with the seams of the bottom.
It is constructed by analogy with previous schemes using the type of floating floor, according to which a technological gap should be left around the perimeter of the room. The joints are filled with sealant, then the entire area is primed with a universal primer.


It is recommended to fill the expansion joint left around the perimeter after laying the floor covering and trimming off excess insulation with sealant and cover it with a plinth on top. This is necessary so that when performing wet cleaning, water does not leak out, accumulate there and spoil the building materials.
Expert opinion
Victor Kaploukhiy
Thanks to my varied hobbies, I write on different topics, but my favorite ones are machinery, technology and construction.
The best way to lay ceramic tiles on a wooden floor is considered to be a two-layer construction made of gypsum fiber boards, which are installed with overlapping seams and mounted to the base using wood screws. In this case, you should pay attention to some important points:
- The subfloor must be waterproofed. To protect against moisture in in this case Bituminous waterproofing is best. Unlike various polymer films, the water-repellent composition of this type is applied in liquid form and penetrates into the upper layers of wood. Thanks to this processing method, it is possible not only to protect the wooden base from various types of leaks, but also to prevent the appearance of fungi.
- If glue in the form of a dry mixture is used to lay tiles, then the gypsum fiber sheets must be impregnated with deep penetration soil (for example, Primer No. 6 from Artisan). Since cement-containing adhesives are diluted to the desired consistency with water, we have one negative factor: by introducing itself into the structure of the gypsum fiber board, moisture changes the linear characteristics of the gypsum fiber board - due to the swelling of the material, its dimensions increase, and after evaporation of the liquid they decrease. These movements can lead to cracking of the tile joints, and in some cases, damage to the ceramic tiles. A thin layer of primer will serve as a barrier that will prevent moisture from being absorbed into the gypsum plasterboard. If you decide to use a ready-made two-component epoxy-polyurethane composition, then no additional processing is required.
- Improve technical specifications Even the most inexpensive tile adhesive can be made using a latex additive, for example, the Latexcol brand from the manufacturer Litokol. The plasticizer is suitable for any cement-based compositions and increases their elasticity, strength and water resistance.
Many questions from our readers concern the installation of heated floors. If you need to mount it on top of a wooden one and cover it with ceramic tiles on top, proceed as follows. GVL is protected with a waterproof film, on top of which it is laid construction mesh with a cell 100×100 mm. Underfloor heating pipes are attached to the latter, a wet screed of at least 3 cm thick is made and ceramic tiles are laid. During installation electrical system warm floor type from concrete screed you can refuse - in this case the cable is embedded in the layer of tile adhesive. As for the requirement that the floor in sanitary and hygienic premises should be lower than the level of other rooms, in our time it can be considered irrelevant. By using a leak warning system that automatically shuts off the water supply when sensors placed on the floor get wet, you can reduce the risk of flooding to a minimum.
The above three preparation methods are just a hint that requires improvement taking into account the technical specifics of the object. There are many more variations on the theme of constructing a kind of stationary “tray” over a freely moving wooden base. It is important to take into account the principle: the rigid substrate should not destroy the floor and, conversely, the subfloor should not destroy the screed with the tiles attached to it.
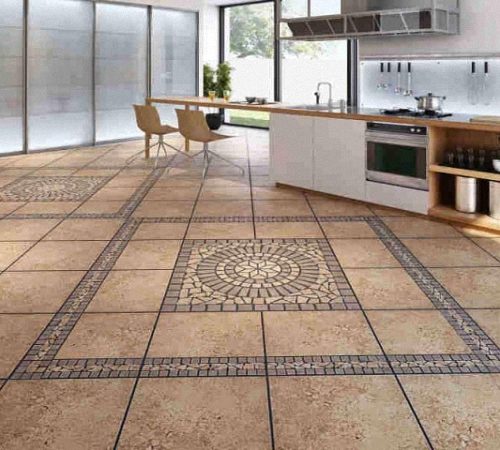
Ceramic tile flooring – practical option For wet areas. This is explained by its high performance characteristics - aesthetics, durability, resistance to moisture, rotting and deformation.
Homeowners often have doubts about whether they can install tiles over wood floors. Of course, it is possible, but with strict adherence to the installation technology of the facing material.
Is it possible to lay tiles on a wooden floor?
Ceramic tiles and wood are practically incompatible materials, since wood, like any material of organic origin, dries out and becomes deformed over time. It can also swell and crack, even if it is well secured.
If you put a layer of tile adhesive, or make a cement screed directly on the floorboard, then the movement of the wood will certainly lead to peeling of the tiles, cracks in the screed and, consequently, loss of money and time for the next floor repair.
The main task is to create a shock-absorbing layer between the wooden floor surface and the tiles that will compensate for the micro-movements of the base without transferring them to the layer of tile adhesive.
The demand and popularity of ceramic tiles allows them to be widely used for cladding old wooden floors. Laying ceramics is allowed on following types grounds:
- frame,
- log,
- lumber,
- panel
Laying tiles on a wooden floor requires taking into account the specifics of the surface, its high-quality preparation and compliance with installation technology.
Based on the results of the preliminary inspection of the wooden base, the following activities are carried out:
- The surface is in good operating condition without damage - floor preparation and tile laying are in progress.
- The surface is damaged or deformed - installation is impossible. To begin with, a complete or partial restoration is carried out with the replacement of damaged areas.
A damper layer is installed between the tile and the base to absorb possible movement of the floor. It also provides additional protection for the floor from increased moisture and prevents premature aging of the wood.
Difficulties in installing floor coverings
Neglecting the basic rules for preparing the base and laying floor ceramics can lead to:
- To deformation, cracking and damage to the cladding as a result of wood movement.
- To damage by rot and mold in rooms with high humidity.
In the process of installing tiles, novice craftsmen may encounter some difficulties:
- Insufficient rigidity of the base due to the mobility of wood for fixing floor ceramics.
- Insufficient oxygen access to the lower part of the floor structure.
- Uneven distribution of maximum loads over the entire surface area.
Installation of floor tiles in wooden house after completion of construction, as well as the installation of floors with wooden floors, is not produced. Work is possible only after complete shrinkage of the structure after 3-4 years. If the house is built of brick, reinforced concrete or cinder block, then flooring can be done at any time.
Features of laying tiles in the bathroom and kitchen
Ceramic tiles are often used to protect wooden surfaces in rooms and buildings with high humidity - hallway, shower room, kitchen, corridor, bathroom, bathhouse and swimming pool.
The main difference is that in the bathroom, kitchen and other functional areas the air is oversaturated with moisture and steam. This requires additional waterproofing of the surface. For these purposes, PVC film or bitumen-based roofing felt is used.
An excellent alternative is moisture-resistant plasterboard and cement-bonded particle boards up to 2 cm thick. Waterproofing materials are mounted on pre-installed bitumen roofing felt and secured with self-tapping screws.
Important! The gaps between the waterproofing material and the walls are carefully filled with polyurethane foam. This will provide additional strength to the base.
The prepared surface is primed, after which the tiles are laid.
Preparing the wooden base
Before performing facing work, it is necessary to properly prepare the wooden surface. The construction of a multi-layer floor pie will ensure solidity and ventilation of the base, reducing the load on the wood.
First, the wooden floor structure is dismantled. Deformed and damaged elements are replaced with new ones. If necessary, the lag laying step is reduced and the surface is leveled. Additionally, the structure is treated with antiseptic compounds.
Instructions for preliminary preparation wooden floor involves the following steps:
Stage 1. Dismantling the base and preliminary cleaning of the paintwork. Surface cleaning is carried out in three ways:
- Chemical. Treating wooden floors with chemicals that help dissolve varnishes and paints.
- Teplov. Heating the base using a hair dryer and dismantling the coating with a metal spatula.
- Mechanical. Removing the coating using a power tool - an angle grinder with an attachment, a grinder or medium-grain paper.
Stage 2. Checking the condition of individual floor structural elements - joists and beams, replacing them with new parts and leveling the surface.
Stage 3. Antiseptic surface treatment. Wood is susceptible to high moisture and temperature changes, and therefore requires maximum protection from rot, deformation and mold. Treatment is carried out in accordance with the manufacturer's instructions, observing the interval and intensity of application.
Stage 4. Arrangement of a thermal insulation layer. For insulation, fine expanded clay is used to fill the free space between the joists in the floor. To maintain natural ventilation a 6 cm technological gap is provided between the lower part of the log and the insulation.
Stage 5. Installation of subfloor. For these purposes, a clean and level board is used, which is fixed to the base using galvanized screws. The surface is leveled with a thin layer of putty. The distance from the wall to the floorboard is filled with foam.
Instead of a floorboard, 12 mm plywood or chipboard sheets can be used after pre-treatment with antiseptics.
Waterproofing layer under tiles
Careful waterproofing of the surface will ensure a long service life of the floor cladding. For these purposes, a practical, wear-resistant and reliable material is used that is resistant to moisture penetration and condensation.
The surface is treated with heated drying oil or latex-based impregnation, on top of which a special layer is laid overlapping damper tape. It provides the necessary shock absorption and compensation for movements of the wooden base.
Double-sided shock-absorbing tape is installed with the elastic side facing the wood and the durable side facing the tiles. Additional benefit The use of a damper layer is to maintain natural ventilation and prevent moisture penetration.
Methods for leveling the floor surface
To lay tiles on a prepared wooden floor, you need to create a reliable monolithic surface. This can be done in three ways:
- dry method,
- method of pouring cement-concrete screed,
- express way.
Dry leveling
A fairly popular method of obtaining a flat surface using moisture-resistant plasterboard, plywood and OSB boards. Such materials are characterized by increased strength and static properties, resistant to deformation and rotting.
Dry surface leveling is different:
- Promotion thermal insulation characteristics grounds.
- Simplicity and accessibility technological process laying insulation.
Among the disadvantages are:
- Significant rise in floor level, which is unacceptable for small premises with low ceilings.
- Visual difference between a smooth and untreated surface.
Dry leveling is carried out according to the following scheme:
- Installation of thermal insulation, processing protective compounds and fixing the painting mesh with an overlap.
- Filling with a leveling dry mixture of expanded clay chips, sand and other binding components. Uniform distribution of the mixture over the entire surface.
- Installation of the selected material - plywood or slabs - in a checkerboard pattern so that the joints between separate elements didn't match.
- Cleaning the surface and joints with a grinder and treating with a deep penetration primer mixture.
Wet screed
The method of leveling the surface is similar to creating a conventional screed for decorative finishing.
A floating screed is prepared from leveling polymer and cement-sand mixtures.
Its main advantage is the creation monolithic base, resistant to movement of the wooden structure. And the disadvantages include: an increase in the height of the floor cake, significant labor and financial costs.
Work on arranging a wet screed is carried out in the following order:
- Increasing the strength of the base. If the logs are located at intervals of 50 cm from each other, then it will be necessary to check and replace the deformed areas with reinforcement of the structure using bars.
- Installation of intermediate flooring from boards. For these purposes, solid floorboards up to 4 cm thick are used, which are fixed to logs while maintaining technological gaps of 1 cm.
- Installation of plywood or slabs up to 12 mm thick, similar to brickwork. Technological gaps between individual elements are 3 mm.
- Installation of a waterproofing layer of polyethylene film or oiled paper over the entire surface of the floor, secured with double-sided tape.
- Pouring a ready-made leveling mixture or cement-sand screed up to 10 mm high over the entire surface.
Express method of surface leveling
It is used to level surfaces that are in excellent operating condition or have minor visual defects. For work, moisture-resistant cardboard is used, which is fixed to the rough board using self-tapping screws or special polymer-based glue.
The main advantages of the method include simplicity and low cost of installation, and resistance to temperature changes in wood.
The process itself is performed as follows:
- Before installing drywall, the horizontalness of the floorboards is checked. Differences are eliminated using improvised means: wax paper, roofing felt or fiberboard.
- Drywall is mounted on the surface using brickwork in two layers. It is important to ensure that the joints between the rows do not match.
- A gap is provided around the perimeter of the base, and the seams between the individual elements are filled with sealant.
- The base is carefully treated with a primer mixture.
- The gap is filled with polyurethane foam, after which the baseboard is installed.
Laying ceramic tiles
The technology for installing tiles on a wooden surface is quite simple to master on your own. First you need to prepare working tools and materials:
- Ceramic tiles.
- Crosses for tiles.
- Tile adhesive.
- Construction mixer.
- A spatula with teeth.
- Rubber hammer.
- Tile cutter
- Level.
There are several options for installing tiles: rectangular and checkerboard, herringbone, diamond or pattern.
Important! First, the material is dry laid on the surface to be selected the best way installation
The main stages of laying tiles on a prepared base:
- Marking the perimeter and dividing the room into four zones diagonally.
- Prepare the adhesive mixture according to the manufacturer's instructions per 1 square area.
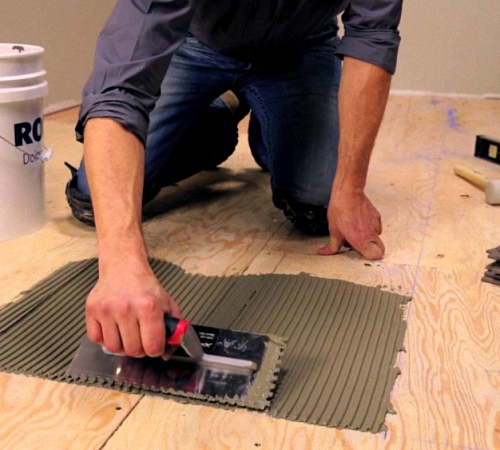
- Apply the mixture with a spatula and distribute it evenly on the surface for mounting two elements.
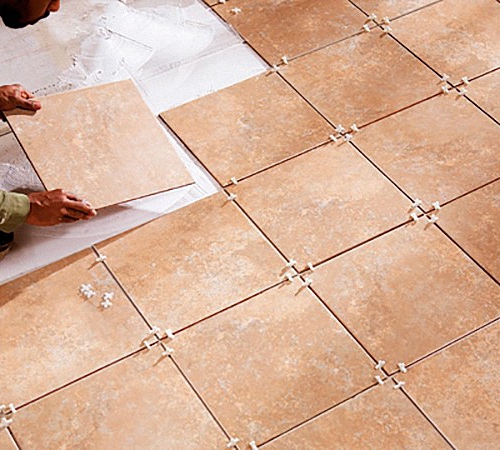
- Installing the tiles on the adhesive mixture with soft tapping with a hammer to ensure that each element shrinks tightly. Placing crosses in the seam space to adjust the seam width.
- Next, the material is laid to fill the entire floor surface.
- Checking the quality of masonry using a building level.
- After the adhesive mixture has completely dried, remove the crosses and grout the tile joints.
High-quality tiles laid on a wooden floor will provide a reliable and practical coating that will last for decades. The main thing in this matter is to follow the installation technology, and also take into account professional advice and recommendations.
Ceramic tiles - best option for finishing the floor. It is preferable to lay the tiles on a concrete base. However, if the floor in the room is made of wood, it can also be finished with tiles. Let's look at how to lay tiles on a wooden floor below.
Is it possible to lay tiles on a wooden floor: advantages and disadvantages
The only advantage of laying tiles on a wooden floor is that there is no need for additional leveling of the floor before starting installation work. That is, there is no need to install additional screed and level the flooring.
However, this process has many disadvantages. First of all, tiles are unstable to deformation processes on the floor; under their influence, they can crack. A tree, in turn, increases in size at high humidity and shrinks at low temperatures. These linear movements can negatively affect the general condition of the floor after laying the tiles.

In addition, we will highlight several more factors that indicate the inappropriateness of installing tiles on wooden flooring:
- wood has a warm structure, and the tiles are cold; it is unreasonable to lay cold ceramic tiles on a warm wooden floor;
- after laying tiles on wood, oxygen does not reach it and the material begins to rot and destroy;
- The service life of tiles and wood is not the same; wood will last less than tiles, thereby shortening its service life;
- in the process of exposure to linear movements on the tile, it begins to crack;
- a wooden floor does not have the static quality that is so necessary during the installation of tiles.
Installing tiles on a wooden base in a room is often necessary if there is high humidity and the need to constantly wash the floor. This is true for such kitchens or bathrooms
The main rule for high-quality laying of tiles on a wooden floor is the creation of a durable and practically motionless flooring. Before starting work, you should evaluate the individual characteristics of the room and choose the most optimal technology gluing tiles. The quality of the resulting coating directly depends on the correct choice of this technology.
How to lay tiles on a wood floor
A wooden floor is a multi-layered sandwich made from lumber. There are several flooring options on which tiles can be laid:
- exclusively joist flooring on which the floor covering has been dismantled;
- covering the floor with plywood with moisture-resistant characteristics or chipboard sheets, with or without joists;
- wooden floor with virtually no defects;
- wooden flooring that needs repair.
The type and further steps for laying tiles depend on the condition of the floor on which the work is carried out. renovation work. Installation of tiles on a surface made of wood on each floor is carried out according to the same scheme, however, the procedure for preparatory work for all floor options differs.
As a result, after the preparatory work you should get a smooth and perfectly flat surface on which ceramic tiles can be laid.
If moisture-resistant plywood is laid on the floor on joists, then it is necessary to initially install a waterproofing layer on it, then a screed with additional reinforcement should be laid. After the screed has dried, the floor is covered with moisture-resistant glue and ceramic tiles are laid on it.
On boardwalk installed on joists, double waterproofing is initially installed. Next, you should install moisture-resistant plywood and a layer of polyurethane glue on the flooring. After this, tiles are laid on the floor.
These options described above are relevant for interfloor floors. If the floor is being installed on the first floor, the procedure changes somewhat.
After the foundation slabs, plank flooring is laid on the floor and two-layer waterproofing is mandatory. After this, it settles down cement screed, covered tile adhesive and directly with the tile itself.
It is possible to cover the floor with insulation, waterproofing, OSB, an additional board, and then glue and tiles.
How to lay floor tiles on a wood floor
When studying the question of what to put on a wooden floor under the tiles, you should be guided by individual characteristics premises where renovation work is being carried out.
The simplest and most technologically correct method of preparing a floor for laying tiles is leveling it. With its help, it is possible to form a stable rough coating, for the manufacture of which plywood with moisture-resistant characteristics or similar in composition is used finishing materials. In order to level the floor using the dry method, the following materials are used:
- there are ready-made sets of adjustable floors, which have screw or plastic supports that allow you to install the plywood sheet very quickly;
- manufacturing a joist system on a strong wooden flooring, followed by installation of plank materials on it;
- installing another plywood layer on top of the existing one;
- fixing the material in the form of OSB using self-tapping screws onto an already leveled flooring.
The dry preparation of the flooring for tiling is completed by installing chipboard, plywood or similar materials. These materials have minimal linear movement, therefore reducing the risk of tile deformation during use.

To fix the tiles on such a flooring, a two-component polyurethane-based adhesive is used, which has a certain elasticity.
Before fixing ceramic products, the plywood must be sanded along the seams. To seal the resulting joints, a sealant or glue is used, and a wood primer is used to treat the surface.
The advantages of using this method of preparing a wooden floor include:
- the possibility of increasing insulating properties by laying such thermal insulation materials like polystyrene foam, mineral wool or expanded clay;
- the presence of a minimum load on a wooden surface that does not have the strength of a reinforced concrete base;
- high speed of production of a perfectly smooth coating; there are no technological breaks, for example, for drying screed.
However, the disadvantage of dry leveling is the reduction in the height of the ceiling in the room, the presence of a difference between the wall and the floor, for the decoration of which a threshold or step should be installed.
Please note that the floor in a room with ceramic tiles should be several centimeters lower than the floors in adjacent rooms. Since when a room is flooded with water, it will not flow into other rooms. If the floor in a room with dry leveling is higher, we recommend abandoning this method.
How to properly lay tiles on a wooden floor
The second, simpler way to level a wooden floor for gluing tiles is the wet screed method. This filling method is relevant if wooden surface does not have the necessary hardness to hold the tiles.
Please note that the screed on a wooden floor is cut off both from the walls of the room and from the underlying layer. That is, it is in some way reminiscent of a floating floor, which is not affected by the thermal expansion of wood. In this case, it will be possible to achieve a perfectly flat flooring that is not affected by linear movements.
Initially, the wooden floor must be repaired and rotten or old boards replaced with new ones. It is also advisable to polish it. After this, the floor is poured using a polymer-based leveler. In this case, the coating is pre-treated using a primer. If it is necessary to level the floor by more than ten millimeters, a polymer-based mesh should be glued to the flooring.
The optimal screed thickness for a floor made of wood is three millimeters. Increasing this value is not desirable, as it increases the weight and pressure on the wooden flooring.

To install a screed on a wooden floor, follow these steps:
1. Remove the flooring down to the timber. If there are questionable and unreliable elements on the floor, replace them. If there is a pitch of more than 50 cm between the logs, care must be taken to strengthen the system by installing additional timber supports. Use antiseptic impregnations to treat all floor parts.
2. The next stage is assembling the flooring for pouring. For these purposes, you will need new or old boards, the thickness of which is about 4 cm. Please note that a gap of approximately 10 mm is left between the boards. It is necessary to ensure ventilation in the underground space. When the boards are laid tightly, ventilation holes are arranged in the flooring independently.
3. Next, moisture-resistant plywood is installed transversely to the boards, the thickness of which is at least 1.2 cm. It is possible to use other types of pressed boards. The arrangement of elements should resemble brickwork. To fix them, self-tapping screws about 200 mm long are used. Provide a gap of 30 mm between the sheets.
4. Further actions are related to the installation of waterproofing on the floor. For these purposes, waterproofing based on bitumen or paraffin is used. It is possible to use such waterproofing materials such as parchment, glassine or high-density polyethylene. In order to form a monolithic insulating coating, lay the material overlapping and secure with tape. The waterproofing extends 10-15 cm onto the walls. They are also fixed to the wall with tape.
5. A damper-type tape, about 1 cm thick and 100 mm wide, is laid on the surface between the floor and the wall.
6. Next, the screed itself is installed, for the manufacture of which a leveling mixture or self-leveling compounds are used. In order to prepare such a solution yourself, you should combine sand and liquid glass in a ratio of 2 to 1. In addition, one part of water is added to this composition.
After the poured layer has hardened, the tiles are laid on a wooden base. Using this method on wooden floors in the bathroom, like laying tiles, is especially important.
You can also prepare a wooden floor for laying tiles by pouring a screed based on a mixture of sand and cement reinforced with fiberglass. In this case, the layer thickness will be about 3 cm. The screed is grouted immediately after it is poured. To level such a screed, beacons are used. Next, the screed should gain strength over three weeks, and after that it is coated with a primer.
Tile adhesive is prepared in batches. Because it is highly flexible and dries quickly. Excess glue is squeezed out by pressing on the tile. In order for the tile to fit tightly to the surface, it is struck rubber mallet. After 24 hours from the moment of laying the tiles, the surface is treated using a fugue.

Recommendations on how to lay tiles on a wooden floor with your own hands
The last method of gluing tiles to wood flooring involves installing the tiles directly onto the floor using polyurethane-based adhesive. Which does not lend itself to the effects of movement caused by the thermal expansion of the tree.
The floor is first inspected for defects that require repair. Next, the base is covered with moisture-resistant plywood. In order to improve the rigidity of the floor, moisture-resistant plywood slabs are laid in two rows. However, the seams of the bottom row should not coincide with the top.
The base is also constructed as a floating floor, to compensate for the thermal expansion of the wood underneath. Sealant is used to fill the joints between the plates. For surface treatment, we recommend using a universal primer.
Next, the tiles are glued to the base. Please note that two-component glue should be diluted strictly following all recommendations from the manufacturer. The slightest errors in this process, will lead to disruption of the integrity of the coating.
The perimeter of the room is closed using a baseboard laid on silicone. Under no circumstances should moisture seep through it onto the lower areas of the floor.
How to Install Vinyl Tiles on Wood Floors
Initially, you should prepare the surface wooden base for laying tiles on it. To do this, the varnish or paint is removed from the coating, and the floor is sanded. If there are cracks, they should be repaired. Next, the surface is primed. At the same time, all work is carried out at temperatures from 19 to 23 degrees.
When gluing tiles to the floor, you should determine the central part of the room and move from it. The tiles are fixed to the floor surface using acrylic dispersion adhesive. The principle of its preparation is indicated in the instructions.
There are two options for laying tiles on the base - in the form of a pyramid or layer-by-layer laying. Please note that small gaps are left on the surface between the wall and the floor, which are covered with a plinth.
The seams must be treated after two days from the moment the tiles are laid on the wooden base.
How to lay tiles on a wooden floor video:
Before laying ceramic tiles on a wooden floor, you must make sure that there is a strong and level base surface on which you plan to tile.
Therefore, if a decision is made to upgrade an old wooden floor, then experts recommend preparatory work to strengthen and level it.
In this article you will find all the necessary information for laying tiles on a wooden floor: what features you will have to deal with, how to prepare the old flooring for installation and, of course, instructions with a video.

Is it possible to lay tiles on a wooden floor?
Indeed, this question arises for many people, and we will answer it unequivocally - CAN. But with some conditions...
 If the floorboards are dented and squeak, or the wooden floor has an uneven surface, then experts recommend eliminating such defects in two ways:
- Go through the floorboards and joists, providing additional attachment points for the floorboards. To do this, using a nail puller, carefully dismantle the floorboards. By using building level And wooden substrates The logs are installed strictly horizontally. Floorboards are laid on top of them. By using long screws in wood we securely attach them to the joists. If after this “procedure” the wooden floor is leveled, does not press down or creaks, you can begin laying tiles.
- The second way to level an old wooden floor is to lay a layer of plywood or plasterboard on top of the wobbly boards.
An interesting solution would be to use the so-called . Read more about this coverage by following the link.
What else needs to be considered
Even if the old wooden floor is in good condition, then before that, you need to take care of other nuances. For example, you definitely need to “rip off” the old paint, because it may cause problems in the future. This can be done mechanically, using an electric planer, spatula, knife, etc.
If the paint does not come off on its own, you can try heating it with a hair dryer.
It is also very advisable, before laying the tiles, to treat the wooden floor with special compounds for wood, which will help the floor last a very long time. The final layer is applying a primer. The primer should be chosen “for wood”; this coating will improve the adhesion of ceramic tiles to the floor.
Choosing the right floor tiles
Agreeing with common sense and the experience of millennia, you have decided to tile the floor in the bathroom. The decision is reasonable. But now you need to choose the right material.
We will not give advice on texture, color or size. Every man to his own taste. But we will consider the following factors:
- Wear resistance. According to this parameter, absolutely any tile is suitable for the bathroom. bare feet, or even if you are wearing slippers, the ceramic tiles cannot be damaged. See.
- Dimensions. If this is your first time taking on self-installation tiles, then it is preferable to buy larger tiles. For example, 25x25 cm. It will be more convenient to work with and you will get fewer seams.
- Face shape. This is a very important question. Pay attention to whether there is a right angle on the edge between the front and end sides of the tile. The fact is that the seams between tiles with rounded edges are a priori larger. But this is not acceptable for the bathroom, because joints between tiles weak point V floor covering . They can retain water, and this is the first step towards the appearance of fungus.
Take the time to check each tile in the box. In the end, you are not buying a pig in a poke. And you don’t have extra money. To check, place one tile against another. There should not be the slightest gap at the points of contact. Apply them not only with the front side, but also with the edges.
Do not be embarrassed by the arrogant views of the sellers - you will not baptize your children with them.
Laying tiles on a wooden floor - instructions
If you decide to lay tiles on a wooden floor yourself, then in order for them to serve you reliably for a long time, we recommend performing the following operations:
- Using a nail puller, carefully remove the old floorboards. Using wooden supports and a building level, we install the logs strictly horizontally.
 To increase the service life of the new floor, logs are treated with special antiseptic impregnating compounds that prevent the formation of rot, mold, and damage by wood-destroying bugs.
- After the impregnation has dried, the gaps between the joists in the bathroom are filled with fine expanded clay to their upper level.
- Across the logs, using wood screws, fix them to them rough boards. Between them you need to leave a gap of up to one cm.
- If old boards are used as rough flooring, then It is advisable to remove old paint from them. To do this, use a construction hair dryer, chemicals, mechanical method. The last option is the most popular. A metal brush is inserted into a drill or sanding machine and used to remove old paint from the surface of the boards.
 Cleared from old paint or the varnish of the board must be treated with a deep penetration antiseptic compound. This will significantly increase their service life and protect against the formation and spread of mold and rot.
- Experts recommend laying vapor and waterproofing on top of the rough boards: waxed, parchment, bitumen paper or plastic film. Is it possible to lay tiles without waterproofing? It's possible, but it's better to play it safe.
- A substrate is laid on top of the insulating layer. For which sheets of plasterboard or cement bonded particle board up to 2 cm thick. It serves as the basis for laying ceramic tiles on a wooden floor. The sheets are securely attached to the rough boards using wood screws with a pitch of approximately 15-20 cm. Considering that the boards will change their size under the influence of moist ambient air, it is necessary to leave a gap of about 10 mm between the substrate and the walls, which is sealed with polyurethane foam.
 Experts recommend covering the laid base from sheets of plasterboard or plywood with drying oil or latex impregnation. The applied layer should be thick and thick. Until it dries, a reinforcing painting mesh is laid on it. This will create a monolithic surface.
- After the coated surface of the substrate has dried, it is placed on it. metal mesh. We fix it to the leveled base surface using self-tapping screws.
- The metal reinforcing mesh is coated with a special mixture consisting of one part water combined with two parts sand and liquid glass.
- The composition is evenly applied over the entire surface of the substrate made of sheets of plasterboard or plywood. After drying, it turns out reliable and smooth. base surface for laying ceramic tiles.
 Experts recommend placing the tiles in water for 10-20 minutes before laying. She will be nourished required quantity moisture, as a result of which less moisture will be drawn out of the solution used to fix the tiles.
- To choose the best option for laying tiles with minimal waste, you can lay them out on the bathroom floor without glue.
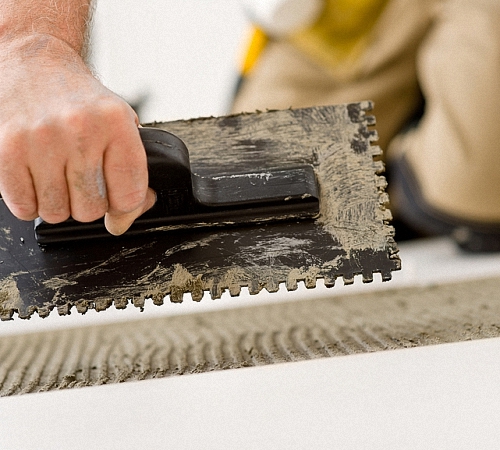
- Ceramic tiles are fixed to a wooden floor using an application that can be purchased in various hardware store in the form of a dry mixture. To prepare a working solution, it is enough to dilute it with water. But it must be remembered that the finished suspension is effective for no more than two hours.
- The working solution is applied to the wooden floor and tiles using a notched trowel.
- Having laid the tile in place, be sure to check its alignment in the plane using a building level.
- It is recommended to immediately remove protruding excess adhesive mixture with a clean rag after laying the tiles.
- Before laying the next tile on a wooden floor, it is necessary to insert plastic crosses between the tiles to ensure evenness of the seams.
- A day after finishing laying tiles on a wooden floor, it is necessary.
Video instructions
For clarity, watch the video with installation instructions. The stage of direct work with tiles and ceramic tiles is described here in detail; as for the wooden floor, work with it has preparatory nature and are outlined above in this article.
By following these instructions, you can lay tiles on an old wooden floor without any problems.


