To create comfort and coziness, both in private houses and in apartments, electric floor heating is used. For the underfloor heating system to work in automatic mode, and was also economical, it is necessary to install and connect additional reliable electronic equipment that maintains the temperature in a given mode. This equipment is a temperature controller and a temperature sensor. Before installing them, it is recommended to understand the principle of operation, as well as to learn the basic methods of connection and installation. In this article, we will describe in detail how the floor heating temperature sensor is installed, and also provide its connection to the network.
The device and purpose of the temperature sensor
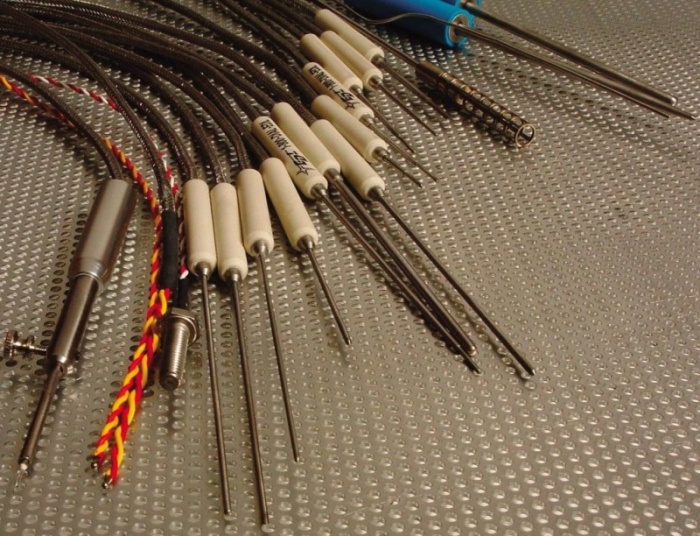
So the temperature sensor for the underfloor heating system is a thermistor protected by a glass bulb, and also having a copper conductor about 3 meters long to connect to the thermostat. In addition to the glass bulb for tiled floors, the temperature sensor itself is also protected by a gel shell. The conductor is insulated with high-quality PVC (polyvinylchloride) to protect against external influences and damage. The length of the conductor can be increased, and of course, reduced, up to 50 meters, the main thing is that at the end of the conductor there is an undamaged sensor.
For its easy replacement in the future, it is recommended to place this design in a metal-plastic tube, even if the manufacturer provided a plastic corrugation with a diameter of 16 mm in the kit. Metal-plastic pipe has a smoother inner surface, so getting and installing, as well as connecting a new temperature sensor, in case of failure, is much easier. These types of temperature sensors are installed in solid floor coverings(under a tile or porcelain tile).

The principle of operation of the temperature sensor is very simple, when the temperature changes, its resistance changes, thereby giving a signal to the thermostat to turn on or off the underfloor heating system from 220 V, the most common network in everyday life.
Mounting sequence
Let's proceed directly to the installation of a warm floor and a temperature sensor. First you need to determine the location of the thermostat, which will be located outside. It is located most often at a height of about 1 meter from the floor. Mounting it is similar to a conventional outlet.
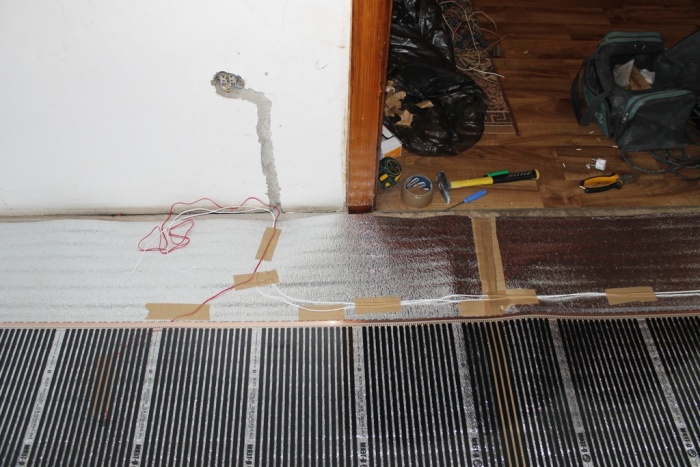
Then you need to make strobes or grooves for laying two plastic pipes. One for the power wire leading to the heating element, the other for the sensor wiring. The tube for the temperature sensor will be located on the floor. Such a gasket will make it possible, without removing the tile, to perform repair work, at least for the replacement of control elements. It will not be possible to completely replace the heating element if it is installed in a screed. It is important that when laying a pipe or corrugation for a cable, there are as few bends and turns as possible. This will further simplify the replacement of a failed thermal sensor.

The video below tells useful advice for installing a floor heating sensor in the corrugation:
The next step is thermal insulation, it is performed for different types heating elements individually, e.g. for heating cable it serves damper tape or another insulation, the thickness of which is at least 1.5–2 cm. After that, installation and fastening is carried out heating element with wiring to the thermostat box.
Installing and connecting a floor heating temperature sensor has its own subtleties. In order to prevent the solution from getting inside the tube, where the sensor is located, its end located on the floor is sealed securely with electrical tape or adhesive tape. It is not recommended to connect the entire system through a socket, it is better to supply power from and through (starter).

The temperature sensor should be installed at a distance of 0.5 to 1 meter from the wall on which the thermostat is installed, as well as exactly in the middle between two adjacent turns of the heating cable. After installation, it is recommended to fix the temperature sensor mounting tape or foil tape.


If produced, the temperature sensor must be installed under the heater sheet, as shown in the photo below. Please note that thermal insulation must be laid under the temperature sensor, otherwise the heating system will not be effective.

Important point! The location of the temperature sensor must be chosen so that it is away from other sources of heating. Otherwise, errors will occur and the warm floor will not work as it should.
The wiring diagram for the underfloor temperature sensor is as follows:


Before making a screed, you need the temperature sensor itself. As a rule, the resistance of both elements is measured. The system is considered operational if the resistance differs by no more than 10% from the passport data.

To assembled circuit was as safe as possible recommended in the premises where electric heating floor, install, which in the event of a breakdown will disconnect the circuit from voltage, thereby protecting a person from falling under electric potential. In wet rooms it can be deadly.
Choosing a thermostat
I would also like to touch on the thermostat itself, which plays a very important key role in this heating system. Exist the following types temperature controllers for underfloor heating:
- Electronic-mechanical. The clarity of such an adjustment is approximate, so it is rather problematic to achieve a specific set temperature. The main advantage of such a device is its low price.
- Electronic. Installation the set value is performed using the touch buttons and has fairly clear settings and the ability to set a limit temperatures up to one degree.
- Programmable electronic. Due to the installation of such an element, it is possible not only to regulate the temperature regime in the room, but also to turn on the heating according to the schedule, or only if there is a person in the room.
By the way, some thermostats already have a built-in sensor, which makes it possible to control not only the temperature of the floor, but also the air in the room as a whole.
As a result, I would like to remind you of the rules for working with electrical equipment, all connection work is performed with the power off. At the same time, it is necessary to ensure that no one, except for the person performing this work, accidentally applies voltage dangerous to human health and life. This is where our do-it-yourself technology for installing a warm floor temperature sensor ends. We hope the information provided was useful to you!
1.
2.
3.
4.
For normal operation Underfloor heating systems require a thermostat and a sensor. These devices support comfortable temperature, while decreasing . What the temperature sensor for a warm floor looks like can be seen in the photo.
Features of the thermostat and sensor
A temperature sensor for a warm floor is a device that determines the temperature of a floor or air and transmits information to a thermostat, which is a three-meter-long copper conductor connected to a thermal resistance. In order to protect against external influences, the sensor is protected by a glass bulb, and the wire is covered with PVC insulation. The length of the device can be reduced or increased up to 50 meters.As the temperature rises, the resistance of the sensor decreases. This information is sent to the thermostat. Depending on the current and set temperature, the heating system turns on and off. Usually, the warm floor starts to heat up again when the temperature becomes 0.5 degrees below the set value (see also: ""). For example, if the temperature is set to 28 degrees on the thermostat, then when this indicator is reached, the system turns off. When the temperature drops to 27.5 degrees, the heating turns on again. In this way, a comfortable environment is maintained. The cycling of switching on and off depends on the air temperature in the room, the thickness of the floor screed, and the quality of the insulation.
Most often, if the sensor for the underfloor heating thermostat breaks down, it is not repaired, but a new one is purchased. If one of the components is incorrectly replaced, it often happens that the interval between turning the heating system on and off increases to 5 degrees.
Selection and functions of the thermostat
The thermostat performs the following functions:- heating on and off;
- maintaining the specified temperature;
- power supply control;
- energy savings by optimizing system performance.
The installation of a floor heating sensor and a thermostat is optional, but without these devices it will be impossible to control the degree of heating. In addition, a system without a sensor and thermostat is not covered by the manufacturer's warranty. Some types of flooring, such as linoleum, carpet, laminate, should not be heated to temperatures above 30 degrees, otherwise they will quickly deteriorate and begin to release toxic substances into the air.

- the power of the device - it must correspond to the load of the warm floor, if the system is more powerful, then a magnetic starter is installed between it;
- type of sensor (it can measure the temperature of the air or the floor, some devices determine both);
- the possibility of programming - such models are more expensive, but allow you to use additional settings and save on electricity;
- installation method.
Installing a thermostat for underfloor heating, see the video:
Mounting the thermostat and sensor
Installation of the underfloor heating sensor begins with the fact that they make a hole in the wall and floor - it will be laid to the junction box. It is convenient to do this with a special chisel perforator.The wire must be protected with a corrugation - usually it is included with the device. It is recommended to smooth the transition between the wire and the sensor with the help of electrical tape wound in several layers - this will allow you to easily pull out the device if necessary. When installing corrugations, it is better to make turns and corners smooth. In order to make sure that it will be possible to easily remove the sensor, the corrugation is first installed, and only then the device.
It will be easier to stick the sensor into it if you use a trimmer line. It has good elasticity, but at the same time it has a thickness of only 3 millimeters. The end of the wire is connected to the fishing line with electrical tape and pushed into the corrugation.

Before moving on to how to connect the underfloor heating sensor, you need to properly position the device. The sensor must be placed parallel to the heating conductors, and in the middle between them. To prevent the screed solution from getting into the corrugation, it is closed with a plastic cork.
Completing the connection
Then they connect the floor heating sensor to the thermostat. The circuit depends on the model of the device, but usually 2 wires from the sensor, phase, zero, ground and 2 wires to the load circuits are connected to the regulator. When performing this work, it is better to focus on the manufacturer's recommendations. Installation is carried out only with the electricity turned off.Warm floors are often made in rooms where it is not possible to lay a carpet on the floor, and the cold surface is inconvenient. To save on electricity and at the same time make the system as efficient as possible, you need to install a thermostat and a sensor.
A modern solution for arranging a warm floor allows you to solve a number of problems associated with heating. However, for normal operation of underfloor heating, it is necessary to fully equip it modern equipment, which includes - a floor heating sensor. The temperature sensor allows you to ensure the correct operation of the entire heating cake. This device is especially necessary when installing electric heating. So, its installation not only controls the temperature level, but also saves money on electricity. In this article, we will tell you about all the features of this device, as well as how to properly install and connect it.
Kinds
Underfloor heating temperature is controlled by a thermostat. And just the temperature sensor is connected to it. First of all, this device is necessary if linoleum, parquet, laminate and similar coatings are laid on top of the electric floor heating.
The underfloor heating temperature sensor has a simple principle of operation. It is located directly next to the heating element. So, it measures the temperature of the heating element and sends a signal to the thermostat, which, in turn, gives signals to turn off and turn on the heating. The whole system is automated, and the degree of error in the indication temperature sensor very little.
This device is of two types:
- Outdoor .
- Internal .
In the first case, the temperature sensor measures the air temperature in the room where the heating element is laid in the floor. In this case, the device is located near the laid warm floor. There are such models of the thermostat in which this sensor is already built-in. As for the internal, this means an element that is placed in the body of the screed, directly next to the underfloor heating channel.
Moreover, the temperature sensor is classified according to installation under a particular coating:
- For soft surfaces. In this case, the device is a plastic cylinder with a wire. It is placed under linoleum, parquet, laminate.
- For hard surfaces. Given that the sensor is placed in concrete, under tiles, artificial / natural stone, it is equipped with a special protective shell.
Today, a number of manufacturers of this device are known, we suggest that you consider specifications underfloor heating sensor "Devi".
"Devi" - a new generation sensor

Devi's temperature sensor is made in Denmark. On the modern market You can find many models of this device. Let's compare some models of the Devi device.
Electronic temperature device "Devireg D 130". This is an overlay device. It has a voltage in the region of 180-250 V at 50/60 Hz. The device can operate at constant and active load up to 16A. The sensor itself is placed directly into the body of the screed. It has a temperature adjustment range from +5 to +45°С. An LED acts as an indicator. Degree of protection IP31. The unit has such dimensions - 85 × 85 × 47 mm.
Programmable temperature device "Devireg 535 ELKO". This model is presented on the market both overhead and built-in. This allows for the most convenient installation. It maintains the supply voltage within such limits 180-250 V at 50/60 Hz. The device can operate at a constant and resistive load of 16A. The indicator of the temperature range for the floor is from +5 to +45°С, and for the air from +5 to +35°С. The device has a display, where you can see the measurements of the temperature sensor. Degree of protection IP31. The device itself has the same dimensions - 85 × 85 × 47 mm, like the previous model.
Programmable temperature device "Devireg Tiuch". This is an embedded device. Maintains the voltage in the supply within such limits 220-240 V at 50/60 Hz. It is capable of handling resistive loads up to 16A. As for the temperature adjustment range, for the floor this indicator has - from +5 to + 45 ° С, and for air from +5 to + 35 ° С. The device is equipped touch screen temperature sensor control. Highly convenient solution. Degree of protection IP21. The device itself has such dimensions - 67 × 67 × 22 mm.
As you can see, certain models have slight differences, but they all differ. high quality and work stability.
Mounting Features
As already mentioned, the underfloor heating temperature sensor is installed directly next to the heating element. And at a short distance from the thermostat. The sensor itself is placed between heating circuits. On both sides, the distance should be equal. Be sure to fasten the device with a special tape. Additionally, the device and the wire are placed in a special corrugated tube.
Important! Be sure the tube is securely sealed so that debris, dust and solution do not get into it. The other end of the corrugated tube goes to the thermostat. The tube itself is laid in a hidden way in the floor and wall.
Connection

There are two methods for connecting the temperature sensor of a warm floor. This can be done using a junction box. That is, the wire from the device is first directed to the thermostat, from it to the junction box and further into the body of the screed. You can also connect directly. The last option is easier and faster.
To connect the thermostat, it is recommended to draw an individual line from electrical panel. Also, this line should be equipped with an individual RCD. A copper cable with a cross section of 2.5 mm 2 is used as the wiring. From the shield, the wire stretches to the thermostat. Additionally, you can install junction box. As mentioned above, from the thermostat, the wire from the temperature sensor is lowered into the screed in the corrugation. A second corrugation will pass nearby, in which there is a cable for underfloor heating.
Advice! After laying the heating circuits and the temperature measuring device, the screed can be made. However, be extremely careful not to damage the heating elements and the sensor itself during pouring the screed.
What if the sensor is not installed
What if you, after reading this article, realized that you made a mistake and did not place a temperature sensor in the screed body? You shouldn't get upset. There is a way out of this situation. For example, you can get out of the situation by installing an air sensor. However, excellent results can only be achieved if the heating circuit output is 170 W / m 2. That is, this is true in all those cases where the electric floor heating is the main heating in the house.
Among other things, there is another way to implement the same device. But this requires surgical precision. You will need to make a strobe in the floor and wall for laying the unit. But remember, one extra movement and there is a risk of damaging the heating circuit. As a result, it can cost you a lot to repair it.
Conclusion
So, here we have considered the features of how the temperature sensor is used. As we have seen, this device is simply necessary when installing a warm floor. Thanks to its presence, the entire underfloor heating system will work correctly, and a pleasant atmosphere and microclimate will be maintained in your home at any time of the year.
Systems warm floors are very popular, and this is understandable, because they significantly improve indoor comfort and make the home more comfortable. And in order to maintain and optimally regulate this comfort, it is necessary to be able to adjust the temperature of the floors. For this, a thermostat is used, which must be installed when installing a warm floor.
The warm floor begins to perform its main function immediately after connecting to the power supply. However, working at full power, it will not last long and will significantly hit your pocket, spending too much a large number of energy. In addition, it will be too hot, which may not be very comfortable. To avoid all the troubles and provide the most pleasant working conditions for underfloor heating, you need a temperature controller.
Classification of thermostats
According to the principle of action
This classification is the most understandable and accessible. It distinguishes several types of thermostats:
 It works on the same principle as the heating regulator of a conventional iron. A specific temperature value cannot be set in this case. The principle of operation of the mechanical regulator is as follows: its wheel rotates, setting itself to the desired position, the temperature of the floors changes and is maintained. Based on your feelings, the temperature can be lowered or increased by setting a little more precisely - in general, as in the shower. This type of regulator is the cheapest and simplest.
In its essence, it is similar to a mechanical one, only the regulation is carried out using the keys or the touch screen. Another difference is the ability to set the exact temperature with an accuracy of up to tenths of a degree.
The most technologically advanced. As the name implies, it allows you to store certain programs in the device’s memory that regulate the temperature as required by the conditions. For example, when no one is at home, the regulator turns off the heating, makes it smaller at night, preheats the floor before the arrival of the owners, etc.
By location
On this basis, there are only two obvious groups: regulators located inside the heated room or outside it, for example, in an electrical panel. The standard practice is to place the underfloor heating thermostat in any place convenient for access, with the exception of bathrooms - electronic devices should not be installed in them.
Another limitation is power. The standard thermostat is designed for no more than 3 kW. As a result, it is necessary to carefully correlate the number of sensors and their type with installed system heating. If it exceeds the allowable power, you will have to install a two-zone thermostat or two regulators for separate areas of the room.
Such two-zone regulators can also be used to set the temperature in two rooms at once, if the total power of the underfloor heating systems does not exceed the permissible limits.
By sensor type

It is worth noting that the thermostats are compatible with different types sensors. AT standard equipment the device has only one temperature sensor that measures the temperature of the warm floor, which can often not be enough. In environments where underfloor heating is the only heating system, sophisticated room temperature control may be required.
In this particular case, it is possible to regulate the overall temperature, and not just the degree of heating of the warm floor, and then the air heating sensor will come in handy, which can also be connected to the thermostat.
There are cases when, on the contrary, it is necessary fine tuning namely the temperature of the flooring - for example, if flammable materials are used as a finishing material: wooden or laminated parquet, or linoleum. In this case, it is extremely dangerous to allow the coating to overheat above 26 degrees.
Thus, there are two types of thermostats:
- with built-in temperature sensor;
- compatible with outdoor sensors.
Installation of temperature sensors and regulators
The device installation scheme depends on the selected type. Usually you will need a niche in the wall into which the thermostat will fit. The underfloor heating system will be connected to it according to the instructions provided by the manufacturer.
Power can be provided either by plugging into a wall outlet or by connecting directly to the mains using a special wire.
Mounting sensors
This issue should be treated with special attention, since it is through the sensors that the thermostat receives information about the temperature, and errors in their installation can lead to both incorrect readings, which will lead to a decrease in the efficiency of the system, and to the complete inoperability of temperature regulation.

The basic underfloor heating system is usually the heating element itself, although there are options with a thermostat in the kit.
The sensor and wires for the thermostat are passed through the corrugation and fit into a strobe punched in the wall. This is necessary so that in the event of a malfunction, parts of the system can be replaced without breaking the wall. This tube will allow you to pull out all the wires, even from completely filled with concrete floors.
The temperature sensor should be located no further than one meter from the regulator, between the heating elements of the system.
There are no other requirements for sensors, so the control device can be used with any type of underfloor heating, including those based on hot water heating.
It is important to keep in mind that underfloor heating and devices for regulating their temperature are components that complement each other. unified system, and only working together, they will provide real comfort of living in the room and a long, flawless heating service. You can not neglect thermostats, especially since the variety of their types will allow you to choose suitable option for any person.
Thermal sensor for underfloor heating: classification and installation
It is through the temperature sensor that the thermostat receives information about the temperature, and errors in their installation can lead to incorrect readings.
Underfloor heating is gaining growing popularity as an additional or main heating of apartments and private houses. Even if the owner is unable to provide this useful system all your home, you can only heat small plot, for example, in the bathroom. In this case, the costs will not be so high, and the comfort during water procedures will increase markedly. It is much more pleasant to stand barefoot on warm tiles than on cold tiles.
In addition, the bathroom, usually not included in the brownie heating system, will receive an additional source of air heating. Self-assembly - great way reduce costs, but it is important to do all the work correctly. special attention requires a thermostat for underfloor heating. It is not difficult to install it yourself, but you will need to carefully study the instructions.
How does a thermostat work?
The thermostat, as it is not difficult to understand from the name, regulates the temperature of the heated floor. it electrical appliance, which must be connected, firstly, to the heating system and a temperature sensor, and secondly, to the power supply. If the thermostat is connected correctly, it works as follows:
- receives from the temperature sensor data on the current heating temperature;
- compares them with the given value specified in the settings;
- turns off heating when the set temperature value is exceeded;
- turns on heating if the floor temperature is lower than specified in the settings.
The cycle is constantly repeated, which ensures uniform heating of the floor and the room, as well as optimal flow thermal energy.
For residential premises, the floor heating temperature is usually set at about 26 degrees, and in kindergartens and other similar institutions, 24 degrees is enough. The type of flooring also affects the heating temperature readings.
Electrical systems installed under laminate typically operate at 27 degrees, but underfloor heating can reach up to 30 degrees. Excessive heating of the elements can cause deformation of the flooring and damage to the system.
What are thermostats?
There are several types of modern thermostats designed specifically to work with electric underfloor heating systems. It should be noted that underfloor heating is not always installed with water systems.
Sometimes owners prefer to adjust the heating manually. But for mats, cables or other electrical systems, the thermostat is used in without fail because it effective method energy savings, as well as the ability to significantly increase the safety of the operation of a warm floor. A water heated floor rarely overheats, but electrical systems require high degree control.

There are both extremely simple in design models of thermostats, and devices equipped with one or more additional features. Among them it should be noted:
- The presence of a programmable timer that allows you to set a different temperature for different times of the day. As a result, the intensity of heat energy consumption can be reduced for specific periods of time and restored full time job systems at other times.
- Built-in energy saving mode, which provides a significant reduction in heating temperature during the absence of residents in the house, which makes it possible to significantly reduce electricity bills.
- The presence of a limiting sensor that allows you to pre-set the limit values of the heating temperature for specific air temperatures in the room, which prevents accidental overheating of the system elements, as well as the surface of the floor covering.
- An intelligent programming function that allows you to almost arbitrarily, depending on the situation in a particular house, set the duration and mode of changing periods of saving and intensive heating.
It should be borne in mind that for installing a warm floor in a small bathroom, there is no need to purchase an expensive programmable model. In small areas, the simplest models successfully cope with the task of regulating the operation of a warm floor: electronic or even mechanical.
But on a large footage, i.e. in a spacious bathroom, it may make sense to install a more “advanced” thermostat in order to reduce electricity costs.

When choosing a thermostat, you should focus on the power and size of the heating system to which it will be connected. Power household thermostat for a warm floor, as a rule, does not exceed three kilowatts. Although thermostats can vary significantly in type and feature set, the principle of their connection usually does not have significant differences. Typically, underfloor heating systems use temperature sensors that are placed under the floor covering.
The thermostat can also be configured to read the air temperature in the room, but for this you need to carefully choose the location of the sensors, since the most various factors: drafts, position of furniture, household appliances, etc.
Installation and connection procedure
For an experienced electrician, the installation of any thermostat is not particularly difficult. Regardless of the model, the manufacturer usually supplies the device detailed instructions. In addition, the connection diagram is usually located directly on the panel of the device.
But for home craftsman, who hardly understands the specifics of the work of an electrician, the task can be difficult. knowing the details and important nuances when installing the thermostat, it will help to avoid mistakes and the need to redo all the work.

Preparing the instrument and installation site
The first thing to do before installing a thermostat is to study the instructions and recommendations provided by the manufacturer. It usually contains information on how to remove the front panel to make the connection. Remove the control panel carefully so as not to damage the device.
Then you need to prepare a place for installing a thermostat. Usually it is chosen even when designing a floor heating system. It is recommended to place the device at a height of about 0.6-1.0 m from the floor. Would like to be around electrical sockets which will greatly facilitate the connection of the power supply.
AT suitable place you should make a niche in the wall, the dimensions of which allow you to install a mounting box for the thermostat in it. Alternative option is to fix the mounting box directly on the wall, but in the interior this solution does not look too good.
Connecting power supply and temperature sensor
First, power wires must be connected to the device. It is necessary to define a wire with a phase. It is usually dark: black or brown. You can check the presence of voltage using a tester. Zero-voltage work wire usually of blue color. The difference between zero and phase should be 220 V.
Color-coded cables greatly facilitate the installation of the temperature controller. Here are some useful information about this label:
- phase wire is usually white, black or Brown color and marked with the letter L;
- the neutral wire is denoted by the letter N, most often it is a blue wire;
- the ground wire is usually yellow or green (yellow-green as an option).
More clearly the process of connecting the thermostat to electrical network and the heating cable can be considered using the diagram:

First you need to bring the power cord to the appropriate sockets. A phase wire, designated as L, is connected to contact 1. Wire N is connected to socket 2, i.e. zero. Then the heating cable contacts are connected to sockets 3 and 4. A neutral wire (N) is connected to socket 3, and a phase wire (L) is connected to socket 4.
After that, a temperature sensor is connected to the thermostat through slots 6 and 7. At this stage, there is no need to observe any polarity.
After that, the temperature sensor is connected. The sensor itself must be laid in a segment corrugated pipe and stacked in such a way as to transmit adequate temperature data. The wires of the temperature sensor are led to the thermostat housing and connected to it.
Features of connecting a heating cable
The underfloor heating cable can be two-core or single-core. In the first case, under the insulation are two wires through which current flows, as well as another wire designed to ground the device. The diagram below shows how to connect such a heating cable.

The brown and blue wires are conductive. There is voltage (phase) on the brown wire, the blue wire is zero. in green marked ground wire. The brown, blue, and green wires are connected to pins 3, 4, and 5, respectively.
When installing this type of thermostat, you will need a special terminal for the ground wire. It is not always included in the delivery package, so you should check in advance for the presence of the terminal or purchase required part before starting the installation of the device.
It is believed that connecting a two-core heating cable to a thermostat is easier than a single-core heating cable, since the latter must be connected to the device from both sides.

Under the sheath of a single-core cable are two wires. One of them comes electricity, the second is necessary for grounding the device. Usually the current-carrying wire is made white color, and the ground wire has green color. In the diagram you can see the order of connecting such a cable to the thermostat. A live wire is connected to slots 3 and 4, and ground is connected to slot 5.

The connection diagrams described above allow you to compose general idea how to connect the thermostat to warm floor, temperature sensor and electrical network. However, when executing installation work in each case, you should pay attention to the device of the selected device and the features of the heating element of the warm floor.
In addition, it is necessary not only to follow the instructions of the appliance manufacturer, but also to adhere to the safety regulations when carrying out electrical work.
Installing the device in the box
After that, the thermostat is installed in the mounting box. Be careful not to damage individual elements device. The thermostat should enter the box freely, it is not recommended to make efforts to install it.
Checking and setting
After that, it remains only to check the correct position of the device with the help of a level so that it stands level. If all operations are performed correctly, you can hang and screw the front panel with the control unit.
After the thermostat is closed with a lid, turn on the machine and apply power to the device. Then check the power indicator on the control panel. If the thermostat is equipped with a liquid crystal display, the corresponding values will appear on it.
AT simple models the presence of power supply can be indicated by a conventional diode indicator.

Another way to check the health of the programmable thermostat and the correct connection is to set the device to the lowest possible heating temperature, and then turn it on. Then you should set the maximum possible temperature and check the closing of the heating circuit, which will be indicated by a characteristic click.
After that, the device must be adjusted by setting the appropriate temperature data. If by this time the work on laying the underfloor heating is completely finished, and concrete screed already dried (in the case when its installation is provided by technology), you can test the operation of the underfloor heating and make sure that the thermostat is working correctly.
- set the time to turn on and turn off the device;
- set suitable temperature data;
- run a warm floor and observe its work during the day.
Modern thermostats equipped with large quantity electronic components must be installed very carefully and carefully. Such devices are very sensitive to voltage drops, and if the wires are connected incorrectly, the device may simply burn out. Therefore, if in any doubt, a novice electrician should consult with a more experienced specialist.
Thermostat for underfloor heating: types, do-it-yourself installation
Recommendations for correct installation floor heating thermostat and its connection to the system, temperature sensor and power supply. Schemes, photos and detailed video.
Thermostat for underfloor heating

- How to choose a thermostat for underfloor heating
- Mechanical thermostat
- Electronic thermostat
- Programmable thermostat
- Thermostat for electric underfloor heating
- Mounting the thermostat
- Setting the thermostat
For management modern systems heating, capable of maintaining a constant comfortable temperature, a thermostat is used for underfloor heating. Together with an external temperature sensor, it controls and regulates not only the heating of the floors themselves, but also the air in this space. Thermoregulators can be installed in each room where there are heated floors and regulate the degree of heating in each of them. Some models are equipped with touch controls, additional temperature sensors, can be programmed for different temperature values at a particular time of day or day of the week.
How to choose a thermostat for underfloor heating
Normal operation of a warm floor is impossible without a thermostat, which saves a significant amount of energy and Money. When performing the assigned tasks, this device only turns the heating on and off at the set time interval or in accordance with the thermometer readings. When choosing a thermostat, it is necessary to take into account its power, which must correspond to the power of the warm floor.
The creation of the most comfortable conditions indoors, as well as the safety of the flooring. When too high temperature flooring can be deformed, cracked and lose their qualities. Therefore, which thermostat for underfloor heating is better to choose is an important issue when installing heating systems.
Among the huge number of models and designs of thermostats, experts distinguish several main groups:
- Devices that provide an economical mode of operation, allowing to reduce energy consumption in the absence of owners. At this time, the heating power decreases by several degrees.
- Models with a programmable timer that allows you to set any time intervals during which the room will be heated at a given intensity. All commands from the timer are transmitted to the thermostat, which, in turn, supports required level temperature.
- There are highly intelligent designs where entire modes of operation can be programmed and set, in which periods of heating and economy alternate. The command from the device goes directly to the heating element in set time depending on external factors and given settings.
- Thermoregulators using a built-in limiter, which is a special sensor that protects the floor covering and the heating element itself from overheating. Such devices are most effective for laminate, which should not be heated above 260C. Otherwise, the release of harmful toxic substances will begin.
The choice of thermostat for specific premises depends on its area. In a small room, a conventional device without programming and settings will suffice. The use of more complex programmable devices is best suited for spacious rooms. Most often in such cases, electronic thermostats with temperature sensors installed inside the floor are used.
Mechanical thermostat for underfloor heating
The simplest devices include room mechanical thermostats equipped with a panel manual control. This panel in most models is made in the form of a rotary regulator, around which a temperature scale is applied. Turning the device on and off is carried out using a special key.

When deciding which thermostat to choose for a warm floor, it is necessary to take into account the absence in mechanical devices any electronics. These devices do not require Electric Energy, although many models on the panels have light indicators that signal the status of the heating process. Some designs are equipped with a mechanical timer that sets the operating time of underfloor heating in certain time.
The air temperature in the room is measured by a special built-in temperature sensor for the underfloor heating thermostat, whose operation is based on the properties of gases or bimetallic elements. Under the influence environment they are able to change volume or shape. That is, when the desired temperature is reached, electrical circuit begins to close or open. The temperature of the heating elements themselves is not controlled.
Thus, the mechanical control device is able to maintain the desired temperature until it is turned off. If necessary, it is enough to turn on the thermostat again and wait for the heating of the underfloor heating elements.
Electronic thermostat for underfloor heating
The most widespread non-programmable electronic temperature controllers allow you to control the temperature level with an accuracy of 0.5 degrees.

The liquid crystal display of the device shows the value of the current and set floor temperature, as well as the air temperature in the room. In addition, a special symbol appears on the screen when the heating system is on. Periodically withdrawn different kinds technical messages, symbols indicating malfunctions in the underfloor heating system. This function allows you to perform diagnostics in electronic temperature controllers. Direct control of the device is carried out by three small keys located on the external panel.
The power supply to the heating elements is supplied in the same way as mechanical thermostats. It must be taken into account that electronic device can constantly change on and off cycles, which saves about 30%. His work will continue until the warm floors are forcibly turned off by the owners.
Programmable thermostat for underfloor heating
When heating large areas Energy savings are of great importance, especially when using underfloor heating. This problem is easily solved with the help of a programmable temperature controller, which is used not only with cable, but also with film systems.

The operation of programmable thermostats is carried out according to the same schemes as in conventional electronic devices. The fundamental difference is the ability to configure operating modes in accordance with the calendar. In this case, all the necessary time intervals and temperature values are set for each day of the week, which leads to a reduction in electricity consumption by up to 70%.
For this, periods are assigned when underfloor heating should operate at full capacity or, conversely, be turned off for a certain time. All adjustment processes occur automatically, after all the necessary settings. For example, the days from Monday to Friday and Saturday and Sunday are separately configured. The cycle will be constantly repeated until the settings are changed.
Thermostat for electric underfloor heating
Thermostats or thermostats are equipped with a temperature sensor, which allows you to maintain the set temperature by periodically turning the circuit on and off. The thermostat works in the same way for an infrared heated floor, which operates from the electrical network.

In most cases, warm floors are initially equipped with thermostats. If such devices are not included in the kit, they can be selected individually, since they are all standardized and suitable for all electrical systems warm floors.
Standard room devices have a power of 3-3.5 kW and are rated for a current of 16 amperes. If the power of the floors is higher than the power of the thermostat, the connection must be made only with a contactor. Each device is equipped with two temperature sensors - internal and external. The first measures the temperature of the floors, and the second - the temperature of the air in the room.
In order to choose the best thermostat for underfloor heating, you must be guided by certain criteria. First of all, the value of the maximum power of the floor should be taken into account. Otherwise, the lack of power will cause the heating temperature of the cable to drop. If necessary, the devices are connected to a single network and freely provide a total power of more than 3 kilowatts. They are installed separately at different ends of the room.

Another factor is the type of installation, i.e., the regulators can be surface-mounted or recessed into the wall. Features of the installation of each device are reflected in the instruction manual. When choosing, the type of control should also be taken into account. For example, devices that are both equipped with built-in and remote sensors. Great importance given functionality and ease of use.
How to install a thermostat for underfloor heating
Before installing the device, be sure to read the enclosed operating instructions. It indicates the procedure for removing the front panel, that is, the control panel. This procedure must be carried out correctly, otherwise the device will become unusable. For built-in models, a recess is prepared where the mounting box is inserted. It is recommended to place the thermostat near the sockets at a height of 0.6-1.0 m from the floor. Before starting work home network must be de-energized.

Installation of the underfloor heating thermostat begins with the supply wires to the mounting box. Further, a temperature sensor is connected between the thermostat and the heating element, which is placed in a corrugated pipe.
The connection of wires to the thermostat must be carried out according to established scheme connections. Phase and neutral wire are connected to the appropriate terminals, and the wires from the sensor are connected to separate sockets labeled sensor. The device itself fits neatly into the mounting box. If there are interferences in the form of wires or corrugated tubes, they must be eliminated. The thermostat is level. After that, the control panel is installed in its place and secured with screws.
Setting the floor heating thermostat
Various models of thermostats can operate in manual and automatic mode. This factor must be taken into account when choosing a thermostat for underfloor heating. Everything depends on it necessary adjustments. Hours and days of the week are set, as well as in-depth setup and calibration. If necessary, one of the temperature sensors can be disabled.
All adjustments are described in detail in the instruction manual. Separately, a blocking is performed from children, who, out of curiosity, can inadvertently knock down the settings. To do this, simultaneously press the keys "up" and "down". You need to unlock the thermostat with the same keys.
What is the best thermostat for underfloor heating?
Types of thermostats for underfloor heating. The best thermostat for underfloor heating. Installation, installation and configuration of the thermostat - thermostat.
How to install an underfloor heating temperature sensor?
The device and purpose of the temperature sensor
So the temperature sensor for the underfloor heating system is a thermistor protected by a glass bulb, and also having a copper conductor about 3 meters long to connect to the thermostat. In addition to the glass bulb for tiled floors, the temperature sensor itself is also protected by a gel shell. The conductor is insulated with high-quality PVC (polyvinylchloride) to protect against external influences and damage. The length of the conductor can be increased, and of course, reduced, up to 50 meters, the main thing is that at the end of the conductor there is an undamaged sensor.
For its easy replacement in the future, it is recommended to place this design in a metal-plastic tube, even if the manufacturer provided a plastic corrugation with a diameter of 16 mm in the kit. The metal-plastic pipe has a smoother inner surface, so it is much easier to get and install, as well as connect a new temperature sensor, in case of failure. These types of temperature sensors are installed in hard floor coverings (under tiles or porcelain stoneware).
The principle of operation of the temperature sensor is very simple, when the temperature changes, its resistance changes, thereby giving a signal to the thermostat to turn on or off the underfloor heating system from 220 V, the most common network in everyday life.
Mounting sequence
Let's proceed directly to the installation of a warm floor and a temperature sensor. First you need to determine the location of the thermostat, which will be located outside. It is located most often at a height of about 1 meter from the floor. Mounting it is similar to a conventional outlet.
Then you need to make strobes or grooves for laying two plastic pipes. One for the power wire leading to the heating element, the other for the sensor wiring. The tube for the temperature sensor will be located on the floor. Such a gasket will make it possible to carry out repair work without removing the tile, at least to replace the control elements. It will not be possible to completely replace the heating element if it is installed in a screed. It is important that when laying a pipe or corrugation for a cable, there are as few bends and turns as possible. This will further simplify the replacement of a failed thermal sensor.
The next step is thermal insulation, it is performed individually for different types of heating elements, for example, for a heating cable it is a damper tape or other insulation, the thickness of which is at least 1.5–2 cm. wires to the thermostat box.
Installing and connecting a floor heating temperature sensor has its own subtleties. In order to prevent the solution from getting inside the tube, where the sensor is located, its end located on the floor is sealed securely with electrical tape or adhesive tape. It is not recommended to connect the entire system through a socket, it is better to supply power from circuit breaker and through a contactor (starter).
The temperature sensor should be installed at a distance of 0.5 to 1 meter from the wall on which the thermostat is installed, as well as exactly in the middle between two adjacent turns of the heating cable. After installation, it is recommended to fix the temperature sensor with mounting tape or foil tape.
If a film underfloor heating is being laid, the temperature sensor must be installed under the heater sheet, as shown in the photo below. Please note that thermal insulation must be laid under the temperature sensor, otherwise the heating system will not be effective.

Important point! The location of the temperature sensor must be chosen so that it is away from other sources of heating. Otherwise, errors will occur and the warm floor will not work as it should.
The wiring diagram for the underfloor temperature sensor is as follows:
Before making a screed, you need to check the performance of the underfloor heating and the temperature sensor itself. As a rule, the resistance of both elements is measured. The system is considered operational if the resistance differs by no more than 10% from the passport data.
In order for the assembled circuit to be as safe as possible, it is recommended to install devices in rooms where electric floor heating is carried out. protective shutdown, which in the event of a breakdown will disconnect the circuit from voltage, thereby protecting a person from falling under an electric potential. In damp areas, this can be deadly.
Choosing a thermostat
I would also like to touch on the thermostat itself, which plays a very important key role in this heating system. There are the following types of temperature controllers for underfloor heating:
- Electronic-mechanical. The clarity of such an adjustment is approximate, so it is rather problematic to achieve a specific set temperature. The main advantage of such a device is its low price.
- Electronic. Setting the set value is carried out using touch buttons and has fairly clear settings and the ability to set the temperature limit up to one degree.
- Programmable electronic. Due to the installation of such an element, it is possible not only to regulate the temperature regime in the room, but also to turn on the heating according to the schedule, or only if there is a person in the room.
By the way, some thermostats already have a built-in sensor, which makes it possible to control not only the temperature of the floor, but also the air in the room as a whole.
As a result, I would like to remind you of the rules for working with electrical equipment, all connection work is performed with the power off. At the same time, it is necessary to ensure that no one, except for the person performing this work, accidentally applies voltage dangerous to human health and life. This is where our do-it-yourself technology for installing a warm floor temperature sensor ends. We hope the information provided was useful to you!
Installing a floor temperature sensor
How to install an underfloor heating temperature sensor. Scheme of connecting the temperature sensor to the network. Installation errors that are shown in the video example.
Everyone strives to create the most in their home cozy atmosphere using various modern technologies home improvement, one of which is underfloor heating. It not only warms the room, but also gives a feeling of comfort.
Installation of a warm floor is a fairly simple procedure, however, malfunctions that may occur during operation can cause inconvenience to the owner. Most often, owners of a warm floor are faced with a breakdown of the temperature sensor, which can be detected during the test.
In order to find out how to check the health of the underfloor heating sensor, you need to get to know the functioning of underfloor heating in general.
Underfloor heating device
The heating cable/heating film, thermostat and temperature sensor are the main elements of underfloor heating, the functioning of which may be impaired.
How does the underfloor heating system work?
- Electric current is supplied through the heating cable, the heating conductor, then the heat enters through the insulating sheath to the concrete screed / floor covering and spreads further.
- The main function of the thermostat is to compare the temperature set by the user with the temperature of the environment: if it is lower, then the corresponding elements are activated and the floor is heated.
- The temperature sensor is a resistor whose resistance is directly proportional to temperature. With any system malfunction, a preliminary check should be performed to make sure that the floor temperature sensor has broken.
Connecting a warm floor without a thermostat to determine the performance of the floor
The stoppage of the heat sensor may be due to breakdowns of the thermostat or underfloor heating. The performance of a warm floor can be checked by connecting it to a 220V network without a thermostat. After applying voltage, you must wait about an hour, if the floor becomes warm, then the thermostat is the cause of the malfunction.
When connecting a warm floor in this way, the system will operate at full capacity, and when heated to a predetermined temperature, it will not turn off. In addition, the power consumption will also increase.
Checking the thermostat and sensor for operability
If when connecting a warm floor without a regulator temperature regime it was found that this element is faulty, the next step should be to check the functioning of the regulator or sensor. To do this, you must perform the following steps:
- guided by the wiring diagram indicated in the passport, check the correctness of their location;
- set the minimum value on the temperature controller;
- apply 220V voltage to the thermostat and check the voltage supplied to the temperature controller (1 and 2 contacts). Its value should be 220V;
- move the toggle switch to the on position;
- turn the thermostat to the maximum clockwise (when the temperature rises, a click is heard at a working regulator when the relay is triggered; with a faulty relay, constant clicks are heard). After that, voltage must be applied to pins 3 and 4.
The operability of the thermostat can be set when the temperature regime decreases, in which case the voltage supply to the system is stopped using a relay.
The temperature sensor should be checked if, when switching the temperature to a maximum of 3 and 4 pins, there is no voltage. The resistance of the temperature sensor decreases when it is heated, therefore, in order to check its serviceability, it is necessary to measure the resistance and compare it with the value indicated in the device passport. In case of any deviations of this value, a replacement of the floor temperature sensor is required.
When using programmable thermostats, if the temperature sensor fails, the corresponding information appears on the control panel.
Debugg
Sensor replacement
If checking the temperature sensor of the warm floor showed that it is faulty, and the design of the thermostat requires its replacement, then the element should be replaced and the system will begin to function as before. average cost sensor on the wound varies from 350 to 600 rubles.
It is worth considering in advance that the sensors on the market differ in type and resistance. If you decide how to replace the floor heating temperature sensor, you can contact the consultants of our website, and after specifying the model, the store managers will help you select the appropriate type of sensor.
For communication, you can use the contacts indicated in the header of the site, as well as the form of an online consultant.
Replacing the thermostat
A failed thermostat can be replaced with universal thermostat models: or. The peculiarity of these models is that they can work in fractions of the time, significantly reducing energy consumption.


 Constellation Scorpio description")


