Relaxing in the country is a favorite pastime for many people. The only thing that can compete with him is a trip to the shore of a reservoir. Having arranged artificial pond in the country you can get an excellent place to get rid of fatigue and relaxation. Moreover, building an artificial pond with your own hands will not be difficult; you just need a little perseverance and imagination.
Types of reservoirs
Depending on what functionality you plan to provide to the pond you have built, artificial reservoirs can be divided into several categories.

Pool
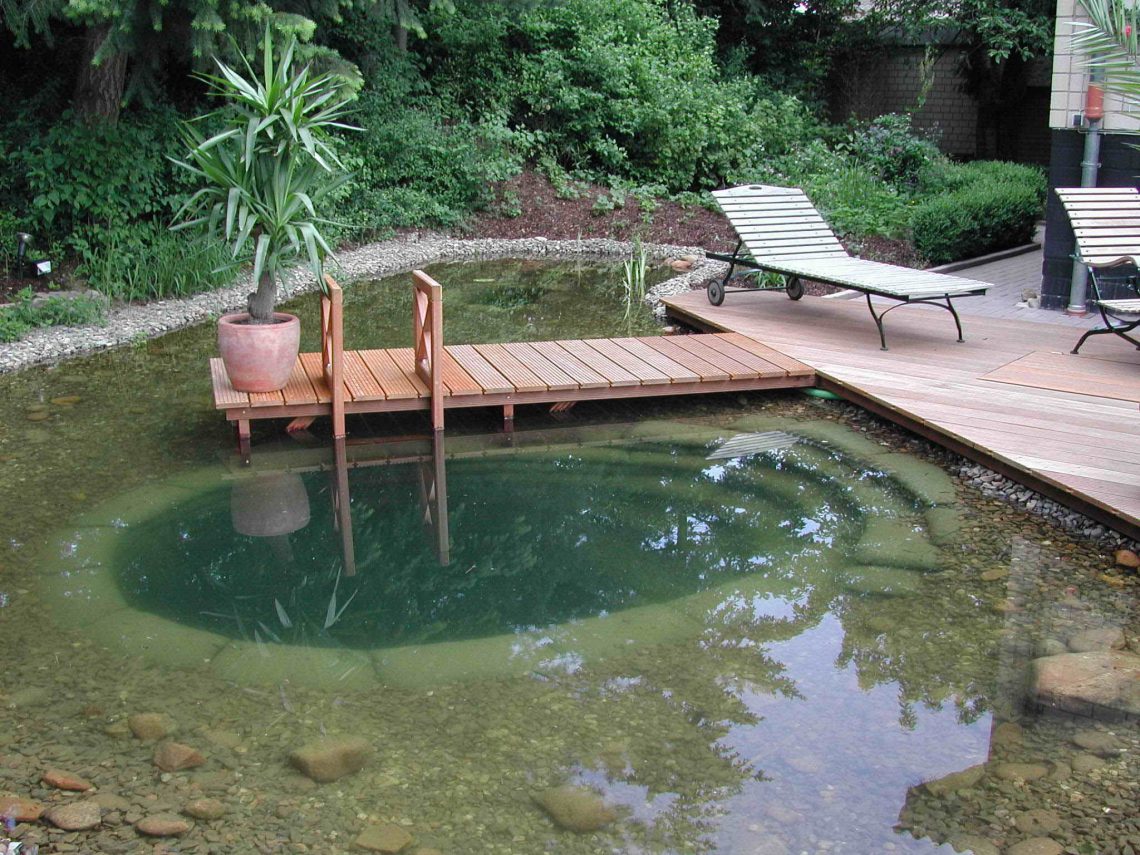
This category includes artificial reservoirs of significant size. Such a pond, built at the dacha with your own hands, as in the photo, has not only decorative properties, but also allows you to refresh yourself, or even swim, without leaving the site.

Pond with fish
A pond for fish breeding is not only suitable for hobbyists fishing. Your family members, especially children, will enjoy spending time at the lake, watching the bright and beautiful fish.

Mini pond in the country
A small body of water that is an element landscape composition. Performs exclusively decorative functions and does not involve placing a recreation area around it.

Decorative pond in the garden
A garden pond, built with your own hands, which is the central place of the recreation area. Combination of sufficient size and beautiful design It will not only please the eyes, but will also give pleasant coolness on a hot day.

Style
Having decided on the functionality of the reservoir, it is worth moving on to choosing the style in which it will be executed. decorative pond at the dacha. There are two main options.
- Formal (regular) pond. An artificial reservoir of strict geometric shape. Ideal if you want to emphasize the geometric shapes of a building or the site itself. Creates a sense of order and looks appropriate next to geometrically correct flower beds, lawns and other decorative elements on the site.
- Landscape pond at the dacha. It is carried out in any form and fits very easily into the surrounding landscape. This option fits any style and looks as natural as possible. Its construction requires significantly less effort than equipping a geometric reservoir.
 Selecting a location
Great value when organizing a pond at the dacha with your own hands, as in the photo in the article, it has the terrain. On flat areas you can place a pond in a garden of any style and size. Uneven areas create more difficulties when deciding how to make an artificial pond, but at the same time they can serve as natural cascades and elevations for waterfalls.
It is necessary to build a pond with a fountain at the dacha with your own hands in an open area so that the pond is clearly visible from every corner of the dacha. Depth groundwater, the qualitative composition of the soil can affect the permissible depth of the reservoir, as well as the complexity of the work and the use of additional materials. When thinking about how to build a pond at your dacha with your own hands, in addition to the terrain, you should take into account a number of other important points.

- Compatibility with the environment. A mini pond at the dacha, visible from all sides, should be combined with buildings and green spaces on the site.
- Illumination of the area. It is preferable to choose the most shaded place on the site for the location of the reservoir. This will prevent increased water evaporation. In addition, with prolonged exposure to direct sun rays there is a high probability of active development of microorganisms in the water, which will negatively affect the aesthetic component.
- Environment. Do not overuse vegetation near an artificial pond. Long and thick roots big trees Over time, they can lead to damage to the insulating layer, which in turn will require repairs and putting the reservoir in order. Leaves falling into the water from tree branches located too close to the pond can cause siltation and will require regular cleaning. On clear days, nearby trees or buildings will be reflected on the surface of the water. Therefore, you should worry about a beautiful exterior in advance so that your gaze does not fall on a rickety shed or a dry fallen tree.
- Expansion of the reservoir. In the future, you may think about the need to increase the area of the reservoir, additional functional and decorative elements. Therefore, it is worthwhile to provide in advance a place for a possible expansion of the reservoir at the dacha with your own hands.
- Electrification. If you are planning to install lighting next to or directly in a pond, or placing an electric fountain or other movable structures, you should worry about laying all the necessary electrical wiring in advance. It is best to place wires underground, protecting them with durable boxes or corrugation.

Size selection
Having chosen a place on the site that will occupy a pond in the garden, you should decide on the size of the future reservoir. Specialists involved landscape design, do not provide clear recommendations in this regard. However, a decorative pond built with your own hands on a summer cottage should not occupy more than 8-10% of the area of the plot, because more large design will look like a bulky and alien object.

The depth of the pond in the garden depends on the purposes for which it is created, as well as on the capabilities of the owner, who equips the pond with his own hands on the site. The photos below will help you make your choice.

Selection of materials
When arranging ponds on your summer cottage with your own hands, you should approach the choice of material with the utmost care. There are many options as to what material is best to use to arrange small pond at the dacha with your own hands.

The photos in the article and the list below highlight the following main categories.
Concrete pond
Capital structure, which is the most expensive option for arranging a pond at the dacha. The advantages of using this material include increased strength and durability.

Plastic container
An industrially made mold made of high-strength plastic allows you to solve the question in the shortest possible time: how to make a pond at your dacha with your own hands. Various shapes and dimensions allow you to choose an option suitable for the most demanding owner.

PVC film or polyethylene film
The use of these materials makes it possible to create a garden pond with your own hands of absolutely any shape. The disadvantages of such a material include low resistance to external influences, and how short term services

Butyl rubber membrane
A do-it-yourself garden pond made from such a film will please the eye longer than the decorative pond in the photo below made of polyethylene or PVC. When planning how to make a pond on your site with your own hands, it is worth considering that the service life of the membrane reaches 50 years, and the increased resistance of butyl rubber to severe frosts makes it very advantageous material.

To save money, you can use various available materials. An old bathtub, basin or car tire for a mini pond - these and other “folk” remedies are used to create ponds in the country. Our photo gallery will suggest other original ideas.

Required equipment
Depending on the functionality of the reservoir and the material from which it will be made, the creation process may require following tools: a shovel, a cart for transporting excess soil, a level, pegs and a strong cord for marking, as well as a hose for watering. This set of tools will be enough to place mini ponds in your dacha with your own hands, as in the photo above. If the planned pond in the garden is of significant size, it is worth assessing the feasibility of using construction equipment. For a pond intended for fish breeding or designed for a particularly long service life, the installation of additional equipment may be justified:
- An aerator that saturates the water with oxygen necessary for fish.
- Pump for filling or draining water.
- Cleaning filter.
- A device for sterilizing water and removing dead algae.
Details of creating a pond from film
PVC film thanks to its performance qualities and relatively low cost, it is one of the most popular materials for pond construction. In addition, in order to make a pond with your own hands from PVC film, no special skills or special knowledge are required.
For arranging reservoirs, you should not use films with a thickness of less than 0.5 mm, and if you plan to create a particularly deep reservoir, it is better to take a film with the maximum available thickness.
The use of multi-colored film allows you to achieve different optical effects: black will make the bottom of the reservoir mirror-like, and nearby trees and buildings will be clearly reflected in it, brown film is perfect for simulating the soil bottom, and film of light blue or cream tones will make the reservoir as transparent as possible, which will allow you to conveniently observe the movement of fish.
The selected film should be cut so that it covers the bottom and walls of the reservoir, leaving a margin of up to one meter. The cut pieces must be joined with specialized glue or adhesive tape for such work.

Before digging a pit, you need to carefully consider the size, shape of the bottom and walls of the reservoir. If you plan to create a complex multi-stage design, it is better to first draw on a sheet of paper detailed diagram indicating all sizes.
Having marked the selected area, we begin to dig a hole. It is better to remove soil in the direction from the edges of the future reservoir to the center, gradually going deeper to the required limits. The bottom and walls of the finished pit must be carefully examined for the detection of foreign objects, sharp roots, etc. Any debris found must be removed to prevent damage to the film. We lay the prepared film on the compacted bottom of the pits, fixing it with stones and sprinkling the edges with soil.
Next, you need to strengthen the banks of the pond. For this you can use various materials. For flat banks, a geogrid or polymer grid is suitable; you can also use a regular chain-link mesh. For vertical banks, the use of piles or supports will be required.
You can complete the design of the pond by adding various decorative elements, planting plants and installing underwater or outdoor lighting.

Decoration with plants
When decorating a pond in the garden with plants, you should understand that they are divided into those that are planted on the shore along the edges of the pond, and plants that live directly in the water. The root system of shore plants will additionally strengthen the walls of the pond. When planting plants in a pond in the garden, it is important to keep in mind the speed of their growth, otherwise, after a long absence, there is a risk of finding a pond completely covered with a thick carpet of vegetation.

Decor
In order to decorate a pond in the yard with your own hands, except various plants, beautiful stones and other decorative elements good effect gives the use of backlight. The colored glow spreading from under the water will create a wonderful decoration for your pond at night. Additional lighting Can also be placed above water.

You can use various fountains as decor for decorating a pond at your dacha with your own hands, as in the photo in the article. The functioning of the fountains is ensured by the operation of pumps, which can be hidden at the bottom of the pond under the stones. Surface devices are also used. Pumps come in different capacities, which affects the height and intensity of the water jets.

Fish
You can add decorative fish to a pond at your dacha, when choosing which it is important to fully understand the conditions under which they are kept. It is worth buying those types of fish that get along well with each other and do not quarrel.

Pond care
A decorative pond at the dacha requires some care. Planted plants must be protected from the cold or transferred to warm room. During a long absence, the surface of an artificial reservoir at the dacha should be covered with a special mesh to protect it from debris. Leaves and other debris that have fallen into the country pond are caught with a net, and if a large amount of sludge forms, it is necessary to clean the reservoir. Water must be renewed periodically using a garden hose or a regular bucket (if not available). specialized equipment).
Photo gallery
In our photo gallery you will see more than 33 examples of beautiful ponds in the country.


How nice it is to enjoy beautiful images of nature, to breathe clean air. And there is a wonderful place for this - the dacha. Here you can realize your ideas. One of them is building a pond at the dacha with your own hands. Near such a body of water it will not only be pleasant to relax, but also boldly show off to your guests the masterpiece you created with your own hands. The size of the pond will depend on the free space on the territory, and the arrangement will depend on each person’s personal imagination and financial capabilities.
General principles
Read also: How to make and decorate beautiful garden beds with your own hands: simple, tall, smart. For flowers and vegetables. Original ideas (80+ Photos & Videos) + Reviews
Before you begin actual construction, you need to carefully prepare. For this you will need:
- determine location
- choose shape, size and style
- purchase the necessary materials
Planting of vegetation around the reservoir is carried out at the final stage.
Location determination
Read also: How to make a patio at your dacha with your own hands: a variety of design, finishing and arrangement options (85+ Photo Ideas & Video) + Reviews
For good functionality and attractiveness of the pond, it is necessary to choose the right place for it. It should not be exposed to the scorching rays of the sun, nor in the shade of trees. Lighting plays a big role because flowers planted around will not be able to fully grow if there is a lack of light.
The open area is not best place for the pond for the following reasons:
- It will be unpleasant to relax on hot days under the scorching rays of the sun
- Unicellular algae with large quantities light grows stronger and causes water to bloom
- Living organisms that will populate the pond will die from the heat at shallow depths
The best option is a site that is not surrounded by trees and is located next to a building or fence. Here in the morning and evening the sun is not so hot, and at noon the shadow cast from the building will give the necessary coolness.
You should not plant trees near a pond, because... their roots can damage the foundation of the pond. For the same reason, do not place a pond next to an already growing garden.
It is necessary to think in advance about a nearby source of electricity for arranging lighting, installing a filter, and a pump.
The construction of a decorative pond does not have strict requirements. The shape may vary. The perimeter, as a complement to the overall design of the site, is decorated with plants.
In order not to make a mistake with the location, it is advisable to outline the future in advance artificial lake using twine or sand. During the day, you need to observe how the lighting changes.
Shape and style
Whatever design is chosen, it must be combined with general view throughout the territory. For example, a round pond looks good in an area designed in the English landscape genre. Irregular shapes Suitable for a dacha made in oriental style.
There is no need to try to design a pond, adhering to clear geometric shapes. It is important that the form simply harmonizes with general design garden
As far as the free area of the site allows, this will be the size of the future creation. It's important to know that A larger reservoir is easier to maintain. It makes it easier to create a stable and sustainable ecosystem.
Materials
Read also:How to make gabions from mesh with your own hands: turning your summer cottage into a cozy corner, decorated with designer taste | 120+ Photos & Videos
In order to equip an artificial reservoir and provide waterproofing protection, various materials are used:
- Concrete– often used to create precise geometric lines. Quite complex construction
- Plastic containers - used on small areas(up to 5 m2). They are easy to install. They have a long service life
- Waterproofing film- good for a special project. It is elastic, but easily damaged. There are the following types:
- PVC (polyvinyl chloride)– deformed areas can be easily removed with glue
- Polyethylene– lower in cost, but not durable. In case of damage, self-adhesive tape helps
- Butyl rubber- most best view. Used different thicknesses. The greater the expected depth, the thicker the film is selected
Plastic mold base
Read also:
Once you purchase a ready-made form, you can create an artificial lake with your own hands quickly and easily. Even a beginner can handle the installation. It will take no more than 2 days.
The plastic is resistant to temperatures and ultraviolet rays, but requires great care during installation. It is very easy to damage, without the ability to effectively close the cracks.
For garden ponds, ready-made structures made from fiberglass are also used. This material is more expensive. It is also durable and can last much longer than plastic.
Installation plastic mold carried out in the following order:
- Initially, you will need to dig a pit that matches the shape of the workpiece. To do this, the finished container is installed on the ground. Around it, along the perimeter, with an indentation of 15-20 cm to the sides, sticks are stuck into the ground. A rope is stretched across them. Plastic container cleans up for a while. A hole is dug along the outlined outlines. It should be 30 cm higher in height. At the end of the work, you need to check the evenness of the bottom using a board or a special device
- The bottom of the pit is covered with a layer of sand, which will act as a base. Then the form itself is installed. All free spaces between the walls of the mold and the edges of the pit are filled with sand and moistened with water. This will make it easier to shrink
- The final stage is filling the mold with water and decorating the banks. beautiful stones, planting
Film base
Read also: Practical do-it-yourself fencing: installing a chain-link fence (Photo & Video) + Reviews
Usage waterproofing film, as a basis, provides great opportunities for recreating a reservoir of various shapes, even the most unusual.
PVC film is also not afraid of exposure ultraviolet rays, temperature changes. Its color lasts for a very long time. The service life is up to 10-15 years.
Butyl rubber film is more reliable. It is more expensive in price. It is used to create deep ponds.
The material is purchased with a reserve (+50 cm on each side) to ensure that its edges are well secured along the banks.
The work is carried out in the following order:
- The outlines are marked with lime or sand
- A shallow ditch is dug. Excavated soil is not thrown away
- New outlines are indicated. The bottom should be the deepest
- Using string and measuring tape, calculate the required footage of waterproofing material
- The bottom is covered with a layer of sand. Then non-woven fabric or geotextile is spread to protect the film from possible contact with roots or stones
- The film is spreading. The bottom and ledges are pressed down with pebbles
- The pond is slowly filling with water. It is important that the base material settles gradually
- After 2-3 days, the shores are drawn up. The edges of the cellophane are tucked in. Tiles and stones are placed on top, filling the resulting gaps with sand.
Base from an old bathtub
Read also: Terrace attached to the house: 150+ Best photo ideas of 2018-2019
In fact, to recreate a decorative reservoir, any containers that are no longer suitable for use on the farm can be used as a basis. For example, an old bathtub.
The course of action will be as follows:
- A pit is dug to fit the dimensions of the bathtub, +20 cm on each side. It should be slightly deeper than the base. A groove is dug along its perimeter. It should be about 30 cm in height and width
- The bottom of the pit is carefully leveled. Its horizontalness is checked using a special measuring tool.
- The bathtub is installed in a pit. Empty spaces on the sides are filled with sand (soil)
- Next, you need to prepare a mixture consisting of tile adhesive and water. Pigment is added to give color. This mass is applied to the sides of the base from the inside. There is no need to try to align it well. The walls will acquire dark color and structure similar to natural soil
- The glue should completely harden within 24 hours. To do this, everything is covered with cellophane and left
- To better strengthen the bathtub, a metal mesh is placed on its sides. It is cut into pieces and laid along the borders and inside the base (at 1/2 of the recess). The bottom is left uncovered
- Next, a solution (cement, water, sand) is prepared for bonding and applied on top of the mesh. It also doesn't need to be leveled much. To make the mesh more natural and strengthen, stones are inserted into the mixture. The drain is carefully cemented
- Clay is poured onto the bottom of the base, water is added and the solution is mixed. It is applied to the sides to cover the cement and fill the void between the stones. The solution must be allowed to dry for several hours.
- The finished base is filled with water. Aquatic vegetation is planted in the grooves in a circle.
After a couple of days the water will become a little cloudy. A decorative lake will look completely natural, hiding its true origin.
It is better to place large stones along the edges of the base on the mesh. This will give the shape of the pond clarity and the banks a natural look. When laying out the fragments, you do not need to adhere to the strictness of the forms. The relief will look more natural with irregularities and elevations. And if you alternate large stones with handfuls of crushed stone, this will add greater beauty to the resulting pattern.
Decoration
Read also:
Creating such beauty is a troublesome task, but the result will be worth it
A homemade pond looks very beautiful if fish swim in it and plants grow around it. This is a truly picturesque picture.
Certain vegetation is selected for different depths of the reservoir:
- no more than 30 cm – yellow iris, marsh marigold, pontederia cordate
- 30-50 cm– common arrowhead, reed, broadleaf cattail
- more than 50 cm– water lilies, lotuses, water hyacinths
Among the fish that are suitable for a home lake, crucian carp, veiltails, individual species carp family. So that the water does not spoil and the living creatures do not suffer, in mandatory the filter is installed.
Creation decorative lake on personal plot- the matter is a little troublesome, but the result will be justified. This is an incredibly beautiful place to relax, which fully suits the tastes of the owners. You can enjoy it every day water surface, bordered with tastefully selected plants. Which is especially important on hot days.
Every plant has its place
Even with the appropriate experience in arrangement, sometimes some mistakes are made. Below are tips that you can follow to avoid disappointment from your own work:
- There is no need to be afraid to pour soil into the created lake. When gardening, many people prefer to plant plants in plastic containers. This is wrong. Plants grow better in natural soil. It contains clay, which strengthens well root system and is not washed out with water. The pond will not be dirty
- For decoration, it is better to use stones of different sizes. In this matter, it is important not to overdo it, so as not to get an absurd picture of an area littered with stones
- Great depth is not the main thing. Firms dealing earthworks, deep reservoirs are often dug. This is done only for profit. If you plan to organize a pond with further breeding of fish in it, an average depth will be sufficient
- For the cleanliness, freshness of the reservoir and transparency of the water in it, installation of a special filter and pump is required. The pump must be selected correctly, because its power depends on the volume of water
- Every plant should grow in its place. Most often, it is in this situation that mistakes are made. It must be remembered that, for example, a water lily planted in coastal zone, will wither away. The same thing will happen to ferns in shallow water. List of plants with favorable zones for them:
- shore line: fluffy, marigold, snake knotweed
- coastal area: elderberry, lily of the valley, conifers
- area with water depth up to 20 cm: susak, arrowhead, reed
- area with water depth more than 20 cm: water lily, water lily
- decoration according to water level duckweed and water dye will add
The pump looks like a small container that can be easily disguised with stones. It is placed on concrete slab or brick. For laying water pipe and electrical wires are marked. According to her reinforced pipe cable is placed. Everything is covered with stones. A breaker is used to connect the pump to electricity. Don't forget to change the filter in a timely manner.
The reservoir should begin with the choice suitable place and determining the size of the future pond. It is best to place the site at the lowest point, but make sure that it is well lit by the sun throughout the day. It is important that it is not near widely developed crowns. Otherwise, they will constantly fall into the water, and large roots can seriously disrupt the waterproofing of the reservoir.
The size of the pond depends on the scale of the entire site and the intentions of its owner. A pond with a diameter of about 3.5 m and a depth of about 100-120 cm is considered classic. But if the area is small, you can make a pond about a meter in size and no more than 50 cm deep. It is important to remember that if you plan to breed some aquatic plants, the depth should be a little larger - about 100 cm.
The next step in pond construction is preparing the pit. In essence, it is just a hole of a certain depth with a relatively flat bottom and walls. The shape of the pit can be made almost any way. If it is subsequently intended to use a ready-made purchased form for waterproofing, then the foundation pit must follow its lines. If there is no rigid shape, you can give the future pond the contours of a circle, oval, figure eight, etc. The walls of the finished pit are cleared of protruding roots and sharp stones, and the bottom is covered with a thick layer of sand, which is well compacted.
Creating good waterproofing is very important stage in the arrangement of the pond. If the choice is made on a purchased rigid form, it is important to ensure that it is made from quality material. Cheap plastic will quickly crack and crumble when exposed to sunlight and temperature changes. Homemade waterproofing is usually made either from concrete, pouring it into the bottom and walls of pits, or from film laid in several layers. For flexible waterproofing, you should choose PVC film or, if your budget allows, butyl rubber. Such material can last from 15 to 30 years. The bottom and walls of the pit are lined with film, leaving small allowances at the edges for fixation.
The finished pond is decorated around the edges with natural materials: large cobblestones, plants, and lined with turf. To replenish fresh water, it is good to draw an artificial stream to the pond, the edges of which can also be lined natural stone. The bottom can be decorated with a variety of stones (necessarily with blunt edges) and aquatic plants planted in baskets or small permeable containers. Most matching colors are water lilies (nymphs), beautifully covering the surface of the water.
Benefits of a basin pond:
- arrangement takes a minimum of time;
- fits perfectly into the design of any site;
- if necessary, the pond in the basin can be easily moved to another area of the yard;
- requires minimal care;
- is budget option, requires virtually no financial costs.
Artificial pond from a basin very easy to do. Take an old metal or plastic basin and dig it into the ground. If the basin is full of holes, then cover its bottom with construction film. It is desirable that it be thick and durable. If desired, the bottom of the basin can be decorated with stones and shells. A pond already filled with water is decorated with live or artificial plants, and the “banks” of the reservoir are lined with natural stone or pebbles. You can also lay out paving slabs.
A mini-pond from a basin will be much stronger if the bottom and walls of the basin coat cement mortar . In addition, if you plan to put frogs in a pond, it will be much easier for them to get to the surface on a cement surface than on a slippery film.
The solution is prepared as follows: mix cement and sand in a ratio of 1:3 and dilute with water. Stir well until the sour cream becomes thick, so that there are no lumps left, and coat the basin. Layer thickness - 2cm. While the solution at the bottom of the basin has not hardened, you can make various compositions from stones in it. The basin, covered with cement, is left to dry for at least a day. After this, it can be painted with black water-repellent paint. When the basin is filled with water, the black color will give the surface of the water a mirror effect.
For mini-reservoirs with aquatic plants, it is better to use basins with a depth of more than 15 cm. In shallow basins, the water will heat up quickly in the summer, and in frosts it will freeze to the bottom and the plants will die.


Device
In order for a decorative pond to please the eye, first of all, it is necessary to choose the right place for the pond.
Basic selection rules:
- Choose a place in partial shade, so the water will bloom less, and aquatic plants will not wither in the sun.
- Avoid open and well-ventilated places.
- You should not place the pond under trees, otherwise you will constantly have to remove leaves from the water, and the water will become clogged.
The pond should be located so that it is clearly visible from everywhere. Choose a place so that the reflections in the pond are interesting and varied. For example, it could be clouds, trees, a house.
As a visual aid when choosing a place for a pond from a basin, you can use ordinary plastic film. Place it on the site of the planned pond, and walk around, see: will the pond be visible from the main viewing points of your site?
Installation
How to make a small decorative pond from a basin at your dacha? The basin is made, the place is chosen, now we begin to build a mini-pond with our own hands.
Tools and materials:
- Shovel.
- Pump (if a fountain is planned).
- Clay or sand for layering.
- A small amount of cement mortar.
- Natural stone of different sizes.
- Pebbles for soil or gravel with non-sharp edges (if the basin is covered with film).

Stages of work:
- Dig a hole slightly larger than your pelvis. The edges of the basin should rise 5 cm above the ground.
- Make a layer of clay or sand under the bottom of the basin and between the walls of the basin and the pit. Such a “pillow” will allow you to place the basin more level, and the water in it will not heat up quickly.
- The dug basin is filled with cement mortar around the edges. This is necessary so that the reservoir holds on more tightly and so that during rain the earth does not wash out from under the edges.
- Soil is placed at the bottom of the basin, and aquatic plants (duckweed, watercolor, water urt) are planted in it. You can decorate the pond with artificial flowers.
- Fill the basin with water.
- The area around the pond is decorated with pebbles or stones. It will look better when large stones are laid out first, and then medium and small ones.
- You can plant it next to a pond moisture-loving plants, such as ferns or callas, and plant the adjacent area with lawn grass.
If the water in the pond comes from a tap, it must first be allowed to settle. Best option - water from the nearest natural reservoir, but you can also use rainwater.
Photo of finished ponds from a basin.


Caring for a pond from a basin
For a miniature water garden to be clean and well-groomed, it needs change the water regularly. Water is scooped out from the pond using a jar or ladle. If there are no plants planted at the bottom, choose pebbles and wash them with water. If the soil is shallow and difficult to select, then pour a small amount of water and mix the soil with your hand, and then remove the water with a rag. This is repeated several times.
Walls and bottom of the basin wash with a sponge or rag. This should be done about once a month, otherwise the water will begin to “bloom” and microorganisms will appear in it.
In nature, the role of natural orderlies of reservoirs is played by snails. Therefore, you can populate your mini-pond with them so that they clean both the plants and the pond itself from algae.
In hot weather, water from a water garden evaporates very quickly, and you need to constantly ensure that its level is sufficient. Add water need to be done in small portions and slowly, so as not to damage the plants and decorative compositions at the bottom of the pond. If necessary, the pond can be protected in hot weather with an awning or canopy.


A miniature pond from a basin can be made on any site, and there are a great many ways to decorate it, it all depends on the author’s imagination.
If you follow all the simple rules for arranging and maintaining such a mini-pond, the artificial water garden will become a real one. decoration country landscape and the pride of the owners.
And a pond. Even a small body of water attracts those around you like a magnet. Water is fascinating even in small quantities... Moreover, you can build a pond with your own hands in a few hours. But this is a small artificial reservoir. Building a large one will require both money and time.
Where to dig
Small artificial reservoirs are best viewed from above. Therefore, if there is a corresponding depression on the site, it is best to do it here. There is, however, in this negative side: You will have to raise the edges of the bowl higher to prevent rainwater from getting inside. The second option is to come up with a water drainage system (make a drainage system above the reservoir).
If there is a key somewhere on the site, it is logical to make a natural pond by digging or deepening the existing bowl, lining its borders with cobblestones or stones, and planting plants. The stream, which is sure to exist in this case, can also be improved by lining its edges with cobblestones, drowning them in the soggy soil, you will give greater strength to the bank, and you can plant moisture-loving plants between them.
Even a small waterfall is a magical sight. How to dam a pond if there is a natural stream on your site - dig a pit, cover it with stones and direct the stream into it
Not everyone has such a luxury on their property as a stream or a spring. We have to make artificial reservoirs. When properly designed, they look no worse than natural ones.
How to make an artificial pond with a bowl (without film)
The simplest and quick way to make an artificial pond at the dacha - bury the finished bowl in the ground, shaping and decorating its edges. There are plastic bowls - ready-made different forms, sizes and colors (mostly blue, green and black).

Construction of a plastic garden or country pond- it’s not a difficult matter. Here are the step-by-step instructions:
- It is necessary to dig a pit in the shape of a bowl. If the shape is very non-standard, you can turn it upside down at the installation site and outline the outline with something (at least dig it with a shovel). The bowl is taken to the side and a pit is dug. It should be a little larger in size - a little wider, but not deeper. The edges should either be flush with the ground or protrude slightly. If you can raise the edges a little, it will be even better: when it rains, dirty water will not flow in.
- After the required depth is reached, the bottom is leveled to the horizon: it is first leveled with a shovel, then compacted and the excess is removed with an even bar. The surface must be smooth and hard: the plastic must have good support. If the ground is poorly leveled (clay), you can pour 5-10 cm of sand, wet it and compact it.
- The next stage is the installation of the bowl in the pit. If the bottom has been made level, the edges of the bowl will be level with the horizon. Now the space that remains between the wall of the bowl and the pit must be filled with soil or sand and compacted well.
- Now it’s time for the design: the installation is complete, you can add water.
How to use this technology to build a pond in the courtyard with lighting, see in this photo report (you can scroll through the photo gallery yourself by clicking on the thumbnails below).
We are digging a pit. We decided that the sides would be 1-2 cm higher than the level of the path - there would be less debris inside, and we would decorate the edges with stones. On this side, just below the maximum level, we cut a pipe into the bowl so that excess water would drain. She was taken to the sewer
But it is not always and not everywhere possible to constantly add and remove water to the pond. Then you will have to either plant plants that will clean it, or change it periodically.
Pond from an old bathroom
You don't have to buy a bowl at all. Any container can be used. Even old bath. It turns out very well. All the actions are the same, the foundation pit is dug first, a bathtub is placed in it, what happens next, see the series the following photos. There's a pond on them old bath transforms into a truly lovely place.
The platform was also entangled with wire - so that the clay did not float and the platform did not sag. This is already a month later, such beauty - a garden pond built with my own hands makes me happy
Pond from a car tire (with film)
A mini-pond can be made from an old car tire, or rather from a tire. The larger it is, the larger the reservoir. The most difficult thing in this matter is to cut off one side part. If the resulting edges are sharp, they need to be processed sandpaper. The second most difficult task is to dig a hole suitable size. The difficulties ended there. The rest is quite easy.
The cut tire is installed in the hole, covered with earth on the sides, and compacted well. Also, earth or sand is poured inside and the bottom is leveled. Take a piece of thick polyethylene film, you can fold it in half and cover the resulting tank. Don’t try too hard: just pour water, it will straighten the film itself.
Instead of polyethylene, you can take banner film (available from advertising companies that produce outdoor advertising) or a piece special for pools and ponds. They are much stronger (but more expensive).
The protruding ends of the film are tucked around the walls of your pond and decorated with stones. The construction of the pond is completed, next comes decoration and planting. See how to make a pond from a tire in the photo report.
The next stage of making a mini-pond for a summer residence is decorating the edges with stones
There is certainly nothing complicated about such a device. Anyone can build such a pond at their dacha with their own hands, and the investment is minimal.
In general, mini-ponds are made from tanks, barrels, pans, even flower pots. The main thing is that there is a body, and designing it is not very difficult: experience gradually comes. They are placed in the garden, at the dacha, near the house. It is possible to supply water, make a stream, it can be placed under trees, for example, or shrubs. Both beauty and benefit at the same time.
Making a pond with film
By creating this artificial pond from film, you almost exactly repeat the work described above, only without installing a bowl:
- mark the shape of the future pond;
- dig a pit, forming ledges if necessary;
- clean the bottom of any sharp objects: roots, stones, etc.;
- level the banks of your pond;
- spread the waterproofing film;
- fill the pond with water;
- fix the edges of the film;
- decorate.
A country pond created using this technology can be of a more substantial size. Important point: on loose soil, simply making a pit and laying down a film will not work. We will have to come up with some measures to strengthen the banks. In this case, you will have to either install a bowl, or make a more serious structure - from brick or concrete. Next, let's look at examples of how to inexpensively make a pond from film.
First project: sides flush with the ground
Eight simple steps and your pond at the dacha is built. How to dig and arrange a pond at your dacha and make it look like a natural one, see the photo report.
Second project: raised sides
Second option homemade pond in the first stages it is built almost the same as the first one. Only after the pit reached the design depth were the sides raised, lined with bricks along the edges and concreted. The result was a pond with raised sides. A water circulation system has also been made. It is shown in the figure below.

As you can see, this pond is more multi-layered and its displacement is more serious. If you want to have a pond of at least medium size and not build a serious bowl, you can do as shown in the figure: fill the created pit with sand, cover it, and only lay the film on top. Geotextiles evenly distribute the load and do not allow plants to grow. This is especially true if you are building a pond in your garden and there are shrubs or trees nearby.
Serious projects: brick and concrete
If you want to have big pond at the dacha, and if you want to build it with your own hands, you will have to study the topic of building swimming pools. Firstly, the construction of the bowls repeats all the stages one by one. Even the forms are sometimes made stepped. True, the banks are not decorated with plants, and they are not planted in the pool itself... But the construction process itself, with reinforcement, plaster, and waterproofing is the same. Moreover, the water supply and water treatment system is also similar. Except that chemical cleaning methods are not used in ponds, but filters, screamers and ultraviolet light can be used.
In general, a large pond is not a cheap pleasure. Moreover, it requires expenses not only for construction, but also for maintaining a large reservoir in good condition: filters need to be regularly cleaned and cartridges or backfill replaced. But of course the pleasure is great...
Not the largest pond, but it required 10 bags of cement, 30 bags of sand (20 coarse and 10 fine), a hydrophobic additive - 5 bags to make the concrete water-repellent. Plastered on a mesh fixed in the ground
Pond Plants
When shaping or choosing a bowl, consider not only its shape and depth. If you want plants to grow in your pond, a marshy riparian area is necessary. If you form a pond using film, you can make a profile approximately like the one in the picture.

It is more convenient to do this if you fill the pit with a layer of sand at least 15 cm thick. With its help you can make the relief the way you like. To make the work easier and the film not torn, lay geotextiles on the sand. This thin membrane is very tear-resistant. You can do whatever you want without breaking it. Having formed the desired bottom topography with its help, you can line the film and lay stones on it, fill it with water and plant plants for the pond at different levels.
To ensure there is enough oxygen in the water, you can plant Canadian elodea, hornwort and swampweed. They are in the photo below. They are planted in water - these are aquatic plants.


, Islam, Judaism How do temples of different religions differ")


