Most construction trailers for temporary residence offered on the market please the buyer's eye with an affordable price. But here’s the problem: they are made from cheap building materials low quality, poorly insulated and limited in width in order to save on transportation (2.5 m is the standard size of a truck). If you need something more comfortable and comfortable home, you'll have to do it yourself. The cost of a cabin built with your own hands will be no less, but you will get a reliable and high-quality structure of the desired size. And the construction technology is described in our article.
Trailer design and drawings
To purchase the required materials, the first thing you need to do is decide on the size of the dacha cabin, develop a layout and draw up an estimate based on the drawings. At the same time, think about how to use this building later, when a full-fledged residential building appears on the site. As a rule, the owners turn a temporary trailer into a bathhouse, a shed or a guest house.
Advice. It is advisable to provide the dimensions of the structure in multiples of 1.5, for example, 3 x 6, 4.5 x 6 or 4.5 x 9 m. This will save materials, most of which are produced according to building standards.

Layout options
Draw a plan and side view of the future building, taking into account the following recommendations:
- Use the principle of minimalism. The home should be comfortable and at the same time compact, so take the most “running” size as a basis - 3 x 6 m. If desired, it can be expanded to 4.5 m by adding a terrace.
- Try not to make walk-through rooms. If 2 living spaces are needed, place the entrance with a vestibule in the middle, as shown in the drawing below.
- For a one-room house, provide a vestibule and porch on the side or at the end.
- Doors from the bathroom or separate shower and toilet should open into the hallway, not into the bedroom.
- Plan the roof to be pitched with a slope of at least 10° and overhangs for effective water drainage.
- Windows small size needed in living rooms and in the kitchen, for the bathroom, it is enough to make a ventilation opening.

When the layout is ready, you can move on to selecting building materials, calculating their quantity and drawing up an estimate. You need to understand that all cabins are built according to frame technology in these ways:
- a frame is mounted from wooden beams and sheathed on both sides with clapboard (or other cladding), insulation is laid inside;
- the same, only the frame is welded from metal;
- construction from steel profiles finished with insulated sandwich panels.

Note. Construction shed with sandwich lining, shown in the photo, is very attractive to its appearance. Until you find out how much such panels and shaped accessories for them cost.

A wooden trailer is easier to build, it is lighter and cheaper than a metal one, although it is not as durable. If you are not a welder, but know how to work with wood and have limited funds, then a house made of timber is suitable option. Some tips on how to choose wood and other materials for it:
- The main structural elements - racks and strapping beams - will use 10 x 5 cm timber. If you need to make the house warmer and put 100 mm thick insulation in the walls (instead of 50 mm), then the section of the racks needs to be increased to 15 cm.
- Make floor joists and rafters from edged boards 50 x 100 mm. For jibs and jumpers, take a 50 x 50 mm beam.
- Boards 25 x 100 mm are suitable for roofing sheathing.
- As insulation, use mineral wool protected on the outside by a diffusion membrane (wind barrier);
- For external cladding use clapboard, block house or corrugated sheeting. It is better to line the inside of the room with plastic panels, and how to do this correctly is described here.
- Budget options roofing there are several: the same profiled sheet, slate and ondulin.

Construction from SIP panels
Advice. If instead of mineral wool you want to use cheaper insulation - polystyrene foam, then provide wall cladding from OSB boards by example Canadian SIP panels. The fact is that wood does not like to come into contact with moisture-impervious polymers and begins to rot.
If you need to mount a reliable steel change house, then prepare for the frame and roof truss profile pipes with a cross-section of at least 60 x 60 mm, and for lathing - 40 x 40 and 40 x 60 mm. The construction technology is similar to the manufacture of a wooden trailer, the difference lies in the welding fasteners.
How to build a house - guide
The construction of a carriage - a cabin with your own hands is divided into several stages:
- Preparing the base.
- Assembling the frame, laying the floors.
- Installation roofing structures and coatings.
- Installation of external and internal cladding with insulation.
- Installation of engineering communications.

Since wooden trailer– the structure is quite light, there is no need to prepare a capital foundation for it. It is quite enough to place it on a leveled plot of land. concrete blocks so that their upper sides are in the same plane. Observe the installation step of 1.5 m, which means that with a cabin width of 3 m, the blocks must be placed in 3 rows - two outer and one in the middle.
Note. For more massive metal houses, shallow foundations are built in the form of columns of several blocks resting on sand cushion. Marking process and devices columnar base shown in video:
The simplest foundations made of solid blocks will allow your structure to stand for 2 to 5 years, then distortions will appear due to subsidence. If you are counting on a longer period in order to later convert the change house into a bathhouse, then you need to lay down a capital columnar foundation made of brick with waterproofing according to the diagram:

Frame installation
At this stage of construction, you need to make the bottom trim from timber and mount the walls. Step by step it looks like this:
- Treat the wood thoroughly with an antiseptic. Upper planes Cover the columns with roofing felt, folded in half for good waterproofing.
- Make notches at the ends of the strapping bars to connect half a tree, as shown in the diagram. Place these beams on the foundations and fasten them together, maintaining an angle of 90° (checked by measuring the diagonals).
- Cut 2 grooves in the middle of the short beams and install the middle beam. The binding is ready.

Note. There is an easier way - to use 150 x 50 mm boards installed on edge as beams. But it won’t be cheaper, because the boards will have to be installed more often, and the design will not be as reliable. The simplified technology is described in the video:
The next step is the installation of floor joists from boards installed on edge in increments of 50 or 60 cm (depending on the width of the insulation boards). Skull blocks are nailed to their sides, onto which subfloor boards and heat-insulating material with a water barrier are laid.

After installing the thermal insulation layer, the logs are covered vapor barrier film in accordance with the diagram, and then the finished floors are laid from boards.

Floor insulation scheme
The walls of the frame cabin are assembled in a horizontal position, directly on the floor. Put together a shield of the first longitudinal wall with lintels (belts) and racks for windows and doors, be sure to install the jibs, as shown in the photo. On top of the first partition, immediately assemble the second, and then the side walls.

Lift all the frames one by one, place them in the design position and fasten them together. If everything is done correctly, then one longitudinal wall should be 0.5-0.6 m higher than the other to ensure the slope of the pitched roof.

Reference. The metal frame is welded from profile pipes or corners in place, in a vertical position. It is important to maintain a 90° angle between the posts and beams and to weld the oblique stiffeners in time so that the structure does not move.
Roofing device
To block country house, it is necessary to install and secure rafters from boards 150 x 50 mm, turned on edge. The beams are mounted directly above the racks and with the same spacing; galvanized corners can be used for fastening so as not to cut out grooves. Sheathing boards are placed on top along the rafters and nailed to them. There is another option: the rafters are immediately covered with sheets of OSB plywood, as shown in the picture.

Note. The rafters must protrude beyond the dimensions of the trailer by at least 150 mm and form roof overhangs. Subsequently, their ends are sewn up in front with boards.

Ondulin is most often used as a roofing covering, laid on a wind barrier (super-diffusion membrane). The film sheets are laid out from bottom to top with an overlap of 100 mm and fixed with a stapler, after which ondulin or corrugated sheeting is mounted. You can see how the frame-panel assembly of the trailer takes place in the video:
Wall cladding and insulation
Unlike ready-made cabins, we are building comfortable temporary housing, so the external walls must be sheathed using construction technology frame houses. The “pie” for insulating the external fences of a home is shown in the diagram:

Finishing work is carried out in the following order:
- Pull and secure with outside canvases windproof membrane. Next, cover the facades with OSB boards, and then decorate them with clapboard or corrugated sheets.
- Place the slabs between the posts basalt wool(recommended) or other thermal insulation material. From the inside, cover the insulation with a vapor barrier film and nail it to the studs with strips.
- The last step is the interior lining. Usually the vapor barrier is sewn up with the same OSB plywood, to which the internal finishing material – plastic panels, block house, wallpaper and so on.

Installation of wind protection film
Note. Thermal insulation and finishing of ceilings is carried out according to the same scheme. But here it is advisable to use thicker insulation, as on the floors.
Upon completion of finishing, install windows and doors, mount ebbs and drainage systems. On external corners, under the roof overhangs and in the lower part of the structure, place shaped elements that cover the joints of finishing materials.

Home interior design
Normal living conditions imply the presence of minimal amenities - heating, running water with sewerage and electricity. It is assumed that these communications are already available at the dacha; all that remains is to connect them to the change house. In this regard, we give the following recommendations:
- Heating can be arranged in two types - electric or wood. In the first case, you need to install convectors or other heaters in the rooms, in the second - install a chimney pipe and a stove. Here it is important to protect wooden structures from fire - cover the walls near the stove with sheets of iron, and insulate the chimney with fireproof basalt fiber.
- Water supply and sewer pipe it is started through the floors of the trailer, going there along pre-dug trenches. How this is implemented, see the diagram below.
- An electrical cable (recommended brand SIP) is attached to a bracket mounted on the wall, and then enters the room through a hole. The input must include protective device(RCD), and behind it is a control panel with automatic switches on lines of sockets and lighting.
![]()
Advice. Internal electrical wiring better to do in plastic cable– channels, they look neat and nice. Lead the power line to the heaters with a wire of a larger cross-section (refer to the dimensions of the connecting factory cables with plugs). All passages through wooden walls perform in metal cases, in other words, in pipes.
Conclusion
A change house is a temporary structure. But, as usual, there is nothing more permanent than temporary buildings. Hence the conclusion: approach construction thoroughly, as if you were building garden house or a bathhouse. Of course, it will take much more time, and you won’t be able to save money, but after ten years you will probably have the opportunity to appreciate your own work. Over such a period, a purchased construction trailer will turn into a ruin.

Design engineer with more than 8 years of experience in construction.
Graduated from Eastern Ukrainian National University them. Vladimir Dal with a degree in Electronics Industry Equipment in 2011.
Related posts:

The construction of a private house usually begins with a “construction trailer”. On the market you can find many offers for the purchase of new or used wooden cabins. Even such a concept as a “block container” has appeared in everyday life. It is made of metal, has a large number of configuration options and can already be used as an element of modular housing construction.
But it’s the do-it-yourself cabin cabin on wooden frame- the most economical and optimal solution for the thrifty owner. After construction is completed, it can be used as a guest house, a shed for tools and equipment, converted into a bathhouse, or transported to a summer cottage and built a house from trailers.
Do-it-yourself cabin car: cabin project
The further use of the cabin depends on its size, design and finishing materials.
As a small shed internal partitions not needed. There is also no need to insulate walls, floors and roofs.
If you plan to use the cabin as seasonal residence(for example, a summer garden house), then you can provide internal layout. It is better to carry out insulation at the construction stage - when using heaters, the cabin with your own hands will better retain heat in the spring and autumn, and in the summer it will not get too hot in the sun.
For a construction trailer, the internal lining may be limited to inexpensive and simple materials. Conversion into a garden or country house IC will only require modifications in terms of decorative finishing.
It's best if interior space will be divided into at least two rooms. For example, the house in the first photo can be imagined like this.
Projects of cabins
A small vestibule-hallway and large room with one small window- a typical DIY construction trailer.
And this is an improved version with three windows, which can roughly be called a house with a living room and a bedroom.

In this diagram, the change house consists of three rooms - a vestibule and two equal rooms.

And of course, before starting construction you need simple drawing indicating the main dimensions.

Drawing of a cabin
foundation
How to build a cabin — step by step instructions Construction of a cabin begins with the foundation.
Feature small wooden structure at her low weight. But even this does not mean that it can be placed directly on the ground. To protect against the effects of soil moisture (including precipitation in the form of rain and snow), a raised base is necessary.

which can be painted or covered with vinyl wallpaper.
But cladding with wooden clapboard is more common.

The internal partition must be provided for while developing the design of the change house, but it is not too late to equip it later. The main thing is that it is attached to one of the floor joists from below and to the timber ceiling beam above.
Window and door frames are attached externally and internally. Finish the corner joints from the outside with strips or wooden profiles, and from the inside with baseboards and fillets.
Finish by sanding wooden coverings, primer and paint treatment.
Where to house your workers during the construction of a facility or how to provide yourself with temporary housing? A change car will be a way out of the situation. It can be used in any way, even become a moving office in the future, roadside cafe or a kiosk. A mobile trailer, which is equipped for the house, is also installed on summer cottages. Transportation of such a cabin is carried out up to several times a year and this is the main advantage of temporary housing.
Having equipped a change house for yourself, you can make it real home, which will have everything: bedroom, bathroom, kitchen corner. If you are still thinking about investing in a home, then don’t hesitate. A well-made structure will more than pay for itself and in the future it can be rented out to other developers.

The material for the frame of the cabin is either metal or wood. A wooden structure is much cheaper than a metal one, and correct processing sheathing, which is often lining, a wooden change house can last up to 10 years. If we are talking about metal, then it has modern look, more durable in operation and transportation, can withstand heavy axle loads, but is undoubtedly a more expensive material.

What types of carriages are there, and what are their advantages?
The change house car is often produced at metal frame and does not require the construction of a foundation when installing it; a flat surface will do, or foundation blocks, welded construction. The change house is equipped as a warehouse, security post or temporary housing for workers. The rooms inside the cabin can be separated or combined, but the presence of a vestibule is desirable. It will protect the main room from cold air.

Wooden trailers are used less frequently and are mainly used for personal plots or recreation near the sea. A wooden cabin quickly conducts heat, which speeds up its heating. The weight of a wooden structure is much lighter than a metal one. But, no matter what frame you choose, you can always equip the trailer with an axle with wheels and take additional living space with you on the road.

Carriages modular type allow you to create a mini-town of several cabins directly next to a remote construction site. All that is required is to install electricity and water. If the building area does not allow for longitudinal arrangement, then do not forget about vertical installation. But, having chosen this option, you should take care of the strength and reliability of the structure.
A change house car has a relatively low cost compared to a container change house or rental housing option, and takes up little space on the site. Below is a comparative table of trailer cabins and container options.

| Container | Caravan |
| Externally, the cabin looks like a building | Externally, the change house looks like a carriage |
| High quality | Standard quality |
| Possibility of repeated movement while maintaining the structure | Frequent transportation is undesirable, since partial repairs will be required after several transportations |
| One truck can accommodate up to 8 cabins | One truck can accommodate no more than 2 pieces |
| Requires installation with at least 2 people | No assembly required |
| Possibility of any configuration | Equipment is limited |
| From containers you can create rooms that will have various sizes or configuration | Limited possibility of constructing a multi-storey building and the need to strengthen the axes of the structure |
| At mechanical damage in the change house they change the panel | Requires complex repair work |
| Saves storage space up to 8 times due to the disassembled design | A change car has a constant need for storage space |
| The tightness of the structure makes the room warm with increased comfort | Availability large quantity joints and crevices require significant heating costs |
| Possibility of installation of high-quality plumbing and electrical wiring | Limited possibility of carrying out powerful electrical wiring due to fire danger, local connection to drainage and electricity |
How to make a trailer cabin with your own hands: drawings and practical tips
If you see the advantages of purchasing a cabin trailer, then you can make it yourself and save money on the services of the manufacturing company. The following shows the drawings standard options cabins for which you can easily make temporary housing or even an office.

Having chosen the required dimensions of the cabin and its internal placement, you need to start preparing flat surface for the construction of the structure. Foundation blocks are often used for this.
Sequence of work when constructing a cabin yourself:
- The change house car begins with the installation of the frame. Install stands: metal or wood. If the change house is larger than the standard size, then it is worth additionally strengthening the surface with runners for the reliability of the structure.
- First install a roof made of galvanized sheet or metal tiles, and then flooring from corrugated sheets or from durable oak boards.
- External cladding is made either with sandwich panels, or corrugated sheets, or clapboard.
- Internal cladding is carried out simultaneously with wall insulation and waterproofing of the floor and roof. But if you do not plan to use the change house in cold weather, then you can abandon this process. As insulation will do mineral wool, the layer of which should not be less than 5 cm. Internal lining It’s worth doing in stages; you don’t need to try to cover the entire trailer at once. Choose one wall and cover it completely, then proceed to the next finishing area.
- At the end of the installation of the cabin, install doors and windows.
It becomes relevant when there is no place for rest and storage of equipment on its territory. When cash limited, but the problem of lack of temporary housing is acute, best option- construction of a trailer according to the type of cabin. The advantages of such a structure and methods of its installation will be discussed further.
Stylish project and design country house from the carriage
The house is an attribute of country life. It is possible to build it with your own hands, but it all depends on source material. Let's consider all the advantages that cabin houses in the form of trailers have:

Disadvantages include the inability to retain heat in winter period, as well as the unreliability of the structure itself regarding break-ins and penetrations of ill-wishers.
Very fast and inexpensive construction
The answer to this question interests many people who are interested in the idea of building a trailer with their own hands. As for the cost, we can say that it will definitely be less than a wooden or metal analogue of the change house. And the fact how quickly such a house can be made directly depends on the professionalism of the builder.
However, even inexperienced novice builders can complete the job in just two days.
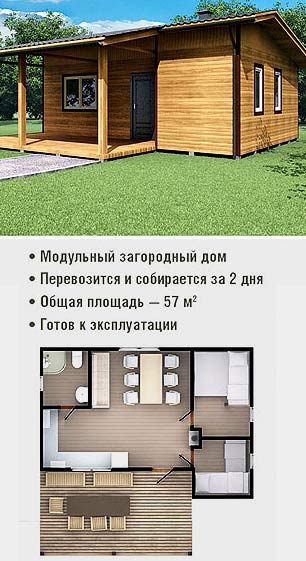
Project and layout modular house for the dacha
This is several times faster than sheet iron.
Stages of construction of a country house
Without anyone's help it is quite possible. Let's look at this process in more detail, dividing it into stages.
Stage 1. Creating a project. Before construction begins, measurements of the area are taken. The project includes the following elements:
- , which helps to graphically present information about building elements and prevent all sorts of defects before construction begins;
- Technical justification - it includes quantity calculations building materials, which is determined by simple mathematical calculations;
- The diagram and plan will help you evaluate how harmoniously the temporary house fits into the surrounding area.
The project should describe as accurately and in detail exactly what the house will be like, what elements it will consist of and what dimensions it will have.
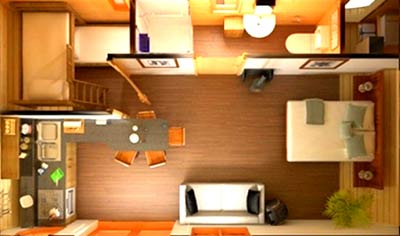
Layout country house from a construction trailer
You can sketch out the project yourself on paper, or you can use a special graphic editor that will do this work for you.
Stage 2. Clearing the area of debris. Particular attention should be paid to the soil. It needs to be leveled as much as possible using any construction mats, well compacted and compressed.
Stage 3. Purchase of construction materials and components. In this case, it is recommended to take the material “in reserve”, since during operation it may be necessary to replace individual parts of the house. You will need the following materials:
- Bars;
- Ruberoid;
- Roofing material (metal profiles, corrugated sheets, lining, wood);
- Insulation (foil and glass wool).
If you want to save on building materials, you can purchase them at wholesale centers, without intermediaries. Also in fashion are prefabricated cabin trailers, which are sold ready-made.

Project of a prefabricated multi-section cabin
The customer can only assemble them according to the instructions and use them for their intended purpose. The cost of such a structure will be 10 times higher than assembling it yourself.
Stage 4. Formation of the foundation. For temporary housing there is no need to organize a full-fledged foundation.
It is quite enough to “raise” the country house 30 cm from the soil level by placing it on monoblocks. This option is the simplest and most economical and will allow you to move the car at the right time.
The perimeter of the structure is outlined and monoblocks are installed. For small dimensions, 5 monoblocks are suitable (4 in the corners and 1 in the middle of the car).
Stage 5. Do-it-yourself waterproofing. Cover the foundation with roofing felt to prevent penetration excess moisture inside the trailer.

Insulation and waterproofing of a country trailer
Stage 6. Beginning of installation. Make a frame (base) between the monoblocks. Suitable for these purposes wooden beams. They build in the same way vertical supports, to which the base of the wall will be attached. When the bases are ready, install the roof, making it slightly sloping. Roof roofing materials are attached at the very last moment.
Stage 7. Wall covering. Using a screwdriver, the panels are screwed to the vertical joists. WITH inside the wall is insulated with a layer of polystyrene foam or mineral wool. 
Stage 8. Arrangement of windows, doors and roof. The final stage of building a house with your own hands involves installing windows and doors, as well as covering and waterproofing the roof. For the latter, it is best to use suitable roofing materials such as tiles, bitumen or regular slate. Before laying the outer layer, the roof surface is covered with polyethylene.
If there is a porch in the plan, then its arrangement is done first.


