Wooden lining (euro lining), which was replaced by siding and plastic panels, is gradually regaining its position. More and more users prefer this beautiful, natural and time-tested material.
Naturally, many construction teams offer services for the installation of wooden lining (euro lining). But, not everyone has the money to pay for third-party work, or simply, if you don’t want to build a house, then at least make the outer or inner wall cladding on your own. Therefore, below is a material focused on those who are interested in self-assembly of wooden lining.
How to sheathe a house with a clapboard with your own hands
At first glance, it may seem that lining walls and ceilings is a simple and time-consuming process. As it is not paradoxical, but the way it is. To work, you will need minimal skills in working with a tool, wood, and step-by-step instructions for installing a wooden lining.

Step 1 - Choosing a wooden lining
To choose the right wooden lining for wall decoration, you need to take into account the influence of such factors:
- Purpose of the premises. Depending on the purpose of the room, the requirements for lining will differ.
- for a sauna, you need eurolining of the “elite” class, preferably of coniferous species;
- any lining is suitable for exterior decoration, the main thing is to ensure its proper protection from all possible damage;
- for interiors - the main requirement is the environmental friendliness of the material.
- Ways of fastening a wooden lining. They will have a key influence on the calculation of the material for installation. There are several ways:
Sheathing lining vertically. The most common method. Two factors contributed to this. Firstly, the vertical fastening reliably protects the tongue and groove from water leakage. Secondly, it allows you to visually raise the height of the ceilings of the room.
Note: vertical installation of lining is the most optimal for a steam room, as it allows condensate to flow down.
Sheathing clapboard horizontally. The easiest way. Finishing with clapboard horizontally allows you to hide possible flaws on the surface of the walls. Horizontal fastening is more often used for exterior decoration, and the lining is installed with a groove down to avoid water leakage.
Diagonal clapboard trim. A very wasteful method in terms of material consumption. But winning when decorating broken surfaces, for example, attic walls.
Herringbone lining. Quite laborious, requiring serious calculations, but at the same time the most economical way to mount the lining, allowing the use of small pieces of lining;
Combined lining lining. Allows you to create geometric patterns from boards of different lengths, mounted at different angles. However, such fastening requires certain skills and is characterized by a high consumption of material as scraps. And also complex from the point of view of the frame device.
Note. Not all lining profiles allow you to choose the installation method. For example, a block house or an American is mounted only horizontally. Therefore, when choosing a laying method, consider the configuration of the lamella.
You can also combine horizontal and vertical wall cladding with clapboard.
- wood species. For the manufacture of lining, both coniferous and deciduous species of wood are used. The choice depends on the purpose of the room, for example, conifers are more resistant to moisture, and hardwoods are more durable. And also on the cost of the material, the desired color and texture.
- Variety of wooden lining. The type of lining can be determined "by eye" knowing the main parameters that determine it. These include: the presence of knots, wormholes, chips, darkening, etc. The highest quality is the "extra" or "elite" variety, which is reflected in its cost. This is followed by varieties 1 (A), 2 (B), 3 (AB).
Note. The presence of knots, especially dead ones (able to fall out), in addition to the visual effect, reduces the ability of wood to retain heat.
- Lining dimensions. Due to the fact that the cost of lining is usually indicated per square meter, its dimensions will be important.
- lining thickness. For outdoor work, you need to take a thicker board (20-25 mm.), For internal work, 10-16 mm will be enough;
- lining width. Doesn't matter. But, users note that for a small room it is worth choosing a narrow board. Conversely, a narrow board on a large surface will "ripple" in the eyes;
- lining length. The maximum length of the panels is 6,000 mm. It is necessary to choose a length at which there will be the least amount of joints and waste. In addition, it is worth considering the problem of large-sized transportation.
- lining type(determined by the appearance of the lamella):
- ordinary lining (classic, calm, standard). It does not have primary processing and is distinguished by a short comb (up to 5 mm), which can create difficulties for beginners when installing with their own hands;
- eurolining. It has more accurate geometric parameters due to stringent requirements for production, packaging and storage. It features an elongated comb (up to 8 mm.);
- block house. Imitates rounded timber, more common in exterior decoration;
- American. The difference of this lining in the absence of the "groove-comb" system. It can only be mounted horizontally.

Step 2 - Calculation of wooden lining
When purchasing a lining, you need to know how much material is required. The price of wooden lining is usually indicated in square meters, less often in cubic meters. But, a simple, mathematical calculation in this case is unsuitable. Since, the quadrature will be affected by the length of the lining, the height of the walls of the house, the number and size of window / door openings. And the thickness of the lamella is also per cubic capacity.
There are three ways to calculate lining:
- Intuitive. The perimeter of the surface area to be finished with clapboard is considered. The area of the openings is subtracted from it. And from 10 to 30% for waste are added to the result. A simple but not very accurate way. For those who want to save money, it is clearly not suitable.
- Mathematical. It is more scrupulous and involves the calculation of the number of lining lamellas piece by piece. Those. takes into account the length and width of the lamella, as well as the parameters of the openings. To calculate, you need to divide the length of the surface by the width of the lamella. Thus, it is possible to determine the number of lamellas, and take into account their length. As a result of the calculations, we get the exact value. In this case, no more than 10% is left for waste.
- Program. in online mode.
Tip: at the point of sale, you need to choose the length of the lining closest to the desired one in order to reduce scrap waste.
The waste percentage is determined by two parameters:
- First, the type of lining. The lower the grade, the greater the waste allowance.
- Secondly, the geometry of laying the lamellas (attachment method).
3 step - Tool and material
In addition to the lining itself, for work you will need:
- wooden rail (45x20 mm) or galvanized profile for drywall;
- heat-insulating material, vapor barrier, wind barrier (if necessary);
- dowel (for a stone structure), screws (for a wooden base);
- nails, kleimer, staples (depending on the method of fastening);
- jigsaw or hacksaw;
- screwdriver, hammer, stapler (depending on the method of attachment);
- level, plumb, triangle;
- antiseptic, flame retardant, primer, paint or varnish;
- perforator;
- drill.
Step 4 - Preparing the lining for installation
Primary preparation is reduced to the performance of work in two directions:
The primary processing of the lining includes grinding (for a regular board), sorting the lamellas by color, checking for defects. As well as treatment with a primer, an antiseptic (protects against decay, biological activity) and a fire retardant (creates a microfilm on the wood surface that prevents combustion). If the softwood lining is very resinous, it is necessary to carry out deresining.
How to remove resin from lining?
To remove resinous secretions, you need to apply an acetone solution to the lamella, and then wipe the surface. In the presence of defects, fallen knots, potholes, cracks, it is necessary to treat the lamella with putty.
Preparatory work is carried out before the installation of the lining, because. it is necessary to process all surfaces of the lamellas, including those that will be located on the wrong side. As well as grooves and ridges, access to which will simply be impossible after installation.
Note: the lining must “gain” the temperature of the room where the finishing will be carried out. To do this, it must be placed in the room in advance. This rule does not apply to lining for outdoor work.
Surface treatment means inspecting the wall/ceiling for cracks, fungus, other damage, removing all defects, and dismantling sockets and switches. The wall surface should be treated with protective compounds.
Step 5 - Lining with clapboard
5.1 Installation of the crate under the lining
The installation of the crate begins with the installation of the frame belt.
Notes. With vertical mounting of the lining, the laths of the crate are stuffed horizontally. For horizontal installation - vertically. With a diagonal - perpendicular to the direction of laying the lamellas.
How to make a crate for lining?
The first rails are installed around the perimeter of the surface. First, the rails are mounted at the corners of the building, so that there are two rails for each corner. We check the correctness of the installation with a plumb line or level. Then along the perimeter of window and door openings, and only after that intermediate rails are stuffed.
The step of the crate for lining is determined by the thickness of the insulation (if it is planned to install one) or is chosen in any order. Professionals recommend installing intermediate rails at a distance of 400 to 800 mm. Moreover, the higher the room, the smaller the step of the crate should be.
Wooden lining can also be installed on rounded surfaces.
The slats are attached to the surface using hardware or EU brackets for drywall profiles. In the event that the wall is absolutely flat, you can attach it directly to it, i.e. without a crate. And if in some places there is a gap between the wall and the rail, it can be filled with a piece of wooden beam, for a tighter fit of the rail to the wall.
Note. Wooden slats for the crate must be of an acceptable level of humidity. Otherwise, the lining will draw moisture and may be deformed.
It is important to ensure ventilation of the surface under the lining. To do this, the slats are packed with small gaps, as shown in the figure.
The most important thing in the installation of the crate is the constant control of the installation using the building level. The more accurately the crate is set, the easier and smoother the installation of the lining will be.
In addition, experts advise leaving a small gap above and below between the end of the rail and the ceiling, so that it is convenient to nail the lining. The gap from below (from the floor) is easy to provide if you place a piece of bar under the rail.
Note. For wooden houses, a gap of 2-2.5 cm is required. This is due to the fact that the tree shrinks within 3-10 years, depending on the method of construction.
5.2 Insulation of the wall under the lining
Wall decoration with clapboard allows you to lay insulation (hard or soft) in the cells of the crate. The insulation is placed in the cells of the crate. When laying thermal insulation material, you need to make sure that there are no gaps between the mats. To do this, it is better to lay two thin layers of material with an offset than one, but thick. From above, a film of a vapor barrier (when installed inside the house) or a wind barrier (when installed outside the house) is superimposed on it.
Universal will be the use of a superdiffusion membrane such as Tyvek (Tyvek). When laying, it is important to ensure that the film overlaps by 100 mm, and also to lay it on the correct side. The marked side (rough) should face the lining. On top of the film, counters are stuffed, on which, in fact, the lining will be attached.
Advice. It is desirable to produce insulation from the outside of the house. This will shift the freezing point into the insulation. And eliminate the possibility of freezing of the wall.
5.3 Fastening the lining
Before proceeding directly to the installation of the lining, you need to decide on the method of fastening. Let's consider all the known ways of fastening the lining to the wall, ceiling and crate in order to choose the most suitable option. It is worth noting that the lining of the bath with a lining will be somewhat different from the finishing of the lining inside or outside the house.
How to fix the lining?
Fastening lining with nails
The nail securely fixes the lining to the crate beam. As you can see in the photo, the nail is driven into the groove.
How to hammer nails into the lining?
Eurolining can be nailed straight, and domestic (ordinary) - only at an angle. Working with nails is more risky compared to other methods because you can split the wood. For the front fastening of the lining, it is better to use galvanized screw nails.
Note. The length of the nail should be at least twice the thickness of the lamella.
Advice. You can simplify driving a nail into a groove if you use a simple fixture. Namely, from a nail (weaving) you need to saw off a sharp edge. Next, attach it to the carnation to be hammered and apply force through it. Thus, the risk of damage to the front part of the lamella is significantly reduced.
The process of fastening the lining with nails is shown in the diagram.
Fastening lining with kleimers
Note: installation of lining on the walls in the bath requires the use of copper or galvanized clamps.
Fastening the lining with self-tapping screws
The method is used for through fastening the lamellas to the crate. Less often with a secret.
Fastening the lining with brackets
Mounting a wooden lining on staples with a stapler is extremely rare. Due to the fact that you need a special stapler (pistol), which is able to break through rather thick and dense wood. Some users recommend driving the staple into the clamp. Professionals disagree on the correctness of such a recommendation.
Combined method
This fastening of the lining allows you to fix the panels securely. The method involves the use of nails or clamps and self-tapping screws to fix the lining from above and below, i.e. where the attachment point will be covered with decorative elements.
What is the best way to fasten the lining?
Knowing how to fix a wooden lining, you can choose the most effective way. At the same time, the final choice may be influenced by:
- plans for further dismantling of the lining. Fastening using clamps simplifies dismantling;
- indoor humidity level. With a high constant level of humidity, it is better to use self-tapping screws;
- aesthetic look. Concealed installation involves the use of clamps or nails and allows you to completely hide the fasteners, and the mounted lining looks more beautiful. External installation of lining provides fastening through a board. In this case, it is important that the screws go in one line;
- lining type. Eurolining can be fastened in any way, it is more difficult to fasten ordinary lining with nails due to the small size of the groove;
- lining, which is re-attached (previously dismantled, used), is attached to nails. This is due to the fact that during the dismantling process, the grooves may be damaged;
- fastening speed and lining thickness. Fastening the lining with a stapler allows you to work as quickly as possible, however, the thickness of the lining and the type of wood affect the possibility of its use;
- installation method - hidden or through. With through-hole installation, you need to drill a hole halfway through the self-tapping screw, and then screw it in until it stops. Again, through installation eliminates the use of rough nails (only finishing), because. ugly streaks of rust may form on the wall.
Installation of lining on the walls begins from the corner of the room, if the mount is horizontal, and from above (if vertical). Particular attention is paid to the installation of the first lamella. After all, she will set the direction for all work. The first board is attached on one side (top or side), then the horizontal (vertical) is installed, then the second end is attached. Only after making sure that the board is correctly set and level, you can fix it in the middle.
In order for the next board to fit snugly into the previous one, efforts must be made to it. To do this, you can use a rubber mallet or padding. The padding is a piece of wooden lining. Its use allows you to protect the front of the lamella from accidental hammer blows.
Note. In case of using nails. They are completely clogged into the previous lamella, only after the subsequent lamella is “baited”. This is done in order to avoid warping the board.
It rarely happens that the lamellas cover the surface perfectly. Often trimming of finishing boards is required. Trimming must be done carefully, especially if it will not be covered with decorative elements. The last board is fastened in a through way using self-tapping screws, which can then be closed with putty, a wooden plug or special overlays. Or using finishing nails that have practically no head.
Another point that you may encounter when finishing is the discrepancy between the length of the lining and the height / length of the room. In this case, everything depends on the preferences of the owners, but it is preferable that the ends of the lamella fragments be at different levels.
5.5 Decorative lining
Sheathing with clapboard outside and inside the house ends with decoration. Decor elements will close the flaws in the work and give the walls and ceiling a finished look.
But, so that the finish does not spoil the work, you need to know how to install decorative elements and how to attach them correctly.
The outer or inner corner is closed with a wooden corner. It can be glued (with a small weight of the decorative element) or fixed with finishing nails.
Window and door openings should be trimmed with platbands. They can be joined at an angle of 90 or 45 °.
The place where the wall joins the ceiling or floor must be trimmed with a cornice or plinth and also fixed with hardware.
Reinstall the switches and sockets removed before starting work.
It is worth noting that the lining does not end with the above steps. Next, the surface is needed:
- clean from dust, apply an additional layer of primer to the lining (individual lamellas were primed with the first layer before starting work);
- grinding (once again go through the lining with fine sandpaper). The fact is that after priming the surface will acquire a slightly rough texture;
- varnishing or painting. Finishing is a rather long and responsible stage. Here it is important to choose the right coating, and apply it correctly. For example, professionals advise applying the coating in several layers and only after the previous layer has completely dried. A detailed description of how and how to cover the lining.
- utilization of lining waste. Users advise using lamella trimmings to make frames, curtain rods, furniture cladding, countertops, etc.
Do-it-yourself clapboard sheathing - video guide
Conclusion
The technology for decorating walls with clapboard inside and outside the house, and in the bath (steam room, shower room) is different, this should be taken into account during installation. The choice of mounting and installation method also makes certain adjustments. Good fasteners and wood processing will extend the life of the cladding.
A wooden house is always a unique comfort and an indescribable atmosphere. In order not to lose this very “naturalness”, many people prefer to sheathe it from the inside with clapboard. Such an inexpensive and high-quality finish will allow you to solve several difficult tasks at once. It is quite possible to sheathe a house with clapboard from the inside on your own, the main thing is to know all the secrets and subtleties of this matter.


Advantages and choice of lining
The lining attracts many precisely because it is a natural material, thanks to which it will be pleasant to be in the house. The material is completely safe, does not emit any harmful substances, is relatively inexpensive and always looks great.
In addition, with the help of this material, many problems can be solved. Since this finish perfectly withstands temperature changes, it will serve for many years. At the same time, it does not deform and does not lose its original appearance. Thanks to this sheathing, sound insulation is increased.
In addition, this is a kind of excellent insulation, which can be appreciated in the cold season.


Lining is a universal material, as it is suitable for any room and for cladding not only walls, but also the ceiling. Since this type of material is very durable, its choice must be approached with skill so that the decoration of the house will last for many years.
When choosing a material, be sure to pay attention to its class. The extra-class material is, of course, the best. Class "A" lining is also a high-quality raw material. The rest, "B" and "C", are a class lower, which means they cannot boast of such an ideal quality. For interior decoration, it is recommended to choose panels with a width of no more than sixteen millimeters.
However, remember that panels thinner than twelve millimeters may be too fragile.


What else you need to pay attention to is the type of wood from which the cladding is made. It can be pine, birch, oak, ash or larch. All of them are great for interior wall or ceiling decoration.
If you prefer pine material, then remember that over time such lining will acquire an unpleasant dark color if it is not coated with a special varnish or paint. Ash is very resistant to temperature extremes and is great for rooms with high humidity. As for oak, this material has no obvious flaws.
The only thing is the high price.


Preparatory stage
Sheathing inside a wooden house is possible only if all external work has already been completed. A wooden house, despite all its obvious advantages, has several disadvantages that must be taken into account before proceeding with the finishing work.
Of course, first of all, it is high humidity, which means the appearance of mold and other harmful organisms. Therefore, before proceeding with the sheathing, the walls must be carefully prepared.


Lining is always mounted on dry and perfectly flat walls., otherwise any defect will ruin the final result of the whole work.
Previously, all walls must be treated with a special agent against fungus and mold. To do this, you can use modern antiseptics, which are sold in any hardware store. You need to process all the walls, despite the fact that they are not affected by mold.
If necessary, before installing the lining, you can additionally insulate the walls and take care of additional sound insulation. For example, you can use a material based on mineral wool or use a special vapor barrier film.


Any insulation or special foil should be overlapped directly on the wall itself. You can strengthen them with a special stapler. The bars will already need to be fixed on top of this material, and not vice versa.
After the walls are prepared, you can proceed to the next stage - the manufacture of the frame, on which the lining itself will then be attached.
The frame can be made of metal or wood. If you plan to mount the lining vertically, then the frame bars should be mounted horizontally and vice versa.
The frame must be made in the same plane, otherwise the final result will not please you.


The first rail, regardless of how the lining will be attached, must be installed strictly vertically. When fixing the rail, for example, with self-tapping screws, be sure to use a plumb line. In order for the entire frame to be made in a single plane, you can use threads that need to be pulled between the slats. Focusing on the threads, you can easily install the rest of the elements for the frame.
When performing the crate, remember that the distance between the slats should not be more or less than fifty centimeters. After everything is ready, the crate must be treated with a special antiseptic.


Skin subtleties
Sheathing inside a wooden house can be horizontal and vertical. It all depends on what style you want to give the room and, of course, on personal preferences.
In the event that you plan to mount the finishing material horizontally, we recommend that you remember a simple rule. The spike must be located at the top, and the groove, respectively, at the bottom. This will allow you to avoid serious trouble in the event that moisture occurs. If the groove is located on top, then water can accumulate in it, thereby deformation will begin, and there will be a high risk of mold or fungus.

It is best to start the installation of lining from the ceiling to the floor, it will be much more convenient. Of course, the opposite is also possible. The slats are attached to each other with nails, which should be carefully driven into the groove. Everything must be done very carefully so as not to damage the surface of the panel itself and not to deform the back wall of the groove.
And you can also nail the finishing material with special staples, which professionals call "clips". Such brackets are usually fastened with self-tapping screws.
The first panel should be mounted with a slight indent from the ceiling of about one centimeter. Thus, there will be natural ventilation of the walls, which will help to avoid deformation of the finish.
The same indent should be made at the bottom of the wall.


It is not worth fixing the lining tightly, since a barely noticeable gap should remain between the elements - one or two millimeters. This is necessary so that in case of high humidity in the room, the skin is not deformed.
After the entire lining is strengthened, the final stage follows - this is the strengthening of the skirting boards. Of course, this is only necessary if you yourself want it. Plinth can be floor and ceiling. It all depends on what design and style you want to give to the room.
External and internal corners can be decorated with special corners that are made of wood. This will give the finish a complete look, as well as help hide imperfections and flaws. Doorways can be decorated with platbands.


Experts share their experience of lining installation, and it is better to adhere to such recommendations for successful do-it-yourself work.
- Before starting the installation of the lining, it is recommended to leave it open indoors for one day. Thus, natural wood material can adapt to the conditions of the room, acquire the same temperature, which will help to avoid deformation. If the installation will be carried out in the cold season, then the material should be left indoors for at least two days.
- After the installation of the lining itself is completed, it is worth taking care of its protection, namely, how to cover the material from above. Processing of facing material is an obligatory part of the repair. Thus, it will be possible to protect the lining from external damage and not only. You can just cover it with varnish. And if it is installed in a room with high humidity, then it must be treated with a protective compound.
Building a house made of wood is a profitable solution for many reasons, but this material needs mandatory protection from the destructive effects of natural factors. One of the solutions is to cover a wooden house with clapboard from the outside: this type of lining will increase the durability of the house, while it will not affect the environmental friendliness of the building. The lining can have any color, so the sheathing will preserve the aesthetic appearance of the building.
What are the advantages of wall paneling for house cladding

The lining is a durable smooth panel made of wood or plastic, the sides are equipped with a system of spikes and protrusions that allow for a strong waterproof mount. Sheathing with clapboard on the outside of a wooden house will solve several problems at once: it not only protects the wood, but also improves some important characteristics of the structure. Sheathing a wooden house with clapboard will be beneficial for several reasons:
- This is a fairly durable material, if you take care of its protection from decay and insects. After treatment with flame retardants and antiseptics, the lining can last for many years, and if necessary, damaged elements will not be difficult to replace.
- It improves the thermal and sound insulation qualities of the house. In combination with modern insulation, this material will create a strong and durable protection against cold and street noise.
- The lining looks beautiful, and it will allow you to save all the aesthetic advantages of a wooden house. Natural material has a unique pattern that will look great.
How to choose the right material for exterior cladding
Sheathing a wooden house with clapboard has become a widespread option, but it is important to choose the right material, which will become a truly reliable solution. Its production is carried out by domestic and foreign manufacturers, the quality of imported products is usually slightly higher. The lining is divided into several classes depending on the quality of the wood; when choosing, you can focus on a few basic rules:
- The moisture content of wood should not exceed 15%. Otherwise, very soon, as a result of shrinkage, cracks will appear in the lining, which will significantly reduce its effectiveness.
- Boards should not be affected by the fungus, they do not have traces of wormholes. The owner of the house needs to check the quality of the material before buying, otherwise he will have to spend money on home repairs and a new purchase.
- The material must not have knots. Their presence is the most important negative factor that reduces the class of the material. Sheathing with eurolining of a wooden house increases the overall durability of the structure, so it is better not to save on the quality of the finish.
The choice on the market is quite wide: you can pick up lining from various tree species, but it is better to give preference to coniferous forests. The wood will be denser, and the high resin content allows it to successfully resist decay. Houses sheathed with wooden clapboard on the outside will look very nice if you choose the right material.
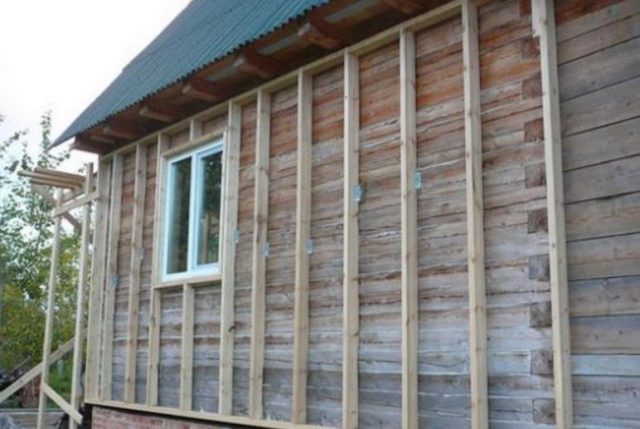
Cladding installation technology
The technology of lining a wooden house with clapboard is the creation of a multi-layer ventilated facade: this finish combines insulation and protection from destructive factors. You will need to purchase insulation (usually mineral wool is used for a wooden house), as well as all auxiliary materials to create a frame and a waterproofing layer. How to sheathe a wooden house with clapboard?
The walls need pre-preparation. Before facing, they must be treated with an antiseptic, as well as flame retardants to protect against fire, in addition, a log cabin must be caulked. When the walls are ready, it will be possible to clad the house:
- A vertical frame made of thin timber is stuffed onto the walls, the correctness of its location is checked by a plumb line. The distance between the frame elements should be slightly less than the width of the insulation, this will allow it to be tightly fixed so that there are no gaps.
- A waterproofing film is installed on the heat-insulating layer. It is better to purchase a modern membrane that will allow water vapor to pass from the house to the outside, but retain moisture from the outside.
- A second layer of sheathing is nailed over the frame, which will create a ventilation gap. It will provide effective ventilation of the insulation.
- We sheathe a wooden house with clapboard: the boards are cut to length, after which they begin to be installed from the bottom up. The first board is positioned so that the spike is at the top and the groove is at the bottom. The lining can be attached to the frame with nails, screws or other fasteners.
Each next board is placed in the groove of the previous one, all walls are faced in the same way. The boards are fixed in the corners, after which they can be treated with antiseptic impregnation and painted.
The cladding will take on a neat appearance, and it will be reliably protected from various damaging factors. It is no coincidence that this material has become one of the most popular options; clapboard cladding is a beautiful and reliable solution that is ideal for a wooden house.
Building a house is a multi-stage process, each of which is extremely important, including exterior decoration. It not only insulates the house, but also gives it its original look, which will be the hallmark of your family nest for many years. Sheathing a house with clapboard on the outside attracts many homeowners with a number of advantages. The most important thing, perhaps, is the appearance. No matter how far we break away from our roots, no matter how progress develops in construction and in the creation of various new materials, wood will always take its place in the heart of a Russian person. Therefore, many homeowners want to sheathe the house with clapboard, since such sheathing will not only give it charm and attractiveness, but can also be easily installed by non-specialists at minimal cost.
Sheathing the house with clapboard on the outside allows you to make the appearance of the house more attractive.
Despite the fact that wood is considered a short-lived material, in fact, this has not been the case for a long time. Any wood can be impregnated with various modern compounds that will prevent its destruction under the influence of fungi, bacteria, insects and other natural factors. Wood has excellent thermal insulation properties. In addition, wood also perfectly absorbs sounds and is suitable for houses located near highways and other sources of noise.
Choosing tools and material for sheathing

For sheathing a house with clapboard, you will need the following tools: a saw, an electric drill, a screwdriver (if you fasten it with self-tapping screws), a hammer, a marker, a level, pliers.
Any important work should be divided into several steps. The main steps in the installation of lining from lining:
- selection of tools and materials;
- preparation of walls and fastening of the crate;
- heat and waterproofing (if necessary);
- fastening boards lining.
Before work, you need to prepare a number of tools and materials:
- high-quality wooden beam with a section of 30x60 mm or more;
- saw;
- electric drill;
- screwdriver (if you fasten it with self-tapping screws);
- a hammer;
- marker;
- level;
- pliers.
But the main material that needs to be chosen correctly is the sheathing material itself. Finishing a house with clapboard begins with her choice. All lining is divided into classes that determine its external and working qualities. The higher the class of the material, the fewer knots in it and the better its surface is finished. As for the other qualities, due to the fact that drying and other processing all types of lining are approximately the same, then the quality of the material almost does not play a role. The class determines, first of all, the type of the tree and the number of defects.

The classes of lining determine its external and working qualities.
The most important requirement for lining is the quality of its drying, since only well-dried wood will not undergo deformation over time. Raw wood will certainly begin to change its dimensions, and soon the entire surface of the skin will be a deplorable sight in the form of numerous cracks and crevices. It will take a lot of time to remove the deformed elements and reinstall others in their place. The norm of humidity for lining used for exterior cladding is 12%.
Recently, in addition to dividing by class, lining is divided into ordinary and eurolining. The difference lies in the fact that the humidity of the latter is much lower than usual, and the surface is processed so carefully that it represents ideal geometric shapes with convenient cutouts and grooves. Of course, such material will cost more than usual, but in this case it is worth considering that repairs for eurolining will be needed much later than for ordinary material.
Wall preparation and framing
Before installing the crate on the walls, it is necessary to prepare the walls of the house for installation. To do this, the walls are cleaned of all irregularities, gaps are covered up, all debris is cleaned off, and if the house is wooden, then all rotten and deformed structural elements are removed. The wall should be as smooth as possible, clean and without the slightest trace of rot or mold.

The next step is to make markings on the walls, along the lines of which the frame of the crate will be attached. It is necessary to carefully approach this work, since the uneven surface of the frame will lead, in the future, to a lot of problems with the skin.
Since in the vast majority of cases the lining of the skin is located horizontally, the bars must be installed vertically. With regard to the beams, the same high quality requirements are imposed as for the lining. It should be well dried and not have significant flaws. The beams are fastened at a distance of about one meter, it can be less (up to half a meter), but it is no longer recommended, since a beam of any drying quality still slightly deforms over time, and the longer it is, the higher the risk that this deformation will affect the skin , the boards can simply pop out of the mounts. Using a level, carefully check the evenness of the surface of the resulting frame.
If you decide to insulate the house, then it is at this stage that the thermal insulation between the bars is installed and fastened. The material for this is different. It can be mineral wool, and polystyrene, and other modern insulating building materials. You choose. But we still advise you not to save at this stage, since thermal protection can not only create comfortable housing for you, but also save a lot of money on heating.
Installation of lining from lining
Fastening lining boards can be of two types: using simple nails and kleimers. The option of nailing the lining boards directly to the beams with nails or self-tapping screws also has the right to exist, especially in this case the fastening is as strong as possible, but still, from an aesthetic point of view, it is not the best design solution.

Schemes for fastening the planks of the lining.
If you decide to fasten the boards with nails or self-tapping screws, then for this they are driven into its crest, as shown in the figure. In this case, the first board is attached to the beam, and the next one is inserted with its lower end into the groove of the previous one and through its comb. Installation starts from the bottom, from the base to the roof.
The second common method of fastening is mounting with clamps. This small fastener is made of tin or stainless steel and fastens the boards in a hidden way, even over time, when the nails begin to show their hats, the kleimers continue to carry out their service completely invisibly. As shown in the figure, the kleimer is attached to the wall with a nail, and securely holds the board with its groove. At the same time, the boards themselves remain completely intact and can even be reused after dismantling the skin.
Installation must begin from the bottom, carefully making sure with the help of a level that the installation is even. The first board is fastened with a spike up, on which the next board is put on. The choice of fastening the boards is up to you, but the best option would be to use clamps. The boards must fit into the grooves accurately and tightly.
If the length of the facade is longer than that of the boards, then you will have to choose how to install and dock the boards together. It is better if the joints form a "herringbone" when they do not pass strictly vertically, but in a checkerboard pattern. If the joints are vertical, then they can be further covered with the help of special decorative strips.
After reviewing the information on how to sheathe a house, you can easily do it yourself, there are no particular difficulties in this.
Finally, remember a couple more tips.
Before starting work, leave all the wood for a day, in the place where the installation will take place, so that the tree gets used to the existing temperature and humidity.
We also recommend installing vapor and waterproofing between the insulation and the sheathing material. This will be a good barrier to moisture and keep the wood from rotting. And remember that the film is placed with its smooth side to the insulation, and the rough side to the skin.
One of the best options for exterior decoration is clapboard cladding on the outside. Thanks to this material, your home will begin a new life, in a new guise. Although it differs from, but nevertheless, such a finish will not only give the building a beautiful appearance, but also improve sound and thermal insulation. But for the correct work, you need to know how to choose the right lining, and how the outer lining of the lining is performed.
Types of lining
First you need to study the varieties of this material. First of all, there are two types:
- . It helps to create a high-quality coating that will last for many years, because it does not corrode. It should also be noted its high level of moisture resistance and low attention requirements, i. no need for additional care.
- Wooden. It has a rather beautiful appearance. Good sound-proofing qualities and a low level of thermal conductivity are also noted.
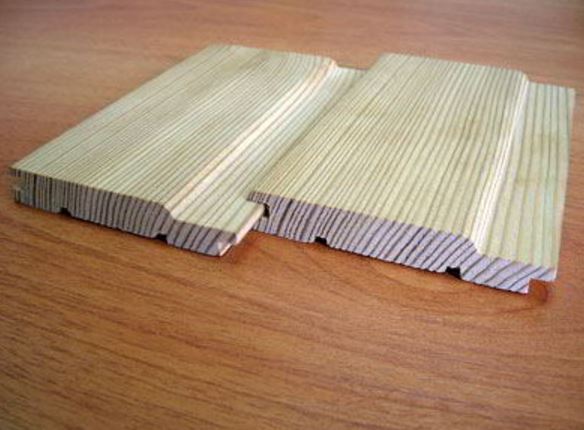
Considering wooden samples in more detail, two subspecies can be distinguished, these are ordinary and eurolining. This division is caused by a large abundance of imports of the material, subject to its significant difference in quality and types of wood used in production.
It should also be noted that the material of foreign production is of higher quality, and some kind of geometric solution.
How to choose lining
Speaking about the choice of material for clapboard lining, you should pay attention to some factors that determine the quality of the product:
- First of all, in the case of choosing a wooden lining, this is humidity. This indicator should not exceed 15%, if it is higher, then under the influence of the environment, after some time, a shrinkage process will occur, which in turn will have a great impact on the appearance (crevices will form, deformation will occur and the exterior finish will be damaged).
- The next factor is the integrity of the material. In no case should you accept products with defects or any damage.
- Also, for wooden products, it is necessary to pay attention to knots, their number should be minimal.
Exterior cladding of the house
The clapboard lining process itself is divided into seven main stages, each of which is quite important, so the following can be distinguished:
- preparation of materials;
- vapor barrier device;
- preparation and installation of the frame;
- heat and waterproofing of the surface;
- installation of an additional frame;
- sheathing material.
Each of the points must be treated as responsibly as possible, any neglect can adversely affect the final result. But let's go directly to work and consider each of the stages separately.
Preparation of materials
The first thing to start with is the preparation of materials for the work. Here is the minimum list of materials that will be needed:
- Vapor barrier. For its arrangement, foil, polyethylene or roofing material can be used.
- Wooden slats and boards. Needed for arranging the frame and fastening insulating materials.
- Mineral wool boards are most often used as thermal insulation.
- Waterproof film.
- And lining for lining.
The calculation of the amount of each of the materials is carried out individually, depending on the surface area of the finishing of which will be carried out.
Vapor barrier device
Going directly to the process, the vapor barrier device begins. As already mentioned, foil, polyethylene or roofing felt can serve as it.
The main tasks for which it is equipped include facade ventilation.
The device is carried out as follows:

- Wooden slats are provided, which are vertically fixed.
- The vapor barrier is directly attached to them.
- After fixing, ventilation holes are equipped at the top and bottom of the coating.
Frame installation
The next step is the frame device. It is made by hand from boards. Lumber is used with a thickness of 4-5 centimeters and a width of 10 cm.
The boards are fastened vertically with their side to the wall with anchors. The distance between them depends on the size of the insulation, and should be less than 2-3 centimeters.
Thermal and waterproofing device
The next step is the installation of insulating materials.
The first is fastening. For its arrangement, mineral wool slabs 5 centimeters thick are used. The insulation is laid in 2 layers so that there are no gaps between them. In this case, each layer must be equipped taking into account the displacement of the joints, i.e. each slab of the second layer should lie centered on the joint of the first. Additional fastening is usually not required, since the material is sufficiently elastic and is able to hold itself between the frame boards.
After that, the waterproofing material is fixed. A special film is used as it, it does not have the ability to hold back steam, but it does not allow moisture to pass through. Its fastening is carried out using a construction stapler. At the same time, each segment of the film is overlapped with the previous one by at least 5 centimeters and is additionally glued with adhesive tape.
Important! By its structure, the film is double-sided, while one of the sides is smooth, the second is rough. For the most rational use, it is necessary to lay the smooth part to the insulation, while the rough part will be turned to the lining.
The device of the frame of the second level
After arranging the surface insulation, it is necessary to install an additional frame.
To create it, wooden slats 3-4 centimeters thick are nailed over the original base and, accordingly, onto the waterproofing.
This solution ensures good ventilation, and also prevents the appearance of moisture. Also, at the bottom of the structure, it is necessary to provide a metal mesh, in order to avoid the penetration of various kinds of insects and rodents under the skin.
Exterior lining
The time has come for the most significant and time-consuming stage of work in the implementation, and this is directly lining the house with clapboard from the outside. It is carried out as follows:
- The preparation of the material is carried out, cutting the boards to the desired size.
- The cladding process itself begins from the bottom, the first board is laid with the groove up. In the absence of the need for alignment, the material is fixed on the frame.
- Next, the next board is laid, and it is driven into the groove with a hammer, after which an additional one is also carried out.
- Further consolidation is carried out in the same way.
- When the fixing is completed, it is necessary to paint the surface, or cover it with a special solution.
This kind of impregnation will give the surface a more aesthetic appearance, and make it resistant to external influences.

Important! In the case of painting, the surface must first be sanded.
For some types of paint, for example, oil, it is necessary to pre-treat the surface, this is done by applying drying oil, preferably in 2 layers, while it will be necessary to wait for complete drying, and then continue to work.
Conclusion:
By itself, the process of lining the house with clapboard from the outside is quite laborious, and requires considerable effort. But despite this, the result cannot but rejoice. After watching the video on how the sheathing work is carried out, you will understand that everything is quite simple.


