A visit to the bath is a pleasant and useful pastime, and high-quality insulation of the bath from the inside will significantly improve all its characteristics. Thanks to the thermal insulation of the walls and ceiling of the steam room from the inside, you can save on fuel material at once and ensure the safety of heat in the room.
Why is insulating a bathhouse from the inside a good idea?
The bath room has a unique microclimate, so thermal insulation is an important aspect in the proper arrangement of any bath. Warming the walls of the bath from the inside with your own hands, as well as the ceiling, in principle, is a time-consuming process, but nothing is impossible. When insulating a steam room, several factors should be taken into account: the material used for internal insulation, your capabilities, skills and desires. The choice of material for insulation should be based on its quality characteristics. The required properties must be:
- vapor barrier;
- waterproofing
- fire resistance;
- environmental friendliness of the material.
There is a division of heaters into natural and artificial. If in the construction of a steam room you strive for authenticity and environmental friendliness, then naturalness is your choice. Insulators of natural origin include moss, cuckoo flax, felt, hemp, tow, sphagnum, etc. Such materials have their drawbacks in operation. Without proper treatment with special means, insects and mold will appear.
It is much easier to insulate a bathhouse from the inside with your own hands using artificial materials. They have the best performance: fire resistant, do not rot, do a good job of vapor barrier. Installation of such heaters will take less time than installation of natural materials.
Materials for warming the bath from the inside: what to add to the shopping list?
Buying a heater for a bath comes down not only to the ability to choose natural or artificial materials, you should also take into account some factors: the purpose of the materials, appearance and price. Depending on the mechanical properties, materials for thermal insulation can be conditionally divided as follows:
- backfills of various densities;
- mats, plates, fibers;
- wall blocks and slabs.
According to the chemical composition, heaters are distinguished:
- organic (ecowool, fibrolite, wood concrete);
- inorganic (glass wool, mineral wool, basalt fiber);
- techno-heaters (technoblock, technovet);
- plastic-based insulation (expanded polystyrene, polystyrene).
All of these materials have both advantages and disadvantages. For example, it is better not to use plastic-based heaters to insulate a steam room from the inside. This is due to their easy flammability. But they are well suited for thermal insulation of other rooms of the bath room: dressing room, rest room.
Organic substances, in turn, are environmentally friendly and relatively cheap, but without special treatment, they are also highly flammable. Inorganic substances are more versatile and practical: fire-resistant, durable, moisture-proof, and do not rot. This explains the popularity of using mineral wool in insulation.
Materials used for vapor barrier of the bath room from the inside:
- ruberoid;
- glassine;
- polyethylene;
- aluminium foil.
Roofing material and glassine cannot be used to vapor barrier a steam room, as under the influence of high temperatures they begin to release harmful chemicals. Glassine is often used in the insulation of baths, having proven itself well in a bunch of lining - aluminum foil - mineral wool - log cabin.
By choosing aluminum foil for the vapor barrier of the steam room, you will significantly reduce energy costs for maintaining the required temperature. The foil, like a mirror, will reflect the heat in the bath room.
Operation 'warming the walls of the bath from the inside with your own hands'
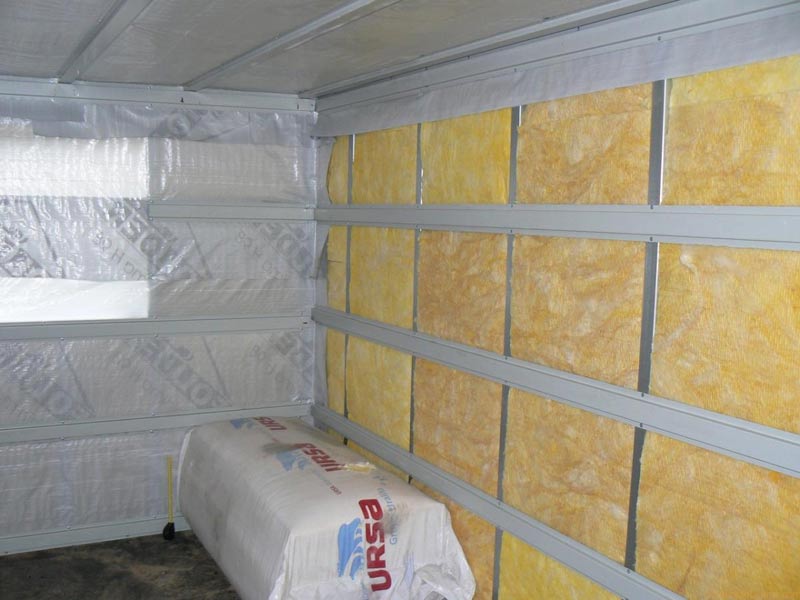
There is a fairly common, one might say, traditional, wall insulation scheme using fibrous insulation and lining.
- It is necessary to create a frame on the working surface of the load-bearing wall. A horizontal and vertical crate of timber is fixed to the wall. The thickness of the beam should exceed the thickness of the insulation itself by 20–30 mm. Such a margin is necessary so that the insulation layer does not wrinkle, slip and retain its properties.
- The wall is sheathed with mineral wool (or other material of your choice).
- A layer of vapor barrier is applied over the insulation (foil vapor barrier, foil). It must be overlapped, the joints are sealed with thin slats. There should be a distance of about 3 cm between the vapor barrier and the mineral wool.
- A lining is stuffed onto a vertical crate 30–50 mm wide. The remaining distance thus creates a gap for ventilation.
This method is proven, but laborious. Now building materials can greatly simplify the entire process of insulation. Modern heat insulators combine several properties at once: insulation and waterproofing. Foil foam is just such a material. This insulation has a high fire resistance, easy to use and install.
The described scheme is well suited for a bath from a bar. Panel and frame buildings have their own characteristics of wall insulation. For insulation of panel walls, light materials are used: expanded polystyrene, reed plates, mineral wool. An additional requirement in this case is the treatment of the heat insulator with lime milk and its further good drying. This will protect the material from decay and increase fire resistance.
A bath with frame walls in cold climatic conditions is insulated with fiberboard or reed slabs. If the area has a warmer climate, then you can use gypsum, sawdust, cement and shavings. For wall insulation, a mixture is made, for example, from sawdust and gypsum (proportion 1 to 10). The resulting mixture is poured between the wall sheathing with a layer of 200 mm.
Windows, doors, corners and pipes require special attention. To process the joints in these places, you can use vapor barrier tape. So you will be sure that the waterproofing layer will not let moisture through.
Insulation of the steam room from the inside: the procedure for working on the ceiling
The thermal insulation of the bath room from the inside is completed with the insulation of the ceiling. The ceiling has the highest temperature, which can reach 160 °C. Warming the ceiling of the bath with your own hands is a process that depends on its design. The ceiling can be with an attic or with another superstructure on top and without an attic.
If the building has an attic or attic, the insulation process is as follows: the ceiling boards must be coated with clay with a layer of 20 mm. Clay effectively copes with the task of retaining moisture. In the gap between the boards you need to fill up the wood chips. You can use any other material with thermal insulation properties, such as expanded clay. The layer of such a coating must be at least 200 mm.
In baths without an attic, whether it is a log or panel building, the insulation scheme looks something like this: vapor barrier material, insulation, sheathing layer, beam beam, ceiling boards. The order of the layers of ceiling insulation in the bath with your own hands will be different depending on the design of the room and the materials used.
Particular attention should always be paid to the junction of the pipe and insulation. In order not to violate fire safety standards, it is necessary to make an indent between the pipe and the heat-insulating material of 200 mm. This problem can be solved by constructing a box from the rafter legs, which will separate the pipe and insulation on the roof. The space inside the box is filled with fire-resistant insulation, such as stone wool.
In any case, the roof and ceiling of your bath must be designed so that there are simply no places through which warm air can leave the room, and cold air can enter from outside. The main goal is also to avoid the formation of condensate. Moisture is, first of all, the enemy of building materials.
Ceiling insulation materials are not suitable for everyone. It is not recommended to use thermal insulation made of plywood, chipboard or fiberboard, etc. Such materials can deform and release harmful substances under the influence of high temperatures. Plastic ceilings will also be a bad solution - condensation will accumulate on them. It is better to use natural heaters or mineral heat insulators.
Have you decided to insulate the bath from the inside yourself, but you have no experience in this matter? Help and advice from experts will always come in handy. Check out the available information: photos, videos, master classes on this issue. All of this can be helpful. The following recommendations for warming the bath with your own hands will not be superfluous:
- It must be remembered that the insulation of a bath is different from the process of thermal insulation of other buildings. This is due to high temperature and humidity.
- When insulating the walls of the bath from the inside, a number of rules should be observed:
- in order to avoid the appearance of cracks and voids, insulation must be laid very tightly against the wall. Thus, the likelihood of cold air entering and the formation of condensation moisture will decrease;
- do not forget about the ventilation gap, which will ensure the drying of the insulation;
- it is necessary to treat the floors with an antiseptic for wood in order to save them from destruction.
- When insulating the ceiling, one should not forget that:
- at the top is the highest air temperature;
- to insulate the ceiling, you can not use materials that can be deformed;
- do not use heaters and vapor barriers, which, under the influence of temperature, release harmful chemicals;
- plastic materials collect condensation moisture.
- When insulating the bath room from the inside, use safe, high-quality and environmentally friendly materials.
- When working, follow the safety regulations.
The room under the bath should keep heat well. To do this, during construction work, it is required to be well insulated from the outside and inside. After all, the steam room should not only heat up quickly, but also retain heat for as long as possible. In this article we will tell you how to insulate a log bath from the outside and inside.
outdoor work
After we insulate our building from the outside, we will not only help reduce heat loss, but also protect the walls of the building from external factors. But before we insulate the frame bath, we must choose the material that we need to insulate the building. You should choose it depending on what material the walls of the bath are built from.

Note! Due to the high humidity in the bath, only special vapor barrier materials should be used for its thermal insulation.

If the walls of our building are made of brick or foam blocks, they must be thermally insulated, since without additional thermal insulation such buildings will quickly cool down, which means that heating costs will increase.

The surest option to improve the thermal insulation of this building is to use the technology of a ventilated facade. In this case, a heat insulator will be attached to the walls of this building, if it is afraid of moisture, then it will need to be additionally isolated with a film.
On top of the heat-insulating layer, it will be necessary to fix finishing materials in the form of lining or siding. It is extremely important that a small space remains between the finishing materials and the insulation, which will provide ventilation.

Usually, mineral wool is now used as a heat insulator. But for the reason that, as a result of getting wet, it may lose its original properties, it will need to be isolated with a film.
Ventilated facade method
The instructions below will tell you how to properly insulate the walls in the bath using the ventilated facade method.
- on the outer walls of the structure, you will need to attach a bracket, which is represented by metal corners. The space between these corners, you must make a little less than the width of the sealing material;
- between the corners it will be necessary to lay mineral wool mats;
- seal the joints between the plates with special construction tape;

- then we attach a layer of waterproofing, which will protect the wool from moisture getting on it;
- at the end, we install an additional mount, which you will need in facing the facade of the bath.
This method of thermal insulation of your building will allow you to cope with several tasks at once. Mineral wool will allow heat not to leave the bath for a long time, and ventilation between the cladding and the heat insulator will help create an air flow that will take moisture from the room.

Analyzing how to properly insulate a frame bath, we come to the conclusion that only mineral wool can become the best heat insulator for you, because it has a lot of positive qualities.
Of which can be distinguished:
- incombustibility of this material;
- low level of thermal conductivity;
- good sound insulation performance;
- environmental friendliness.
Insulation of the walls of the bath, built of wood
How to insulate a brick bath, you now know. Now let's talk about what may be required for the thermal insulation of this structure, built of wood with your own hands.
From time to time, wooden walls can dry out and then gaps will appear between them, and as a result, cold air flows will begin to pass inside the room. Therefore, even during the construction of the bath, its walls should be insulated using jute fiber.

Note! Jute is a material that has a low thermal conductivity. It is not subject to rotting even when in a humid environment.
But at the same time, it is not strong enough, so it is advisable to use jute with the addition of flax fibers to it..
How to properly insulate a bath using this material? As we said earlier, it is necessary to start thermally insulating this structure even during construction work.

You will need to insulate each element of the log house, and you will need to compact the jute fiber with a hammer or a special caulk.
- at the first stage of construction work, you will need to lay jute between the logs;
- after the log house is erected, the joints between the timber and the log should also be sealed with jute;
- seal all joints with a caulk or hammer.

Advice! The final stage of compaction should be carried out sequentially, otherwise the log house may squint. You need to caulk first the lower crown around the entire perimeter of the house. After the first crown is thermally insulated, it will be possible to proceed to the insulation of the new crown, and so on.
Warming of the frame bath
We have already told you how to insulate a dressing room and a sauna made of brick and wood, now we want to tell you how to insulate a frame sauna.

For such a structure, it is very important to choose the right heat insulator; foam is most often used as it.
This material has many advantages:
- it is light;
- has a low percentage of thermal conductivity;
- it can be attached with glue;
- he is not afraid of moisture;
- over it as a cladding, you can use any material.
But it also has a number of shortcomings.
Of these, we can distinguish:
- combustibility of some types of this material;
- it crumbles easily, so you need to mount it with special care.
Note! The first point is very important, therefore, for the thermal insulation of our building, it is advisable to use special types of foam that are not afraid of fire.

Warming the bath from the inside
To isolate the walls of this structure from the outside is not such a difficult process, it may require only a little free time and desire from you. Upon completion of all necessary insulation work from the outside, you will also need to. And we will now tell you about how to insulate the walls in the bath from the inside.

For the reason that in this design a high temperature must be constantly maintained inside, external insulation alone will not be enough.
We warm the floors
Starting work on the thermal insulation of the building from the inside should be from the floors, but before that you should consider how to insulate the foundation of the bath. Indeed, without effective insulation of the foundation, it will not work.

For the reason that the foundation of our structure will be in contact with frozen ground, it will give off a lot of heat. The foundation must be thermally insulated to the depth of freezing of the soil. Its underground part can be insulated with expanded clay, and the basement itself can be insulated with mineral wool.
Wall insulation
When deciding how and how to insulate a steam room in a bathhouse from the inside, give your preference to natural insulation - mineral wool.
For this you will need:
- attach the frame to the inner walls;
- put mineral wool in it;

- provide waterproofing insulation;
- sheathe the walls with any finishing material convenient for you.
As a waterproofing material, you can use any suitable material for this. As a rule, waterproofing materials distinguish between price and their technical characteristics. But unequivocally, the best material for waterproofing are polyethylene films.

When deciding how to insulate the walls of this building, you also need to know how to insulate the door to the bath. After all, it will directly depend on how warm it will be inside a given room, and how long it will remain in it.


We insulate the ceiling
There are several ways to insulate the ceiling. The order of execution depends on the material of the floor, there are wooden and concrete floors.

Wooden ceiling insulation
In this case, the order is:
- cover the ceiling with a layer of fiberglass;
- cover the fiberglass with a 30 mm thick screed of clay and sand mixed with straw;
- on top, apply a layer of clay and vermiculite 50 mm thick;
- leave to dry;
- after complete drying, lay a layer of foam or mineral wool 100-150 mm thick;

- cover the surface of the foam with a cement-sand mortar screed.
If the ceiling is concrete
In this case, the order of work from the inside is as follows:
- on the side walls, fix beams 100x100 mm every 50 cm;
- cover the plates with fiberglass;

- fix thermal insulation 100-150 mm;
- cover the insulation with a layer of foil;
- fix the crate of the rails;
- wash the lining over the rails.
It will allow you to steam longer, while not spending extra firewood or electricity.
Conclusion
We told you about how to insulate a bath from expanded clay concrete blocks, bricks and wood. You will get more information on this topic from the video in this article.
The main function of the Russian bath is to improve human health. In order to achieve this goal and in no case harm your body while visiting the bathhouse, it is necessary to properly insulate the bathhouse. Subject to all the rules for warming this type of room, the heat in the bath is stored for a long time, which significantly saves money spent on heating it.
 The process of wall insulation in the bath
 In most cases, insulation must be done indoors. This allows you to quickly heat the bath and also quickly cool it if necessary. Baths are characterized by the following properties:
- Relatively low air temperature 50-60 degrees;
- High humidity. Sometimes it can reach up to 100%.
 Step-by-step internal warming of the bath

In order for these indicators to remain normal, it is necessary not only to properly insulate the bath, but also to use for this purpose proven over the years and well-proven.
 Existing types of heaters for the bath
 All of them, without exception, must meet the following safety requirements:
- Do not disturb, but only maintain a healthy atmosphere in the bath.
- Resistance to temperature changes in air.
- Absence of harmful impurities emitted into the atmosphere.
- Without smell.
- Fire resistance.
All these indicators should be taken into account in the process of general warming of the bath, especially when choosing a heater for the steam room.
 The scheme of warming the steam room in the bath
 Nowadays, there are many completely different types of heaters on the market. Among them, the most popular and popular among buyers are the following types.
Mineral wool
Mineral wool is a natural material with a fibrous structure. It is obtained by processing a mineral stone, some of its rocks, for example, basalt rocks. Cotton wool has a number of useful properties. These include:

 Mineral wool sheets for thermal insulation
 Mineral wool comes in different densities and hardness. In specialized stores, it can be purchased in the form of soft rolls, semi-rigid mats or rigid plates. It all depends on what purpose it is intended for. In other words, with its help they will insulate the bath from the inside, or vice versa from the outside.
glass wool
Glass wool in terms of its technical indicators lags far behind mineral wool. It is made using glass, or rather, its waste remaining during its production.
 The process of finishing the bath room with glass wool
 Glass is mixed with soda, sand and dolomite. The result is a quality insulation.
Glass wool is recommended to insulate the bath only from the outside, as it does not tolerate high temperatures. And over time, it begins to smell rather unpleasant. Basically, glass wool insulates the attic and the roof of the bath.
jute felt
It is also called an interventional type of insulation. Jute fiber felt is a natural material of natural origin. It is produced from the fibers of the jute plant.
 It looks like a roll of jute felt
 Basically, jute fiber is used for the production of ropes. It also produces fabric - burlap. Everywhere they insulate the bath, namely its walls.
Jute is able to retain heat well indoors, and also removes excess moisture from it. By itself, jute fiber is quite fragile and tough. That is why, in order to enhance its thermal insulation properties, flax fibers are added to it. The most famous brands of this insulation are flax jute, felt, linen. 
All of them are collected in tape bobbins. It is characterized by such properties as resistance to settling and drying out, and also the felt practically does not rot.
Expanded clay
It is a material with thermal insulation properties. It is used mainly for warming the genitals and in the bath. Expanded clay in appearance looks like small balls. Their development is associated with such a process as the rapid firing of clay.
 An example of floor insulation in a bath with expanded clay
 Thermal insulation of the chimney with expanded clay

It is used as one of the types of backfill. The effect of thermal insulation is achieved when the backfill layer reaches a height of at least 25 centimeters.
Styrofoam
It is used for insulation of external walls. The whole is pasted over with the material, then it is plastered or covered with sheathing.
 An example of finishing a bath with foam plastic

Styrofoam cannot be used for wall insulation inside the building itself. It releases phenol into the atmosphere. Styrofoam is unable to withstand elevated temperatures and it does not have sufficient fire resistance.
Watch the video review of heaters for the bath.
 An example of fixing a heater in a frame bath
They are pre-coated with a protective film and only then the insulation is fixed - basalt wool.
 The process of installing a vapor barrier in a frame bath
 In the steam compartment, a vapor barrier film with foil is additionally used.
Insulation of a log bath
A bathhouse carved out of wood practically does not need to be insulated. The only places that are subject to this process are the intervention joints. For thermal insulation, jute fiber is used with the addition of flax elements to it.
 Detailed scheme for warming a log bath

The steam room of the bath is also subject to additional insulation. Mineral wool is suitable as a heater for it. Foil is used for vapor barrier of walls.
Block bath insulation
The insulation of a block-type bath is similar to the process of warming a brick bath. To begin with, the walls of the bath are insulated from the outside. This will keep the room at the optimum temperature. The walls from the inside are traditionally sheathed with aspen clapboard. It is the most suitable option, as it has low thermal conductivity.
 Scheme and names of elements for warming a block bath
 In addition to such insulation, the walls in the steam room are covered with the so-called warm puff. It consists of a layer of mineral wool surrounded on both sides with foil or vapor barrier film.
 The process of mounting a wooden frame on blocks
Having thus completed all the necessary steps to insulate a block bath, it is possible to achieve relative ease in warming up the room to certain temperature indicators and maintaining it for as long as necessary.
Proper insulation of individual bath blocks
Any bath needs good thermal protection. At the same time, each individual block of the bath must be insulated in its own way. Not only modern types of expensive heaters are suitable for this. Since the time of our grandfathers, simple and affordable materials have been known. So how and with what can you insulate the bath yourself?
 The names of the elements and the principle of warming the bath room
 Insulation of the foundation of the bath
For its insulation, only those types of insulation that have such properties as:
- Resistant to high humidity.
- Biological resistance to various types of damage.
- Ability to withstand temperature extremes.
Styrofoam has such properties. With its help, they do it immediately after it hardens. In this case, sheets of cellular foam are fixed on the outside of the base of the bath.
 Bath foundation insulation scheme
The thickness of these layers should be 5 cm. It is best to use 2 layers of foam, arranged in a checkerboard pattern. 

As additional insulation, the foundation is covered with warm plaster.
Read also
Construction of a sewer for a bath
Insulation in the bath floor
Traditionally, the floor in the bath is a wooden flooring. There are two types of flooring:
- Leaking floor. This name was given to a cold floor, between the boards of which there are small gaps. Through them, water leaves the bath room to the street.
- Non-leaking floor. This is the so-called blind floor. It differs from the previous floor in a way. This floor is made with a slight slope in one direction. In the basement of the bath, a special water collector is made.
 The process of warming the floor in the bath
Insulation in the bath is subject only to a non-leaking floor. At the same time, two types of insulation are suitable for such purposes: expanded clay and basalt wool. They fill all the gaps between the two floorings: rough and finish. At the same time, do not forget that both of these materials need protection from moisture. It is performed both from the outside and from the inside. If a concrete floor is provided in the bath, then foam plastic or mineral wool is used for its insulation, in the form of rigid mats.
 The process of laying foil material on the floor


In the steam room, the concrete floor is not insulated at all. To protect from the cold, you just need to put wooden lattices on top of it. In the washing department for the concrete floor, a so-called underfloor heating system is created.
Bath wall insulation
In the process of warming the walls of the bath, it is especially worth paying attention to them. To enhance the protection of walls from moisture, it is not at all a film specially designed for this purpose that is used, but a heater with a reflection effect or foil.
 The scheme of wall insulation in the bath

When installing such a heater, it is imperative to leave a small gap between it and the finish of the bath.
 An example of laying mineral wool on the walls in the bath
When installing the upholstery, it is advisable to use a crate. It is fixed over the mirror side of the insulation. The mirror film is fixed on the walls in a vertical position. In this case, stretching of the strips should be avoided. 
 The process of attaching foil to the walls in the bath room
 Since this material is quite thin, the foil on the wall is made two-layer. All joints between the strips are glued with special adhesive tape.
In stone baths, with additional wall insulation, basalt wool is used. On both sides it is protected by hydro-vapor barriers.
Insulation of the ceiling in the bath
The ceiling, like no other part of the bath, needs reliable thermal protection. The heated bath air comes out most of all through it. The ceiling of the bath can be insulated in two ways. These include:


Previously, in order to qualitatively insulate the ceiling of the bath, sawdust with foliage was used. Dry sand at least 5 cm thick was poured on top. Ceilings were covered with a layer of liquid clay. This method of ceiling insulation is quite popular, it is used today.
Bath roof insulation
The roof of the bath is insulated using the standard insulation scheme. Exactly in the same way. Insulation is chosen based on how the attic of the bath will be used in the future.
 Scheme for installing insulation on the roof of the bath
If planned, then in this case the roof is covered with mineral wool.
If the attic is planned to be used only for household needs, then mineral wool can be replaced with glass wool. 
This will help to significantly save the money allocated for the purchase of insulation.
 Example of foil thermal insulation on the ceiling
The internal insulation of the bath is one of the most important stages in the arrangement of this building. Without high-quality thermal insulation, the owner will have to spend much more resources on heating the steam room, and the very situation in the bath without properly installed protection will leave much to be desired.
Since ancient times in Russia, moss, felt and even flax have been used to insulate baths, mainly due to the lack of other heaters - vegetable fiber either rots or dries, therefore today it is not used for basic thermal insulation.


The main difference between warming a bath and a similar event in an ordinary house is simple: in the steam room you need to keep the heat for as long as possible, i.e. high temperatures should remain indoors for as long as possible.


Thermal insulation work in the bath can be carried out using a wide variety of materials. For example, an ideal solution is a modern insulation based on stone wool with a foil coating - it does not burn, withstanding temperatures up to 750 degrees, effectively retains heat, does not rot, and is not of interest to rodents.
After reviewing the information below, you will get a complete theoretical understanding of the process of performing the internal insulation of a steam room, as well as study the step-by-step instructions for self-installation of heat-insulating materials.
We warm the bath from the inside: what do we need?
Any construction, repair and finishing activities begin with the preparation of materials, without which the implementation of the planned work will simply be impossible. Pay due attention to the study of the list below: it is better to spend a little time reading and buy everything you need right away than to return to the store and buy more of what you forgot.
insulation
The main component of the list under consideration. The modern market offers the widest range of thermal insulation materials, but not every one of them is suitable for use in a steam room - humidity and temperature can be too tough. For warming the bath, the most commonly used are: expanded clay (floor insulation), materials based on stone wool, and expanded polystyrene.
Important! It is strongly not recommended to use foam plastic for warming the steam room directly - at high temperatures, a material of dubious quality can most likely release substances harmful to human health.
Comparative characteristics of the mentioned materials are given in the following table.
Table. Comparison of popular bath heaters
Evaluation criterion Expanded clay
| Structure | Bulk material of natural origin. Presented in the form of granules with a cellular structure. | fibrous structure. The arrangement of fibers is both vertical and horizontal, disordered. | Open cell structure. |
| moisture permeability | The material does not pass water. | Mineral wool insulation has practically no tendency to absorb moisture. | Moisture permeability is extremely low. |
| The weight | Easy | Medium-light | Easy |
| Strength | high | Medium | |
| Compressive strength | high | From low to medium, depending on the specific type of material and manufacturer's technologies. | Medium |
| Toxicity | The material is safe | No toxic properties | Over time, it begins to release harmful substances |
| Can be used under high load conditions | Suitable | Depending on the brand of material | not suitable |
| prone to decay | The material retains its original integrity for a long time | Durable insulation | Has a tendency to break down |
| UV resistance | Doesn't react to sunlight | Features high UV resistance | Long-term direct contact with sunlight has an extremely negative effect on the performance of the material. |
As noted, expanded clay is suitable for warming bath floors. Bulk material allows you to provide the required thermal insulation of both wooden and concrete structures. Mineral wool insulation is optimally suited for insulating both walls and ceilings. The best option, as noted, is a stone wool-based heat-insulating material equipped with an additional foil coating - the key characteristics of such heaters are at a higher level.


In accordance with the current provisions of the technology for carrying out the work in question, the joints of the insulation boards must be glued with foil tape. This will create a sealed surface with the highest possible thermal insulation properties.


The elements of the heat-insulating coating are placed in the cells of a pre-mounted crate, for the assembly of which wooden bars are used. Select the cross section of the bars in accordance with the thickness of the thermal insulation. For example, if you are equipping a 10 cm thermal insulation layer, use bars with a similar thickness or width to assemble the frame.
Choose the distance between the bars 1-2 cm less than the width of the plates or the insulation roll. For bulk materials, the optimal distance between the bars is 45-60 cm.


Fixing the elements of the crate (bars) is carried out using dowels / self-tapping screws (if the surface is wooden) or anchors (if the base is stone). The length of the fasteners is also selected in accordance with the base material: for wood - 2-2.5 cm, for capital structures - from 4 cm.
The specific length of fasteners is determined in accordance with the characteristics of their use. For example, during the installation of the crate, the fasteners must be of such length that high-quality fixation of the timber / profile of the selected section is ensured. The cross section of the beam itself, as well as the profile parameters, are determined in accordance with the thickness of the heat-insulating layer to be equipped.
Additional materials
If the bath is insulated with a material other than foil mineral wool, you will additionally have to purchase a hydro-vapor barrier film.


If a concrete screed is planned to be poured, the work set will increase to include the items listed below:
- reinforcing mesh;
- mixture for pouring the screed or materials for its self-preparation (cement, sand, water);
- lighthouses;
- damper tape;
- polyethylene.


The floors in the bath can be wooden or concrete. The technology for arranging the directly heat-insulating layer does not have any special differences depending on the material for making the floor, except that in the case of a concrete structure, more expanded clay will have to be poured.
The thickness of the backfill is usually determined in accordance with the thickness of the walls. On average, a layer of expanded clay is poured at least 2 times thicker than the walls. If the height of the room allows, the thickness of the backfill can be further increased - this will help increase the efficiency of insulation.
Previously, for greater convenience of work and subsequently more accurate control of the evenness of the backfill, mark the base. To do this, it is enough to divide it with parallel lines into sections up to 1 m wide or along the length of the rule you use.
Important! If you are insulating the floor on the ground, at the very beginning, even before marking, you must do the following:
- carefully tamp the ground inside the base (if the foundation design assumes the presence of “free” soil, for example, in the case of strip supports);
- cover the walls with impregnation for waterproofing;
- fill the soil with a 10-centimeter layer of sand, spill it with water and carefully tamp;
- cover the sand with roofing material with a 15-centimeter overlap on the walls. Lay individual sheets of roofing material also with a 15 cm overlap. For fastening, use waterproof construction tape.
Directly the procedure for warming the floor with expanded clay with illustrations and the necessary explanations is given in the following table.
Table. Bath floor insulation with expanded clay
StageIllustrationRequired explanations
  |
The film must be stretched so that its edges along the wall are above the floor level. If the base is already covered with roofing material, there is no need to lay the film. |
|
  |
For example, a profile for drywall is well suited. The guides are set in accordance with the previously applied markings and fixed in a suitable way, for example, screws or nails. | |
  |
Set the beacons according to the level. In the future, these accessories will help you fill the most even layer of expanded clay, which will ensure the best quality of further planned work. Determine the installation height of the guides in accordance with the required thickness of the heat-insulating layer. Many developers do without guides, but this is a less convenient and accurate option. |
|
| We pour expanded clay |  |
The previously installed guides will help to do this as efficiently as possible. |
 |
For leveling, we use a rule or an ordinary rail of a suitable length. | |
 |
For greater convenience of leveling the insulation, we can use various auxiliary devices. For example, in large areas, a rake will come in handy. |
The floor is insulated and ready for further development in accordance with the developer's plans. At the discretion of the owner, additional heat-insulating material, for example, mineral wool or expanded polystyrene, can be laid on top of expanded clay.
As an example, a diagram of a concrete floor, equipped with expanded clay for thermal insulation, is given.


Video - Floor insulation with expanded clay
Insulation of bath walls and ceiling
Wall insulation schemes will vary somewhat depending on the material of manufacture. Information about this is presented in the following table.
Table. Wall insulation schemes
Production materialScheme
 |
 1 - wall, 2 - thermal insulation, 3 - lathing, 4 - sheathing, 5 - ventilation gap. |
  |
The sequence of thermal insulation work remains the same for walls made of any materials: if necessary, a hydrovapor barrier film is attached, lathing bars are mounted, insulation is placed in the formed cells, another layer of hydrovapor barrier is fixed on top (if necessary), lathing laths are nailed for finishing sheathing (at the same time they will provide the necessary ventilation gap), the selected finishing material is mounted (usually lining).
The ceiling is insulated in a similar sequence. An example of a ceiling thermal insulation scheme is shown in the following image.


Information regarding the step-by-step insulation of the walls and ceiling of the bath is given in the following table.
Important! Insulation will be carried out with a mineral wool material with a foil layer, which eliminates the need for preliminary fastening of a hydrovapor barrier material to the surface. The order of work is considered on the example of wooden surfaces. For concrete walls and floors, the recommendations are the same, the only thing is that you need to use other fasteners and for greater convenience, wooden guides can be replaced with a metal profile.
Table. The procedure for insulating walls and ceilings in the bath from the inside
Stage of workIllustrationRequired explanations
  |
Information regarding the elements used to arrange the frame, as well as fasteners for fixing the guides in different cases, was given earlier. The installation step of the guides is selected in accordance with the width of the insulation. As a standard, this is about 60 cm, it can be reduced to 59-59.5 cm so that the heat-insulating elements lie as tightly as possible. |
|
| Slab laying rules |   |
We must first put on gloves - the contact of “bare” skin with mineral wool does not deliver the most pleasant sensations. The foil material is laid with foil inside the room - thanks to this, the heat will not only be retained, but also additionally reflected into the steam room. |
 |
The slabs are installed by surprise into the frame and do not require additional mechanical fastening. | |
| Installation of plates on the wall |  Installation of plates on the wall |
The sequence and recommendations for wall and ceiling insulation are similar. To insulate the partition separating the steam room from the adjacent room, a layer 50 mm thick is usually sufficient. |
 |
The thermal insulation of the outer wall requires a thicker layer - 100-150 mm (in regions with a particularly cold climate - up to 200 mm). | |
  |
In order to save money, the insulation can be made two-layer, equipping one layer of ordinary mineral wool, and the second, which will “look” into the room, from a foil-coated material. | |
 |
The use of such a heater, as noted, eliminates the need for additional waterproofing materials. |
|
  |
Having filled the frame with heat-insulating plates, we glue the seams and joints with foil tape. | |
   |
A 1-2 cm gap is enough. The outer trim will be attached to the same crate in the future. Important! The order of further installation of the lining depends on the location of the rails: if the rails are fixed vertically, the lining must be fixed horizontally, and vice versa. |
|
| The best material for the interior lining of the bath is lining. The choice of material for the manufacture of the skin is at the discretion of the owner. The fixing of the cladding elements is traditionally performed using screws / self-tapping screws. |


Video - Insulation of walls and ceiling from the inside
Now you know everything about how to properly insulate a bath with your own hands using the most optimal heat-insulating materials for this. The information obtained will help you cope with the planned events on your own, eliminating the need to contact third-party masters and saving significantly.
Successful work!
Video - Insulation of the bath from the inside scheme
Warming the walls of the bath from the inside with your own hands
The bath insulation technology involves three successive stages: insulation of the ceiling, then walls and, last but not least, the floor. The technology, in general, is the same for any type of building, but there are some features. In this article, we will try to figure out how to properly insulate the walls in the bath.
Scheme of the "pie" of warming the walls of the bath from the inside
Before starting work, be sure to eliminate all the flaws: close up and insulate the cracks, treat the walls with flame retardants and antiseptics, if you see fit, check the tightness of the joints, etc. After completion of the preparatory work, you can proceed with the installation of thermal insulation.
The pie itself looks like this:
- a wall on which bars are stuffed;
- heat insulator laid between the bars;
- vapor barrier;
- a crate of slats that holds materials and serves to mount the finish.

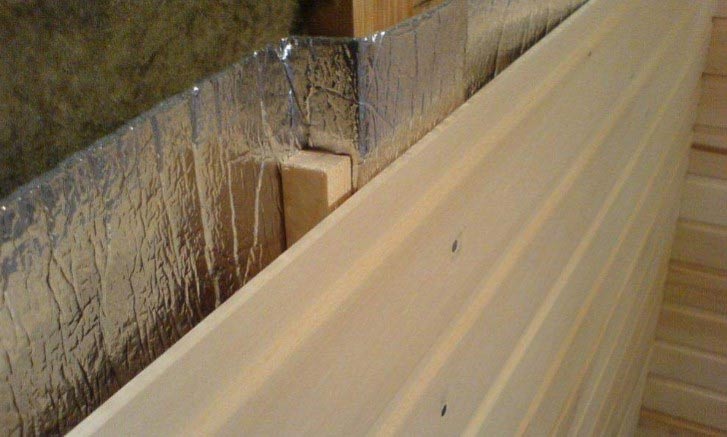
Step 1. A crate of bars is attached to the walls into which a heat insulator is tightly inserted. The thickness of the bars should correspond to the thickness of the thermal insulation. A vapor barrier is attached to the bars, which, as a rule, use aluminum foil. After the foil, a crate is attached under the lining with a thickness of 20-3 ohm, and then the walls are sheathed with a lining.
Main conclusions:
- It is not necessary to leave a gap between the insulation and aluminum foil in the bath;
- It is desirable to leave a gap between the aluminum foil (or other foil material) and the lining so that the condensate can flow down freely. Otherwise, the lining will rot very quickly.


Between the bars we tightly lay the heat insulator. The thickness of the insulation corresponds to the thickness of the bars
You also need to decide on the direction in which the bars will be nailed to the wall. They can be nailed vertically and horizontally. And there is constant debate about how best to do it. Some builders claim that with a horizontal location of the heat insulator, and hence the bars, there is less heat loss. Their opponents say that ventilation is better with a vertical arrangement. More importantly, everyone chooses for himself, as well as whether or not the bars need to be treated with antiseptics and fire retardants.
Advice! It makes sense to think not about how to fix the bars, but first of all about how the lining will be attached: horizontally or vertically. It is more practical to mount the lining horizontally. In this case, the condensate, which will inevitably form on the vapor barrier, will be able to flow down unhindered, so the crate under the lining will be mounted vertically.
The step of stuffing the bars, under the insulation, is determined by the width of the selected heat insulator: the distance between the bars should be approximately 1 cm less than the actual width of the insulation(in this case, the insulation will fit snugly against the bars).
Advice! Be sure to measure the width of the insulation before attaching the bars. Do not trust the data on the packaging: firstly, there may be factory deviations, and secondly, during storage and transportation, the edges may wrinkle, thereby reducing the actual width. Any gap and loosely fitting heat insulator is a place where cold will penetrate and condensation will form. These areas are also called cold bridges.
Step 2 Between the stuffed bars, tightly, without gaps, with little effort, a heater is laid. With the right distance between the bars, the heat insulator holds itself well, but to be sure, you can fix it with hot-dip galvanized or stainless steel screws and washers of large diameter (read this article about the choice of fastening materials for the bath).
If a foil heat insulator is chosen, to ensure tightness, close each connection with a patch of aluminum tape, and on top you need to fix another piece of adhesive-backed foil - tightness is very important: most heat insulators lose their properties in the presence of moisture. For example, the thermal conductivity of wet basalt wool is much greater than dry. For this reason, the insulation must not be allowed to get wet.
Also, carefully in this case, you need to approach the sealing of the joints of the foil insulation and the bars: they need to be glued with the same foil tape, ensuring that they enter at least 5 cm both on the insulation and on the bar.


For a steam room, foil is considered the best material to prevent moisture from penetrating into the insulation. It not only retains moisture well, but also reflects heat back into the room, greatly reducing its loss. If you choose such material, the time required to heat the room will significantly decrease, the costs of maintaining the required temperature will decrease, the stove will work in a more gentle mode, which means it will last longer.


In other rooms, you can lay any other material that is suitable for performance.
The strips of the selected material are laid so that they overlap by at least 5 cm. All joints are additionally carefully glued with foil tape, which is sold in the same place as the vapor barrier. Attach it to the bars with staples and a construction stapler. To maintain tightness and prevent steam from entering the thermal insulation, it is advisable to glue the joints with the same foil tape.
The video below shows how insulation is laid in a Finnish sauna and covered with aluminum foil.
When insulating the ceiling, there should be a "sunset" of the heat and vapor barrier on the walls. When installing wall insulation, put it on top of the wall “pie”, and then carefully seal the joints (use foil tape again).
Step 3 After the installation of the "pie" is completed, a crate of planks is stuffed onto the protruding bars. It will hold the materials, and will also serve as the basis for attaching the interior trim.

This is how the wall may look after the completion of all work: 1 - insulation, 2 - vapor barrier, 3 - lining
Features of wall insulation from different materials
The technology and sequence of insulation layers remains virtually unchanged for various rooms and types of buildings. Only some parameters can be changed. For example, for a steam room, the thickness of the insulation is recommended twice as much as for other rooms: it is here that it is very important to retain heat for the maximum amount of time.
The thickness of the insulation also differs for buildings made of different materials. A log bath itself holds heat well, and when finishing all rooms except the steam room, you can do without insulation at all, or choose a material of small thickness - if the winters in your region are harsh.
The video below explains why there is no need to additionally insulate the walls of a log bath (the plot of the program "Estate").
Insulation of the walls of a brick bath from the inside practically no different, except for the methods of fastening: it is more difficult to hammer nails into a brick wall, you can use dowels. You can use galvanized profiles instead of wooden bars, but when buying them, pay attention to whether they are suitable for use in rooms with high humidity. And with the choice of sizes it is much more difficult here: there are not so many standard sizes, and metal can become a conductor of cold. Insulation of the brick walls of the bath from the inside implies a greater thickness of thermal insulation than in a log bath: minimum - 10cm, but this parameter depends on many factors: wall thickness, external insulation, region, etc.
Insulation of the walls of the bath from foam blocks the composition of the "pie" is no different. The whole difficulty is that this material does not hold fasteners well, even special ones. It is no better than he tolerates excessive loads. Therefore, when choosing materials, pay attention to their weight. It should be one of the decisive factors.


The fastening of the crate must be done so that the main load falls on the floor, and not on the walls. To do this, you can make U-shaped structures that are attached to the floor and ceiling, just fix their position in the walls with a pair of dowels.
Advice! To further reduce the load on foam concrete walls, you can not fasten the planks tightly to the wall, but make clamps from pieces of galvanized steel that will only hold the slats in a vertical state. The entire load will be on the floor.
The insulation between the slats should be laid tightly, and you can fix it so that it does not fall with the help of a thread and a stapler (shoot the thread to the slats). A vapor barrier or vapor barrier can also be attached to the planks with staples, but do not forget to overlap the panels, glue and seal the joints with foil tape, and cover the staples with patches.
The last stage of warming the walls of the bath from foam blocks is the installation of the crate for interior decoration. This is a similar frame of U-shaped sections, the load from which is distributed mainly on the floor. This frame is attached to the first one in several places to the bars.
This is just one solution that allows you to insulate the walls of the bath from foam blocks, but it is simple in execution and quite reliable.
Bath insulation materials
The choice of material for insulation is a rather complicated process: it is necessary to take into account not only the technical characteristics of heaters, but also their environmental friendliness, harmlessness, and fire safety. It is especially problematic to correctly select a heater for a steam room, since it has not only high humidity, but also a high temperature, which causes the release of toxic substances from some types of heaters.
Classic mineral wool
Not so long ago, almost everyone advised using mineral wool to insulate the bath, but recent studies have shown that in production, a composition containing phenol-formaldehyde resins. They have a harmful effect on a person, are a carcinogen, which in itself is unacceptable, and in a bath or sauna with its high temperature, it is generally very dangerous. Yes, the certificates indicate that the release of these substances does not exceed the threshold, but do you need it?
Even Rockwool or TechnoNIKOL basalt wool, any other mineral wool from well-known or not manufacturers, emits phenol-formaldehyde substances. In general, according to physicians and experts, any mineral wool is harmful to health. In this regard, the question arises: "what is the best way to insulate the bath?". There are several materials about which there are no negative opinions. Anyway, until...
Mineral heaters of a new generation
URSA PUREONE material is presented as a new generation of mineral insulation. Acrylic is used as a binder - a chemically neutral substance that does not react with other substances and does not emit harmful substances under any operating conditions.


The safety of URSA PUREONE has been confirmed by the EcoStandard group (classified as an M1 material by Eurofins, EUCEB certified).


Heaters made of glass, peat and paper
FOAMGLAS® foam glass is foamed glass. It does not burn, does not lose its properties over time, is stable in shape, environmentally friendly and safe. Its only drawback: the high price and rather large weight.


There are also peat-based heaters - peat blocks . Crushed peat is soaked with water, filler is added - straw, sawdust, etc., blocks are formed from the resulting mushy mass, which are used as heat and sound insulators. The resulting material not only reduces heat loss, but is also a "breathable" material - it absorbs well and also releases moisture well, has a bacteriostatic effect, does not burn or rot.


Despite all the positive qualities, peat blocks are not the most common material, and there are few manufacturers of this material. The most famous is the GeoKar enterprise from Tver. If all the declared qualities are confirmed, then this is a good alternative to mineral wool.
There is also such a thermal insulator as ecowool . This is a cellulose substance, mostly consisting of recycled newspapers, to which safe (according to the manufacturers) fire retardants - boric acid and borax salts - are added. Everything would be fine, but this material strongly absorbs moisture, and is not suitable for thermal insulation of the bath.
Wood fiber boards - are made from crushed wood chips, but using a different technology than the well-known fiberboard - without chemical binders. The chips are ground, diluted with water, distributed over the grid. The mass simply dries, after which it is cut into canvases.
Among the safe heaters, one can also name natural heaters made of flax, wool, moss, reeds. Use as a warming material and sawdust, reeds and straw. But all these substances are combustible, and without treatment with special compounds they cannot be used to warm the bath.
Modern foil insulation
In this article, we could not help but talk about what modern insulation materials the Finns use in the construction of saunas. Hot finnish guys use insulation boards SPU Sauna Satu specially designed for wall and ceiling insulation in the sauna.
SPU Sauna Satu slabs are made of polyurethane foam and have an aluminum laminate coating on both sides.


SPU Sauna-Satu cooker
SPU Sauna Satu slabs can be attached to walls even without battens. The process of attaching the slabs to stone walls and wooden ceiling lathing is shown in the video.
At the moment, it is the SPU Sauna Satu boards that can be attributed to the most suitable heaters for baths and saunas.
findings
The main problems of warming the bath are associated with the warming of the steam room, since it has not only very high humidity, but also high temperature. Under the influence of high temperature, many heaters begin to release toxic substances that can harm human health. For this reason, it is necessary to carefully choose mineral wool insulation, as many of them contain phenol-formaldehyde resins that act as a binder.
Styrofoam and expanded polystyrene should not be used as a heater, which, when heated to 60 degrees Celsius, begin to release toxic substances.
In fairness, it should be noted that many natural materials that are harmless at normal temperatures, when heated, can release substances that can harm human health.
In the sauna room, the microclimate is unique. Proper arrangement of the building involves warming the bath inside. This process is laborious, but quite doable on your own.


Information on how to properly insulate the bath inside will allow the owner to greatly improve its performance. After completion of the work, it will be possible to save on fuel and ensure the safety of thermal energy in the room.
When deciding how to insulate a wooden bath from the inside with your own hands, a number of factors should be taken into account:
- properties of the material used to provide thermal protection;
- personal construction skills and abilities;
- own preferences.
Features of materials for thermal protection
To decide how and what is better to insulate the bath from the inside, you need to know the conditions under which the materials will be used:
- First of all, you need to take into account that both in the steam room and in the washing room the air is characterized by high humidity. In the dressing room, it is unlikely to be dry. Taking into account these factors, we can conclude: you need to choose a non-hygroscopic insulation or the material must have reliable vapor and waterproofing.
- In the steam room, the air temperature often reaches more than 100 degrees. Insulation materials such as extruded polystyrene and polystyrene foam, under conditions of strong heating, will begin to release substances harmful to human health. For the same reason, plastic panels and linoleum cannot be used to finish the steam room. In the first case, the products are subject to deformation even at 80 degrees of heat.
- A significant part of the thermal energy under high temperature conditions begins to be lost both due to heat transfer and in the form of thermal radiation. To prevent heat loss, the insulation for the bath on the walls from the inside must have a foil surface or a reflective layer consisting of foil must be provided in the thermal insulation scheme.
Insulation of different types of walls
The choice of how to insulate the walls of the bath from the inside depends on the type of material from which it was built:
- If it is brick, stone or concrete products thermal protection required. The fact is that when there is no thermal insulation, the bath will have weeping walls and, as a result of temperature fluctuations, they will quickly begin to collapse. The thickness of the insulation should be chosen taking into account the parameters of the supporting structures and the climate in the region. Most often, experts recommend a 10-centimeter layer.
- Is it necessary to insulate a wooden bath? On the one hand, the thermal protection of the building will not interfere, and on the other hand, wood can be called one of the best materials for the walls of the steam room and dressing room. Of course, it is required to insulate baths from a bar with a wall thickness of no more than 15 centimeters. Bath log buildings are thermally insulated when the cross section of the log does not exceed 20 centimeters.
From the inside, walls of greater thickness are either not insulated, or thermal protection is made with the arrangement of waterproofing and clapboard trim. The crate is arranged only if there are blockages on the walls.

Horizontally located strips of vapor barrier are fastened with a stapler with a 5 cm overlap to prevent water from penetrating under the material. First, the bottom sheets are hemmed. Polyethylene should not be used for vapor barrier due to high temperatures.
Choice of materials for insulation
Basalt wool is considered the best solution for insulating a bath from the inside. Rigid mats 10 cm thick are used. With thermal protection of the ceiling, the thickness of the heat-insulating layer should be about 15-20 centimeters, since heat loss mainly occurs through the ceiling.

To insulate the bath inside, you still need to have materials at your disposal:
- For crates. The most reliable option for bath buildings made of brick or stone is to build a frame from a profile used for drywall (read: "How to insulate a brick bath with your own hands correctly"). The CD ceiling profile is often chosen, and the UD guide profile is used to make a border along the perimeter of the walls. The step of fixing direct suspensions is from 60 to 80 centimeters. The gap between the profiles must be made less by 1-2 centimeters compared to the width of the insulation boards. In wooden baths, bars are used as a profile.
- For waterproofing. Requires heat-resistant material with foil, impervious to moisture and steam. There is a large selection of such products on the construction market. For example, you can purchase foamed foil polypropylene, designed for temperatures up to 150 degrees. This material is able to protect the walls of the room from dampness and reflect radiant heat, thereby reducing heat loss. So a layer of Penotherm 3 mm thick provides a degree of thermal protection like a 150 mm beam.
- For a fine finish. Usually, insulation is placed in a bath under the lining, as in the photo. This material is produced for final finishing from linden or aspen, since the products of these tree species are resistant to decay processes, do not heat up even at high temperatures, and retain their original appearance for a long time.
Thermal insulation of floors, windows and doors
When a decision is made on how to insulate the bath inside with your own hands, take into account the possibility of increasing the degree of thermal resistance at the ceiling and walls. True, the cool floor and the presence of drafts also take away a lot of heat.
To insulate the door leading to the steam room, a thick felt frame is attached to it, which will reliably cover the cracks. Wooden frames at the windows located in the steam room, dressing room and washing room are insulated with cotton wool.


As for plastic, it is not installed in places with high temperatures, but in other rooms you should not be afraid that polymers will undergo thermal decomposition. Self-adhesive foam strips are used to protect plastic windows.
The choice of products, the better to insulate the bath inside, depends on the type of flooring. Expanded clay is poured onto the surface of the leaking wood floor, and boards are already mounted on top of the leveled backfill.
They begin to equip a concrete leaking floor with digging a foundation pit 50 centimeters deep.
The layers of the thermal insulation structure are arranged in the direction from bottom to top in the following sequence:
- sand -5 centimeters;
- polystyrene -20 centimeters;
- concrete mixed in a ratio of 1: 1 with foam chips - 5 centimeters;
- waterproofing;
- concrete combined with vermiculite in a ratio of 1: 1 (the so-called natural material with low thermal conductivity) - 5 centimeters;
- reinforced screed -5 centimeters.
In the process of pouring the foundation, it is necessary to equip the slope. A boardwalk is mounted on top of the concrete screed on the logs.

In the case when a continuous floor covering is needed, heat-insulating material is laid on top of the rough base with a layer of 10-20 centimeters, it can be mineral wool or polystyrene. Then it is covered with waterproofing, not forgetting to overlap the walls. A reinforced screed 5-10 centimeters high is mounted on top of this layer.
Then, as a rule, lay a tile. Despite the fact that the tiles in the steam room do not heat up to a high temperature, it is advisable to provide for the presence of wooden footrests to make visiting the bath more enjoyable.
Arrangement of thermal protection of walls and ceiling
Insulation of the walls and ceiling of the bath from the inside is similar to how it is done in other rooms, while special attention should be paid to the reliability of laying the vapor barrier layer.
Stage one - creating a crate. The order of how to insulate the ceiling in the bath from the inside suggests that the distance from the crate to the base of the wall or ceiling must be made slightly larger than the thickness of the material for thermal insulation.
When using galvanized profiles, this gap is adjusted with the help of suspensions, and the bar is nailed with a lining, it can be a piece of the bar. For wooden crates, galvanized suspensions are also used.


The profile fastening sequence is as follows:
- A UD guide profile is fixed along the perimeter of the walls or ceiling, observing a 60-centimeter step. It is mounted to a beam or logs with self-tapping screws, and to brick or concrete walls - with screws with plastic dowels.
- The axes of the CD profiles are marked, taking into account the fact that the gap between them should allow laying the heat insulator plates without trimming. Then hangers are attached to the wall, observing a step of 60-80 centimeters.
- To install and fix CD profiles to suspensions, metal screws 9 mm long are taken. The free edges of the suspensions need to be bent.
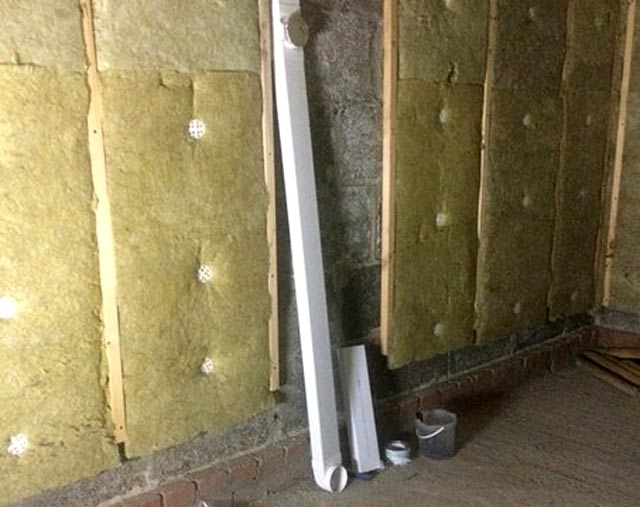
Stage two - installation of insulation. Basalt wool in slabs is placed between the bars (profiles). Similarly, the insulation of a ventilated facade or loggias is performed. Work must be done in a respirator (gauze bandage) and special glasses. The fact is that the small fibers of this material are volatile and, once on the human mucosa, greatly irritate it.

A standard sharp knife is used to cut the slabs. The insulation should not be crushed during installation. Regarding how best to insulate the bath, you need to know that with a constant weight of the material, the smaller its volume, the worse its heat-insulating qualities will be.
Stage three - vapor barrier device. Strips of material in the horizontal direction are fixed from the bottom up, observing a 5-centimeter overlap. The foil side of the insulation should be turned inside the room.
The method of fixing the vapor barrier depends on the material from which the crate is made. So, before you insulate the steam room in a log bath, you need to stock up on a construction stapler. In the presence of a galvanized profile, the strips are fixed with double-sided aluminum tape.
To create a high-quality vapor barrier, the insulation not only needs to be fixed, all existing joints should be glued with the same adhesive tape. Then moisture will not be able to penetrate the insulation.


Stage four - clapboard lining. To make the room cozy and beautiful after the completion of the insulation, it is necessary to finish the walls.
First, prepare the tools and materials necessary for the work, including:
- circular saw or electric jigsaw;
- drill - screwdriver;
- rasp (required when fitting and processing the edge of the lining);
- building square (necessary for marking boards);
- level and plumb (they are in demand when checking verticals and horizontals);
- metal clamps for fixing wooden lining;
- copper or galvanized screws, which are needed to fasten the kleimers to the bars;
- self-tapping screws for metal;
- wooden skirting boards for finishing corners.
When carrying out work, you need to take into account a number of points:
There should be a small gap between the lining and the vapor barrier layer. In addition, gaps (no more than 1-2 centimeters) are arranged along the edges of the ceiling, as well as in the upper and lower parts of the walls.
The end boards in each row of lining should be fixed with screws through and through, and their caps will be covered by the plinth. All other boards will be held by the clamps.
The above procedure for carrying out work allows you to both insulate the old bathhouse from the inside, and a completely new building. The thermal protection of the bath structure is a very important stage, since the efficiency of the steam room depends on its quality. The main thing in the work is to take into account the slightest nuances and then the result will exceed expectations.
How and how to insulate the walls of the bath from the inside?
According to the technology in the bath, it is necessary to insulate the walls, floor and ceiling. In what sequence to do this, you need to figure it out on the spot. In principle, all work is carried out in the same way. However, some points of insulation do not apply to all structures. In order not to throw money away, first we will figure out how to properly protect the walls from the cold.

 The insulation of the bath will not meet the stated requirements if you do not first prepare it for finishing. It is necessary to close up all the cracks, the seams must be tight, all wood materials are treated with antiseptics. In a log bath, jute fiber or tow is necessarily laid between the crowns, brick walls are treated with primers that protect them from moisture.
After completing the preliminary preparation, you can begin the main work.
Insulation "pie", what materials are needed?
There is nothing to do with a rich product here. A pie is a layer of materials used in insulation and consists of the following elements:
- wall, it must be flat;
- bars, they are stuffed for crates for lining with boards;
- heat insulator and materials for isolating circulating steam;
- counter-lattice for external finishing.
Installation of the crate and insulation
For work, you need a bar with a section of 50x50. It is stuffed on all walls with such a distance from each other that the insulation fits tightly into the gap between it. It will be better if you get the insulator of the same thickness as the timber. If not, then it is necessary to lay the material in several layers. In a log bath, a small problem will be the even arrangement of the crate bars. You will have to trim them further. Randomly stuffing rails is impossible. Subsequently, the exterior finish simply does not "lie" on the timber.
Vapor barrier is an obligatory moment in the insulation of walls in the bath.

Then, a vapor barrier film is laid along all the walls, with fastening with stapler brackets. The sheets overlap each other. On top of this design, a crate is stuffed under the lining. For this, wooden slats with a smaller cross section are used, approximately 20x30 mm.
At first glance, the work will seem simple. In principle, it is so, but if you do everything superficially, then there will be no result. Be guided by the following rules:
- it is impossible to leave even a minimum gap between the insulation, the vapor barrier film and the wall;
- joints of materials, fix with reinforced tape;
- between the vapor barrier and the lining, a small gap is necessary for the free flow of condensate.
Decide in advance on the direction of the inner wall cladding in the bath and laying the insulation. They can be mounted horizontally or vertically. There is complete freedom of action. Although some masters say that in the first arrangement, heat loss is reduced. At the same time, the vertical laying contributes to better ventilation. What is more important to you, choose for yourself. The consequences of heat loss with horizontal laying are negligible, as well as ventilation with vertical lining.
Be guided by the location of the lining. Some people like horizontal stuffing, while others like vertical stuffing. Having chosen one of the options, it is not necessary to change the direction of the counter crate for laying insulation. If you decide to lay the material vertically, then the lining with planks can be easily done in the horizontal direction, simply by stuffing the slats under it in the same way. You can also do it in the opposite direction, if you need to mount the lining while standing.
People who are tempted by enthusiasm, and not burdened with time, can experiment with finishing. On one wall, make a horizontal sewing, on the other vertical. Only it is necessary to develop the finish at the planning stage of the bath.

 Roll materials with a foil surface are considered the best in the line of vapor barrier products.
Steam room wall insulation
Here it is better to use foil materials for vapor barrier. They will protect the insulation from any penetration of moisture into it. And all materials do not particularly like water, except for polystyrene and its derivatives. But it is better not to use a heater on such a basis for a steam room.
It is necessary to lay the insulation in the wall crate with an “overlap”, of about 5 cm. The joints are additionally insulated with adhesive tape. The vapor barrier can be laid in two layers: one of the usual polyethylene film, the second with a special foil material. Sheets are fastened in a checkerboard pattern and all joints must be sealed with tape.
Wall insulation in the dressing room is carried out according to the same scheme as in the washing department. There shouldn't be any particular problems. The main thing is to properly prepare for work.
When construction work is nearing completion, the question arises of how best to insulate the bath. The choice of a suitable material and the methods of its installation, the technology for performing insulation are very crucial moments.
How to choose a heater
What is the best way to insulate a bath? For this, natural or synthetic materials are used.
Natural heaters:
- cuckoo flax;
- moss red;
- linen tow;
- hemp hemp
- sphagnum.

 Kukushkin flax - one of the natural types of insulation
 These materials do not require serious material costs, are highly environmentally friendly and will help create a special atmosphere in the bath, filling the interior with natural natural aromas.
The main disadvantages of organic materials, which must be taken into account when choosing which insulation is better to insulate the bath:
- fragility of the material;
- significant labor costs;
- the need for constant renewal of the insulation.
It is necessary to provide protection against small rodents, birds and insects.
Many homeowners believe that it is better to insulate a bath with synthetic materials that do not rot and are not damaged by rodents.
jute felt
What is the best way to insulate a bath from the outside or from the inside? Jute felt can be used as an interventional heater for a bath. This is an organic natural material, for the manufacture of which plant fiber is used.
 Flax jute felt is used not only for thermal insulation, but also to remove excess moisture from the interior of the bath
 To improve performance, flax fiber is added to jute fibers. The result is flax or flax-jute felt. The material release form is tape bobbins. This allows you to choose a heater for logs of different diameters.
Flax jute felt is used not only for thermal insulation, but also to remove excess moisture from the interior of the bath. This is a durable material that no animals will spoil.
Expanded clay as a heater
Expanded clay is a bulk material of natural origin. It is a granule with a porous structure. Expanded clay is often used to insulate baths or other buildings due to the following qualities:
- moisture resistance;
- relatively small specific gravity;
- high strength of granules;
- resistance of granules to mechanical damage;
- durability;
- low price.
 Floor insulation with expanded clay
 Working with expanded clay is easy. Other loose materials can be used with it.
Synthetic insulation
Currently, synthetic heaters are produced in large quantities and can be of the following types:
- expanded polystyrene extruded (XPS plates) or ordinary;
- Styrofoam;
- mineral wool;
- glass wool.
 Insulation of the floor in the bath with foam
 Each material has unique properties:
- Expanded polystyrene provides reliable thermal insulation. At the same time, the material has a low cost and a small specific gravity. It should be borne in mind that ordinary polystyrene foam is flammable and easily deformed under the influence of high temperatures. Therefore, in the bath it is used for warming the dressing room, utility rooms, rest rooms. Styrofoam cannot be used in the washing and steam room.
- For a bath, it is better to choose XPS plates or extruded polystyrene foam. This material has a sealed cellular structure and a not very large specific gravity. XPS boards are resistant to moisture, compression and high loads. This gives them durability and reliability in operation.
- Styrofoam is used for external insulation of a bathhouse built of brick or cinder blocks. It is glued to the outer vertical surfaces of the building. Plaster and finishing material is applied from above. Styrofoam is highly flammable, so it cannot be used for interior decoration in the bath.
- The main material for the production of mineral wool is molten rocks or waste from metallurgical production. Therefore, the cost of this insulation is low compared to other similar materials.
The result is a heater that has such positive properties as:
- reliability;
- non-hygroscopicity;
- strength;
- Fire safety;
- durability.
It is easy and convenient to work with such a heater. The service life of the material is quite high. Therefore, when deciding how to insulate a bath, you can opt for sheets or mats of mineral wool.
Insulation with mineral wool allows you to provide in the bath such conditions as:
- low thermal conductivity;
- high sound insulation;
- hydrophobicity.

 Glass wool is produced by interlacing fine fibers of inorganic glass.
 The main thing to remember is that mineral wool is easily subjected to mechanical damage. Therefore, when using it, you need to act carefully and carefully.
Glass wool is produced by interlacing fine fibers of inorganic glass. High thermal insulation properties are provided due to the large volume of air in the finished material.
The cost of glass wool is low. It is sold in roll and/or tile form. The thickness of glass wool is different, so it is always easy to choose the right option.
Preparatory work
When the insulation is selected, it is necessary to purchase all the additional materials necessary to work with it, prepare the tools. To warm the bath you may need:
- construction knife;
- roulette;
- level;
- a hammer;
- brushes and/or spatulas;
- sledgehammer;
- construction mixer;
- container for mixing solutions;
- work clothes, gloves, rags.
 When the insulation is selected, it is necessary to purchase all the additional materials necessary to work with it, prepare tools
 It is better to make a list of everything you need after it has been determined what is the best way to insulate the walls of the bath, floor or ceiling, and all the necessary materials will be purchased.
How to insulate a bath from the inside
When thinking about the best way to insulate a bath from the inside, you should remember the high level of moisture content in the interior. Therefore, vapor barrier must be provided. This will preserve the integrity and basic useful properties of the insulating material. The walls of the room will be less destroyed under the influence of moisture and high temperatures.
What is the best way to insulate the walls of the bath? The most convenient vapor barrier for a bath is aluminum foil. This material protects the heat insulator from destruction and helps to conserve heat in the interior of the bath. After applying the foil, the intersheet seams must be sealed with a special metallized adhesive tape.
On a note! In different sections of the bath, there are different levels of moisture and temperature. Therefore, the decision, the better to insulate the bath inside, depends, first of all, on the specific room.
Various heaters are used, the technology of their installation is also different.
Walls in the steam room
The walls in the steam room are exposed to high temperature and humidity. Therefore, how best to insulate the steam room in the bath should be considered in detail.
First, a crate is attached to the walls. It is best done using dry slats and/or thin timber. The resulting cells must be even and uniform in size. Fiberglass will be covered in them.
 Aluminum foil insulation
 A heat insulator is laid on top of the fiberglass. Basalt fiber is considered the most reliable for the steam room. The last layer is a vapor barrier. For this, aluminum foil is used.
When all work is completed, decorative wall decoration is carried out. To do this, you can use lining made of durable types of wood. It should be remembered that if the interior of the bath is not divided into several rooms, insulation according to the described scheme is carried out everywhere.
 Basalt fiber is considered the most reliable for the steam room.
 How to insulate the ceiling
The better to insulate the ceiling in the bath, depends on the purpose of a particular room. Hygroscopic material should not be used in the washroom and/or steam room. In the washroom or in the dressing room, you can use polyethylene film or kraft paper for vapor barrier.
On a note! To improve air circulation between the vapor barrier and the finishing material, it is necessary to leave a ventilation gap (gap) of no more than 2 cm.
This will speed up the drying of the skin after using the bath, otherwise abundant moisture will cause the material to rot, and it will have to be replaced.
How to insulate the floor
Significant heat losses in the bath occur not only through the ceiling and walls, but also through the floor, especially when the bath is used in the cold season - in winter, autumn, early spring.
To figure out how and what is better to insulate the floor in the bath, you should remember that the procedure for laying the floor cake must be strictly observed. The earthen floor must be leveled, cleaned of debris and foreign objects and leveled. A concrete screed must be poured onto the prepared surface.
On the set concrete, you need to lay a layer of rolled waterproofing. It can be roofing material or plastic film.
Further, the entire surface is laid out with a layer of heat insulator. You can use both sheet and linen material. Then roofing material or polyethylene is re-layed. The final layer is a concrete screed.
The laying of all layers of the floor cake must be carried out carefully. It is especially necessary to pay attention to the tightness of each layer - this will preserve the integrity of all materials. Properly carried out internal insulation will create comfortable conditions for the proper use of the bath and keeping warm.
The better to insulate the bath from the outside, depends on the main building material from which the building was erected.

 External floor insulation in the bath
 For external insulation of a brick bath, mineral wool is most often used. It is best to apply this material in 2 layers, overlapping the seams between the sheets laid earlier. This will prevent cold bridges and help keep you warm.
A block bath is insulated in a similar way. For expanded clay concrete blocks, the outer insulation layer may be slightly thinner.
Wood retains heat well. In this case, the question of the better to insulate the walls of the bath from the outside is solved a little easier. The basic scheme for applying a layer of heat insulator depends on the wood building materials used.
Important! If the bath is built from a bar, it is necessary to seal the seams of the main box. To do this, you need to make neat layers of flax jute fiber.
Solving the question of how best to insulate a frame bath requires special attention. The free space between the components of the frame must be filled with a heat insulator. For this, mineral wool is used, protected on both sides with a waterproofing film.
If a log cabin was erected for the bath, only the interventional joints need to be insulated. For this, it is optimal to use flax-jute felt or other natural material.


Since ancient times in Russia, the walls of the baths were insulated exclusively with natural materials: felt, linen and moss were used, which are occasionally used today. But any natural insulation has its drawbacks - birds and mice like to take it away, and the very insulation of the walls in the bath in this case requires special skill. Much better than modern synthetic materials - more durable and no less warm.
Of course, how to insulate the walls of the bath seems to be a simple question, but in fact there are many nuances here. And the more you know about it, the warmer and safer your bath will be.
Inside the bath, for reasons of safety for human health, it is better to insulate it exclusively with natural materials - for example, mineral wool. And it will be protected from moisture by heat-reflecting waterproofing films sewn up from the eyes with clapboard.
Features of wall insulation from a log house
It would seem, why in log structures, wall insulation - after all, when laying the bath, it looks quite tight? The fact is that such a building material as a log house is characterized by shrinkage, which causes serious gaps. And through them, cold air penetrates directly into the steam room - which is absolutely not in favor of either health or finances in terms of excessive fuel costs. Therefore, such a bath needs to be insulated, and the most effective way is an interventional caulk.
All that needs to be done is to lay out the insulation during the construction of the log house, and at the end of the construction process the joint of adjacent logs or beams. After that, the fibers are stuffed with a hammer and caulk, and the seams are treated with a sealant.


Technology of the process of insulation of frame, block and brick walls
But the insulation of the walls inside the bath from the frame is more intricate - here you already need your own methods. After all, such a design cannot withstand high loads and special weight, and therefore everything must be calculated, first of all, from the technological side. Those. insulation can be used only one with a small weight. And polystyrene as an external insulation is simply indispensable for block buildings - it is not afraid of water, is lightweight and is attached with ordinary building glue.

The very insulation of the walls from the inside in the bath looks like this:
- Step 1 Creates a frame on a load-bearing wall.
- Step 2. The walls are sheathed with insulation.
- Step 3. Waterproofing materials are attached to the insulation - a foil layer or at least a plastic film. They need to be laid with an overlap, and all joints should be sealed with thin slats.
- Step 4. Everything is sheathed with boards or clapboard - that's all.
As an option - use special PPU plates.
Wall insulation from the outside - how to wrap a bath in a "fur coat"
It is necessary to insulate the bath not only inside, but also outside - in order to fully protect it from external cold and significantly reduce fuel costs. And high-quality external thermal insulation is a significant reduction in fuel consumption, humidity control and a guarantee against mold and unpleasant odors. After all, the main task of external insulation of the bath is the shelter of building structures, protecting them from contact with cold air and precipitation.
Further, how to insulate the walls in a bath of bricks and various kinds of blocks? The answer is simple: you need to create a good outer protective layer. The easiest way is to install a ventilated facade. Everything is very simple: a protective layer of waterproofing is applied, and then the wall is sheathed with siding, clapboard or even simple wooden boards.


But as a heat insulator for such a “pie”, the good old mineral wool is most suitable: environmentally friendly, fireproof, soundproof and has low thermal conductivity. The very process of warming looks like this:
- Step 1. Brackets are attached, which are made in the form of squares. Between them - a step one centimeter less than the width of the insulation mats.
- Step 2. Mineral wool is inserted - between the squares, which must be acquired elastic, able to withstand significant pressure.
- Step 3. The remaining joints between the plates are glued with construction tape and filled with adhesive.
- Step 4. The walls are covered with a rolled waterproofing agent, and it, in turn, is fastened with thin slats.
- Step 5. Now - the installation of guides, which are designed to hold the insulation and serve as a support for the cladding.

By the way, universal materials have already appeared on the modern market that perform two functions at once - insulation and waterproofing. For example, foil foam is foamed polypropylene, which is coated with aluminum foil and metal-coated levsan. It withstands temperatures up to 1500 degrees and creates a really effective warming of the bath.
Read in the article
Insulation of a brick bath
When choosing a material for building a bath, many opt for a capital brick building, which will faithfully last for many years. And this is no coincidence. Brick walls are not afraid of various insects that are happy to eat wood fibers in a log bath or from logs, are not subject to decay, do not swell under the influence of moisture and do not dry out in hot summer from solar radiation.
But brick walls also have their drawbacks. These include:
- large own weight;
- high thermal conductivity.
And if the first drawback is solved by creating a reliable strip or column foundation, then the second one requires careful thermal insulation to keep the heat inside the steam room.
Which side to insulate - from the inside or outside?
Before considering the possible options for the materials used for insulation, you need to figure out - to insulate the walls of the bath from the outside or from the inside?
How to insulate walls?
After we have decided on which side the brick walls should be insulated from, let's see what can be used for insulation and how the whole insulating “pie” looks in layers.
In ancient times, a variety of materials were used to insulate the walls in the bath - flax, moss, hemp, felt. As you yourself understand, the service life of such heaters was small. Materials of plant origin dried out, rotted, were eaten by insects and became unusable, and often caused a fire in the bath, as they flared up from the slightest spark.
But progress does not stand still, and today many types of heaters of various chemical compositions are produced industrially. These are glass wool, and basalt fiber wool, expanded polystyrene and polyurethane-based insulation.


The numbers in the figure indicate:
Wall insulation with Rockwool boards
One of the easiest ways to reliably insulate the walls of a bath is to use special Rockwool Sauna Butts boards, produced specifically for insulating saunas and baths.

The insulation is placed between them by surprise, after which the seams between the plates are glued with a special metallized adhesive tape, which prevents moisture from entering the insulation layer.


Wall insulation with ecowool
Another type of modern materials, increasingly used as insulation for brick walls, is ecowool.
If ecowool is produced in accordance with the technology, then it is a highly environmentally friendly insulation that is not afraid of fire or water, does not support the spread of mold and fungus, and can serve for many years.


The only thing to remember when buying is that you should not save and buy insulation from unknown dealers, since under the guise of ecowool you can simply buy ground waste paper, which does not at all correspond to even a small part of the declared characteristics.
So that the heat does not leave the steam room, you should take care not only of the insulation of the walls, but also think about the insulation of the floor.

Steam room ceiling insulation
You should also pay attention to the insulation of the ceiling of the steam room so that hot air is kept indoors for as long as possible. . When insulating the ceiling, it should be remembered that the greatest fire hazard is a hot pipe passing through the ceiling structures, around which it is necessary to arrange reliable insulation from non-combustible material
The place of passage is called the ceiling cutting. As a rule, the node of the passage of the pipe through the ceiling is a container filled with non-combustible material with a low coefficient of thermal conductivity.

As you can see, the insulation of the walls of a brick bath is no more difficult than that of a bath made of logs or timber. By following the recommendations in the article, you can enjoy a light steam at any time of the year.
Insulation of a brick bath
How to insulate brick walls? Why is it better to use stone wool? What are the disadvantages of foam? All answers in one article!
Source:
Insulation of the walls of a brick bath
It's time to move on to the most important thing: to the insulation of brick walls. To do this, you need to tune in to the fact that the bath will “lose” a significant amount of internal space. You just have to make along the brick load-bearing walls, additional wooden ones. That is, make the finish with clapboard, vapor barrier, insulation itself, waterproofing and leave a ventilation gap between the brick and the insulation. Now about this in more detail.
 Installation of vertical bars
Wooden blocks 40-50 mm thick are vertically attached to brick walls. They should first be treated with a deep penetration antiseptic, as they will be operated in harsh conditions, especially in winter. The distance between them is 60-80 cm. Then a waterproofing film is attached to these bars. All joints are sealed with tape.
After that, carefully, without tearing the film, a wooden frame is assembled for the insulation itself. The thickness of the frame depends on the climatic latitudes: if it is warm and moderate, 50 mm is enough, if it is harsh, cold, then 100 mm is already needed. The frame is assembled to match the size of the insulation used. The best option is Rockwool mineral basalt wool, especially if it is in the form of slabs and has reflective foil.
Having assembled the frame and laid the insulation in it, it is worth taking care of the vapor barrier of the bath. To do this, lay a layer of foil on top of the insulation. For example, Penotherm is perfect. Only all joints must also be glued with adhesive tape for greater sealing of the insulation.
Then, carefully, without damaging the vapor barrier, wooden blocks 25-30 mm thick are attached. And already the final finish is mounted on them - lining or. Now you can list all the layers of the "pie" that was just made, starting with the brick walls and ending with the finish:
- brick walls
- wooden bars
- waterproofing layer
- Wooden frame with insulation
- Vapor barrier layer
- wooden bars
- decorative trim
It should be noted that between the brick wall and the insulation there is a ventilation gap of 40-50 mm. for the thickness of the bars. There is also an air gap between the lining and insulation 25-30 mm. In a word, the total thickness of the insulated wall, not counting the brickwork, will be 20-25 cm. This will greatly affect the internal areas of the room.
The bars on the brick were fixed vertically for a reason. This is due to the fact that if, in severe frost, the walls accidentally “cry”, the water flowing down them will go down unhindered. Although, proper warming of the bath, this should not be allowed. For the same reason, special vents are made in the lower part of the walls for "breathing" and the elimination of condensate.
How to insulate floors and ceilings will not be considered here. These activities are carried out according to the usual and standard scheme. But for those who are interested, there are relevant articles on the site.
From the foregoing, it can be seen that the insulation of a brick bath is a rather costly undertaking, both in terms of materials and in terms of physical work. To achieve good results, you have to work long and hard. But, only in this way the warming of the bath from the inside will be correct and productive.
Wisdom Quote: Apathy and laziness - the true freezing of the soul and body.
Insulation of a brick bath methods and materials used

Choosing brick as a building material for a bath is a great way to solve several problems at the same time: to give the structure maximum strength and durability, to achieve perfect wall geometry, and to retain heat perfectly. However heat-saving properties of bricks not so good as to guarantee the comfort of bath procedures in severe frosts. Therefore, even a brick bath without fail requires additional insulation.
The inner surface of the walls
The procedure for installing insulation
wooden clapboard.
floor laying technology:
External wall insulation
 External work on the thermal insulation of a brick bath are carried out using the same mineral wool insulation, which retains heat well, is non-combustible and is capable of performing the functions of a sound insulator. If rolled insulation is used, then it is easiest to fix it on the outer walls with wooden planks or slats.
When application of thermal insulation in the form of mats based on mineral wool, the technology for performing work will be somewhat different:
- a crate is constructed from a metal profile and corners, fastened with dowels to the outer surface of the wall;
Meanwhile, for the insulation of brick baths it is quite possible to use foam sheets. The order of work when insulating a bath with foam heat-insulating material will be like this:
- the surface of the brickwork is freed from all types of pollution;
Ceiling insulation
Through the ceiling with poor-quality thermal insulation, up to a quarter of all the heat generated by the stove can go away
Therefore, to reduce losses, the insulation of the ceiling should be given no less attention than in the case of walls. The most suitable insulating material for this purpose is lightweight and non-combustible fiberglass
Work on the insulation of the ceiling in the bath produced as follows:
- fiberglass canvases or mats are laid out on the ceiling boards;
How to insulate a steam room
 Insulation of a steam room in a brick bath as a whole differs little from the creation of thermal insulation in other rooms of the bath. The differences are only in the need for additional thermal insulation of the ceiling inside the steam room, as well as in the use of metal foil both on the ceiling and on the walls.
The procedure for insulating the ceiling in the steam room will be next.
- The entire surface of the ceiling is covered with roll paper. At the joints, you need to create overlaps of 10-20 cm.
Similarly, the foil is fastened to the surfaces of the walls in the steam room.
As a sheathing material in the steam room, it is best to use pine lining. Pine perfectly resists both high temperatures and the effects of hot steam from the heater. In addition, due to the presence of a certain amount of resins, distillation from pine will add a special aroma to the atmosphere of the steam room.
In general, the process of warming a brick bath does not cause any particular difficulties even for masters without extensive experience in such work.
Internal insulation of the walls of the bath
Consider options for how to insulate a brick bath from the inside.
Option 1. Create a second wall
Most often, second walls are erected inside a brick box. The material is a bar-ten, which in itself is a warm material and does not emit harmful components when heated.
Mount the cake as follows:
- A crate is stuffed onto the brick.
- A waterproofing film is fixed along the crate.
- Install timber walls.
- A second crate is stuffed over them.
- Close the beam with fiberglass, fixing it to the crate with a stapler. Between the bars of the crate, the fiberglass is not stretched, but an overlap is made, so that later it is easy to place a heater.
- Insulation plates are inserted into the spans between the crate.
- To protect the heat insulator from internal steam, it is covered with foil or vapor barrier film on top.
- The lining is stuffed last.
 The foil is attached to the crate with a construction stapler, without pulling it close
Regardless of the type of insulation, its thickness must be at least 10 cm. To insulate the bath, heat insulators are chosen that will not emit harmful substances at hot temperatures. For this, basalt or fiberglass heaters are optimally suited, which are not afraid of moisture. If there is a desire to close the timber with polystyrene foam materials, then it is better to choose penoplex. It has a higher resistance to high temperatures than foam, and in the event of a fire, this insulation tends to self-extinguish. But still do not do the warming of the steam room in a brick bath with polystyrenes. With strong heating (over 100 degrees), they will begin to char and release toxins. For the steam room, it is worth taking only basalt materials.
Option 2. Double layer of insulation
Considering options for how to insulate a brick bath, you can focus on creating a double layer of insulation. Its difference from the 1st is that instead of timber walls, an additional 10-centimeter insulation is laid in the crate.
The wall cake will look like this:
- Brick.
- Waterproofing.
- Crate.
- Insulation.
- Waterproofing.
- Second crate.
- Fiberglass.
- Insulation.
- Vapor barrier.
- Clapboard.
The thickness of the internal insulation pie will be about 22 cm.
When choosing a heater, line the first layer (closer to the brick) with extruded polystyrene foam. He is not afraid of moisture, so external vapors that have got through the brick are not dangerous for him. Choose the second, inner layer of insulation, taking into account the room in which you will lay. In all rooms, except for the steam room, it is worth covering it with foil foam. This foam material is covered on one side with a thin layer of foil, which will simultaneously reflect IR rays and become a barrier to internal vapors.
 Foiled materials are joined together using aluminum tape
For a steam room, it is better to choose a basalt insulation, and close it with a special foil for baths on top. So you will avoid the release of harmful substances during strong heating of the room. Joints in foil insulation and foil are sealed with special aluminum tape.
Material Features
Penoplex is a foamed polymer made by extrusion from general purpose polystyrene. Modern equipment makes it possible to produce material with an ordered structure, in which small gas bubbles are evenly distributed. Such isolated and completely closed microscopic cavities have a size of about 0.1-0.2 mm. The foaming agent is light types of freon with the introduction of carbon dioxide into them.
 Penoplex is a foamed polymer made by extrusion from general purpose polystyrene.
By its nature, penoplex has a chemical inertness, which excludes its oxidation or decay. The main goal of developing this material is to provide high thermal insulation capabilities with low water absorption and very high compressive strength. An important characteristic is good manufacturability, i.e. it is easy to cut and bend, which allows it to be used in hard-to-reach places.
As you know, the thermal insulation characteristics of any foamed or porous material are sharply reduced under the influence of moisture, which is absolutely not characteristic of foam. A slight water absorption by the material is observed only for the first 7-8 days, when moisture fills the cells located near the surface. In the future, the penetration of water stops, and the initial saturation has little effect on the thermal insulation properties of the product.
Moreover, steam impermeability should be noted, which is very important for bathing conditions.
 The main form of release of the plate: width 60 cm and thickness from 2 to 15 cm
The material is divided into 3 groups:
- Penoplexstandard.
- Penoplex 45.
Its types differ in specific density, mechanical strength and heat resistance. Insulation of the floor in the bath with foam plastic is carried out by the first 2 types of material.
On a note! Penoplex 45 has increased mechanical strength and is designed for floors where significant load and vibration are possible.
The main form of production of the plate: width 60 cm and thickness from 2 to 15 cm. Sheets with a thickness of 10-12 cm are very popular. The standard length of the plates is 120 and 240 cm, in special cases material 4 or 4.5 m long can be used.
How to insulate a steam room in a brick bath
 Novice builders mistakenly assume that the construction of a bath ends with the construction of walls and the installation of a stove. But in order for the steam room to be warm, heat up quickly and cool down slowly, it needs to be modernized - insulated. Many claim that a brick building does not need additional sealing due to the wonderful properties of bricks, but this is nothing more than a myth. A well-insulated bathhouse is much warmer from the inside.
The whole process consists of three main phases of insulation:
It is in this sequence that we will consider all the insulation of a steam room in a brick bath.
We warm the floor
To make the floor warm, it is necessary to carry out heat, steam, waterproofing
It is important to observe two fundamental rules here: . When choosing a heater, pay attention to its properties
It must pass steam, and not create a greenhouse effect. In such a bath will be very uncomfortable.
- When choosing a heater, pay attention to its properties. It must pass steam, and not create a greenhouse effect. In such a bath will be very uncomfortable.
- Lay all layers of insulation tightly to each other, avoiding the appearance of even minor gaps and holes.
We will not torment you with long discussions about possible heaters, we will say right away that polystyrene is an ideal option for warming the foundation. It is durable and allows you to increase the life and characteristics of the base. Expanded clay is most often used to protect against high humidity. This material perfectly copes with its "duties" and significantly reduces costs. Conscientious waterproofing cannot be thin, the thickness of the layer should be 1.5-2 times greater than the wall.
The procedure for performing thermal insulation: 
- we lay the gyro-insulating layer;
- we lay thick foam sheets, strictly observing the dimensions;
- we reinforce and tighten the floor with a fill;
- lay the floor.
Now it remains only to wait until the solution seizes and you can proceed to the next step.
We heat-insulate the walls
To make the process not troublesome and enjoyable, you need to take care of this at the construction stage. A cobbled crate is installed in the steam room, on which the heat material is fixed. Thus, you protect the insulation from deformation and slipping during operation. If you decide to opt for a loose version, then do not forget to fill up the cracks.
In order for the bath to be really warm, carry out thermal insulation in several passes, allowing the limestone mortar to grab and dry. If you opted for slabs, then put them between the finish and the wall. Most often, foam is used for insulation inside. One of its sides is covered with foil, which reflects heat and warms up the bath much faster. In addition, foil insulation has undeniable advantages. It withstands high temperatures and does not collapse from sudden changes, does not allow moisture to pass through.
If finances are limited or you could not find this material, then you can stop at mineral wool. But the savings here are false, since in addition to cotton wool, you will have to spend money on the purchase of waterproofing material.
After that, we produce wall cladding inside the bath. Natural material - wood - is used as a cladding.
We insulate the ceiling
Physical processes make it necessary to carefully approach the thermal insulation of the ceiling. Since hot air is lighter and rises to the top, it must not be allowed to escape through the ceiling cracks. There is no strong difference between the insulation of the ceiling and the walls, the only thing that needs to be done more carefully and used together is both loose and tiled material. For sheathing, use the same material as for the walls. The uniform style of the room will create a cozy atmosphere.
Floor insulation in the bath
The floor in the bath is usually made of wooden boards or concrete. The board is used in relatively dry rooms. Concrete - in the washing room and in the steam room. The technology of floor insulation depends on the base material.
Expanded clay (3-5 mm), extruded polystyrene or boiler slag is most often used to insulate a concrete floor. The upper level of the floor at the end of the insulation work is understood to be 15-20 cm. The work is carried out in the following order.
 The concrete base must be leveled and cleaned of construction debris and dust. Next, an adhesive composition is applied to the surface in 2-3 layers. Most often, special mastics are used for this, for example, rubber concrete. A waterproofing agent is laid on the adhesive composition - high-strength polyethylene or roofing material.
After the waterproofing has set, the laying of the insulation begins. An adhesive composition is again applied on top of it, on which a waterproofing agent is laid. The last layer is a reinforced concrete screed, at least 30 mm thick. Concrete must be leveled and properly dried. Finishing such a floor is usually done using ceramic tiles. Under it, you can place a system of underfloor heating.
To insulate a wooden floor, you must first remove the old boards. A cranial bar is planted on the remaining beams from below. It must be wrapped with roofing material or heavy-duty polyethylene. A rough floor covering is laid on top of the waterproofing. For this, bulk materials or mineral wool are mainly used. Is it possible to insulate the floor in the bath with isopink? It is possible if the floor is wooden and arranged in a room with a low level of moisture.
A waterproofing material is applied over the insulation. Then the board for the finishing floor is laid. A plinth is attached around the perimeter of the room. The final paintwork is not used in this case, since these materials release toxins under the influence of temperature and moisture. If desired, the wooden floor can be covered with special rubberized mats. They will make the room cozy and will not cause much trouble when cleaning. The floor in the bath is insulated mainly for greater user comfort. Floor insulation has little effect on the overall temperature inside the bath rooms.
Correction of insulation and ventilation by efflorescence

Efflorescence can be removed with special means
By themselves, efflorescence on brickwork is not a problem for a load-bearing wall, but they may indicate a malfunction of the insulation scheme, leading to a violation of moisture transfer. In winter, the partial pressure of gases dissolved in water increases. The capillary movement of the liquid through the thickness of the brick increases in the direction from heat to cold. Internal condensation and capillary flow cause waterlogging of the layer located 2 - 3 cm from the outer surface of the wall.
At sub-zero temperatures, waterlogging is not evident due to the freezing of bricks from the side of the street. In the spring, the condensate accumulated during the winter begins to intensively stand out on the surface, carrying water-soluble salts with it.
If efflorescence is equally formed on all walls, then the reasons may lie in the quality of the brick, the composition of the mortar, and the violation of the masonry technology. However, in the case of localization of salts on individual walls of the bathhouse and their sections, it makes sense to revise the insulating sandwich, provided that the influence of the unsuccessful design of ebbs on the process is excluded. It is necessary to do this in order to align the operating mode along the entire bearing perimeter in order to increase the life of the building.
On a wall with intense efflorescence, you should:

Adding foil insulation
- add foil insulation if it has not been installed earlier, or eliminate possible defects in this layer (for example, poor-quality sealing of joints);
- provide a ventilated gap between the vapor barrier and the main thermal insulation;
- add an exhaust vent.
Insulation options
Immediately make a reservation that there are a large number of different ways where different heat-insulating, and not only, materials are used. Consider the main options that you can do with your own hands.
Option number 1
This method is considered by the masters to be the simplest, so doing it yourself will not be a big problem. It is based on the process of wall insulation with heat-insulating materials, which are placed in the crate or without it. Here is the sequence of this process: 
- The internal surfaces of the walls must be waterproofed. To do this, it is necessary to level them with plaster or putty, and after drying, apply a coating waterproofing. We recommend using bitumen-based mastics. It is rare that rolled material is used for these purposes.
- Next, a crate of wooden beams is stuffed onto the walls, which are pre-treated with an antiseptic solution.
- Now insulation is laid between the elements of the crate.
Advice! The optimal thickness of the heat insulator for bath rooms is 200 mm. It is necessary to lay the insulation between the beams in an interference fit so that there are no gaps that will become cold bridges
Please note that in this case, the thickness of the insulation and the width of the beam must be the same.
- After that, a vapor barrier membrane is stretched directly along the crate. It is attached to wooden elements with metal brackets. Therefore, you will have to purchase a stapler.
- And already on the crate itself, the lining is mounted.
 Often, experts use double wall insulation, while installing two battens with heaters 100 mm thick. The process is more complicated, but it will not be difficult to do it yourself.
If penoplex is used as a heater, then there is no need to install hydro and vapor barrier layers. But here it is better not to refuse the crate. This is the base on which the lining will be mounted.
Option number 2
The second way to insulate a brick bath is to build another wall near the walls, only wooden with a heat-insulating layer. To do this, a frame of wooden slats is installed on the brick.
Its elements can be laid horizontally or vertically. It is up to everyone to decide. But remember that the elements of the wall itself will be laid perpendicular to the elements of the frame:
- Now a waterproofing membrane is stretched and fastened along the crate.
- Next, a second wall is built. It is most often erected from wooden beams with a section of 100x100 mm or 150x150 mm. Please note that the elements of the new wall must fit tightly to each other. Such a thickness of a wooden wall is already an excellent indicator of thermal insulation.
- And now you need to decide whether to use additional insulation or not. If “yes”, then a crate is assembled along the new wall, where the heat insulator is laid. A vapor barrier or foil roll material is installed on top of the crate. If there is no need for insulation, then the crate is mounted anyway, only from rails of small thickness. A waterproofing material is stretched on top of the frame.
- And the last stage is the decoration of the walls with clapboard.
Advice! In the bath there is a fairly large number of different rooms that carry their purely purpose. So in all rooms except the steam room, you can use any heat-insulating materials as a heater. In a steam room, insulation with a foil layer cannot be used.
The procedure for thermal protection of the ceiling
It is impossible to eliminate heat loss in bath rooms without insulation of the ceiling in them
This is especially important to do when they are located in a one-story building.
The sequence of work when arranging the thermal protection of the ceiling in the bath is as follows:
- Fiberglass is laid on top of the ceiling, placing overlapping strips of material. They are connected to each other using adhesive tape or adhesive tape.
- A solution mixed from clay, chopped straw and river sand is laid on top of the insulation. The thickness of this layer should be approximately 30 centimeters.
- A layer of foam is laid on the clay mortar, and then a cement mixture about 10 centimeters thick is poured on top of it.
- To improve the thermal insulation performance of the bath structure, you can add foam chips to the cement mass, observing a ratio of 1: 3, and even better 1: 4.
- To the rough surface of the ceiling, the bars of the crate are attached from the inside, placing basalt wool in slabs between them.
- A foil film is laid over the heat-insulating product, and on top it is sheathed with clapboard, observing a 10-mm gap between the elements.
If the room is properly insulated from the inside, during its operation, the loss of thermal energy will be minimized, which means that visiting the bathhouse will bring maximum pleasure.
The general rule is that the bath is insulated from the inside
During the construction of residential buildings, the main thermal insulation is mounted outside, but during the construction of a bath, the situation is exactly the opposite. And the thing is that the bath is used (heated) periodically, while the house is heated almost all year round.
Therefore, for a bath, it becomes important to preserve the resulting internal heat given off by the stove, without transferring it to the outside.
If you make external insulation, then the structures of the structure (walls, floor, ceiling) will first warm up, and after they are heated, the air inside the room will begin to warm up. In this case, it will take a very long time to heat the bath, which in turn entails an increased consumption of firewood. Read more about warming the bath from the inside.
Scheme

Warming the bath from the outside with your own hands (if you still decide)
If you think that internal insulation will not be enough, or you just want to maximize the life of the bath, then you can do external thermal insulation.
External insulation will increase the holding time of high temperature inside the bath and reduce the cost of maintaining it.
Due to the fact that when installing external thermal insulation, finishing (finishing) materials will be required, you will additionally protect your building from the effects of natural phenomena: fog, rain and snow. That protects the bath from excessive moisture and prolongs its service life.
The material from which the bath is built affects the choice of insulation and the nature of the upcoming work.
Baths erected from a log (calibrated or ordinary) require captious processing (caulking) of all cracks and cracks. To do this, you can use: sphagnum, jute or tow, flax as natural and environmentally friendly materials, or you can use a special wood sealant.

If the material of the walls is timber, then such a bath requires quite serious insulation: for example, with mineral wool on a frame made of slats, using wind and steam protection and subsequent finishing (lining, siding, block house, etc.).
Brick baths or baths made of foam or cinder blocks, foam concrete, etc., must be insulated without fail. All of these materials have high thermal conductivity, which in cold climates can cause high heat losses.

According to the requirements for insulation, it is similar to baths made of timber, but the total thickness of the walls must be at least 80 cm. Polystyrene foam boards, polystyrene or foamed glass can also be used as insulation.
Insulation of a brick bath from the inside
How to insulate the walls of a brick bath from the inside? The inner surface of the walls It is most effective to insulate a brick bath with the help of natural heat-insulating materials that perfectly retain heat, but do not emit any harmful substances at high temperatures. In particular, mineral wool webs, available in the form of rolls or individual mats, are excellent for this purpose.
The only one the disadvantage of such a heater- the ability to absorb moisture, which, by definition, is always in abundance in any bath. Therefore, the heat-shielding layer will require additional waterproofing, which protects the mineral wool from steam and water.
The procedure for installing insulation on the interior walls will be as follows:
- a supporting frame is erected on a brick wall of wooden slats;
- heat-insulating material is laid in the resulting cells. In addition to mineral wool, more modern materials can be used here with great success. For example, foil foam is not only absolutely insensitive to moisture and temperatures of several hundred degrees, but due to the shiny surface of the foil it is able to reflect heat back into the bath rooms;
- the entire structure is covered with a layer of waterproofing (polyethylene, foil, etc.). To ensure complete moisture resistance, the waterproofing material should be laid with an overlap of 10-20 cm. To give additional strength to the joints, all joints should be fixed with thin and flat wooden slats.
In order to improve aesthetics, thermal insulation is usually not left open, but closed. wooden clapboard.
In addition to walls, the internal thermal insulation of a brick bath should include Measures to reduce heat loss through floors. The sequence of actions here will be as follows:
- a layer of vapor barrier is laid on the subfloor cleaned of dust and dirt;
- thermal insulation mats are lined and fixed in one way or another;
- a layer of waterproofing is laid;
- the finishing floor is equipped with the widest possible boards with a thickness of at least 40 mm.
It is very important to consider the material from which the subfloor is made. If it is formed by boards, then they will need to be pre-treated with a means to prevent wood decay.
. The concrete subfloor itself is able to play the role of thermal insulation.
Therefore, even at the stage of its arrangement, one should take care of giving heat-saving properties. This is achieved by the following floor laying technology:
The concrete subfloor itself is able to play the role of thermal insulation. Therefore, even at the stage of its arrangement, one should take care of giving heat-saving properties. This is achieved by the following floor laying technology:
- a layer of sand about 5-10 cm thick is poured into the pit;
- a solid heat insulator (polystyrene) is laid;
- a mixture of cement, sand and crushed foam is poured;
- sheets of roofing material are overlapped;
- the reinforcing mesh is lined;
- a concrete solution is poured with the addition of crushed stone of a fine fraction;
- at a height of 10-20 cm, a finished plank floor is created.
The resulting design is advantageous in that it is ventilated. And this means a significant increase in the service life of both the finished floor and the heat-insulating concrete base underneath.
 How to insulate the floor in the bath? You will find out the answer to this question by reading this article.
And in this article, read about the insulation of the roof of the bath.
Floor insulation
 A brick bath with its solidity suggests that the owner does not intend to limit himself to warm days in order to take a steam bath in it. And this means that of all types of floors at his disposal only:
- concrete;
- dry wood;
- pouring on a concrete screed.
They all need insulation, just a little different.
Dry wood floor consists of rough and finish, between which there is a gap to the height of the floor beam. This space is filled with insulation. Foamed polystyrene foam will be the best - it is not afraid of moisture. Mineral wool and expanded clay need a hydrobarrier before laying the final floor. It is also possible to insulate with ecowool and Aisinin foam. Alternatively, you can also fill the space under the subfloor with expanded clay, but for this you need to waterproof the soil in advance.
Concrete floor on the ground or concrete screed under pouring floor are insulated the same way.
- The soil is removed by half a meter.
- The future water flow is laid - a pit / ladder and pipes to the outside.
- 15 cm of gravel is poured and rammed.
- Then 35 cm of sand and rammed.
- This "pillow" is hermetically sealed with roofing material.
- A layer of insulation is laid: mineral wool, expanded clay, slag, felt with tar.
- It closes with a hydrobarrier if the insulation is wet.
- Reinforcing mesh is laid.
- A concrete screed is poured with the desired slope towards the drain.
Find out more:
Floor insulation
The floors in the bath are made of wood or concrete. The technology for applying insulation does not have big differences depending on the material used to make the floor.
The only thing that when constructing a concrete structure is to pour an increased layer of expanded clay. At the same time, it is customary to compare its thickness with the width of the walls, and pour, about twice as thick a layer.
If the floor is insulated on the ground (in the case of a strip foundation), then you need to do the following:
- Treat the walls with a preparation for waterproofing;
- Pour sand 10 cm thick, spill it with water and tamp;
- Cover this layer with roofing material with an overlap of 15 cm on the walls.
And then fall asleep expanded clay.
 Scheme of floor insulation in a brick bath
Ceiling insulation
The imposition of a heat-insulating layer on the ceiling is, in fact, the same as on the walls. It is only necessary to bear in mind some features in this case. Since hot air tends to rise, the thermal insulation layer becomes thicker than on the walls. This is usually achieved by adding a ceiling covering on top, and a foil sheet and facing material is laid inside.
How to insulate the floor
Significant heat losses in the bath occur not only through the ceiling and walls, but also through the floor, especially when the bath is used in the cold season - in winter, autumn, early spring.
To figure out how and what is better to insulate the floor in the bath, you should remember that the procedure for laying the floor cake must be strictly observed. The earthen floor must be leveled, cleaned of debris and foreign objects and leveled. A concrete screed must be poured onto the prepared surface.
On the set concrete, you need to lay a layer of rolled waterproofing. It can be roofing material or plastic film.
Further, the entire surface is laid out with a layer of heat insulator. You can use both sheet and linen material. Then roofing material or polyethylene is re-layed. The final layer is a concrete screed.
Laying of all layers of the floor cake must be carried out carefully
It is especially necessary to pay attention to the tightness of each layer - this will preserve the integrity of all materials. Properly carried out internal insulation will create comfortable conditions for the proper use of the bath and keeping warm.
Material
 Building materials can be divided into structural (steel, concrete, brick, stone) and heat-insulating, which have low strength and specific gravity, but they perfectly retain heat.
Thermal conductivity and specific gravity are interrelated.
That is why almost all heat insulators have a porous structure, float in water and are often combustible.
Insulation of the walls of a brick bath from the inside can be carried out with any heat insulators that are approved for use in interior work.
The choice of material is carried out necessarily before insulating a brick bath. The required material is indicated in the project.
Here is a sample list of them:
- Styrofoam (foamed polystyrene). Moisture resistant, which is well suited for a bath, thermal conductivity is very low. The specific gravity is about 25 kg cubic meters. The main disadvantage is a fire hazardous and non-environmental material;
- Mineral wool. It is rarely used in baths, since even after a single wetting it irreversibly “sits down” in volume. With good thermal insulation in the baths, it can be used. The advantage in combination with brick walls is absolute fire resistance;
- Basalt slabs. In many properties they are close to mineral wool. Safer for humans;
- Organic insulation: moss, straw, sawdust. Now they are almost never used, but as a fallback they are often used;
- Prefabricated organic insulation, such as porous cellulose boards. Their main advantage is environmental friendliness. For a bath, a good option;
- PU foam. Mainly goes to the insulation of pipes. In rare cases, they insulate houses and baths. It is possible to use both ready-made elements and PPU spraying from a foam generator;
- Other polymeric heaters, of which there are many brands: pepoplex, foamed polyethylene, magnesium oxide on acrylic resin;
The insulation can be fireproof, like the rest of the brick bath. How to insulate walls and ceiling - is determined by the budget and the overall project. Of all the options for a bath, foam is most often used (only it has excellent moisture resistance) and basalt slabs.

Both materials are available in the form of flat slabs.
For their installation on walls, floors and ceilings, a trellis frame is always required.
The insulation itself is fragile, does not clearly hold its shape, and on top of its layer there must be a strong outer surface (for example, a bath lining).
The combination of these two layers is provided by the frame. Warming with any plate materials is similar in technology.
This is the installation of plates cut to the size of the frame cell, as well as their adhesive fastening.
Almost any plates are fastened with glue: foam, basalt, ecowool. The choice of glue is carried out according to the recommendations of the insulation manufacturer.
Important! Work with mineral wool, insulation containing fiberglass requires special care. Work in protective equipment, a respirator, goggles.
Work with foam plastic and cellulose porous insulation requires compliance with fire safety rules
When cutting, slight dust formation is possible. Such intensive protection as when working with glass wool is not required.
Work with foam plastic and cellulose porous insulation requires compliance with fire safety rules. When cutting, slight dust formation is possible. Such intensive protection as when working with glass wool is not required.
Advantages and disadvantages of penoplex when used in a bath
 Penoplex for warming the bath
Among the main advantages of the material for warming baths are:
- moisture resistance. During the day, the heat insulator plate absorbs less than 0.4% of its volume, and in a month it can absorb up to 0.6%. Moisture penetrates only into the top layer, the inner filling remains dry, even if the foam sheet is completely immersed in water. Due to this factor, the material is not subject to the formation of mold and decay.
Low thermal conductivity. This property is provided by the special structure of the penoplex. The coefficient of heat conductivity is 0.03 W / m and is considered the lowest among heaters.
Strength. Due to the homogeneity of the material, which is achieved by extrusion, it is able to withstand significant mechanical loads. With 10% linear information, its strength is 0.2 MPa. In order not to damage its integrity, insulating the floor, you need to monitor the evenness of the surface.
Vapor resistance. This indicator for penoplex is close to roofing material. Therefore, it is often used for warming bath rooms in which high humidity is maintained.
Ease. The density of the material is only 25-32 kg / meter 3. It is often used for thermal insulation of roofs, since it does not weigh down the structure. Because of this property, it is easy to mount it.
Easy to install. Penoplex for warming the bath is cut with an ordinary construction or clerical knife. Thermal insulation with it can be easily done independently.
Durability. Some manufacturers provide a guarantee for the material up to 50 years.
Chemical resistance. The heat insulator is not affected by alkalis, water-based paints, saline solutions, alcohol compositions, bleach, ammonia, carbon dioxide, propane, butane, various oils, freons, concrete mixtures. However, it must be borne in mind that under the influence of formaldehyde, diesel fuel, gasoline, acetone, methyl-, ethyl acetate bases, enamel and oil paints, the physical and technical characteristics of the penoplex deteriorate. Some formulations may even dissolve the material.
Soundproofing. After insulating the roof and walls, you will not hear the sound of rain or the rumble of a busy highway. Noise protection index - 41 dB.
Temperature resistance and stability. The operating temperature of the heat insulator is from -100 to +75 degrees.
As for the shortcomings of the material, it is possible to single out the average flammability index and the release of toxic fumes during combustion. For this reason, before thermal insulation, it is treated with special fire-fighting compounds. Some manufacturers offer insulation already impregnated with flame retardants.
The method of thermal insulation of the basement of the bath with foam
 Scheme of insulation of the basement of the bath with penoplex
Plinth - a thinner part of the foundation, to which the walls of the structure are attached. Therefore, the durability of the building depends on the quality of its thermal insulation.
In the process, we adhere to the following sequence:
- We cover the base with a waterproofing membrane.
We fix a 12-centimeter layer of foam plastic on top of acrylic glue.
We lay the second layer of waterproofing. It will be a kind of drainage.
We attach a geotextile material that acts as a filter.
Fill with sand-cement screed.
Due to the hydrophobicity of the heat insulator, the steam room will be reliably protected from moisture.
Do-it-yourself warming of a steam room in a brick bath
Building your own bath from aerated concrete or timber is currently not so widespread. Modern builders and developers prefer to use ordinary building bricks for the construction of bath walls.
Especially popular for these purposes was the double silicate brick M 150, which in its parameters is practically not inferior to wood.
Bath made of silicate bricks
Thanks to the availability of information on the Internet, everyone can learn how to insulate a brick bath with their own hands, this is now not particularly difficult. The main requirement is to do everything neatly and correctly.
Thermal insulation of brick baths
Building bricks can easily absorb moisture, so when building a bath, it is necessary to avoid contact between bricks and the ground. Before you insulate a brick bath, you should decide on the option of insulation.
Modern baths are built today with several options for thermal insulation:
- baths, lined with insulation in the form of plates;
Mineral wool insulation
- baths with an air cushion in the wall;
Hollows in the wall
- baths having a layer of thermal insulation between the outer and inner layers of the walls.
backfill wall
With slab insulation
Warming the walls of a brick bath from the inside is the most common way.
In this case, the order of work is as follows:
- drill holes in the seams;
- insert wooden plugs into the holes;
Some are even ready for sale.
- a frame made of a metal profile or wooden slats impregnated with an antiseptic is attached to the prepared brick wall;
- fasten on the rails of the insulation plate;
- close the insulation with a layer of waterproofing overlap, avoiding gaps. Most often, various foil materials are used for these purposes;
- perform the final finishing of the clapboard.
The insulation inside the steam room must be not only environmentally friendly, but also able to withstand high temperatures in the room.
Using the wrong material can lead to a complete loss of thermal insulation.
Basalt slab fits perfectly
With an air cushion in the wall
This type of insulation is done at the stage of wall construction. A gap of 4-6 cm is left between the inner and outer masonry. Reinforcement is performed every 4-6 rows by laying steel bars with curved edges.
With thermal insulation between walls
This method of insulation is based on the use of well brickwork and backfill.
Work instructions:
- perform masonry, making transverse walls every 3 bricks;
- as the masonry is raised, the voids between the walls are filled with expanded clay, fine slag or sand with lime and shavings;
- after 10-15 cm of insulation filling, it is carefully rammed;
- the last layer of backfill is reinforced with a metal mesh;
- complete the laying, performing 3-4 rows of a continuous type of brickwork;
- if in the future the wall will not be plastered, then all seams are completely filled with mortar. If the wall is to be plastered, then the seams should be left unfilled by 10-15 mm.
We make the seams even
If you have a lot of bricks with some kind of flaw, then you need to lay them with the good side out.
This will not only improve the appearance of the masonry, but also keep the brick from being saturated with moisture.
Floor and ceiling insulation
Warming the brick walls of the bath from the inside is not the only problem. The floor and ceiling should be insulated in the same way.
To work with the ceiling, you will need the following materials:
The simplest option for insulating the ceiling is to use a mixture of straw and clay as a heater, which is applied in a thick layer. It should be remembered that the quality of insulation directly depends on the quality of the insulation, so the cheapest way is not always the best.
Finishing
The inner lining of the steam room is usually made of wood materials. It is considered ideal lining made of linden or aspen. However, aspen lining loses its pleasant color over time, although it is famous for its healing properties.
A more practical option is to use pine lining. The price is much lower, and the aroma and benefits are almost the same.
Examples of different types of lining
If you have done the insulation of a brick bath from the inside correctly, then you will not have a draft or condensation, but only a pleasant aroma of wood and a feeling of comfort.
Everything is ready, you can steam!
By correctly and accurately completing all the stages of warming, you can get an excellent bath that will delight you and your friends for a long time.
Steam room ceiling insulation
You should also pay attention to the insulation of the ceiling of the steam room, so that hot air is kept indoors for as long as possible. In one of the publications, we have already touched on the question of how to properly insulate the ceiling. It is also advisable to choose mineral wool roll or plate materials as a ceiling insulation.
It is also widely practiced to backfill the floor with expanded clay.
When insulating the ceiling, it should be remembered that the greatest fire hazard is a hot pipe passing through the ceiling structures, around which it is necessary to arrange reliable insulation from non-combustible material.
The place of passage is called the ceiling cutting. As a rule, the node for the passage of a pipe through the ceiling is a container filled with non-combustible material with a low coefficient of thermal conductivity. How the passage of the pipe through the ceiling looks like is shown in the photo below:
 *** As you can see, the insulation of the walls of a brick bath is no more difficult than that of a bath made of logs or timber. By following the recommendations in the article, you can enjoy a light steam at any time of the year.


