For country cottages, private houses and simple country houses, equipped with an attic, the presence of a convenient and reliable staircase leading to the mentioned room is a common necessity of life.
At the same time, the staircase does not have to be capital and bulky at all - you can assemble and install an excellent folding structure, which will be in no way inferior to stationary stairs.

You can handle all the related tasks yourself, saving money and testing your own strength.
There are several types of stairs that can be installed to access your attic.
Stationary


A staircase with wide flights and railings is the most reliable, durable and easy-to-use design. However, the possibility of arranging such a staircase is not available everywhere - it certainly cannot be equipped in small areas.
Portable

They are used primarily as a temporary option, as well as for access to rarely used rooms. The main disadvantages of such a ladder are low safety and ease of use. Therefore, if possible, the use of such a design should be abandoned.
Folding

They are something between portable and stationary ladders. In terms of ease of use and safety, they are almost in no way inferior to full-fledged stationary structures and, at the same time, have a significant advantage - they require very little space for their arrangement. Therefore, when self-production It is recommended to give preference to folding stairs.
Selection of materials
No less important point is the choice of materials from which the stairs to the attic will be assembled. Wood is usually used to make the main elements of folding sectional stairs, and fasteners are traditionally made of metal.

Currently there are many various materials, types of controls and fasteners, which makes it possible to easily assemble a folding ladder that will best suit your specific room.
When choosing materials for the manufacture of attic stairs, you need to take into account a number of important factors. First of all, decide on functional purpose structure, its type, width, as well as the optimal number of sections.

The functional purpose of the stairs to the attic is very important in terms of determining the maximum permissible load on the steps. So, for example, factory-made wooden stairs can withstand an average load of 150 kgf, metal ones - 250 kgf. For homemade stairs, these figures are slightly reduced.
This does not mean that the steps cannot bear more high load, however, you definitely shouldn’t load them like that regularly, otherwise the structure will break very quickly.

The width of the stairs should not be greater than the width of the attic opening.
When choosing the dimensions of the attic ladder, be guided by proven and approved standards.


Remember: the steps must be installed strictly parallel to the floor surface. In addition, the steps of the stairs must be non-slip. To do this, you can stuff linings of any non-slip material over the base material.

Guide to making a staircase to the attic
There is nothing overly complicated about making your own stairs to the attic. Of course, an inexperienced craftsman is unlikely to be able to assemble a structure with the same attractive appearance as factory-made models, but it’s definitely worth a try.

Before starting work, create a drawing of the future staircase. If you do not have the necessary skills, order the creation of a drawing from a specialist, or select a suitable diagram from the options presented in open sources.

Tools
Prepare everything at once necessary equipment so as not to be distracted by searching for missing tools in the future.
You will need:

Also, before starting work, you need to buy or assemble an ordinary ladder. To assemble this design yourself, you only need to fix the transverse steps between two long vertical posts and further strengthen the structure.
The finished staircase should be approximately 30 cm longer than the distance from the level of the opening to the attic to the floor.

You can also easily handle making a hatch with your own hands. The only materials you need are sheets of plywood and wooden beam 5x5 cm.
First step. Choose a location to place the hatch and determine its optimal dimensions. Add approximately 7-9 mm on each side to the dimensions of the hatch so that in the future you can easily close the lid without squeaks or other noise. Make the opening according to the specific dimensions.

Second step. Cut the wooden beam into four parts in accordance with the dimensions of the hatch.

Third step. Make grooves at the ends of the bars. Lubricate the prepared grooves and connect the bars into a rectangular (square) structure. Additionally strengthen the connections using self-tapping screws. Screw the gussets so that the diagonal does not move.
Fourth step. Attach the plywood cover to the resulting base and try on the product in the hatch opening.

Fifth step. Install a regular latch into the hatch cover. You will open the latch using a handle. Attach it to the lid and finally fix the product in the pre-aligned opening. Usually loops are used for this.

Simple folding ladder
Start making a folding ladder. It is assumed that you already have at your disposal the previously mentioned wooden extension ladder.

First step. Attach the width of the beam to the bottom of the ladder. Attach the same block to the top of the product. In this case, the lower bar must be fixed rigidly, and the upper one - on the hinges.
Second step. Saw the ladder into 2 parts. The upper part should have a length of about 2/3 of the total length of the stairs.
Third step. Attach a pair of slats to provide additional diagonal rigidity.
Fourth step. Connect the parts of the structure using loops.
Fifth step. Secure the top beam under the hatch using anchors.
Sixth step. Secure the bottom of the ladder with a hook - this will prevent it from opening spontaneously. Place the loop on the stringer above the cutting line.
Seventh step. Press the finished structure against the wall surface and secure.
The main disadvantage of such a homemade staircase is that it is not very attractive appearance– the entire timber and fastening elements remain visible. However, such a staircase copes 100% with the main tasks - ensuring a convenient and safe ascent and return descent.

An improved and more attractive version of the previous design. There is also nothing complicated in making such a staircase; it is enough to follow all the instructions step by step.

First step. Divide a regular wooden ladder into 3 parts. Make the first part according to the dimensions of the attic hatch, make the second a little smaller than the first, and make the third such that the remaining space to the floor surface is completely covered.
Second step. Take a small tool and measure the corner of the attic hatch. Transfer the angle to the boards, thus marking the location of the steps.
Third step. Drill holes where the hinges will be located between the individual stair sections.
Fourth step. Sand the edges of the structures.
Fifth step. Saw the boards at the hinge points.
Sixth step. Cut and sand the steps.
Seventh step. Prepare indentations for the steps in the strings.
Eighth step. Insert the steps into the prepared recesses. Use glue and further strengthen the connections with self-tapping screws.
Ninth step. Connect the sections of the stairs using special loops. To do this, the sections must be placed on a stable, flat surface.

Tenth step. Check the operation of all sections. If you find any defects or deviations, try to correct them immediately.
Eleventh step. Sand everything down wooden surfaces and coat them with varnish.
Twelfth step. After the varnish has completely dried, install the structure in the attic hatch opening. If necessary, make final adjustments to the structural elements.

Thus, self-assembly stairs is extremely simple and accessible to almost every event. At the same time, the cost of a homemade staircase will be much lower compared to the price of a similar factory-produced design. Follow the instructions and everything will definitely work out.
Happy work!
Also read the article on our website - do-it-yourself staircase to the basement.
Video - Do-it-yourself staircase to the attic
The attic is traditional room in almost every country house. Its functionality is unusually wide. For example, this room is used as a storage room or workshop; some homeowners even decorate the attic as a living room or bedroom. In fact, the functional purpose of such a room depends solely on your own imagination, as well as financial capabilities. However, despite the wide variety of design options attic space, it is worth knowing that the attic ladder with a hatch is an integral part of it. If you do not build this structure, you simply will not be able to get into this room. Creating an attic staircase is a fairly simple matter, for which you don’t even have to turn to professionals in the construction industry.
Classification of structures
Actually, the most labor-intensive process in organizing the attic space is the design of the staircase segment. Before creating a project for a specific staircase for your home, you must first decide on the design category. The following options exist:
- foldable;
- stationary;
- portable.
Workaround
Portable models will be highlighted in separate category however, it is quite extensive. The variety of portable products is incredible. Meanwhile, we should not forget that the daily use of such a product can never become safe or comfortable enough, and the staircase itself is not able to compete with stationary and folding models in terms of operational and technical characteristics. 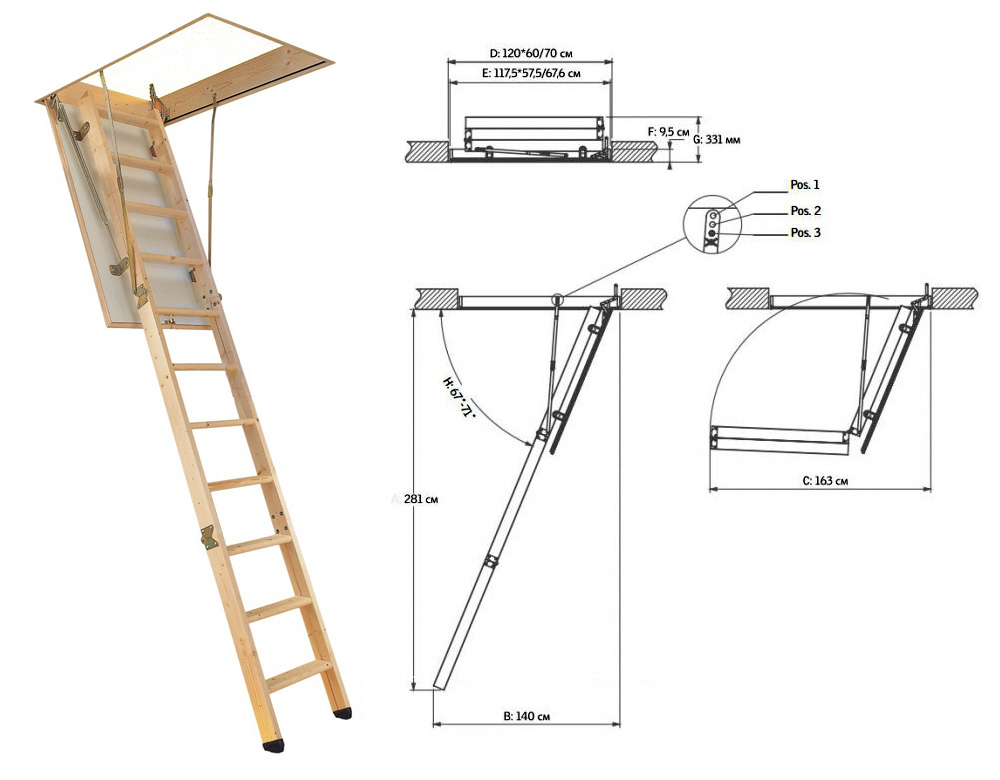
Selection of building materials
In the process of creating an attic staircase with your own hands, namely its preliminary drawing, it is worth paying attention to what building materials are usually used in this matter. Despite all the variety of products in the building materials segment, any experienced builder will tell you what it is certain types goods that in the best possible way show themselves during operation. As a rule, all main structural parts are made primarily of wood, while fastening and fixing elements are made of metals. Thanks to the competent selection of materials, a do-it-yourself attic ladder, the drawing of which was made by a non-professional, will be much stronger and more reliable. 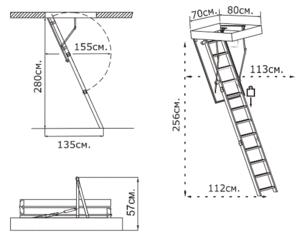
How to make your choice?
Due to the fact that building materials for folding stairs to the attic are presented in a variety price segments, source material and characteristics, it’s quite easy to drown in a sea of information about them. To minimize the time spent searching and selecting the best options, you should follow a number of rules:
- Specify the type of functional purpose of the structure, as well as its main parameters, including design features, sectionality, width, etc.
- Choose building materials in strict accordance with how actively the product will be used and under what conditions.
- Identify negative factors that can reduce the service life of the product.
The main thing is to correctly define the function
Any specialist who has required level qualifications and experience in working with these types of objects will tell you that the final result largely depends on the competent definition of the functional purpose of the product construction work How to build a staircase to the attic with your own hands. This parameter allows you to calculate the permissible load on each step of the product. Standard value this indicator for a metal product reads about 250 kGs, but wooden models designed only for 150 kGs. In addition, it is worth considering that the above indicators are valid for products made by professionals, while home-made objects have slightly lower parameters. In general, the permissible pressure on a step does not mean that it cannot withstand greater stress. However, if you overload the structure too often, it will become unusable within a sufficient period of time. short term. 
So, the main criteria by which the optimal option is selected are as follows:
- area of free space in the room;
- functional purpose of the object;
- required angle of inclination of the product.
Figure 9.
What to consider when designing?
Most general requirements regulatory and technical documentation can be reduced to a number of simple and understandable conditions:
- the ergonomic range of product width is from 60 to 100 centimeters;
- the best height is three and a half meters;
- maximum number of steps – 15 pieces;
- the distance between adjacent steps should be about 20 centimeters;
- a comfortable step height for a person reaches about 20 centimeters, a deviation of 2 centimeters is allowed;
- If we are talking about a folding structure, then when creating the project, a permissible load of 15 kilograms is taken.
Tools
Having decided to independently carry out construction work, it is very important to stock up on a certain set of equipment, so that in the process of implementing the product project you do not stop due to the banal lack of a screwdriver or tape measure. So, the standard set of tools consists of the following items:
- polyurethane foam;
- bars;
- self-tapping screws;
- electric screwdriver;
- hacksaw;
- measuring tape;
- anchors;
- screwdrivers.
 Building a staircase is not a difficult task
 Location Features
All the nuances of the location of the object in the room will become visible during the construction process. This is especially true if you are involved in the creation and subsequent implementation of the project yourself. Remember that the product cannot in any way reduce the comfort of the room. That is why stairs with hatches are not located in bedrooms, living rooms and kitchens. However, if necessary, you can diversify your staircase design interesting design. Thanks to this, the product can harmoniously fit into general interior premises.
Project implementation technology
By following a certain technology, you can quickly and efficiently implement even complex project. So, if you have chosen metal as the main material, then remember that the following steps are carried out:
- the drawing is applied to sheets of cardboard;
- cardboard elements of the future product are cut out;
- the hinge is marked on strips of metal and special holes are prepared;
- the prepared parts are fixed together;
- the required angle is measured and the structure is moved apart in accordance with the obtained parameters;
- on metal sheets markings are applied to those places that will subsequently be covered with corners;
- elements are cut out using a special tool;
- gives an aesthetic appearance to the object;
- existing corners are rounded;
- The workpieces are fastened in pairs.

As you can see, the technology for implementing a staircase project with your own hands is quite simple. It applies not only to metal objects, but also to wooden products.
In order for the appearance of the attic staircase to be as attractive as possible, do not be too lazy to implement preparatory work on the surface building material. We are talking, for example, about applying a special primer before covering the surface with paint.
Do not be afraid of difficulties, because the technology for constructing stairs may seem problematic to you only at first glance and require experience in the construction industry. Application optimal quantity effort will help you achieve maximum results.
The attic in a house can be used for various purposes. Of course, comfortable access to it must be organized, for which a ladder is needed. It can be installed with outside building or inside it. The latter is easy to use and more popular. There are many ways to make an attic ladder with your own hands. Before describing how to make it into an attic or attic floor, you need to choose the one that’s suitable for your home. constructive solution.
Types of attic and attic stairs
Let's look at the most popular options for attic stairs.

The latter type is more often used temporarily or in case of rare use of the attic space. But the most practical and compact will be a folding design with a hatch.
What to pay attention to when making your own stairs?
The first thing that must be ensured when building an attic or attic staircase with your own hands is safety. The staircase system must have adequate strength and reliability.
The dimensions of the staircase are also important: the more inclined it is, the larger the space occupied. The most suitable angle is considered to be 60-70°. Although when constant use, they recommend making it 45°. Steps with a height of 20 cm and a depth of 30 cm are considered standard. The width of the staircase should be comfortable, as a rule, it is about 70 cm. It is not recommended to make such stairs more than 3 m in height, since a higher structure will not have the necessary rigidity and reliability.
It is advised to make a structure with a number of steps from 10 to 15, and leave the distance between them 19 cm. The recommended thickness of the steps is 2 cm. They should be positioned strictly parallel to the floor surface. For greater safety, anti-slip pads are glued to the steps.
Important!The ladder for climbing to the attic floor must withstand a load of 150 kg.
The hatch also has its own recommended parameters. The following dimensions are considered standard: width 70 cm, length 120 cm. Smaller sizes will make the opening not comfortable to use, and larger ones will increase heat loss in the room. For an unheated attic, it is recommended to make the hatch thermally insulated and vapor barrier.
Where is the best place to place the stairs?
The staircase structure should be located so as not to interfere with household members. Therefore, you should not install it in the kitchen; it would be more advisable to use a corridor or hall for this purpose. It is also worth considering the size of the room. Sometimes a ladder can be used as an interior detail, then it is not hidden in a hatch.
Important! It is advised to first draw the future staircase, then it will be easier for you to understand which place will be the most suitable for its installation.
DIY one-section design
The easiest way to lift it to the attic floor will be a single-section structural solution that will be fixed in one place. To build a staircase with one section you need two wooden boards. The length must be suitable to obtain the appropriate angle of inclination, and the thickness must be at least 5 cm.
The steps can be secured with strings or stringers. Bowstrings are grooves made by a router in the end board. A stringer is a horizontal platform cut out on a board, on which a step is then placed. The steps are fixed in place using metal screw pins. A comfortable climb to the floor is provided by handrails. For their manufacture, polished solid timber appropriate length. Depending on the location of your stairs, the railing may be on one side or on both. To make the structure more reliable, it is worth adding vertical connecting beams.
Manufacturing of a single-section attic ladder.
Making a hatch
Installation and manufacture of the hatch is also an important aspect of the work. It will prevent cold air masses from entering the house. This is the main reason for equipping staircase structures with a hatch. To make it you will need 50x50 bars and a sheet of plywood.
Work order:
- Define suitable place taking into account a dimensional margin of 0.8 cm so that the hatch closes normally.
- The bars need to be cut into four parts according to the size of the hatch, and holes should be cut along the edges.
- You need to apply glue to each resulting groove and fasten the bars with self-tapping screws.
- To maintain the diagonals, screw the gussets.
- The next step is attaching the plywood.
- The finished cover is tried on, and then the latch is installed on the opening.
- To ensure that the lid opens without interference, a handle is installed in the opening.
Important!The resulting structure should open easily and unhindered.
An example of a homemade attic hatch with a metal-plastic cover.
A staircase equipped with a hatch and leading to an unheated attic floor or attic has design features. The opening for the construction of such a structure with a hatch must be insulated. When making a hatch, a layer of thermal insulation and vapor barrier is placed on plywood. From above everything is strengthened again vapor barrier film. After the work is completed, the final stage remains - decoration. It is made similar to the ceiling decoration. At your request, the color scheme can contrast with the walls. Sometimes instead plywood sheets They use metal ones, which must be painted with paint that matches the color and performance characteristics.
How to make a folding staircase structure from two sections?
The staircase design of two sections is quite simple to manufacture and does not involve the use of a complex mechanism. This design will be optimal for execution by a person without special construction skills.
The first thing you need to do is make a simple ladder. After manufacturing, it is carefully adjusted according to the dimensions, and precisely observing the angle of inclination. After which the finished structure is cut into two sections, which need to be attached to each other using canopies, and you get a folding staircase. All you have to do is install the folding structure to the cover of your hatch.
Folding staircase design can be supplemented with an auxiliary cable mechanism, which will facilitate disassembly and assembly of the system. To prevent the folded structure from opening, install a fixing hook. To secure it, a loop is installed at the junction of the sections, and a hook is mounted on the wall at the required distance from it. The design is ready for use, but it will always be in your sight, which is considered its disadvantage. If this moment is important to you, then you can use the following recommendations. Make a three-section ladder, which is made using the above technology. Such a ladder can be easily hidden in a hatch.
Making a folding staircase to the attic.
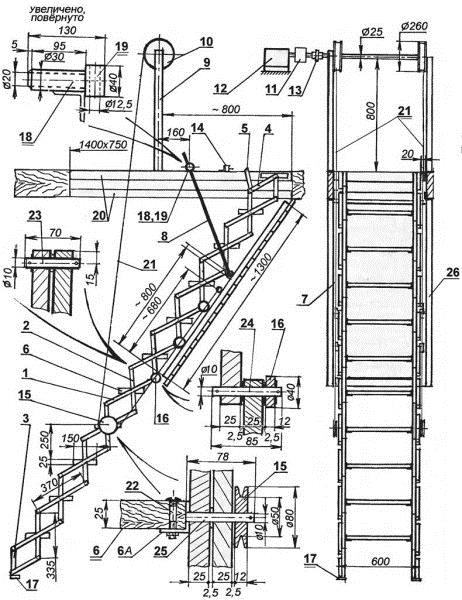
Manufacturing of the hinge mechanism
When making a folding structure, the mechanism that opens it is important. You can make it yourself using following materials:
- metal corner;
- part of a sheet of metal;
- two strips of different lengths;
- bolts;
- clamps;
- set of drills;
- drill;
- jigsaw;
- Teks;
- small
Manufacturing procedure:
- First, the staircase is drawn on a sheet of cardboard indicating the future angle of inclination when opened.
- Then they cut out a mock-up from cardboard to check all dimensions.
- On strips of metal, measure out the places for the holes where the hinge will be attached. The hole must match the size of the bolt.
- The parts are assembled and pulled together.
- Use a measuring stick to measure desired angle. Then open the mechanism to the resulting angle.
- Mark on the metal the part that will be covered by the corner during opening. Cut it out with a jigsaw.
- Round the corners of the strips and remove unnecessary length so that the strips do not catch, which will allow you to operate the mechanism.
- When the excess metal is removed, the corner will rest in the desired place. You have made the first hinge.
- The second is made by fastening parts with clamps in pairs, special tools for better fixation. Drill a hole and place a bolt in it.
- Then a second hole is made.
- The blanks are twisted using two bolts. After which they can be aligned, giving them the same shape.
This is how all parts of the hinge are performed to obtain identical elements. The completed mechanisms are attached to the hatch and tested to see if it matches the opening. They do it this way: if, when fully opened, it does not touch the edges of the opening, then the dimensions were taken correctly, and the hatch is ready for installation.
Manufacturing of folding staircase structure
Construction folding stairs has similar technology to folding ones. At the first stage, an extension ladder is made using the technology described above. Then choose the more suitable of the two options:
- The entire structure can be folded back.
- The ladder folds out in parts, similar to a folding one.
This type of structure is not hidden in a manhole cover. Manufacturing of folding attic stairs.
Advice! If you decide to make a staircase for the attic or attic yourself, it is recommended to use materials that are light in weight, this will make the structure easier to operate. When making your choice, also consider the ease of processing of materials and their aesthetics.

- 1 Design requirements
- 2 Varieties
- 3 Dimensions
- 4 Selecting a location
- 5 Measurements
- 6 Material selection
- 7 Form
- 8 Getting started
- 9 Two-section ladder
- 9.1 Manufacturing technology
- 10 Making a folding ladder on bowstrings
- 11 Videos
- 12 Photos
- 13 Schemes
If in the near future you intend to convert the attic into a functional room, then before starting work you should think about where to install the staircase and how to make it. A ceiling door or hatch will also be installed here. This design can be ordered or purchased, but let's find out how to make a staircase to the attic with your own hands. Yes, you will save a lot family budget and acquire new skills that may well be useful to you in the future.
Previously, attic stairs were made from the outside, but hardly anyone would be pleased with the prospect of climbing into this room across the street in frost or rain. Many people have a ceiling door in their attic, most often in the hallway, and if they need to climb into the attic, they use a ladder. But this is also inconvenient if you have to create, for example, a study or a recreation room in the attic. For a civilized person, a better choice would be to install a stationary or folding ladder. If you don't have room for the first option, then the second one will suit you very well.
Design requirements
 Design requirements
Whatever staircase option you choose, it must meet safety requirements. The structure must provide safe passage into the attic and be strong enough. Spiral staircases take up relatively little space and are highly attractive, however, it will be very difficult for older people to climb such a structure.
If the area of the corridor or hallway where the staircase will be installed allows, it is better to make an opening wide enough so that a good stationary staircase can be installed.
The larger the opening under the stairs to the attic, the greater the heat loss will be, unless, of course, we are talking about a heated attic space.
 Stationary ladder
Handrails and railings provide sufficient safety for a person climbing stairs. Therefore, if possible, make a design with these elements. Since in our case we are talking about making a staircase ourselves, it is also important to process it by special means, increasing the fire resistance of the structure. This is especially true in the manufacture wooden stairs.
The load capacity indicator should not be small, since if it is necessary to lift a heavy load into the attic, one must also take into account its own weight. So, the optimal load capacity is 260 kg.
Varieties
 Varieties
Attic stairs are divided into the following types:
- Monolithic. They can be marching or screw.
- Foldable. They can be lever, scissor, folding, sliding or telescopic.
- Portable stepladders or ladders.
Portable types of stairs are a temporary option for connecting floors. If you plan to use the attic on rare occasions, then an attached structure is the best option. But when arranging an attic space for a recreation area or for children to play, you need to make a more reliable staircase.
 Ladder
Most often for arrangement massive construction no room in residential buildings. Therefore it is not surprising that retractable stairs and their folding counterparts are in greatest demand when arranging an attic. They take up little space, are safe and convenient, and easy to use.
 Dimensions
Attic staircase has standard parameters, observing which you can produce a truly reliable and easy-to-use design:
- The width of the march should be 65-110 cm.
- The height of the stairs is up to 3.5 m. This is due to the fact that a fall from such or greater heights is fraught with injury, and the rigidity high design will be significantly less.
- The average number of steps is 15.
- The height of the risers is 19 cm.
- The thickness of the steps is 1.8-2.2 cm.
- The tilt angle ranges from 60 to 75º. This is due to the fact that an angle less than 60º will require a lot of space, and an angle greater than 75º is dangerous to use.
- If you have to make a folding ladder, then it must withstand a weight of up to 150 kg.
- The steps should not be slippery. They are installed parallel to the floor.
Selecting a location
 Selecting a location
If you have to make the stairs yourself, then it is important to determine the installation location of the stairs - inside or outside; if you choose the first option, then in which room will the opening be made to climb to the attic? It is important that the stairs do not interfere with household members. Therefore, installing it in the kitchen or bedroom is not cost-effective.
If attic space will not be used intensively, then a ladder to climb into it can be made in the living room. It is better that the staircase to the attic in this case is closed or autonomous. In such a situation, a folding ladder is very good option.
 Measurements
If you are making a folding ladder, then take into account its dimensions when folded and unfolded. Take a measurement from the floor of the room in which the stairs will be installed to the ceiling. Decide on the width of the stairs, the number of steps, and the angle of inclination. Record all data on paper, which will help you draw up the most accurate drawing. Errors in calculations can lead to undesirable consequences. For example, the stairs will be inconvenient to use and the risk of injury will increase.
The steps should be parallel to the floor. Doors should not open onto a flight of stairs.
Material selection
 Material selection
When making a wooden staircase, all parts should be treated with antiseptics to avoid rotting of the finished product. After assembly, you can paint the structure with any suitable color varnish/paint. Typically, attic stairs are made of pine. This material is chosen by most homemade ones, since wood is easier to work with than metal.
If you decide to work with metal, then use galvanized materials. This type of metal does not rust. Such designs have great strength. So, you can save space; galvanized elements are thin and therefore do not take up much space.
To prevent metal elements from rubbing against each other, plastic parts should be used. Thus, due to the replaceable side plastic inserts, slipping will be prevented.
 Form
Form
The peculiarity of the attic staircase is its shape. It should be ergonomic, compact, comfortable and convenient. In a small room, an oversized design will look ridiculous. In a fairly large room there are no restrictions; if you want to install a compact staircase, but if you want to make a stationary massive one.
It depends on the available space and personal preferences whether the staircase will be one-, two-, or three-flight. If the distance from floor to ceiling is no more than 3 m, then it is quite possible to get by with the simplest one-flight design. But, if you want to be more original, then make a staircase consisting of two flights.
To make a single-flight structure look more interesting, make it arched. The steps can be made in the form of diverging rays.
Getting started
 Getting started
If you have made the measurements and outlined the drawings, then it’s time to create an estimate for materials. So, so that you can make an attic wooden staircase yourself, you should stock up on:
- Screws.
- Screwdrivers.
- Roulette.
- Wood saw.
- Kit wrenches.
- Polyurethane foam.
- Goniometer.
- Hinges.
Side and vertical beams are used as the base to support the stairs. The amount of permissible load on the structure depends entirely on the strength of the base.
Two-section ladder
 Two-section ladder
One section of this design folds upward. When assembled, the two-section ladder is not hidden, but remains in plain sight. This is allowed if access to the attic is installed in a garage or other work space. When decorating the house in the appropriate style, a two-section staircase will also look good in the hallway. To make it you will need the following materials:
- Roulette.
- Ordinary wooden staircase.
- Wood saw.
- 4 bars with a thickness of 2-3 cm, 2 of them must correspond to the width of the hatch, and 2 must be 20 cm longer than the hatch.
- 4 pcs. card loops corresponding to the width of the stringer.
- Fastening elements.
The stringer is the base of the staircase on which the steps are laid.
Manufacturing technology
 Manufacturing technology
First you need to connect a short block using loops to the upper end of the ladder, another similar block should be rigidly fixed to the bottom of the ladder. To make the structure reliable in the end, take 2 slats and nail them diagonally on the back side flight of stairs. In this case, these actions should be carried out so that these reinforcing slats do not interfere with movement along the stairs.
After this, you need to measure 2/3 of the total length of the structure. Measurements are taken from below. The ladder should be cut in the designated location. These parts of the structure will subsequently be connected with card loops, which are attached to the back of the stairs. Thus, the structure can be easily folded.
The top bar is fixed under the hatch. Thanks to the hook and loop, your staircase will not open randomly. So, the hook needs to be attached to the wall, and the loop to the block.
Making a folding ladder on bowstrings
 Making a folding ladder on bowstrings
The manufacturing process of a folding ladder consists of the following stages:
To speed up the process of making an attic ladder, carry out all work with a partner. This will also help avoid injury when working at height.
The main points for making a wooden attic staircase were described in this article. If you have questions on the topic, be sure to ask our expert. Would you like to supplement the article or provide useful information? additional recommendations? Leave your comments.
In the video provided, you can learn about other intricacies of making attic stairs:
The photo shows several options for attic stairs:
 Stairs to the attic from the street
 Staircase above the entrance

 Folding ladder
 Stationary ladder
 Species folding stairs
 Calculation of a spiral staircase
 Staircase drawing
 Wooden staircase diagram
 Staircase diagram
 Scheme for determining the height and slope of the stairs
A folding attic ladder is a convenient option that does not take up much space.
It is not difficult to make such a staircase on your own.
To do this, you don’t have to have special talents, you don’t need to be a professional carpenter, but you just need to have a few materials, free time and, of course, a little patience.
Which staircase is better?
The attic can be a place filled with old junk and make a great Halloween decoration.
You can equip a creative workshop or an office for work in the attic, you can equip a cozy children's room there.
But no matter how different the purposes the attic space serves, no matter how it is equipped, all attics in the world are united by one fact: it is impossible to get there without a ladder. Of course, if the owner of the attic is not a superhero.
So which ladder should you choose to climb up to the attic? Is it possible to make it yourself? The answer to the second question is simpler: anything can be done with human hands! The first question will have to be dealt with in more detail.
The type of staircase should be chosen depending on the purpose of the attic and the availability free space down.


All types of stairs can be divided into three types:
- attached;
- permanent;
- folding structures.
The simplest option is, of course, ladder. This type includes both ordinary wooden poles and metal stepladders.
Advantages of an extension ladder:
- light;
- does not take up space;
- You can use one ladder to climb in different places.
On the farm, this option is undoubtedly irreplaceable. Using a stepladder, you can change light bulbs, trim trees on your property, repair the roof, etc.
However, it is convenient to use it to climb into the attic only if you plan to use the attic from time to time.
This ideal option, if old things will be stored in the attic, that is, they will go up there a couple of times a year.
If the attic is planned to be converted into a useful, functional room that will be used frequently, then the method of climbing there must be appropriate.
A stationary staircase is an ideal option.
This option has many advantages:
- stable;
- reliable;
- it is easy to climb along it for both a child and an elderly person;
- it is easy to decorate it in the style of the room;
- can be supplemented with railings;
- The space under the flights can be used functionally, for example, to arrange a storage room there.
This is the only acceptable option if the attic is to be converted into a children's room. Metal ones also look very impressive. spiral staircases with forged railings.
But all the advantages of this staircase are negated by one big disadvantage - it takes up a lot of space. What should those who have space not allow for a stationary staircase do?
Do you really have to give up the idea of converting the attic space?
For those who want reliable and safe stairs, but do not have free space for its installation, there is a third option - a folding design.
This option is slightly inferior in safety to the stationary one, but after use the ladder will be removed and will not take up space. In addition, it is easy to do it yourself, taking into account all the individual nuances.
Folding structures
There are many options for folding stairs.
The following designs belong to this type:
- hanging;
- retractable upstairs.
Both options are easy to make yourself. The difference is that the ladder can be folded and stowed away attic hatch or fold and hang on the wall.
The hanging option is only suitable if the hatch is located directly against the wall. Moreover, hanging on the wall near the ceiling, albeit folded wooden structure, will not fit into any interior.


Therefore, the most the best option is a ladder that will be removed to the attic. Depending on the size of the hatch, it can consist of two, three or even four sections.
Taking measurements and drawing drawings is the first step in making a staircase with your own hands.
There are a number of rules that, if possible, must be followed to make the design comfortable and safe:
- the width of the stairs should be no narrower than 60 cm;
- when unfolded, the tilt angle must be at least 30°;
- the depth of the step must be at least 10 cm so that the person climbing feels confident;
- the distance between steps should not exceed 30 cm (preferably less);
- if the attic hatch is higher than 2.2 meters, then it must be equipped with a leash for easy opening;
- if the room height is 4 m or more, it is better to choose a stationary option, since the structure can “play” under the weight of a person, which will significantly reduce its safety.
First of all, you need to decide on the size and location of the future hatch. The longer it is, the fewer sections the staircase will need to be divided into.
For example, with a door length of 90 cm and a staircase length of 240 cm, three sections are obtained: 240: (90-10) = 3.
It is better if the hatch is made of solid wood. In this case, it will be heavier than from plywood or other materials, but the fastenings in the wood will “sit” much better.
The hatch must be secured to the ceiling using reliable door canopies with a fixed opening.
Such canopies are fixed with your own hands in the position required for opening using special pins.
When the hatch is opened further, it will open only as much as the installed studs allow.
You should not use any other fastenings (for example, window awnings).
It must be remembered that the weight of the hatch itself, the ladder and the person climbing it will fall on the canopies. Therefore, it is worth ensuring proper design reliability.
In addition, you need to install a lock and, if the height of the hatch is unattainable from human height, a leash.
The lock on the ceiling side can be used for both interior door, equipped with an automatic latch. A latch type latch is suitable for the attic side.
A cable or lever can be used as a leash. The cable, passing through the roller device on the attic side of the door, activates the lock mechanism.
However, a rope hanging from the ceiling will not fit into every interior, so more good decision is the lever.


The lever is a plastic or metal rod (for ease of storage it can be telescopic) with a recess of the desired shape at the upper end.
This method is suitable when using a do-it-yourself mortise lock in the hatch cover, from which you need to remove the turntable.
A pinwheel is a plastic attachment on a non-removable key. It is used to make it easier to open the lock from the inside.
Under the turntable there will be a square or semicircular metal rod on which the lever should be placed.
The hole in the lever should fit as tightly as possible to the lock rod, in this case the lock will open easily.
If you have the financial means, you can install an automatic lock with a remote control on the hatch.
Making stairs
After the attic door is made, you can begin making your own stairs.
To do this you will need the following materials and tools:
- two beams, length equal to length future stairs, at least 12 cm wide and 3 cm thick;
- board for steps at least 10 cm wide, 2 cm thick. The total length of the board is equal to the length of the steps multiplied by their number;
- corners or bolts for fastening steps (4 for each step);
- fastenings for fixing the upper section of the ladder on the hatch cover;
- hinges, two for the number of section connections (4 sections = 3 connections);
- drill;
- screwdriver;
- wood hacksaw;
- long metal ruler or tape measure;
- protractor or malka.
After everything is prepared for work, the primary task is to mark and secure the steps.
It should be remembered that the staircase will be at an angle, and the steps must be parallel to the floor. They must be marked at an angle of 30°.
After the first step is secured, you should install the ladder and make sure that the steps are positioned correctly.
When the staircase is ready, it should be cut into required quantity sections. The cuts should be located at the same distance from the steps. The sections are fastened together using metal hinges or hinges.
When the ladder is assembled, it top part it is necessary to secure it tightly to the attic door, retreating 5 cm from the top edge.
After this, you should check the load-carrying capacity of the ladder and its connections. You cannot test the ladder with your own weight by climbing on it!
To soften the harshness of the opening, you can use rubber belts or metal springs, securing one end to the bottom of the hatch cover and the other to the attic floor.
The staircase was made by hand, and not much time and effort was spent on its production.
But for greater safety and reliability, you should do something else:
- lubricate all moving metal parts (hinges, hinges);
- sand all wooden surfaces with emery cloth or a sander;
- If desired, the structure can be painted acrylic paint or varnish.
In this case, this structure will last a long time, will not leave splinters after climbing it, will not tear clothes and will not creak.
Such a device, made with your own hands, will become the real pride of the owner. Happy renovation!


, Islam, Judaism How do temples of different religions differ")


