The attic is a special room under the roof of the house, which can be used in different ways. Naturally, you need to somehow climb up. To do this, you will need an attic ladder. Doing it with your own hands is quite simple. It will only take material, a tool, a drawing and a little time.
Attic staircase designs
Naturally, the presented structure should be convenient and take up very little space in the house.
There are quite a few types of such structures:
- folding. Most often it consists of 3 parts that are fastened together. They can be easily folded. That is, if not needed, such a ladder will be in the attic and will not take up space. You can adjust the height of this design manually. Do-it-yourself folding attic stairs are very easy to set up.
- Sliding. Such a product most often has 2 parts in its composition, which are attached to the hatch. Such stairs must be equipped with handrails. However, keep in mind that in this case you will have to think about how to properly install it in the opening.
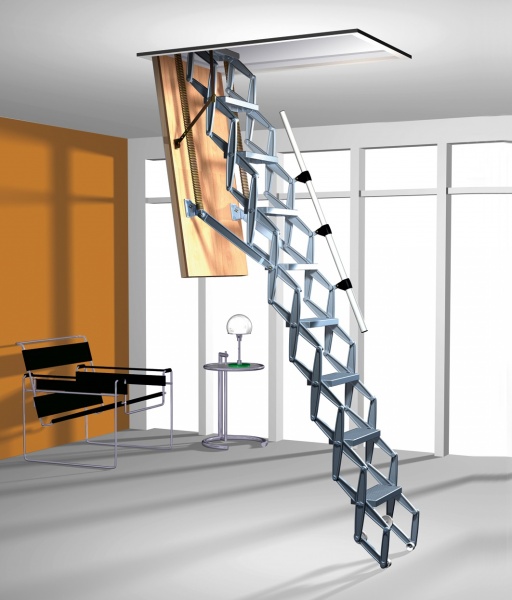
- scissor. Most often they are made of metal. The principle of operation of such a design is simple. Sections of steps connect with each other like scissors. In a calm state, such a ladder looks like a spring. You can also equip it with an automatic drive, which will be controlled by a remote control.
What are the building requirements?

If you need an attic ladder, even an amateur can design it with his own hands. However, certain requirements must be met:
1. Particular attention should be paid to the safety of the product. That is, all fasteners must be reliable, and the materials of manufacture are durable. And the stairs should not block the passage.
2. Keep in mind that functionality is more important than external beauty. Although this is not the last detail. For example, you should be comfortable climbing stairs. The design should be chosen taking into account all family members living in the house who will use it.
3. It is better if the stairs are equipped with railings, handrails and slips that will prevent slipping.
4. The design must meet especially the wooden one.
5. Consider the load capacity of the product. The optimal figure is 260 kg.
The attic staircase (it’s quite easy to make it with your own hands) must fully meet the specified requirements. By doing this, you will save your health, space and money.
Necessary materials

If you need an attic ladder, do it yourself only after you decide what you will fold it from. For example, you can build it from wood or metal. In the first case, unpainted material should be used. So in the future you can decorate the stairs according to your interior. Moreover, such a design is made faster and easier.
4. For the hinge mechanism, metal elements should be prepared: sheet steel, a thick corner and a strip.
5. Bowstrings and steps should be well sanded. Otherwise, you may get hurt. Further, recesses are made in the bowstrings for inserting steps. Please note that the last elements must be located strictly parallel to the floor.
Features of the manufacture of a metal structure
There are other types of structures presented. Do-it-yourself attic stairs made of metal are much more difficult than those made of wood. For example, here you must strictly observe the slope of the marches within 25-45 degrees. The height of the steps should also be in the range of 60-64 cm. These are standard indicators that you should be guided by.
Kosours can also be different. For example, there are stairs with a bowstring made of sheet metal, sawtooth, with a serrated section, without or with brackets. In principle, if you have a suitable drawing, you will quickly assemble the desired version of the stairs.
Construction installation

It should be noted that the manufacture of the structure is not the most difficult stage. Do-it-yourself installation of an attic staircase must be done very accurately so as not to redo all the work later. During installation, certain rules must be followed:
1. First of all, do not do everything yourself. You need an assistant.
2. You must have the exact dimensions of the opening to which the structure will be attached.
3. Pay attention to the fact that the stairs should be easy to manage. That is, you need to reach for the sliding mechanism. At the same time, it must securely fix the structure in the assembled state.
4. You need to fasten the structure very, very firmly, so that at one fine moment it does not fall on your head. To do this, use large bolts and metal inserts.
5. To facilitate the operation of the structure, you can equip it with automatic mechanisms that, using the remote control, will raise or lower the product.
Before screwing, test the ladder: whether all mechanisms work correctly.
In principle, you have learned all the features of the manufacture and installation of attic stairs. Naturally, all actions should be performed accurately and carefully. Subject to all the technology, your product will last a long time and very high quality. Good luck!
Currently, every developer is trying to make the most of the available area of his home. However, climbing into the attic without a ladder is almost impossible. Do-it-yourself attic stairs are the best option for safely climbing to the attic.
The ladder to the attic can be located both indoors and outdoors. Of course, when the ladder is located inside, it is much more convenient to use it - you do not need to go out in the cold in winter or get wet in the rain in autumn.

There are several types of attic stairs, namely:
- folding;
- stationary;
- portable.

Stationary stairs with railings and wide flights are the most convenient, but their use is limited due to the impossibility of operation in small areas.
Portable ladders are used mainly as a temporary option and serve to access rooms that are rarely used. The main disadvantage of such a ladder is low security.

Folding attic stairs are the middle link between stationary and portable. In terms of convenience, they are almost as good as stationary ones, but they take up much less space. In terms of safety, they are significantly superior to portable designs.
The choice in favor of one or another type depends on several factors:
- the area of \u200b\u200bthe room where the staircase will be located;
- purpose of the attic;
- possible angle of inclination.

Standard sizes
There are a number of standards that an attic staircase must comply with:
- the optimal width of the march should be about 65-110 cm;
- the height should not exceed 3.5 m. This is due not only to the fact that the rigidity of the structure is significantly reduced, but also to the fact that a fall from such a height can lead to serious injury;
- the number of steps should usually not exceed 15;
- between the steps it is customary to make a distance of about 19 cm;
- the thickness of the steps is usually 18-22 mm;
- the standard tilt angle is 60-75 degrees. A small angle requires a lot of space, and a large one is dangerous during operation;
- folding ladder must withstand 150 kg load;
- steps should be installed parallel to the floor and should not be slippery.
Manufacturing process
Making attic stairs with your own hands is not at all as difficult as it might seem at first glance. Of course, you won’t achieve such beauty as industrial models, but it’s worth a try. Do-it-yourself drawings of attic stairs that you can make can simply be found on our website.

Luke - the basis of any attic stairs
You can make a hatch with your own hands using the following materials:
- bars 50 × 50 mm;
- plywood.
The order of work is as follows:
- determine the location and size of the future hatch;
Note!
7-8 mm should be added to the overall dimensions of the hatch so that the lid closes easily and without creaking.
- cut the timber into 4 parts of the required size;
- we cut grooves at the ends of the bars;
- lubricate the grooves with glue and connect the bars, reinforce the junction with self-tapping screws;

- so that the diagonal does not go away, we fasten the scarves;
- fix plywood;
- try on the hatch in the opening;
- to close the hatch well, we will cut the latch into the lid;
- to open the hatch we will use the handle, which is inserted into the hole and presses the latch.

Necessary tools and materials
For self-manufacturing stairs to the attic with your own hands, you must have the entire list:
- wood saw;
- foam gun;
- a set of screwdrivers or a screwdriver with a set of bits;

- various self-tapping screws, anchors;
- roulette;
- card loops;
- bars 20-30 mm thick.

These are just the basic tools that you will need for self-manufacturing if you already have a ready-made wooden ladder 30 cm longer than necessary to the level of the opening.
Simple design
As an example, consider how to make an attic ladder with your own hands.
The instruction will allow you to understand the principle of work:
- on the finished one-piece staircase made of wood, we fix 2 bars in width, on the lower and upper parts. Moreover, we fasten the upper bar to the hinges, and fasten the lower one rigidly;
- sawing the ladder into 2 parts. measuring 2/3 of the length. The top part will be longer, the bottom short;
- to stiffen diagonally, we fix 2 slats;
- we connect both parts of the stairs with loops;
- with the help of anchors we fix the upper bar under the hatch;

- so that the lower part does not open, it is fixed with a hook. The loop is located on the stringer above the cut.
- the finished staircase for the attic is pressed against the wall surface and fixed.

The main disadvantage that this design of the attic stairs has is its appearance and the fact that all fasteners and bars are visible. However, even such a do-it-yourself ladder to the attic will greatly simplify the difficulties with climbing and descending from the attic.
Folding design on bowstrings
For the manufacture of the structure, several steps must be performed:
- divide the total height into 3 parts. The first part will correspond to the dimensions of the hatch, the second is slightly smaller, and the third will cover the remaining distance to the floor;

- we measure the angle of the hatch with the help of a bevel;
- we transfer the angle to the boards, thereby marking the steps;
- in place of the future hinge between the sections, we drill holes;
- we grind all edges;
- we cut the boards in those places where the hinges will be placed;
- cut and grind steps;
- under the steps we make small recesses in the bowstrings;
- we insert the steps into the recesses, putting them on glue and fastening them with self-tapping screws;
- connect the sections with special loops. To do this, be sure to place the sections on a flat surface;

Note!
Working at height is recommended with a partner.
This will not only help to avoid injury, but also greatly speed up the whole process!
The price of a ladder made by one's own hands is much lower than the price of a factory design, so if the financial issue is acute, be sure to try to do everything yourself.

Conclusion
Purchasing a ready-made staircase to the attic is the easiest option, however, with the necessary tools and initial skills, it is not at all difficult to make it yourself. In the presented video in this article you will find additional information on this topic.
There is an attic in any country house. Very often this is an unused room, but in some cases some unnecessary things are stored here or even some kind of room is equipped. In any case, there must be access to it, and for this, stairs to the attic are made. They can be created from wood and metal - in this case, you can make them yourself. And they can be beautiful forged - such designs are usually created to order.
Primary requirements
Before building an attic staircase, you need to consider several of its features. First, it must be convenient and safe to use. Moreover, these two indicators depend on the design principle of the staircase itself and the attic. An important role is played by taking into account the type of stairs, the width of its steps, the height of the rise. The height of the stairs is calculated depending on what its design will be. If it is a folding type, then you need to carefully consider its dimensions when folded.
Steps should be of such dimensions that it is convenient and safe for any person to climb them. The correctness of the design also depends on the location of the steps: the distance between them should not be too small or large. If these requirements are not observed, safety regulations will be violated.
The span of the stairs to the attic must be at least 0.8 m. It is important that the angle of inclination is observed: this must be considered at the design stage of the structure.
Types of stairs: folding or stationary?

The choice between these two types of structures depends on how large the attic area is. Of course, a stationary staircase is more reliable and safe, but it is also solid, that is, it requires a lot of space. That is why many people prefer folding attic stairs: they are convenient, take up little space, due to the fact that they can be folded. Most often, such structures consist of several sections that overlap each other, thereby saving space. Moreover, they can always be adjusted depending on the required size.
Or retractable?
These designs are becoming more and more popular, due to their advantages:
- are cheap;
- easy to mount;
- take up little space due to the design in the form of an accordion;
- reliable;
- mask the structure with an attic hatch.
All these advantages make retractable stairs so popular. How to make it yourself?
Self-assembly of a retractable ladder: the main stages
The very first step should be a thorough analysis and verification of the dimensions of the hatch opening. This is necessary so that the parameters you choose match the dimensions of the stairs. Then the location of the bars is thought out - first at the bottom, then at the top. Special spacers are located between the opening and the stairwell - they will help to better fix the structure. When it is laid, the spacers can be removed.

Or outdoor?
If space does not allow mounting retractable stairs, you can replace them with an external structure. It will provide a connection between the outside world and the interior of your home. The main thing is to remember the safety rules, since the operation of such a design has its own characteristics. When installing an external staircase, it is important to choose the right material: it must be resistant to sunlight, have increased abrasive wear, reliable and wear-resistant.
Wooden ladder
Wooden stairs to the attic - the easiest option, which you can create with your own hands. This can be done in several ways. Consider the most simple and implemented in practice.
Method 1
To make an attic staircase, you first need to take measurements: we need parameters for the height of the room, the estimated angle of inclination, which most often reaches 30 degrees, while the height is about 2.5 m. To make the staircase reliable and correct in terms of design, you need to think over and draw up the drawings correctly. The simplest wooden stairs are created on the basis of bars for stringers, bars corresponding to the width of the stairs for fastening, overhead hinges and boards from which we will make steps. Yes, and do not forget about folding hangers - the hatch cover will be fixed on them. The installation process itself is as follows:
- Steps are installed and securely fastened between the stringers. This is done either with a tenon-groove fastening, or with self-tapping screws, or with glue. It is better to treat the steps with anti-slip pads - they will increase the safety of operation of the structure.
- The ladder is first fastened under the ceiling opening on two bars, which are equal to the width of the ladder. Their connection is carried out by loops.
- We check how efficient the hinges are, after which we finally tighten the fasteners.
This is the easiest way to create stairs to the attic.

Method two
This is a more time-consuming way of making stairs, which can be mounted even in a country house. It looks more aesthetically pleasing and has a more reliable design, which is important in conditions of heavy load on it. The structure itself will be movable on one side, and the other half will be attached to the wall. To create such a staircase to the attic, we need:
- two boards with a length corresponding to the height of the ceiling and the angle of inclination;
- boards for creating steps with a width of at least 0.5 m and a thickness of about 3 cm;
- bolts, self-tapping screws as fasteners;
- card loops with which the steps will be attached.
It is important to arm yourself with a drawing - it will allow you to perform all the work efficiently and accurately. After determining the angle of inclination, you need to saw off the bars from above and below so that they firmly rest on the floor. The boards along the entire length are divided into equal segments - steps will be located here at the distance that you need. The steps are fastened with card loops, and after the construction is completed, you can make it exquisite by varnishing or painting it.

Metal stairs
Attic stairs made of aluminum look very nice, especially if your country house is decorated in the style of "minimalism" or "hi-tech". Why is metal good? First, it is more reliable. Secondly, such structures are treated with special compounds that protect the surface from mechanical stress or corrosion. Thirdly, metal structures are able to withstand heavy loads.
The most popular among buyers are metal ladders of retractable type, which take up little space. They are relevant for rooms that are small, that is, where rational use of space is required.
How to do it yourself?
Despite the complexity of the technological process, you can make a metal staircase yourself. Moreover, it can be made both from metal and from a combination of materials. To make the simplest metal staircase, we need to prepare:
- welding machine;
- mechanical saw;
- emery wheel, which will remove burrs on the metal;
- a circular saw and a clamp for joining parts if the stairs will have wooden parts;
- pipes;
- steel sheets.
Note that the quantity of materials is calculated based on the drawing. We will make strong seams with a welding machine, so the staircase will be a monolithic and durable structure.
Such an aluminum or steel staircase will be built on the basis of a channel (size 8-10). The steps are made of sheet steel, if they are without additional finishing, grating on the steps will be required, which will protect against falling. The railings are made of angle steel and the tread supports are made of rebar. First, support devices are installed and welded on the beam, then brackets for fastening are welded.
Metal attic stairs can have wooden tread plates, but first you need to consider where the additional fasteners will be located. On metal steps, holes for self-tapping screws should be located at a distance of 15 cm from each other. A plywood substrate is mounted to the metal treads - it is attached to a mounting adhesive, which retains its shape after hardening.

Finished aluminum ladder
Very often, many people prefer to buy ready-made structures, rather than mount them on their own. But even in this case, you will have to work hard, since they are delivered unassembled. How to assemble? The general scheme of work is approximately the following:
- First, a sketch of the future staircase is created.
- 4 identical segments are cut from a metal profile or pipe.
- The pipe is fastened in a vice and carefully cleaned of rust.
- Steps are cut out of a metal sheet - they must be the same length.
- Steps are tried on on a flat surface and adjusted to size.
- Steps are attached to the supports by welding - this is a more reliable option than corners and bolts.
- From below the ladder is finished with rubber heels.
Forged designs: beautiful and modern
Very often, in country houses, rooms with an attic or attic are connected with forged stairs. Moreover, they can be simple screw, or they can have ornate patterns, which allows them to fit into any room in terms of stylistic orientation. All spiral staircases can be divided into several types:
- in the first version, the staircase is carried out with support on the central pillar and walls;
- in the second - a spiral staircase is removed from the walls and is mounted on a support column with steps;
- in the third case, a staircase with a turn does not have a central pillar, but rests on spirally curved bowstrings;
- the fourth option is a reliable metal staircase, which rests on a pillar made of a monolith based on a steel pipe.
The most convenient are stairs, the span width of which is up to 900 mm with a diameter of the entire staircase structure up to 2200 mm.
What if you buy?

If you don’t feel like doing the installation yourself, you can always buy the same forged stairs, which are quite difficult to mount on your own, and even more so to come up with and make. A large selection of attic stairs is offered by many brands, not only in Russia, but also in other countries of the world. Consider the most popular:
- STANDART ISO PLUS (MINKA, Austria). This folding wooden ladder is made of quality MDF and is designed for a maximum load of 150 kg. There are special protective nozzles on the legs, and with the help of a metal handrail, maximum safety is ensured. This is a compact ladder, the price of which is an average of 8200 rubles.
- The Danish company VELTA offers economy class structures that can be mounted in the attic or in the attic. For 6,000 rubles you get a simple staircase, which is compact: it consists of three sections that are conveniently assembled and retracted into the ceiling.
- FAKRO stairs are made from winter harvested pine, therefore they are reliable and durable in operation. This company offers a wide range of products that are compact and have a wide price range. The warmed cover of the hatch - the most important advantage which this ladder has. The price of models starts from 8000 rubles. It is also important that all connections of the structure are reliable and durable, the steps are supplemented with anti-slip grooves, making operation safe and comfortable.

conclusions
Now you know how to make a staircase to the attic with your own hands. Having at hand the simplest materials, you will create a concise, but comfortable wooden or aluminum structure.
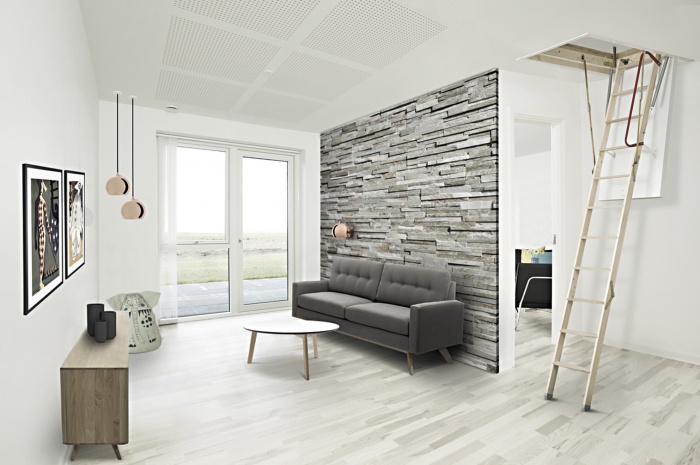
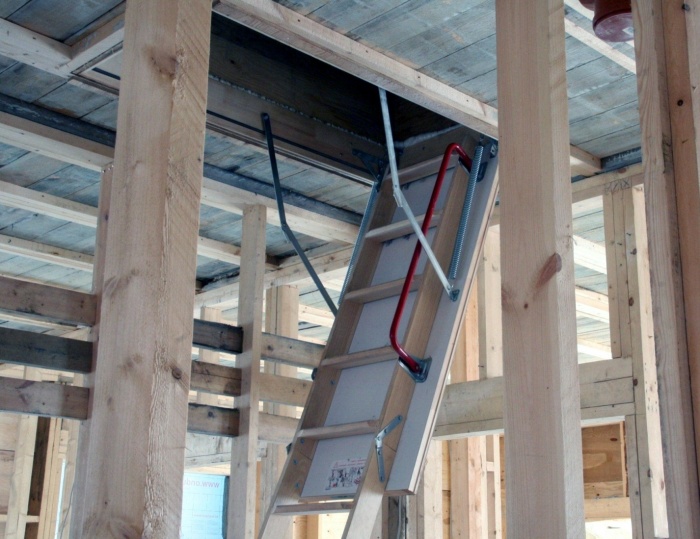
Long gone are the days when homeowners had to climb a bulky ladder to the attic. Modern options for the attic are good because they take up a minimum of space both in the folded and unfolded state, and it is difficult even for an attentive person to guess the presence of such a design behind a beautifully finished attic hatch.
And such a wonderful alternative to helical structures and ladders as a folding attic ladder is definitely pleasing to the eye - you can make it with the right fasteners, with a strong spring mechanism and no worse than modern expensive market products. And even better!
Advantages and disadvantages of folding stairs
A folding attic ladder should be easy to hide and fold under the ceiling, and therefore it is customary to make it shorter, with a small number of sections. After all, each extra step in this regard is an additional weight and volume.
Such stairs are good primarily because they can significantly save space. At the same time, they do not spoil the ceiling of the dwelling at all. After all, the entrance to the attic is often located just in one of the inhabited rooms of the house. At the same time, such stairs are quite functional, durable and compact. And using them is as easy as shelling pears: just pick up a special rod with a hook at the end and hook on the ring.
Then, with your left hand, you can easily take out the bottom step of the extreme section, reach the floor and straighten all the other components of the stairs. In the same way, doing everything in reverse order, you easily fold the ladder back and remove it into the ceiling. Moreover, many modern attic stairs also unfold and fold with the help of an electric drive, which is generally incredibly convenient:

Another benefit is safety. Going down and up such a ladder is much safer than using an attached ladder: it will not break underfoot and the legs will not suddenly “leave”.
And finally, ease. The lightest folding attic stairs are made of stainless steel and aluminum, so that the attic floor is not subjected to serious loads. As you understand, in view of the design features, such a staircase can only be made of metal.

Why is it better to make the stairs yourself?
Ready-made industrial stairs, which the market is actively offering today, are quite convenient, as far as one can judge from the available reviews on them. But we do not recommend putting them in attics that you often have to climb (for example, our workshop or mini-library is located there).
Why? Because such stairs often turn out to be quite flimsy in practice - this is not hand-made production, but mass production, and no manufacturer needs to make them too durable. For any product, the maximum border load is always calculated, which often does not take into account quite a lot of factors and force majeure. And this is the case when you are in a calm state and with almost no additional weight in your hands, carefully descending or ascending. If you slip, fall, or a sufficiently complete relative decides to lift a heavy box into the attic - expect trouble.
Also, such stairs are often made quite steep, and it is inconvenient to go down them with something in your hands - you need to stick to one. And go down only backwards. Therefore, it is quite natural that many home craftsmen who have built their own house or bath see no reason to buy fragile and expensive folding stairs to the attic. Why, if they can be made with your own hands, and of excellent quality and much greater reliability?
Moreover, in this case, you have much more choice both in terms of material for the manufacture of stairs, and the fasteners themselves. The main thing is to correctly calculate the dimensions of the future structure, so that later it folds easily and compactly over the hatch, nothing touches the opening and does not create problems.


Another common reason that many undertake to build such stairs on their own is that most industrial options usually have very thin and fragile steps - they literally creak underfoot.
So, in order to make such a ladder for the roof with your own hands, you will need wooden trimmings. Decide first on the dimensions of the future attic opening, and in the second step, make the lid and frame of the hatch. Then you will attach a ladder to it. On each side, it is desirable to leave gaps of 7-8 millimeters. Here are the technical parameters:

So, now let's figure out what types of attic folding stairs are.
Design #1 - Sliding Ladders
Sliding ladders usually consist of two sections, one of which is attached directly to the hatch cover, and the second is moved apart vertically with the help of special guides. When you fold such a ladder, one section seems to crawl over another, which is quite convenient. The only negative is the bulkiness of the whole structure, which requires a wide opening in the attic floor.

Design #2 - folding with spring mechanism
The most popular today are folding stairs, otherwise called sectional. These consist of three or four sections, which are easily straightened into a flight of stairs. They are interconnected by a special spring mechanism.
Folding structures are considered the most complex in their design, since they have many fasteners and must be correctly attached to the hatch opening. Such stairs are made of both wood and metal.

Construction #3 - telescopic ladders
The next view is a telescopic design. She shows herself remarkably well in cases where the attic is visited quite often. For example, when it was specially insulated to make it residential, although it has not yet reached a full-fledged attic. That is, we are talking about a technical attic, like a dressing room or a workshop, and in this case it is better to put a residential attic in a spiral staircase made of wood or metal and always with a railing.
In a telescopic design, the blocks are pulled out one by one, while taking up as little space as possible. And such stairs are good, especially because they can be extended to almost any length, which is especially valuable for high ceilings. But such devices are not suitable for children and the older generation in the house, which is quite difficult to reach the bottom section and generally cope with the whole structure.

Design #4 - Simplified Folding Ladders
These types of folding ladders do not hide behind a hatch in the attic, but they are easily removed into a corner or behind an interior decoration. For example, here is such a rarer species, which is usually made independently, also has the right to life:

And such options for folding stairs are quite popular abroad:

But both of these options have considerable disadvantages, some of which are able to bring discomfort to the interior of the living space, from where there is access to the attic, and after a month or two such structures are already annoying the owners with their stupidity to the point of soreness. And so we still suggest that you take a closer look at more practical folding ladders that can be easily folded and hidden behind a manhole cover.
How to determine the parameters of the future stairs?
So, let's give you some tips on choosing an attic ladder.
- Council number 1. When you choose the parameters for the future staircase, consider the mechanism of the hatch: when it is opened and closed, it can move forward and backward slightly.
- Council number 2. If the ceiling in the room is high enough and exceeds 3.5 meters, it is better to install a marching or attached structure, or a spiral staircase, which will be safer in this case.
- Council number 3. When making a hatch, keep in mind that the larger the opening, the more heat will go to the attic.
- Council number 4. Another point that you should pay attention to is how the hatch will open. For example, in ready-made market options, most often it opens slowly, thanks to special springs, and certainly does not fall on anyone's head. Be sure to work on this point, especially since special parts are not difficult to acquire today.
- Council number 5. The steepness of a staircase is always determined by it only by its angle. The larger the protrusion of the step, the greater the number of these steps and the smaller their height. But this does not mean at all that it will be convenient for you to climb and descend on such a ladder. Therefore, we will call the most convenient step height of 20 centimeters, which is most suitable for a standard human foot.
Here is a very useful video that will help you avoid many mistakes when installing such a ladder:
What fasteners and materials are needed?
As for the base material, a wooden staircase will be the most affordable, but here it is important to pay special attention to the strength of the fasteners. To make such a ladder, you will need two long and two short bars, as well as a piece of plywood 10 millimeters thick.
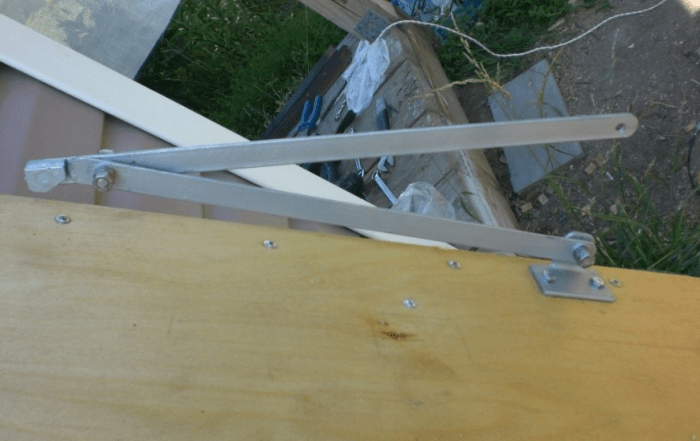
Let's look at this point in more detail. All designs that help open the stairs with a hatch down differ only in the presence of additional mechanisms and depreciation. Cushioning, in turn, makes it easier to close and open the stairs. And you can buy all the necessary hinge elements at any store. But simple metal strips drilled in several places are quite suitable for arranging such a staircase, and an aluminum sliding system will cost you the most for arranging stairs.
Simple and practical fastening:

More complex system:

But what are the requirements for fastening the entire staircase. The first is the ability to support the weight of the entire structure, as well as the weight of the person who will climb and descend it. And not only the static loads of a person standing on it with its certain weight, but also dynamic ones, which are much more than static ones. For example, a person stumbled and abruptly stood on a lower step, or staggered and leaned on the stairs with all his weight, but sharply and suddenly.
And, finally, we note the ability to easily control the design. As you understand, such a ladder weighs decently and it is important that you then look at it easily to open it. And when closing, you have to lift all the weight at once, so provide special springs that will make the whole process easier for you over time - you will be grateful for such a trick.

Instructions for making a folding ladder
So, let's go through step by step how to make a folding ladder for your attic. You will need the following tools: a hacksaw, a ladder, hinges, two beams, bolts, self-tapping screws, a screwdriver and a metal hook.
The process itself can be divided into several steps:
- Step 1. Fasten the top beam to the opening with hinges, and the bottom beam with self-tapping screws. The fastener itself should be on the back of the stairs.
- Step 2. And now we connect everything using the most common bolts, with a diameter of 6 or 8 millimeters. A smaller diameter may not withstand the load, a larger one is simply not needed. Remember that self-tapping screws cannot be used here at all - they will not withstand the load and on a certain day they will simply tear out the entire system mount.
- Step 3. Now we divide the stairs into three parts, measure 2/3 and make a cut, just between the steps.
- Step 4. We connect the sawn parts again, but already with loops.
- Step 5. Nail longer bars on the reverse side so that they turn out obliquely for strength.
- Step 6. Now the ladder itself is supplied under the hatch and pressed against the wall with the upper bar. Secure this bar with bolts.


Believe me, in practice everything will be much easier!
For dachas, country houses and cottages with attic rooms, a compact and lightweight folding staircase to the attic becomes a vital necessity. It should not take up much space, because every square meter is important in a country house. In addition, the great advantage of the ladder will be its mobility. Foldable designs save space and are easy to install. To complete all the related tasks for the construction of such a staircase, you can do it yourself.
Types of attic stairs
Attic stairs can be located both indoors and in the attic itself. The second option is more profitable in terms of saving living space. According to the design of the stairs are:
- monolithic (marching or screw);
- folding (lever, telescopic, scissor or folding);
- portable (attached or ladders).
Portable structures are used very rarely, mainly when performing construction work. The most convenient option is monolithic products that have wide marches and are equipped with railings. However, they are not suitable for access to the attic, because they have large dimensions.
It is better to use retractable structures that are safe to use and easy to install. In addition, when folded, they do not take up space in the room. Thanks to the variety of possible designs, you can choose the staircase that best suits your home.

Transformer stairs
For the manufacture of folding attic stairs, wood and metal (most often aluminum) are used. This combination produces the best results. Wood is necessary to create flights of stairs (the weight of the structure is reduced), and metal parts are most often corners, fasteners and mechanisms that ensure the rigidity of the structure.
For stairs choose solid wood (birch, ash, larch, beech, maple). The beam must be chosen at least 2 cm thick. If the ladder will be used quite often, it is worth thinking about a metal structure.
The manhole cover should be filled with foam for greater thermal insulation. Dimensions of stairs to the attic:
- the optimal march width is 65 cm;
- the average number of steps is 15;
- the optimal step width is 19.3 cm;
- the thickness of the steps is not less than 18 mm;
- the optimal angle of inclination of the structure is 60-70 degrees.

To prevent the ladder from sliding on the floor, it is worth putting special pads on each bowstring.
scissor
Such stairs are made entirely of metal. Their other name is accordion stairs. They are light, compact, easy to attach to the hatch. However, scissor ladders have one drawback - over time, a creak appears during their operation. They need to be lubricated periodically.
Telescopic
In this case, a folding ladder has several sections that fold into one another. They are usually made from aluminium. Domestic summer residents are wary of such stairs and prefer transformers to them.
Sectional hinged products are more in demand. They are more bulky and difficult to install, but they have high strength and durability. How a retractable staircase to the attic is made is described below.

Location
There is one main requirement for the location of the stairs - it should not interfere with residents when moving around the house. That is why it is not installed in the bedroom or hallway. Sometimes you can install a staircase as a piece of furniture - if the size of the room allows. In this case, it is not necessary to hide it.
Production of a two-section ladder
If you need to perform a simple and practical design, you should look at the option with two sections. To make such a ladder, you will need a small amount of tools and materials:
- hacksaw;
- ladder;
- roulette;
- beam 2-3 cm thick.
- loops along the width of the stringer;
- hook, screws, anchors and loops.
First you need to carry out preparatory work, then make a ladder, and then install it correctly.
Preparatory work
First, the old structure is dismantled, consisting of a ladder and a decorative frame equipped inside the passage. Then you need to pick up bars for flights of stairs. Each bowstring must have a cross section of at least 30 * 50 mm. The optimal slope of the attic stairs in a small room is 60-70 degrees. It must be taken into account when calculating the length of the stairs and the angle of inclination of the steps relative to the ladder racks.
It is worth arranging a two-section staircase when the attic passage is located in close proximity to one of the walls. The folding design will hang directly on the wall. The presence of only 2 sections does not allow you to hide it in the attic directly above the aisle.
Making stairs
First, the lower and upper parts of the stairs are assembled. To do this, you need 4 bowstrings and steps. The bottom should be 1/3 of the total length. Then it is necessary to strengthen the upper part with diagonal slats to give it greater rigidity. Then the structure is connected together with loops. A bar is attached to the top of the stairs, which will later be screwed to the wall.
The ladder is attached to the wall with a pre-screwed bar. It should be installed directly under the hatch. The advantages of this design are obvious - a minimum of parts and effort in manufacturing, ease of installation, ease of construction. The disadvantage of a two-section ladder is that it remains in sight.
To avoid this situation, it is worth building a more complex structure. The best option is a ladder with 3 sections. It can be easily hidden in the attic, used only when necessary.
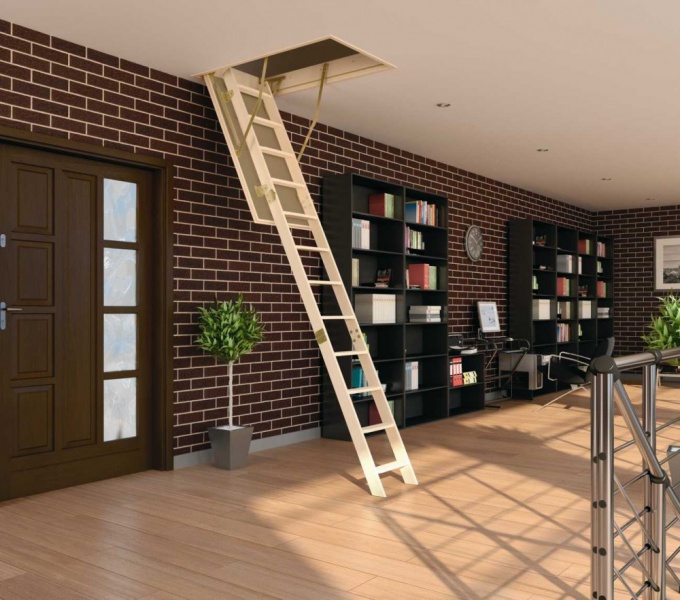
Three-section
The most compact version of the stairs to the attic is a hatch with a folding structure of 3 sections attached to it. Such products are sold in stores. They are made of steel, have a small size and are made of steel. You can also build them yourself. The most commonly used material is wooden blocks. To build a staircase to the attic with your own hands, you will need to perform a certain sequence of actions.
How to make a hatch
Before performing the hatch, it is worth calculating its dimensions. If the hatch to the attic is 125 * 70 cm in size, then the passage should be cut 7-8 mm more on each side. This will make it easier to open and close the sunroof. The level of thermal insulation from such a gap will not decrease.
As materials you will need:
- Bars 50 * 50 mm - 2 long and 2 short.
- Plywood 10 mm thick.
Now you need to build a hatch. To do this, 4 bars are attached to each other, and then a sheet of plywood is nailed to them. Before attaching plywood, check the diagonal. So that the construction of the bars does not “lead”, you need to nail scarves to the corners. After the hatch is completed, it must be tried on in the opening.
So that there are no locks on the outside, and the hatch closes well, you should cut the door latch into the cover. It will hold the hatch perfectly and open comfortably.
opening mechanisms
Now it’s worth doing the most difficult thing - creating opening mechanisms. In order not to complicate and not delay the process, you can buy them at a hardware store. However, if there is a desire to do everything with your own hands, you should follow certain rules.
To begin with, drawings of the future design are made, taking into account the opening angle of the hatch. To make a hinge on which the hatch will open, you will need:
- pieces of sheet metal;
- one corner;
- two metal strips of different lengths.

Holes are made on the hinges according to pre-made drawings. Then they connect everything together, without tightening the bolts too much. You can determine the opening angle empirically. To do this, the hatch is opened to the desired angle and marks are made on the metal. Then the area that interferes with the movement of the corners is cut out with a jigsaw.
Now each corner is locked in the desired position. To make the mechanisms identical, first one is completely made, and then all the details of the second are made according to the finished sample.

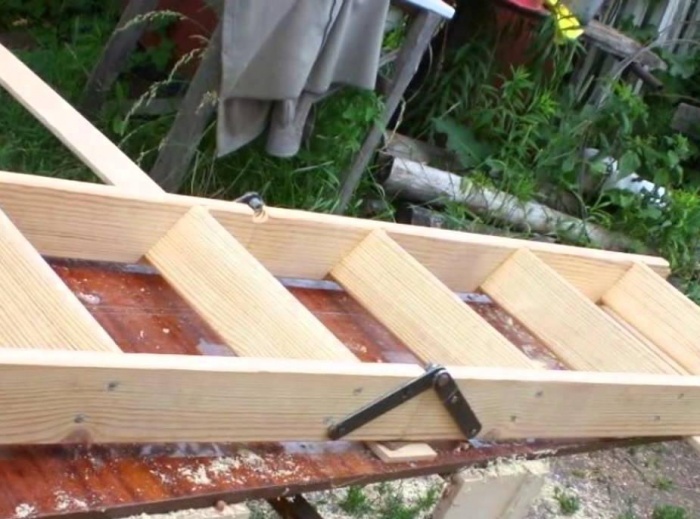
For greater strength, the hatch is connected to the opening by a supporting structure made of corners and metal strips. Pieces of metal are welded to the end of the upper strips, against which the lower strips will abut. The corner becomes a base. The result is a hinge mechanism that is half-bent when the hatch is opened.
Stairs
The staircase itself is made of wooden boards. For bowstrings and steps, an inch board of 100 mm is suitable. The first section is made according to the size of the hatch. The length of the second can be equal to the first section, provided that it does not touch the ceiling during unfolding.
For the third section, the length that remains to the floor is selected. The angle of inclination is measured with the hatch open. Then it must be transferred to the board, marking the steps. Then the length of the sections is marked. All the markup that was done on the first board should be transferred to the second. All lines must be mirrored.
Where the hinge hinges will be located, it is worth drilling holes. The top one is drilled directly at the junction of the fastened boards, the bottom one is drilled on their outer sides. To make the holes look more aesthetically pleasing, you should additionally go through them with a milling cutter.
Then the boards are sawn at the junction of the segments. After that, steps are cut and all elements are ground. Small indentations are made on the bowstrings into which the steps will be inserted. Once all the structural elements are ready, you can start assembling.
March loops
The next stage in the manufacture of stairs is the implementation of loops for connecting flights of stairs. To do this, you need to find 8 metal strips 25 mm wide. On 4 of them it is necessary to weld a small piece of the same strips. Each drilled 3 holes. One will serve as a connection to the hinge, the other - for screwing to the stairs.
To connect the ladder segments, they must be placed on a flat surface. The hinge must be screwed so that the bolt enters a groove specially cut out for it - in the center of the connection of the sections. After screwing the loops, it is necessary to check the section for flexion-extension. Only after the check is done, you can screw the 3rd section. After all the procedures are completed, you can remove the hatch and screw the ladder to it.

Each staircase, regardless of type, should be comfortable. In addition, when performing attic construction, it is worth adhering to the basic rules:
- attic folding stairs should not be more than 3 meters;
- metal steps should be equipped with anti-slip pads;
- wooden models are not installed in too dry or damp rooms;
- mechanisms and fastenings must be strong and reliable;
- from time to time the rubbing parts of the product should be lubricated.
Such rules will be useful in the manufacture of attic stairs.
As you can see, making an attic ladder with your own hands is simple. In the process of its manufacture, certain recommendations should be followed, and before starting work, make a detailed drawing. In the process of work, care should be taken, especially when working in the attic near the opening.


