Any piece of land, be it a cottage or a farm, must be surrounded by a fence. A fence usually performs several functions at once: security, functional and aesthetic. But not every fence can fully comply with these parameters. Often, the unreliability of a structure lies precisely in the materials from which it is made. Therefore, their choice requires careful study of the issue. This article will discuss the features of constructing a fence from corrugated sheets.
Advantages and Disadvantages
Today there is large selection building materials, which makes choosing very difficult. The most popular universal materials, which can be used under various conditions. These include corrugated sheets or, in other words, profiled metal sheets.

There are few disadvantages to using metal profiles, and with an objective assessment they are insignificant and completely solvable. To prevent the fence from swaying under the influence of the wind, you need to select sheets certain markings with greater thickness. Corrosion can be easily avoided by promptly treating the material with a special protective coating. And scratches can simply be painted over.
Corrugated sheeting has more advantages than other similar building materials, and for an ordinary person with a modest income living in the middle climate zone, such fencing material is perfect.

Its main advantages are:
- low cost;
- the ability to install the fence yourself, which will save on hired workers;
- light weight of the material itself;
- long service life;
- durability of texture and color;
- worthy appearance;
- ease of care;
- opacity;
- wide range of colors (about 300 options);
- reflective qualities of a shiny coating;
- UV resistance;
- flexibility and impact resistance;
- fire safety;
- long service life - about 50 years.


It should be noted that few types have such an extensive list of advantages. building materials. Without exaggeration, corrugated sheeting can be called universal and multifunctional.
But these properties can only be assessed if it is used correctly. There is an opinion that metal profile fencing is flimsy and short-lived. Perhaps the reason for the dismissive attitude is the budget price. However, this is a misconception. This building material is clearly underestimated. In addition, such a fence is often cheaper than other types.

By giving preference to a metal profile, the owner of the site will be able to quickly, easily, efficiently and inexpensively build a fence that matches his financial capabilities and taste. Despite the relatively low price, fences made from metal sheets are not inferior in quality to fences made from more expensive materials.

Types of structures
A profiled metal sheet must have a protective coating, which can be:
- Zinc. Coating the material with this metal is the simplest and most cheap look protection. Galvanized corrugated sheeting is one of the most popular materials for cladding and fencing. This is a lightweight, easy to use, easily transportable material. In addition, it will not cause inconvenience during installation. However, professionals do not recommend giving it preference. The sheet quickly rusts, and in sunny weather it heats up many times more than any other coating.

- Aluzinc. When zinc is combined with aluminum, the service life of the material increases.

- Polymer is the most reliable. Polymers are extracted in laboratory conditions from components of paints and varnishes. Sheet metal with this type of coating is obtained from galvanized steel by cold rolling in machines specially designed for this purpose. Expanded sheets with other wave parameters are also available, differing in height, width and stiffness of the ribs. They consist of pigments that are responsible for protecting the surface of the fence from external mechanical damage. The polymer is applied to the corrugated sheet using a roller. It is first necessary to apply a layer of primer to increase anti-corrosion properties.

Advantages of polymer material:
- unusual design;
- ease of care;
- durability and UV resistance;
- long period of use.
Among the disadvantages, it is worth highlighting the increase in cost (by about 15%). Polymer coating provides long-lasting color and smooth texture. There are many types of polymer coating, each of them has its own characteristics.
Types of polymers:
- Polyester – Wavy polyester (PE)– a modern multifunctional component. This sheet is used in both northern and southern regions. Service life – up to 35 years, layer thickness – 25 microns. The fence will be indifferent to external influences, in particular to corrosion, direct ultraviolet rays and precipitation, mechanical and chemical damage. It also has increased heat resistance and prevents the formation of microcracks, which is main reason corrosion. The classic corrugated sheet is covered with a matte polyester layer, which has a matte surface. It gives a more expensive and sophisticated appearance to the fence, which is why it is most popular. Also, matte polyester provides additional resistance to abrasive loads.
A fence coated with this type is ideal for central Europe and Russia.

- Plastisol (PVC). PVC-coated corrugated sheeting has high resistance to mechanical irritants, since its thickness is 200 microns. The texture can be smooth or embossed. This is an ideal option for harsh climatic conditions. However, it is worth considering that the paint will fade over time when exposed to sunlight, so this coating is more suitable for owners of plots in the northern regions. However, plastisol is much more expensive than polyester. Service life – 35 years.

- Polyurethane (PU). Profiled sheets treated with polyurethane provide protection for the fence from ultraviolet radiation, therefore it is recommended to be used where there is a risk of surface fading from sunlight and its damage. It has high resistance to other external factors. Polyamide and acrylic modified PU sheets are lightweight and easy to use. Cracks do not form in places of bends. Another important advantage is the fairly low cost. Service life – 50 years.

- Pural. The latest development of scientists makes it possible to apply a layer of pural 50 microns thick to a corrugated sheet. The service life is 50 years, which is achieved thanks to a wear-resistant layer of resin-based polymer. Corrugated sheets treated with it have the following advantages:
- resistant to sudden changes in temperature (from -60 to + 100-120 C);
- excellent resistance to rust;
- UV and chemical resistant.

- PVDF. This profiled sheet does not wear out over time and is not exposed to moisture, ultraviolet rays, snow or rain, and can be used at temperatures from -50 to +120. PVDF is an environmentally friendly component that is applied in a thin layer (27 microns). The high price of the material is compensated by its excellent properties (for example, resistance even to damage that is dangerous for conventional spraying). Operation period – 50 years.

- Printech– patented technology of Dongbu Steel. The products of the South Korean company are one and a half times more expensive than standard profiled sheets, but have unsurpassed aesthetic properties. There are about 100 types that imitate natural textures - from granite to cut wood. Service life – from 50 years.


- Powder coating. This processing method is the most environmentally friendly. The small component undergoes polymerization under the influence of high temperature, due to which it becomes homogeneous and very durable. Application is carried out using electrostatic influence. The technology allows you to achieve a perfectly smooth coating. The method is environmentally friendly since the amount of waste does not exceed 5%. Layer thickness – from 50 to 300 microns.


Choose suitable material quite difficult for a beginner. However, in order not to make a mistake, it is enough to adhere to the above recommendations of professionals.
The fence can consist entirely of profiled sheets. But for greater stability, it is recommended to build a fence with a plinth, that is, with a strong base. It is necessary not only to increase stability, but also to drain water that may accumulate during heavy rainfall. There are several types of base:
- with a columnar base;
- with a columnar-ribbon base;
- stone.


The option with columns divides the entire sheet of corrugated sheets into sections. And the columnar-ribbon one, in addition to the sections, also adds a foundation along the entire base from below. In both cases, you can use either cement or brick. The stone type of foundation is the most expensive, but at the same time the most reliable. However, the need for such a fence appears only when the fence is built from heavier materials, for example, wrought iron.
The calculation of the required construction tools and materials largely depends on the type of fencing and the number of sections.

Dimensions
Marking "H" applied to products with a thickness of more than 44 mm. This corrugated sheet is suitable for load-bearing walls, as well as for roofing and container manufacturing. Its thickness is quite large. Using this type of fence is impractical and uneconomical.
Profiled sheets with marked "NS" 35-43 mm thick is intended for roofing. They are commonly used as construction site fencing material. IN living conditions increased resistance of sheets of such thickness will not be needed, so you should not stop at this option.
Marking "C" has a thickness of 8 mm and is intended for external decoration of buildings. For the construction of fences and barriers around private houses, a coating thickness of 21 mm is optimal. Despite the lightness of corrugated sheeting marked “C”, it is quite strong and stable, only slightly inferior to materials marked “H” and “NS”.


In addition to the above, there is another type of profiled sheet With marked "MP". This type is considered universal, it is lightweight and inexpensive, it is used both in roofing works oh, and in the construction of buildings for domestic purposes, as well as for the installation of fences. However, a corrugated sheet is best suited for a fence. With marked "C8".

Below are the parameters of the most popular brands of corrugated sheets in the form brand/total width, mm/working width, mm/thickness, mm/wave height, mm/distance between ribs, mm:
- C8/1200/1150/0.4: 0.8/8/62.5;
- C10/1150/1100/0.4: 0.8/10/45;
- C18/1150/1100/0.6: 0.7/18/91.67;
- C20/1150/1100/0.45: 0.7/20/137.5;
- C21/1051/1000/0.4: 0.7/21/65;
- CH35/1060/1000/0.5: 0.9/35/70.
As for the length of the sheets, there are no fundamental restrictions. The seller will cut you material of any length up to twelve meters. It is also possible to obtain profiled sheets above the specified limit, but for this you may need to place a special order.

It is better to choose the height of the fence at 2-3 meters. With such a height, you don’t have to worry that someone will be able to look inside or climb over the fence and get into the site. In addition, loud sounds will not penetrate from the street, and the area will be protected from road dust.
Which one to choose?
The next step after studying the existing types and shapes will be the choice of material for building the fence. When choosing components, we will consider those materials that are best suited for budget structures and will not create problems when assembling the fence even by an inexperienced builder.
Corrugated sheeting marked “C” and “MP” is quite suitable. You should not buy sheets without coating, otherwise, the fence will soon require replacement or updating. Inexpensive polyester will protect iron from corrosion.

Tools and accessories
The design of the fence is not only metal sheets, but also a number of other components:
- support stands in the form metal pipes;
- jumpers-spacers;
- metal screws or roofing screws.


Before purchasing building materials, it is important to know how much you will need. It is enough to calculate the length of the fence as a whole and each side separately, as well as the height of the structure. To determine the number of sheets, you need to divide the perimeter of the fence by the width of one sheet, and then round it up.
The height of the fence is also of no small importance, since the sheet will be attached at a short distance from the ground. The corrugated sheeting must not be allowed to rest on the ground.

Support posts can be used in either round or square shapes. However, it is better to give preference to square ones. Their size should be 50x50 mm or 60x60 mm. For round pipes, it is recommended to choose a diameter of 50 mm. The most suitable wall thickness is 3 mm.
The length of the supports depends on the height of the fence and how deep you need to dig them into the ground. The height of the fence itself will also be of great importance. For example, if the depth of the pit for the stand is 1.3 meters, and the height of the structure is 2 meters high, then a pipe measuring 60x60x3 mm is approximately 3.3 meters.

Theoretically, it is also possible to use wooden posts as bases. Before installation, they must be treated with an antiseptic.
It is also necessary to pay attention to the part of the pole that will sink into the ground: it must be especially strong. It is recommended to first treat it with a blowtorch and then with a bitumen primer.
Usually the distance between supports is 2-3 meters. In areas with strong winds, it is worth reducing this gap. When calculating the number of pillars, it is necessary to take into account that the supports in mandatory placed at the corners of the perimeter and on both sides of the gate or wicket.
If, however, there is a desire to build sectional fence with pillars, then it will be necessary to ensure that one sheet of corrugated sheet fits entirely into each section. It is also better to use profiled pipes as lintels. Determining the required number is simple: to do this, you need to multiply the total number of crossbars by the perimeter of the fence. Logs with dimensions of 40x25x2 mm have optimal strength parameters.

Welding will be required to connect the supports to the joists. If you do not have a welding machine or experience working with it, you can use bolts or special fasteners - “crabs” as an alternative. Working with them is much easier. In terms of reliability, they are inferior to welding, but are irreplaceable if quick and easy installation is required.

And the last thing you need to assemble the fence is roofing screws for metal. The suitable size is 4.8x19 mm. Their number depends on the planned size of the fence itself. For example, for sheets of markings “C” or “MP” 20 mm thick, 4 screws will be required for each crossbar.
If there are two logs, then you need 8 screws, if there are three - 12 pieces. However, such a calculation will be correct provided that the self-tapping screw is screwed correctly into every second wave. In all other cases, their quantity is calculated individually.
To make the fence look aesthetically pleasing, you should choose the color of the screw in the same tone as the fence.

Manufacturing Features
In addition to the main components of the corrugated fence structure, you will also need:
- a drill or shovel to dig holes for the foundation pillars;
- tape measure for length measurements;
- container for mixing the solution;
- level for checking verticals;
- cord for marking boundaries;
- a screwdriver or drill for tightening screws;
- cement marked M200, as well as sand and crushed stone for backfilling the racks;
- a can of spray paint to mask scratches when installing a fence.


It is not difficult to install a corrugated fence with your own hands. There is a universal type of metal profile fence with a simplified structure. However, it is important to understand that if you decide to build a structure yourself, you must take responsibility for performing additional actions that are no less significant than the assembly itself. Before starting construction work, it is important to imagine the type of fencing in the final version. To do this you need:
- draw a drawing of the fence, noting on the diagram the dimensions (height, length in general and individual sections), as well as its exact location;
- assess territorial features (relief, climate, other objects and plantings, if any, communications arrangement); if the ground surface is uneven with a slope, the best option is a stepped type of structure;
- think in advance where the gates, also made of corrugated sheeting, will be located for the passage of vehicles;
- clean the surface of the earth from unnecessary objects and debris, level out small distortions, if any, in the places where the fence will be installed;
- determine the degree of soil stability for support pillars.
In this case, the option of constructing a universal fence without a foundation is being considered. If it is necessary to build a fence on a foundation made of cement or brick, then for this it is necessary to calculate their number.


In general, the structure is made from corrugated sheets with concrete base more difficult to build. The reason for this is the additional hassle of pouring a strip foundation, as well as the cost of reinforcement and hiring a concrete mixer.
Having a mixer machine is not necessary, but it will help you finish the job faster. If the land has soft soil, it is recommended to use a strip foundation, which ensures greater stability of the metal profile fence.
Step by step instructions
The construction process itself should be considered in more detail and sequentially. So, the main stages of work:
- Installation of support pillars and their concreting. First, you need to determine the distance at which the racks will be from each other, and dig holes for each of them. Typically, the distance between pillars is 2.5-3 m. The recommended depth is 1.3 m or 1/3 - 1/4 of the total length of the pillar. The thickness of the gravel-sand cushion should be at least 100-150 mm. First of all, supports are placed at the corners of the perimeter, and then on the sides of the gate and gate. The height along the entire perimeter must be checked with a level.
- After installing the racks, they should be concreted. To do this you need to fill cement mortar the remaining recesses, then fill the cavity of the pipes. Next, the supports are left for 3 days so that the cement has time to harden.


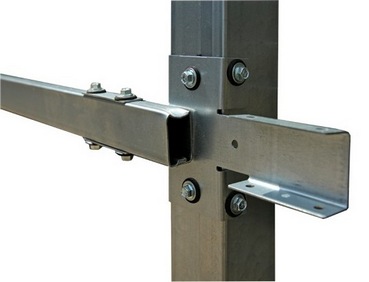
- Installation of logs. This stage can only begin after the cement has completely hardened. The logs should also be treated with an anti-corrosion solution. Next comes the installation of the joists to the support posts. This can be done either by welding or with self-tapping screws. There are three mounting methods:
- butt mounting at the front of the support has proven to be the best method;
- fastening to the back of the post using a bracket is more often used for fences with sections;
- Fixing it on the side of the rack makes it possible to attach both racks and joists to the sheets, which gives stability to the structure, but you will have to spend more time and self-tapping screws.
In this case, professionals advise using a bracket. It connects the support pillar and the joist. This method is considered more expensive, but also more reliable.

- Attaching corrugated sheeting to the base frame. Here you can do without welding. Using special screws or rivets, joining the sheets together will be much more convenient. It is important to correctly determine the position of the very first sheet of corrugated sheeting - it must be placed “overlapping” so that the beginning of the second sheet covers the end of the first, and the third sheet covers the second. This principle should be used along the entire perimeter of the fence. One layer covers another. The sheets are attached along the edges of the transverse joists. Brackets are installed in the center of the sheet.
- The rules for fastening metal sheets require special attention. If you neglect them and carry out installation at your own discretion, then you can soon lose the fence due to wind load. The self-tapping screw is attached to the joist at the bottom bend, and does not connect the sheets from above. Do not tighten them all the way: they can come off and damage the outer surface of the profiled sheet. The main thing is to properly fasten the first profiled sheet. The appearance of the entire fence depends on this, because each subsequent sheet is attached to the previous one.
If for some reason there are gaps or cracks in some places, then they need to be riveted. It would also be a good idea to purchase paint to touch up scratches that occurred during the installation of the structure.

- You can install racks using bricks in several stages. The support pillars are laid out with bricks, and one should not forget about the intermediate lintels. Brackets are placed on the racks at a height of about 30 cm. Then you need to check the level. Horizontal strips are attached to the brackets. After this, all that remains is to screw the corrugated sheets with self-tapping screws.


If you want to fill the foundation of the fence with concrete, then for this you need:
- dig a trench around the entire perimeter of the site;
- make formwork;
- fill it with solution;
- wait until it hardens.
To do this, you will need a flat board measuring 2.5x1.5 cm. The width of the formwork can be chosen as desired; a side of about 20 cm will look neat. Shields are attached to the sides of the trench, and they are connected at the ends with self-tapping screws. This is necessary to ensure that no leakage occurs during the foundation tide.
Next, pegs are placed in the corners of the shields for strength. The formwork should be installed approximately 30 centimeters above the intended cement pouring boundary. If the fence is planned to be made with posts, then the foundation for it must be monolithic. This guarantees the strength and durability of the structure. In this case, we must not forget about the fittings.
Immediately before pouring, it is necessary to check whether the support pillars are level.


If the concrete inside the pipes hardens in three days, then the foundation will have to wait several weeks for readiness, after which the formwork can be removed. Concrete will harden faster if bricks are placed on top of it 10-15 days after pouring. So the density of the foundation will be higher. During the “ripening” process, the foundation should be protected from increased evaporation of moisture. To do this, you need to periodically water the concrete with water from a hose, and then cover it with any film or wood shavings.

Once the foundation is ready, installation of the fence can continue. Pouring a foundation, like building a fence, is not a difficult task, but it is energy-consuming and troublesome, so if possible, it is better to ask a friend or neighbor for help.
This kind of “nozzle” can be purchased in any size in accordance with the dimensions of the main sheet. However, there is an opinion that the untreated end of the fence is an obstacle to the penetration of thieves, because the edges of the corrugated sheet are quite sharp.

In any case, everyone decides for themselves whether to close the top end or not. You need to be prepared for the fact that even with the most accurate calculations, there will still be waste, and this, accordingly, is extra costs. But these are “production costs” and they are inevitable.
Nuances when building a fence:
- Experts advise placing plastic plugs on top of the base posts - this will prevent the appearance of water inside and the formation of rust.
- When purchasing fence slats, you need to make sure that their edges are concave inward. Otherwise, there may be many scratches on the surface of the sheet. Then you will have to repair a new fence.
- Corrugated sheeting is considered a rather sharp material, so it is better to use durable gloves when working with it.
- If you plan to install fences with posts, then one section should be one whole profiled sheet.


- If there are uneven terrain on the site, then you must mark these places on the drawing: this will help to avoid mistakes in installing support pillars.
- When choosing corrugated sheeting, you need to take into account that a regular galvanized sheet will last 20-30 years, and polyester-coated iron will last up to 50 years.
- The bottom of the fence should start at a distance of approximately 100-150 mm from the ground. This will protect the sheet from corrosion.
- If there is an error in the calculations or other subsequent deformations of the structure, small gaps may form. They can be sealed using leftover cement.
- Before installing the supports, it is recommended to treat them with an anti-corrosion coating.


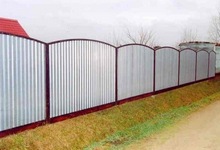
Examples and design options
Although a fence made of corrugated sheets with wooden support posts is used infrequently, it has its place.

The combination of corrugated sheeting with forging or forged inserts looks solid and prestigious. Iron products can put a dent in the family budget, but they are particularly durable and reliable.

Even the most primitive fence can be made visually attractive. Therefore, if the budget is limited and it is not possible to build a fence with a metal ornament, you can do the following:
Insert strips of glass into one or more profiled sheets, which can be vertical or horizontal lines, individual “islands” in the form of circles, squares or other geometric shapes. Any glass will do: frosted, transparent, embossed, smooth, with or without a pattern.

- Apply a pattern along the entire perimeter or on one of the front sides of the fence - it looks unusual and attracts attention.

- Cut off the top edge of the sheet. For example, a wavy line will add personality to the structure and give it a complete look.

Even if the neighbors are the whitest and fluffiest, any home owner considers it necessary to protect his private life from prying eyes. This is why fences are erected. How to make a fence yourself, without helpers, is described in detail in our article.
A fence is a fundamental part of any suburban area. After all, it’s true: what happens in the yard is private life, which you don’t always want to put on display for strangers. Moreover, the safety of personal property located on the territory of the site, the contents of its adjacent buildings, is becoming an increasingly urgent task. One way or another, fencing a private house, at least on its front side, is very important and necessary.
A little earlier, the configuration of the fence and the material from which it was built were much more commonplace. Today, manufacturers offer many options that even listing them would take a lot of time. And yet the most popular can be considered corrugated sheeting, or corrugated sheet. The full name of this material is profiled metal sheet. The fact is that the price of a set of building materials for such a fence is very low for almost any home owner, and the construction of such a fence is so simple to recreate that making a fence with your own hands from corrugated sheets is within the capabilities of any average landowner.
The advantages of a fence made of metal corrugated sheets are obvious, because during its construction you can do without hiring people, buying or renting construction equipment. Obviously, this is why many owners consider such structures to be frivolous and unreliable fencing for their homes. This prejudice is completely groundless, because products made from corrugated sheets have decent quality and therefore very popular among the population.
Installation speed. According to this parameter, there is, perhaps, no other prefabricated structure like this. A person who is not experienced in the construction business does not necessarily need to learn anything special and comprehend all the nuances of the construction business. There is no need to have any special construction tools. You may just need welding equipment, but if you don’t have it and don’t have the skills to handle it, it is quite possible to install it in another way, using commonplace tools and devices that every owner of a private home has.
The fence is continuous. This is not a simple picket fence. The fence completely hides the property of the yard and everything that happens in it from prying eyes. The parameters of the fence - height, width - are chosen by the owner himself. Of course, the dimensions should not be selected at random, but should be clearly measured - meaning that the fence should have precise limitations. It should be taken into account that even a very low fence made of corrugated sheets can perfectly protect the territory from prying eyes. And it’s very good that profiled sheets can be ordered in lengths, be it short or long – whatever the footage.
Many people, barely looking at a fence made of corrugated sheets, think: what kind of protective function can such a simple tin have? If we look deeper, a fence made of corrugated sheets will have such a sharp, cutting upper edge that it will protect against intruders no worse than barbed wire or a more impressive, permanent fence. Anyone can easily cut their hands when trying to climb over. Many people think that such a fence is easy to dismantle. But if a professional attacker wants to penetrate some territory at any cost, he can dismantle any barrier.
The fence is very durable. Of course, provided that all the nuances of its installation and operation are observed, and also if only high-quality materials from trusted manufacturers were used for its construction. Such a fence usually lasts for several decades.
Aesthetics. Having carefully read about how to make a fence from corrugated sheets with your own hands and enthusiastically set to work, you will already see in the process of work how good and laconic it will look. There is nothing superfluous here, everything is smooth and neat. The color is often matched to the roof of the building - fortunately, color options there's no counting here. Such a fence also has a beautiful and neat appearance because the surface of the sheet is covered with special persistent protective substances, which tend to preserve the metal in its original form for many years. Thanks to this, the fence does not fade in the sun, does not suffer from precipitation, and requires minimal maintenance.
Ease of care. If the surface of the fence becomes dirty, it can be easily washed with water from a hose after applying a solution of ordinary household detergent to the fence. By the way, many types of corrugated sheets are coated with special polymer coatings that repel dirt. If contamination does occur, then with the first rain the surface cleans itself.
Noise absorption. Speaking about protection from prying eyes, we cannot say about some sound insulation inherent in corrugated sheets as a fence. Of course it's not soundproofing literally this word, but the good density of the material allows you to protect yourself quite well from street noise, and also will not allow random passers-by to eavesdrop on the conversations of the owners of the yard. Thus, a fence made of corrugated sheets provides not only fencing in physical sense, but also protects the owner’s privacy from prying ears.
In order for the choice to be correct, you need to know not only the properties, but also the types of materials for constructing a reliable fence. Let's figure out what corrugated sheeting is.
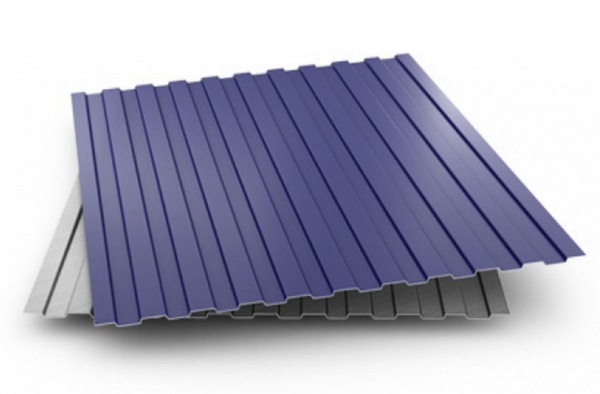
This is a steel sheet (thickness varies) that has a zinc, aluminum-zinc shell that protects against corrosion. In production, such sheets are rolled through a machine, which gives them a certain profile. The purpose and application of this sample depends on the thickness of the sheet and the shape of the profile.
Corrugated sheeting is divided into several types. When choosing, markings with alphabetic symbols (they indicate the purpose of the product) and numbers (which indicate the dimensional values of the material) are always taken into account. So, let's look at the types of corrugated sheets.
"N". This material is used for load-bearing structures in construction. Such canvases have a pronounced high profile with additional stiffening ribs and longitudinal grooves. It is used as a base for walls and roofs, permanent formwork for monolithic installation, containers are made from this profile. It is clear that such corrugated sheeting for a fence in an ordinary residential building is completely unjustified.
Corrugated sheet "NS"- something between the material for load-bearing structures described above and sheets for mounting walls. The wave profile here is already lower - 35+40 mm, the thickness of the material is also smaller. It is used as wall cladding, and also as a loaded element on buildings of not very large size. Can serve as a roof or be mounted in the form of canopies. This type is also widely used for fencing large areas and for construction. This product is truly durable and versatile. But, accordingly, it is quite expensive to build fences from it for a simple private house. High performance the strength of such a product will simply remain unclaimed here.
Profiled sheet "WITH". This is a material intended for wall decoration. The profile height here is small, the sheet thickness is insignificant. The price is affordable. It’s just right for fences: the fences will be reliable, durable, and lightweight. For this purpose, it will be enough to choose a metal with a profile height of no higher than 21 mm.
Profile sheets "MP". There is quite a wide range of products on the market. Its popularity and versatility in use are obvious: it is used to install lightweight roofing coverings, outbuildings, and sandwich panels with insulation function. Perfect for building a fence.
If we talk even more about the types of corrugated sheets, we should tell you how to read their designations. Double digit number after the letters it shows the profile height, after which numbers are written that indicate the useful width of the sheet in millimeters. That is, this is the distance that the sheet occupies after installation, without areas for overlap with the adjacent sheet. Therefore, if you are calculating how many sheets will be needed for a fence, you should focus on this last figure.
Examples of designations for types of corrugated sheeting:
- S8x1150 (A,B) - for cladding walls and building fences;
- MP18x1100 (A,R) - roof covering and construction of fences;
- MP18x1100 (B) - wall cladding and fence construction;
- MP20x1100 (A, B) - wall cladding and fence construction;
- MP20x1100 (R) - roofing;
- S21x1000 (A) - roofing, construction of fences;
- S21x1000 (B) - wall cladding and fence construction;
- NS35x1000 (A) - roofing and construction of fences;
- NS35x1000 (B) - construction of fences;
- MP35x1035 (A) - wall cladding and fence construction;
- MP35x1035 (B) - roofing and construction of fences;
- MP40x1000 (A) - wall cladding and fence construction;
- C44x1000 (A) - roofing and construction of fences;
- S44x1000 (B) - wall cladding and fence construction;
- H60x845 (A) - roofing, construction of fences;
- H60x845 (B) - load-bearing structures, permanent formwork, construction of fences;
- H75x750 (A, B) - load-bearing structures; permanent formwork, construction of fences;
- H114x600 (A, B) - load-bearing structures, permanent formwork.
As for the thickness of the sheet, it can also undergo changes, even in the same type of profile. Sometimes this indicator is indicated when labeling a product, as a fractional number. If, for example, it says “0.6”, this means that the sheet steel in this profile has a thickness of 0.6 mm. For erecting fences around local area Usually a sheet with a thickness of 0.45+0.6 mm is used. This is quite enough for reliability.
Based on the above, for construction simple fence From corrugated sheets, the best solution would be to choose sheets marked C (wall) or MP - a universal sheet, the wave height of which is 18+21 mm. Sometimes they are used with a shallower wave height - 8+10 mm, but for reliable fencing such material will still be rather weak, especially considering the climatic conditions in which the building is located. Under the pressure of winds and hurricanes, such a thin fence may not withstand. Well, if you want to choose a profiled sheet with a wave height of more than 30 mm, this is also not worth doing, since this is simply an extra expense without any particular practical benefit for the owners.
It is unlikely that there will be many people who want to make a fence for their site from simple galvanized steel - it will look unaesthetic, too simple and uncomfortable. Instead of habitability, the impression will be created of some kind of temporary unfinished housing, eternal construction. So that the fence gives a feeling not only external protection, but also calm isolation, comfort, it should be mounted from sheets with a polymer coating.
What types of corrugated sheeting are there?
Polyester. The most affordable, where the cost does not mean low quality. This protective and decorative coating is quite resistant to temperature changes, perfectly protects the metal from corrosion, does not collapse under the aggressive influence of sunlight, and does not fade in the sun. Thanks to these qualities, the product remains in its original form for many years. However, polyester still has a significant drawback: it is easily scratched if handled carelessly. Unfortunately, it cannot withstand high abrasive loads.
But if you want to choose polyester, which is fully justified by its price, aesthetics, and protection, then it is best to choose a matte finish rather than gloss. In this case, the coating turns out to be more resistant to abrasive influences, and small defects will not be so visible on its surface. It also looks more pleasant due to the fact that it does not produce glare in bright sunshine. Another plus: profiled sheets treated with a matte polymer coating have an interesting textured pattern that will pleasantly fit into the design of your site.
Pural coating. This coating is based on pural - a multipolymer composite that combines best qualities polyurethane, acrylic, polyamide, which are included in it. This is a higher level of quality and durability of a product wearing a coating of this kind.
Corrugated sheeting with a pural coating usually lasts up to 50 years without losing its aesthetic qualities. Stable resistance to external aggressive factors environment allows it to remain in a beautiful, original form for a very long time. Such sheets are often used for roofing work. For a fence this is also just an ideal option. But given the very high cost, which is many times higher than the price of a polyester-coated sheet, using this type is too expensive and impractical.
Plastisol coating. This material is based on polyvinyl chloride. It is valued because it very reliably protects the sheet from various external influences, including the action of abrasives on it. With such a coating, profiled sheets have a very beautiful design. A wide range of design varieties, many color and texture solutions, which often imitate natural materials - all this makes corrugated sheets with this coating very popular among designers.
But the plastisol coating still has disadvantages, and they are quite significant. For example, it does not like high temperatures, so it is not recommended for use in hot regions. Regarding resistance to sunlight, there is a tendency to fade on the sunny side. Therefore, if you plan to use plastisol on the sunny side, it is better to choose the lightest possible shades, then the loss of color will not be so noticeable.
Plastisol corrugated sheeting is mainly used for roofing work. The construction of a fence from this material is still in doubt due to the disadvantages described above. Although, if we talk about durability and reliability, then this is perhaps the most reliable protector from storms, hail and other natural influences.
PVDF coating. It is a composite composition based on acrylic (approximately 20%) and polyvinyl fluoride (approximately 80%). This is truly a winner in terms of durability and longevity. Resistant to any aggressive external influences. Service life - more than 50 years. Suitable for any climatic conditions, feels great under any operating conditions. Not destroyed due to chemical influences in areas with unfavorable conditions associated with industrial emissions into the atmosphere.
There is only one drawback - the high price, due to which there is no need to talk about the widespread use of such products. After all, it is much more profitable for an ordinary home owner to buy polyester flooring, which is affordable. Very often, for a fence, sheet footage is purchased with some reserve, so that the damaged areas can later be repaired by replacing them with new components.
Having planned the construction of a fence, you should sketch out a diagram that will help you build an even and beautiful fence from corrugated sheets with your own hands; you can see the video in our article. Overly complex designs do not always justify themselves and require greater skill, greater investment and scale of work. Main task of this article - to teach how to do the usual neat and strong fence from corrugated sheets with your own hands. For example, a simple fence made of corrugated board according to a scheme without a foundation.
To install such a fence, a common fence is not made for the entire length of the fence. Each support pillar will be dug in separately. If everything is done correctly and accurately, this fencing option turns out to be strong and durable.
A hole is dug or drilled for each pillar in the form of a well. In order for the fence to stand firmly and not deform, it is necessary to make the depth below the freezing level of the ground. For example, if in a given area the ground freezes to a depth of 0.8 m, then the depth of the well should be approximately 1.3 m. It is best to check this parameter with local construction companies, since the specific composition of the soil in a given area plays a significant role in determining the depth of the well .
Installation of support stands. For supports, metal pipes are used - both round and rectangular or square in profile. It is most convenient to install a square section of 50x50 or better 60x60, the wall should be 3 mm. If the pipes are round, you need to take a diameter of 50 mm or more.
Concreting a well with a stand. The well is filled with sand and gravel and concreted.
Attaching jumpers to racks. Jumper logs are attached to the posts using welding or mechanical means. For 1 post you will need as many jumpers as the fence is high. For example, if the height of the fence is planned to be no more than 2 m, then attach 2 jumpers per post - at the top and bottom. At the same time, 250-300 mm retreat from the edges of the fence. If the fence is higher, then another jumper is needed in the center of each post. If the fence is very high, then the approximate ratio of the distances between the lintels and joists is as follows: lintel per meter of height.
Attaching corrugated sheets to pillars using jumpers. The corrugated sheets are attached using roofing screws with an overlap in one wave. Fasteners are installed through one where the lower part is adjacent to the cross member.
This scheme is quite simple if you carefully follow the tips for installing such fences.
When deciding on the amount of materials, you must first determine how long the fence will be required. The total length should be calculated, as well as the length of each side. Next, you should think about the height of the fence.
How to determine the number of corrugated sheet elements. This is not so difficult to do: you should divide the perimeter of the fence (the sum of the lengths of all sides) by the usable width of the sheet. Round the resulting figure upward. The length of the sheets depends on the height of the fence, which is planned by the customer. It should be taken into account that the sheets will be attached to support posts with some clearance from the ground surface. This clearance can be approximately 100-150 mm. It should be remembered that the profiled sheets should not rest against the ground.
Determining the number and length of fence posts. The length is calculated based on the depth of immersion in the ground, plus the planned height of the fence. For example, if the depth of the well is 1.2 m, and the planned height of the fence is 1.5 m, then the total length of each 60x60x3 pipe-rack is 2.7 m. During installation, the fence is raised above the ground level, so the upper parts of the racks will be outside not visible.
What should be the distance between the posts? The distance is 2-3 m if it is an area with calm climatic conditions, protected from wind and squalls. In areas where there are often strong winds, support stands are placed at a shorter distance.
If you plan to install a solid fence, then the length of the gaps between the posts may not be the same everywhere. If the fence is installed in sections, that is, each of the spans is filled so that the column is visible, it is better that several whole profiled sheets are placed in one section. In extreme cases, the number of corrugated sheets can be a multiple of half a corrugated sheet. If done differently, a lot of material will be wasted.
The number of racks is calculated on each side of the house, taking into account the distance between them. After which the exact interval in centimeters is calculated, so that during the work you can act according to this maximum precise marking.
Total quantity profile pipe, which is best suited for lag crossbars, is determined simply: the perimeter of the fence is multiplied by the number of crossbars. As for the cross-sectional dimensions, some clarifications need to be made here.
Most often, pipes of 40x20 mm are taken for such purposes; many purchase such products with a cross-section of 1.5 mm. But after, due to the insufficiently dense section, installed fence It turns out not very stable, it starts to wobble in windy weather. This is because these pipe parameters are not good enough for such an application.
The best load-bearing lintels are made from a pipe with parameters 40x25x2.0, although it is also possible to take 40x20x2.0. The first, although slightly increased in size, has a lateral rigidity of the enclosing structure that is one and a half times greater than the second. In areas with frequent strong gusts of wind, this is especially noticeable.
The logs are connected to the support posts by welding. This fact also favors a pipe with a wall of 2 mm. It is very difficult to weld a one and a half millimeter steel pipe without burning, especially for a novice welder. The “two” will be welded without problems.
Weldless fastening. This is a bolt-on mount. It is used in cases where there is no welding equipment, or the owner is afraid of ruining something with inept welding. Fastening with bolts is carried out as usual; all home craftsmen know this.
Another tip is to buy special “crabs” - fastenings that will simplify the solution of this problem. This bracket is very easy to install. This is done using roofing screws, which are used to fix the corrugated sheet to the cross-beams.
Of course, such fastening is slightly inferior in strength to welding, but in terms of simplicity of execution it is completely justified. The only caveat: if the crossbars are mounted by welding, they can be combined at any points. If the fastening is mechanical, then the profile pipes will have to be redrawn so as to join them exactly on the support pillar.
Profile screws. Definitely needed for attaching corrugated sheets to joists. Their number is calculated depending on the size of the fence and the nuances of its configuration.
For example, if you screw screws into every second wave, then for C20, MP20 you will need 4 screws per crossbar. With two lags - 8 pieces each, with three lags - 12 pieces each.
If you use a high-quality screwdriver, the self-tapping screws with their countersinking tip-drill fit perfectly into the base without pre-drilling holes. The hexagonal head distributes the rotation, a press washer equipped with a rubber gasket protects the joint from moisture, which can lead to corrosion of the metal in the place where the holes are made in it.
A wide selection of self-tapping screws helps you choose them to match the color of the corrugated sheet. In this case, at the joints of the sheets they become almost invisible. To install fences, it is best to buy self-tapping screws with a diameter of 4.8 mm. The length may vary, but the most optimal is 19 mm. This length allows the self-tapping screw to pass through the metal and one wall of the profile pipe-rack without resting against its other wall.
If installation is carried out on crab brackets using self-tapping screws, you should buy them with some reserve.
Cement, sand, gravel (crushed stone). All this is needed in order to fill and concrete the support pillars. When calculating the quantity, you should take into account the number of pillars and the depth of the wells for installation.
Tools. Everything is very simple: a shovel, a drill, a container for mixing concrete, a tape measure, a level, a marking cord. You also need a screwdriver or drill with good speed control and a head of 8. Even better if you have a welding machine. In order to cut metal and clean profile pipes from corrosion before priming, you need a grinder. It should come with a brush with extra bristles.
The work also requires other devices, which will be mentioned below in the description of the fencing installation process.
Let's look in detail, step by step, at how to make a fence from corrugated sheets with your own hands; you can find the video here. This description made by a master who own experience I learned all the subtleties and tricks of this process, so as not to call on any craftsmen for help. Of course, sometimes you need help, but there are different situations when even such a voluminous work has to be done alone.
Terrain marking. Pegs are installed at the two extreme points of the fence. A cord is stretched between them - this will be the fence line. Next, you need to remove all obstacles to work in the area of this line - debris, stones, large plants.
We install two foundation pillars, which for now will mark one side of the fence. They must be on a strictly horizontal line with their upper parts. And they should be installed slightly higher than the planned height. This will help make the next steps easier. Later they can be trimmed after the concrete has hardened. These pillars are installed in the same way as other supports.
To prevent the fence from becoming deformed in the future due to winter soil uplift, concreting is carried out at the very bottom of the well. If the ground freezes, then the support will remain in place, since the action of tangential forces will occur above the concreted area. This will give a good guarantee and stability for the entire structure throughout its entire service life.
So, as already mentioned, first two pillars are installed at the borders and connected with a rope. After being carried out preparatory work After cleaning the fence line, the rope can be removed. The designated points are used for drilling wells and installing supports. The diameter of the drill should be 180-200 mm with a pipe diameter of 60x60. This is necessary in order to make a good concrete belt for the post, thereby ensuring a reliable installation. It is not worth working with a drill having a larger diameter, as this will require additional physical costs, more concrete mortar to the same initial result.
Cleaning of pipes from rust and plaque is carried out before installation - right now it is much easier to do this than after it. After cleaning, the products must be immediately coated with anti-corrosion coatings or painted.
Installation of end posts. They must be positioned strictly vertically. It is necessary to control both the longitudinal and transverse lines. To do this, it is best to use a building level with a magnetic platform, which is attracted to the pipe to free the installer’s hands. An even more accurate result will be achieved if two levels are used so that two planes can be controlled at once.
After installing the outer supports and trimming them to one horizontal line, an action is carried out that can be called a useful trick. The fact is that a string is stretched in the center of the cut posts (this can be a steel wire with a diameter of 1 mm). On the one hand, it is tied to the top of the post to a loop welded to it or inserted into a drilled hole. Be sure to go to the top of the pillar! On the other support, the wire is only inserted into the eye or hole, but not tied, and a counterweight is hung on the threaded end. These can be bricks, or a weight, a blank - an object weighing 15-20 kg.
The result is an ideal layout of the fence, which can be erected along this even line without fear of “mowing” somewhere.
We determine the installation step of the supports. How to do this was described above. Let’s say that the calculations result in a value of 2.9 m. We measure this distance using a tape measure from the first support. The center point of the new support will help to fix a new plumb line - an object suspended on a string with a hook. This can be a nylon cord or a steel chain with a weight. The plumb line shows exactly where to drill the next well. Moreover, it accurately shows the center of the well.
We are digging a well. Before drilling, you should dig a small hole, the width and depth of a shovel bayonet. Next, we drill the hole with a drill. After deepening the tool by 100-150 mm, the drill is removed and soil is selected from the resulting hole. In order to keep the “workplace” in order and make it convenient to work, it is best to immediately throw the soil into a wheelbarrow and take it away.
We deepen the drill further, but its length is shorter than the planned depth of the well. To do this, we take a piece of steel pipe as an “extension” of the drill. We screw the “extension” into place of the transverse handle. On the other side of the “extension” we screw the handle. Now the length is enough to drill a deeper well.
If, when drilling, the tool encounters difficult-to-pass layers, the obstacle should be removed with a sharp reinforcing rod with a diameter of 20 mm. If you encounter clay, you can add a little water to the hole.
Another problem when working with a drill: the tool may inadvertently deviate from the vertical direction. To do this, it is necessary from time to time to lower a plumb line into the hole, which should be located there in the center.
Approaching the planned depth, measurements must be taken from time to time. The depth should not be measured from the ground line with a tape measure - it may be uneven.
Measurements are taken from the same string. It is better to use a laser tape measure, placing it on the string and directing the beam to the bottom. If the depth is insufficient, you need to continue drilling. If by chance it turns out deeper, you can pour a little clay there and trample it thoroughly with the help of a long beam.
As for laser roulette, not everyone may have it. If you don’t have one, you can use a long stick prepared in advance, on which a line is drawn indicating the desired height. The position of the line relative to the string will indicate whether the well depth is sufficient. All these subtleties are necessary to ensure that all the columns fit perfectly along the top horizontal without additional trimming. Which, of course, will greatly simplify further actions.
So, the pipes of the required length are cut, the wells are dug. For closer contact with concrete, small pieces of iron can be welded to the pipe walls at the pouring site.
Installation of pillars and pouring concrete belt. It is best to do this immediately after drilling a well, in order to avoid littering the holes and flooding them with water. We install the pipe in the center. The top runs exactly along the string. Adjust the bottom side for level. Next, the vertical is adjusted along the plane of the fence. We fix the pipe with temporary supports. The solution is prepared at the rate of: M400 cement, sand, fine gravel in a ratio of 1:2:4. It is better to mix it in a trough without a concrete mixer. To fill about 1 m deep you will need about 30 liters of solution, or 3 buckets.
When pouring the solution, make a bayonet - pierce the fill with a reinforcing rod to remove air cavities. The height of concrete poured into the pit is controlled using a rail with a mark that corresponds to the calculated height from the concreting level to the ground surface. After pouring, the stand is left alone for a day. At this time, they are digging another well and installing the next pillar.
After 24 hours, the concrete should set well and you can continue filling the well. It is also worth checking the position of the support once again.
The upper part of the well is filled with sand and gravel. When any soil freezes, as a rule, it swells and lifts what is built into it. A loose mixture of sand and gravel (PGM) is not subject to such influences. Pour the mixture 50-70 cm thick, then compact it well using a wooden stick or the handle of a shovel. All this is done until the hole is filled to the very surface of the earth.
The master, who shares here all his secrets on how to make a fence from corrugated sheets with his own hands, step-by-step instructions, recommends filling the inside of the pipe with cement mortar. In this case, the structure will be more resistant to corrosion, and the strength of the fence will increase. Filling a 60x60 pipe will require a solution slightly larger than a bucket - approximately 13 liters. You can fill it using a homemade funnel from a plastic bottle. The funnel is filled with a trowel, and the seal is made with a long reinforcing rod.
Many people probably consider this action unnecessary. But the quality of the fence will undoubtedly improve. Moreover, concrete removes heat, and it will not be so easy to burn a hole in the pipe. You can not concrete the pipes, but simply close the hole on top with special plugs made of metal or plastic. One way or another, the support is ready.
Once all the pillars are installed, you can remove the string and begin installing the joist jumpers. There is one secret that allows you to do this with maximum accuracy. To do this, two simple conductor devices are made from ordinary boards.
The top of the jig is a groove with a top board in order to put the structure on the pole. At a certain distance, which is dictated by the position of the jumper in relation to the end of the post, a shelf is screwed in for laying the top pipe.
The lower part of the conductor is used to lay the lower jumper. The second conductor is made in the same way; it must be symmetrical to the first. Both conductors are hung on two poles located nearby. Start from the second corner. Fits on the lower shelves horizontal pipe, is leveled. It should reach the corner post.
If the top of the posts is aligned with the string, it is level, and if the jigs are made the same, the jumper will also be in a perfectly horizontal position. The pipe is then lightly welded to the supports. Exactly the same operation with the pipe for the joists is done at the top. After tack welding, the conductors are removed and moved further to other fence supports. And the supplied pipes are welded firmly, forever.
So, the master assembled the frame for the fence without outside help, making everything perfectly even and neat. This work serves as proof that even such a seemingly labor-intensive task as installing a fence can be done without hiring labor force, saving money. At the end of the installation of the frame, excess slag is removed from the welding areas, and the entire structure is painted.
Installation of corrugated sheets on the frame can also be done without anyone’s help, and also using some devices for ease of work.
First of all, a conductor is made from boards. To do this, take one long board that will serve top part. The support board is used to move along the upper beam; its thickness should be equal to the width of the profile pipe. The second board should rest against the side edge of the profiled sheet, its lower cut will run along the middle of the height of the profile pipe. The thickness of the board corresponds to the height of the profiled sheet. The top plate makes a groove for the sheet, in which the sheet is held until final fixation using self-tapping screws.
The lower part of the jig has a shelf that helps measure the distance of the sheet from the ground. You also need a homemade clothespin with a wedge-shaped cutout - it will serve to temporarily fix the sheets in places where they overlap. A set of boards with wedges is also being prepared different thicknesses, from which you can build an excellent adjustable stand for the side of the sheet, which must be combined with the previous sheet. Such a device will constantly move under the next mounted sheet as work progresses.
We place the planks under the edge of the last sheet, which is already installed on the pillars, so that the sheet rests against them. To do this, insert a wedge between the planks. Using a wedge, this support can be adjusted to required height. Some craftsmen, instead of a wedge and boards, use a trapezoidal jack, which every motorist has, which is also very convenient.
A conductor is hung along the far cut of the profiled sheet that is being installed. The sheet is inserted into the groove, the lower edge rests against the shelf. The required height position of the sheet is ensured. Advice: it is better to do this work with gloves, as the edges of the sheet are sharp and you can cut your hands deeply.
If the jig is installed accurately, the waves of two adjacent sheets will exactly coincide. At the bottom, the edge in the overlapping sheets will rest against a support made of planks. Now all that remains is to fasten the sheets on top in places where they overlap using a homemade clothespin. How to do it is described above. This fastening securely holds the sheet; even the wind cannot disturb this position. And the master’s hands are free.
Now you can start marking for installing screws. Take a ruler, preferably a plastic one, you can make it from an unnecessary PVC panel for cladding. It will not scratch the paint of the corrugated sheet; its light weight helps the master to easily manipulate it. To prevent the plastic from sliding on the surface, you can stick a patch or electrical tape on the back side. When installing the ruler, you should focus on the already installed screws and the middle of the profile pipe.
The places where screws need to be screwed in are marked with a marker. All this is done both along the upper and lower lines of the jumper.
After the markings have been made and the sheet is held well in the desired position, you can finally fasten it with self-tapping screws. Special roofing screws secure the sheet without pre-drilling it. To avoid the self-tapping screw slipping or being pulled in the wrong direction, or to prevent kinking, it is still better to slightly drill a small hole with a drill with a 3.9 mm drill bit. You should start from the outermost screws, which are already on the pre-installed sheet. First, a hole is drilled, then a self-tapping screw is screwed in. The same is done on the upper jumper pipe.
When the sheet is fixed at the edges, you can already make holes for the remaining fasteners. Then the screws are screwed in along the entire length of the blade. In order not to reach for a new screw every time, there is one more trick. You can tie a magnet from the speaker of some old radio to a ribbon, attach a whole bunch of screws to it and hang it around your neck. Now you can quickly grab screw after screw and screw in one after another without any extra effort.
It is very important to adjust the screwdriver stroke well so that the screws are screwed in well and evenly. Neither weak nor strong tightening will provide good fixation. If you tighten it too much, the screw will go very deep, which can cause the sheet to become deformed; if it is too weak, it will remain sticking out of the sheet, which is also unacceptable. In addition, it should be ensured right direction screwing in a self-tapping screw, which affects not only the strength of the joining of sheets, but also the aesthetic appearance of the structure itself.
By the way, if you still have to drill holes, you can advise purchasing steel rivets instead of self-tapping screws. It is best to use a steel riveter for fastening; it is steel that will provide the fastening with a long life without corrosion. If you use riveters made of some alloys, then in this case it is not necessary to guarantee the anti-corrosion of the fasteners. In addition, such fasteners, unlike self-tapping screws, will certainly not be unscrewed by some “well-wisher”.
Next, the conductor is moved to another place, the stand from the planks is removed to move it to another place, where a new sheet is installed - and so on until the very end, until the entire fence is installed. The last sheet is sometimes cut to width, this is done with metal scissors. Urgent advice: do not use a grinder for this - it can ruin the surface, damage the coating, melt under high temperature cut edge, which can lead to corrosion in the future.
A detailed description of how to build a fence from corrugated sheets with your own hands without outside help can provide excellent practical results if:
- learn how to choose the right material for building a fence;
- acquire knowledge about markings and types of corrugated sheets;
- prepare correctly for this process: collect necessary tools, parts, materials, make recommended devices
- carefully read the article, watch the video and believe that all this is possible
Fences for houses and cottages made of corrugated sheets: which type is better to choose?
Options for fences made of corrugated sheets can be divided into metal and combined. Fences combined from corrugated sheets include several different materials.
Metal fence made of corrugated sheetsThe simplest and least expensive. Sheets of corrugated sheets are fixed to a metal frame and form a continuous strip. Perfect for the garden and garden. |
 |
Sectional or modular fences made of corrugated sheetsEach sheet is framed by a rectangular or shaped metal frame. The sections are welded to metal posts using tapes. The fence looks neater and more finished than a regular metal one. |
 |
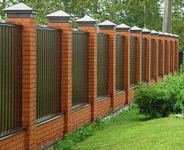
Brick fence with corrugated boardA more expensive and labor-intensive option, but it looks very solid. The sheets are fixed between square pillars lined with decorative bricks. |
 |
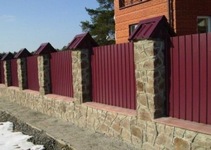
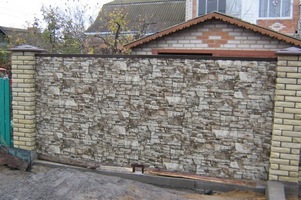
Fences made of stone and corrugated boardSheets are placed between concrete pillars finished with stone. You can also decorate a concrete foundation with stone. |
 |
Fences made of corrugated sheets with forgingVery beautiful decorative fencing. The sheet is framed with elements of artistic forging. Each section is installed between brick, concrete or metal pillars. |
 |
Attention! When building a fence from corrugated sheets with your own hands, you should not tackle combined options, if you do not have the skills to pour a strip foundation and lay bricks, and also if you have a limited budget.
Preparing the tools

To build a fence from corrugated sheets, you will need the following tools:
- tape measure (at least 3 meters);
- hole drill (manual - for light soil, gasoline - for heavy);
- sledgehammer;
- level;
- cord;
- welding machine;
- drill or screwdriver with a hex bit.
Attention: working with a welding machine requires special training. If you do not have the skills, it is better to invite a professional. You can also use installation technology corrugated fence without welding! The most reliable way to fasten logs to poles is with galvanized clamps, which are tightened with self-tapping screws.
What components do we need for a corrugated fence?
1. Corrugated sheets for the fence
Which corrugated sheeting for a fence is best to buy? In terms of size, everything is simple:
- fence up to 2 meters - you can buy corrugated fence sheeting with a corrugation height from 8 to 21 mm (C8, C10, C20, C21)
- a fence over 2 meters and with increased wind load - the height of the corrugation is at least 20 mm (C20, C21).
Thickness corrugated sheeting for the fence - at least 0.5 mm.
Width corrugated sheeting for the fence depends on the height of the corrugation.
Height corrugated sheeting for the fence - standard - 2 meters, the most common range is 1.8 - 2.2 meters.
It remains to decide type of corrugated sheet. Practice has shown that best option - double-sided corrugated fence— galvanized sheet with double-sided polymer coating. Such a fence will look great from any angle and, if handled carefully, will serve you for many years.
Take note! The design of a fence made of corrugated board can be made quite interesting. Today, corrugated fences imitating stone and wood are gaining popularity.

2. Fence posts made of corrugated board
Round or profile (rectangular) pipes are used as pillars. They are available with or without painting. If you want to build cheap fence from corrugated sheets, you can use used pipes, but without corrosion.

Parameters:
Thickness metal for pillars 2-3 mm (used pipes - 2.5-3.5 mm).
Diameter round pipe for a fence made of corrugated board - 5-7 cm.
Section profile pipe - 4*6 or 6*6
Height pipes - fence height from the ground surface + 50%
3. Cross joists
The logs are attached to the posts and will serve as a base for the fence sheets. Usually they use a profile pipe 40*20 or 40*25, with a metal thickness of 1.5 mm.
 4.
Fasteners
4.
Fasteners
Most often, galvanized self-tapping screws are used for corrugated sheeting on the fence. They have a rubber gasket for a tight connection, and the top is coated with polymer coating to match the color of the leaf. Most running size self-tapping screws for fence 5.5x19 mm. With this length, the sharp end remains inside the profile pipe of the log.
We make calculations for a fence made of corrugated sheets
For a simple metal fence made of corrugated sheets material calculation is performed as follows.
Number of sheets = fence length: useful sheet width + 1-2 spare sheets.
Number of posts = fence length: distance between posts + 1.
Attention! The length of gates and wickets is not included in the length of the fence. They also require sheets and posts. It is easier to make the frame of gates and gates to order.
Number of logs = (number of pillars - 1) * 2 (if there are 3 transverse logs, then multiply by 3).
Number of screws = number of sheets * 6 (to increase strength, the number of screws can be increased).

Materials have been purchased. It's time to learn how to make a fence from corrugated board.
Installation of a corrugated fence in 5 steps
1 step. Clearing
The site for the fence is cleared down to the ground. If possible, you need to level the ground.
Step 2. Marking
We drill holes at the corners of the fence and install pillars in them strictly vertically. You can check the vertical accuracy with a level or plumb line. Between them we stretch the twine cord in 2 rows (it’s better to keep it vertical). We will install the remaining pillars along this line. It also allows pillars to be at the same level (in the absence of terrain slopes).

Step 3. Installation of pillars
Along the cord line at regular intervals (standard 2.5 or 3 meters), it is necessary to drill cylindrical holes for the posts. With a fence height of 2 meters, the depth of the holes is 1 meter. The most important question when installing a fence made of corrugated sheets is: What is the best way to secure the pillars?
 1 way
1 way
Hammering into the ground with a sledgehammer. Suitable for light fences that are placed on fairly solid soil. Here the diameter of the drilled hole should be slightly smaller than the diameter of the pipe.
Method 2
Partial concreting. The most optimal solution for a summer residence. The post is set level, then filled with ½ or ⅔ of the hole with soil and compacted tightly. The remaining space is filled with concrete. For strengthening, instead of earth, you can use a mixture of crushed stone and sand.
3 way
Butting. Instead of concrete, the hole is filled with small crushed stone, which is compacted with a vibrating plate. This method prevents pillars from bulging on clay soils, which occurs when inland waters freeze.
4 way
Full concreting. Suitable for light soils. The entire hole around the post is filled with concrete. A cushion of crushed stone and sand will also not hurt in this case.

Useful advice. At high levels groundwater waterproofing of the hole is required. It can be done by laying the walls and bottom with roofing felt.
Other installation methods are considered time-consuming and costly. They are suitable for permanent fences of country houses. These include the installation of a strip foundation under a fence made of corrugated sheets, as well as the installation of a fence made of corrugated sheets on screw-type piles.
Step 4 Installation of cross beams
The logs are welded perpendicular to the posts. The places of fastenings are pre-measured.
Attention! The distance from the log to the edge of the sheet should be 20 cm.

After welding, you need to thoroughly clean the seams and apply paint to them, otherwise corrosion cannot be avoided. If you decide to install a fence made of corrugated sheets without welding, galvanized clamps will not require painting and will provide additional protection.
Step 5 Fastening corrugated sheets to the fence
 The corrugated sheet is secured to two joists using self-tapping screws. The work needs to be done by two people, protecting their hands with construction gloves (the edges of the sheets are quite sharp). We fasten the sheets from the gate or wicket with outside. First you need to draw a straight line with chalk along which the screws will be screwed. There are 4 self-tapping screws per lag on one sheet. The outer ones simultaneously overlap adjacent sheets.
Watch the video about installing corrugated sheets, which explains in detail how to fasten the sheets.
Tip: The top line of the fence can be strengthened and decorated with a U-shaped strip. It will give the fence a finished look. You can use contrasting colors.

So, your corrugated fence is ready
All that remains is to clean it and enjoy the work you did with your own hands. We also invite you to watch a video where the gate construction process is shown inside and out.
One of the most inexpensive fences for a summer house or private home is made from corrugated sheets. Its design is simple - dug-in pillars to which transverse joists are attached. A corrugated sheet is attached to this grille using self-tapping screws or rivets. Everything is really simple, especially if you know how to use a welding machine. Although there is a technology without welding - on bolts or on wooden crossbars. In any case, you can build a fence from corrugated sheets with your own hands. If necessary, you can do all the work alone, but when installing sheets it is more convenient with an assistant.
Construction with metal posts
The simplest production is a fence with metal posts dug into the ground. You can use round or square section, but it is more convenient to work with square - profiled ones.
The length of the pillars is taken depending on the desired height of the fence, plus 1 to 1.5 meters are added for penetration into the ground. It is necessary to bury it in the ground below the freezing depth of the soil. For each region, the soil freezes to a different depth, but in Middle lane In Russia it is about 1.2 m. When determining the depth to which you bury pipes, it is better to play it safe and make the holes deeper. Otherwise, the forces of winter heaving will simply push the posts out, and your fence will collapse (see photo).

For pillars, a profiled pipe with a cross section of 60*60 mm and a wall thickness of 3 mm is usually taken. The distance between the pillars is from 2 to 3 meters. The greater the thickness of the corrugated sheet, the less often you can install pillars. If the soil is difficult to dig, it makes sense to make the distances larger, otherwise you can save on purchasing metal - the thinner, the cheaper and the difference in price is significant.
Logs for a fence made of corrugated sheets are made from a profile pipe 40*20 or 30*20 mm. The second option is wooden blocks 70*40 or so. When using wood, a significant amount is saved, but the wood disappears faster, and besides, it warps from moisture. Most likely in a few years you will have to change the logs, and they will already be metal. But it will work as an economical option for several years.

Making a fence from corrugated sheets with your own hands wooden joists, do not forget to thoroughly treat the wood with an antibacterial compound (for example, Senezh Ultra). It is better to do this in the bathroom - immerse the bars completely in the solution for 20 minutes. This way they will last longer.
The number of logs depends on the height of the fence. Up to 2 meters - two are enough, from 2.2 to 3.0 meters you need 3 guides, even higher - 4.
Methods for attaching joists to poles
Metal logs are welded either between the pillars or in front. The first method is more labor-intensive, and produces more waste: you have to cut the pipes into pieces. But with this arrangement of the logs, the structure turns out to be more rigid: each post serves as a support for the sheet and it “walks” less; if desired, a couple of additional fasteners can be placed along it.
If you weld pipes in front of a pole (from the street side), there is less work, but you will still have to cut and there will be waste: it is necessary that the weld of two sections falls on the pole. Unless you adjust the distance so that they lie flat. Then you purchase materials in advance, and then calculate the installation step of the pillars.

To fasten wooden blocks, holders are welded in front or on the sides - metal corners or U-shaped guides. Holes are then drilled into them and fastened with bolts or self-tapping screws.
There is an option to assemble a fence from corrugated sheets without welding. For this there is a special fastening element called an X-bracket. This is a cross-shaped plate with curved edges, which is attached to self-tapping screws.


Corrugated sheeting for fences
For fences, corrugated sheets marked C are used - for fences and walls. There are also N and NS, but they are not suitable for fences - they are more roofing materials. It is rare to see A and R markings; A profiles can be used for fences.
In the marking, after the letter there is a number - from 8 to 35. It indicates the height of the rib in millimeters. So C8 means that the profiled sheet is intended for a fence, and the wave height is 8 mm. The higher the wave height, the more rigid the surface will be. In strong winds, take at least C10, or even C20.
Sheet thickness - from 0.4 to 0.8 mm. Most best option— thickness 0.45 mm or 0.5 mm. They are suitable for fences up to 2.5 m in height. If you need a higher one, take at least 0.6 mm.
The height of the sheet is usually around 2 meters, you can find 2.5 m. The width can be very different - from 40 cm to 12 meters. Different factories produce corrugated sheets of different formats.

Corrugated sheeting can be galvanized or painted (painted ones are 15-25% more expensive than galvanized ones). There are two types of paint applied: powder and polymer coating. Powder coating is more durable, but also more expensive.
There are sheets painted on one side - on the second there is galvanized sheet metal coated with primer gray, there is - from two. Double-sided coating is naturally more expensive than single-sided painting, but it looks better and has a longer service life.

Support pipes and fence logs are usually primed and then painted. And somehow it became customary to paint them with dark paint. By then attaching a corrugated sheet painted on one side to them, you get a clearly visible “skeleton” on a light gray background. In a small area this can be critical. Please note that when building a fence from corrugated sheets with your own hands, paint the supporting frame light gray. The result will please you: it looks much better from the yard.
How to attach a corrugated sheet to a frame
The sheet is secured with self-tapping screws or rivets. Self-tapping screws for corrugated sheets are galvanized and painted. They are selected to match the color of the fence. Tighten with a screwdriver using an attachment.
The installation step depends on the wavelength and height of the fence. The higher the fence, the more often you need to install fasteners. It holds normally if you fasten it through a wave, to increase strength, with two lags you can fasten it in a checkerboard pattern, and not one above the other.
When installing, it is important to align the first sheet vertically. Then everything else will install without problems. When laying sheets, the next one goes onto the one already installed on wave 1. Attach to the bottom of the wave. The self-tapping screw must be installed strictly perpendicularly. Then the hole is blocked with a washer and precipitation will not cause the paint to peel off.
To see how one can attach a corrugated sheet to a fence, watch the video.
DIY corrugated fence: photo report
A fence from neighbors and a front fence were being built. The total length is 50 meters, height 2.5 m. Brown corrugated sheet is used on the front, galvanized sheet is used on the border, thickness 0.5 mm, grade C8.
In addition, the following materials were sent:
- for poles profiled pipe 60*60 mm, wall thickness 2 mm, pipes 3 m long;
- 80*80 mm with a 3 mm wall were installed on gate posts and gates;
- logs 30*30 mm;
- gate and wicket frame 40*40 mm;

One person built the finished fence from corrugated sheets with his own hands.
The fence is installed on metal poles, between which the base is then poured. The owners need it because they plan to plant a flower garden in front of the fence (you can see the fence made for it). It is also needed to prevent water from flooding the yard during heavy rainfalls. Metal sheets are not attached immediately from the ground, but slightly retreating. This gap is closed with a die-cut tape that remains in some industries. This was done on purpose so as not to block the access of air, so that the earth dries out faster.

Metal preparation
The first stage is preparing the pipes. A rusty pipe arrives from a warehouse; in order for it to serve for a long time, you have to clean off the rust, then treat it with Anti-Rust and then paint it. It is more convenient to first prepare all the pipes, prime and paint, and then just start installation. The rust was cleaned off wire brush installed on an angle grinder.

There were only 6-meter pipes in the warehouse. Since the height of the fence is 2.5 meters, another 1.3 meters need to be buried, the total length of the post should be 3.8 meters. To save money, they cut it in half into 3-meter pieces, and the missing parts were welded with various scrap metal available on the farm: cuttings of corners, fittings, pieces of various pipes. Then everything was cleaned, primed and painted.
Installation of pillars
The two corner posts were installed first. The holes were drilled with a drill purchased from a store. The soil was normal; it took about 20 minutes to complete one hole 1.3 meters deep.

The first pillar was placed horizontally and so that it rose above the ground to a height of 2.5 meters. To set the second one, it was necessary to recapture the height. A water level was used. You need to fill it in such a way that there are no bubbles - from a bucket, not from a tap, otherwise it will lie.
They placed the second post along the marked mark (they put it on a plank that was placed next to the hole) and concreted it. When the cement set, twine was pulled between the pillars, along which all the others were aligned.
The filling technology was standard: a double-folded roofing material was installed in the hole. A pipe was placed inside, filled with concrete (M250) and placed vertically. The level was controlled by a plumb line. It is very important to position the posts correctly, otherwise the entire fence will warp.
During the work, several times it turned out that the concrete was poured not inside the rolled up roofing material, but between it and the walls of the pit. It was a little pleasure to scoop it out from there, so the protruding part was cut into petals and nailed to the ground with large nails. The problem has been resolved.

After the concrete had set, we made portable formwork from boards covered thick film. With their help, the basement was filled. To make it stronger, reinforcement bars are welded along the bottom to the pillars on both sides. Formwork was placed around them.

Installing jumpers
Cleaned, primed and painted pipes for the crossbars were cut and welded. They cooked between the pillars. They also need to be leveled to make it easier to attach.

After the welding is completed, all welding areas are cleaned with a wire brush, treated with Anti-Rust and then painted.
Installation of corrugated sheets
Since the top lintel runs along the very top of the fence, and it is welded exactly level, there were no problems with leveling and installing the sheets. First they fastened along the edges, then installed intermediate screws. To make it easier to place them evenly, a thread was pulled between the outer ones.

Evenly installed fasteners are also beautiful
Afterwards the gates were welded and attached. How finishing touch- additional elements are installed on top - a U-shaped profile covering the top of the fence and plugs for the pipes.

As you understand, there is nothing particularly complicated. It is important to align the posts evenly and weld the frame. This is the main task. A lot of time - about 60% - is spent preparing pipes - cleaning, priming, painting.
Fence made of corrugated sheets with brick pillars

Of course, a fence with brick pillars. If you wish, you can do it, but it will take more time. There are two options:
- Make a full-fledged strip foundation. But it is long and expensive. On well-drained soils, you can make a shallow foundation; on heaving soils, you will have to dig below the freezing depth of the soil. And although the tape will not be wide, there is a lot of work - digging a trench along the entire length of the fence, installing formwork, tying reinforcement, pouring it and then finishing it. Place brick pillars on top. Durable, reliable, but expensive.
- Do it according to the scheme described above: load-bearing pillars with plinth. Bricks are laid around the pillars. This method is less expensive. About

The whole technology is the same, only the reinforcement will be more rigid - two belts of two rods with a diameter of 10-12 mm. It will be necessary to install embedded elements in the pillars to which the guides will be attached. They (mortgages) can be welded to the pipe after it has been exposed and the solution has set.
Photos of the design of fences made of corrugated sheets
Often a profiled sheet is combined with forging, sometimes a frame is made from a profile pipe, a profiled sheet is mounted into it and the whole thing is decorated with metal patterns - forged or welded. Another option to make the fence non-standard is to install the wave not vertically, but horizontally. It would seem like a small change, but the appearance is different. Some ideas in the photo gallery below.
The construction of fences from corrugated sheets is a common method of fencing a site. This type of fencing fits perfectly into any landscape. Manufacturers produce canvases in various colors.
We'll tell you: how to properly make a fence from corrugated sheets with your own hands, we’ll tell you about the features different designs, we will describe step-by-step instructions. In the article you will find answers to the questions: how to make a fence from corrugated sheets with metal, stone and brick supports.
Construction materials
To install a fence yourself, you need to prepare certain building materials:
- Polymer corrugated sheeting. It can be painted on one or both sides. The material is coated with a polyester compound, which ensures a long service life of the product. You should not purchase galvanized profiled sheets. They have one advantage - the price, while galvanization quickly becomes covered with rusty spots. On a sunny day, such a fence will further raise the temperature. If you plan to install a two-meter fence made of corrugated sheets with your own hands, and a foundation will be installed as the base, subtract the height of the base from the planned height (2 meters). The difference is the height of the profiled sheets that need to be purchased. The distance between the pillars is the width of the span of corrugated sheets. If you do not know how to install the posts, we recommend placing them at a distance of 2.5 - 3 m from each other.
- Supports. Metal pipes, round, rectangular or square, are used. If desired, stone or brick columns are installed as supports. Brick supports look much more attractive than metal ones. To install non-metallic pillars, decorative brick, stone, cement and sand are used. What pillars are needed for maximum structural strength? Metal supports should have dimensions of 40 x 60 mm or 60 x 60 mm. Then the structure will withstand loads of varying strength.
- Metal logs– they are necessary for transverse fastening of corrugated sheets. The optimal size would be logs measuring 20 x 20 mm. The technology for constructing a fence with a height of 2 meters or more involves two rows of logs. Otherwise, the structure may become deformed under physical impact.
- Fastenings(or dowels for installation). With their help you can attach the corrugated sheet to the fence.
Stone, sand, crushed stone (screenings), cement - will be needed to create the foundation. To properly build a fence from corrugated sheets, you need to install it on a foundation. Without a quality foundation, the fence will not last long. Vegetation, soil erosion, and animals can deform the structure over time, and the foundation will prevent this possibility.
We have already written in more detail about what types of foundations exist in the article: types and methods of pouring.
Tools for work
When we build a fence from corrugated sheets with our own hands, we need the following tools:
- Sledgehammer.
- Shovel.
- Roulette.
- Cord.
- Level.
- Apparatus for welding work.
If the tools and materials for construction are prepared, we proceed to building a fence from corrugated sheets.
How to build a fence?
Stages of work:
- Marking the territory and calculating materials.
- Installation of foundation and columns (installation of support columns in a fence without a foundation).
- Installation of corrugated sheets on joists.
Before building a corrugated fence, we mark the territory and collect site data. We wrote how to do this correctly.
We hammer pegs into the corners of the future fence and stretch the thread between them. Along it you need to put marks where pillars or metal supports will stand.
The construction of fences from corrugated sheets on a sloped area involves a stepped structure. We check the height and evenness of the steps using a level.
We calculate the number of columns that will be installed. To do this, divide the length from the corner to the next one by 2 - 3 meters. These will be spans. It is necessary to make markings for gates and gates and take these additional supports into account when purchasing material.
Depending on the type of construction, corrugated sheet fencing can be of the following types:
- A fence without a base. The corrugated sheet is placed at the height of the fence.
- Constructions.
Construction of a fence from corrugated sheets without a base is less expensive. In addition, installation is faster, but the second option looks more respectable, although it requires more costs for materials, funds, labor resources.
Building a fence with metal posts
To correctly install a fence made of corrugated sheets, where sections of metal pipes will be used as pillars, do the following:
- We place corner posts in the marking areas. To properly make a fence from corrugated sheets, we advise you to immerse the post in the ground a third of the length, in this case maximum resistance to wind is created. Fill the recesses with concrete mortar.
- We will organize the formwork. In this way, a board is created that connects adjacent posts. The width of the formwork depends on the wishes of the owner, but the side, about 20 centimeters wide, looks aesthetically pleasing. If we build a fence from corrugated sheets with formwork, it will last longer.
- Along the length of the structure, at a distance of 2 - 3 meters, we install markings. We stretch the thread between the corner columns.
- We dig in the columns according to the markings. Building a fence from corrugated sheets with your own hands involves installing pillars at the same distance.
- Pour into the formwork container concrete mixture. Additionally, we compare the accuracy of the transverse, longitudinal and vertical columns. Leave the structure until completely dry.
- We weld the transverse strips to the finished structure. To install a corrugated sheet fence correctly, you need to check the evenness of the structure with a building level.
- We attach the corrugated sheeting to the transverse joists. For reliable fixation we use metal screws. We recommend choosing fasteners that match the color of the sheets.
Important: Special attention pay attention to attaching the first sheet. The appearance of the entire structure depends on how smoothly it is attached. After all, each subsequent profiled sheet is attached to the previous one. You need to make an overlap, the size of one wave.
Installation of brick and stone pillars
Construction metal fences made of corrugated sheets with brick columns involves the creation of formwork for the future foundation.
The brick layer is built using reinforcement. Metal parts are placed in a vertical position and lined with brick.

Building a fence from corrugated sheets with your own hands with brick columns cannot be performed without reinforcement. Brick is a fairly heavy material. Metal jumpers will only increase the load on the foundation, which can collapse over time under the influence of gravity. If we make a fence from corrugated sheets with our own hands, it is necessary to reinforce the foundation layer.
- We lay out the pillars and intermediate lintels with bricks. If the height of the fence is standard, we install the brackets in the posts at a height of 20-30 and 1.50-1.60 m from the ground, where the horizontal strips will be welded. We periodically check the verticality with a level.
- We weld horizontal strips to the embedded parts. It is advisable to coat the metal parts with paint. This will help prevent corrosion in the future.
- We fasten the profile structures using self-tapping screws. You can use rivets and attach them with a special riveter.
The peculiarity of building a fence from corrugated sheets with brick columns involves creating a roof for each column. The structure will not be affected by precipitation and weather phenomena(snow, rain, wind).
More detailed instructions with video tutorials and images on installing fences with brick pillars presented in this article: ?
Video
You can see how to build a fence from corrugated sheets with your own hands in this video:
To finish the facade, designers recommend installing a fence made of corrugated sheets with your own hands with posts. It looks stylish and emphasizes the status of the owners. On the back side, it would be appropriate to build a fence with metal columns.
We determine which option suits us best and install the fence. As you can see, building a fence from corrugated sheets with your own hands is quite possible, and videos, photos and detailed instructions will help you achieve your goal.


, Islam, Judaism How do temples of different religions differ")


