The decision to build do-it-yourself fence from corrugated board requires certain skills and knowledge. Installation of a fence from a professional flooring requires a preliminary study of some of the nuances, it is important to understand the types of construction, draw up a work plan, select the appropriate components and materials. This overview will help you understand how to build a fence, a video at the end of the article will be useful for beginners.
Varieties of designs
A variety of landscape and aesthetic requirements determine the features of the structure:
- Solid fences. Sheets of corrugated board cover the supports. Most often, this option is used.
- Sectional. They are not in demand so often, they are built in the presence of stone or brick pillars. The length of the section depends on the features of the relief. Accurate calculations of the length of the spans allow you to reduce the amount of waste from trimming the profiled sheet.
In addition, fences are divided into:
Fundamental. Poles are included in the design strip foundation. It increases the wind resistance of the fence. The gap under the fence is completely covered with profiled sheets, in addition, dust from the street will not blow onto the site. Increased construction time and the cost of its arrangement. This is how permanent facade fences are built.
Supporting - fences are mounted on supporting pillars that are not connected to each other. This results in significant cost savings. However, the high height of the building significantly reduces the reliability of the fence. But it provides good circulation of soil and water on the surface of the earth. These advantages are especially noticeable when building on a slope or on loose, creeping soils, as well as soils with high humidity. Fences between neighboring plots are usually made as reference.
It is better to determine the type of construction after creating a complete sketch of the building.
Necessary materials and tools
To install a fence of any kind, you will need:
- Decking, wave height 8-20mm.
- Fasteners, rivets, screws.
- Sand, gravel, cement.
- Coating against metal corrosion - paint for metal.
- Marking ropes, pegs.
- Tools for earthworks (shovels, drill).
- Welding machine, electrodes, fasteners for transverse logs.
- Riveter, drill, screwdriver, cutting tools.
- Supports from profile pipe 60x40 up to 3.5 m long for support.
- Measuring tools (tape measure, level, plumb line).
- Crossbars - profile pipe 40x20.
- Roofing material, another insulating material that prevents mixing of concrete and earth in holes.
Measurements and a sketch of the fence allow you to calculate the required amount of materials.
Watch the video! Errors when installing a fence
Carrying out work according to plan
Step-by-step instruction to create a fence from a profiled sheet is proposed below. Installation involves the implementation of 6 stages of work. It is better to study these steps in advance in order to make a corrugated fence strong and reliable.
markup
The future location of the fence is marked with pegs that are driven into the corners around the perimeter. After measuring the distances, the number of openings can be determined. The locations of the supports are marked with pegs. You will need to designate a place for the gate, gates. Pegs are also driven in there.
Advice! For sectional fence it is better to make the width of the spans a multiple of the dimensions of the sheet. For solid - a standard 2.5 - 3 meters is suitable.
Installation of a fence on a strip foundation, including a stepped type, provides for the installation of levels. Marks are placed on the appropriate posts installed in the corners along the perimeter, and on inclined sections - at the beginning and end of each section.

The marking of the territory is carried out independently, no sophisticated equipment is needed.
Create a project
To create a plan, the perimeter of the territory, slopes are measured, obstacles that cannot be moved or removed are indicated. It can be pipelines, electrical poles. According to the measurements taken, a plan of the fence is drawn. Depending on the type of soil, relief features, economic opportunities, choose:
- foundation type;
- rack design;
- material for poles and additional structures ( cross beams, connecting brackets, mortgages);
- types of fasteners used, finishing.
Drawing up a detailed sketch allows you to carry out exhaustive calculations, determine the number of required components.
Installation of supports
The use of such types of racks is practiced, providing a strong fastening of sheets:
- ordinary tubing pipe diameter from 73 mm to 89 mm or profiled 60x60 or 80x80 mm;
- pillars made of reinforced concrete or wood;
- brickwork;
- screw piles.
Installation of a profile pipe as supports
In the designated places, holes are drilled with a depth of 1 to 1.5 meters, with a diameter of 20 to 40 cm.
Comment! At high altitude fence from 2 meters, the depth of the embedment of the supports should increase by 35% underground and 65% above the ground.
Racks are placed in one line, using a plumb line. Verticality and linearity eliminate the possible difficulties of joining sheets of corrugated board.
 The supports will need to be concreted. Before pouring the solution, the edges of the pits are covered with roofing material, you can apply polyethylene film. This will eliminate the mixing of concrete and earth, and maintain high structural strength. The solution is poured to a depth of 1 meter, the rest is covered with sand and compacted. This method contributes to the compensation of soil deformations during temperature changes.
Important! Concrete is always air locks to be removed. The air is removed by bayoneting with the available tools. It is acceptable to use fittings or a metal corner.
The remaining types of work can be performed only three days after the concrete has been poured.
Before installing the profile pipe requires:
- Make a top cap to prevent rainwater from entering. You can use plastic plugs, decorative tips. It's a good idea to just weld the top of the rack.
- It is better to immediately cover the supports with paint of the required color.
- It is necessary to weld metal heels on the base of the supports (a square made of sheet iron). This will make it easier to align the posts. Fastening will be more reliable and reduce draft.
Installation of reinforced concrete or wooden poles
 Installation of wooden or reinforced concrete supports carried out in the same way as when installing a tubing or profile pipe. wooden supports short-lived.
Reinforced concrete pillars have too big weight, the crossbars are difficult to attach to them. It is better to install such elements on a strip foundation.
Installation of brick pillars
The installation of brick pillars implies the presence of a strip foundation, since the weight of the structure is very large, the pressure on the ground increases. Such poles are difficult to install, require significant costs and additional creation waterproofing.
The installation process repeats the installation of a profile pipe, which is later lined with bricks.
Important! When installing brick pillars, it involves the installation of metal mortgages, which are used when attaching the transverse elements of the fence.
Watch the video! Corrugated fence. Highly a budget option
Fence on screw piles
Installation advantages:
- creation of a traditional foundation;
- applied on any soil;
- no need for special equipment, high installation speed.
Proper anti-corrosion treatment ensures a fence service life of more than 50 years.
However, there are also disadvantages. Screwing into rocky soils breaks protective covering, visual detection of damage is not possible. Racks to piles are attached by welding. Its implementation requires certain qualifications and experience. Installation of columns on piles using screw connections is carried out after welding the flanges.
Installation of transverse logs
 The next step in the installation of the fence is the installation of transverse logs. This is done by welding, clamps, bolted connections. Electric welding is the most operational reliable way. Logs are placed parallel to one another and the base of the structure. For a fence with a height of less than 1.7 m, 2 logs are required, if the height is greater, 3 logs will need to be installed.
The created structure is a frame. Everything is colored anti-corrosion paint. Special attention given to welds to prevent corrosion.
In addition to welding, it is allowed to use:
- Staples, clamps for pairing logs with supports.
- Brackets allow you to fix the logs to the pole (front butt, with pads-holders, on the side of the supports).
Installation of corrugated board
The fifth stage is the fastening of corrugated board sheets to the transverse strips using screws. Docking of canvases is usually done with an overlap.
Important! One edge of the sheet should have a full wave, the second - not a full one. The joint is made in one direction only. This point is important if the marking of the sheet and its cutting is done gradually as it is installed. The joint should be fixed with rivets.
 Self-tapping screws are screwed onto the lower front wave:
- loose screws will cause leakage.
- too much twisted self-tapping screw causes deformation of the gasket, destroys the metal coating.
- a crooked screw will break the metal, cause a loose fit of the gasket, this threatens with premature corrosion.
Correctly screw the screw at an angle of 90 degrees to evenly press the gasket without touching the metal surface. It is allowed to fasten self-tapping screws to every third wave.
Completion of installation work
The end of construction will be the installation of a U-shaped bar on top of the fence. The element is optional, but creates a smooth edge. The plank is secured with clips.
Some features of the installation of a fence made of corrugated board
Uneven areas or heaving soils require special techniques.
Fluffy soil
 This aspect taken into account by those who want to install sectional or combined fences with heavy stone pillars. The danger is represented by sandy loam, loam. In other words, the earth that retains moisture during frost has the effect of heaving. The soil rises sharply when it freezes. The foundation behaves like plasticine.
You can solve the problem in various ways:
- Complete removal soil to the depth of freezing and its replacement with sand. The soil around the foundation is also subject to removal.
- Installation of the foundation below the freezing point. But the pressure of the swelling will remain on the walls of the base.
- Lightweight structures can be installed if the foundation is insulated special material. The insulation is laid to a width equal to the freezing depth.
- Drainage is good. It is a trench with a depth equal to the depth of the foundation. The bottom of the trenches must be equipped with a pipeline wrapped in filter material. The trench is dug at a distance of 30-50 cm from the foundation. Ready drainage is covered with rubble.
uneven areas
If leveling the site is too expensive, you can put the fence on uneven ground. A territory with sharp slopes can be fenced with sectional or combined fences that fit perfectly into the terrain. It is necessary to calculate the height and width of each span. Aesthetics will provide a stepped foundation.
On a slope of less than 35 degrees, it is allowed to make spans of a fence 2.5 meters wide. With an uneven slope, you can make a fence from spans of different lengths. Increasing the slope requires reducing the length of the section. On uneven areas, it is better to install fences on a strip foundation.
- The connection of sheets at an angle must be closed with corner strips, which are obtained on bending equipment.
- Working with corrugated board requires the use of work gloves, since the material has sharp edges.
- Sheet cutting is performed with metal shears. The edges must be painted over. Bulgarian can not be used, it destroys the decorative coating.
Features of care
It is practically not necessary to care for a fence made of corrugated board with a polymer anti-corrosion coating. The polymer provides excellent protection. The barrier along the road can be damaged by stones, gravel. Places of damage should be periodically painted over with a special paint.
Watch the video! How to make a fence from corrugated board with your own hands
Any homeowner seeks to surround his home with a fence, which is not only a means of protecting property, but also helps protect the privacy of those people who live behind it.
When choosing a material, each person proceeds from his own criteria, the most universal among which are durability, practicality, ease of installation and processing. It is these properties that the corrugated board has, which, unlike the chain-link mesh, the fence from which, allows you to completely hide the house from the eyes of others.
Consider how to take up the construction of a fence from such a common and beloved by many material.
Preparing to Install a Fence
In order for the installation of the fence to take place without interruptions and delays, it is necessary to carry out some preparatory measures.
The main of these activities are:
- Calculation required amount and purchase of material. To this end, the perimeter of the fenced area should be determined and the height of the planned fence should be taken into account.
- Determination of places for installation of gates and gates for the entry of vehicles.
- Determination of the installation step of the supporting pillars. The step is determined based on specific conditions, but it should not exceed 3 meters.
- Site preparation for work. To this end, all objects and elements that are a hindrance must be removed from the zone of upcoming work, and the zone itself must be leveled.

The procedure for installing a fence from corrugated board
markup
First of all, the places where the fence will be installed are determined and marked. For this purpose, a cord is stretched between the corners of the future fence, along which the installation of support pillars is marked.
As a support poles, as a rule, metal pipes or square profiles. Of course, it is also possible to use wooden poles or bars, but it is necessary not to forget about the short period of their service. In the case of using metal elements, great attention must be paid to. To this end, all elements must be painted before installation, and their upper sections closed with any material that can prevent moisture from entering the internal cavities.
Support elements must have the following dimensions:
- diameter at least 75 mm if pipes are used
- section of the order of 60 × 60 mm, if square profiles are used.

Installation of support poles
The installation of the posts begins with the preparation of the pits, which can be made with hand drill. The depth of the pits can be from 70 to 100 cm, which is determined by the height of the fence. As a rule, the depth is equal to 30% of the height of the fence.
The very same installation of support pillars can be done by tamping or concreting. Moreover, the first method is cheap, and the second is reliable. In the case of concreting, the concrete solution is prepared from a mixture of cement, sand, gravel in a ratio of 1:3:4, diluted with water.
The installation of pillars must be done in the following sequence:
- Install the extreme poles and pull the cord along their upper cut.
- Align the height of the intermediate posts with a stretched cord.
- Using a building level or plumb line, check the correct fixation of each pillar.
- Install the next pillar only after the concrete has hardened under the previous one. This period can be from 2 to 3 days.

Lag installation
Having installed the pillars, it is necessary to proceed to the installation of inter-column logs, on which the corrugated board will be attached. This operation usually produced by welding. However, it can also be done with bolts.
As a lag can be used:
- corner size 40×40 mm
- profile rectangular section 25×40 mm.
For every meter of fence height, there must be at least one log. After finishing the installation frame structure, it is necessary to cover it with a layer of paint in order to prevent possible corrosion.
Installation of corrugated board
Installation of corrugated board on the prepared frame is the final stage of all work.
Sheets are fastened using self-tapping screws for metal, twisted or with an electric drill with a bat into the recessed part of the wave at a distance of 100-150 mm from one another. With the help of tensioned cords, you can control the installation height of corrugated sheets and the level of screwing screws.
In the course of work, precautions must be taken, since all metal edges are sharp. These edges must be tinted with special polymer paints, and all work should be done in protective gloves.
To cut the corrugated board, you should use a grinder, after putting on goggles. The edges resulting from sawing must be processed with a file.
How to build a fence from corrugated board - step-by-step instruction
Fence around country house and the site is necessary not only to protect property, but also is great way make your area attractive.
For the construction of a fence, corrugated board is ideal. This material has properties such as high strength, beautiful appearance, long service life, a huge selection of colors and low cost.
A fence made of corrugated board is easy to build for the owner himself. How to do this will be discussed in this article.
We select the material for the fence
Before starting the construction process, you need to prepare all the necessary material:
- support poles. For these purposes, it is recommended to use a square metal profile measuring 60x60 mm. fit and round pipes, but it is important that their wall thickness is at least 2 mm. Wooden supports are acceptable, but they are less reliable and require special processing.
Support poles are placed at a distance of 2-3 meters from each other. Their height is calculated from the height of the corrugated board plus one meter, which will be spent on digging into the ground. - crossbeams. For crossbars, you can use metallic profile with a size of 40x20 mm, the required wall thickness is 2 mm. If the supports are made of wood, then the crossbars must be made of wood. The length of one crossbar is equal to the length of one span between the supports. In the center of the support they are joined.
If the crossbars are longer than the span, they will have to be cut. On the contrary, small crossbeams will need to be joined in the middle of the span, which contributes to a significant weakening of the entire structure. If the fence has a height of less than 2 meters, then two crossbars must be installed. Otherwise, three are mounted. But for ordinary suburban area it is still recommended to build a fence about 1.8 meters high. - Decking. Exist special kind corrugated board, which is made for the construction of fences. The thickness of the profiled galvanized sheet should be at least 0.5 mm, the wave height should be about 20 mm. Such characteristics guarantee the strength of the fence - gusts of wind will not bend the profiled sheet. More thin material can also be installed, but in this case, additional rigidity should be created due to additional crossbars.
- Holder plates. Necessary for the assembly of the structure without the use of welding. These plates are required to bolt the rungs to the support posts.
- Pole caps. Required to protect the support pillars from water ingress into them. Also, the caps will make the appearance of the fence more attractive.
- End U-shaped bar. Installed on request. It is designed to border the upper edge of the corrugated fence. With it, the fence looks more finished. However, if you need to save a bar, you can not purchase.
- bolts. Needed for attaching to the crossbar supports.
- Roofing screws. Required for fastening corrugated board. They are available in various colors, so they can be matched to the tone of the corrugated board. The use of such self-tapping screws does not require drilling holes, they fit perfectly into the metal.
- Cement, sand and gravel for concreting support pillars.

Corrugated fence - view from the yard
Preparation of tools and calculation of the fence
When erecting a fence from corrugated board, the following tools should be prepared:
- roulette and level;
- garden drill;
- hacksaw or jigsaw - for cutting corrugated board if necessary;
- screwdriver for screwing screws.

Fence marking
Before starting work, you need to do necessary measurements to calculate the length of the fence. Correct measurement is a guarantee correct calculation necessary building materials.
Pegs must be driven in around the entire perimeter of the territory. If the fence will have kinks, then the pegs must be installed at the turn. Next, a nylon thread is pulled onto the pegs, at a height of about 20 cm from the ground. It is important that it does not sag. Then the total length of the thread is measured with a tape measure, which will be the same as the length of the future fence.
When calculating the material, it must be taken into account that the sheets of corrugated board are installed overlapping each other in one wave.
Carrying out installation work
First stage - installation of support pillars. First you need to install all the supports in the corners and in the places where the fence turns, then intermediate posts are placed. The frame of the future gate and gate is done last.
The pits for the supports should have a depth of about 80 cm. Another 20 cm support must be driven into the ground. Therefore, the total recess is about one meter. The diameter of the pit is about 30 cm. For this work, it is better to use a garden drill.
The supports are placed strictly vertically, using the level. Next, they need to be poured with concrete, the total solidification time of which is three days. 
Installation of crossbeams
The upper crossbar is installed at a distance of 20-30 cm from the upper edge. Lower - 20-30 cm from the lower edge of the fence. If there are three crossbars in the design, then the third is attached in the center.
The crossbars are joined to each other on support post or fastened with bolts and special plates.
Fastening of corrugated board
Important is correct installation the first sheet of corrugated board. The rest of the sheets will be attached at its level. The material is screwed with four self-tapping screws to the crossbars at the place where the waves fit.
Self-tapping screws are screwed in two waves. A rarer mount will make the structure fragile, it will knock when strong wind. For an even location of the screws, it is recommended to stretch the nylon cord as a level.
It is important to be careful at this stage. The greatest risk is damage polymer coating profiled sheet. If this happens, then the scratch must be immediately painted over to prevent the formation of corrosion. 
Nuances with a fence height of more than 2 meters
If a fence is being erected with a height of more than two meters, the following features must be considered:
- for supports, a pipe with a section of 80x60 or 80x80 mm is used;
- the profiled sheet is attached only to three crossbars;
- the depth of the pits for the supports is 1.5 meters;
- the profile must be fixed only with self-tapping screws.
Thus, it is not difficult to build a fence from corrugated board on your own. If a choice is made on this material, then the owner of the summer cottage will be able to evaluate the durability, reliability and aesthetic appearance of such a fence.
The video below shows how best to make a corrugated fence yourself:
Every homeowner strives to enclose his site from prying eyes and thieving hands, and more and more often a profiled metal sheet is chosen as the main material for the fence.
Among the people, it is better known as a professional sheet or corrugated board and is distinguished by its affordable cost and ease of operation - any owner can build a fence out of it.

Why professional sheet?
The corrugated board is a steel profiled sheet with a zinc or aluminum-zinc anti-corrosion coating. Type of rolled profile and thickness original sheet defines its functionality and purpose.
So, for the construction of a fence, the most optimal, durable and inexpensive profiled sheets of the “C” or “MP” series are most often chosen.

Profiled sheet fencing, along with cost-effectiveness, has several advantages:
- High installation speed;
- The coating is continuous, without cracks or holes;
- Any height of the fence;
- The presence of a sharp protective edge;
- Durability;
- Aesthetic appearance, large selection of colors and textures;
- Light sanitation;
- Muting street noise.
Materials and tools
The main advantage of a fence made of corrugated board is a limited number of necessary tools and materials, which allows you to install it on your own without involving a construction team and without hiring special equipment.

So, optimal material for the future fencing, wall or universal corrugated board with a wave height of 18 to 21 mm will become.

For aesthetics and long service life of the fence, you should choose a coating in advance: economical polyester, matte polyester resistant to local damage or the most durable pural, plastisol or polyvinyl fluoride.

The frame for corrugated board is made of metal pipes, preferably a rectangular profile with a cross section of 60x60 mm and a wall thickness of 3-5 mm. It is recommended to use jumpers-lags for the strength of the structure.

You will also need a solution of concrete, sand and gravel backfill, and among the tools: mortar shovel, tape measure, welding machine, building level, cord or rope, self-tapping screws, drill, grinder and screwdriver.
We measure and calculate
First of all, the perimeter of the site is measured, the necessary calculations are made and all the required materials are prepared. The number of profiled sheets is calculated by dividing the perimeter of the fence by the mounting width of the sheet, while the result is rounded up.

The length of the sheet varies depending on the desire of the customer and can reach 3 m. Or when planning the height of the fence, a mandatory ten-centimeter indent from the ground is taken into account.

The length of metal pipes-supports is determined by the sum of the following indicators: the depth of the drilled well and the height of the fence. The number of posts is calculated by dividing the perimeter of the fence by 2-3 m - the recommended distance between the supports.
Fence Installation
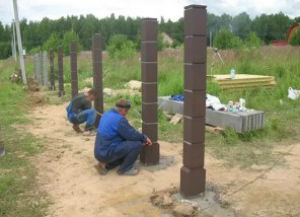
Step-by-step photos of building a corrugated fence show the whole simple algorithm.


The most simple circuit building a fence from a profiled sheet does not imply a solid foundation, which makes it the fastest and most affordable.

Below is the procedure:
- For each base metal pipe a well is drilled with a depth of 0.5 to 1.3 m, depending on the characteristics of the soil.
- A concrete mortar is prepared from M400 cement, sand and fine gravel in a ratio of 1:2:4.
- The pipe is aligned with building level, fixed concrete mortar and sprinkled with a mixture of sand and gravel.
- Horizontal lintels are welded to the supports, while an indent of 25-30 cm is made from each edge of the fence.
- The corrugated board is attached to the crossbars with self-tapping screws or other fasteners through each wave.
- Each sheet should be superimposed on the adjacent one by one profile wave.

Note!

With your own hands, it is within the power of every owner to enclose their possessions with a fence made of corrugated board.

The ease and reliability of the design, the minimum required tools and a simple algorithm have a positive effect on the speed, quality of construction and saving the family budget.

Photo of a fence made of corrugated board with your own hands


Note!


Note!


Corrugated fences are advertised as the best in terms of price / quality ratio. This is true: an unpainted galvanized fence lasts 10 years, and manufacturers give a guarantee of 20-70 years for panels certified according to GOST 24045-94, depending on the type of coating. However, the proposals of fence builders are immediately alarming: the simplest, unpainted, 1.8 m high, on poles driven simply into the ground - from 900 rubles per linear meter. m. It turns out, for country 6 acres (20x30 m), 90,000 rubles. without a gate? Nice business!
More surprises follow. First, the turns: for each of them there is an extra charge. Then, the frame needs to be at least primed, what does it need to rust right away? And you have to pay for the primer. As a result, no less than 1300 rubles / linear run up. m. for "budgetary - non-budgetary". Involuntarily, you will think: isn’t it better to take it with your own hands?
This article is built, so to speak, in reverse order: first we will tell you from what and how to build a fence yourself, and then we will compare it with a custom-made one. You just have to compare the cost, estimate your options and decide what suits you best.
materials
The most common mistake of "fence" DIYers is the wrong choice of material. Fence materials decide everything: appearance, strength, durability, but it is wrong to chase only cheapness or only “coolness”. It is necessary to choose taking into account various kinds of external factors.
Sheet
The basis of the fence - profiled sheet, profiled steel sheet with protective coating. The fence needs a so-called. wall corrugated board designed for vertical installation. Roofing and other varieties are not suitable primarily for the price, they are much more expensive.
Wall corrugated board is marked with the letter "C"; it is followed by a figure indicating the height of the corrugation (wave) taking into account the thickness of the coating and, through a hyphen, a figure indicating the practical width of the sheet in millimeters. Practical - it means taking into account the overlap of sheets during assembly. Eg. C15-1150. The height of the sheets is within 1440-4500 mm. True, sheets above 3000 mm are supplied only by special order and the corresponding price.

Sheet C8 - C25 goes to the fences, but the most popular is C15 (at the top of the figure). Why? Take a look at his profile. The ascending small half-wave (shown by the red arrow) is cut off without an allowance, so the sheets are mated without problems, as shown in the inset at the top left, and you can buy C15 from any manufacturer. So it's cheaper.
But already at C20 (below in the figure), the same half-wave is cut off with a small upward allowance. This gives an advantage when installing loaded structures (walls of temporary pavilions, for example), but it is not essential for a fence. However, at the slightest violation of the manufacturing technology, the mating sheets no longer "climb" into each other. You can’t check when buying, a defect can appear on any pair of sheets. This means that you will have to take expensive, reputable brands.
Coverage and price
"Bare" sheets of corrugated board are not produced. They go on sale mainly with 3 types of coating:
- Galvanized - from 160 rubles / sq. m. Not for the sheet!
- Painted with polymer resins or enamels - from 230 rubles / sq. m.
- Coated with plastoisol (modified PVC) - from 260 rubles / sq. m.
Galvanized sheet requires additional priming and painting, not only for aesthetic reasons. Zinc resists corrosion well, but as a metal it is rather soft. And the fence, unlike the roof, is located in the most dusty layer of air. Look at the neighboring galvanized roofs: a galvanized fence will last 1.5-2 times less. And in any case, if the fence has a free lower edge (see below), it will have to be tinted every year.
Sheets painted with polymers serve in any climate zone 20 years, subject to isolation of the lower edge. Without it - half as much. The reason is not the ultimate resistance of polymer paints to abrasion (abrasion).
Sheets in plastoizol withstand even the most: microscopic grains of sand are pressed into a rather viscous PVC and create themselves protective layer from subsequent ones. But PVC does not tolerate overheating and, especially, UV overexposure, it is from an excess of direct sun rays dry out and peel off.
Therefore, expensive plastoisol sheets justify themselves in the regions approximately to the north of the line Tver - Yekaterinburg - Novosibirsk - Blagoveshchensk. In the boreal zone, a fence made of them can stand for 50 years. South need to use polymer coated or galvanized.
columns

The sheets are attached to a frame that provides most of the strength of the fence. The frame consists of vertical pillars and longitudinal horizontal connections between them - a log. About the lags a little lower, but for now let's deal with the columns.
Easiest and cheapest middle lane will take ready-made purchased poles (see the figure on the right). They can be found on sale, from small local producers, for 260-300 rubles. a piece. On a fence for a plot of 6 acres correct configuration you will need somewhere around 36 pieces, taking into account the gate and the gate. Total - 9360-10800 rubles. Let's say right away: if you make the pillars yourself from a pipe or profile purchased at retail, it will cost no less, plus time and work. The exception is the fence on, see below.
The column shown in the figure is actually intended for a fence from a chain-link, but it is also perfect for corrugated board:
- The top is already muffled, you can not be afraid of water getting inside.
- There is a thrust bearing, which allows you to get by with a cheap sand cushion during concreting.
- In the paws, in most cases, holes are already drilled. This allows you to fasten the logs not by welding, but by bolts (metal) or self-tapping screws (wooden).
- No need for separate (expensive) corner posts; how to fix the logs in this case - see fig. below.
- The paws allow you to assemble the frame end-to-end, and not overlay (see below), which allows you to increase the strength of the fence at times.

Since all manufacturers buy ready-made metal profiles for poles, the quality of the product does not depend on the place of its manufacture. In places without excessive precipitation, provided that the soil is sandy or loamy, the pillars can simply be dug into it. On greasy, but not soaked and not sour soils, it is also possible by first dousing their root parts with molten bitumen and wrapping them with roofing material. Under the condition of deepening by a third of the height of the pillar, the fence will be strong enough.
About homemade piles
On sandy loam and loam in areas with an annual rainfall of up to 300 mm, the fence can be made on screw piles. At the same time, they completely disappear concrete works and a dig. At a price, this saves one and a half times: pits for poles need to be drilled with special equipment, see below for technology.
However, you may not be interested in ready-made piles: they are intended for foundations, capable of carrying high load and are designed for a service life of 50-120 years. Therefore, the price is 2500 rubles. a piece - funny.
Piles under the fence can be made from pipes yourself, if the home workshop is sufficiently equipped and there is strength and skills for hard work:
- The ends of the pipes are flattened into a cone-"spear".
- From a sheet of steel of at least 3 mm, disks with a diameter of 3 pipe diameters are cut (possibly roughly, with autogenous).
- In the center of each disk, a hole is cut out (also roughly) along the outer diameter of the pipe + 15% of it and a radial groove is cut.
- The discs are bred into "propellers", put on the "spear" to the untouched body of the pipe and are seized by welding.
lags
Sometimes you can find recommendations to put under corrugated board wooden logs. This is simply nonsense: wood and corrugated sheet are not coordinated among themselves in absolutely all respects. It’s better then just put together a picket fence.
Installation of corrugated board should be carried out only on metal logs from a rectangular pipe. The corner will not go to the logs: there will be no required wind strength. The channel is heavy and expensive. And a professional pipe 40x40 costs something around 90 rubles / rm. m. Sorokovka is not taken by chance: the width of the lag pipe should be one and a half times less than that of the column, and optimal size pipes for the pole - 60x60.
self-tapping screws
Sheets are attached to the lags / pillars with self-tapping press washers (with a head broadened in the form of a washer). The head itself should be hexagonal: you can’t drive it into 4-5 mm of metal with a screwdriver or a screwdriver with a cross nozzle, you will have to wield a ring wrench or put the appropriate working body into the tool. Of course, self-tapping screws are needed for metal.
The diameter of the screws is 4-5 mm. The length of the threaded part is 2 sheet thickness + pipe wall thickness + diameter of the self-tapping screw body. Total comes out 2 mm + another 2 mm + 4-5 mm = 6-7 mm. For each flooring sheet of self-tapping screws, 5 are required with two lags or 7.5 with three lags. How much lag to set - see below.
About purchasing flooring
Sellers of corrugated board often, when purchasing from a certain minimum number of sheets, offer in addition a jar of paint from the manufacturer of the sheet of the same color. Do not refuse, and if they do not give it, buy it. "Native" paint will be needed to paint the heads of the screws and paint the joints of the sheets. This is necessary primarily for the corrosion resistance of the fence, and aesthetics are in second place here.
Video: about cheap corrugated fences
Fence designs

The construction of the fence begins with the choice of its design. The first thing to decide here is whether it will be with a free (raised) lower edge (see. Fig.) Or recessed into the ground. A fence with a gap at the bottom is absolutely necessary if the site is on a slope and / or on loose, floating, waterlogged soils. In this case, the violation of the natural drainage of the soil is fraught not only with a decrease in land productivity, but, possibly, with cracks in the building.
However, the wind with dust will blow into the gap below. The point here is not only in the constantly arising roller of garbage inside along the fence. Street dust is a good abrasive, the smallest grains of sand will eventually erase the protective coating, and the flooring will rust. So you will need to tint it regularly.
The second option is to install special U-shaped protective profiles on the bottom (and on the top, too), they are sold together with sheets. The lower profile will also have to be painted every 3-5 years, but at the same time it will not be as conspicuous as the “blimbs” on the branded painting of the sheets.
Overlay or butt?
The frame of the fence on round piles / pillars will have to be assembled overlay, i.e. weld logs to the outer surfaces of the pillars, and attach the flooring sheets only to the logs. So it is possible (and more often everything is done) to assemble the frame on rectangular pillars. The advantage of the method is simplicity and speed: we “drive” whole pieces of lags and drive. Therefore, professional fence builders work like that.
But if the fence is on rectangular poles, then it makes sense for yourself to work too much and install logs between the poles end-to-end so that their outer surfaces coincide. Then the sheets can be attached both to the logs and to the poles. You will also need more self-tapping screws to the above quantity, we add 3 more per pole, but the strength of the fence increases much. This becomes especially clear if, God forbid, a car drives into it.
Mistakes, sizes, more lags
The most significant factor affecting the strength, reliability and appearance (evenness) of the fence is the penetration of the pillars into the ground. It should be at least 1/3 of their height, but if the pillars are concreted, this is not enough.

The correct corrugated fence is shown on the left in the figure, and on the right - typical mistakes, leading to corrosion of poles and their distortions:
- The pillar pierces the pillow and enters the ground. Due to the subtleties of physical chemistry, which there is no place to discuss here, corrosion will go several times faster than just in the ground.
- A pit in a concrete "bump" around a post; cause and effect are the same. Concreting should be brought out at least to the ground level, and it is best to make a formwork with a plank height of 40-60 mm and raise the concrete plug.
Another common mistake is to wrap the posts with roofing material, concrete 2/3 of their depth and cover the rest with sand. Soil moisture will immediately accumulate in the capillary gap between the post and the wrap. Soil microanimals will come with it, it will quickly cope with the metal coating, and - corrosion.
As for the dimensions, the distance between the pillars is essential. If the frame is assembled overlay, then it will be optimal in double the practical width of the sheet. If the frame is made end-to-end, then you can take a maximum of 3 m between the pillars. Where, with either method, the joints of the sheets will fall, it does not matter.
With a sheet height of up to 2 m, you can get by with 2 lags spaced from the top and bottom of the sheet by about 300 mm. If the sheet is higher, you need a third, in the middle of it. And if the sheet is up to 1700 mm high, then the logs can be installed lightweight, not 40x40, but 40x25 mm. Then they are mounted with an edge, with the wide side vertical.
The simplest: straight into the ground
The cheapest, but by no means the weakest fence can be built if local conditions allow the posts to be driven directly into the ground, pos. 1 in fig. The deepening of the pillars is shown conditionally. If the fence is not on piles, but on rectangular pillars, you need to dig holes under them, and put the pillars themselves on a sand (gravel) cushion 200 mm thick. Pit diameter - in 2 sides of the thrust bearing; for a standard post - 300 mm.

It is impossible to dig wide holes under the pillars with a shovel or a bucket excavator: violation of the soil structure far to the sides will lead to the fact that the pillars will soon “go” in all directions. With a hand drill to the desired depth, it will be possible to go deep only in sand or black soil, but it is generally impossible to build a fence in them without a foundation. Conclusion: you have to hire a drill machine. And how much they will take for a hole - look at the place, something similar to the price standard for the Russian Federation is not visible.
It is impossible to wrap 3-4 dozen piles with a manual gate, continuously monitoring the verticality of each in two mutually perpendicular planes (after all, you can’t fix it if it “left”). That is, you will have to hire a mini-excavator with a pile driver or a drill right there (they are almost all equipped with it). Hence, another condition for the possibility of building a dugout fence: access to the necessary special equipment. Therefore, despite their apparent simplicity, such homemade fences little widespread.
The conditions that allow you to dig / drive the pillars directly into the ground (see above), in most cases, allow you to deepen the lower edge of the sheets into it. But in this case, you need to protect it from rusting, otherwise why bother?

The simplest way is to dig a narrow trench in advance and fill it with bitumen after installing the flooring to the top of the soil. However, it is not worth hiring a trench excavator for this, it is better to make a trench shovel yourself, it will then come in handy in the garden for digging, hilling, loosening, etc.
How to turn from an ordinary shovel into a trench one is clear from fig. In this case, the emphasis under the leg will be a piece of reinforcing bar with a diameter of 10-12 mm. It is durable, the foot does not slip on it, and at the same time, its smoothed relief does not cut shoes. Several holes in the handle of the shovel are needed to regulate the depth of digging. The emphasis in them, so as not to fall out, is wedged on both sides with small carnations.
About pillars
Since you can’t put up a dirt fence without special equipment, you can’t help but mention such a variety of it as a pillar machine. She just sticks the pipes into the ground at once exactly on preset depth. In our area, this technology is not common, but in Japan, for example, almost all new poles made of thin-walled stainless steel are installed as pillars. If you find such a machine within reach, and you need a fence in the country, keep in mind. This will be the least labor and money option.
With concreting
In the same way, with the help of bitumen, it is possible to isolate the recessed edges of the fence sheets on concreted pillars from the soil. Then the sequence of work is as follows:
- We concrete first not on full height waiting for the concrete to harden.
- We dig a trench under the lower edges of the sheets.
- We install the flooring.
- Let's concrete the poles.
- After the concrete has set, we pour the bitumen.
But, if funds and time allow, it is better to concrete the bottom of the flooring as well (item 2 in the figure). This is especially important in windy places: bitumen provides only waterproofing, and a solid concrete tape around the perimeter also provides high wind resistance. The technology is the same, only item 5 is excluded, and in item 4 we add concrete under the pillars and fill it with the bottom of the flooring. It is useful, as already mentioned, to raise the concreting above the ground using a collapsible formwork made of planks.
Brick and corrugated board

A brick fence with a sheet of corrugated board is a common phenomenon. It has a fairly solid appearance for a private house (see fig.), It is not visible, but costs 2-5 times cheaper than a deaf brick one. However, erect brick pillars separately it is impossible: a heavy structure will give a large load on the ground and shrinkage. As a result, the fence will not only go in a wave, but may even collapse: the logs will pull the pillars one after another, like dominoes.
For such a fence, a foundation is needed, as for any capital structure. The best option- , 0.6 m wide; a column is equivalent to a wall of 2 bricks. Deepening into the ground - at least 0.7 m in the middle latitudes, of which 0.2 m will fall on the sand cushion. Protrusion up - 250-300 mm.
In the "brick-sheet" fence, it is necessary to ensure the insulation of the edges of the sheets, not only from below, but also from the sides. The reason is the same: dust whirlwinds, and particles of brick will now also be included in the composition of the dust. That is, both in the columns and along the top of the foundation, grooves (strobes) are needed, which will include the corresponding edges of the sheets. Then the edges of the sheets are sealed with a cement-sand mortar.
To hammer strobes with a puncher - you yourself understand, this is not work, but self-mockery. One of the solutions to the problem shows pos. 3 in fig. higher. A groove in concrete is formed, as usual, with a wooden block.
There are grooves in the columns. You can deal with them, bearing in mind that now there are ready-made, with all even sides, three-fours and halves of bricks on sale. Therefore, we will change the way the pillars are laid. Instead of the usual, to dressing in a row in a circle - as shown in pos. 3 of Fig. We lay out even and odd rows in a mirror image, as shown in the same place. It remains to drill holes in the lintels of the pillars, draw lags in them, and close up unnecessary strobes in the corner pillars with brick halves.
True, this method of laying is not very economical: if 4 full-sized bricks are needed for a row of an ordinary column, then for a “new” 2 + 3 by 3/4 + 1 half = 4.75 bricks. When laying in 25 rows (a fence 2 m high), 250 bricks run onto 20 pillars, counting by full measurements, a surplus. Moreover, a ready-made undercut goes on sale more expensive than the same amount of full-sized bricks in terms of volume.
A brick fence, anyway, with a "foreign" flooring or solid, looks best on a brick foundation. In this case, the lower strobe is formed by simply not adding one brick to the middle of the tape (item 4 in the figure above). And you need to keep in mind that a brick foundation can not be made everywhere. The conditions are about the same as for building a fence right in the ground.
About edge corrosion
The precautions described above regarding the edges of the sheet are intended to protect its edge. Here, on a thin cut with sharp edges, the protective coating is destroyed first of all. It is from here that rust begins to creep, and when its streaks become visible, it is much more difficult to deal with it.
How to build a fence?
The calculation of the fence is simple and does not require any design. It is based on the estimated length: 3 m for a fence on a butt frame, 2 practical sheet widths with overhead logs. The methodology is:
- At the corners - one post for each.
- 2 poles - on the gate with a gate, if it is separate.
- Divide the length of the perimeter by effective length, the result is rounded up to a smaller integer, this will be the number of intermediate columns.
- We distribute them evenly around the perimeter.
If rounded up, it will come out 2 columns more. And each pillar costs at least a bottle of vodka. Joke. And no kidding - you can push the pillars a little apart without losing the strength of the structure.
Next, we count the flooring sheets: we divide the length of each side of the perimeter by the practical width. We subtract their width from the side with the gate and consider each remainder as a separate side. We write down the width of the rest of the sheets, then sum it up and count how many whole sheets will come out. Now we are already rounding up to a larger integer - you can’t joke with bottles here, a hole is formed in the fence. Putting it all together, we get the purchase number of sheets.
It remains to count the lags. To do this, we divide the same perimeter by the sale length of the profile (3 m most often) and multiply by 2.05 for 2 lags or by 3.07 for 3. We give a small allowance for welding / cutting. The result in pieces is rounded up to a larger one, so that again it comes out without a hole, and trimmings on the farm will come in handy.
Pole installation
Some of this has already been said along the way. The poles are aligned in height and in a row in the usual way - along tightly stretched cords, 30 cm above the ground and along the tops of the poles. We put the corner posts first, then the gate posts, and then the intermediate ones between them. We begin to put them only after the corners with the gates are firmly in place. And when concreting, and when backfilling with soil, this requires at least 3 days.
In height, we level the pillars along the cord immediately, adding / subtracting a sand cushion, but it should remain at least 15 cm. We set it vertically along the upper cord and plumb line. If the fence goes up / down the slope, then the posts can only be leveled along it in a row, and the verticality will have to be checked with a plumb line from two adjacent sides of the post. We align the pillars in the process of fixing them.
If the pillars are dug in, then we feed the soil from the dump into the pit in portions so that layers of 15-25 cm come out. Each layer is rammed, for this a piece of a sixty beam or something like that will work well. Having tamped the layer, we check the column for a row and a vertical; if necessary, we level.
Pits of concrete pillars are first poured to 3/4 of the depth. Until the solution begins to set, we level it in a row and vertically, wedging stones in the pit (they can be left there) or wooden wedges wrapped plastic film- they will have to be removed after the solution has solidified and topped up with concrete. Having leveled, add the solution to the top and wait at least 3 days until it solidifies. We leave the advice to strengthen the pillars until the mortar sets and hardens, welding temporary supports to them, on the conscience of their authors. Let them build fences like that, if they ever built anything at all.
Frame assembly
There are no difficulties here: we put the pipe to the pipe, temporarily fasten it to the posts with knitting wire, align the lags along the cord and level. Then we weld the joints of the log; if they are not on the poles, it's okay. Then we remove the strapping one by one, weld it to the poles.
Assembling the frame end-to-end is justified only if the distance between the sidewalls of the pillars is equal to or slightly (20-30 mm) more than the sales length of the log, otherwise a lot of money and labor will go into trimming. When welding such a frame, the joint is first grabbed, then the strapping is removed from it and the log is completely welded, both to the paws and to the pole. The installation of the frame ends with a primer and painting.
Flooring
We install corrugated board on both sides of the gate, placing the sheets in turn. Thus, all the "patches" will fall on the backyard. After cutting the corner sheets in width, we immediately paint over the cuts with regular paint, driving it tightly with a hard end brush. With edge corrosion in mind, this is exactly the case when a penny savings will cost thousands of dollars in overspending.
To install the flooring, you will need 3 self-tapping screws per log per sheet: in the first wave from the beginning, in the middle and at the junction of the sheets. The self-tapping screw at the junction fastens 2 sheets, therefore, when calculating, we consider it as half a self-tapping screw. If the frame is assembled end-to-end and the flooring is on 2 lags, then we add 3 more screws for each pole, at the level of the lag and in the middle between them.
We drill holes for self-tapping screws with a diameter of 1.15 of the body of a self-tapping screw without thread. For a four it will be 3.3 mm, and for a five it will be 4.5 mm. It is impossible to drill a smaller diameter, the self-tapping screw, without entering completely, will seize so that you have to break it out and re-drill the hole.
Before screwing, the self-tapping screw and the hole under it must be lubricated with cheap grease: grease, grease. It is cheap - it is bituminized in a year, and the mating parts will be reliably protected from corrosion. The lubricant squeezed out from under the head by an assistant (you can’t put a fence alone) immediately removes it with a rag soaked in kerosene and paints over the head of the self-tapping screw with standard paint, driving it in like a cut.
If the paint still remains after installation, it is useful to paint over the joints of the sheets. This will protect them from dust and all the same, if it's amiss, corrosion. Now it remains to impose protective profiles, seal the edges of the sheets in the strobes, if the pillars are brick, the fence is ready.
Video: the process of self-assembly of a corrugated fence
Let's compare
Now you can figure out how much cheaper it will be to put up the fence yourself. Here are the missing data for the calculation:
- Strip foundation in the middle lane. - from 5000 rubles. per sq. m slab.
- Drilling a hole 300x1000 mm or driving a pile with a Bobcat mini-excavator - from 200 rubles. in the black earth.
- Concreting of 1 pillar under the fence, on the owner's materials - from 500 rubles. there.
- Brickwork - at local rates, the cost varies greatly depending on the region.
- A good gate with a built-in gate can be bought for 10,000 rubles.
But do not delve into the calculations. Already carried out, and we can say that if the price of the work is 100% of the cost of materials, then they will do it for free. That is, with independent execution, the savings are at least double. As for the fence near a residential building, especially if it only fences from the street, you can still think: beauty is needed, but it costs money. But the country fence is definitely better to do it yourself.
Finally
Decking, like brick, element building structures, the technology of which is very plastic. For comparison, ask a bricklayer what is the best way to lay. He will most likely stare at you like Badamka the President at the map of Hakhluyandia. It all depends on the specific conditions and requirements, you just need to follow some basic principles. For a fence from a professional flooring they:
- The fence must sit firmly in the ground; about the deepening of the pillars has already been said.


")


