Finishing the plywood theme for myself, I decided to make a stand for shoes. Through pinterest, I went to one interesting store, in which I peeped the idea.
At the time of writing (October 2016), 720 New Zealand dollars is 32,088 Russian rubles.
True, the design had to be slightly adapted to the realities of a family of four, three of whom are girls.
First, I sawed blanks from waterproof birch 18 mm plywood

Stand parts are attached to dovetail. To do this, I made grooves in the appropriate places with a 15.9 mm cutter.

And with the help of a special device (which you can read about here:) I made the corresponding spikes at the ends of the blanks.

The dovetail connection is one of the strongest and is not prone to loosening.


With a straight cutter 19 mm, I made grooves for connecting parts into half a tree.

The sawing-milling stage turned out to be rather short. The cabinet parts are almost ready for assembly.

An important step is grinding. Sanded with 180 and 240 sandpapers.

The outer walls of the stand were assembled on 10 mm beech dowels. To fine-tune the places for drilling, I used small studs, sharpened on both sides.

We hammer nails into one part, position the second one on top and hit it with a mallet. The photo clearly shows the marked places for drilling.

The fit is fairly accurate, although not perfect.

Thus we get the outer box of the stand,

into which we insert internal partitions. This time, due to the simplicity of the design, I decided to do without dry assembly. It turned out to be wrong. While the dovetail joints on the test bars fit perfectly, they were too tight on the cabinet pieces. Therefore, the part with the adhesive already applied had to be assembled using pipe clamps and after that, once again, go through the fixture along the edges of the remaining parts.


After the glue has dried, the final grinding of the edges. After all, it is in them that the whole highlight of plywood furniture.

Coating as always in four layers of varnish residues from the previous project. You can read about the equipment used and the procedure for preparing materials in earlier articles on my blog.


Sanding between coats was done with a 180 grit abrasive pad.

Putting furniture on wheels instead of legs is not just a feature of this project. According to the same Pinterest, this is a trend that many furniture designers follow. In general, this great idea- it will be much easier to collect dust in the hallway.

The finished product has a length of 1.6 m and a height of about 0.5 m. The internal useful volume of the cells is 18 cm high, 25 cm wide, 35 cm deep. Men's winter low shoes size 45 fit perfectly.
I chose the sizes in accordance with my needs and the possibilities of the hallway. Therefore, despite the seemingly monstrous size at first glance, it fits perfectly into the space intended for it.

I must say that we were not able to arrange our shoes into separate cells even in such a large stand. And this despite the fact that all the summer shoes have already been put away in the pantry. I had to put several pairs in some cells. It is difficult to say for whom only six cells in the prototype were designed.
In any case, there is much more order in our hallway.
Read my other articles: littlehobby.livejourmal.com
For tenants small apartments the question of the location of shoes in the hallway is very acute. Families with children know what shoes are scattered throughout the apartment. The problem is no less relevant for those who like to pick up a variety of accessories to their image. To keep order in your home and conveniently arrange each pair, it is not at all necessary to buy expensive shelves from the range furniture stores. Craft convenient devices for storing shoes can be from available materials, if you show imagination. Here are some examples for inspiration.
Simple wooden cabinet
Such an interior item is quite simple to make. Four boards are connected to each other with furniture screws. Thin wooden planks are attached to the facades of the pedestal. The best paint for coloring water based. Optional upper part can be made contrasting and adapted for sitting.
You can just hang shoes on a shelf!
The idea is ingenious in its simplicity. In order not to stain the floor with the dirty soles of boots and sneakers, you just need to keep them hanging. 
Wooden pallet shelf
What is not made from such an affordable and practical thing as pallets. They are also suitable for making shoe racks. It is quite simple to build such a piece of furniture, since for the hallway part of the pallets can be left unprocessed.

Staircase instead of shoe cabinet
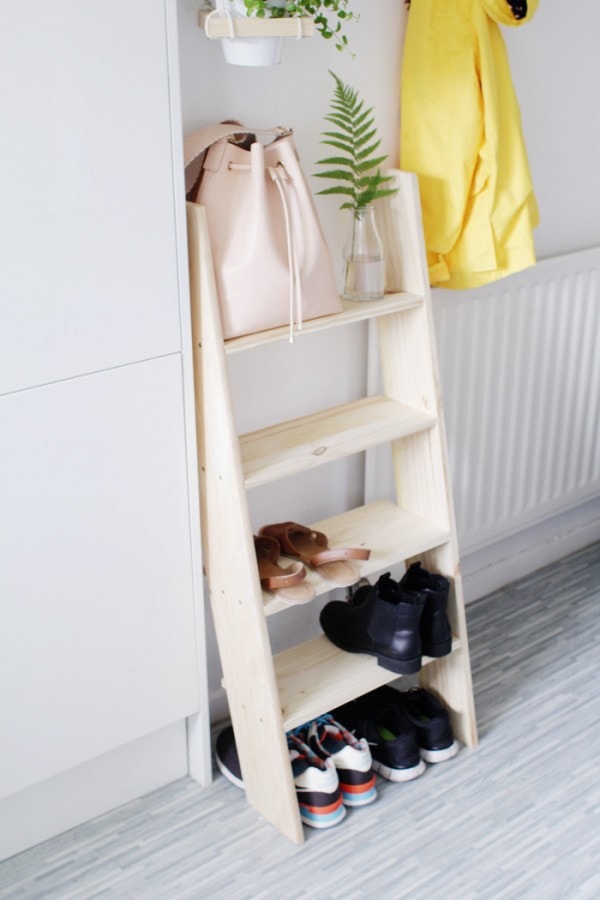
For this idea, it is suitable as a finished one. wooden staircase, and made independently from planed boards. The main thing is that the steps should be inclined so that the shoes do not stain the wall.
Rack of boxes
Wooden boxes are another universal remedy for lovers original furniture. When placed vertically, the boxes are suitable for storing high autumn and winter shoes. The side surface can be adapted to store keys, hoopoe accessories for shoes and other useful little things.

Shelf for shoes of different heights
In spring and autumn, the weather is very changeable, and shoes for almost all seasons can be relevant. Such simple design with shelves different heights allows you to store autumn boots next to sandals and sneakers.

Bee hive
A very original design can be created by combining several wooden hexagons, each of which is suitable for storing one or even several pairs of shoes, depending on its size.

Shelf with French chic
An ordinary piece of furniture can become a real decoration of the hallway, if glued on back shelves with a special film or paper with printed text. The color for the shelf itself with this design is better to choose a neutral one.

Skateboard shelves
Real skateboarding fans always have a few old boards that have fallen into disrepair. In extreme cases, you can turn to your hobby buddies for help. Multi-colored shelves are great for storing sports shoes.

Shoe organizer
The design of the shelves of different heights allows you to store shoes for different weather. A small mirror in the hallway will allow you to evaluate your image before leaving the apartment.

Farm bench
It is very convenient to store shoes in closed boxes located on the shelves of a rustic bench. This method of storage gives the hallway a neater look, since the shoes are hidden from view.

Wall-to-wall shoe cabinet
So that the design does not seem cumbersome, it is better for it to choose boxes made of thin plywood and arrange them in the form brickwork. The strength of such a locker is ensured by a wide board, to which individual shelves are attached.

Diagonal shelves
By placing the usual wide shelves diagonally, you can significantly save space in the hallway.

Copper pipes
The original piece of furniture is easy to make from the pipes left after the renovation of the bathroom. To attach the parts of the shelf to each other, special adapters from the plumbing store are suitable.

Dynamic Design
bars the same size mounted on the wall with special movable corners. When folded, the structure is decorative panel, and if necessary, turns into a space for storing shoes and accessories.
Even a small amount of untidy shoes in the hallway creates a feeling of untidiness and disorder. But what if the family is large and there are a lot of shoes? What if the corridor is too narrow? In such a situation, capacious and light-weight shelves for shoes will save. With their help, you can compactly place all sandals, shoes, boots and boots, saving space in the lobby. We propose to organize free place in the hallway and make a roomy shoe rack. Moreover, a do-it-yourself shoe rack is a great opportunity to show off your knowledge and carpentry skills, because its design is extremely simple.
Another positive moment in favor of making a shoe stand with your own hands is the availability of materials from which you can make it. In addition, if you use the available tools and materials for its manufacture, you can significantly save the family budget.
The tree is the most common and available material to create any homemade furniture, this also applies to shelves for shoes. There are options for making shelves from chipboard or MDF, from boards or furniture panels. You can get a budget shelf if you make it out of plywood with your own hands. Opt for quality birch plywood.
In addition to suitable material, you will need a standard set for carpentry tools:
- hacksaw or jigsaw;
- sandpaper or grinder;
- drill;
- screws and metal corners for fastening the structure or furniture ties;
- special protective equipment for processing wooden products.
The first thing you need to think about is the drawings and diagrams of the shelf or rack you like. You can draw them yourself or find suitable ones on the Internet and fit them to your size.

So, to create a shelf for shoes made of wood, everything is prepared, you can get to work.
A shelf for shoes is a necessary attribute of the hallway, because thanks to it space is freed up and the room looks neat. It is not difficult to buy a shoe rack in a store, but a small, simple design is not cheap. If there is a desire and imagination, then figuring out how to make a shoe rack with your own hands is easy. Material home master serve as laminate panels, boards, plywood, pipes, cardboard and wooden blocks. Having shown imagination and skill, you can make furniture that you will not find in the store.
From PVC pipes
An easy-to-make shelf made of PVC pipe sections will surprise you with wealth decorative possibilities. For its manufacture you will need:
- sewage pipe PVC diameter 300 mm;
- sandpaper;
- wallpaper glue and epoxy;
- washable wallpaper.

The length of the plastic pipe is 3 m, so it must be cut into 10 pieces of 30 cm, because each compartment of the shelf will be that long. You can cut the material with a jigsaw or grinder. Every detail must be carefully crafted sandpaper to remove roughness and make the surface of the ends as smooth as possible.

To decorate the blanks, you will need a roll of wallpaper - choose a pattern and color to your liking. The shoe rack is located at the door, so it can get dirty in bad weather, so it’s better to paste over it with washable wallpaper that is easy to clean. Each part is glued on the outside and set aside to dry. Finished segments are collected in single structure. It will consist of three elements at the base and top, and four segments in the middle.

First, horizontal stripes are glued, and after the epoxy glue dries, the parts are glued on top of each other. It turns out an interesting and original shelf that requires a minimum of material costs, and which you can easily assemble yourself.
From cardboard

Cheap and lightweight construction for summer shoes and slippers will be made of cardboard. Suitable for any box household appliances. To make an unusual shelf in the hallway, prepare simple items:
- scissors;
- scotch;
- stapler;
- ruler and pencil.

Several rectangles are marked on a sheet of cardboard, the width of which is 25–30 cm, and the length is taken over the entire sheet. The number of blanks depends on your desire - each is a pocket for one pair of shoes. The cut out rectangles are divided into three equal parts. Two lateral ones are bent in the shape of a triangle and fastened together with a strip of adhesive tape or a stapler. Having made pockets from all the blanks, they are partially inserted into each other and fastened into a tape. This design is hung on the wall, so it will be appropriate in the country or in the interior. rustic style. To make it more attractive appearance the product can be pasted over with colored paper or self-adhesive film. This simple and exciting work can be done with children.
Wooden
A beautiful shelf can be made at home. It will take longer to tinker with it than with cardboard, and the cost of the material is higher, but the result is worth it. The shelf will be round, made of wood, with two tiers and dividing bars. To work you need:
- 4 sheets of wood 15 mm thick;
- screws;
- dye;
- caps for fasteners;
- jigsaw;
- drill;
- Grinder.
Note! Quantity and size Supplies depends on the material you used and the size of the shelf, but, as a rule, the consumption is small.

From three sheets cut out round blanks for the top, middle and bottom of the shelf. The diameter of the circles is 600 mm, they are drawn using a simple fixture. A nail is hammered into the center, a cord 300 mm long with a pencil at the end is attached to it. Cut out blanks electric jigsaw. For dividing crossbars, which will be mounted on each tier in 4 pieces, 8 identical parts 160 by 200 mm in size are cut out. The edges of all blanks are carefully processed with a grinder.

On the smooth surface of the parts, the attachment points of the separating parts are marked. Marking is applied to upper surface the lower circle, the middle circle is marked on both sides, and the upper one on inside. Holes with a diameter of 2 mm are made at the attachment points, the same marks are drilled on the separating parts.
Assembly

4 planks are screwed to the bottom circle along the marked lines, 2 screws are required for each. The central circle is attached to the separating elements, and holes are drilled between the attachment points for fastening the upper separating parts. These slats will be located a level higher and located between the lower elements. They will also connect two circles - the central and the upper one. The shelf is assembled, it remains to paint it and close the places where the screws are screwed in with caps. Convenient and spacious shelf will be a great addition to the interior of the hallway.

Each handmade thing has not only a practical function, it fills the house with special comfort, because it is made with love and especially for this place.
Video
See how you can make a solid shoe rack from an old closet:
The problem of placing shoes in an apartment is always relevant - each person has several sets that require a lot of storage space. After the street, it is impossible to immediately put the shoes in the closet, so having a special rack in the hallway will be the best solution.
Great solution for a large number shoes - a high wooden shelf
Modern stores provide the widest variety of options of any size and design. A suitable bookcase or shelving will help save space in the hallway, ensure order, and provide space for your guests' shoes and shoes.

Modern entrance hall in the style of minimalism open shelves for shoes
In spite of big choice finished products in stores do not lose their popularity do-it-yourself shoe rack. On your own, you can make a model that is ideally suited to your interior in stylistic terms, accurately calculate the dimensions, and select the desired materials.

Shoe cabinet from old furniture
The piece of furniture is quite simple, so even a novice master will cope with the task, and on the Internet it is easy to find a project for every taste.

Do-it-yourself bright shelf for shoes from a pallet
In addition to the pleasure of creative work, making a shoe rack yourself will help save on the expensive services of a professional carpenter.

Painted boxes nailed to the wall play the role of a shoe rack and are a decor in the hallway.

Convenient movable shoe rack on wheels
A do-it-yourself shoe rack can be made in many ways. various options. Use of improvised means such as cardboard boxes and wooden boxes, opens up a wide field of fantasy work. You can also choose traditional way– making an item from scratch using tools and suitable materials. The design is very different - floor, suspended models, lockers, bookcases, panels.

Drawing for the manufacture of shelves from boards
Whatever project you choose, you need to draw up a drawing - this will help to avoid errors with dimensions, make sure that the finished product will fit in the space allotted to it. Therefore, preliminary measurements are taken indoors.

Scheme and photo of a suspended metal shelf
In addition to dimensions, you should consider the functionality of the rack, whether it will perform any additional tasks. For example, a locker that simultaneously functions as a table in the hallway will provide a place where it is convenient to put keys, an umbrella, and small items.

Do-it-yourself wooden shelf - drawing with dimensions
Necessary tools and materials
There are many pretty original solutions how to make a shoe rack with your own hands from improvised materials. It can be pieces of wood, plywood, metal, plastic, fabric. Pieces of linoleum, laminate, plastic water pipes. When placing outdoor shoes, the material must be moisture resistant so as not to suffer from pollution, frequent cleaning.
The specific set of tools will depend on the selected materials, but in general you will need items:
- hacksaw, chainsaw;
- a hammer;
- grinder with a cutting wheel;
- nails, screws;
- electric drill;
- jigsaw;
- screwdriver, screwdriver;
- wood glue;
- roulette.
Working with metal will require the use of a soldering iron, welding machine, - when using, do not forget about protective equipment (mask, gloves). You will also need a planer, grinder, sandpaper. Fastening parts from various materials will require the purchase of accessories in hardware store– metal furniture corners, handles for doors.
From wooden planks

Scheme wooden shelving for shoes
For this simple project it is necessary to prepare boards with a thickness of 1.5-2 cm. Pine is well suited - its wood is easy to process and is durable. There will be only six parts, the work is carried out in the following sequence.
- In accordance with the measurements taken, the dimensions of the frame are calculated and a drawing is made.
- The side walls are sawn to the required size (for a specific project, the height is about 80 cm).
- Cross bars are made - four pieces, about 60 cm long.
- Saw out the support bars that support the crossbars.
- All surfaces are sanded to a smooth finish.
- The bars are attached to the main fragments, respectively, to each other.
- Boards are laid on the bars, the lower and upper ones are fixed with wood glue, metal corners- get the frame of the rack.
Wheels attached to the lower part of the sidewalls facilitate the movement of the frame. You can make a rack for shoes with your own hands according to the same principle from chipboard, plywood. In the latter case, you need to be careful - plywood cracks easily and forms chips when sawn.

Three tier shelf wooden slats for eco style
Portable

Lightweight shelves are very popular, which are easily moved or transferred to another room if necessary. Make a portable whatnot from cardboard, fabric and other materials.
- A frame is made of rigid wire, rails, on which the fabric of the panel is stretched. The frame is rectangular, made like a hanger - when placed on the cabinet door, the filled fabric shelf will not twist.
- A rectangular panel is sewn from thick fabric well tolerated washing. The panel is stretched over the frame.
- Rows of pockets are sewn onto the fabric. Pockets should be tight and easy to clean. Suitable soft plastic, thin rubber, book covers.
Light portable shelf well suited for storing summer sandals and sneakers, but will not withstand heavy winter, autumn shoes, from which contaminated moisture flows.

Fabric pockets are perfect for storing slippers, ballet flats and children's shoes.
Carousel

Multi-storey Shelf with Rotating Shoe Racks
This option is suitable for installation in the hallway, placement in the closet. round shelf with capacious cells makes it possible to quickly find the right pair of shoes - just turn it around its axis. You can make such a shelf from wood, chipboard, plastic and a metal rod.
- In accordance with the dimensions of the product, circles of the stand of the required diameter are cut. A hole is made in the center for the rod.
- Wheels are attached to the bottom of the lower circle or rotary mechanism on bearings.
- Dividers are installed vertically on the circle - quadrangular blanks.
- The second circle is placed and fixed on top. The uppermost circle is fixed on the rod with a bolt and washer.
- Fastening is carried out using fittings (metal corners).
To turn, either a support mechanism is used, or a double bottom is made - the lower stable layer and the first shelf located above it. The friction between the bottom and the first tier will be reduced by a special gasket made of smaller diameter discs.

The rotating shelf can be mounted in any suitable locker
corner

Drawing homemade corner shelf in the hallway
The most economical and user-friendly small hallways is a corner shelf.
Stages of work:
- cut out required amount crossbeams - triangular or semicircular;
- using fittings, attach them to the sidewalls - these can be either solid fragments of wood, plastic, cardboard, forming an angle, or separate vertical slats.
The corner rack can be quite tall, and its triangular compartments can accommodate many pairs of shoes without taking up functional space.

Do-it-yourself corner shoe rack in the hallway
From sections of water pipes
An unusual option would be to use plastic pipes, cut in a certain way and connected with glue. original design, which has a stylish look, looks good in modern interiors.

The design of water pipes is convenient in that it is easy to make any width and height, vary them. A compact shelf made of segments will fit into the smallest space.

The design of a vertical shelf-rack made of plastic pipes
From cardboard boxes

Cardboard shoe rack
The most affordable and inexpensive option of all. The downside of the design is a little strength, so it is recommended to put light sneakers and flip flops in the upper compartments, and put heavy boots down.

Shelving from cardboard boxes do it yourself
Manufacturing.
- Boxes of the same size of two types are selected - large for the frame, smaller for boxes.
- The boxes are neatly cut off or sealed with lids. Large boxes are fastened with adhesive tape to the rack.
- For smaller boxes, a rectangular hole is cut in the front wall.
- Boxes are inserted into cells.
From the cut parts of the covers, internal partitions and compartments for small items are made. Cardboard easily absorbs water, it is recommended to treat all boxes with moisture-resistant paint and varnish.

Unusual cardboard shelf for shoes made of small triangles
decoration

Shelf for shoes in the style of Provence with the effect of aging
Depending on the material of manufacture, the means of decoration will differ. The design of wooden products will require grinding with sandpaper, processing with carpentry varnish, various stains, wood paint. Wooden structure it will last much longer if it is treated with moisture-proof impregnation with an antiseptic - this will protect against mold and fungus. metal and plastic structures quick-drying paint, self-adhesive film with decorative pattern. Cardboard must be protected from moisture by special impregnation. The shoe rack can be painted in any color according to overall design interior. The decoration is often completed by drawing a picture, an ornament with the help of paint. Wooden crafts often decorated with carvings, a burnt image made using a special device.

Creative triple shelf made of pipe and wood
Video: Simple do-it-yourself shoe rack


")


