Typically, the construction of a building is not the end point of the entire project. In order for the house to last good timing, it is important to follow the rules of care and preventive repair. This is especially true for log buildings. One of key points, which you need to know how to caulk a log house.
What, why, when
A bathhouse or house that was built from rounded logs or logs usually shrinks. In some cases, this value can reach 15–20 cm in the first year. This factor must be taken into account when designing. This phenomenon occurs when some of the moisture is lost and drying out occurs. During this process, loose junctions of material may appear where previously everything seemed quite tight. To compensate for this unpleasant fact, it will be necessary to seal the seams. Simply put, this is an event that is aimed at sealing cracks to prevent drafts and reduce heat loss. Caulking should be done after complete shrinkage, which occurs within 6–7 months.
The better

In order to carry out the process of compacting a log house as efficiently as possible, it is necessary to acquire not only good tools, but also suitable material, and also have an idea of how to use them correctly. From the devices we will need:
- Caulk. This is a small device that in appearance resembles a chisel or chisel. Typically, to carry out tasks efficiently, you will need at least two types. One of them is called typesetting. The width of its blade can reach 10 cm. Thanks to it, you can move faster large plots. The second will be smaller, about 2-3 cm. It will be needed during compaction corner connections. Skilled craftsmen use a curved tool, which allows them to do the work much better, but requires special skill.
- Material that will be used to fill the gaps. Previously, only natural fibers were used for these purposes. Today, synthetic materials have already been invented, as well as various sealants.
- Hammer. In this case, you can use any one you have on the farm, but it’s better if it’s a small sledgehammer.
Some craftsmen believe that it will be more convenient to work with wooden or rubber mallet, since the blow is soft, the logs are not damaged as a result. Opinions may differ, so everyone chooses the most suitable tool for themselves.

Moss
Red marsh moss is used for these purposes. This is one of the most environmentally friendly methods. It serves as a kind of antiseptic that prevents rotting. It has been used for centuries. This material allows the wood to breathe in the best possible way. You can’t lay it too wet, you need to let it dry a little.
If this is not done, this may lead to the joints beginning to rot and the structure becoming unusable. But it is also not recommended to lay it dry. In this state, it will crumble easily, and subsequently will not be able to seal the seams hermetically. Before driving it, it is necessary to carry out certain processing. A water-based solution (10 l) is prepared, to which 500 ml of oil and 250 g are added laundry soap. Mix everything until the soap is completely dissolved. After this, the moss is soaked and laid to drain a little. To make the roller easier to form, some craftsmen add tow fibers.

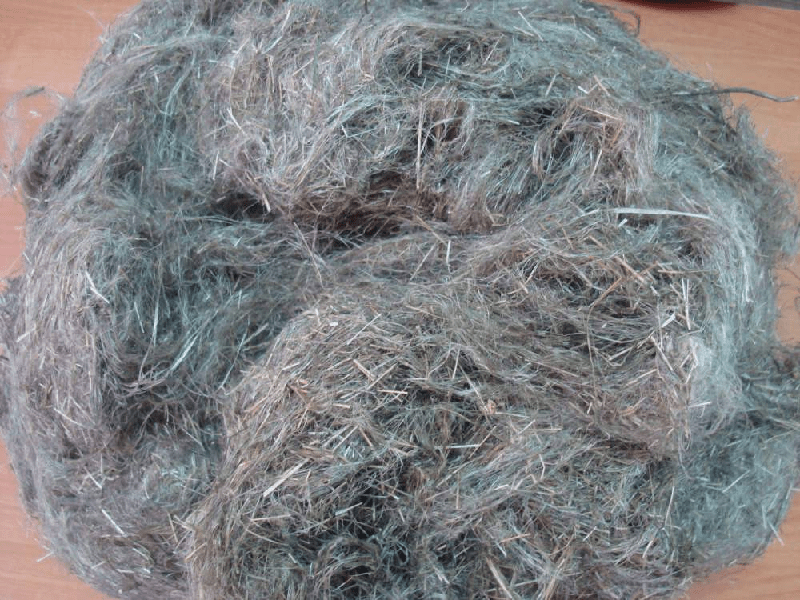
Tow
It is also a natural material that is very familiar to plumbers. Due to its fibrous structure, it serves as a good sealant. Some craftsmen are not very fond of this fiber. The fact is that it is quite difficult to work with him. Also, over time, the tow becomes unusable, which will force you to take out its remains and do everything again. Before laying it, it will be necessary to treat it with a special substance that will serve as an antiseptic and also repel insects that can feed on both the fibers themselves and cause harm to the wood.

An excellent material that, like moss, allows the tree to breathe. He is good filter, which does not allow odors to pass through. Additional synthetic inclusions began to be added to modern material, which made it even more durable. The main disadvantage of using this solution is that moths love to feast on felt. It is treated before caulking special compounds which repel this insect.

A modern material that is 100% flax and is a production waste. It is a good seal that does not interfere with air circulation. It has some rigidity, which complicates the caulking process.

One of the most the best materials. It not only perfectly fills cracks, but also protects the inter-crown space from moisture penetration. Birds don't use it to build their nests, so you don't have to worry about them pecking it off. It is made from wood from the linden family. It is usually imported from other countries. The material is soft and flexible.

Jute rope. In addition to its direct purpose, such caulking serves as a decorative finish.

Sealant
This modern method. Many manufacturers have joined this race. The material is supplied in special tubes. It is applied to the joints, after which a beautiful seam is formed.
What to choose is a personal decision for each individual. Everything will depend on the budget, as well as the availability of a particular material in a particular area. But it’s better not to skimp on material.
Technology

The process of sealing inter-crown seams is divided into two types. They are interchangeable and rather complement each other.
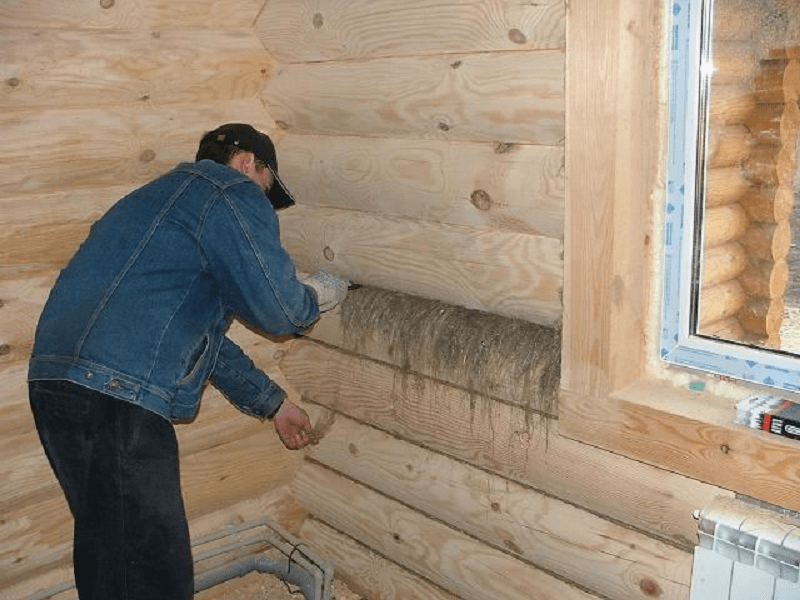
- Stretch. This type got its name due to the fact that the material stretches along the entire seam and the fibers intertwine with each other. It is usually used for primary caulking. After the construction of the log house, the cracks are still quite small, so there is no point in filling them with a thick layer of insulation and it is useless. The material is arranged in fibers so that they are perpendicular to the logs. Using a tool, it is pushed into the cracks. After this, the ends that are left hanging are tucked into a roller and compacted tightly into the seam.
- Included in the set. This method is used after the log house has shrunk and the cracks have become more noticeable. To do this, you will need to collect all the fibers in a heap and make ropes from them, which are then wound into a ball. Moreover, the thickness of such a rope will have to be calculated separately for each seam, because the cracks are not the same everywhere.
After the distribution of roll material, the process of sealing seams was greatly simplified. Primary laying is usually done immediately when laying the logs. To do this, a roll of material is placed on the lunar recess and secured using construction stapler. Next, the log is placed in its place. There is no need to carry out additional work after complete assembly.

During initial sealing, it is important not to save material, but also not to lay it in a large layer. One strip will not be enough, so two are laid. One should go next to the other, and the edges should protrude a few centimeters. This is very important to give stability to the log and make it easier for yourself when re-processing is carried out.
Secondary compaction, which takes place at least six months later, is not the last. In about 4-5 years, when the building has finally settled down, it will be necessary to treat the seams again. You can follow the following sequence:
- We clean the seams from debris and material that has come out or worn out. You can use a vacuum cleaner to make the task easier.
- Caulking needs to be done one by one, not one by one. Those. You need to move around the circumference of each row. This is important so that distortion does not occur and the building is not damaged.
- You should start with outside, and then move inside the building.
- You need to unwind the tape. Its length should be 15–20 cm greater than the length of the wall. This is important, because during the compaction process folds are formed, which will be used for this reserve.
- Now it is important to carefully tuck one of the edges of the tape into the gap to secure it.
- Next, using a caulk and a hammer, we make a compaction. To do this, we lift the hanging end, tuck it in and tamp it down. This operation must be completed in several passes. You shouldn’t try to hammer everything in at once, as this can lead to misalignment faster and the sealing itself will be worse. When twisted several times, a seam is formed in the form of a rope, which is dense enough to not allow air from the street to pass through.
- We repeat the operation with inside.
- We move from the lower (flashing) crown to the upper one. Perhaps in the upper part it will be enough to just carefully tuck the material in without much effort so as not to interfere with further shrinkage.
You need to be careful not to overdo the layering. During caulking, the frame is raised. If you make the backing too thick, it can cause the lift to exceed the size of one log. The consequence may be that the dowels will not hold up and the beams will fall out.
Insulation with sealant is much easier. To do this, purchase a special cord suitable diameter. It is usually made from synthetic materials. It fits effortlessly into the seam to cover the gap. After this, mastic is applied. Its layer should be 5 mm wide and 10 mm high. After application, the composition is sprayed with impregnation, after which it is leveled with a small spatula. In the first few days you will have to curtain the seams on the sunny side, because... usually the manufacturer advises to avoid contact with direct sun rays until completely dry.
The sealant is also used after application natural materials. It helps protect the seal from pests and animals. Inside the house, instead of sealant, you can use twine of sufficient diameter to decorate caulked joints.
Usually, self-sealing a log house does not cause any particular difficulties and does not require great skills. The only thing you need is patience, because it will take a lot of time.
Video
This video shows the process of caulking with acrylic sealants:
After installing the log house, there is still a lot of work to be done, including caulking the bathhouse. This must be done to close the gaps between the timber or logs and to insulate the walls. Without proper caulking, the bathhouse will be ventilated, and the heat will quickly leave the room. In addition, logs or beams will soon become unusable, crack and become damp.
You can easily caulk a bathhouse with your own hands, since this process not very complicated. But it is important to choose the right materials and carefully follow the technology. Let's find out how to properly and what is the best way to caulk a bathhouse made of logs or timber.
Features of bath caulk
It is important to perform this procedure correctly, otherwise errors during installation will cause the walls to warp or cause serious cracks and cracks. This is a simple process, but quite long and monotonous. Therefore, you need to be patient! Caulking is done six months after the installation of the log house, when most of the shrinkage of the tree has passed. After this caulking, you can already install windows and doors.
If a second caulk is needed, the procedure is performed a year after the first (1.5 years after installation of the log house). Depending on the quality of work and material, another caulk may be required after 4-5 years. In any case, this procedure is very important for wooden buildings.
Bath caulk performs the following useful functions:
- Reliably closes cracks and gaps in wooden walls between crowns and ceilings, logs and crowns, in window and door frames;
- Eliminates cracks in wooden log house, which are formed during the shrinkage process. Caulking prevents the growth and appearance of new cracks;
- Enhances the thermal insulation qualities of wood and retains heat indoors for a long time, which is especially important for a bathhouse;
- Protects the room from wind penetration, internal wooden walls - from negative impact moisture;
- Seals cracks in an already built house or bathhouse.

Among the materials for caulking there are natural and synthetic species. Natural jute, tow and moss are traditional products that have been used for a long time. From modern artificial materials use industrial sealants. Each product has its pros and cons, and which one to choose is up to each owner to decide. Also among the tools for caulking you will need a hammer, a 20 mm chisel and a rubber mallet.
Natural materials for caulking
The oldest and most proven method is to caulk a bathhouse or house with moss. This is an environmentally friendly and safe material that will retain its natural properties and aesthetics. wooden structure. It effectively resists the negative effects of bacteria and prevents the formation of fungus or mold, quickly absorbs moisture and does not rot. However, it is not very convenient to use. Moss is optimal for baths and sealing cracks in a wooden house.
Processing with jute is also good for baths, as this environmentally friendly material preserves natural properties and tree safety. This fiber is distinguished by high strength, thermal insulation, resistance to moisture and decay. Roll material with an even structure it is easy to lay between the crowns. However, jute often becomes a breeding ground for moths, so it is recommended to treat the material with a moth repellent before use.
Tow represents waste after the primary processing of natural fibers of jute, flax or hemp. This is a very difficult and inconvenient material to work with. In addition, when a log house shrinks, it gains moisture, rots and turns into dust.

As a result, this rot has to be cleaned out and the bathhouse frame caulked again. Among the advantages of tow, we note the environmental friendliness and safety of the fiber, high antibacterial and thermal insulation properties. However, due to its complexity and fragility, tow is not recommended for caulking baths or at home.
Sealants
Modern sealants have long filled the construction market. These are quick, convenient and easy to use products that are well suited for independent work. However, in this case, it is important to choose high-quality sealants from a reliable manufacturer, since some do not tolerate exposure to sunlight and wind.
As a result they lose beneficial properties and are blown out. Additionally, some types of sealants can damage the wood fibers when they dry. To avoid this, use elastic products (acrylic) that contract or expand with the wood.
At the same time, sealants have a large number advantages, including not only easy and quick installation. Such products are characterized by high thermal insulation qualities, resistance to moisture, cold and temperature changes. In particular demand today warm seam using acrylic sealants. This product contains rubber, which gives elasticity and prevents small hidden cracks from cracking further.

Acrylic sealants are safe and environmentally friendly, making them ideal for processing wooden bath or at home. They do not emit toxic substances and allow the wood to “breathe”. These products can withstand high temperatures and do not have unpleasant smell, are distinguished by quick and easy finishing. They do not allow wood to rot and have wide choice color range. Read more about acrylic sealants and “warm seam” technology read.
Features of caulking using different materials
If you are using moss, the material must first be completely dried and re-moistened before use. To do this, soak the material for 30-60 minutes and squeeze thoroughly. The soaked moss is laid out between the crowns in an even layer so that the ends of the material stick out on both sides of the log or timber. After this, the too protruding and long parts of the material are trimmed and tucked into the cracks of the log house. After a year, re-caulking must be done.
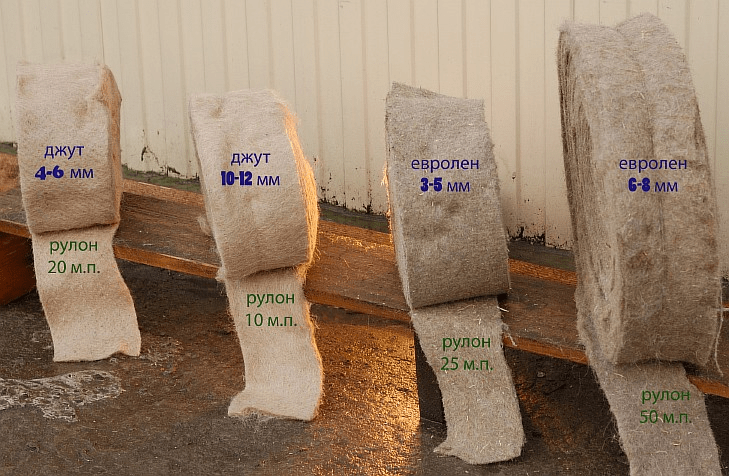
When using tow, it is better to choose rolled tow, as it is easier to use. If you choose tow in blocks, a strip of material is pulled out of the block and a rope is twisted, which is then placed into the seam. Take jute with a fiber length of more than two centimeters. Short fibers fall out easily and are blown out.
Caulking with natural materials is carried out using two methods. The “stretching” method assumes that the material is divided into separate strips and placed in the gaps between the rims. The insulation remaining outside is rolled into a roller and driven into the groove. The “bundle” method means that the fibers are separated into strands and wound into a ball, and then pushed into the spaces between the logs or beams.

When choosing a sealant, first lay a heat-insulating cord made of polyethylene or jute fiber in the cracks. This will reduce the consumption of the main product and increase the thermal insulation properties of wood. And then sealant is applied over the cord in a wet state with a layer thickness of 4-6 mm.
Then the layer is leveled with a spatula or spatula, and the remains are cleaned with a rag. The sealant is left to dry for two days, while it is important to protect the seam from moisture. You will find detailed instructions for use on the packaging of each product.
Bath caulking technology
- Before starting work, logs or beams are cleaned of dust and dirt. You can cover the wooden surface with construction tape or masking tape so that the insulation does not get on the walls of the log house;
- Start with the bottom crown and move around the perimeter of the bathhouse, first from the outside, then work the bottom crown around the perimeter inside. Only then move on to the next crown! Each crown should be caulked in turn, without skipping rows;
- Pay special attention to the corners of the bathhouse, as in these places there is large number cracks and large gaps;
- During the process, carefully monitor the evenness of the walls of the log house and check how the insulation fits. The material should lie tightly, evenly and not form bubbles;
- Do not use under any circumstances polyurethane foam for caulking a wooden bathhouse or home! It violates the naturalness and environmental friendliness of materials, reduces the service life of insulation;
- After completing the work, check the quality of the work. To do this, try removing the material or piercing it with a sharp object. If you can remove an entire strip or pass a sharp tool through the insulation, the work was not done well.

When laying insulation, it is very important to follow the technology, otherwise incorrect actions will not allow you to get maximum efficiency from the caulk. The room will be ventilated, and the caulking itself will have to be done again every two to three years. In addition, mistakes can lead to skewed walls, rotting of logs or beams, and lumber falling out of locks!
To avoid possible problems and get quality work, contact professionals. The masters of the MariSrub company will reliably and quickly carry out caulking and insulation of the log house of a bathhouse or house. We provide a full range of services for the construction and finishing of wooden buildings.
The scope of work includes the production of lumber and the creation of a project, installation of a log house, installation of the roof and foundation, installation and connection utility networks, finishing. We provide high-quality insulation and caulking of log houses, and seal seams!
Despite wide range materials, construction of houses from natural wood is still a priority for many people. Wood is not only environmentally friendly, durable and reliable material. Houses made from timber “breathe”, which allows you to maintain a healthy indoor microclimate. But in order for your home to be warm and free of drafts, you need to correctly follow all stages of construction.
Insulating a log house is very important step, which will help maintain heat in the home and prevent the penetration of moisture and dampness into the room. Since ancient times, log houses were caulked with moss; at that time it was the only available material for home insulation. Modern choice The number of insulation materials that can be placed between logs is much wider. Caulking the gaps between the beams provides high-quality thermal insulation.

Stages of log house insulation
A log house shrinks over several years. Despite the fact that a crown seal is always placed between the logs, it is not possible to avoid cracks and gaps in the walls.

The first time the log house is caulked immediately after or during construction. The work process itself is quite painstaking and time-consuming. The walls are insulated a second time after a year or more. During this time the logs are exposed to environment, which may cause the material to become slightly deformed. It is the cracks that appear after shrinkage that need to be caulked again.

The third time the walls of the house need to be caulked is after 5 years after the construction of the log house. During this period, the house will finally shrink and the material will take on its final shape.

Important rule! You need to caulk the log house strictly according to the scheme: start sealing the gaps on the lower crown, along the entire perimeter of the house. Only after one row of logs is sealed can you begin to insulate the second row. If this rule is not followed, the log house may warp.


“Stretched.” This method involves pushing the insulation material into the gaps using a special tool. In this case, the gap is tightly filled with insulation, the remaining material is tightly rolled into a roller and forcefully pushed into the gap.
"Recruiting." This method is suitable for filling wide gaps. The insulation is made into bundles, which are then twisted into loops. These loops are pushed into the gaps and completely fill the free space. With this method of insulation, material residues do not stick out from the cracks.
Materials for filling gaps between logs

Natural materials
Moss. Despite the fact that moss has been used to insulate walls for many centuries, it still does not lose popularity. This natural material is not only environmentally friendly and safe, but also provides long-term antibacterial protection for wood. Moss prevents mold and mildew from growing in the gaps between logs.


Before caulking the walls, high-quality moss must have a certain moisture content and not be too dry or too wet. The only drawback of this material is its high cost.
Tow. This material is also often used to insulate log houses. Tow does not cost much, but working with it requires effort. This material is not the best best sealant, since fibrous tow is capable of absorbing moisture, which after a few seasons can affect the wood. Damaged tow is quite difficult to remove from the gaps. You should also pay attention to the possibility of moths eating the insulation, which will affect the quality of wall insulation.


This material is made by grinding flax and pressing it into ribbons. Linen wool has good heat-saving properties, is not subject to rotting, and does not accumulate moisture. This material is laid between the crowns during the construction of the log house. Attached to logs using a construction stapler.


Jute. Today it is one of the highest quality and durable materials for caulking log houses. Jute tapes are laid between the crowns during the construction of the log house. Attached to brackets. Jute does not rot, is not hygroscopic, and is durable. The only drawback is the rather high cost of the material.
Also, when purchasing insulation, you should pay attention to the fact that the material should not contain any secondary additives, for example, flax. If there are additives, then the insulation is not durable and resistant to rotting.

Rubber sealants

Working with these insulation materials is quite simple, not labor intensive and does not require effort. Sealants can be divided into three types.

Soft sealant in special tubes is squeezed into the cracks, filling the entire space. Excess extruded material is leveled. This sealant can be matched to the color of the wood, which will improve the appearance of the log house.
Video - Insulating a log house with acrylic sealant
Polyethylene foam in the form of a cord is pushed into the cracks and leveled. After drying, it can be coated with varnish or other covering material. Sold in different color options.
Briquettes for caulking a log house require the use of a special electric caulking gun. The liquid mass is squeezed into the slot through the nozzle and fills the free space. This method of insulation is perfect for walls with large gaps, since the tool has several attachments with different diameters nozzles

Tools for caulking log houses

If sealants are not used for insulation, then before caulking the log house you need to purchase the following set of tools.

Mallet. A hammer with a wooden or rubber base for working with blades.
Stacked caulk. This tool has a narrow spout that makes it easy to push material into narrow crevices.
Crooked caulk. This type of instrument has a curved shape. Allows you to quickly fill gaps of uneven width with insulating material.
Road worker. This is a wide spatula, similar to a spatula. Allows you to work faster with gaps of equal width.
Breaking caulk. With its help, the gaps between the crowns are slightly widened for better styling thermal insulation.
What you need to know before starting work
- The process of insulating and sealing walls using natural materials is a rather labor-intensive task. With this procedure, the material is forcefully driven into the cracks, which helps raise the entire structure of the log house by 10 -12 cm.
- Before insulating walls, you cannot carry out any finishing works inside or outside the house. Raising the crowns can cause damage to the entire finish.
- You need to start work from the lower crowns of the structure. The material is driven into the cracks evenly and consistently. After the lowest logs around the entire perimeter have been insulated, you can work on the overlying crown.
- Caulking only one wall can lead to deformation of the entire structure of the log house; it is also not recommended to use it for insulation of one building different materials with different hygroscopicity indicators. When moisture accumulates, the insulation tends to expand, which can also lead to distortion of the frame.
- If self-insulation led to the distortion of the building's structure, do not panic. Professionals who do this type of work can correct defects by re-caulking.
- Particular attention should be paid to caulking cracks at the corners of the house. Since a locking or groove fastening system was used for the construction of the log house, the gaps may vary in size.

To insulate stretched walls, tow or other fibrous materials are most often used. You need to take a bunch of insulation in your hands, smooth it out, forming a wide strand. The material is then applied to the gap. It is important that the fibers run across the gap.

The insulation is pushed between the logs, the remains of the fibrous material should stick out 5-6 cm from the gap. Then a dense roller is rolled up from the protruding fibers, which, using a tool, is forcefully pushed into the gap and hammered in with a chisel. After this procedure, the material should not protrude more than 1 cm between the logs. The amount of material from which the strand is formed depends on the width of the gap. How bigger slit, the more insulation you need to take.

For this type of insulation, it is necessary to pre-prepare the material. Thin and long strands are formed from the insulation, which are rolled into a ball. Then the resulting bundles are folded into loops, which are pushed into the gaps between the logs. This method of insulation is suitable if the cracks in the log house are large and different in width.

When caulking, the loops are first driven into top part gap, then compacted into the bottom. In this way, you can achieve uniform filling of the space between the logs and high-quality thermal insulation of the walls.

If jute was used as insulation, then after the house shrinks, additional thermal insulation of the log house is required. When laying the crowns, the jute should be placed between the logs so that the edges of the insulation protrude a few centimeters in the gaps. After the log house has shrunk, it is necessary to additionally caulk the walls. To do this, the protruding ends of the jute are tucked down and forcefully driven into the resulting gaps. It is also necessary to follow the insulation technology: sealing the gaps must begin from the lower crowns.

At the very upper crowns, which are located high, there is no need to drive in the insulation with a mallet. It is enough to push the jute into the gaps with a spatula.
Video - How to properly caulk a house using jute
Preservation of log bathhouse building to a large extent depends on the choice of what and how to caulk the bathhouse, the ability to correctly identify future problems with crowns, and mastery of tool operating skills. First of all, you need to know which inter-crown insulation to choose for a bathhouse. You can, of course, give up and seal the joints with silicone, but this will only make the situation worse. It’s still better to do a full-fledged caulking of the bathhouse with your own hands.
Why do you need to caulk a bathhouse?
Craftsmen usually answer such a question simply - so that the log house does not rot or fall apart. Without a seal, a log box becomes a cold, eternally creaking hut. If you do not caulk the bathhouse and seal the seams hermetically, then the supporting surfaces of the crowns will rot in a year or two and the log house will simply “sit down” or fall on its side to the north.
In addition to choosing how to caulk a log bathhouse, it is important to do the job correctly, so we will try to understand the means used, the tools and the rules for caulking a bathhouse.
For high-quality sealing stitches required:
- Packaging jute, flax tow, proven over the years, or any other type of sealant with a fiber structure;
- A set of tools - a wooden hammer, a spatula, a wedge knife and a hook for stripping a seam or an electric groove;
- Brush with stiff bristles;
- Carpentry measurer.

Advice! There are few tools, but they will all be needed for the job. The first time you can rent them. After the first appears practical experience, it will become clear how to properly caulk a bathhouse, then you can buy a good kit or make it yourself.
If you want to seal the seams with sealant, fortunately there are quite a lot of different brands and types of them sold for bathhouse needs, then in this case no tool other than a nozzle gun for a tube with liquid polymer will be needed at all. It is possible and necessary to spray the joints with sealant for a log bathhouse in one day; the technology requires laying the paste-like mass in two passes with a difference of no more than four hours. Any disruption of the process can lead to peeling of the sealant, whereas caulking the frame of a bathhouse can be done in a couple of days with breaks.

Choosing material for padding
Traditionally, seams and joints between wooden parts are sealed with a moisture-resistant, durable and necessarily easily deformable material. Interventional insulation for a bath can be made from:
- Synthetic polypropylene fibers, for example, in the form of a tape of woven and non-woven structure;
- Organic fiber, primarily jute cords and flax tow;
- Natural plant fibers from certain types of moss for baths.
For your information! Sometimes there is a problem of choosing what moss is better or jute for a bathhouse or are trying to determine before starting work whether it is better to caulk with synthetics or organics. You need to choose based on the degree of shrinkage of the bathhouse frame and the size of the seam between the crowns.
What is better, moss or tow for a bath?
Today, both materials are recognized as the most durable and reliable of all traditional fiber seals. In both cases, the decisive factor is not even the type, but the quality of the preparation of the material.

Moss is recognized by all masters as universal remedy for sealing crowns. Most often they try to caulk the bathhouse with red or white moss. Bunches of plants are prepared 2-3 weeks before the start of work. Before caulking the bathhouse, remove debris and dry the moss under a canopy, periodically turning over and shaking the layers.
The organic matter should remain slightly moist. After drying, the fibers turn into a springy and strong wire-like structure.
Caulking walls with moss is not difficult; you just need to correctly measure the amount of material and the force of hitting the shovel with a hammer. The easiest way is to caulk the seams immediately on the new log house, after assembling the walls of the bathhouse. After shrinkage, after a year and a half, the procedure will have to be repeated with the same material.
For your information! Often, craftsmen who undertake to caulk the walls of a bathhouse tell stories about the bactericidal properties of mosses, the ability of the plant to germinate and completely fill the gap between the crowns.
In fact, the seal can bloom and turn green only if the birds have collected seeds and grass in the spring. If you caulk with organic matter, the seal can easily become a source of problems, from the appearance of fungus to green sprouts. Therefore, you still need to be able to prepare the moss for the bathhouse for caulking. If it’s too dry, the material becomes brittle and doesn’t hold well in the gap; too wet moss is very difficult to caulk into the seam.
How difficult is it to caulk the walls of a bathhouse with tow?
Tow or combed flax fibers twisted into bundles are safer than moss or jute. Due to its soft and thin structure, working with linen material is more difficult than with any other sealants. Tow is convenient for caulking the seams on the walls of a rounded bathhouse. Interventional gaps on log buildings are too large, so the fiber has to be rolled into several loops. Technologically, this does not affect the quality, but it can seriously delay the caulking process over time.

Flax tow, thanks to the small amount of non-drying oils remaining in the fabrics, has the best damping properties of all possible sealants, both natural and synthetic. Tow for a bath is very well suited for sealing corner locks, especially hand-cut ones. When shrinking, it does not make frightening squeaks or sounds; the process itself occurs without any complications.
The only drawback is the low durability of flax fiber. IN log house Tow caulking will last up to 5 years; in a bathhouse, the fiber will burn out in 2-3 years.
Jute fiber
The stems of jute hemp processed by mechanical combing, Jute Tassa, produce a tough and at the same time durable fiber, which is used not only as a sealant on the walls of the bathhouse, it perfect material for containers and technical fabrics. Jute is produced in the form of coils, ribbons, and ropes, which allows you to caulk cracks on the walls of a bathhouse many times faster than using tow and moss.

Technical jute has only two disadvantages:
- High hygroscopicity;
- Susceptibility to rotting when soaked for a long time.
Jute for a bathhouse is interesting because during the shrinkage process it ideally fills the inter-crown space, especially if the log house is built from chopped logs. In this case, you only need to caulk with jute fiber and rope.
If according to the project the bathhouse building is planned to be faced decorative finishing, jute rope will simply rot in a couple of years. The tapes are laid to seal the crowns of the new log house; the rope is good for finishing the open surfaces of the walls of the bathhouse.
In fact, jute occupies an intermediate position between dense and hard moss and soft flax tow.
Synthetic materials
In addition to natural fibers, you can caulk a bathhouse more modern materials, for example, a composite rope consisting half of polypropylene threads and wool fibers. This type of caulking ensures strong retention of the seal even when the gap expands.

Caulking with synthetics is much more difficult; in addition, polypropylene burns out and crumbles under the influence of ultraviolet radiation, so for a bath it is best to use seals made of natural materials.
Seam filling technology
The process itself looks easy. In theory, it is necessary to caulk the crowns of a successfully constructed bathhouse twice, immediately after construction and after completion of the shrinkage processes. In practice, caulking is done every three years, especially if the log has not been sanded and rounded.
First of all, before caulking the bathhouse, you need to inspect the seams, check and free the joint line from the old burnt-out seal. If the gaps in the inter-crown space of the bathhouse are supposed to be caulked with a cord or rope, then you will first need to measure the maximum drawdown of the crowns with a gauge.
This is done in order to determine the uniformity of shrinkage of the bathhouse building. If on one side the seal is pinched and compressed, and on the other it has fallen out of the cracks, then before caulking the box you need to determine the reasons for the uneven settling of the log house. At the same time, we specify the required thickness of the jute or flax hemp rope.
Sealing the material with tape
The easiest way to caulk a bathhouse is with a tape seal. After measuring the cracks, it becomes clear what width of tape should be used in this section of the log house. One end of the roll is secured in the gap at the corner, the sealing strip is carefully unrolled along the wall without twisting, a margin of 20-25 cm is left and cut off.
The ribbon laid out on the gap is carefully tucked into the gap so that the material does not sag or be stretched. Caulking begins from the widest edge, using a hammer and a wooden spatula with a rubber tip. The ribbon is pressed into the slot with light blows. It will be necessary to make 3-4 passes so that the sealant evenly and completely fits end-to-end between the crowns.

It will be necessary to caulk three or four pieces of tape before the desired joint seal can be achieved.
For your information! In this way, the cracks along the entire perimeter of the crown are sealed before it is possible to move to the next higher level.
If you caulk the entire wall at once, then one edge of the log house may rise by more than the thickness of the log, which will lead to the breakage of the upper rows of the bathhouse.
Caulk joints of tow
The procedure for sealing the inter-crown space with bundles of fibers, such as tow or linen yarn, is a little more complicated. After cleaning the seam between the logs, the future place where the tow will be laid is rubbed with a mixture of formaldehyde, alcohol and linseed oil. You can impregnate individual cords with a disinfectant mixture before laying them in the wall of the bathhouse.

You need to caulk the bathhouse wall in the same sequence as when using tape. If the thickness of the seam is small, then the material can be laid by immediately rolling cords of 2-3 mm thick from the fiber. A tightly rolled roll of tow applied to the gap, without blows, is carefully pressed into the gap with a spatula.
For the next pass, roll up a thicker cord from tow, about 3-4 mm; this time you need to caulk the seam with force. For the last pass, a thick rope is rolled up, sometimes up to 8 mm. The material is hammered into the gap so that the edge protrudes above the line of the bathhouse crowns by no more than 3-4 mm.

If there are wide cavities between the crowns, they are caulked with additional ropes made of tow with a lubricant of any rubber-based elastic adhesive. In the same way, cracks in the logs of the bathhouse walls are clogged. The repaired areas are rubbed with additional acrylic paste.
Conclusion
Before caulking a bathhouse, it is best to practice small area, in order to evaluate how correctly the embedding is performed, and at the same time measure how high the top log of the crown rises. If the force is too great, the log house can rise by 10-15 cm; with a soft seal, the walls quickly settle into place; with a hard synthetic material, the shrinkage process can take several weeks.
Caulking a log house is a painstaking process that requires patience and great effort. Everything matters here: the tool, the quality of the material, the sequence of work. Without the appropriate experience, not everyone can properly caulk a log house, so first you need to familiarize yourself with the technology, study caulking methods, and choose the right inter-crown insulation.
Caulking of a log house is carried out in two stages - immediately after construction and after some time, when shrinkage occurs. Primary (or rough) caulking can be carried out in two ways: with laying insulation during the process of assembling the walls or performing one-time work upon completion of construction.

1 way
Lay the bottom row of logs on the base.

Then the insulation is spread on top so that the ends of the material hang evenly on both sides. Next, lay the second crown, and again a layer of insulation. This is repeated until the very top of the log house. After all work on the construction of the log house is completed and the roof is installed, the protruding ends of the seal are driven into the gaps between the beams using caulking.

2 way
Caulking begins after installation roofing system to the log house Insulation (preferably tape) is applied to the seam of the bottom row and, using a tool, is pushed into the gaps between the logs along the entire length, leaving hanging edges 5-7 cm wide. Then these edges are folded in, formed into a roller and hammered inside the seam. Repeat the procedure in the next row and so on until the top of the structure.


The second stage of caulking is carried out after shrinkage of the log house - after 1-2 years. The selected insulation is applied to the cracks between the crowns and driven tightly inside. You should always start work from the bottom row, and be sure to do it along the perimeter of the log house.

You cannot caulk one wall first, then the second, and so on. In addition, each row is caulked both from the outside and from the inside to avoid distortions in the structure. The insulation raises the frame by 5-10 cm, and its uneven distribution contributes to the vertical deviation of the walls. IN in some cases The log house is caulked for the third time - 5-6 years after construction. During this time, the wood completely shrinks and new gaps form.

There are two ways of caulking - “set” and “stretched”. The first is used to eliminate wide gaps between logs, the second is usually used during primary caulking, when the gaps are still narrow.
To work, you need tools - a set of caulking tools, a road worker and a mallet. As a rule, metal caulks are used, although many craftsmen make them themselves from hard rocks tree.

| Name | Description | What is it used for? |
|---|---|---|
| Flat metal or wooden spatula. Blade width 100 mm, thickness 5-6 mm | The main tool for filling gaps between crowns | |
| Flat chisel with a blade width of 50-60 mm and a thickness of up to 5 mm | Used to seal seams in corners and rounded areas of a log house |
| The caulk is triangular in shape with a longitudinal groove along the blade. Width - 170 mm, thickness 8-15 mm | Tool for forming even rollers from twisted strands of compaction | |
| Thick and narrow wedge up to 35 mm wide | Widens narrow gaps, making it easier to fill with insulation | |
| Wooden hammer | Used for filling the seal with wooden caulks |

The caulking blades should not be sharp, otherwise when driving the material they will cut it. Pay special attention to the surface of the blades: if it is rough, the insulation fibers will cling and be pulled back out of the seams.
Caulking materials

As interventional insulation The following materials are used:
- red and white moss;
- tow;
- felt;
- jute;
- flax wool
| Type of material | Description |
|---|---|
| Ecologically pure material, which has antiseptic properties. If you independently procure raw materials, the costs of insulating the log house will be minimal. It is usually collected in late autumn, when there are no snails and fewer insects. Immediately after collection, the moss is sorted, lumps of earth and debris are removed, and slightly dried. There is no need to dry it too much, otherwise the stems will become too brittle and unusable. Purchased moss must be soaked before caulking to make installation easier. Pros: durability, low thermal conductivity, resistance to temperature changes, environmental friendliness, antimicrobial properties, low cost. Cons: difficult to find on the market, protection from birds is required, requires pre-treatment before installation |
|
| Tow is suitable for the initial caulking of a log house and for sealing the crowns after shrinkage. It is made from flax fibers, and depending on their quality, it is divided into bales and rolls (tape). Rolled fiber consists of shorter and stiffer fibers, which makes it difficult to stuff between the crowns. Tape tow is better in quality, softer and more convenient for caulking. Pros: has low thermal conductivity, does not electrify, is highly absorbent and dries quickly, has bactericidal properties. Disadvantages: labor-intensive installation, unaesthetic appearance of seams after caulking. |
|
| Until recently, natural felt was widely used in the insulation of log houses. Now its composition is supplemented with synthetic and plant fibers, which significantly improve its individual properties. And yet, felt insulation without additives has a number of advantages: it has high vapor permeability, does not allow odors to pass through, provides good noise insulation, has low thermal conductivity, is easy to use, and is environmentally friendly. Cons: susceptible to rotting, easily damaged by moths |
|
| Traditional insulation materials are increasingly being replaced by materials such as jute. It is available in the form of fibers, ropes of any thickness, and also in the form of tape. Tape jute is soft and pliable, compacts evenly, and is used for both primary and repeated caulking. It is more convenient to use jute fibers and ropes after shrinkage of the log house. Pros: it is durable, not damaged by moths and other insects, does not rot, and provides a favorable microclimate in the building. Cons: the material cakes quickly, short term services. |
Prices for tow

Primary caulking “stretched”
The whole process is divided into two stages - laying insulation between the logs during the construction of a log house and the caulking itself. The insulation is laid after installation of each crown. If moss is used, it should be slightly damp.

Take a large bunch of moss and lay it in fibers across the log so that the ends of the fibers hang down on both sides by 5-7 cm. The next bunch lies close together.

The fibers must be evenly distributed over the surface, forming a layer of equal thickness. The wood should not show through the moss, so make the insulation layer thicker. It is better to put too much than not to add, because a thin layer will not be able to effectively protect the seams from blowing.

If used tape insulation, installation is much simpler and faster: the tape is rolled out along the crown and secured with the staples of a construction stapler. When the tape runs out, the new piece is overlapped by 5 cm so that there are no gaps at the joints. After the entire row around the perimeter is covered with insulation, the second crown is installed.

So, the log house has been erected, the roof has been installed, and the walls can be caulked.


The procedure for caulking and sealing cracks after shrinkage of a log house
It is more convenient if the insulation is tape, then forming a roller out of it is much faster. When twisting the material, it must be slightly stretched along the seam, which promotes greater compaction and uniform distribution of the insulation. Sometimes the thickness of the roller is not sufficient to fill the gap, then they take additional strands and wrap them in the hanging ends of the material. After this, the thickened roller is driven into the gap.

If during the construction process insulation was not laid between the logs, caulking is performed in the manner described above, only more material will be needed. It is necessary to apply it to the seams with the fibers across. The longitudinal arrangement of the fibers will not provide the required density; the material will not be able to be firmly fixed and will constantly crawl out of the grooves. When choosing a tape compactor, make sure that the width of the tape is several centimeters greater than the thickness of the log. Edges that are too short are difficult to tuck, and therefore the quality of caulking will be poor.
- The edge of the tape is laid on the ground near the corner of the log house and retreated along the wall, unwinding the roll. The material cannot be pulled, it should simply lie in an even strip on the ground. It is very important that the tape does not twist during the unwinding process. Having reached the second corner, the roll is also left lying, nothing is cut off yet.

- Return to the beginning of the tape, take it by the edge and apply it over the seam. Using a caulking blade, press the tape in the middle, leaving the edges to protrude by 5-7 cm. In this way, the entire inter-crown seam is passed.

Insert insulation into the seam
- Measure out another 25-30 cm of tape and only then cut it off the roll. This reserve will allow you to hammer the grooves more tightly without adding insulation.
- Now, little by little, straightening and tucking the edges of the material, they begin to caulk the seam. The tape should completely disappear into the gap between the logs along with the reserve.

- As a rule, one layer of tape is not enough for high-quality filling, so everything will have to be repeated two or even three more times.
- The finished seam should protrude from the grooves no more than 3-4 mm and be of uniform thickness.

Prices for caulk
caulk
If the gaps between the crowns are very wide, caulking is used “in a set”. For these purposes, tow, hemp ropes or jute cords are used. Long strands are formed from tow and wound into a ball. Finished cords or ropes are also wound into balls for convenience.

Start from the edge of the lower crown:
- clear the gap, removing loose chips and debris;
- unwind a small amount of cord, fold it into loops and push it into the gap with caulk;
- seal the loops first in the upper part of the gap, then in the lower part;
- put another strand on top, this time without loops, and level it with a road worker.

Further along the seam, the strands are laid in one layer until the next gap. The more densely the voids are clogged, the better insulation. Try not to leave hanging fibers: firstly, they spoil appearance walls, and secondly, the seal can be pulled away by birds. Having finished caulking the first row, they move on to the second, and everyone repeats in exactly the same way.
To make the log house decorative, you can hammer a jute cord along the entire length of the seams.

Caulking corners
The corners are caulked separately after the work on the walls is completed. It is also more convenient to use tape insulation here.

Since the seams between the logs at the corners have a semicircular shape, you will need a curved caulk.

Step 1. The tape is positioned vertically. They take it by the edge and apply it to corner seam and press it inside with caulk. They step back a little and drive the material into the gap again.
Step 2. As soon as the insulation has been secured a little, they begin to tuck the protruding edges and drive them deeper into the cracks.
Step 3. After filling and leveling the top seam, move on to the second. The material must be constantly straightened and stretched a little so that it lies more evenly.
This is how the entire corner is sequentially compacted. The seams should not protrude more than 5 mm, otherwise the appearance will be sloppy.

Video - How to caulk a corner of a log house
Caulking a log house with sealants
Caulking of log houses with special sealants, which are easy to apply, give the seams a very aesthetic appearance and reliably protect against blowing, is gaining popularity. If the log house is made of rounded logs or laminated veneer lumber, and jute is laid as insulation between the crowns, you can only use sealant and a rope made of foamed polyethylene. Sealing of seams is carried out no earlier than shrinkage of the log house occurs.
Step 1. The joints between the logs are cleaned of dust and clogged debris and wiped dry with a rag.
Step 2. A primer primer is applied along the perimeter of the seams using a brush or sprayer. If work is carried out in winter, the primer should be rubber-based, summer time- on the water.
Step 3. After the primer has dried, a rope of foamed polyethylene is inserted into the seams, the diameter of which is selected according to the width of the gap.


Step 4. Apply sealant. They use the composition in tubes, which is applied using mounting gun, in buckets and in the form of a tape. The latter option is very easy to use: remove the protective film from one side of the tape, apply it to the seam, press it with your hand and roll it with a roller.


Step 5. After sealing all inter-crown joints, remove the outer layer of film so that the sealant hardens. Finally, the joints are coated with colorless varnish or a tinting compound is applied, depending on the color of the sealant.

When applying the composition with a spatula or from a tube, the sealant should be smoothed and excess should be removed with a damp cloth.
If the logs for the log house were harvested by hand, more uneven gaps will form during shrinkage. Here, one sealant and a polyethylene cord will not be enough. In such cases, caulking is performed traditional way, after which the seams are sealed with sealant. After such treatment, there is no need for subsequent caulking.
Video - How to caulk a log house
 Simple sections")