Today we publish paper house plans for beginners. This is a very simple and lightweight paper house model. Even a novice modeler will be able to glue it. You can implement the acquired skills when gluing more complex models, for example, "".
We glue the house out of paper
- To glue the paper house model, print it on two sheets of plain thin office paper.
- Cut out the diagrams of the details of the house.
- Transfer their contours to a sheet of whatman paper or other thick paper.
- Cut out the pieces and glue them together. This will make the parts more durable.
- Use sharp scissors to cut.
- Using a drawing metal ruler and a pen or toothpick, make straight lines of bends.
- Glue the parts into a house model. When gluing, use transparent types of adhesives designed to work with paper. Try to apply glue in moderation.
- Use paper towels to wipe dirty fingers, this will keep the model neat.
- When the model of the house is glued together, with the help of paints, paint it.
Schemes of details of a house made of paper
For dessert, we offer you to watch a funny cartoon "Three heroes against Godzilla"
How are you not glued yet? Well, it's useless...
Many people, seeing the beautiful and neat models of buildings made by architects, dream of learning how to create the same small copies of beautiful houses. It is difficult to learn how to make real difficult layouts, but it is in your power and probabilities to assemble a decorative model of a house on a scale of 1:50, having previously drawn on paper the silhouettes of the details and facades of the house, as well as the roof and frame.
Instruction
1. To create a layout, you will need plywood 6-8 mm thick, as well as materials for facades, partitions and roofs. Make the frame of the house out of plywood and place it on a flat surface.
2. Separately prepare the facades cut out according to the drawings, and cut door and window openings into them. After that, sand the cuts and joints.
3. Make the base of the house from wide slats, gluing them onto the finished box of the house, and also separately make a porch with stairs from solid wood bars.
4. From thin plywood, cut out the doors and window casings separately, sand them with sandpaper, paste over the silhouette with thin slats and glue them tightly to the frame of the house in the openings. Instead of glass, insert plexiglass of millimeter thickness into the windows with plastic or wood frames glued on the outside.
5. Take a separate sheet of plywood and saw out a gable roof for the house, and then roofs for individual buildings if you want to complement the house with a yard. Solder downspouts and gutters from thin tin, and then fix them on the roof slopes. Chimneys are made from small pieces of wood.
6. Later, after the small details are ready, start assembling the house. First, assemble the box of the house, then place the roof on it, then fix the porches at the outer doors.
7. Carve individual beautiful posts or slats with which you close the joints of plywood sheets so that the house looks more beautiful. Sand the surface of the building, cover it with stain and varnish or paint it with paint.
8. Start production of building models with primitive models - say, small huts or barns. After that, you can improve your knowledge and move on to building more difficult layouts.
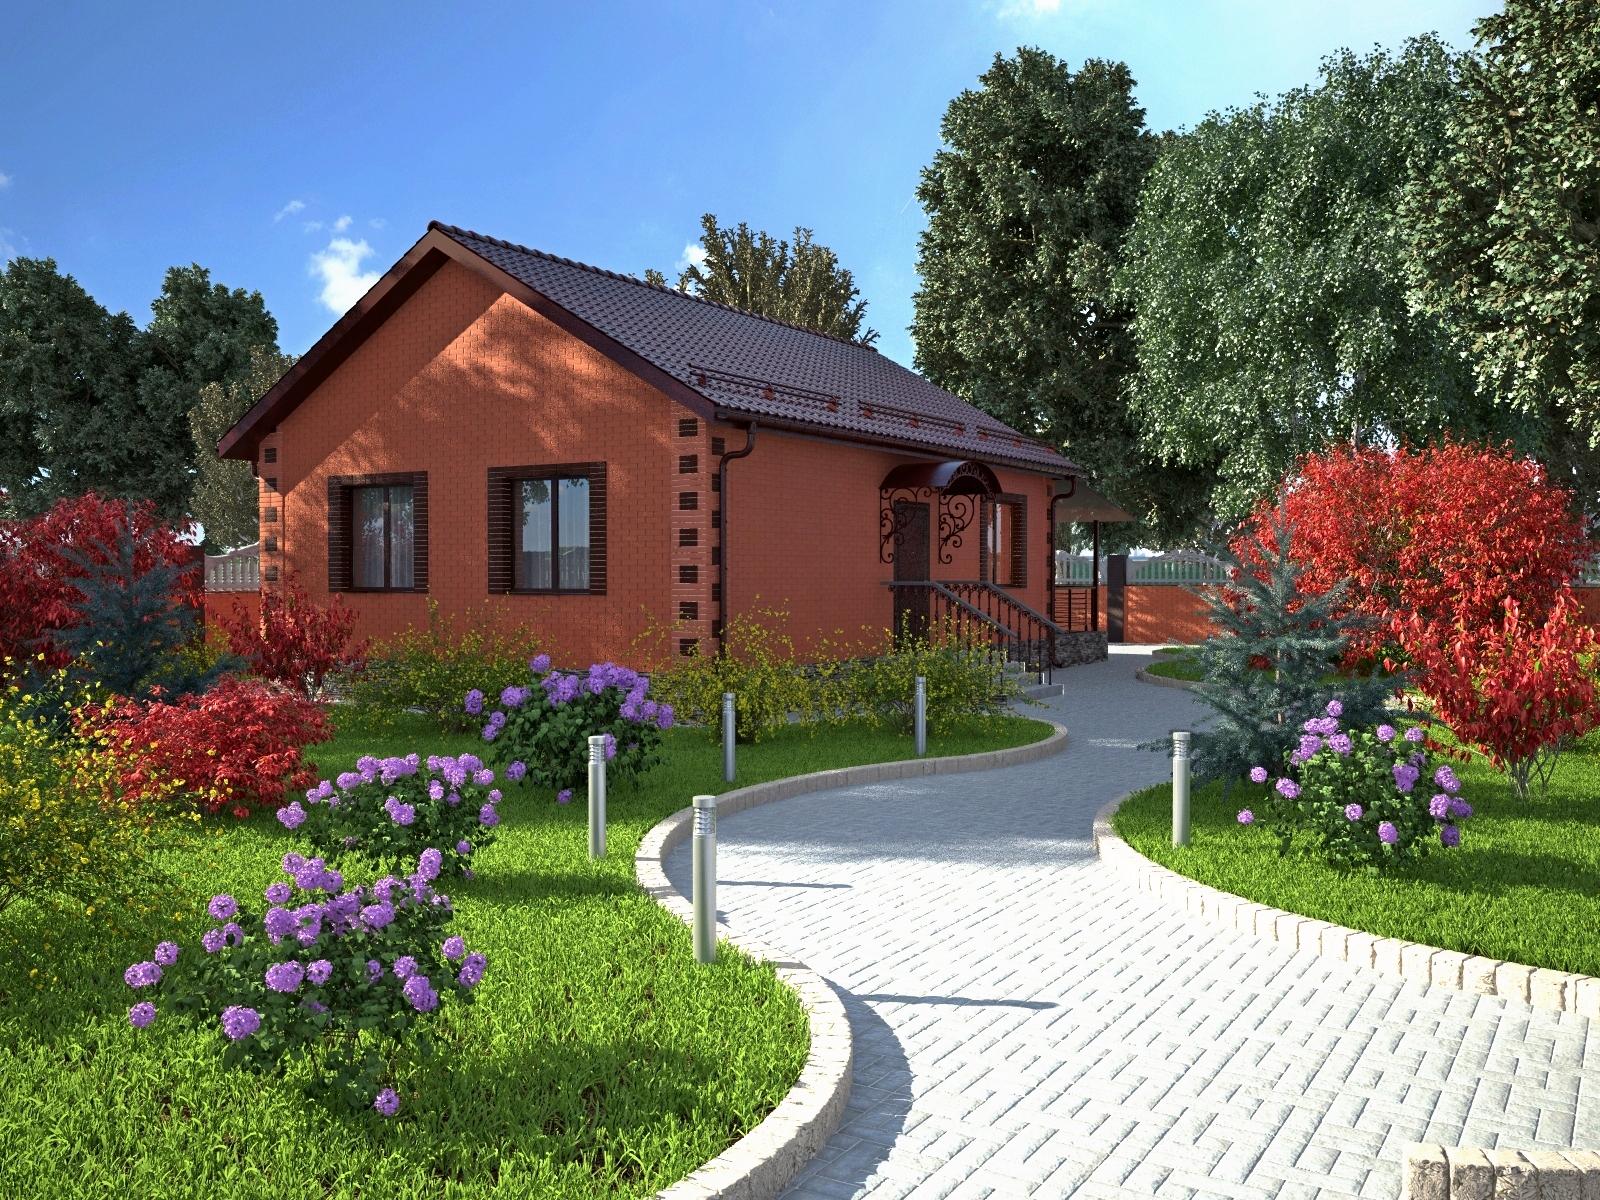
When people are planning to build their own house, it is cooler for everyone to make its layout first. This will allow potential owners to visually look at their future home and, for example, make some adjustments before construction.

You will need
- - a special mock-up knife with replaceable blades. It can be either plastic or metal. The final one is better because it is more durable and will not break when pressed.
- - thick cardboard It is allowed to buy it in special stores for artists, designers. But the best option for making a house layout would be corrugated cardboard. Where is it allowed to be taken? For example, if there are obscene shoe boxes, then it is permissible to use them bravely to create a model of a building. The thickness of corrugated cardboard is different, and what will be applied depends on the scale of the model of the house. For example, at a house scale of 1:50, it’s better to take cardboard at least 5 mm, and at 1:100, corrugated cardboard 2-3 mm thick will perfectly fit. That is, the smaller the scale of the house, the thinner the cardboard.
- - glue. More often than not, PVA glue is recommended, but this is by no means the best option. Because it requires high accuracy and the presence of practice in its application. In order to make the layout of the house more excellent, Globus glue and other types with a similar composition are suitable.
- - a dense board (fiberboard, chipboard). It will be used to cool the cardboard on it, so as not to damage the surface of other coatings.
Instruction
1. The first thing that begins with the production of a layout is the choice of a building plan, from which in the future it will be necessary to make a model of a house.
2. Later, after choosing the necessary house, we proceed to its manufacture. To begin with, we draw a plan and facades of the building on paper. We paste the drawn plan onto prepared corrugated or ordinary, pressed cardboard, and cut it out according to the silhouette. Thus, we will have a ready-made basis for the future building model.
3. We proceed to the manufacture of facades and their assembly. To begin with, we produce two facades. They certainly must be located each other, on the contrary. Say, two side, or main and courtyard facades.
4. After that, two selected opposite facades are glued onto the plan. We install a stiffener between them along a length equal to the length of the building. We do the same with the other two side walls of the house. The device of stiffening ribs is necessary so that the walls of the layout hold tightly and do not collapse.
5. Manufacture of the roof layout of the house. Say, if the roof is gable, then we cut out two plates of cardboard equal to the required dimensions of the roof, remembering that any roof should have a small overhang.
6. In conclusion, it is permissible to note that pastel paper is better than anyone for facing the facades and roof of a house model, but it is also possible to paint with acrylic paint or gouache, in which case extreme accuracy is needed.
Related videos
Beautiful architectural models often attract admiring glances, but few people dare to repeat the object they like and make a model on their own - working on a model is caring and requires a lot of time and physical expenses. However, the finished model can please your eyes and the eyes of your friends for a long time, so you can try to make a model of a simple building with your own hands. In this article, we will show you how to make a simple rural house layout from plywood and wooden slats.

Instruction
1. First, draw all the elements and details of the upcoming layout on paper. The drawing must be in 1:50 scale and its measurements must be accurate. Calculate the dimensions of the roof, walls, facade, platform on which the building stands, and other fragments of the layout.
2. Transfer the drawings to thin plywood and carefully cut out the details. After that, cut window and door openings in the finished parts, and then sand the edges and cuts with sandpaper.
3. Glue the wide slats for the base onto the base, and then sand and clean it. Saw the doors out of thin plywood and paste over with thin wooden slats, adjusting the size of the door leaf so that it fits snugly into the opening.
4. For windows, take thin plexiglass and cut it to the shape and size of the window openings. Make window frames from thin wooden slats, and then make ebbs and platbands.
5. Make the frame of the roof and galleries out of plywood, and bend downspouts and gutters out of thin sheet metal. Attach them to the roof, and then make a chimney and a dormer window in the attic wall. The porch can be made from wide blocks of wood.
6. Start assembling the layout later after all the elements are installed - doors, windows, and the like. Fix the roof frame on the box of the house, install the porches, stick decorative rails covering the frame gluing points.
7. If desired, saw out balusters for the porch and balconies. Bring the shape of the logs to life with the support of a needle file and a file. Sand all the fragments of the layout and cover it with decorative impregnation or varnish. Also, the model can be painted with acrylic or oil paint.
8. Start by making models of light construction and continue to improve your knowledge on more difficult buildings.
The art of diorama - military simulation and re-creation on a scaled-down picture of combat, thought out to the smallest detail - is an exciting, difficult and costly hobby, which, nevertheless, gives rise to spectacular paintings that attract both the owner and creator, and other people. In a diorama, in order to correspond to reality, not only figures of soldiers and military equipment are significant, but also the environment - a forest, a field, a relief, a river or a waterfall, and of course, trees and shrubs. About how to do trees in layouts, you will learn from our article.

Instruction
1. In order to make a birch layout on a scale of 72 with your own hands, prepare a number of tools: a clerical knife, a flat hard brush, a thin spatula and a mini hand drill.
2. You will also need painter's tape, superglue, tile putty, a small birch twig, dried moss, green powder that resembles tree foliage (it can be made from crushed painted paper or tea leaves), black and white paint for models, swamp green paint and matt varnish.
3. Sharpen the tip of the birch branch with a knife. Wrap the branch with paint tape in several layers. At the base of the future trunk, wind more layers of adhesive tape in order to make a thickening.
4. With a tile grout diluted in white paint, process a branch wrapped with adhesive tape, with the support of a spatula or brush. The grout should be diluted evenly so that lumps do not spoil the texture of the trunk. Wait for the surface of the coming birch to dry.
5. Dip a thin brush into black paint and apply black dots to the birch trunk. Dilute the greenish paint and lightly paint the base of the tree.
6. As birch branches, use moss branches, which must be painted with black paint. Coat the especially branchy part of the branch with varnish, and then sprinkle with a mixture that imitates the small foliage of a tree.
7. Prepare a whole set of branches in this way. To install them with a mini hand drill, drill holes in the trunk for branches, directing the drill at an angle from top to bottom. The upper branches will, unlike the lower and middle ones, be attached severely perpendicular to the trunk.
8. Put a little glue on the tip of the prepared branch and place it in the prepared hole. Do the same with the rest of the branches, holding each of them with your fingers in the desired location until the glue dries.
9. Thus, you have a realistic birch on a scale of 72. Based on this method, you will be able to make any deciduous tree.
Every person should have their own hobby. With his help, it is allowed to be distracted and it is gratifying to spend your free time. Modeling has become one of the most popular hobbies in recent years. Moreover, it is unconditionally allowed to make models from any material. Modeling will not only help to occupy your free time, but will also bring a lot of joy to your child.

You will need
- drawing accessories, wooden blocks, tools, PVA glue, paints or varnish.
Instruction
1. Before everyone, decide on the type of the upcoming aircraft. allowed to do layout a genuine aircraft, but you are allowed to come up with your own model. It all depends on your imagination. First you need to make a sketch of the upcoming layout, that is, make a freehand drawing, one that will show the upcoming approximate view of the aircraft. After making a sketch, you need to start making an accurate drawing. This is one of the most significant steps, which should be taken with special care, since a positively executed drawing is the key to a good layout. The drawing is better than everyone to execute on thick paper.
2. Now it is necessary to prefer the material from which the layout will be made. The choice is huge. The most primitive option is paper or not very thick cardboard. They are cool in that they are easily fastened with glue and are easy to process. Virtually any model can be made from paper and cardboard. However, it is worth remembering that these materials are short-lived and can easily deteriorate from the influence of external factors. You can also take foam. It is hefty easy to cut, giving the desired shape, however, the foam crumbles powerfully and can become a source of debris, only if a child plays with the finished model. It is better than everyone to make a model of an airplane out of wood. Wood is also easy to work with and extremely durable.
3. You need to pick up a few blanks for the upcoming layout. Of course, it is allowed to make a layout from a single piece of wood, but it is not so easy, and then there will be a bunch of obscene trimmings. It makes more sense to take a few smaller bars. Take three main blocks, from which you will make the fuselage and two wings. You will also need small pieces of wood from which the tail and other small parts will be made. Mark the tree according to the drawing. After this, you need to carefully cut out all the blanks. When they're ready, try them on beforehand. Make sure that all parts fit snugly against each other and that there are no cracks or gaps.
4. Now it is allowed to collect all the details together. To connect, use either small cloves or PVA glue. Use glue very carefully so as not to leave dirty spots on the surface of the layout. After connecting all the parts, make sure that they fit exactly together. If irregularities and distortions are found, they must be eliminated. After that, let the model dry thoroughly.
5. Now the final moment remains - decorating your model. Here you need to give freedom to your own imagination. The model can be scrupulously sanded and varnished. You are allowed to color it. Also, the fuselage of the aircraft can be decorated with burnt inscriptions or patterns.
Useful advice
Carry out all procedures in a specially prepared room so as not to litter the floor and furniture with sawdust.
If you decide to independently develop a plan for your future home, then you need to carefully think through all the details. In particular, it is necessary to make a model of the future building in order to clearly see what will happen. Also, the layout will help calculate all the costs of building material. Later, the construction of the house, its reduced copy can be a wonderful interior decoration.

You will need
- Drawing supplies, plywood sheet, wooden blocks of various sizes, woodworking tools, PVA glue, cotton gloves.
Instruction
1. Draw a rough sketch of your future home on paper. This will help you decide on the type of building you want, to understand what exactly you want to do. It is better than everyone to make a sketch in 3 parts: two sketches of 2 sides of the house and a sketch of the house in section. The implementation of the sketch does not require special care, however, all the main details must be present on it.
2. After completing the sketch, proceed to the manufacture of a detailed drawing. Be very observant about this, because the layout drawing is the basis of the drawing for a life-size house. Use a scale of 1:100 to make the layout. Carefully calculate all the smallest details. The furor of your construction site will depend on the quality and reliability of the drawing.
3. Now it's time to decide on the material from which you will produce your layout. There are many options, but it is better to use cardboard, foam or wood. Plastic is also occasionally used, but it is very problematic to process at home. Making a mock-up out of cardboard is very easy, but a cardboard mock-up can be easily ruined by an unwittingly spilled liquid. Styrofoam is also easy to process, but during the manufacturing process it will crumble powerfully. It is worth making a layout out of it only if the future product will not be exposed to external factors. A tree is better than everyone, it is easy to process. It is strong and durable.
4. Take a large sheet of plywood of medium thickness. This will be the stand for the upcoming layout. It is even allowed to supplement the layout with a design or an approximate layout of buildings in the surrounding area. Now make all the parts according to the drawing you developed. Make sure that all the details are of exact dimensions. Also, as you make it, do an advance fitting. If some details do not clearly fit with each other, then you need to correct the error.
5. Start putting together the layout. Use PVA glue to connect the parts. Use it very carefully so as not to leave traces of glue on the surface of the layout. Particularly large parts should be connected with small nails or staples. After complete assembly, let the layout dry. After that, decorate it to your taste. A clearly executed and beautifully designed drawing will be an amazing addition to the layout.
Useful advice
Carry out all work with wood in a deliberately prepared room, so as not to spoil the interior items with chips. All work is done in cotton gloves, so as not to damage your hands.
The durability of the structure and the comfort of living in it directly depend on a solid, faithful roof. In modern construction, different types of roofs are used. The types of building materials used for coating are also diverse.

Roof structure
By type of roof construction, there are single-pitched, double-pitched, hip (four-pitched), mansard (crushed), multi-pitched. The most economical and simple design is a pitched roof. But it has an unattractive appearance and, therefore, is rarely used in residential construction. Shed roofs are made on garages, sheds, outbuildings. The most common in the construction of houses are gable roofs. It is primitive in construction, it is allowed to use all kinds of roofing materials to cover it. The design of a gable roof consists of the following elements: racks and braces; mauerlats and rafters;? crate; roof;? ridge run. The truss system (truss) consists of 2 legs, interconnected and reinforced with braces, and there are 2 types - hanging and layered. When building a roof, both types of trusses are often used. Metal can serve as a material for rafters and battens, but wood is more often used due to availability, ease of processing and installation, and low cost. The cross section of the beam used for the elements of the truss structure is 15x15 or 20x20 cm. If the rafters are rarely installed (a step is larger than 1.5 m), then the section should be larger.
Roof installation
As usual, the angle of the slope is made within 15? 50 degrees, in many respects it depends on the roofing material. The ratio of roofing material and slope in degrees: - slate - 30? 50; - corrugated board - 16? 30; - metal tile - 30? 45; - soft roof - 15? 30. Roof construction begins with the installation of roof trusses. A waterproofing material is laid along the perimeter of the building frame - roofing material, Mauerlats are placed and fixed on it. Now truss structures are being installed, it is allowed to assemble them on the ground and lift them up, and it is allowed to make the assembly at ease on the spot. Later, the installation of rafters, they begin to create a multilayer cake, the one that will protect the building, save heat in it. The pie is made up of the following layers: waterproofing; vapor barrier; thermal insulation. Waterproofing from membranes is laid on top of the rafters from the bottom up with an overlap of 10 × 15 cm, and fastened with slats - this will be a counter-lattice. The next step is the installation of the lathing from the boards, which are nailed perpendicular to the rafters. Under a soft coating, a continuous crate is made. Under the slate, corrugated board, metal tiles, the boards are stuffed into a stretch. After that, there is a layer of insulation - polystyrene foam, fiberglass or mineral wool. A vapor barrier is laid on top of the insulation, and the final touch is the laying of roofing material.
Related videos
Related videos
Have you decided to build your own house? This process is long and complicated, but the game is definitely worth the candle. Where to begin? Of course, with the creation of the layout. This service is now offered by hundreds of specialized firms throughout Russia. Their services are not cheap. Up to 20 thousand rubles can be requested for the project. But designing a house, if you turn on your head, is a simple thing. There are some points that you need to pay close attention to. You can design a house yourself on a computer using online and offline programs. Some of them offer free use, others work only after payment. Which one to choose, and in general, where to start?
Before you make a housing plan on a computer, you need to decide how you imagine it:
- how many floors are in the building;
- will there be a basement;
- what should be the roof;
- how many rooms;
- do you need a bathroom on the second and subsequent floors of the house;
- will there be a room or attic under the roof;
- Is there a garage in the building?
You need to immediately estimate the area of \u200b\u200bthe house based on the number of residents.
Important: according to modern house-building standards, at least 12 square meters of living space should be allocated per person (more is possible, most importantly, not less). Only in this case, the house will be comfortable and cozy for every member of the family.
Design and build a house so that there is a place for every member of the family. Based on the requirement - 12 square meters per person
It is also necessary to conduct geo-prospecting of the area: from the nature of the soil to the level of groundwater. This can be clarified with the administration of the city or village where you intend to build your own home. Why is such data needed? To lay the right foundation. It, depending on the land, can be:
- tape;
- monolithic;
- tiled (slotted);
- columnar;
- pile;
- stepped.
Basement in the house - the decision is not always justified. If the groundwater level is too high, then the arrangement of the basement will cost a pretty penny - too much money will be spent on waterproofing. If you need a basement for storing household utensils, seamings and other things, just create one room in the house without windows and make it unheated.

When designing a house, keep in mind that the basement is convenient and practical, but expensive. It is cheaper to equip one of the rooms of the building for such purposes instead of a basement
The old fashioned way: draw a plan with a pencil on paper
Creating a sketch with a pencil on a sheet of paper precedes the design of a home on a computer. The sketch is only a sketch, a rough plan, nothing more. Why is it so important to start with a simple layout:
- to understand what exactly you want from your future home;
- if necessary, you can add or remove a room or an entire floor;
- to imagine how the building will be located on the site relative to other objects;
- determine how many windows and doors will be in the house;
- provide, if necessary, a place for the furnace;
- decide how the building will be heated.

A house plan on paper before designing on a computer will help you understand: what the building should be like, whether all the rooms are needed, where the doors and windows will be
Draw on paper the exterior and interior of the house. When drawing up an internal project of a building with your own hands, consider the following points:
- the first floor should include a vestibule and an entrance hall;
- toilet, bathroom and kitchen should be located next to each other - this will simplify the wiring of communications;
- it’s good if there are no walk-through rooms in the house - they are not very convenient to use;
- on the ground floor, you need to provide a pantry and a dressing room - this is convenient to use;
- immediately draw windows and doors;
- on the second floor, a toilet and a bathroom are not always needed, but only if the building area is more than 100 square meters, and the number of residents is from 5 people or more;
- if you are designing a 3D house yourself and are going to build it yourself, stop at a gable roof. It is the easiest to build, and under it you can make an attic;
- make it a rule: utility rooms should be located on the north side, and residential - on the south or east. During the day, sunlight will enter through the windows, which will heat the air in the room. So you can save on heating;
- immediately indicate the dimensions of the house on the plan.
It is also important to draw a house project yourself and indicate the materials from which the dwelling will be built.
For information on how to correctly draw a house drawing on paper, see the video:
Without communications - nowhere
Another important stage in the design of a dwelling is engineering and technical calculation. This is a kind of plan where communications are noted, without which it will be impossible to use the house:
- heating system;
- pipes for water supply and drainage;
- Electricity of the net;
- ventilation;
- fire alarm.
Sometimes this list includes a burglar alarm.
What is an engineering plan - see below.
Best programs: how to make a 3D house drawing on a computer
To draw a house plan on a computer on your own, you will need a computer directly with Internet access and a special program. All 3D house design programs can be divided into two types:
- working only online;
- allowing you to draw a house project offline.
Almost all modern programs that allow you to make a building project yourself draw layouts in 3d. Such a system allows you to see the house from all sides in a "volumetric view".

You can create a 3D house project on a computer in a day. The program interface is simple and clear, it is not difficult to understand it.
Among the popular online programs for designing a building with your own hands, the following are distinguished:
- Resource Planner 5D. Even experienced architects use this program. With its help, you can plan any dwelling - from an apartment to a country penthouse. No registration or training required. Everything is so simple and clear that even a child can handle it. There are special templates that will reduce the time spent on self-projecting a house project. With Planner 5D, you can even develop your own interior design. However, many resource functions are paid. For using the program for a month, you will have to pay about 300 rubles.
The subtleties of using Planner 5D:
- the Rooms tab will help you create the building rooms in 3d mode. Immediately set the footage of the walls, the height of the ceilings;
- the Construction tab is responsible for the presence of windows, doors, stairs;
- the Interior button creates the design of the room;
- using the Exterior button, draw outbuildings in the yard;
- the layout can be saved in the PC memory and printed on paper.
- The HouseCreator designer helps you move from 3d design to calculations. The instructions, which can be found on the designer's website, will tell about the use of the resource. Everything is simple and clear, minus - a small number of options:
- the "Wall" tab allows you to create rooms of the desired size in 3d;
- “Opening” is the installation of windows, doors, stairs;
- "Roof" - for drawing the roof, respectively;
- the project can be saved in the PC memory and viewed offline.
Many options are available for free. But you will have to pay for the calculation. To do this, send a request to the site administrators. Decoration in HouseCreator is not provided.
- The Planoplan program is similar to the previous ones. Plus, it allows you not only to draw a project at home on a PC, but also to “wander” through it using a special option. Planoplan even allows you to take into account the location of sockets and lighting fixtures in 3d mode.
- Many architects and designers prefer Homestyler. The resource contains real brands and brands of furniture, building materials, so the program is considered as close to reality as possible.
You can learn more about online resources that allow you to draw a house plan with your own hands on a computer from the video.
To draw a structure, you can download a program to your computer that does not require the Internet to work:
- the Autodesk resource is paid (about 500 rubles per month). On a gratuitous basis, it is allowed to be used by students and teachers of construction universities. Autodesk is a professional tool. You can even design a car with it! To use the program, you need to download it from the official website. A demo with limited features is available for free. Tools allow you to choose not only materials for construction, but also the nature of the terrain, topography, soil conditions.
- SolidWorks is considered to be complex, but the most professional program. Anyone can understand it if they want. To help - video tutorials and e-books.
- SketchUp is a very cool resource for those who dream, without exaggeration, of their own city! The program allows you to create your own municipality, not to mention how to draw a building in 3d.
This lists only the main programs for drawing private building projects with your own hands on a PC.
Useful little things
You can make a house plan yourself, but according to the result, you should not immediately start building.
It would be nice, before designing a house yourself, to learn all about the norms and rules for the construction of residential buildings. You can read about it.

When designing even a small house, follow the basic rules and requirements. Otherwise, the building cannot be operated and even built.
After drawing up a house project on a computer, print it out and take it to the architect. If there are no such specialists among your friends and relatives, you have a direct road to the BTI - the Bureau of Technical Inventory. Submit your layout there. Department staff will evaluate your drawing and give (or not give) a building permit.
Start drawing a house project on a computer on your own when an engineering layout and a pencil sketch on paper are ready.
Remember, the creation of a project must comply with the following principles:
- The plan of the house should be simple. If you want to build an original and unique structure with many floors, balconies and other complex architectural elements, seek the help of professionals;
- the design of the building must meet the requirements of aesthetics and morality;
- before designing a house on your own on a computer, decide on the foundation. Electronic platforms do not provide for it.
Before designing a house, decide on the foundation of the building. The base will give the structure strength and reliability
Finally
Do you intend to create a building project yourself? Nothing is impossible. Be sure to read the building codes, construction rules. This will make your work easier in the future.
It is convenient to use offline programs to draw your house. You can safely work with them, even if the Internet suddenly "freezes" or turns off. However, online resources are considered more complete and modern, they have more functions.
We will make a cute Victorian paper house with a diagram from Lisa in this do-it-yourself master class. And as always, making such a craft will be very simple, since the paper house layout is already ready in all the details, you just need to download the diagram, print it and use it as a template for your craft. It is only necessary to choose a suitable thick paper with a print that you like, such paper for creativity is now sold in large quantities in art stores and craft stores.
How to make a paper house
And so for the future crafts of a Victorian paper house, we need the following materials:
- thick paper with a print;
- dummy knives;
- pencils;
—

We print the diagram on plain printer paper to use it as a template. We evenly cut out all the necessary holes on the template and applying it to a pre-prepared dense sheet, transfer all the hole marks to it. All solid lines are cut and dotted lines are bent.
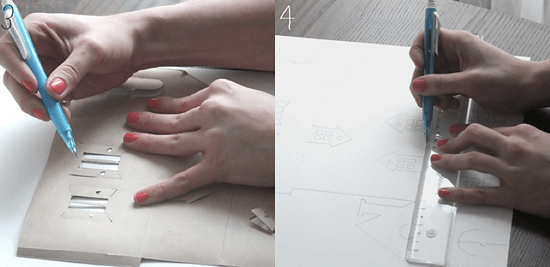
Then, along the ruler, we cut the door windows with a breadboard knife, cut out the layout contour. If you only have a white sheet of thick paper at hand, you can always additionally decorate it with stickers or paint it. You can also print the layout right away on a clean, thick sheet of paper - 200g printer paper is ideal for such crafts, and then decorate it yourself.

In order for all the corners of the house to be neatly bent and not to break, it is necessary to score all the folds - just walk the stack along the ruler, pushing through all the folds.

Then you can fold the house out of paper, fastening the edges by inserting them into each other.
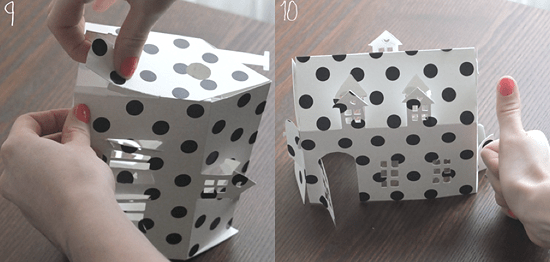
By the way, such a paper house can also play a practical role, for example, the role of a candlestick - you can hide an electronic candle on a battery under it.

Tatiana Khadyka
It is no secret that in every kindergarten great importance is given to educating children in the correct behavior on the road and the ability to navigate in difficult situations on the roadway. In this regard, in kindergartens, a prerequisite for instilling in children a culture of behavior on the road is the production layout"Our street" and work with it.
Today I bring to your attention, dear colleagues, master- manufacturing class multi-storey buildings for layout, which shows the street of the city.
For work we need:
a) Empty matchboxes.
b) Glue gun.
c) Colored cardboard and self-adhesive paper.
So let's get started.
1. We glue the internal (2 pcs.) and external (2 pcs.) matchbox parts.

2. Three pairs of "tops" are glued together. Then glue another box in the center.


4. There can be as many floors as you like. Now we proceed to the design of balconies with colored paper.


Here are some we got high-rise buildings. The children were delighted! And immediately posted them on our layout.


This work is easy. It can even be performed by the guys of the preparatory group, but always under the guidance of a teacher who works with a glue gun!
Try it and you will succeed!


