Roof drainage is a mandatory system when constructing buildings. Its main responsibility is to collect and remove rain and melt water flowing from the roof slopes away from the foundation. Typically, the drainage system begins to be assembled during construction roofing structure before assembling the sheathing. Although situations often occur when the roof is already covered with roofing, but the drainage has not been assembled. As an example, you can replace the old drainage system to a new one.
Before moving on to the topic of the article, let’s consider what the elements of a drain are and what materials they are made from today.
What is a gutter
The system consists of two main elements:
- Gutters (trays), which are mounted under the overhang of the eaves.
- Pipes that are attached to the walls of a building in a vertical position.
Additionally, the composition includes:

Gutter material
More recently, the main raw material from which gutters were made was metal, or more precisely, galvanized sheet. Even earlier, gutters were made from ordinary steel sheet, which was painted. The latter gradually went out of circulation. Galvanization is still used today because the material has a presentable appearance, copes well with natural loads and has good technical characteristics.

Scientific and technological progress does not stand still, and today the question of what to make a drain from means the possibility of choosing from several materials. To pure galvanization, galvanized metal is added, coated polymer composition, and purely plastic. Let's look at their pros and cons.
Plastic
The big advantage of plastic is that the material does not undergo corrosion processes when it comes into contact with water. Hence the long service life. Other advantages of a plastic drainage system include:
- Possibility of operation under almost any temperature conditions;
- one hundred percent inertness to ultraviolet radiation;
- presentable appearance, indicated by enormous possibilities in terms of color design;
- ease of construction.

The only thing they're afraid of plastic products- shock loads, under the influence of which they crack and become unusable.
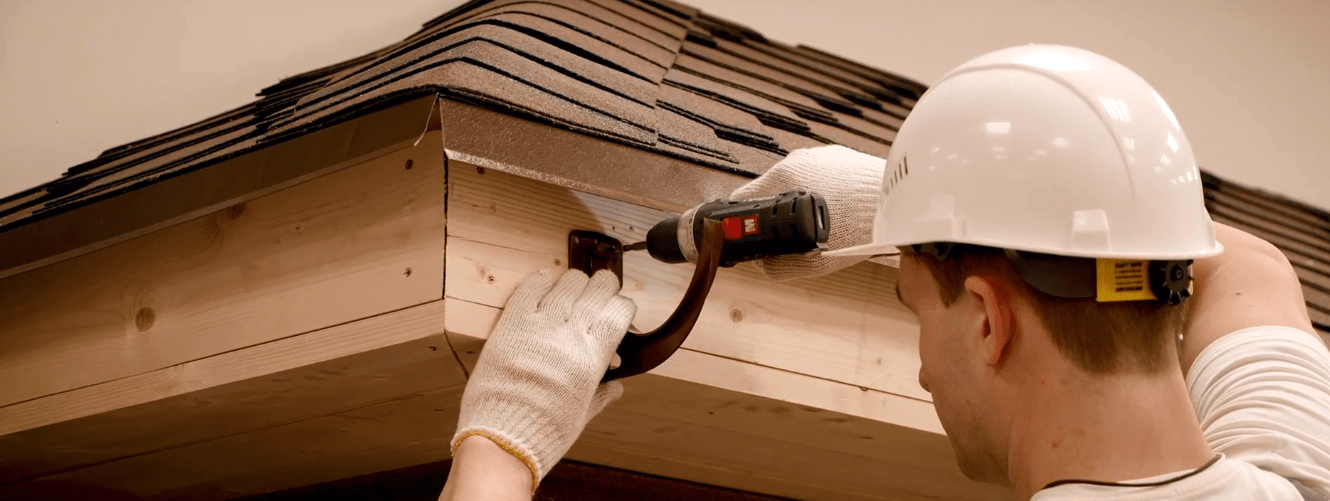
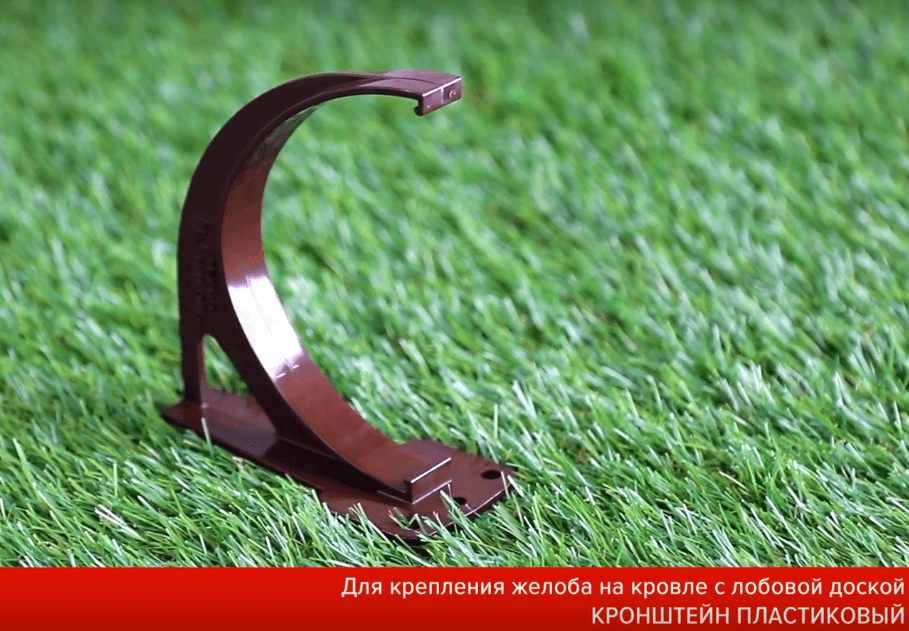
About plastic brackets. It will not be possible to bend them and give the necessary shape to the fastening. In this regard, metal ones are better, they are easier to customize. Therefore, when installing plastic brackets, it is necessary to accurately install them on the frontal board, taking into account the landing site and the height of the roof overhang. True, today manufacturers offer adjustable products in which you can change the angle of inclination using a hinge joint. A good option that has proven that it is the most convenient in the category of plastic brackets.
Metal with polymer coating
In terms of their characteristics and service life, the products will not be inferior to plastic ones. But there is one serious drawback - the polymer layer. It is not strong enough and can easily be scratched or peeled off with a little force using a sharp tool. Therefore, it is important not to spoil the protective polymer coating when installing a roof drain.
 Metal drainage systems with polymer coating
 There is no protective layer even in a tiny area, you get a defect through which water begins to penetrate to the metal sheet. The consequence is metal corrosion and reduced service life.
Other options
It should be noted that on the market you can find exclusive water drainage systems made from alloys of copper or aluminum, titanium and zinc. Firstly, the products are marked by long-term operation of the structure and increased reliability. Secondly, a design approach to solving the problem of decorating the facade of a house. But exclusive gutters are not cheap, so total mass consumers rarely purchase them.
Types of brackets
This fastening element There are three varieties on the market:

Methods for installing gutters
In this section we will not talk about how to properly install gutters. Here we denote the situations that arise during the construction of this system. The first situation is installation, when the rafters are installed, but the sheathing is not installed.
It's simple, correct option. The brackets are attached to rafter legs, usually on top of the top plane, but it can be done from the side, from below, bending the device to the required angle. Side mount can be used if the thickness of the rafters is not less than 50 mm, the width is not less than 150 mm. Often the installation is carried out on the first sheathing element at the eaves, which is also considered the correct approach to the construction of a drain.
 An example of attaching brackets to rafter legs
 If the roofing material has already been laid on the roof and secured, then the methods for attaching the brackets are as follows::

Rules and stages of installation of a drainage system
Before installing the gutter, you need to prepare everything. A drainage system is purchased. What it includes was described above. Now you need to decide on the quantity of each element.
The number of gutters is determined by the length of the slopes. They have a standard length of 3 m. For example, if the length of one slope along the eaves is 10 m, then you will have to buy 4 trays. The latter must be cut to the required size.
Quantity vertical pipes depends on the height of the building, the distance of the drain to the ground and the length of the slopes. Here are the following positions: the distance from the ground to the end of the drain is 25 cm, the distance between the risers is 12 m. Standard length one drainpipe - 3 m. For example, the height of the wall to the roof overhang is 4 m. Subtract the length from this size drain pipe and 25 cm to the ground. The resulting pipe riser length is 3.5 m.
 A clear example of the number of drain risers placed
 Regarding the number of risers. The maximum distance between them is 12 m.
- The length of the slope is 10 m; you can install one riser at one end and direct the gutters in its direction.
- The length of the slope is more than 12 m, but not more than 24 m; two risers are installed at the edges of the roof, which means their total length is 7 m.
- The length of the overhang is more than 24 m, three drainage risers are installed.
Regarding the remaining elements of the drainage system.

Dimensions of drainage system elements
Dimensional parameters of trays and pipes – important criterion, which defines efficient work the entire structure. Because the roof and the drain are united by one factor - water flowing along the roof. The larger its volume, the larger cross-section the elements should be selected. Incorrect selection leads to water overflowing over the edges, and these are the walls and foundation being poured.
There are certain standards that use the ratio of the area of the roof slope and the diameters of pipes and trays. They are shown in the table.
Here it is necessary to understand that the selection of sizes of system elements depends only on the area from which water drains into them. For example, the length of the slope is 24 m, which means that 2 risers are installed along its edges. Total area The slope will have to be divided by “2”. It is this parameter that must be taken into account when selecting the dimensions of the tray and pipe.
Preparing tools
Before installing gutters, you need to prepare your tools. Depending on the choice: plastic or metal, the complete set of the tool arsenal depends.
So, you will need:
- hacksaw for metal;
- metal scissors;
- hammer drill for drilling walls for fastening risers;
- screwdriver
- long cord, tape measure, pencil;
- level, plumb;
- pliers;
- mallet, hammer;
- ladder.
 Cut metal gutters using an angle grinder is prohibited, so it was not included in the list of required tools. At high rotation speed cutting disc cutting metal is accompanied by the release of high temperatures. This leads to disruption of the protective zinc layer. This means that the cut site is an area that will quickly begin to corrode. Regarding plastic, where the grinder is cut, the material melts, losing its properties and parameters.
Installation sequence
Everything is ready, you can proceed to installation work. The drain is a gravity-flow system, so it is important to correctly position the gutters at a certain angle. Its value is 3–5 mm per meter of length of the gutter structure. For understanding, let’s denote that one end of a tray 1 m long should be 3–5 mm lower than the other. For example, the length of the roof slope is 10 m, one edge of the gutter structure relative to the other should be 3–5 cm lower.
 Gutter slope options
 Based on this, marks are made at the corners of the slope, where the locations of the two outer brackets are determined. Self-tapping screws are screwed into the front board or nails are driven in, between which a strong cord is pulled. This will be the hook installation line. 
How to do it correctly to accurately determine the installation locations of the two outer hooks.
- The first top one is installed from the bottom edge of the roofing material at a distance of 4–5 cm.
- The exact distance is measured from the nail driven into the designated point to the edge of the roofing material.
- The resulting size is transferred to the other edge of the slope with the addition of a slope based on the length of the overhang.
 Experienced craftsmen do not always use nails or screws to install the cord. They immediately attach the brackets, avoiding unnecessary operations. If both outer brackets are screwed to load-bearing base, you can proceed to installing other hooks. It is important to install the latter so that they are oriented relative to the cord with the same parts as the first two installed devices.
 There is one more point that must be taken into account when installing brackets. The result should be such that the edges of the roofing material overlap the gutter by a maximum of one third of its width. It is this arrangement that can guarantee that the flowing water will accurately enter the tray without overflowing.
So, the brackets are installed exactly level, you can remove the cord and proceed to laying the gutters.
Installation of the grooved structure
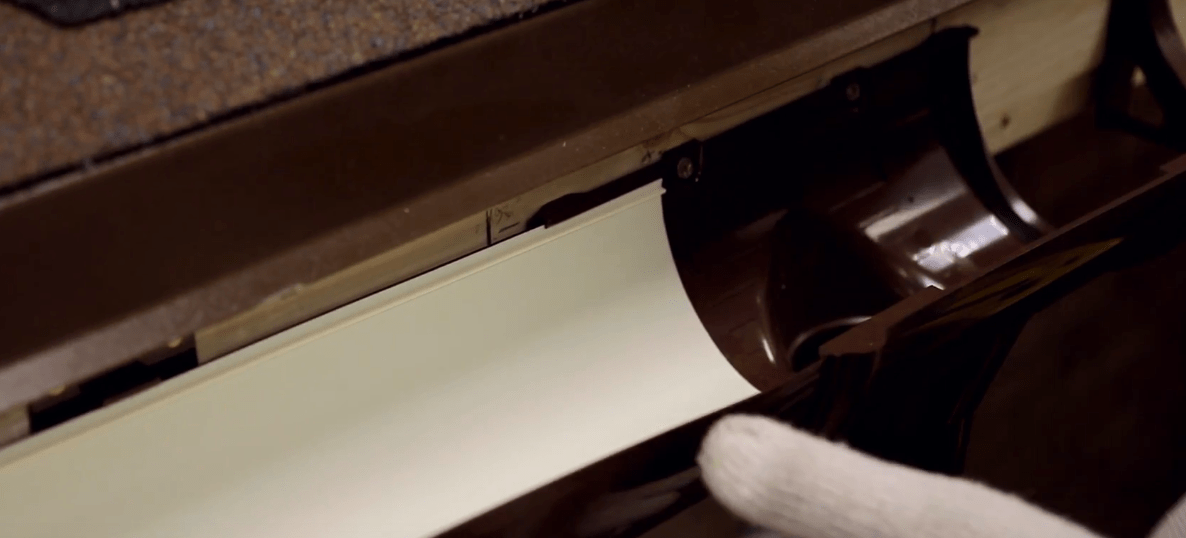
In principle, you can start laying gutters from any side. It is recommended to start from the location of the downspouts. At this point, connections will be made between two systems: horizontal and vertical. The element connecting them is a funnel. Therefore, first the gutter is adjusted to the funnel and the place where the hole will be made in the tray is determined. 
It is done with a hacksaw for metal. You just need to make an angle cut on both sides, taking into account the distance between the cuts, equal to diameter pipes. It is recommended to process the cut edges so that there are no unevenness or burrs..
 Sawing the hole for the funnel and installing it
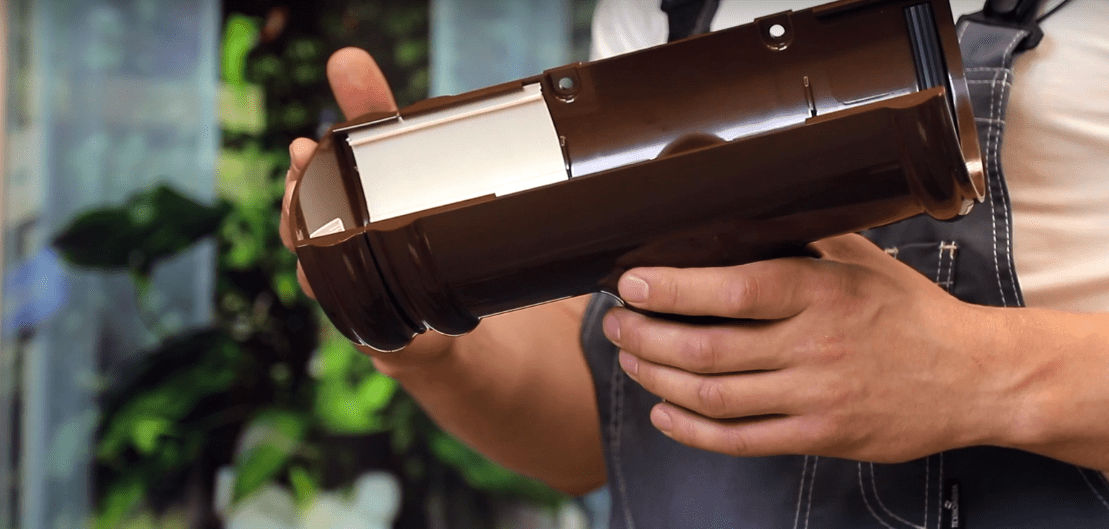
 A plug is placed on the outer gutter. This can be done on an already installed structure. But it’s more convenient to do this before installation. The edge of the grooved part is inserted into the groove of the plug, where a rubber cuff is located inside, ensuring the tightness of the joint. Now the gutters can be laid alternately with the edges of each joint overlapping. The overlap size is 5–10 cm. Many manufacturers of plastic trays today offer connecting elements, which are gutters 25 cm long complete with rubber cuffs, like plugs. By inserting two gutters from different sides of the connecting device, you get a sealed joint. 
Exactly the same designs are made for funnels. Using them, there is no need to cut holes in the gutters. The latter are simply connected by a funnel to each other. Simple and convenient.
Regarding the attachment of gutters to brackets. There are different fastening technologies. Two types are most often used:
- clamps with throwing the element through the gutter; previously they used ordinary wire;
- The clamps that hold the edges of the gutters together are flexible and hook-like.
Installation of drainage risers
The process can be described as follows: the risers are strictly aligned vertically and attached to the wall of the house with clamps. First, clamps are installed. From the center of the funnel pipe, you need to lower a vertical line along the wall with a plumb line. It is better to beat it on the wall surface. It is optimal to install fasteners of this type at the junction of two pipes, a pipe and a drain.

The first clamp is attached to the wall at a distance of 30–50 cm from the ground, taking into account the distance from the drain to the ground and the size of the drain pipe itself. Fastening is done with self-tapping screws into plastic dowels, so holes are made in the wall at the installation points, into which the latter are driven with a hammer.
Please note that the clamp should be located below any joint at a distance of approximately 10 cm.
The riser assembly itself involves installing pipes into clamps and connecting them together using sealant or special connecting pipe elements with rubber cuffs (double-sided couplings). In the first case, this is a socket connection, which is often used when assembling a sewerage system.
 Installation process couplings
 If the riser is located far from the wall, then it is connected to the funnel with two bends (elbows). Therefore, first, bends are installed on the funnel up to the wall, on which a vertical line is then drawn with its exact passage through the center of the section of the lower bend.
Sometimes two elbows do not connect to each other with pipes. The reason is the wide overhang of the roof. Between them you need to install a piece of pipe, which is cut from the pipe element of the riser. The distance between the branch pipes is measured, and 3–4 cm on each side is added to the obtained value. The allowances are the joining edges for fitting into the bends. Important - you need to correctly connect both outlets through the cut pipe to each other. First, the pipe section is put on the upper branch, that is, the elbow pipe should be inside it. Then the second elbow pipe is put on the second free end of the pipe section. The first one should be inside the second one. Both joints are treated with sealant.

Video instructions for DIY installation
Conclusion
So, we discussed the topic of how to properly install a drainage system. Manufacturing materials, elements and assembly technology were analyzed. Despite the apparent simplicity installation process, this is not an easy undertaking. It requires care and accuracy. The main thing is to accurately mark the location of the gutters. Because making a drain, that is, assembling it, is easier if the calculations and markings are done correctly.
Correct installation of the drainage system ensures 90% of its durability and normal operation. It must be installed by a specialist who knows all the intricacies and rules of installation. And when self-installation Installation instructions must be followed.
However, developers continue to install gutters without following manufacturers' recommendations and make problems for themselves out of the blue. Due to careless or incorrect installation, or skimping on fastenings, the functions of the drain are disrupted, which leads to roof leaks and wear and tear of the facade.
What are the consequences of installation errors?
When installing each system, you need to take into account the material of the pipes, the method of assembling the system and the type of fasteners. And although a modern plastic drain at first glance is assembled like a construction set, “behind the scenes” remain individual characteristics systems known only to professionals.
Common mistakes when installing a drainage system.
Incorrect selection of pipe diameter and number of funnels is the reason that the system cannot cope with the water flow. This is more a design issue, but often unprofessional calculation and installation of a drainage system go hand in hand.
Gutters are installed horizontally, which causes water to accumulate in the gutter itself and in the corners of the system. If collected in tanks rainwater for irrigation - it is reasonable, then the “accumulation” of water in the gutters does not allow the drain to perform its main function - to drain water.
Stagnant water turns into ice when it gets cold and melts when it thaws, causing ice plugs to appear that impede drainage. One or two years of such operation - and the entire system will require repairs, and the plastic drain may even burst. Copper drainage is less susceptible to danger, but its cost is higher.
The roof overhangs the gutter too much or, conversely, is far from its center. It is also incorrect to install the gutter with a slope towards the wall or away from the wall of the house; in this case, overflowing over the edges of the gutter is possible during high-intensity rain.
The pipe is located very close to the wall of the house. Ill-thought-out fastening of the drainage system will lead to wet walls during rain.
The basic rules for installing a drainage system are common to all types. But there are some differences in the installation of metal and plastic gutters.
Correct installation of the drainage system.
Unforeseen difficulties with the installation of gutters can be avoided by installing them before laying the roofing.
Gutters are usually secured to the rafters, sheathing or roof fascia. But if the roof covering has already been laid, the rafters are closed, and there is no frontal board in the structure, a problem arises with fastening the drainage system. Yes, any drain can be installed on finished roof, but then the process of attaching the gutter becomes more complicated.
Let's consider the procedure and rules for installing a drainage system with differences in the installation of drains made of plastic and metal.
1. Compliance with temperature conditions during installation.
Plastic drainage is installed at temperatures above +5 ° C, metal depending on the material of the protective coating. Minimum temperature for plastisol +10 ° C, ceramic granules -10 ° C, purala -15 ° WITH.
2. Attaching the gutter to the roof with a slope.

Rice. 1 Double slope on a line over 24 m./Simple slope on a line up to 24 m.
Gutters are installed with a slope towards the storm drain. The slope value is indicated in the installation instructions for the drainage system. As a rule, for a PVC gutter it is 3-5 mm per 1 meter, for a metal gutter 2-5 mm per 1 meter. The distance between storm drains should not exceed 24 m.
3. Install the gutter holders at the same distance.
First, the outer holders are fixed at the highest and lowest points at a distance of no more than 200 mm from the edge, and the rest are placed between them. Depending on the roof design, manufacturers provide different types hooks (holders). Long hooks are attached to the bottom of the sheathing with self-tapping screws, and compact holders are attached to the front board.

Rice. 2
The distance between the brackets for a plastic drain is a maximum of 50 cm, for a metal drain - no more than 60 cm. The gutter holders on the sides of the storm drain are located at a distance from each other of no more than 50 cm for a plastic drain and 60 cm for a metal one. The end cap of the gutter and the angle of rotation should be located at a distance of no more than 20 cm from the bracket.
4. The edge of the roof should be 1⁄3-1⁄2 of the gutters.
In this case, the gutter is located below the conditional line that continues the roof (by attaching a rail, as shown in the figure, we form this very conditional line) so that the snow does not slide onto it in its entirety.

Rice. 3 Attaching the gutter to the front board / Attaching the gutter to the sheathing
Plastic gutters are cut using a fine-toothed saw (hacksaw or tin saw), and tin snips are used for the holes. The cut edges of the plastic drain are cleaned with files or sandpaper.

Rice. 4 Pipe cutting
You cannot use an angle grinder (“grinder”) to cut metal pipes, because it heats the steel and destroys the coating.
6. Fastening the drainage system to the wall of the building with a sufficient number of pipe holders.
The holders are installed at a distance of 2 m from each other for buildings up to 10 m high and 1.5 m for buildings above 10 m. The pipe should be located at a distance of 3-8 cm from the wall of the building. The bend of the pipe is formed using elbows.
Plastic drains connect:
- for glue (cold welding);
- on latches and clamps;
- on rubber seals.
Metal:
- on seals;
- clamps.
Connect elements plastic pipe necessary taking into account the gap to compensate for linear expansion. The drain is mounted at a distance of 25 cm from the ground or 15 cm from the blind area.
When installing a drain, be sure to follow the installation rules of the drainage system and the manufacturer's recommendations.
Is it possible to save money on installation?
You can install the drain yourself, strictly following the installation instructions for the drainage system. Pay attention to the strength and reliability of fasteners and components.
Consequences of errors when installing a drainage system:
- if you install fewer brackets, the gutter may bend and crack under the load;
- if the drain is placed too high, water will fall on the walls of the house, destroying the facade;
- wrong assembled pipes may leak and burst.
A standard gutter holder can support about 75 kg, but it is not the weight that is important, but the supporting area. If you install fewer holders, the pressure is concentrated at one point and is not distributed over a meter of length. The gutter will “lead” or it will break.
Again, competent calculation of the system during design will reduce costs. Then you will purchase the optimal number of elements without compromising the reliability and proper operation of the system.
Checking whether the drain is installed correctly is quite simple. The slope of the gutter can be measured using a regular building level or a hydraulic level, if possible - a level and a theodolite. The tightness of the connections is checked as follows: plug the drain holes, pour water into the gutter and see if a leak appears at the connections. You can also then open the drain and see how quickly and completely the water drains. The throughput and the absence of overflows are checked by directing a watering hose with medium water pressure onto the slope. The correct location of the gutter at the edge of the roof is checked by applying a strip to the slope. It should not rest against the gutter, but pass over it.
It is better to entrust the installation of a drain to a specialist. But if you still decide to install it yourself, you must follow the installation instructions for the selected eastern system. This way you can avoid gross mistakes and provide correct work drainage throughout the entire service life.
If you want to use this material on your web resource, you can copy the Title and Abstract of the article, followed by a link to the original. Source link required. Full copying of the article, as well as its rewriting and partial copying forbidden .
Installation of a drainage system is relevant even for small baths.
The reasons for this are very logical and simple:
- If there are no drainage gutters, then during rainfall moisture freely flows from the roof directly onto the walls of the bathhouse. Along with rainwater, accumulated dust, dirt, and small debris also flows away. As a result: dirty walls, windows and front door. In such conditions, the appearance quickly deteriorates and the service life of wood, plaster, brick and any other materials decreases;

- Moisture flowing from the roof collects directly near the foundation or blind area, if there is one. And the more often it rains, the more more soil soaked in water. As a result, subsidence of the blind area and even the foundation may occur. In addition, if the foundation is not well-waterproofed, moisture will seep into the subfloor, having a negative impact on the floors of the first floor and the indoor microclimate.

Note! SNiP 31-06 of 2009 regulates the issues of drainage from the roof. Yes, according to regulations, in private construction, the absence of drainage systems on roofs of single and two-story buildings, but provided that over entrance group and the balcony has canopies, and the eaves overhang is wider than sixty centimeters.
Any bathhouse with an installed drainage system looks more aesthetically pleasing and solid, the appearance is complete and solid. And the benefits of installing gutters are tangible.

It is advisable to install hooks and gutters at the stage of building the roof of the bathhouse, but even after completion of the construction and external finishing it is not too late to begin installing the drainage system.

And the first stage of the upcoming work is choosing a drain and calculating the number of elements.
On sale you can find a drainage system for every taste and budget. From the point of view of economy, plastic (polyvinyl chloride or vinyl) gutters come first, and elite copper and zinc-titanium products close the list. Steel and aluminum systems are classified as medium price category. But focusing only on the price tag is not always correct; you should pay attention to the service life of the products and ease of installation. But the noiselessness of gutters can play a role only in one case - if the bathhouse has living quarters or the building is attached to the main house, but usually the noise of rain through gutters and pipes rarely disturbs those visiting the steam room.
Table 1. Types of external drainage systems by material of manufacture
| Material of manufacture | Peculiarities | For which roofs is it recommended? |
|---|---|---|
| Wall thickness up to 3.3 mm. The color palette of plastic gutters is rich, but after several years of use the shade may lose saturation. It is very easy to install a plastic drain on a roof of absolutely any configuration thanks to large selection additional and fastening elements. And the light weight of the products and the absence of the need for use special tools- an additional plus for those who want to do the installation themselves. It can last 30 years, but it’s better to choose quality products. with a wall thickness of 3.3 mm. | They harmonize well with roofing made of ondulin, slate, and soft bitumen tiles. | |
| Classic gutters with a service life of 60 years or more. They are made from rolled steel up to 0.7 mm thick. They do not burst, do not break, and do not spoil the appearance of the bathhouse. Relevant for regions with predominantly sunny weather, scorching sun. Among the disadvantages: firstly, certain difficulties may arise during the installation process, and secondly, not all rafter systems are designed to support the weight of a metal drain. | Metal galvanized roofing coverings. | |
| Refers to metal gutters. A layer of primer and a polymer protective coating, for example, pural, polyester, modified polyester or plastisol, are applied over the steel base. The service life is impressive, but can be shortened if the decorative coating is damaged (the corrosion process begins actively). To action sun rays All coatings are stable, except polyester, which quickly loses its shade saturation. | Corrugated sheeting, metal tiles with polymer coatings. | |
| Wall thickness up to 0.8 mm. Lightweight, durable, reliable. Not subject to corrosion. Wide selection shades. | Any metal roofs. | |
| Made from material 0.7-0.8 mm thick. Are not subject to corrosion, are not afraid of UV radiation and high temperatures. Scratches on the surface may heal on their own. The service life reaches one hundred years. Disadvantages: incompatibility with some metals and high price. | Suitable for elite roofing coverings, such as seamed copper, slate, natural ceramic or composite tiles, shingles, titanium-zinc. | |
| Copper gutters have a thickness of no more than 0.6 mm. Elite gutters are valued for their durability (up to 150 years, subject to proper installation). They do not require painting, frequent cleaning or maintenance. Copper gutters are resistant to heat and high humidity. They do not fade or rust. The average price of one three-meter copper gutter is 6 thousand rubles, one three-meter section of pipe costs about the same, and prices for receiving funnels reach 15 thousand rubles. Install an expensive drainage system for a bathhouse on summer cottage unreasonable, another matter - prestigious bath complex several floors high. | Ceramic tiles, slate tiles, copper roofing sheets or copper shingles. |
Table 2. Dependence of pipe diameter on roof area
Table 3. Dependence of the width of the trays on the number of risers and roof area
| Roof area, sq.m | Number of risers | Gutter width, cm |
|---|---|---|
| Up to 70 | 9 | |
| From 70 to 140 | 13 | |
| Up to 110 | 9 | |
| 110 - 200 | 13 | |
| No more than 140 | 9 | |
| From 140 to 220 | 13 |
Calculation of the number of elements
To calculate the number of elements, you need to schematically draw a sketch of the bathhouse, take measurements of the building, and then put them in the drawing. This will simplify the calculation process as much as possible. Then, on the same diagram, you can draw a design for a drainage system indicating the elements.
Table 4. Elements of gutters
| Name | Description |
|---|---|
| The total length of the gutters corresponds to the length of the cornice minus the length of the corner elements, if provided. The standard length of 1 gutter is usually 3 meters. | |
| They are calculated by the number of gutter joints. | |
| 2 plugs for each open line of gutters. If the drain is closed around the entire perimeter of the roof, plugs are not needed. | |
| Prevents large debris from accumulating in gutters. The length corresponds to the total length of the gutters. | |
| The quantity depends on the roof configuration and the length of the eaves (L). If L is 12 meters, then the funnel is installed closer to the center of the eaves or two funnels are placed at the corners of the roof. In accordance with SNiP II-26-76, the distance between funnels cannot be more than 26 meters. | |
| According to the number of internal corners of the bath. Typically the length of the corner is 40 cm. | |
| Accordingly, according to the number of external corners. Elements can be 90 and 135 degrees. | |
| The pitch between the brackets depends on the material from which the drain is made. For plastic systems, the pitch is 55-60 cm, metal - 70 cm, copper - 30-60 cm. The smaller the pitch between the hooks, the greater the load the gutters can withstand. The number of hooks is equal to the total length of the cornice divided by the pitch between the hooks. The hooks are attached at a distance of 15 cm from the edge of the cornice. Additional hooks (2 pcs.) are installed on both sides of the gutter connectors. |
|
| The standard length of one pipe is 3 meters. The total length of the riser corresponds to the height of the bathhouse wall. | |
| If necessary, to connect pipes in a riser more than 4 meters high. | |
| If necessary, for each riser. The size of the knees depends on the size of the eaves overhang. | |
| If necessary, connect risers, combine pipes. | |
| By number of risers, subject to availability storm sewer. | |
| If there is a storm drain. | |
| It is installed 15 cm from the ground if there is a drainage collector (well) or 30 cm from the ground if there is no well. | |
| The step between the holders is no more than two meters. The length of the screw and dowel is selected depending on whether the facade is insulated or not. |

Prices for gutters
gutter
Example of drainage system calculation
Initial data: hipped roof. The length of the cornice along the long side of the bathhouse is 12 m, along the short side – 8 m. Eaves overhang 0.9 m. Height from eaves to ground 8 m. Roof area 120 sq. m.

The roof area is more than 100 sq.m, so we choose gutters and pipes with a cross-section of 130 mm. The facade is insulated, the insulation thickness is 50 cm. We choose screws 160 mm long. Bend – 67 degree elbow.
Cornice length:
8 + 8 + 12 + 12 = 40 meters.
Number of gutters:
40 m: 3 m = 13.3 pcs.
Round 13.3 to the larger integer 14.

Number of drainpipes:
8 m (length from eaves to ground) x 4 (number of risers) = 32 m.
32 m: 3 m (length of one pipe) = 10.66 (rounded to 11 pieces).

Two more pipes will be needed to bring the drain to the wall.

Total: 13 pipes.
Number of brackets and extensions. The bracket is fastened from the edge of the funnel at a distance of 10 cm, the step between the hooks is taken to be 55 cm. In total, 80 brackets will be needed.
If the hooks are attached to the front board, you will need 80 x 3 = 240 self-tapping screws.
If there is no front board, you will need bracket extensions (straight or twisted).

Straight ones are attached to the flat part of the rafter system.

Twisted extensions are attached to the side of the rafters.

Using the same extensions, if there is no frontal plate, couplings and funnels are attached. In this case, the number of extensions is equal to the number of brackets + number of couplings + number of funnels. A total of 94 extension cords will be needed.


Prices for bracket extensions
bracket extension
Number of two-coupling bends: 8 pieces. There are 2 outlets for each funnel.
4 funnels x 2 outlets = 8 outlets.

Scheme of connecting a funnel to a drainpipe using two-coupling bends and a pipe section
Number of brackets: 28 pieces. They are installed under each connecting element. The pitch between the brackets is taken to be 1.5 m.
Result:
- required number of funnels – 4 pieces;

- the same number of outer corners of the gutter;

- number of gutters (L = 3 m) – 14 pieces;
- 10 coupling connectors;

- 80 hooks;

- number of three-meter drainpipes - 14 pieces;
- 8 connectors and 24 pipe brackets;


- screws 160 mm long will need 24 pieces;

- number of bends (67 degrees): double-coupled - 8 pieces, single-coupled - 4 pieces.


Single-socket outlet, fastening diagram

Single sleeve bend 67 degrees
Important! Do not transport three-meter drainage elements on the roof of a personal car, do not store plastic parts in the scorching sun, and do not place heavy objects on lying gutters and pipes.

Prices for different types of pipe bends
pipe bend
Video - How to choose hooks
Installation procedure for a plastic drainage system
Tools:
- metal hacksaw with fine teeth;
- device for bending metal hooks;
- construction level and tape measure;
- screwdriver, dowels and self-tapping screws on wood;
- file;
- construction cord (rope);
- adjustable pliers;
- marker or pencil.
Basic principles installation
- The inclination of the water intake trays is 3.5 mm for each linear meter length.
- The water flowing from the drip should fall into the central part of the trays.
- The edge of the bracket and gutter should not intersect the line of the roof slope.
- If we conditionally continue the roof slope in a straight line, then the bracket should be 1 cm below this line.
Provided that the indicated rules are followed, moisture flowing from the roof will not overflow the edges of the trays, and in the spring there will be no risk of deformation and breakage of the gutters during an avalanche of snow.
Installation procedure
Stage 1. Determine the location of the water intake funnel. It can be located at the edge of the cornice or closer to its middle. But always, regardless of the installation location, the funnel is located at the lowest point of the gutters along the entire eaves, that is, the trays should always be tilted towards the storm drain.

Using a marker or pencil, mark the line where the funnel will be fixed.

Stage 2. Plastic brackets are used to attach the gutters to the frontal board.
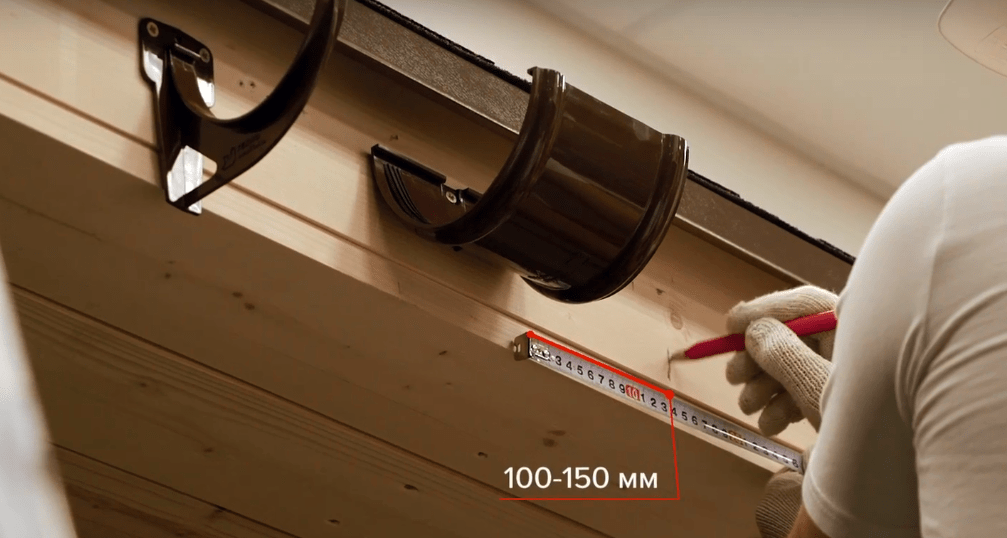
Mark the location where the bracket is attached. The extreme hook is always attached fifteen centimeters from the corner or edge of the roof.

We fix the first bracket, not forgetting the main principle of installation: the hook should be located 1 cm below the continuation of the roof slope.

Important start installation from the outer hooks in order to set the correct slope of the entire drain.
Stage 3. Using a tape measure, we measure the distance between the installed hook and the place where the storm drain will be installed.

Taking into account a slope of 3.5 mm per 1 linear meter, we calculate where the attachment point will be located. For example, if there are 2 meters from the hook to the funnel, then it will be 7 mm lower.

Stage 4. We fasten the storm drain with self-tapping screws to the front board. There are factory holes in the funnel for screwing in hardware.


Important! If there is no frontal plate, the funnel must be fixed using bracket extensions.
Stage 5. We pull a string between the storm drain and the outer bracket.
Along the line of the stretched cord, we install brackets on both sides of the storm drain. The recommended distance from the edge of the funnel to the bracket is 15 cm.
We attach intermediate hooks in increments of 50-60 cm. If the distance between the brackets is made greater, then the gutters are likely to become deformed.
How to attach brackets if there is no front plate?
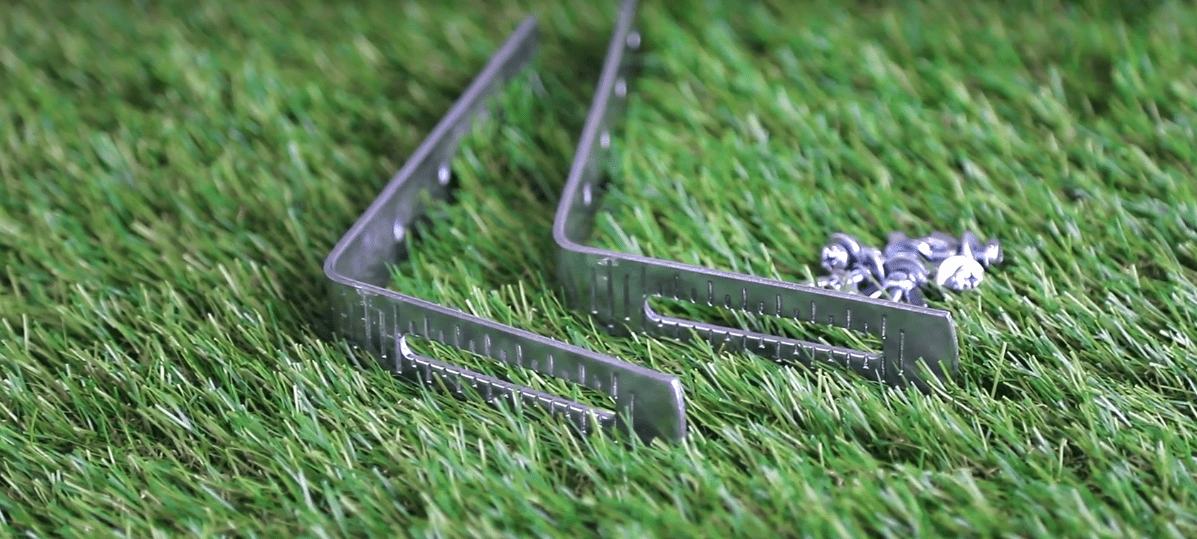
Option 1. If the roof is not already covered and the structure does not include a fascia board, either metal hooks or straight bracket extensions that are mounted on top of the rafters are used to install the gutters.

note! Most often, the pitch of the rafters does not coincide with the pitch of the hooks. In this case, it is permissible to fix the brackets on top of OSB-3 boards, having previously cut out the recesses.
Option 2. If the roof is already covered, curved side extensions are used to secure the hooks.


The main advantage of extensions is the presence of holes and grooves, which make it easy to set the position of the brackets and adjust the angle of the gutters.

Stage 6. We begin installation of gutters.
The first step of the work is marking. We measure the required length of the gutter with a tape measure, put a mark, then saw off the excess with a hacksaw. We process the edge with a file to remove burrs.
We lay the gutters on top of the brackets.

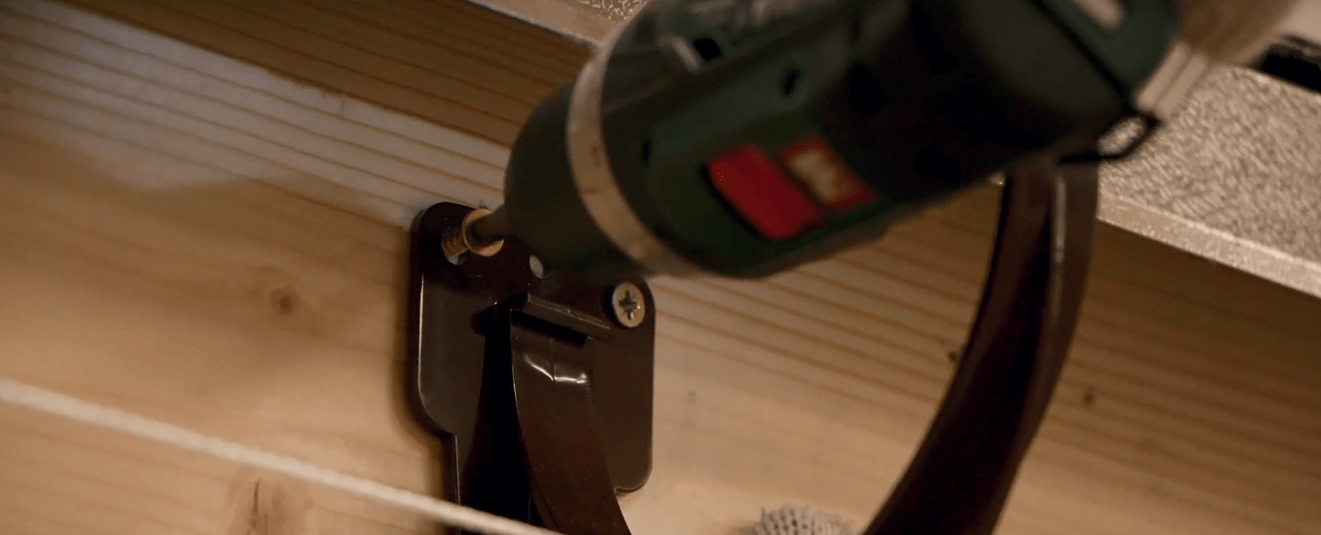
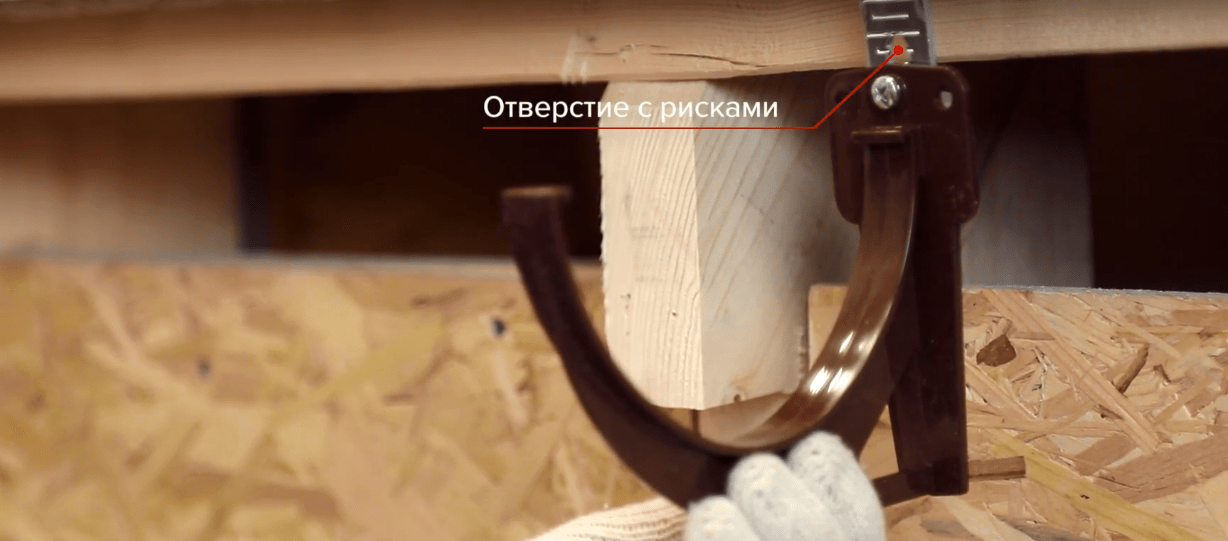
First, insert the edge of the bracket into the funnel. There are special notches inside the funnel; these are specially applied markings that take into account the linear expansion of the gutter material when heated.

We insert the gutter from the inside out so that it snaps into place inside the funnel. Apply a little pressure on the gutter during installation.
Similarly, we snap the gutter into the brackets.


Stage 7. We install gutter connectors.

The location of the elements is strictly between two brackets, which are mounted at a distance of 10-15 cm from the connectors.
Markings for fixing brackets
We fix the connector to the front board in the same way as funnels, using self-tapping screws through the factory holes.
We place the edges of the gutters inside the connector, focusing on the notches made inside.

Note! The connectors are equipped with rubber seals for better sealing of the connection.
Stage 8. Installing corner elements. Both on the external and internal corners of the bathhouse, the elements are fixed equally simply. They don't even need to be screwed to the front board, you just need to snap the edges of the gutters into them.

Stage 9. We install plugs on the gutters.
Pay attention! Depending on the gutter configuration, the plugs can be right-handed, left-handed or universal.
If necessary, we also install a plug on the funnel (in the case when it is located close to the corner of the roof), using a small piece of gutter to connect the elements.
Stage 10. At the final stage, we move on to the installation of drainpipes. We carry out installation from the funnel from top to bottom.
The order of connecting the elements depends on the configuration of the roof and the size of the eaves overhang.

Stage 11. We fix the drainpipes with universal clamps.

Important! There should be no more than one and a half meters between adjacent clamps.
Stage 12. We connect the pipes with couplings, and then secure the structure with a clamp. Each coupling has a special seat under the clamp.


Stage 13. All that remains is to install an elbow to drain the water. This elbow, like other elements, must be secured with a separate clamp.

Test the operation of the entire gutter by pouring a bucket of water onto the roof (but not directly into the gutter!). Make sure that water flows from the roof into the central part of the gutters, enters the funnel and flows through the pipes to the ground or into the storm drain.
This completes the installation. In order for the drainage system to last as long as possible, do not forget to take care of it: inspect the condition of the elements twice a year, clean the trays from large and small debris.

Video - How to install a PVC drain
The drainage system involves the collection and disposal of precipitation, as well as melt water, but the capabilities of such systems do not end there, since with their help it is possible to direct liquid directly into the storm sewer. As a result, precipitation does not fall on the walls, while ensuring the safety of the blind area. In addition, the accumulation of water near the foundation and in basements is eliminated, which guarantees an extension of the life of the building.
In this article we will look at some types of rainwater drains, and also learn how to make them yourself.
The design of the drain requires the presence of special gutters for drainage atmospheric precipitation, which are installed around the perimeter of the roof using brackets. Due to the fact that the storm drain repeats the configuration of the upper element of the building along its base, there are both external and internal corners. In this case, all elements of the system are connected to each other with sufficient tightness, which is ensured by rubber seals.
Many consider such elements to be superfluous, since the option of laying gutters overlapping is available, when one part overlaps the other by at least 30 cm, and their connection is carried out using self-tapping screws.
To ensure the removal of sediment, holes are made in certain places in the gutter necessary for the installation of funnels. After that, sewer pipes are connected to the installed cone-shaped devices, that is, they are integrated into the overall system.
When the roof has a large overhang, a curved cylindrical product is used, which is possible with the help of additional elements in the form of elbows and special rings. The drainpipe is mounted on the wall of the house using clamps.
The result of such an assembly is the creation of a system of the required configuration. To arrange a storm drain yourself, you will need a house plan with its exact dimensions. This will allow you to understand what elements will need to be purchased for the future design, as well as determine their quantity.
Species
Drainage systems may differ in the installation method and the material used. In the first case, the water drainage structure is classified as home-made and industrial, and in the second - as plastic and metal.
Homemade drain
Solving the issue of installing rainwater drainage on your own has certain advantages. Such a system can turn out not only beautiful, but also original. You can realize almost any fantasy in terms of creating a structure to protect your home from water. It is worth considering some nuances.

A homemade system requires significant costs and regular maintenance, since its arrangement is usually carried out using galvanizing, which quickly begins to rot. In addition, it is necessary to take into account the certain complexity of joining some elements.
We have tried to take into account the common mistakes of craftsmen and have provided installation rules below.
Factory drain
Purchasing a factory-made rainwater drainage system will save you from many problems of non-compliance with standards and parameters. By purchasing certain gutter elements from one manufacturer, you don’t have to worry that they won’t fit with each other, since the factory is distinguished by the production of standardized products.
Plastic drain
Plastic-based systems can be adhesive, which involves installing storm drains using glue, or glueless, assembled using sealing rubber bands. Regardless of the choice of installation method, plastic gutters have the following advantages:
- UV resistance;
- no corrosion;
- strength;
- light weight;
- wide operating temperature range – from -40 °C to +70 °C;
- the ability to create a drain of any configuration, which is determined by a rich assortment of components;
- no need for regular care;
- ease of installation;
- variety of color solutions.
However, plastic also has a certain number of disadvantages, including the following:
- weak resistance to mechanical impact, which eliminates the possibility of installing plastic building on high-rise buildings;
- regular shift rubber seals, which can be carried out exclusively by disassembling the problem area and reassembling it after eliminating the malfunction;
- the inability to restore one or another destroyed instrument, which characterizes such systems as insufficiently repairable;
- significant linear expansion of plastic elements.
Metal drain
Storm sewers made of metal differ from each other in that they can be galvanized, copper, or with a zinc layer supplemented with a polymer coating. The choice of a specific type of design is based on characteristics such as price and service life. In any case, metal gutters are good because they:

The disadvantages of such systems include:
- significant weight of the drainage structure as a whole;
- Not large number components, which makes it difficult to install such systems on roofs with angles other than 90 degrees;
- installation complexity;
- high price;
- small selection of colors;
- susceptibility to corrosion (except for copper systems);
Determining which drain is better is quite difficult, since much depends on various factors, for example, operating conditions. At the same time, it is necessary to understand that the main importance is not the cost of the design, but its compliance with quality parameters.
Do-it-yourself drain from various materials
Below are several examples of how to make a roof drainage system yourself. This task is not difficult, the main thing is to have the desire to do such work, understand the process of creating a system and know some options for executing the plan. For example, a drain can be made from a sewer pipe, tin, sheet metal, wood, polyethylene, etc.
sewer pipe
For correct calculation gutter parameters in accordance with the expected intensity of rain flow, it is necessary to determine the effective roof area. If such calculations cause you difficulties, you can use average values, which involves preparing the following elements of the system:
- plastic pipe with a diameter of 50 mm for arranging water drainage;
- a cylindrical product with a thickness of 100 to 110 mm, necessary for the manufacture of gutters;
- adapters making possible connection the elements mentioned above among themselves, when the inlet diameter reaches 110 mm, and the outlet diameter reaches 50 mm.
 Since a plastic sewer pipe was used to make gutters, it will need to be split into two halves of equal size. To do this, you can use a grinder, electric jigsaw or a hand hacksaw. The first option is preferable, but there are some nuances of the process.
If you cut a pipe using a grinder, plastic will inevitably stick to the special casing, so it is advisable to dismantle this safety element. As a result, it is recommended to use other protection, part of which is a mandatory face mask. Although there is a more optimal solution to the problem - buy a special disk designed for working with plastic.
To ensure a high-quality connection of gutters and tees, do not unravel the pipe all the way: leave about 150 mm at the edges.
Metal
A sheet of metal is taken and cut into strips so that their width is 25 cm. Then these parts are given the shape of a gutter, that is, they are curved accordingly. The use of galvanized sheet or tin requires the manufacture of durable steel brackets. For this you can use wire rod (6 mm), but then you will have to double the number of hooks.

Making your own brackets shouldn't be difficult. To do this, it is enough to take a cut of a log with a diameter of 20 cm and wind a wire around it, making about three turns. After this, you need to remove the resulting workpiece and compress it. Then you need to bend the edge of the structure by 4 cm to fix it on the roof, and shape the remaining part in accordance with the required profile.
Using the same screws, the brackets are installed on the roof. Then the gutters are suspended and the catch basins are leveled to form the desired slope.
Wood and polyethylene
As source material To construct a drain of this type, you should use a thin board, the total length of which would be equal to double the perimeter in relation to the roof overhang. After which you can begin the actual production of the drain:
- Connect the boards in pairs using nails at 90 degree angles.
- Assemble gutters that match the length of the walls of the house, which must be overlapped.
- Make fasteners for installing gutters in the form of hooks using boards or wire rod. The best solution will be the use not of wire, but of scrap lumber, the use of which involves cutting triangular grooves that serve to secure the gutter.
- Secure the brackets to the corners of the wall, for example, with nails.
- Install narrow channels to direct rainwater from the top of the building, ensuring that their edges overlap.
- Adjust the slope of the gutters and lay them in plastic film, securing it with shoe nails, buttons or tape.

For the manufacture of a drainpipe, a wooden gutter is quite suitable if its length is at least 2.5 m. The purpose of arranging a drainage is to divert atmospheric precipitation into a special ditch, which should have a depth of about 30 cm, and it must also be filled with crushed stone. When digging a ditch, you should create a slope that helps remove sediment from the wall of the house to a distance of at least 1.5 m.
A wooden roof drain will last longer if, to ensure tightness, you use not plastic film, but silicone sealant, having previously treated the wood with a preservative composition.
Installation nuances
After all the preparations have been made, let’s take a closer look at how to build a drainage system with your own hands. Installation of brackets is carried out with the obligatory creation of a slope towards the funnels, when, taking into account the linear meter, it is expected vertical offset by 5 mm. If there is a need to accelerate the flow of water, this slope can be increased to 10 mm.
If the length of the pediment does not exceed 10 m, a slope is made to one side. Greater value involves the installation of an additional funnel installed in the middle with a drain pipe connected to it to form a drain. But you can also make two slopes of the gutter going from the middle of the gable.

To install gutters you need:
- fix the first bracket at the point of maximum height of the sewerage system;
- fix the second one, taking into account the fact that it will be lower than the first, thereby creating the required slope;
- Pull twine between the installed brackets, which serves as a guide for marking the attachment points for other supporting parts of this type.
The described process of installing storm sewers looks quite simple from the point of view of its implementation, but there are certain nuances. To create a slope, they mainly focus on the horizontal, which is the front board, known as the wind board.
But is it always installed with strict horizontality? It is advisable to verify this, for example, using a hydraulic level or level. You can also use a simple option in the form bubble device, but only on condition that its length is 1 m or more.
Installation of a metal drain
Installation metal structure a little more complicated. The system is set up in compliance with a certain order of work: first, hooks are installed, then funnels are cut in, gutters are connected to each other, plugs and other elements are used to form the system as such, including connecting drainage pipes.
Hooks
Installation of long hooks at the stage of building a house, that is, before laying the roof, is the primary way to fasten these parts to the rafters. If the upper element of the building's covering is already equipped, short rods are used, the mounting location of which is the frontal board.

The use of long hooks is preferable, as this gives additional strength to the system. In any case, regardless of the type of fastening, the installation step of the hooks should be observed - from 600 to 900 mm. If this is not followed, there is a high probability of the system collapsing due to the load created by the snow. To calculate the required number of hooks there is a simple formula:
n = L/b,
where L is the distance that determines the distance of the first two installed metal rods from each other, b is the installation step of the supporting parts of the type in question.
The number of hooks required during the construction of a gutter system is calculated not only using the above formula, but also taking into account the fact that these supporting parts must be present at the joints of the gutter and at its ends.
To create a flow of collected water towards the funnel, the system is given a slope of 5 mm per linear meter of the gutter. As a result, there is a need for vertical displacement of fasteners, which can be calculated using the following formula:
h = 0.005 x L,
where L is the distance between the outer hooks.
For example, with a gutter length of 10 m, the vertical displacement will be determined to be 5 cm. The installation of the so-called starting hooks is carried out taking into account the vertical displacement. Installation of other supporting parts is carried out along a line that is marked using twine stretched between the two initially installed hooks.
Before you begin installing these parts, it is advisable to check whether the position of the cornice matches horizontal level, as this may affect the accuracy of the marking. The hooks must be fastened with a distance of at least 25 mm between the line created by the roof slope and the edge of the gutter looking outwards.
Funnels

Mark the locations for installing the funnels, and then cut out the holes in the shape of the letter V. If you intend to install a 125 by 90 mm drain, then the width of such openings should be from 100 to 110 mm. When installing a structure 150 by 100 mm - from 120 to 130 mm. In this case, it is necessary to maintain the distance of the upper edge of the gutter from the cutout in accordance with a minimum distance of 15 mm.

Stubs
Installation of such devices is carried out at the ends of the gutter. The implementation of this process involves the direct installation of a plug, followed by sealing the connection using a special silicone compound. Greater density can be achieved through the effectiveness of a rubber mallet.
Gutters
Using a hook, secure the gutter by sliding its inner edge into the clamp and ensuring that the outer edge is held in place by plate type of this fastener.
This installation involves fastening the gutter, ensuring that the outer edge of this element of the system should be 6 mm lower than the inner one. Setting the proposed angle of inclination is necessary to eliminate the possibility of water getting on the façade during heavy rainfall. 
In this case, the roofing covering should be located above the gutter, covering 50 mm of its width. At the same time, the slope line should not reach the edge of the gutter by 40 mm. Although a run-up is usually formed due to the fact that the narrow channel is installed at a slope, that is, at the top point of the gutter it can be 20 mm, and at the bottom - 70 mm.
Upon completion of the installation of the channel that collects and directs water from the roof of the building, it is installed cornice strip. Its lower edge should hang over the gutter, as this eliminates the possibility of the front board getting wet.
Connectors and corners
Special connectors make it possible to join gutters. Such elements contain rubber gaskets, which not only guarantee the tightness of the joint, but also eliminate the negative effects of thermal expansion.

The gutters must be fixed with the condition that there is a gap of 3 to 4 mm between them. Direct installation of connectors involves the following set of actions: bend the lock to an angle within 90 degrees; install the device so that its rolled side is put on back gutters; Align the product and secure the lock.
Drainpipes
This stage requires the mandatory installation of at least 2 brackets with a step of 1 m. Supporting parts must be installed at the pipe joints and where the elbow is mounted.
If the walls of the house are wooden or the material from which they are made is quite soft, then the brackets are fixed with self-tapping screws. In relation to concrete and brick walls Installation of supporting parts requires the use of a drill.
The final installation process is the connection of the elbow of the cylindrical product, the drain and connecting pipes, as well as the drain elbow. Taking into account the fact that the connecting pipe is crimped on both sides, the product can easily be used when installing two risers, since it can be cut.
If there is a need to get connecting pipe about 90 cm long, to do this you just need to get rid of the top crimp, that is, cut it off. The height of the drain elbow from the ground level should be no more than 200 mm, as this avoids splashing water.
The last nuances of installing the system are connecting the sewer pipe to the funnel and snapping the bracket locks.
Installation of cylindrical drainage products should be done with crimping down, which is necessary in order to eliminate the possibility of leakage.
Installation of PVC drain
There is nothing complicated in installing this design, but it is necessary to take into account some nuances:

- indicate how the system will be placed, taking into account the fact that it should receive the entire volume of precipitation collected from the roof;
- determine the location of funnels and corners;
- install the first bracket at the highest point in relation to the cone-shaped device;
- using twine and a level, determine a horizontal line passing through the point where the bracket is installed, and, starting from it, set the slope;
- install the latest support piece and connect it to the first one with twine;
- install other brackets in 40 cm increments, adhering to the marked slope line.
- Gutter installation:
- prepare a narrow channel by making sections of it of the required length;
- connect the drainage components using appropriate elements or glue;
- install the gutter on the brackets, engaging the latches and avoiding contact with these supporting elements joints of both the channels themselves and the funnels;
- install plugs.
- Installation of a sewerage system:
- connect the pipe to the gutter by diverting the drain;
- align the vertical of the cylindrical structure using a plumb line and a square;
- fix the pipes forming the sediment drainage structure in order to determine the installation locations of the clamps in 1 m increments, but with mandatory location the top part on the line of the first joint;
- fix the connecting elements on the wall, taking into account that the sewer pipe after installation will be 2 cm away from the side structure of the house;
- mount the drain bell on the hatch, but without rigid fixation, so that you can control the drainage.
We tried to touch on all the nuances of installing rainwater drainage. Some work is quite difficult to do alone, so it is recommended to use a partner.
Drainage of waste water from the roof is a must to ensure the longevity of the roof. To do this, install a drainage system on the roof. You can do the work yourself or hire specialists for this purpose.
Atmospheric precipitation accumulates on the surface of the roof, which causes its destruction over time. Buildings with a pitched or flat roof are especially susceptible to this. Of course, you can initially build rafter system at a certain angle, due to which the drains will be in a natural way drained from the surface of the house. But then the foundation may be washed away due to the strong flow of water from the roof.
Photo - drain for home
Benefits of using a gutter:
- Increasing the efficiency of roof self-cleaning. At correct installation, regardless of the coating material, maximum liquid drainage is ensured;
- Protecting the building from erosion. You can direct the drain pipes to the drainage or to the garden at the dacha, which will help protect the foundation of the building;
- Extends the longevity of metal and asphalt roofs. Regardless of the coating material, it is destroyed by prolonged exposure to moisture.
The quality of the coating does not depend on the material used. The fact is that in certain conditions it is necessary to use a Modern metal profile (with a large number waste water), and in some - plastic (if you live in regions with sudden changes temperatures). Sometimes sandwich panels are also used.

 Photo - water flow with pressure
 Construction and materials
Depending on the type of drainage chosen, the system may consist of various additional elements. Main details:
- Gutters;
- Funnels;
- Bends and plugs;
- Fastening elements;
- Couplings.

 Photo - design of the drainage system
 Each of these parts has its own purpose. Guide pipes are necessary to ensure the drainage of water to a certain place on the site and the intake of excess liquid from the roof. Galvanized metal and PVC are used for gutters. Funnels complement the main pipes; they are necessary to create a certain angle on the roof, with the help of which maximum quantity liquid will fall into the chute.
According to SNiP, for a complex roof it is necessary to use various bends and tees. They will help create the most effective technique water intake from the roof surface. The entire system is installed using brackets, screws and other fasteners.
Video: how to install gutters yourself
Gutter installation
Before starting work, you need to calculate how much water needs to be drained from the roof. Please note that this indicator does not affect the installation process itself, but is necessary when choosing a specific ready-made drainage system (Hunter, Galeco and others).
Step by step instructions How to install a storm drainage system with your own hands:
- The brackets are installed first. The fasteners are installed on the front board. To ensure that all hooks are located at the desired level, we recommend stretching the thread after installing the first one. According to SNiP rules, the minimum distance from the lowest rail should be no more than 25 mm;
- The technology for installing fasteners necessarily includes taking into account the slope of the entire system. For every 10 meters you need to tilt up to 5 cm. It turns out that after installing the bracket, you determine the installation location of the next part and mount it 5 cm lower than the previous one;
- Recommendations from experts on mounting brackets:
- It is imperative to maintain the average selected distance. During the rainy or thaw season, a large amount of water will pass through the drain, so it is important that it is secured as rigidly as possible;
- On average, the pitch of the hooks is no more than half a meter;
- The general slope should be done gradually, without sudden transitions.
- Next, in the places where the pipes are installed, you need to install water inlet funnels. They come in rectangular and round sections. There are different ways to install them. For example, for plastic construction special glue is used, and for metal - clamps;

 Photo – water intake funnel
 - It is imperative to install a grate in the receiving gutters, which will help protect the drains from dirt, fallen leaves and other debris;
- All that remains is to connect the gutters and brackets. The pipes are threaded into the fasteners using grooved holes. These are available in TechnoNIKOL systems. You need to clamp the pipe until it clicks;


- For galvanized steel and PVC siding (Plastmo, Murol), rubber plugs must be used. These details will help ensure the right job systems. They are put on the very end of the gutter;

 Photo - stubs
 - The manual for builders states that it is necessary to secure the gutters together after installation. To do this, you will need special couplings and seals that will increase the efficiency and rigidity of the system;

 Photo - clamps
 - Afterwards, drainage elbows are attached to the panels. These drainage parts will help ensure that water drains from the roof at a certain angle and connect the different parts of the system to each other. The rules for their installation state that the distance between the pipe and the wall should be no more than 35 mm;

 Photo – knee
 - Next, the circuit is assigned as a constructor. To the very bottom of the system, the knees are threaded into each other and strengthened with clamps. If you use a metal profile (Ruflex, Alta-Profile or Rainway), then you must additionally install brackets to increase the rigidity of the drain;
- It should be noted that the clamps for installing the drain on the wall of the house differ from the standard ones. They can be attached to bricks or foam blocks using dowels and screws;
- The last step for installing a gutter system for slate or tiled roof- These are low tide installations. It represents the knee turned in the other direction. To avoid having to dismantle it later, you need to calculate in advance the distance of the edge of the drain to the drain. 30–35 cm is considered optimal.
Tips from the professionals for gutter installation:
- Before starting work, you must prepare the surface. Treat the boards with antiseptics and varnishes to extend their durability;
- If the roof requires repairs, then it must be completed before installing the drainage system. Otherwise, a leaking roof will negatively affect the efficiency of the drain;
- If you cannot cope with the task yourself, then you can turn to specialists for help. Calling a brigade will cost about 10,000 rubles per object.
Price overview
Now there are a huge number of different gutters on the market. The Bryza, Braas, Docke, Icopal Wijo TBS systems (with additional insulation) and others. Their advantage is durability, and also the fact that they can be installed on bitumen shingles, slate, metal profiles and even provide drainage on the balcony.

 Photo – Ruukki 125 drain
 Let's consider what the price is for installing a drainage system in different cities(the price is for Ruukki pipes 125 mm):
Prices may vary depending on the required gutter diameter. The total cost can also be reduced by using non-professional brackets and couplings.


, Islam, Judaism How do temples of different religions differ")


