The number of soft roof fans is growing like a snowball. And this is not surprising - just remember the visual appeal and operational advantages of one of the most modern coatings. But there could be even more supporters of flexible roofing materials, if they knew that installation could be done without involving a team of roofers. Today we will try to fill this gap and share not only construction technology, but also the secrets of experienced craftsmen.
The structure of the soft roof
Before talking about the roof structure with soft roofing, I would like to briefly mention the features of this unique material. In fact, it is a modified roofing material. That's just the basis of flexible tiles (hereinafter we will call them shingles) is not a banal cardboard, but a stronger and more durable fiberglass or polyester fabric. Improvements have also been made to impregnation. The waterproofing of soft tiles is provided by a modified polymer-bitumen composition, thanks to which the critical temperature points have been shifted to higher values.
The multi-layer structure allows you to make a soft roof durable and completely waterproof.
Basalt or slate chips are applied on top of the flexible tiles - it not only determines the design of the coating, but also makes it more resistant to mechanical stress, ultraviolet radiation and other external factors. From below, the tiles are covered with an adhesive layer, which is covered with a protective film. In some cases, a fine mineral dressing is applied to the lower surface - then the adhesive part is a wide strip in the upper part of the shingles.
Roofing pie construction
The multi-layer structure makes flexible tiles not only strong, but also durable - some manufacturers give a guarantee for their products for up to 25 years. As a rule, soft roofing materials easily overcome this boundary. Of course, we are talking about those cases when the base of the soft roof complies with accepted standards, and the laying of the material is carried out strictly according to the prescribed technology.
Studying the device of roofs with bituminous tiles, we immediately divide them into two types:
- cold,
- warm.
The first are built for cold attics. Many websites and print publications sin by pointing out the inexpediency of arranging simplified roofing pies for residential buildings. Like, if the house is intended for year-round use, then its roof must be warm. This statement is fundamentally wrong - most of the private houses of the old housing stock were cold. Moreover, the cold roof has its advantages. And the biggest one is durability. In winter, frost is practically not formed on such a roof, which, as you know, is one of the worst enemies of shingles. In addition, the simplest roofing cake is well ventilated, which means that the wooden frame will always be dry. As for energy efficiency, for thermal insulation it will only be necessary to insulate the attic floor. As you understand, its area in any case will be less than that of the roof.
 When using a cold roof on a residential building, it is necessary to insulate the attic floor, the area of \u200b\u200bwhich is noticeably smaller than that of the roof structure
 So, the structure of the roofing cake for cold roofs includes:
- step (sparse) crate made of wooden beams or steel shaped pipes;
- solid flooring (from plywood, OSB or skid boards);
- insulating lining;
- bitumen coating.
Roofers working as part of professional teams often recommend installing a superdiffusion membrane under the lining carpet, arguing that the wooden base is more protected from moisture. A rather controversial statement, which I personally can only call wastefulness. A conventional waterproof lining leaves little to no chance for the wood frame to get wet due to snow or rain. Such actions on the part of specialists can only be explained by the desire to earn a certain amount for an operation that requires minimal labor. As for the warm roof, in this case, the installation of moisture-resistant coatings is mandatory due to the use of thermal insulation.
 A warm roofing cake allows you to use any attic space for year-round use
 For attic insulation, fibrous materials are most often used, which, when wet, can lose most of their unique abilities - that's what they need to be protected. From below - from moist air, and from above - from leaks. In this case, the roofing cake should have the following structure:
- rails for mounting cladding panels;
- vapor barrier waterproof film;
- thermal insulation layer;
- waterproofing windproof vapor barrier membrane;
- counter beam;
- sparse crate;
- solid flooring;
- lining base;
- flexible bituminous coating.
You may object that the slats installed from the attic side have nothing to do with the roofing pie, and you will be absolutely right. However, we nevertheless indicated them due to the fact that in our case they also act as fasteners for the lower layer of vapor barrier.
Video: correct installation of a roofing pie is easy
Tiled roofing technology
Roofing made of soft bituminous tiles is similar to tiled only visually. Not only the installation technology differs, but also the operational characteristics, service life, maintenance and repair procedures. And although the work on the construction of a shingle roof cannot be called too complicated, you will have to carefully follow the manufacturer's recommendations. It is best to divide the construction process into several stages:
- Procurement of materials and preparation of tools.
- Preparatory work.
- Laying of insulating materials.
- Arrangement of counter-lattices and battens.
- Solid foundation construction.
- Laying the top layers of the roof.
- Installation of additional elements and arrangement of passages.
By organizing your working hours in this way, you will not only minimize the number of possible errors, but you will also be able to make the most informed decisions about attracting outside help.
How to calculate how much and what materials will be needed
The first thing to do when starting mathematical calculations is to draw up a detailed drawing of the roof or create at least an elementary sketch indicating the exact dimensions and features of each slope. The calculation itself includes the determination of the geometric dimensions and the number of main parts of the structure:
- additional elements;
- valley carpet;
- lining layer;
- ventilated ridge or roof aerators;
- timber for step battens and counter battens;
- boardwalk;
- soft cover.
I must say that the accuracy of the calculations carried out affects not only the cost of the roof, but also the timing of the work. For this reason, we will understand the features of the calculation of all components of the roof in as much detail as possible.
Additional molding
To finish and protect various parts of a soft roof, several types of extensions are used:

The presented additional moldings are produced in the form of strips of a standard length of 2 m. However, in order to determine the number of certain strips, the length of the area in need of protection should be divided by 1.9 or 1.85. This is due to the fact that aprons and planks are not mounted end-to-end, but with an overlap of 10–15 cm wide.
If the roof structure includes grooves and junctions with vertical surfaces, then their waterproofing is provided by a special valley carpet. Manufacturers produce it in the form of 1 × 10 m rolls, presenting a choice of several colors to match the tiled flooring.
 When choosing a valley carpet by color, it is not at all necessary to get exactly the color - a slight desynchronization of tones will play a plus, making an ordinary roof extremely stylish and expressive
 Calculating the total length of the carpet, you should make a margin of 20 cm for each valley - you will need it for the correct installation of the lower part of the joints.
The lining layer is arranged both over the entire area of \u200b\u200beach slope, and partially - it all depends on the steepness of the surface. If the roof slope is more than 1:3 (18 degrees), then only areas prone to leakage are protected with a roofing carpet:
- internal corners of adjacent slopes;
- ridge part;
- ribs;
- areas with fractures of slopes;
- edges at pediments and cornices;
- ventilation outlets.
When laying the insulating carpet, it is necessary to make an overlap of 10-15 cm. For this reason, its calculated quadrature should be 1.1 - 1.15 times the total area of the slopes. If the lining is partially equipped, then the length of the strips of the roofing carpet corresponds to the length of the parts of the roof prone to leakage.
 The lining carpet can be laid both along and across the slope
 The width of the lining with partial waterproofing should be 40-50 cm. An exception can be made only for skates and external corners, reducing this value to 25 cm.
Skate air elements
When calculating the number of ridge aerators, it is assumed that one element 1.2 m long is able to provide ventilation for about 25 m 2 of the under-roof space. If point air elements are used, then the total area of \u200b\u200badjacent slopes should be divided by 5 - that is how many square meters of the roofing pie "serves" one such element.
 The design of the ridge aerator allows you to organize ventilation of the roofing pie on roofs of any configuration
 Note that point air elements vary in height. Steep roof slopes are equipped with short ones, and gentle surfaces are long.
Lumber for battens
For the arrangement of the crate, a wooden beam with a section of at least 40x40 mm is used, as well as a board 25 mm thick. The length of the counter beam is the easiest to determine - it is equal to the length of the rafter legs. As for the sparse lathing, the total length of the wooden elements is determined based on the standard step width for shingles - 37 cm for rafters located at a distance of 0.9 m from each other. Therefore, the length of the rafter leg in centimeters should be divided by 37 and multiplied by the width of the roof - this will be the desired length of the beam, which will be needed for the crate of one slope.
solid base
Sheets of plywood or OSB used for arranging a solid base should be mounted apart, that is, with overlapping seams. For this reason, when determining the area of \u200b\u200bthe material, an amendment must be made:

When determining the amount of plywood or OSB in sheets, it is recommended to make a sketch of their location on paper with the most dense laying - this way you can avoid wasting material during installation.
Covering and roll materials
In the process of laying, two types of tile shingles are used - ridge-cornice and ordinary. The first are produced in the form of packages designed for 12 p.m. m of skate and 20 linear meters. m eaves. When calculating the latter, the same correction factors are used as for a solid base (simple roofs 3–5%, combined roofs up to 10%). To determine the number of shingle sheets, the total quadrature of ordinary shingles is divided by the area of one bituminous strip. One pack of soft tiles is usually designed for 3.5 m 2 of roofing - knowing this number, it will not be difficult to calculate how many packs you will need to buy.
 Before installation, tile shingles from different packs must be mixed - this will eliminate the appearance of non-uniform color sections of the roof
 The amount of materials that will be needed for a warm roofing cake is calculated with the following tolerances:
- waterproofing and vapor barrier - at least 4%;
- roll thermal insulation - according to the area of \u200b\u200bthe slope;
- plate insulation - up to 4%.
It is easy to see that the amount of roll and slab insulation practically does not depend on the complexity of the roof. This is due to the fact that such materials are easily joined together and do not affect the appearance of the structure.
What tools and supplies will be needed
In addition to roofing and wood materials, the following equipment and tools will be required during the work:
- saw;
- a hammer;
- scissors for cutting metal dobor;
- metal spatula for mastic;
- roofer's knife (different from the usual hook-shaped cutting part).
In addition, you should purchase ordinary nails, which will be needed for the construction of a wooden base, and special ones for fixing a soft roof. The latter are distinguished by a wider cap (diameter 8–10 mm) and a length of 25–30 mm. Fasteners that are used in automatic pistols are also suitable - such hardware has a length of 40 mm. The number of nails is calculated based on the consumption of 4 pcs. per shingle or 500 grams per 10 m 2 of roofing.
 For a one-time use, it is not necessary to buy a special tool - you can get by with replaceable hook-shaped blades for a regular construction knife
 During the installation of flexible tiles, you will need bituminous mastic, designed for waterproofing building structures. Its volume can be determined by the roof area - for every 10 m 2 of coverage, up to 1 liter of liquid mixture will be required.
The price of bitumen mastic is affected by both the type of material (cold or hot applied) and composition. The cheapest is bitumen-polymer waterproofing, while the most expensive is recognized as bituminous polymer-aluminum coating. The latter is highly resistant to heat aging and UV radiation. In our conditions, bitumen-rubber mastic will be enough - it has an average cost and has good installation and operational characteristics.
Preparatory work
The preparatory stage includes several steps:
- dismantling of the old roof (if necessary);
- installation of a crate frame;
- installation of heat-insulating and accompanying layers;
- solid foundation construction.
The arrangement of a warm roofing pie is carried out in the following sequence:

Table: determination of the thickness of a solid base for a soft roof
Before, we have already talked about the need to lay slab material apart. In addition, thermal gaps of about 5 mm should be left, otherwise, in the summer heat, sections of the roof will bend in an arc. On each side of the ridge, gaps of 70–80 mm are left to create effective ventilation for the roofing pie.
It should be noted that for a cold roof it is enough to build a sheathing and boardwalk - the need for other elements is eliminated due to the maximum simplification of the design.
Video: how to build a solid base for shingles
Step-by-step instruction
The manufacturer provides for the laying of bituminous tiles at an outdoor temperature of up to -15 ° C. Since installation during the cold period requires additional heating equipment and the cost of heating materials, it is best to start work in the warm season, choosing days when the temperature rises above 20 ° C. In this case, the bituminous component will be warmed up due to solar heat, which will make it possible to obtain a strong connection of all layers of the roof.
 Laying soft roofing can be carried out in winter - the main thing is that the temperature does not fall below -15 degrees
 In order to properly allocate time and effort, we suggest using the step-by-step instructions for laying a soft roof on your own.
Forming the underlayment
As a substrate, rolled materials from fiberglass impregnated with a bitumen-polymer mixture are used. You should not refuse a soft base - a lining is needed in order to additionally level the surface, waterproofing, insulation and sound absorption.
Strips of rolled waterproofing can be laid parallel or perpendicular to the horizon line - the main thing is to ensure an overlap of 10 cm along the long side of the insulation and 15 cm at the joints.
From my experience I can say that on steep roof slopes it is best to lay the lining in a vertical direction. And not at all because in this case the likelihood of leaks during heavy rains is reduced. The fact is that under the influence of gravity, the waterproofing panels sag, and folds form on the surface. In order to level them well and properly fix them, additional time and effort are required - one cannot do without assistants. As for gentle slopes, here, of course, the horizontal method of fixation wins, as it is simpler and more reliable. It is only important to start work from the overhang and move towards the ridge. At the same time, each subsequent strip of waterproofing will cover the edge of the previous one and the water will not have a single chance to get under the upper layers of the roofing pie.
 Partial underlayment is only possible on roofs with steep slopes
 When deciding to partially lay the underlay on steep slopes, the most important areas should be protected. So, on both sides of the valley and at the edge of the slope (cornice line), the width of the bituminous waterproofing should be at least 50 cm, while for skates a strip of this size is divided in half.
To fix the lining layer, use a nail fight or fastening with building brackets in increments of 25 cm. In areas prone to leakage (valleys, junctions, etc.), the litter should be glued with a bituminous compound.
The list of materials that are suitable for use as a bituminous base is indicated by the manufacturer in the installation instructions for shingles. It is irrational to replace them with improvised coatings such as roofing material or polyethylene film due to the short service life, rapid thermal aging and other factors.
Installation of valley carpets and additional strips
When choosing a bitumen-polymer carpet for arranging valleys, they are guided by the color of the main coating. For decorative purposes, you can choose a material that differs in tone - this will emphasize the line of each groove and make the roof more expressive. Experts recommend covering the valley with a solid panel 1 m wide, be sure to glue it with mastic to the plank base. If it is required to join two pieces, then the junction is located as close as possible to the peak of the roof. The overlap of the top sheet to the bottom must be at least 20 cm with mandatory fixation with liquid bituminous waterproofing.
 The material of the valley carpet is laid over the entire surface of the groove and glued to the base with mastic
 To protect the edge of the lathing from dripping condensate and sedimentary moisture, a cornice and gable extension should be installed over the insulating carpet. To fix the planks, roofing nails are used, which are hammered in a zigzag pattern at intervals of 10-15 cm (at the joints - up to 5 cm). It is necessary to withstand the overlap of adjacent additional elements of 3–5 cm, placing the edges of the planks along the contour of the eaves or end ledge. It is advisable to fasten the droppers first - in this case, at the corners of the slopes, they will be covered by gable strips.
 The joints of the cornice and gable planks are overlapped with reinforced fixation with roofing nails
 Before installing the cornice and end protection, it is recommended to frame the perimeter of the solid flooring with a rail with a section of 20x40 mm. If an edge is made along the edges of the slope, then the waterproofing is installed on top of it and cut off behind the perimeter line. After that, additional elements are attached.
Cornice tile installation
The horizontal lines of a marking put on a lining simplify installation and allow to lay a tile in equal rows. It is best to form them with the help of linen twine rubbed with chalk. The cord is pulled in the right place and released like a bowstring to leave a mark on the dark surface of the substrate.
 For even laying of cornice tiles, it is necessary to apply chalk markings on the lining layer
 Starting shingles are laid at a distance of 1 cm from the eaves line and fastened with roofing nails. So that the tiles do not come off under strong wind load, the fasteners are hammered at a distance of 25 mm from the edge. Each subsequent strip is laid end-to-end, and the junctions are protected with bituminous mastic.
Installation of ordinary tiles
The main coating is mounted in the direction from the center of the slope, placing the first ordinary shingle with an indent of 2–3 cm from the edge of the cornice strip. To fix soft tiles, it is enough to remove the protective film from the adhesive layer and firmly press the shingle to the substrate.
 When laying the lower tiles of ordinary tiles, make a small indent from the edge of the cornice sheets
 The final fastening is carried out with nails at four points - along the edges of the strip, as well as over the depressions between the inner petals. The top sheets are offset by 1 petal. Thanks to this, the very “tiled” texture appears, and in addition, the joints and fixation points of the soft roof are closed.
 The scheme for laying a soft roof provided by the manufacturer makes it easy to understand the nuances of the technology
 The tiles protruding beyond the edges of the slopes are cut off, after which the cut is treated with bituminous mastic.
Video: soft roof installation technology from the material manufacturer
Arrangement of the ridge and sealing of penetrations and junctions
Ventilation of the under-roof space is provided by air elements installed on top of the ridge. They are attached to the wooden frame with screws or nails. After that, the ridge part is closed with flexible tiles. There are no special strips of soft bituminous coating for external corners - they can be made by cutting out the cornice tiles. The petals cut along the perforation are placed across the ridge and fixed with a nail from each edge. The next element is placed with a 5-centimeter overlap, and for additional sealing, the contact point is treated with bituminous mastic.
 The ridge air element must be covered with a layer of bituminous tiles, otherwise atmospheric precipitation will quickly render it unusable
 Places where pipes, cables and other communication elements pass through the roof slope must be closed with special passage units. They are attached directly to the base even before the installation of the lining carpet.
 The junctions with walls and chimneys require special attention, otherwise the moisture flowing down the vertical surface will penetrate inside the roofing pie
 During the installation process, the upper layers of the roof are let in over the penetration, impregnated with mastic and cut in place. In the same place where the slope is in contact with a brick chimney or wall, roofing materials are let into the surface of a vertical structure. For additional protection, a segment of the valley carpet and a figured metal apron (adjacency bar) are used.
Video: arrangement of a soft roof passage unit
bituminous roofing cost
Doing all the work yourself, you can save a lot, because the total cost of the roof will consist only of the cost of the necessary materials. Depending on the manufacturer, the price per square meter of a soft roof of a budget and medium level varies between 800–1,500 rubles. If we talk about the premium segment, then certain types of shingles are sold at prices up to 4,000 rubles. Of course, in this case, there can be no talk of any independent installation - anyone who can fork out for such an expensive material will find money for a professional team. The services of the latter, by the way, are not cheap - from 600 rubles per square meter of finished coating.
As you can see, it is not at all difficult to build a soft roof with your own hands, which, however, does not exclude proper accuracy and following the technology developed by the manufacturer. If you do everything with high quality, then the roof will please with its appearance and trouble-free operation for many years. Otherwise, it is better not to take up the work at all, otherwise the roof will constantly remind you of its existence with leaks and other unpleasant moments.
Surely, you have repeatedly noticed that many private houses are covered with flexible tiles, a noble, solid and aesthetically attractive roofing material. You can also equip such a roof, because this coating can be laid on a roof of any complexity, the slope of which reaches 12 - 90 degrees. Bitumen is very light, which makes it easy to install a soft roof with your own hands. Today we will talk about how to cover the roof with soft tiles.
Calculation of shingles
Before buying a soft tile, it is necessary to take into account that the price of a soft roof will depend on the area of coverage and the number of additional elements. A feature of the material that is used to organize the roof is to minimize waste during work. It is this factor that allows you to accurately calculate the roof and calculate the required amount of base material.
Let's give an example of calculating the amount of flexible tiles. So, let the gable roof have the following parameters: the length is 6 meters, the height is 4 meters; tilt angle - 32 degrees. Then the total area is 48 square meters (4*6*2). Keep in mind that one package of shingles is enough for 3 square meters. But be careful, as the area covered is indicated on each package. Then you will need 16 packs (48/3).

Similarly, you can calculate the amount of required lining material and valley carpet. It should be noted that the technology of covering the roof with soft tiles is such that there will always be cut parts and waste. Therefore, feel free to add another 10-15% to the calculated amount. After buying a soft tile, it is necessary to store it in a warm, dry, shady place, folding no more than 12 packs one by one.
Installing a roof sheathing
To lay the bituminous tiles correctly, it is necessary to properly prepare the base. A soft roof can be laid on an ordinary crate, which can be lattice or solid and is attached to the rafters. The frame is most often made of wood. If you need to arrange a lattice crate, then take boards for this.
In this case, it is desirable to use planed coniferous boards, which have a thickness of about 20-25 millimeters. To create a solid crate, you can use moisture-resistant plywood or chipboard, grooved and edged boards. The moisture content of the material should not exceed 20% of the dry weight. The material is attached to the rafters using ordinary nails or self-tapping screws.
To increase the service life of wooden elements, they must be impregnated with an antiseptic before installation. When creating a crate, calculate in advance the installation step of the rafters and the thickness of the board used for its construction. If the step is 60 centimeters, then you can use a board that has a thickness of 20 millimeters. With a rafter pitch of 90 centimeters, a board with a thickness of approximately 23 millimeters is required.
The joints of the boards must be placed in the places of the supports, and the boards must have a length of at least 2 spans between the supports. When laying the sheathing under a soft roof, it must be remembered that it is worth leaving a couple of millimeters between the individual materials to compensate for the expansion of the wood when it dries.
On the crate between the boards, a gap of 1-5 millimeters is made, between large-panel elements - 1-3 millimeters. Plywood and slabs are laid on the rafters with a spaced seam. You can not leave such gaps if all the wood has been previously subjected to technical drying.
Underlay installation
After arranging the crate under the soft roof, it is necessary to lay the lining layer, the main purpose of which lies in protecting the house from moisture ingress in case of possible leakage of flexible tiles. According to current standards, if the angle of inclination of the roof is 18 degrees or a little more, then waterproofing can only be arranged parallel to the end and cornice edges. It is these areas that are considered the most likely places for leaks.
Things will be different if the roof has a smaller slope angle - from 12 to 18 degrees. The installation technology of such a waterproofing layer provides for its installation over the entire roof area. This layer is mounted parallel to the cornice overhang from the bottom up with an overlap of at least 10 centimeters for transverse seams and at least 15 centimeters for longitudinal ones, fixing the edges with nails at intervals of about 20 centimeters. The seams must be sealed with glue.

To protect the edges of the frame structure of the roof under the soft tiles on the eaves overhangs from moisture, metal cornice strips called “droppers” with an overlap of at least 2 centimeters should be mounted over the lining carpet. They are nailed in a zigzag manner with special roofing nails, maintaining a step of 100 millimeters. To protect the lathing on the end parts, gable strips are mounted with the same overlap of 2 centimeters. The strips are stuffed on the cornices and ends over the lining layer.
If the design has elements such as valleys, then it is necessary to lay a special carpet that matches the color of the tiles on both sides. The edges should be fixed with roofing nails, maintaining an interval of 100 millimeters. After fixing, it will not be superfluous to coat the carpet along the edge with bituminous mastic.
Ventilation space arrangement
Without sufficient ventilation in the attic, the microclimate will be disturbed, humidity will increase and condensation will form. Ventilation is ensured by three elements: channels above the thermal insulation, a hole that serves for the inflow of outside air and exhaust holes, which are located in the upper part of the roof.
If the cornices in a residential building are hemmed with siding, then the soffit strips will act as a ventilation gap.
If, when constructing a roof for a soft roof, the cornice is made out with a clapboard, then it is customary to equip a gap between the boards. Ventilation of a roof made of flexible tiles is carried out by means of a ridge, which is customarily laid on a special ribbed profile. But often its throughput is not enough and it is necessary to install special ventilation elements on the roof surface.
If the roof slope is 15 - 40 degrees, then the area of the ventilation space is calculated as a quotient of the total area of \u200b\u200bthe slopes and a factor of 300. And if the slope reaches 41 - 85 degrees, then it is calculated as a quotient of the soft roof area and a factor of 600. Let the total roof area be 50 square meters, the angle of inclination is 35 degrees, and the cross section of the ventilation element is 258 square centimeters.
The ventilation area in this case will be 0.167 square meters (50/300) or 1670 square centimeters. Then the required number of ventilation elements is five (1670/258). The number of ventilation elements that are installed on the ridge is half of their number on the roof slopes, that is, 3.
Installation of soft tiles
Manufacturers of flexible tiles do not recommend fixing it at temperatures below plus 5 degrees, because the shingles become brittle in the cold and the procedure for installing a roof made of soft tiles is difficult, and the lack of heat affects the tightness of the joints. In winter, joints and folds of shingles should be heated with a blow dryer or other device that generates heat flow. To lay the material on the roof in the summer, it must be taken in parts, because the protective film is poorly removed from the tiles heated by the sun.
When laying tiles, roofers often make the same mistake, as a result of which the roof has a different shade in different places. Remember that tiles in different packages may not be from the same batch, but from different ones, and therefore its color is different. Thus, it is necessary to use several packages of material at once so that the color of the roof is uniform.

To simplify work and ensure smooth lines, before covering the roof with soft tiles on the roof, a chalk marking of the slope is carried out along the crate and lining. Horizontal lines are drawn parallel to the eaves in increments of 80 centimeters. It turns out approximately 5 rows of tiles. Vertical lines are applied along the length of the slope in increments of 1 meter.
Installation of roofing from flexible tiles begins with the arrangement of the zero "cornice" row. Self-adhesive ridge tiles are glued end to end over a metal plank. From the edge of the slope you need to retreat 1-2 centimeters. On the other hand, the tiles are nailed, and the first row of ordinary flexible tiles is laid on top of the attachment point. If you did not buy ridge-cornice shingles, then you can attach simple shingles to the cornice, but without petals.

The first row of ordinary shingles begins to be laid from the center of the eaves, heading towards the ridge and gables. To move in hot weather on the roof, you need to use special manholes, otherwise footprints may remain on the roofing. First, the protective film is removed from the individual roof tiles from the back and glued to the base. Also, the tile requires additional fastening.
The tiles are fixed with nails, hammering them when laying two adjacent rows. When you drive a nail into the first row, you will also nail the second one at the same time. It is impossible to displace the mount - to drive a nail from the very edge or into the center of the petals, since the device of a roof made of soft tiles does not allow chaotic fastening;

Approximately 4-5 nails are used per shingle. This is enough, since the bituminous tiles between themselves under the influence of solar heat will stick together and stick to the crate. The length of the nails is selected according to the type and thickness of the crate. The diameter of the nail should be approximately 3.2 millimeters, the diameter of the cap should be 10 millimeters.
When installing subsequent rows of tiles, remember that the lower petals of the material must correspond to the upper ones, which are located on the already nailed row. Along with this, it is customary to shift half the petal to the left or right.

Ridge tiles are obtained by dividing the cornice tiles into three parts according to the perforations. Mount the ridge shingles on the roof ridge, having previously cut the tile, while the short side should be parallel to the ridge. Nail with four nails so that the nails are located under the overlapping shingles with an overlap of 5 centimeters.
Proper connection design
In the process of installing a soft roof covering, quite often one has to face some difficulties and various objects that the roof adjoins. Say, the most elementary object of this type is a stove heating pipe. In the area where the pipe adjoins the roof, a gap is always formed through which moisture flows.
To get rid of this shortcoming, you need to properly attach the flexible tile. To begin with, hammer the rail into the angle between the roof surface and the chimney. It is desirable that it has a triangular shape, like an ordinary wooden plinth. Further, it is recommended to bring the tiles onto this rail and directly onto the pipe. After that, a valley carpet should be laid on top of it, starting from the chimney.

It should cover the entire channel at a height of 30 centimeters from the roof surface. After that, the lower part of the pipe with a carpet and bituminous tiles is placed in a metal apron - lined with sheets of painted tin on all sides. To avoid the accumulation of snow behind the pipe, it is necessary to equip the groove by installing a pyramid with two faces close to the pipe. Thus, both snow and rainwater will fall on the slopes of the groove and flow down the roof, flowing around the pipe.
Sometimes you need to bring some communications through the roof. In such cases, it is best to use passage elements that are made specifically for tiles. They are attached to the base of the roof with nails. Such elements reliably protect the roof from leakage. For example, antenna passages of small diameter through the roof can be made with rubber seals.
Joint sealing procedure
To seal the roof of soft tiles, overlaps of the lining carpet and ordinary bituminous tiles on the valley carpet, passages of the ventilation system and various junctions, a special sealant is used. Immediately before applying the composition, clean the surface of loose materials, oil and dirt. On dusty and porous substrates, first apply a bituminous mortar. Remember that with an excess of glue, excessive dissolution of the bitumen may occur.
The composition is applied to one of the surfaces to be glued with a spatula. Maintain a layer thickness of 0.5 - 1 mm. The width of the sizing is indicated in the instructions. When pasting joints to pipes and walls, apply sealant over the entire contact surface. Grout the seams of the brickwork with mortar flush with the brick. The bonding process lasts 1-3 minutes, depending on the air temperature. At low temperatures, the composition must be heated before application.

Now you know how to cover the roof with soft tiles! In addition, you can always update the roof with flexible tiles without removing the old coating. Laying on top of old new shingles is not much different from laying from scratch. To do this, you need to lay an inverted shingle on the protruding cornice strip and glue it, and cut the protruding part along the cornice. Next, the tile is laid exactly on top of the previous pattern.
Until recently, only galvanized steel, tiles and slate were used as roofing material. Several people were involved in the installation work, who spent a lot of time and effort on the work. But today the range of materials has expanded and now after the construction of the roof, one person can cope with roofing work, a lot of new things have appeared - for example, a soft roof.
In terms of its technical and operational characteristics, soft roofing is in many ways superior to other materials. Its advantages include:
- ease of installation (can be handled alone);
- strength;
- durability;
- flexibility;
- resistance to moisture and corrosion;
- tightness;
- attractive appearance.
Varieties of soft roofing
Often the following types of roofing are used as roofing:

Attention! If the top layer of the roof will not be removed, then when buying a soft roof, you should clarify whether it is compatible with the material from which the structure is made.
Preliminary work
Installation begins with preparation.
Stage 1. Preparing everything you need
As already noted, laying a soft roof can be done by one person. For work, he will need a completely standard list of materials:

Stage 2. Preparatory work
The base must be as strong as possible, its deflection is unacceptable. There are several materials that can be used for strengthening:
- plywood;
- OSB boards;
- grooved boards 10 cm wide.
It is characteristic that in winter small gaps (about 3 mm) should be left between the seams of the skin. If the structure is sheathed with boards, then 5 mm.

Attention! It is desirable to treat the rafter system to protect against decay and insects, as well as flame retardants - to increase the refractory properties.
Prices for OSB (Oriented Strand Board)
OSB (Oriented Strand Board)
Stage 3. Ventilation gap

It solves the problem of high humidity and reduces the amount of ice that forms in winter. Moreover, in summer, ventilation reduces the temperature inside the roof sandwich.

Ventilation consists of three main elements:
- ventilation outlet;
- valves for fresh air supply (installed from below);
- an air gap of 50 mm between the base and the waterproofing layer.
Attention! If the slope of the slope exceeds 25ᵒ, then the area of the ventilation hole should be 8 cm². If the slope is less than 25ᵒ, then 16 cm².
Stage 4. Intermediate layer

In this case, a gasket means a special one laid around the entire perimeter of the roof. Installation is made from the bottom up, starting from the eaves. An overlap of 10 cm is observed. The material is fixed with nails every 20 cm.
When the roof slope is less than 18ᵒ, the lining can be laid not over the entire area, but only in certain areas, such as:
- skate;
- overhangs of cornices;
- junction with a vertical wall;
- location of the chimney.
Attention! If the slope is less than 12ᵒ, then the use of a soft roof is not recommended.


Stage 5. Installation of strips
Step 1. To protect the material from atmospheric precipitation, cornice strips are installed on the overhangs, you can directly on top of the gasket material. Planks (another name - droppers) are located with an overlap of 2 cm and are fastened with roofing nails (zigzag, along the entire length of the plank).
Step 2 Gable strips are installed at the ends of the structure. This must be done with the same 2 cm overlap. Nails are hammered in 10 cm increments.
Step 3. The exit point is marked (if the house has a heating stove).
Step 4. Upon completion of the installation of the planks, the valley carpet is laid, which will significantly increase the moisture resistance. The color of the carpet should match the color of the roof, the edges are fixed with nails in 10 cm increments.
After that, you can start laying the roofing material.
Below is the technology for laying bituminous tiles, since this is the most common type of soft roof.
Stage 1. Cornice tiles

Cornice tiles are laid on the planks fixed on the overhangs. For fixing, galvanized nails are used - they are hammered in two rows 2.5 cm from the upper and lower edges of the material.
Instead of cornice tiles, you can use an ordinary one, which will save a little. For this, the tile is cut out - a shingle is taken and the petals are cut from it. In this case, the installation is carried out "end-to-end" at a distance of 2 cm from the cornice overhang.
Stage 2. Tiles

Attention! Do not forget about color deviations. Even if all the tiles are from the same batch, the tone in different packages may differ. For this reason, it is recommended to mix six to seven packs beforehand.
Step 1. Laying starts from the center of the roof overhang and is carried out in both directions.
Attention! The protective film is removed from the shingles immediately before installation, because without it the material cannot be stacked.
Nails are used for fastening. Usually four pieces are enough for shingles, but if the roof slope exceeds 45ᵒ, then six is better.
Step 2. The first row is laid in such a way that its edges recede from the edges of the cornice overhang by 1-1.5 cm. At the same time, the petals cover the joints between the cornice tiles.
Step 3. The second row is laid in the same way, but the petals should overlap the cutouts of the previous one.
Step 4. At the edges, the material is cut along the edge and glued. There should be a layer 10 cm wide.

The same is done in the end - the tiles are cut to obtain a 15-centimeter strip, after which the edges are smeared with glue by about 7-8 cm.
Attention! When trimming tiles, it is advisable to put a piece of plywood under it so as not to damage the underlying layer.
Stage 3. Ridge tiles

Step 1. First, the scaffolding is prepared. They will greatly simplify the work with the roof ridge, but at the end of the work, do not forget to glue the petals of the shingles at the attachment points.
Step 2. The tiles are overlapped (approximately 5 cm), each shingle is fixed with four nails.
Attention! Ridge tiles are laid only after the laying of the ordinary is completed.
Step 3. To obtain a ridge tile, the eaves are cut at the places of perforation. Further, each element is bent and laid in a short part along the roof ridge.
Stage 4. Passages and junctions in the roof

There are several ways to organize passages through the roof. So, if the diameter of the passage is small, then it is better to use special rubber seals. This applies to inputs for antennas and other communications, but the pipes are finished in a slightly different way - here it is necessary to take into account possible heating and, as a result, expansion, therefore the technology is used differently.
Step 1. First, a triangular-shaped rail is nailed along the perimeter of the junction of the pipe and the roof (in most cases - 5x5 cm).
Step 3. The pipe is glued with insulating material so that 25 cm of the slope and 35 cm of the pipe itself are covered.
On this, the installation work is almost completed, it remains only to fix the adjacent bar around the entire perimeter of the pipe. Next, an iron apron is fixed, and the seams are carefully sealed with silicone-based sealant.
Adjacency to vertical walls is carried out in the same way. The only difference can be considered that the triangular rail does not form a perimeter, but is fixed along the wall.
Video - Installation of a soft roof
Prices for different types of tiles
Roof tiles
Roll roofing
Rolled material, which is also called euroroofing material, is laid mainly on flat roofs, although it can sometimes be found on pitched roofs with a slight slope.
The technology looks like this.

Step 1. After rolling out the roll, all the folds are leveled and the material is stretched.
Step 2. One side of the roofing material is heated with a special burner until a special indicator melts.
Step 3. After that, the side is glued to the base. When the material has cooled, the roll is rolled up again to the place of fixation.
Step 4. The roofing material is fused and gradually rolled out. In this case, you must adhere to certain rules.
- The roofing material is welded with an overlap of 5 cm. For this, a special indicative strip is applied along the entire length.
- Do not overheat the material, otherwise it will deteriorate, lose its ability to stick.
- A high-quality weld material must be homogeneous - without voids, dark spots, etc.
The joints with other surfaces are treated with bituminous mastic, which, after drying, will have the same properties as euroruberoid.

Video - Installation of euroroofing material
As a conclusion
The main points of installation, discussed above, will help to understand the essence of the issue even for a non-specialist. The main thing to remember is that compliance with the installation technology and strict adherence to all instructions will extend the operational life of the soft roof.
The hot mastic is heated to 220 degrees, after which various mineral fillers are added to it:
Before laying, the roofing material itself is laid on the base and rolled out over the entire surface.
To glue the canvases, it is necessary to use mastics that are designed for a specific roll roofing material. If a bituminous roof is used, then it is glued with bituminous mastics, roofing sheets are glued with tar compounds.
Lay individual strips of material end to end. At the same time, when laying subsequent layers, it is necessary that the joint of the previous layer be covered with a new layer. With a slope of less than 5%, the joint must overlap by at least 10 cm.
During the installation process, not one roofer of a soft roof takes part, but two:
The duties of the brushman include applying mastic to the base and the inner surface of the rolls. The stacker glues and adjusts the sheets to the prepared base. Already laid canvases are rolled from above with a roller. This is necessary to ensure good contact with the surface (see also: "Solid roof device - advantages in use").
Roll roof laying includes checking the quality of gluing materials. To do this, carefully tear off one layer from another. A small gap is acceptable. If the web of material has deviated to the side, then it must be moved in the right direction without tearing it away from the previous layer. If the layer has already stuck and it is impossible to move it, then the already glued part is cut off and re-glued. At the same time, the size of the required overlap is monitored.
In case of formation of blisters over the area of the material, they must be pierced with an awl or cut with a knife. After that, this place is pressed to the base until the mastic flows through the hole. Thus, the surface is sealed after solidification. The canvases are laid in layers, and if cold mastics are used in the work, then at least 12 hours must pass between laying the layers.
Installation of a rolled roof is a time-consuming process, moreover, requiring a lot of physical labor. That is why various devices for mechanical installation of the roof are increasingly being used. Such equipment is used at large facilities where the estimate for a soft roof is estimated at tens of thousands of rubles. That is, in cases where the use of manual power would be costly.
Installation of a rolled roof, in detail on the video:
Roll roof repair is not a difficult task. Even people who do not have experience in roofing can cope with the procedure for eliminating defects in such a roof (read also: “Repair of a soft roof”).
To repair a roof section, it is necessary to remove deformed elements that have lost their insulating qualities. Instead of the removed section of the rolled roof, a new coating is laid. At the same time, it is important to comply with the rules and regulations for the arrangement of such a roof. This implies taking into account the slope of the roof and observing the overlap. See also: "Soft roof: technology, device and purpose."
Soft roll roofing: photo and technology of do-it-yourself soft roll roofing
Preface Soft roll roofing is one of the types of flat roof coverings.
Most often, this material is used for household buildings or industrial buildings.
Soft roll roofing is one of the types of flat roof coverings. Most often, this material is used for household buildings or industrial buildings. By observing the technology of laying a soft roll roof, it is possible to provide a building on a summer cottage with reliable protection, however, due to the limited color range and structure of the material, it will not be possible to give originality to the coating.


Rules for laying a rolled soft roof with your own hands
Installation of a soft roll roof is usually used where other roofing materials cannot be used, for example, on flat or gentle slopes.
According to the rules for laying a rolled soft roof, it should be installed in several layers: with a slope of 0 ° to 5 °, four layers of material must be laid, with a slope of 5 ° to 20 ° - three layers, and if the slope exceeds 20 °, then two layers are enough .
At the same time, the maximum slope angle of the roof slopes for rolled materials should not exceed 45°.
When equipping a roof made of soft roll materials, it must be remembered that they are laid on a crate that does not have slots.
In the event that only an unedged board was used and cracks could not be avoided, gaps wider than 10 mm should be covered with strips of galvanized sheet. The prepared crate must be absolutely even and smooth.
On its surface there should not be uninsulated nails, protruding knots or fragments of wood that can damage the roofing material. Moisture-resistant plywood is suitable for these purposes, but it increases the cost of the roof. In the event that a soft roll roof is installed on a concrete base (for example, a concrete screed or reinforced concrete floor slabs), it must be dry, without potholes and bumps. All ends of the boards or floor slabs through which the rolled materials will be bent should not have sharp corners in order to avoid rips and chafing.
After cleaning the surface of debris and dust, it is primed with roofing mastic.


Do-it-yourself strips of material according to the technology of soft roll roofing are laid in one direction.
On a roof with a slope of up to 20 °, soft roof panels are glued horizontally, that is, along the eaves, perpendicular to the water drain. For flat roofs, the sequence of mounting panels does not play a special role, but if there is even a slight slope, then work starts from the very bottom. On roofs with a slope of more than 20 °, the panels are rolled out vertically, that is, perpendicular to the eaves, in the direction of water flow.
According to the technology, a soft roll roof is laid with an overlap.
In this case, the joints of the inner layers must be at least 70 mm, and the top - at least 100 mm. In addition, overlaps in adjacent layers should not be stacked on top of each other and should be spaced half the width of the roll.
The technology of laying a soft roll roof using mastic
In the case when soft roofing is performed using mastic (bituminous, bitumen-polymer or polymer) as an independent roofing material, no seams are formed on it.
In addition, the roofing mastic has a high expansion coefficient, which ensures the integrity of the coating during seasonal roof movements and other loads, for example, if snow accumulates on the roof. However, this method also has its drawbacks - it is very difficult to obtain a mastic coating of the same thickness on the entire surface of the roof.


Look at the photo: soft roll roofing is usually reinforced with fiberglass or glass mesh with an approximate cell size of 4 x 4 mm.
Mastic is usually applied using a special sprayer. The number of layers also depends on the slope of the roof slopes: up to 15°, two reinforcing layers are sufficient, and from 15° to 25°, three layers of mastic and two reinforcing layers. In this case, the device of each subsequent layer is produced after the previous one has dried.
The device of flat roofs of various types
The roof ridge, valleys and grooves, cornice overhang, as well as junctions with walls and vertical protruding parts are reinforced with several additional reinforcing layers. It is recommended to protect the top layer of mastic coatings with a layer of paint. However, some types of modern mastics do not need a protective layer, since they have the necessary decorative properties when dyed in mass, and the material itself is sufficiently resistant to atmospheric influences.
But it’s still worth laying a protective layer of mastic with fine gravel or a decorative coating, especially for inhabited roofs.
Roll materials for built-up roofing
Welded materials for roofing in a rolled design are in demand for the arrangement of flat and pitched roofs and for waterproofing hydraulic and underground structures.
They have a multilayer structure, moisture protection is provided by a layer of modified bitumen, tightness is achieved by heating it and pressing it firmly to the surface.
The material is valued for its availability, ease of transportation and installation process, operational safety, high resistance to temperature, atmospheric, mechanical and biological influences.
The technology is considered reliable, the waterproofing roofing carpet obtained by fusing effectively protects the building from getting wet, fire and other negative factors for at least 10 years.
 deposit photos
Structure and composition of the material
The basis of the built-up roof is modified bitumen, the material has a multilayer design:
- The bottom layer is presented in the form of a polyethylene film, in addition to protection against sticking, it serves as an indicator that the optimum heating temperature has been reached.
- The next layer is working, knitting.
It is he who softens during installation.
- Reinforcing base made of fiberglass or polyester threads.
- External bitumen or bitumen-polymer layer.
- Protective dressing from a mineral crumb.
This structure guarantees tightness, especially when welding several layers. The base is biostable and is made of randomly directed threads, which indicates a high tensile strength.
Types of bitumen
The working surfacing and protective outer layers are made of modified bitumen with two possible types of oxidizing additives: rubber (styrene-butadiene-styrene) or atactic polypropylene.
The first modification is valued for its elasticity, this property is preserved even in conditions of extreme cold (up to -40 ° C). Bitumens with APP plastic are hard and heat resistant (melting temperature is 150 °C), their optimal scope is the hot climate zone.
Regardless of the composition, modified bitumens are resistant to temperature extremes and moisture, and polymer-based materials win in terms of service life and strength.
Such a binder does not need to be melted to a liquid state; to achieve a tight fit, it is sufficient to heat it evenly.
Reinforcing materials
Currently, for the manufacture of welded roll roofing, a fragile cardboard or asbestos base is not used, the reinforcing layer is made of polyester, fiberglass or fiberglass.
The type of base is indicated in the first letter of the marking.
Polyester (E) is considered the most reliable and durable basis, the threads in it are distributed randomly.
Due to this, the roofing material has an elongation at break of up to 60%, the minimum applied force for breaking is 35 kgf/cm. The only disadvantage of polyester is the high price, this variety is the most expensive.
Fiberglass (T) the base is distinguished by high strength (tensile strength - from 80 kgf / cm), the best characteristics are observed in grades with frame fiberglass.
The downside is low elasticity, elongation at break reaches only 2%. Such a coating does not tear during shear or deformation of the roof structure, but simply moves away from the surface.
Fiberglass (X)- has a minimum strength - breaking strength of 30 kgf / cm with a complete lack of elasticity. This is the cheapest variety, and problems may arise during its transportation (cracking or tearing of the material). It is not recommended to be laid on complex or mobile roofs, and on structures that are frequently used.
Types of toppings for the top layer
The main purpose of this layer is protection from atmospheric precipitation, mechanical external influences and ultraviolet radiation. For sprinkling, chemical inert materials are used: sand, basalt, slate, mica, ceramics.
Depending on the shape and size of the fractions, dust-like, fine, medium, coarse-grained and scaly types of mineral chips are distinguished, the first variety protects the material from sticking together in a roll.
Recently, a built-up roof coated with foil or polymer film has been produced, which is not inferior to varieties with mineral chips in terms of reliability of protection against external factors. There are grades with double-sided dusting, they are used as the bottom layer of the roofing carpet.
 deposit photos
Mounting principle
The laying technology is simple: the lower layer of the rolled roof is heated with a burner until the inscriptions on the indicator film disappear (burn-out), the material is rolled onto a pre-prepared base and pressed with a roller.
The installation of built-up roofing is carried out quickly, but on pitched roofs with a slope, at least three people will be required. Mandatory conditions are: treating the base with primers, laying the roof with an overlap, laying at least two layers (the smaller the angle of inclination, the thicker the roofing cake), checking the quality of the fit.
Soft roof installation technology
The canvases are stacked with an offset, there should not be coincidence of the joints. If a low-quality area is found, the bituminous roof should be reheated and laid again.
Application area
This is a multifunctional building material used for waterproofing structures of various types:
- Flat and pitched roofs with slopes up to 30°.
- Hydraulic structures: wells, pools, sewer channels.
- Foundations and underground elements of buildings, including tunnels and bridges.
- Ceilings and floors in rooms with high humidity: bathrooms, baths, baths.
The main purpose is roofing work: repair or main.
The built-up materials can be used as a base for slate, tile and other types of roofing or laid as an independent protective coating. In the first case, one layer is enough, in the second - from 2 to 4 (depending on the angle of the roof).
The operational characteristics of the rolled roof are suitable for use in all climatic zones of the Russian Federation, including the northern ones.
mvnvdanwamnbaa
The construction of any industrial building or residential building ends with the construction of a roof, thanks to which a kind of barrier is created that prevents moisture and snow from entering the room, and also retains warm air. The comfort and coziness of staying in the building depends on how correctly and efficiently the device of the rolled roof is made.
In ancient times, builders ensured the tightness of the roof structure using clay and sheet iron (for more details: “Roofing sheet iron - characteristic”). However, the fragility of these materials led to a rapid loss of the original properties of the roof and its constant repair.
Soft roof - roll: device technology
With the development of construction, new materials began to be developed and modern technologies for their installation were used.
One of the important elements that is included in the installation of rolled roofing materials is waterproofing for the roof.
It is the protection of the roof space from water penetration, which has a positive effect on maintaining the high quality of the wooden truss system, as well as the attic floor.
Here you also need to take into account the device of rolled roofs, according to which a waterproofing roofing will be selected.
Owners of private houses, as a rule, prefer a gable or broken structure, therefore, in this case, the waterproofing layer is made of membranes with a base of polyethylene or PVC, as well as roofing material supplied in rolls (read: "Roof waterproofing device - characteristics of materials").
If the building is erected with a flat roof, then the listed materials are no longer suitable for work.
In this case, the installation of a roll roof is carried out from welded materials.
What roll materials can be used for roofing installation
Depending on the various characteristics of roofing, there are several classifications.
Let's consider some of them.

Depending on the application method, there are:
- materials with a bitumen base - it is possible to achieve tightness of the connection when laying them using special mastics, which can be hot or cold;
- materials on an adhesive polyethylene base, protected by a film.
When laying on the roof surface, the film is removed.
- deposited materials. In this case, roll roofing - its installation technology is somewhat different from the two listed methods of applying the material, it is laid using a gas roofing burner.
Depending on the use of materials are selected:
- for a single layer coating;
- for multilayer coating.

The former are characterized by the presence of multilayer fiberglass with the addition of polymers and bitumen.
Basalt, sand, foil or shale dressing is made on the upper layer of such material. The most common option is considered to be a roofing device made of hydrostekloizol, stekloizol, rubitex, glass-elast, prorofichrome, masterkrom.
List of properties characteristic of roll roofing
These roofing coverings cannot be classified as elite, but they are used by developers.
The possibility of fast and convenient laying significantly speeds up the pace of work. Also, another advantage of the materials is that the repair of rolled roofs can be performed both on flat and gently sloping (no more than 11 degrees of slope) roofs, which is not allowed by any coating, including ondulin.

The elasticity of the composition of the rolled roof prevents the appearance of cracks, makes the canvas very durable, and improves sound insulation. Compliance with European standards, as well as environmental friendliness of materials allows them to be used in any conditions. Specialists highly appreciate the presence of high thermal insulation qualities of canvases, which are preserved even with prolonged ultraviolet radiation.
Description of roll coating installation technologies
Since each coating has its own characteristics, their installation is also carried out in different ways, as can be seen from the installation photo.
Laying of built-up roof
Before repairing a rolled roof - the technology of which boils down to applying materials by fusing, you should know that they are produced by TechnoNIKOL and Isoflex.
This method is absolutely not suitable for attaching the coating to wooden floors and rafters, but is intended for a flat or gently sloping roof (for more details: "Flat roofing device - technology").

The best option is to use a built-up roofing material, also called euroroofing material, which includes fiberglass with a bituminous coating on both sides (for more details: "Euroroofing material - laying technology: installation process").
Its difference from obsolete materials is observed in the strength of the base, so the roofing will last longer than economical counterparts.
Installation sequence:

Roll roofing device, see the video:
Fixing roofing with mastic

Possibilities of a multi-layer roofing carpet
Due to the design features, the roof must be reliably protected from wind, rain, snow, and temperature fluctuations.
For this, the roofing device from rolled materials is carried out in several layers. Roofing material or other selected roll material is placed in 2-5 layers, their number is determined by the magnitude of the slope of the roof.
TechnoNIKOL https://www.youtube.com/embed/wofS8o7z9E4
If the work is carried out on a flat roof, it is recommended to lay as many layers as possible, then the coating will easily withstand any load that occurs during the operation and repair of the roof.

In the case of a roof slope of up to 2-3 degrees, the best option would be to create a four-layer cake. If the slope angle reaches 10 degrees, then a three-layer roofing material coating will be needed, if more than this value, then a two-layer one - underlying and external.
Installation of a roof from rolled materials
—> Roofing and hydro-insulating material Rukan™ 1 is intended for installation of roofs with a small slope and their repair.
BITUMEN ROOFING AND WATERPROOFING MATERIAL
Rukan™ 1 consists of a non-rotting base, on which high-quality bituminous binder is applied on both sides.
The lower side of Rukan™ 1 is covered with an easily meltable polymer film, the upper side is covered with a film (grade P) or a protective coarse-grained mineral dressing (grade K).
Rukan™ 1 is welded with a propane torch onto the prepared base.
Thanks to the use of fusing technology, the roofing and waterproofing coating from Rukan™ 1 is homogeneous, without voids.
This guarantees the strength and durability of the coating.
Rukan™ 1 is excellent for new roofing and roof repairs.
Rukan™ 1 is recommended to be laid on a primed concrete base or cement-sand screed.
Tensile strength in longitudinal/transverse direction 60/40.80/90.30 Flexibility on beam R=25mm, С°, not higher than 0
Heat resistance for 2 hours, С°, not lower than 80
Roll dimensions, Length 10 m2
Width 1m2
What is a roofing pie
We raise the corrugated board to the installation site
How to lay out profile sheets
The list of additional elements for the profiled sheet
Technology of laying profiled sheet on the roof
How to lay sheets on the roof
Profiled sheets have a number of advantages, which makes it possible to design various roofs with their help.
Having figured out how to properly lay corrugated board on the roof, you can implement this work yourself.

What is a roofing pie
In the process of studying the question of how to properly lay a profiled sheet, you will need to understand the nuances of arranging the roof structure.
At the beginning of construction work on the construction of the roof, a truss system is mounted. This procedure must be performed in compliance with all technical standards, since significant static and dynamic loads are placed on the rafters during operation. It is better if this work is performed by specialists who have the appropriate skills in the design and installation of the structure.

Before laying corrugated board on top of the finished truss system, you need to decide on the lining material.
This is directly affected by the type of roof structure and the characteristics of the material itself. For example, if the role of waterproofing is performed by a volumetric vapor-permeable diffuse membrane, there is no need to install a vapor barrier. Separate heaters endure exposure to moisture and are able to pass steam.
Roofs are warm or cold - this is affected by the purpose of the room.
If we are talking about an attic room, then the roofing pie will include the following elements:
- Vapor barrier.
- Internal crate.
- Insulation.
- Waterproofing.
- Control grate.
- crate.
- profiled sheet.

A cold roof provides for the presence of only a waterproofing layer, which must necessarily have vapor-permeable characteristics.
This will allow excess moisture in the room to leave it unhindered: in this way, the attic will be saved from the accumulation of dampness.
It takes much less time, effort and money to equip a cold roof than to build an insulated structure.
After arranging the roofing cake, you can lay the roof with corrugated board.
We raise the corrugated board to the installation site
Before laying the profiled sheet on the roof, it must be lifted there in an intact state. Usually short sheets are easy to lift due to their good vertical stiffness.
However, since it is desirable to lay a profiled sheet with a small number of connecting sections, the length of the material used for these purposes can be 5 meters or more. This implies the presence of certain difficulties with raising such a sheet - the slightest careless movement can lead to its deformation or breakage.

To raise the profiled sheet to the roof, one of three methods is usually used:
- Construction crane.
- Suspension.
- Guides.
The first method is considered the simplest, but at the same time the most expensive.
The roofing material is first laid on pallets, and then it is lifted to the surface of the mounted crate by a crane.
It is better to lower pallets on the roof in the area that will be sheathed last. This will make it possible to do without the laborious procedure for rearranging them from place to place.
Using suspensions is the most inexpensive way to bring corrugated board to the installation site. However, its implementation will take a lot of time. Having lifted a pack of material on the roof, you need to put it on a pre-prepared place on top of the crate.
It is also important to think about how to fix this pack on the roof. In the process of implementation, the long side of the profiled sheet is installed on the base, and the last wave along the top is equipped with a pair of wooden bars located opposite.
It is important to do this so that they protrude a little on both sides.

For tight fixation of the bars, screws, metal staples or clamps are usually used.
To lift the sheet up, a rope is tied along the edges of the wooden bars. After that, it will be necessary to carry out a complete dismantling of the entire mounting system.
In the third case, special wooden guides are used. The laying of two wooden bars is carried out in such a way that they fall inside the extreme waves along the inside.
Wooden boards are used to fasten the guides to each other, in increments of 1-1.5 m. The finished impromptu staircase is placed so that one side of it rests on the roof, and the other on the ground. The angle of inclination of the structure should approximately coincide with the angle of inclination of the roof.
By tying a profiled sheet on both sides in the area of \u200b\u200ba long rib with a rope, you can drag it onto the roof. To avoid scratching the material, the guides are covered with a tarpaulin or any other dense fabric.
How to lay out profile sheets
Understanding how to properly lay a profiled sheet on the roof, one cannot ignore the basic schemes for mounting the material. The layout of the corrugated board is thought out in advance: for this you can use a specialized program or just a paper sheet.

The presence of an accurate diagram will significantly speed up the installation procedure, and will also make it possible to do without unnecessary cutting.
The lower edge of the overhang, on either side, is chosen as the place to start laying the roofing sheets. If you want to design a shed or gable roof, then due to the simplicity of work, a preliminary scheme is usually not done.
The use of a profiled sheet with a capillary groove will require special care: the section with the groove must be placed under the adjacent sheet.
The list of additional elements for the profiled sheet
It is necessary to install some additional elements on the roof surface, how to properly lay corrugated board on the roof without them will not work. Basically, for these purposes, a cornice strip, a valley and abutment strips are used.
With the help of a cornice strip, the frontal board is protected from climatic moisture, and the attic is protected from rain getting inside it during strong gusts of wind. It is mounted on top of the frontal board with self-tapping screws, in increments of 2-2.5 m.
The overlap used is from 100 mm. The cornice strip must be brought under the waterproofing material: this will allow moisture that has penetrated under the roofing to drain freely.

The valley bar is also installed before laying the corrugated board on the roof.
It consists of two parts - external and internal. The internal component is under a covering. The docking point should be decorated with an additional layer of waterproofing material or a special tape. With the help of adjoining strips, passages through the roofing surface of various pipes and other elements are organized.
The lower junction bar must be brought under the corrugated board at a distance of 20 cm.
Technology of laying profiled sheet on the roof
Before starting to lay the roofing material with a cord, check the plane of the slopes. If differences of more than 5 mm are detected, they are eliminated using linings under the crate for this, or by cutting out suitable grooves in the counter-batten. This stage should not be skipped, since it is quite difficult to properly lay corrugated board on an uneven base.

On roof slopes of a simple rectangular shape, any lower corner can be the starting point for laying. For temporary fixation of the sheet, a pair of self-tapping screws is suitable. The installation of the first row of the profile sheet is carried out in such a way as to achieve complete overlap of the cornice overhang. The dimensions of the protrusions beyond the edges should be in the range of 50-60 mm. This is especially true in situations where a drainage gutter is laid over the roof eaves. If the drainage system is not used, the protrusions of the corrugated board must be increased to 200-300 mm.
How to lay sheets on the roof
Having mounted 2-3 sheets included in the first row, you can proceed to the second row. At the same time, it is necessary to achieve overlapping of sheets of the next row by 150-200 mm of sheets of material in the previous row.
The size of the overlap depends on what is laid on the roof in this case. For these purposes, there are special tables in which the most common coating grades are calculated.
Since it is quite easy to lay the roof with a profiled sheet, some craftsmen immediately apply the finishing fixation, without checking the evenness of the laying along the overhangs.
It is for this reason that ugly distortions of the roofing material are obtained. To correct such errors, one cannot do without unscrewing the screws and re-laying the sheets. It is most reliable to carry out the final fixing of the corrugated board after checking.

If it is necessary to arrange a triangular or trapezoidal slope, the installation is carried out according to a different algorithm.
Do-it-yourself roll roofing
In this case, the starting point for laying is the central part of the slope or the line passing between the edge of the ridge and the eaves. After that, both sides serve as the mounting direction.
Special roofing self-tapping screws act as fasteners for profiled sheets on the roof batten. They usually have a hexagonal head and a drill-like tip.
For fastening the corrugated board to the crate, the lower wave of the profile is used. The place for screwing the screws is each wave on the eaves and the overlap area. The rest of the surface is equipped with fasteners every 300-400 mm, using a checkerboard pattern for their location.
To install the ridge on the crate, you will need long self-tapping screws.
Soft roofs include bitumen-based roll materials, as well as a piece coating that externally imitates tiles. Soft roofs are widespread due to reasonable prices and the ability to do the work from and to with your own hands. Another important plus is the light weight of soft roofs, due to which the load on the rafter system and the foundation of the bath is significantly reduced.
It is worth choosing the type of soft roof, starting not only from the external design of the bath, but also from the angle of inclination of the slopes.
Roll roofs
Laying of rolled materials is most often done on flat roofs and shed roofs with a slight slope. Roofs with a large slope are usually not covered with rolled materials, since the appearance of the bath will be unpresentable.
| Material | Description |
|---|---|
| The most famous roll coating is roofing material. It is glued to the base with bituminous mastic. The material is the most budgetary, easy to install, but the service life of roofing material does not exceed ten years. | |
| Built-up roofing felt is a material of better quality compared to its "predecessor". A layer of bitumen has already been applied to the basis of the built-up roofing material. During the installation process, the material is heated with a burner and rolled into several layers. | |
| Stekloruberoid - material with a fiberglass base, resistant to temperature extremes and UV rays. A coarse or fine fraction is applied to the surface of the material. So, for example, S-RK glass roofing material, which is laid with the top layer, has a sprinkling of a large fraction on the front side, and a fine one, similar to dust, on the wrong side. At S-RF glass roofing material, which is also laid with the top layer, the sprinkling is scaly. And sprinkling of the smallest fraction on both sides of the C-PM glass roofing material, which is laid with the bottom layer of the coating. Laying is carried out by welding or mechanical fixation of the material. The service life of roofs made of glass-ruberoid does not exceed 10-12 years. | |
| Membrane materials - the most modern of all of the above, have a much longer service life, high waterproofing properties. Membrane materials are not susceptible to climatic factors and the action of sunlight, mechanically strong, light and elastic. In addition, you can choose the shade of the material yourself. |
Bituminous roofs
Piece bituminous tiles are an economical material with high decorative and soundproofing properties.

Flexible multilayer tile TechnoNIKOL SHINGLAS “Dragon tooth”
A rich color palette of shingles allows you to implement many design solutions, create your own unique roof design.

Flexible tile TechnoNIKOL SHINGLAS “Modern Brix”
Small size soft shingles can be installed on roofs of any configuration, including hipped roofs and domes, while the amount of waste is always minimal. Caring for a bituminous roof is not difficult - it must sometimes be cleaned of snow and accumulated fallen leaves. And roof repairs are carried out as simply and quickly as possible - you just need to remove the hardware and replace the defective element.

The top layer of shingles is a sprinkle of natural materials, such as basalt. The rough surface of the shingles allows snow to be retained on the roof and prevents its avalanche. In addition, coarse dressing provides mechanical strength to the coating.

Flexible tile Docke, collections "Cologne"
Roofing must comply with the quality of GOST 32806-2014.
Laying can be done independently, having a minimum set of tools and following the instructions.

Prices for shingles
shingles
A step-by-step guide to laying shingles
Soft shingles are laid only on a solid base, always hard, dry. As a base, it is recommended to use plywood sheets of increased moisture resistance or OSB-3 with a thickness of 11 or 12 mm (for some types of tiles, the use of plates with a thickness of 9 mm is acceptable). The recommended dimensions of the plates are 1.25 x 2.5 m.
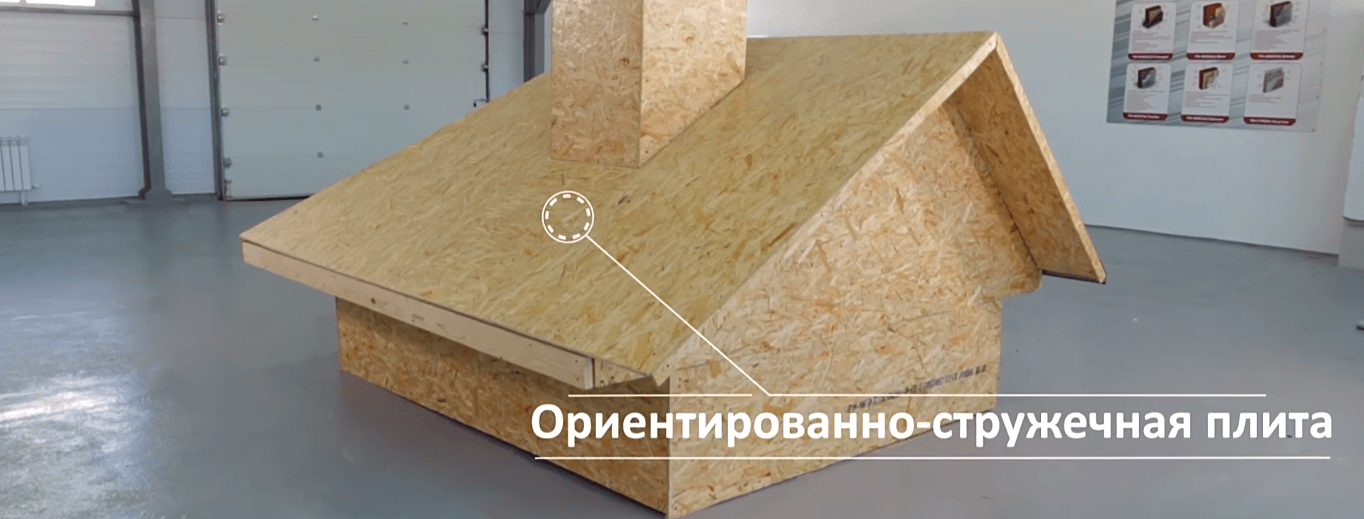
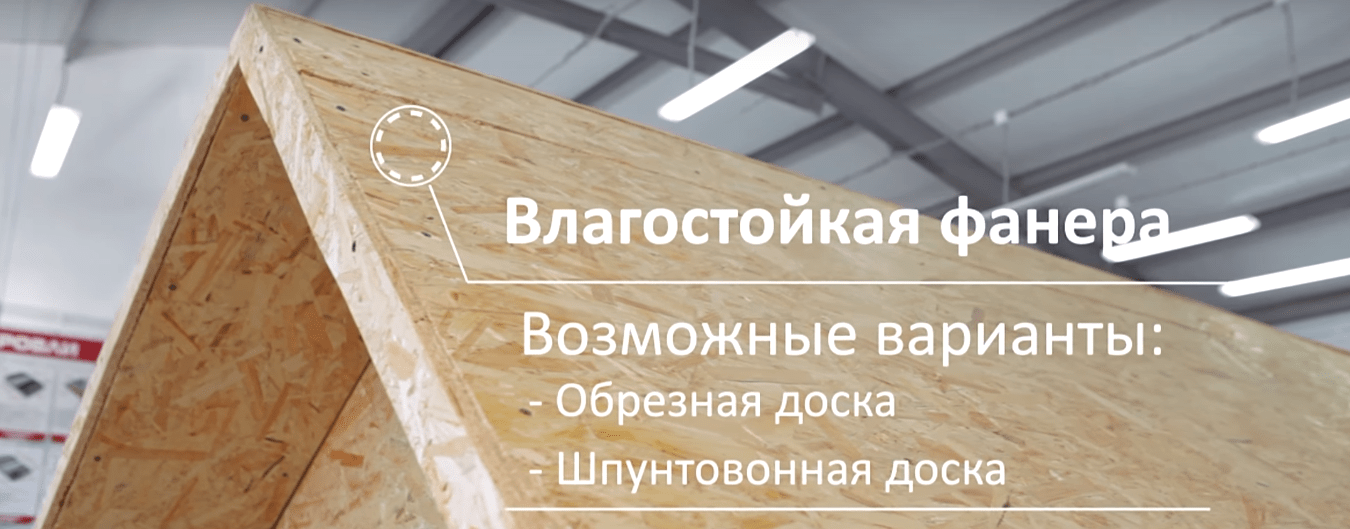
It is also permissible to make a continuous crate of tongue-and-groove or edged boards with a relative humidity of less than 20%.


The slabs are mounted on top of the crate of the "inch" board, mounted in 100 mm increments. A prerequisite for the installation of a continuous crate is the observance of the spread, that is, at one point of the roof, 4 corners should not converge at once.
Stage 1. Before laying flexible tiles, it is necessary to fix additional elements, the first of which is a cornice strip. The element is necessary to drain water and strengthen the roof structure.

The bar is laid with an edge on the edge of a continuous crate and fixed with roofing screws. Hardware is driven in in a checkerboard pattern, observing a step of about fifteen centimeters. The overlap of the ends of adjacent planks is not more than five centimeters.
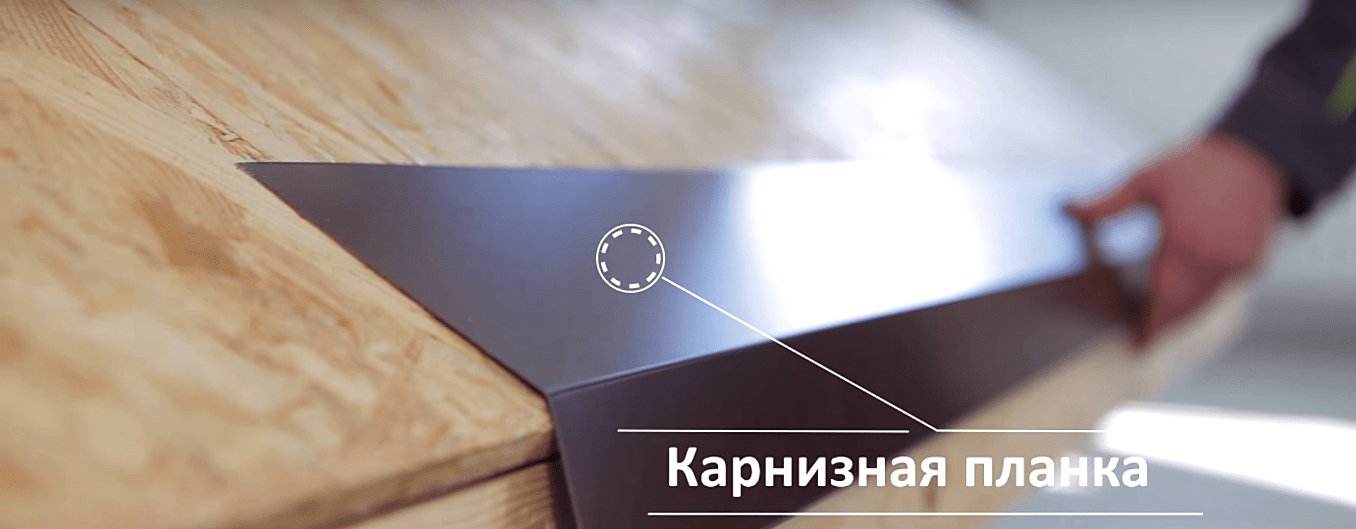
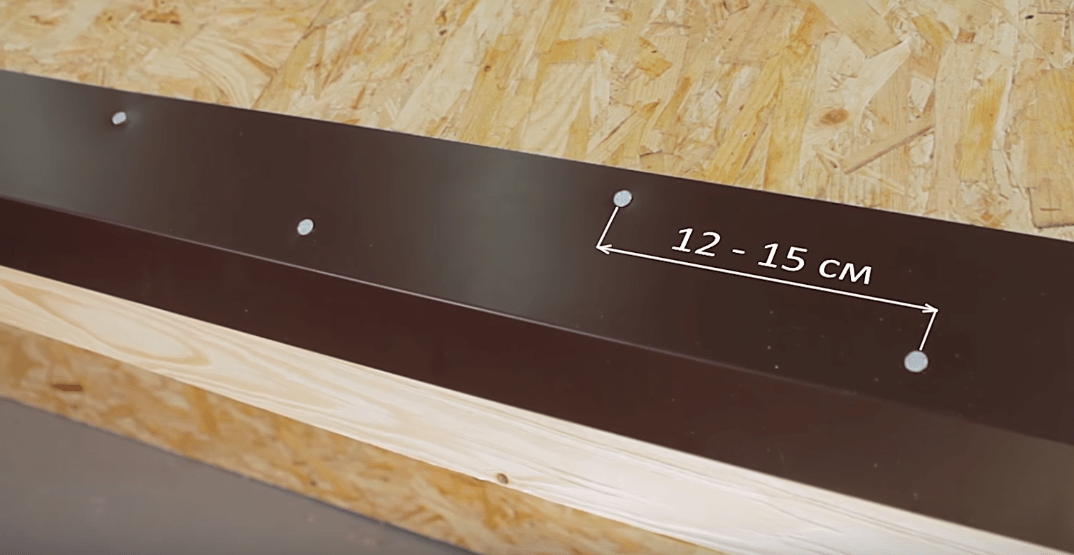
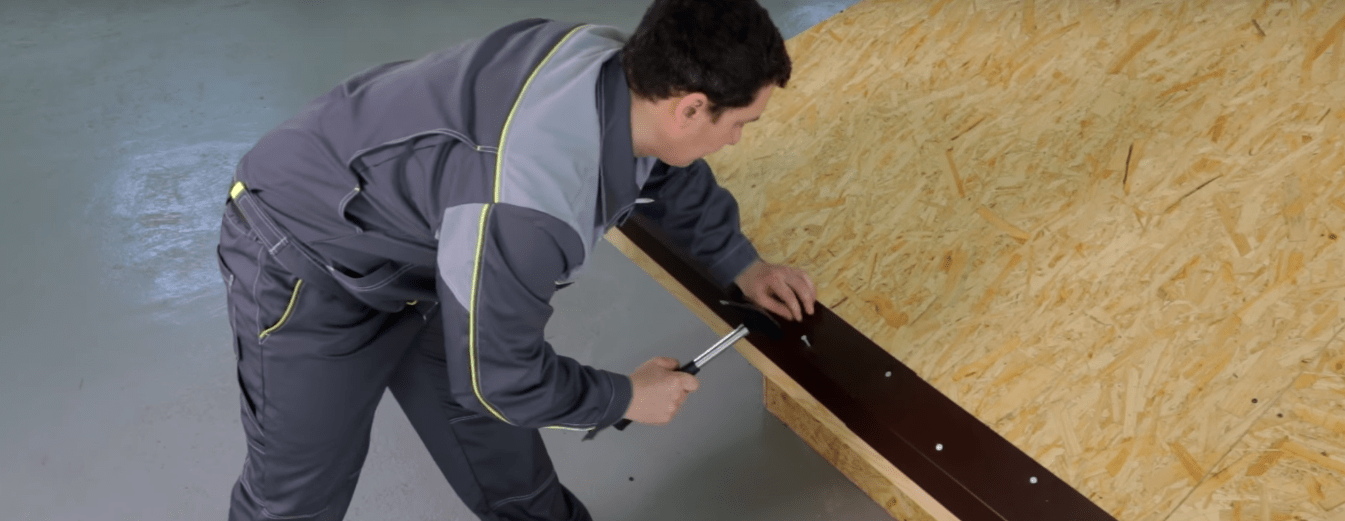
Stage 2. Lining carpets are used to provide additional tightness of the roof.


The first roll is rolled out parallel to the cornice strip, and the lower edge of the carpet should not reach 2-3 mm before the bend of the strip. The lining layer is fixed with roofing screws along the edges at the top and bottom. It is important that the carpet is laid with a slight tension to prevent the appearance of wrinkles and waves on the surface of the material.

The second row of material is laid with an overlap of the first 10 cm and fixed with nails along the upper edge, keeping the distance between them from 20 to 25 cm.
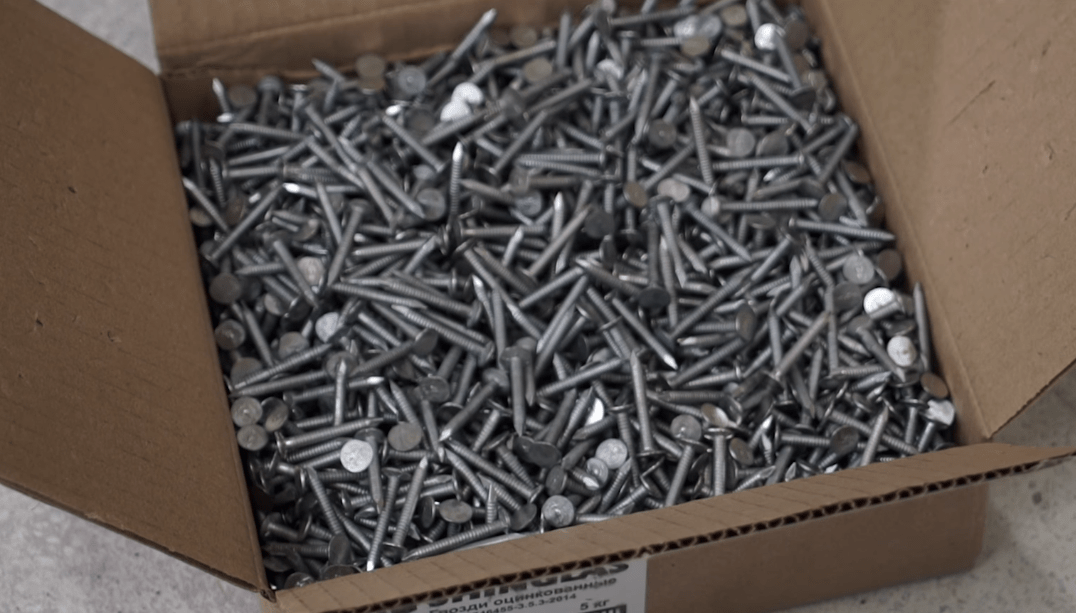
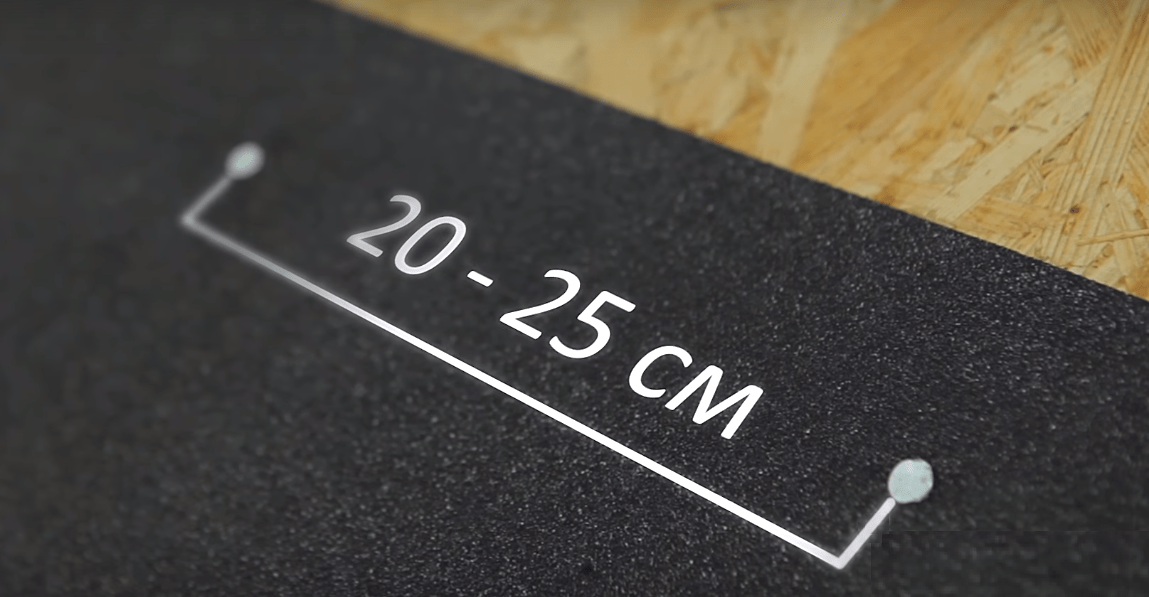
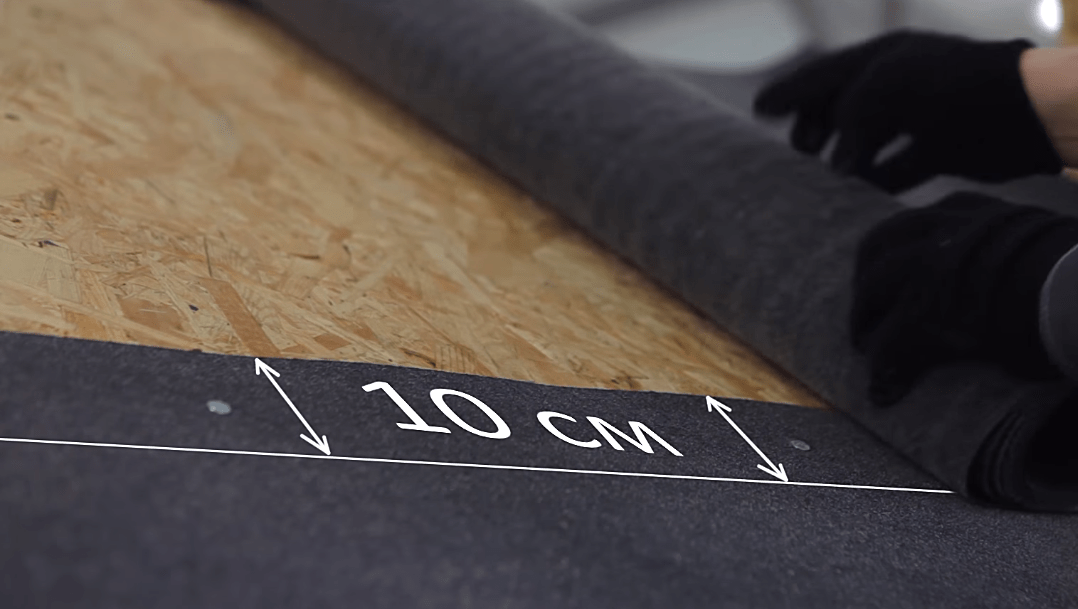
Between the canvases (in the place of overlap), a fixing mastic is applied with a spatula with a layer 1 mm thick. If the mastic is applied too thickly or previously diluted excessively with a solvent, swelling and smudges may appear on the roof.

If the lining carpet has adhesive strips along the edges, then additional mastic is not needed.
On a note! If there is a junction of slopes (valley) on the roof of the bath, then the lining carpet is first spread along the junction, and only after that the rolls are rolled out parallel to the cornice strip.
The total width of the lining carpet on the valley should not be less than 1 meter, that is, 50 cm in each direction from the junction line of the slopes. It is desirable that the lining carpet on the valley does not have joints, but if this cannot be avoided, then the layers are laid from the bottom up with an overlap of 30 cm and the junction must be smeared with mastic.
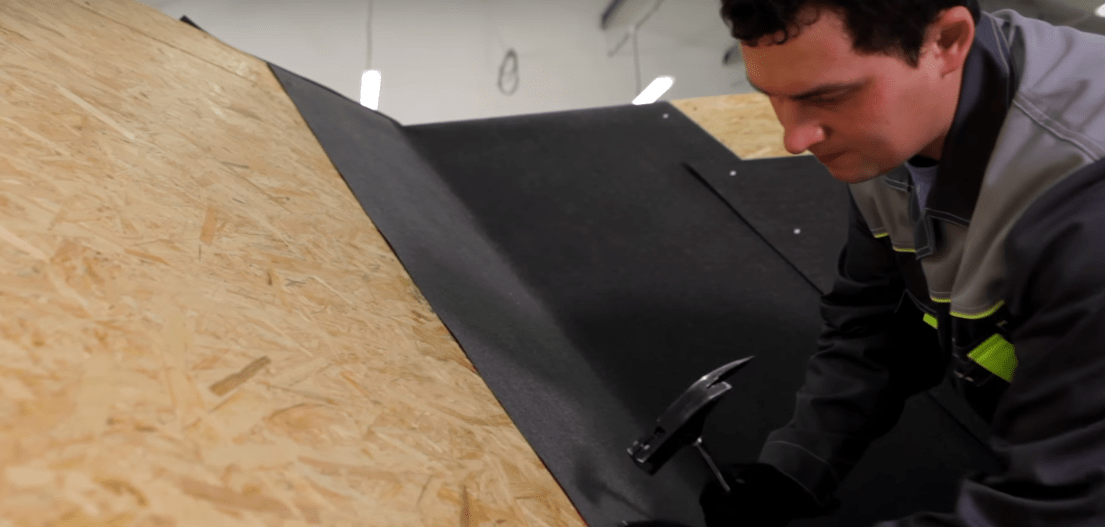
Stage 3. On top of the lining layer, gable strips are attached, which are also called wind strips. Fixation is carried out with nails. The hardware is hammered in with a hammer in a checkerboard pattern, a step of 12-15 cm. The end overlaps of the planks are 3 cm.


Stage 4. Design of valleys.
Moisture resistant plywood prices
moisture resistant plywood
Method 1. Open
A valley carpet is laid over the lining carpet.
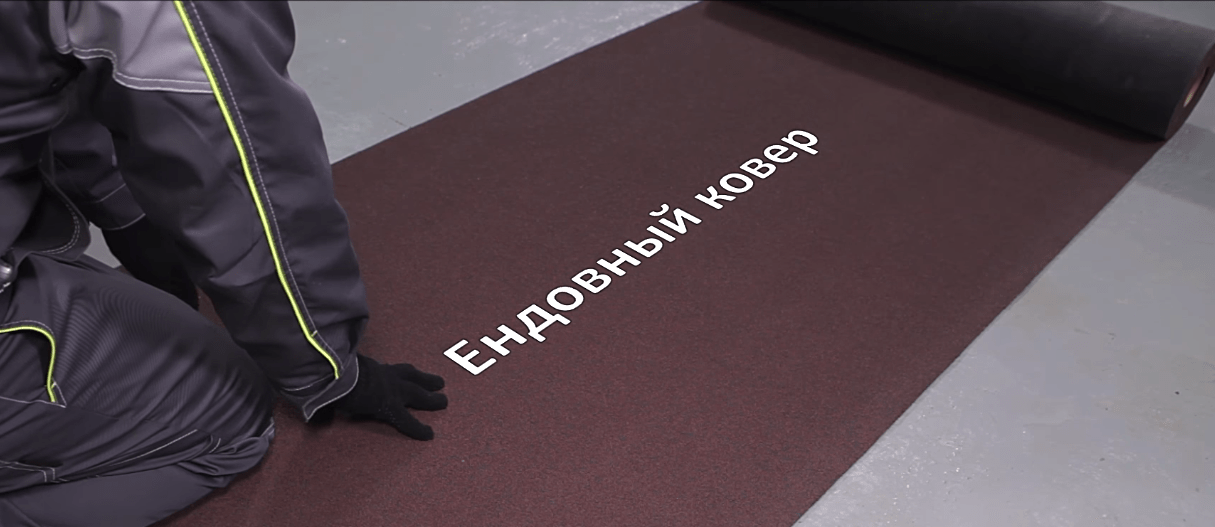
The width of the valley carpet should also not be less than 50 cm in each direction from the axis of the slope joints. Bituminous adhesive mastic is applied to the wrong side of the carpet (strips 10 cm wide along the edges of the material).
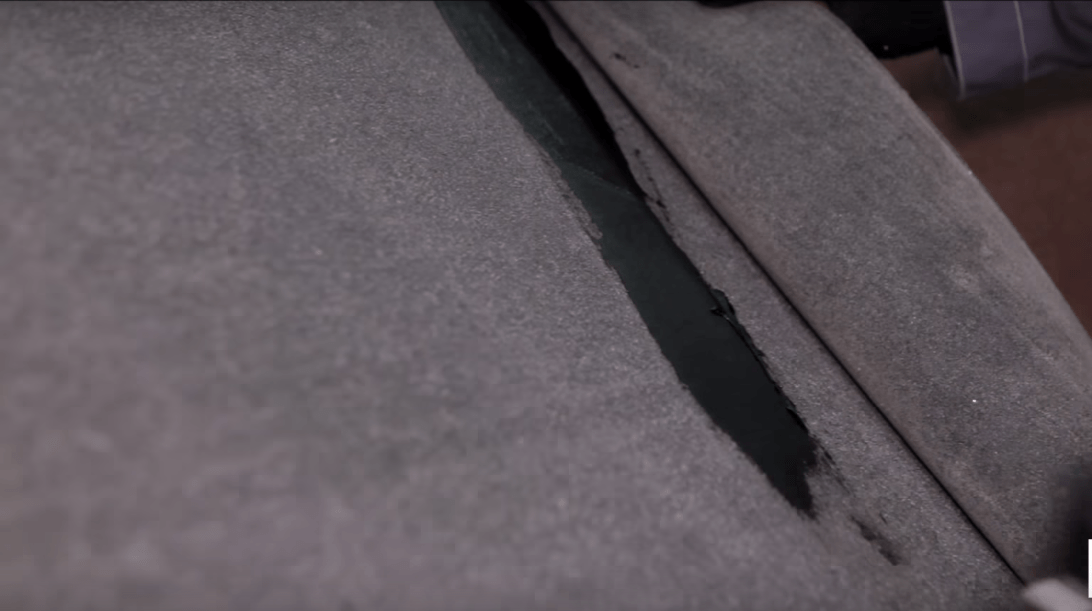

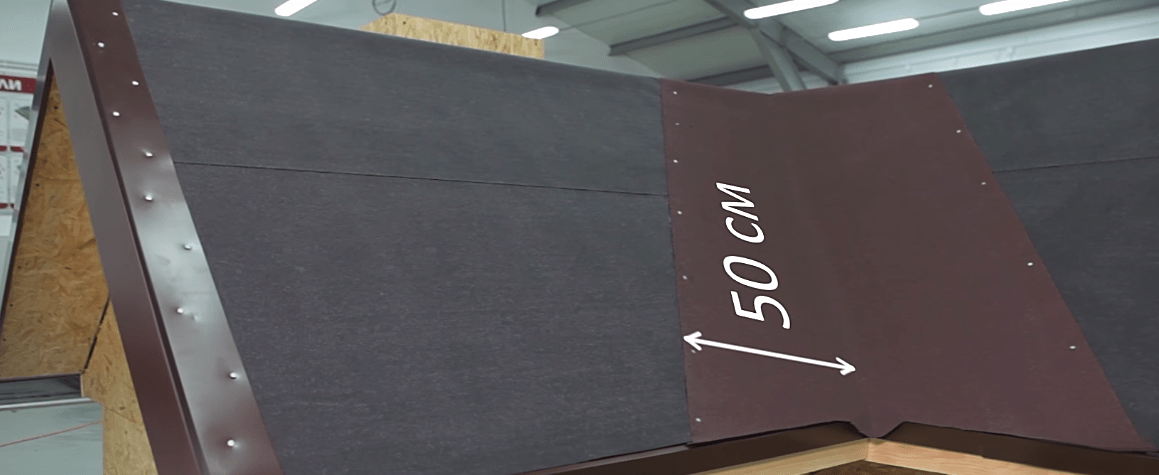
The material is fixed around the perimeter with nails in increments of no more than 25 cm and indented from the edge of the carpet by 3 cm.

Method 2. With pruning
The design option for the valley does not involve laying a carpet. The shingles are cut and overlapped directly at the junction of the slopes.

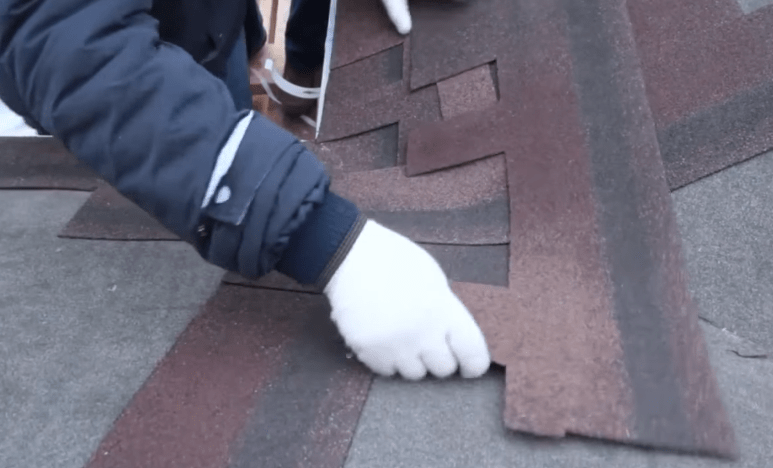
Stage 5. You can go directly to the laying of shingles.
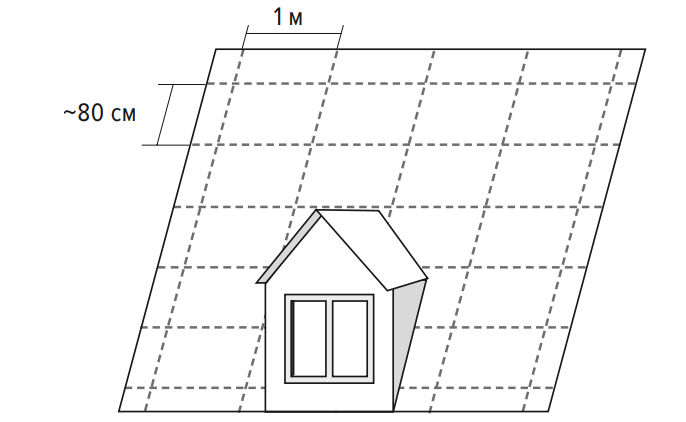

The first row is the starting one. A distinctive feature of the starting row shingles is the absence of slots. Whole strips are glued, stepping back from the bend of the cornice strip by 2 cm. Additionally, the shingles are fixed with twelve nails each (6 nails along the upper and lower edges).

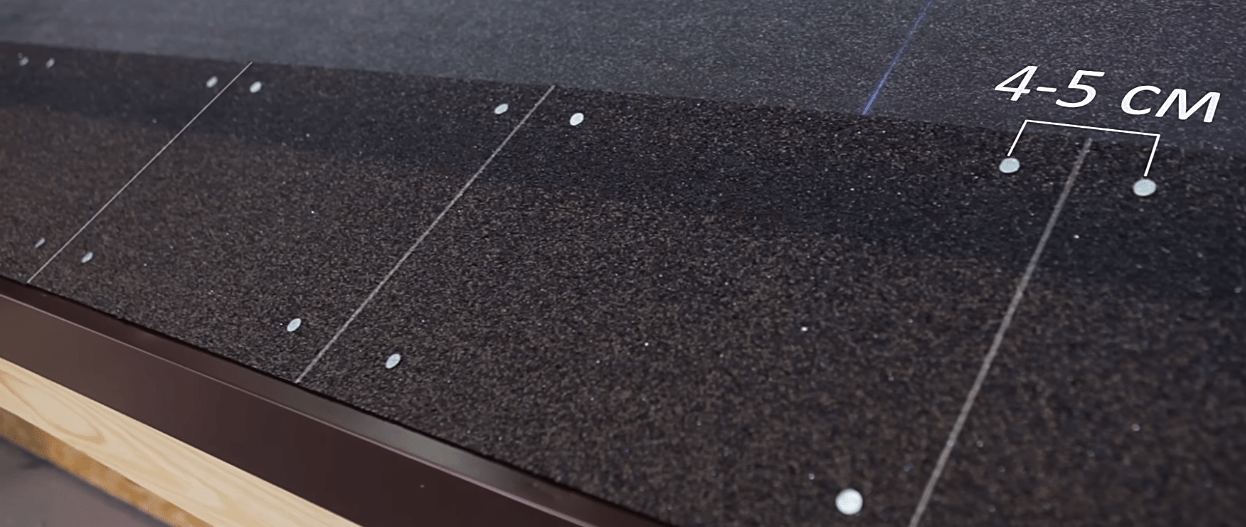

On a note! If you have not additionally purchased bituminous shingles for the starter row, simply take a sharp mounting knife, a strip of ordinary shingles, lay it on a plank of a suitable size and cut the petals (teeth, triangles, etc., depending on the shape of the shingle cutting). Bituminous shingles with a “dragon tooth” shape can be left uncut.
Flexible tiles can be installed in all weather conditions, but if the outdoor temperature is below zero, then it is desirable to apply roofing material in small batches to the roof from a warm room.
Important! Do not forget to remove the shingles from the cardboard boxes and mix them together. So the roof covering will be more uniform in shade. You need to mix at least 5 packages at the same time.
The second row is started by moving the shingle of the second row relative to the shingle of the first row by half a petal horizontally and stepping back 2 cm from the bottom edge of the starting row.

The edge of the shingle, which will be laid on the wind bar, is cut at an angle of 45 degrees. The wind bar is smeared with mastic before laying the tiles.
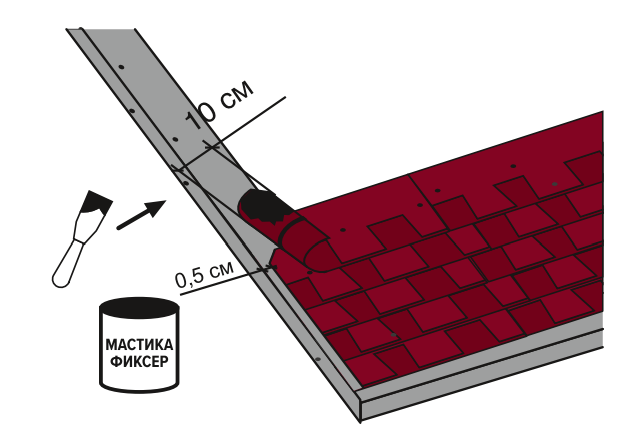
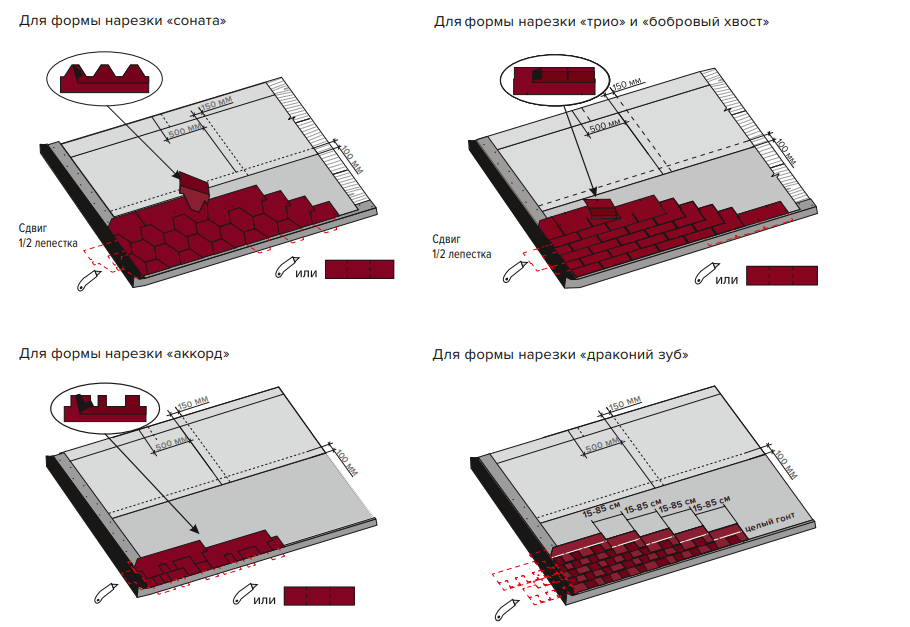
The “dragon tooth” shingles are displaced by 15 cm. That is, the fastening of the lower row must be blocked by the petals of the overlying row.
If the shingle has a protective film on the back, it is removed by pulling in the direction from the top edge of the shingle to the bottom.

Some collections of tiles do not have a protective film, the shingles are simply folded into packages with the wrong side to each other. If the strips are difficult to unstick, they can be slightly warmed up with a building hair dryer and gently bent in different directions.

Nails for fastening tiles are galvanized with wide caps, the length of the hardware is 30-45 mm, the thickness is 3 mm. Hardware is hammered in a strictly defined order, which is recommended by the manufacturer, depending on the shape of the shingles and the angle of the roof. The greater the angle of inclination of the roof, the more nails are used to fix the coating.

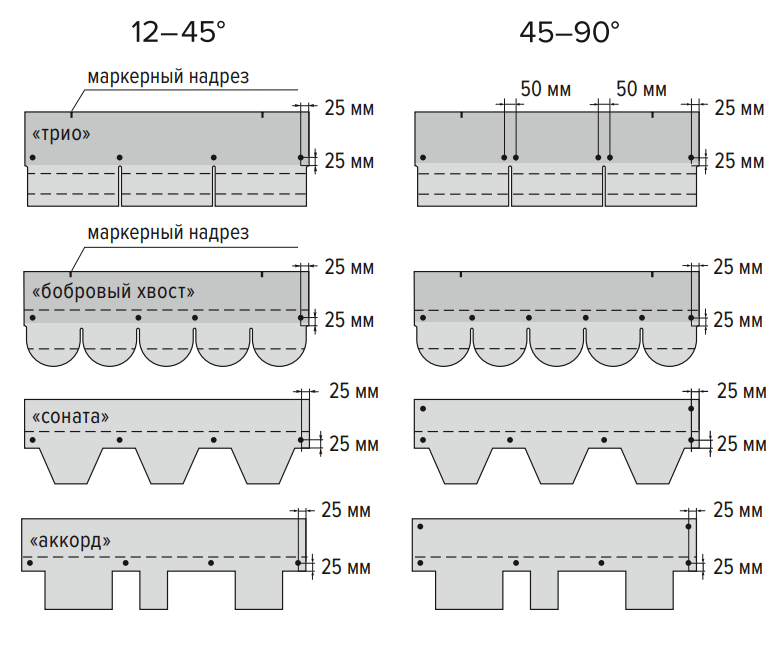
Schemes of the location of hardware depending on the angle of the slope
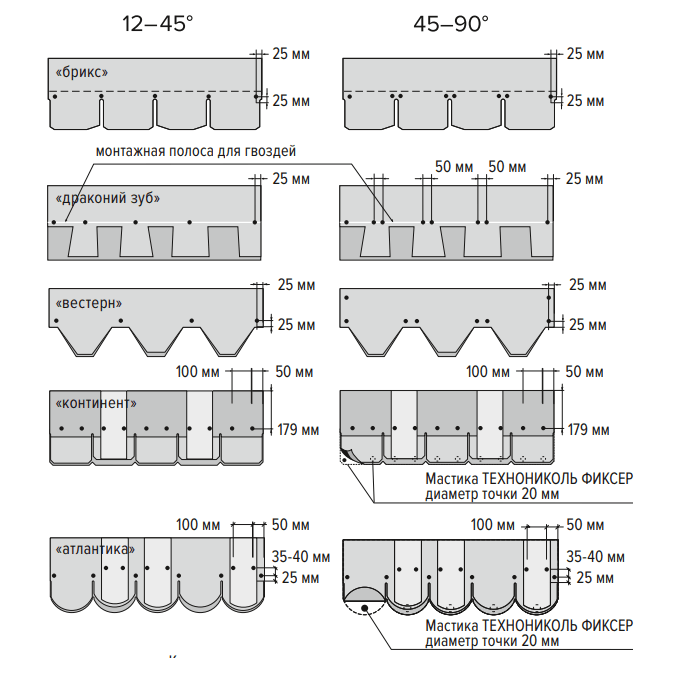
It is important to drive the nails perpendicular to the battens so that the head is flush with the roofing material, not excessively sunk into it, but not above the surface of the shingle.

The nails of the overlying row must simultaneously fix the underlying shingles. This is necessary for the durability and reliability of the roofing.

Tiles are laid on top of the valley carpet by cutting the corners of the shingles and smearing the wrong side with bituminous mastic. It is recommended to drive nails into the shingles at a distance of 30 cm from the central axis of the valley.


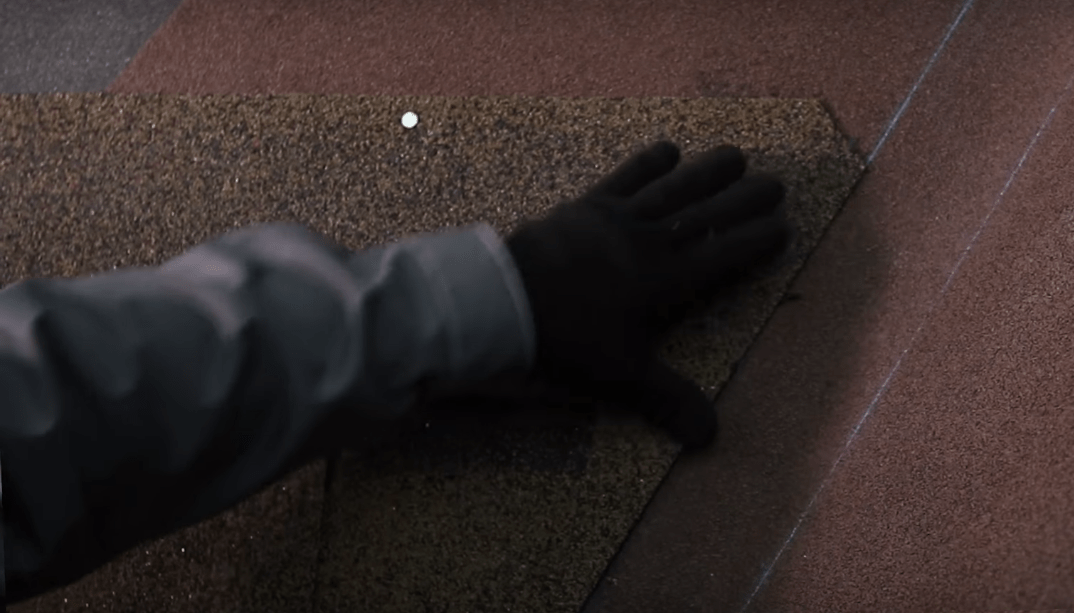

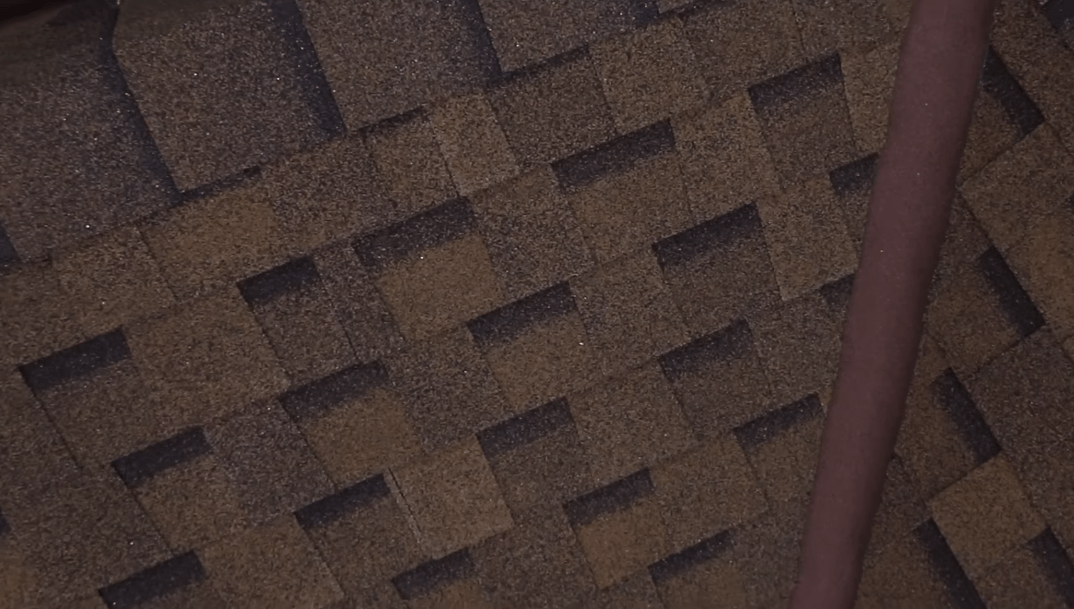

Stage 6. When the bituminous tiles are laid to the very ridge, they proceed to the design of the junction with the pipe.
Be sure to keep in mind that walking in shoes on the laid roofing in hot sunny weather, as well as negative air temperatures, is prohibited. Scaffolding and other devices are used to move along the roof.
The junction is made using a valley carpet.
- A pattern for the front side of the pipe is cut out of the strip (the tile should be covered with a carpet by 20 cm, and the material should go 30 cm onto the pipe). A thin layer of adhesive mastic is applied to the reverse side of the pattern with a spatula. The pattern is pressed tightly and smoothed so that there are no bubbles and irregularities.


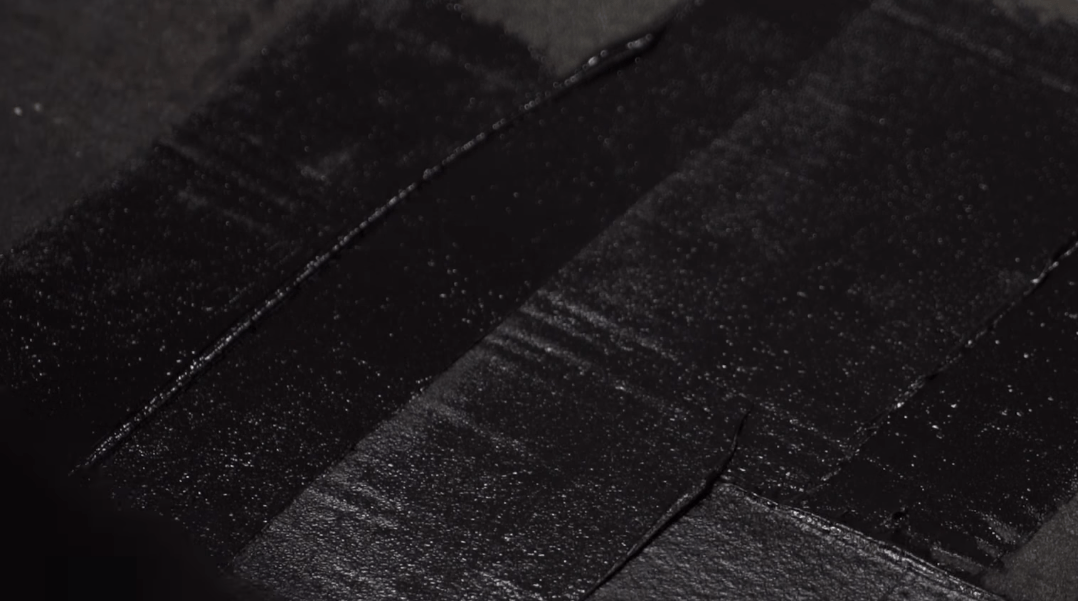

- Next, the right and left patterns are cut out, smeared with mastic, glued in place, leading the edges under ordinary tiles.
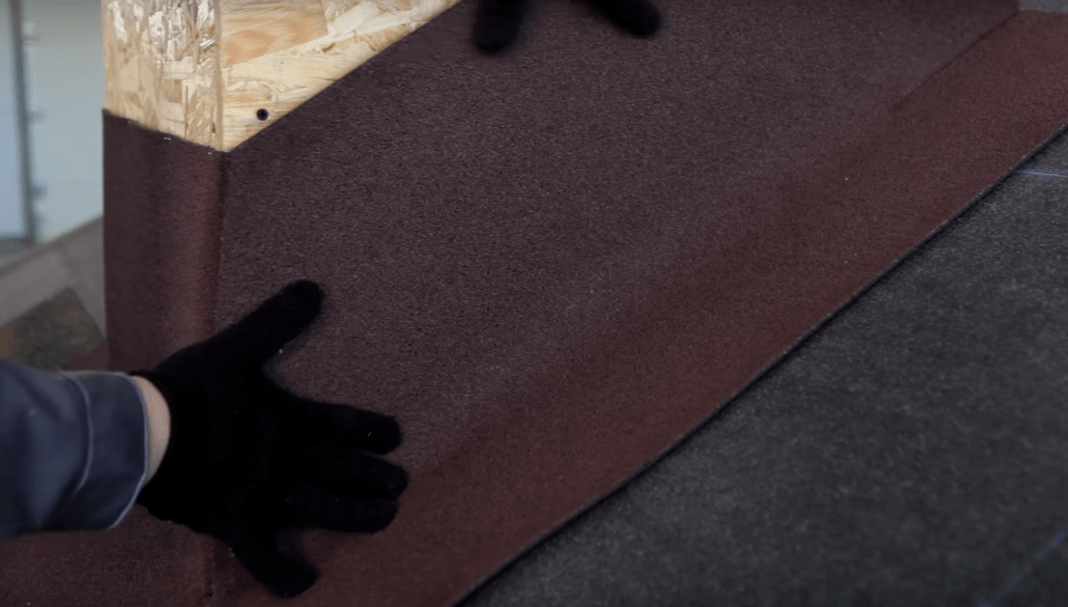
- Lastly, the back of the pipe is closed, the canvas along the upper edge is fixed with metal strips.

If the pipe is more than 50 cm wide, it is recommended to make a slope behind its back wall to prevent rainwater from stagnating.

Instead of a valley carpet, the junction can be made using metal elements.
Video - Finishing the chimney
Stage 7. To decorate the ridge, ridge-cornice tiles are used.
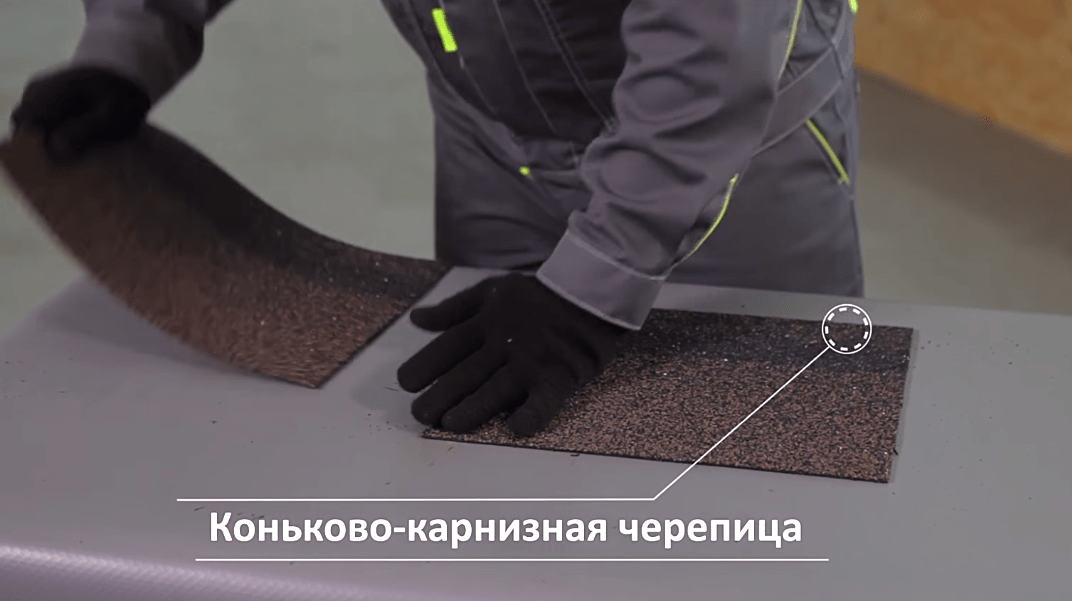
Each shingle is cut into 3 pieces before installation. Ridge elements are laid from the bottom up (for hipped roofs) and fastened with four nails in the corners. The overlap of the elements is 3-5 cm, sufficient to make the heads of the clogged hardware invisible.

It is recommended to lay an aerator on a ridge with a slit 3-8 cm wide and located horizontally.

This is a plastic element necessary to ensure ventilation of the under-roof space.
Each element is bent along the central axis, applied to the ridge of the roof and fixed with nails, which are driven through the factory holes of the element. The connection of adjacent elements is carried out similarly to the designer, by snapping the existing fasteners.


The laying of tiles on top of the aerator is carried out, taking into account the direction of the prevailing wind direction for the area.
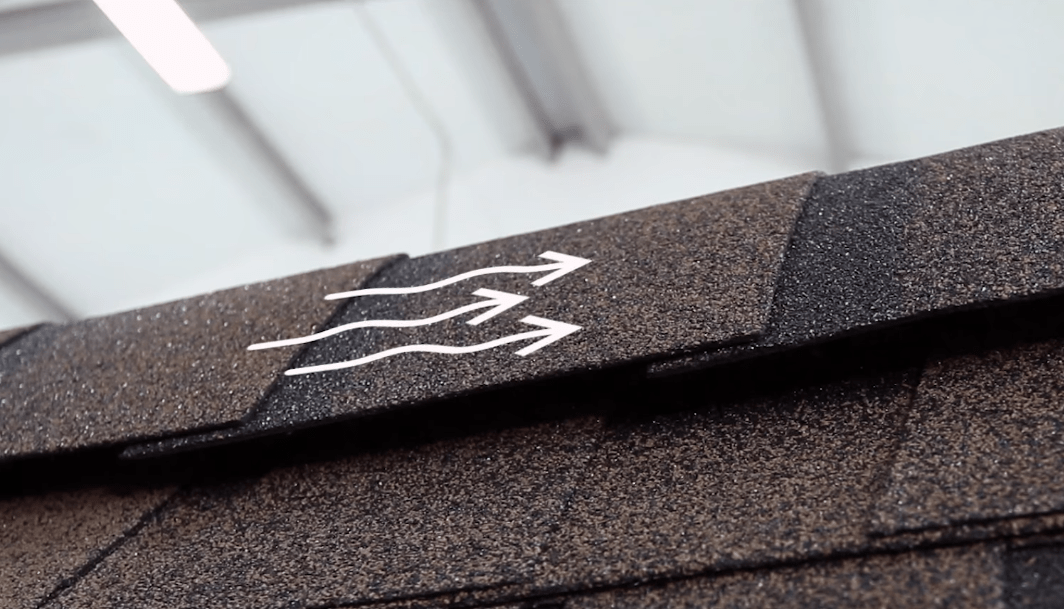
They begin to fasten the ridge-cornice tiles from the side where the wind most often blows. Fixation of the roofing material is performed using roofing nails of increased length.

Video - Installation of a soft roof
Answers on questions
How to arrange the junction of the bath porch canopy to the facade?
If the roof adjoins the wall (this may include the adjoining of the bath roof to the wall of a residential building), regardless of its shape, it is necessary to waterproof the joint using a valley carpet.

Procedure:
- put the lining carpet on the wall by 5 cm, smear with fixing mastic from the wrong side, press firmly;
- if the adjoining roof is located at an angle, then in the lower part, fix a plastic wall-turning flashing with self-tapping screws. If the connection is horizontal, the tide is not installed;
- lay the valley carpet in such a way that it goes 30 cm onto the wall, and 20 cm onto the lining carpet;
- smear the valley carpet on the reverse side with mastic, glue and level so that there are no bubbles or folds;
- fix the upper edge of the valley carpet with a metal rail with holes into which screws are screwed;
- lay flexible shingles, smearing the edges of the shingles with fixing mastic (at least 10 cm from the edge).
Prices for valley carpets
valley carpet
How to move along the slope of the roof during the installation of the coating?
For safe and convenient work at height, scaffold brackets are installed. The brackets have holes through which nails are driven in for fixing. A board is laid on top of the bracket, which is fixed with self-tapping screws. The length of the board is chosen so that the free ends extend beyond the brackets by at least 150 mm and not more than 300 mm. The cross section of boards for working on the roof is 200 x 40 mm.
The upper part of the bracket is installed under the petals of bituminous tiles. For fastening, it is recommended to use nails 10 cm long and 5 mm thick, 3 nails for each element. The nails must be driven through the battens into the rafters.

One bracket can withstand 140 kg. The distance between the brackets should be no more than one and a half meters (only one roofer can be on these one and a half meters).


To remove the brackets, you simply need to bend the tabs of the shingles and pull out the nails, then put the shingles back in place and fix them again. Brackets must be lowered from the roof carefully, without dropping them down.
Important! Walking on wet, icy boards is prohibited. Working on a roof in extreme heat or cold is strongly discouraged.
How to install a roof penetration?
Roof penetrations are installed to pass ventilation pipes and antennas through the roof.
General installation principle:
- on the roofing make markings for the installation site of the element;
- shingles are cut according to the markup, the cut out part is removed;
- in the crate, a hole is cut to fit the size of the passage element;
- if necessary, the hole is closed with a fine mesh;
- the penetration contour is lubricated with fixing mastic and pressed to the installation site;
- screws are screwed into the holes of the element contour;
- install the upper penetration element.

There are also penetrations that are mounted with a slight difference - the edge of the passage element is closed with tile petals, smeared with bitumen from the wrong side.
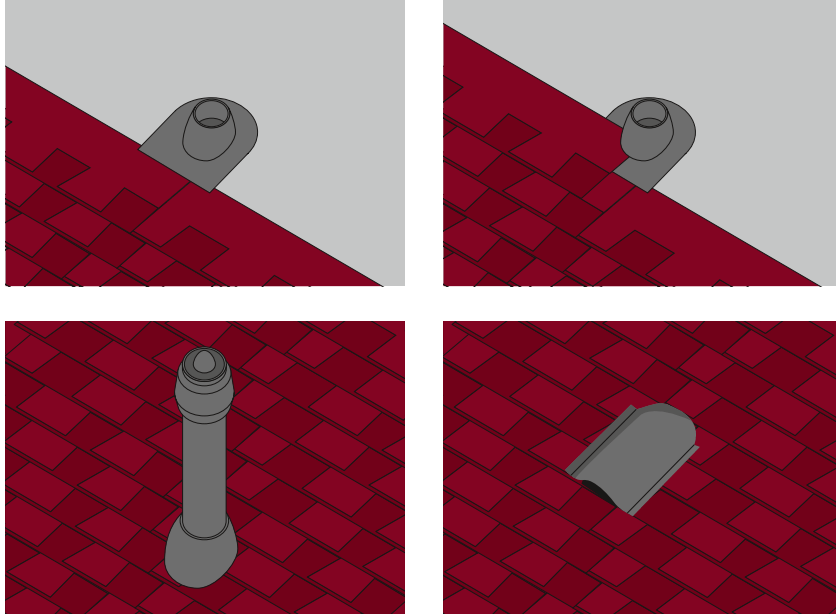
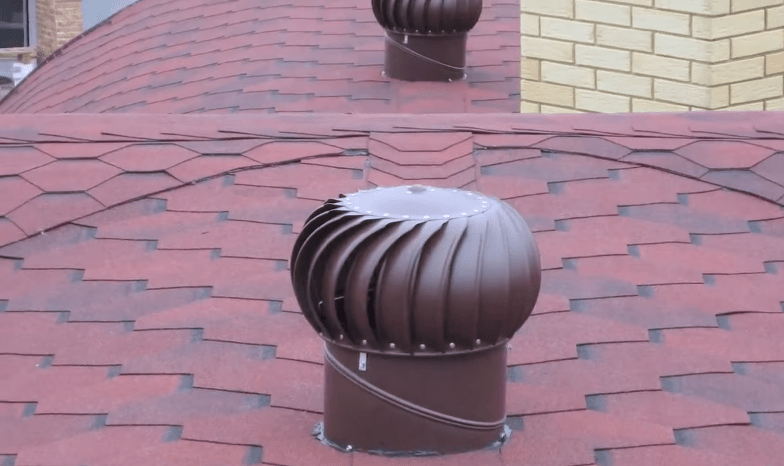
Variant of the installed penetration of the ventilation pipe. The base is covered with shingles
What snow retainers to install on a soft roof?
To prevent uncontrolled snowfall from a soft roof, the simplest snow stops are installed in the form of corners on a long leg. Snow guards are metal and plastic, it is recommended to opt for the former because of their greater durability.
The installation of snow stops is carried out simultaneously with the laying of shingles. The hooks are fastened with self-tapping screws to the crate, treating the attachment point with mastic. From above, the leg of the snow retainer is closed with bituminous tile petals.

The distance between the corners is approximately 60 cm. The minimum number of rows of snow stops is 3. On steep roofs, it is advisable to increase the number of rows or even fix the corners over the entire slope area.

How to take care of your roof
Care instructions are very simple:
- it is necessary to periodically visually inspect the coating;
- snow removal from the roof is carried out with a wooden shovel. Moreover, not all the snow needs to be removed, a layer about 10 cm thick should remain on the roof;
- it is necessary to clean the gutters and pipes in time, eliminate blockages;
- if moss or lichen began to grow on the roof, it is removed, and an antiseptic with an algicidal composition is applied to the coating.


Manufacturers of soft tiles usually provide a guarantee of at least 10 years for the coating. The coating is ideal for both hot southern regions and cold northern ones. The coating is environmentally friendly, does not require maintenance, ideal for any facade of the bath. Soft roof - a great solution for baths and saunas!


 Constellation Scorpio description")


