One of the conditions for the full growth and development of plants is timely watering. But due to the busyness of the owners and the remoteness of the site from the city, it is not always possible to provide it. Solve the creation problem optimal conditions Setting a timer will help with maintaining the humidity regime. This device will not only simplify the care of green “pets”, but will also have a beneficial effect on the quality of the harvest. The device you need for your household can be purchased at a gardening store, or you can make a watering timer yourself. About how to choose best option Models or making a simple device yourself will be discussed in the article.
The irrigation timer is a single or multi-channel shut-off mechanism that controls the water pump. It opens at certain intervals, allowing water to flow into the irrigation system.
Systems drip irrigation provide the opportunity to not appear on the site for several days or even weeks, without worrying about your seedlings
Timer automatic watering solves a lot of problems in one fell swoop:
- Provides watering with a specified intensity and frequency;
- Prevents soil from waterlogging and root rotting due to measured and slow water supply;
- Supplying water to the roots garden crops, solves the issue sunburn leaves and minimizes the risk of their disease;
- Providing local irrigation helps solve the weed problem.
For ease of maintenance, water supply timers are placed together with other equipment in plastic boxes installed underground.

To be able quick access to devices, such boxes are equipped with a removable hatch or a tightly closing lid
Based on the counting principle, timers are divided into single-action devices (when triggered once) and multiple-action devices (when they trigger several times with preset shutter speeds).
Depending on the type of mechanism used, the timer is:
- Electronic– the control unit of the device includes electronic equipment that determines the response time and opening of the solenoid valve. The undeniable advantage of this type of device is the wide range of response times, which can vary from 30 seconds to one week. The watering regime can be adjusted both locally and remotely.
- Mechanical– is a control unit equipped with a spiral spring and a mechanical valve. Works on the principle mechanical watch. One plant cycle spring block is capable of ensuring continuous operation of the mechanism for up to 24 hours, opening the valve according to a user-specified response period. The watering mode can only be adjusted manually.
Both devices are multi-channel designs. The mechanical irrigation timer is characterized by its simple design and the absence of electrical supply wires. This significantly reduces the cost of the device.

A mechanical timer, compared to its electronic counterpart, has a more limited duration of a given cycle.
In a mechanical timer, it is enough to set the watering cycle by selecting an interval. With an electronic model it is somewhat more complicated: you first need to set the date and time, and only after that select the optimal program for the crop being grown.
Many have noticed that in water supply systems suburban villages in the daytime, due to intensive water intake, the pressure decreases. By setting an automatic watering timer, you can schedule irrigation for the evening and night hours.
Depending on the modification of the device, timers may have an internal or external “regular” pipe thread, and are also equipped with quick-release hose connectors or quick-connect connectors with the irrigation system.
The most expensive models have additional functions, for example, determining humidity, depending on which indicator watering is automatically reduced or extended
Water timer manufacturing options
When planning to install an automatic irrigation system on your property, it is convenient to use water timers to control the taps. With their help, the water supply system can be made completely energy independent, avoiding the use of any electronics.
Design #1 – timer with wick dropper
The wick fibers, saturated with moisture, lift it up to a certain height, preventing the water from quickly evaporating. If the wick is thrown over the side of the container, the absorbed water will simply begin to drip from the free end.

This method is based on physical laws that create the capillary effect. It occurs when a fabric wick is lowered into a container of water.
The moisture throughput can be adjusted by adjusting the thickness of the wick, the density of twisting of the threads and pinching them with a wire loop.
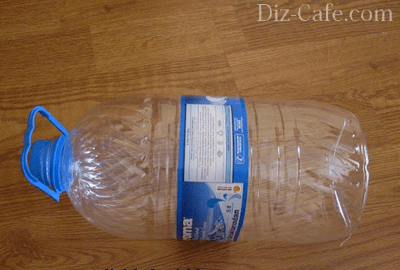
To install a timer in a container with low sides, the height of which does not exceed 5-8 cm, install a five or ten liter plastic bottle. One of the key operating conditions of the system is maintaining the liquid level in the container at a constant height. The optimal ratio of capacities is easiest to determine experimentally.

The determining factor in its operation is the water column. Therefore, the height of the bottle and the depth of the wide container are interconnected things
A small hole is made in the bottom of the bottle to allow water to flow out. The bottle is filled with water, temporarily covering the drain hole, and sealed with a lid. The filled bottle is placed in the trough. The water seeping through the bottom will gradually flow out, stopping at a level when the hole is not hidden under the thickness. As water is consumed, the water flowing out of the bottle will replenish the losses.

The easiest way to make the wick itself is from a rope of suitable thickness or a rope twisted from a piece of fabric. It is placed in a container with the ends correctly distributed
The main advantage of such a timer is that due to the same level of water in a wide container, in the event of rain, replenishment of moisture losses from the bottle will be suspended.
Craftsmen who have already tested such a device in practice claim that five liter bottle with a flow rate of 1 drop/2 seconds, it lasts for 20 hours uninterrupted operation. By selecting optimal size a bottle that acts as a water column, and by adjusting the intensity of the drop, you can achieve the effect of multi-day delays.
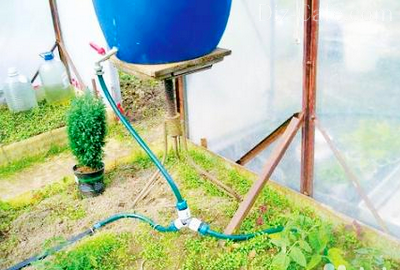
Design #2 – device that regulates the ball valve
In a water timer, the response time is determined by the action of the drop. Water flowing out of the container, which acts as ballast, reduces the weight of the structure. At a certain point, the weight of the container is no longer enough to hold the stopcock handle, and the water supply starts.
To set up a water timer you will need:
- Water barrel;
- Ball valve;
- Two plywood or metal circles;
- Canisters or 5-liter plastic bottles;
- Construction adhesive;
- Spool of sewing thread.
For smooth operation of the system ball valve It is advisable to modify it by attaching a small pulley - a rocker arm - to the handle secured by a screw. This will allow the valve to be brought from a closed state to discovered by changing the angle of the handle.
The pulley is constructed from two identical plywood circles, gluing their planes together with construction adhesive, or metal ones, connecting them with bolts. A strong cord is wound onto the pulley, making several turns around it for reliability. When constructing a lever, pieces of cord are firmly fixed at its edges. To the free ends of the cord with opposite sides attach a ballast weight and a container of water that compensates for its weight. The weight of the load must be such that under its weight the crane comes into a lever state.
It is convenient to use five-liter plastic bottles as cargo ballast and a water container that compensates for its weight.
The easiest way to adjust the weight of containers is by pouring sand into one of them and adding water to the other. Metal chips or lead shot can also serve as a weighting agent.
The container with water will serve as a timer. To do this, a tiny hole is made in its bottom with a thin needle, through which water will seep in drop by drop. The flow time will depend on the volume of the bottle itself and the size of the hole. It can range from several hours to three to four days.
To operate the device, the watering container is placed on flat surface and fill with water. Bottles suspended from the ends of a cord to a pulley are also filled: one with sand, the other with water. When the weight of the filled bottles is equal, the tap is closed.
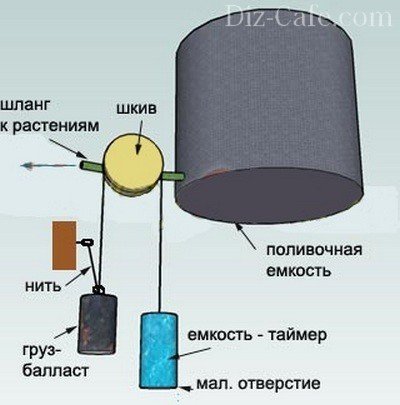
As water is dug out, the container loses weight. At a certain moment, the ballast weight, outweighing the partially empty bottle, turns the tap to the “open” position, thereby starting watering
There are situations when it is necessary to obtain a full opening of the tap, bypassing intermediate positions - the so-called toggle switch effect. In these cases, a little trick will help: closed position From the tap, the edge of the thread is wound to the weight, which will serve as a fuse, and its free end is fixed to the tap. When the mechanism is closed, the thread will not experience any load. As the water container empties, the load will begin to outweigh, but the safety thread will take over overweight without allowing the ballast to move the valve to the “open” position. The thread will break only if there is a significant overweight of the load, instantly switching the tap and ensuring the free passage of water.
To restore the system to its original state, simply remove the load or fix it in a suspended state, eliminating the tension of the cord.
The system is ready for operation; before leaving, all that remains is to fill the watering barrel and timer with water and hang the ballast, securing it with a thin thread. Such a device is easy to manufacture and convenient to maintain. Its only drawback is its one-time operation.
Other ideas for creating mechanical timers can be found in thematic forms. For example, some craftsmen use a cylindrical plunger with polyethylene granules in oil as the working body of a timer. The device is adjusted so that when the temperature drops at night, the displacer is retracted, and the weakened spring opens the tap. To limit water flow, a diaphragm is used. Warm up during the daytime sun rays polyethylene granules increase in size, pushing the plunger to its original position and thereby cutting off the water supply.
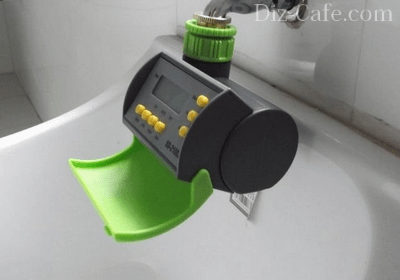
Design #3 – electronic timer
Craftsmen with basic knowledge of electronics can build simple model electronic timer. The device manufacturing instructions are presented in the video:
Electronic water timer for irrigation D-2
Setting the current time and date
1. Click the button TIME
2. Use the arrows to set the hour (0-23 hours)
3. Press the button SET
4. Use the arrows to set the minutes (0-59 minutes)
5. Click the button SET to save the minutes value
6. Use the arrows to set the day of the week (Su-Sunday, Mo-Monday, Tu-Tuesday, We-Wednesday, Th-Thursday, Fr-Friday, Sa-Saturday)
7. Click the button SET to save the day of the week value.
This completes the setting of the current time and day of the week.
Forced on/off water supply
1. Click the button ON
2. Using the arrows, set the hour value at which you want to turn on the water supply (0-9 hours)
3. Press the button SET to save the hours.
4. Use the arrows to set the minutes for which you want to turn on the water supply (1-59 minutes)
5. Click the button SET to save the minutes.
The timer will turn on the water supply for the time you set.
To turn off the water supply, simply press the button OFF
Setting programs to turn on/off water supply
1. Click the button PROG
2. Use the arrows to select the program number (1-16 programs)
3. Press the button SET to save changes
4. Use the arrows to set the hour value when the timer should start (0-23 hours)
5. Click the button SET to save changes
6. Use the arrows to set the minute you want the timer to start (0-59 minutes).
7. Click the button SET to save changes
8. Using the arrows, set the duration (in hours) for which the timer should turn on (0-9 hours)
9. Press the button SET to save changes
10. Use the arrows to set the duration (in minutes) for which the timer should start (1-59 minutes)
11. Press the button SET to save changes
12. Use the arrows to select the days on which watering will automatically turn on.
"2nd" - every other day
"3rd" - in 2 days
or on a specific day of the week.
The "*" icon is not used in this timer model.
13.Pressing a button SET, You can select the days on which watering will be turned on.
14. To complete programming, press the clock button.
View installed programs
1. Click the button PROG
2. Use the arrows to scroll through the program data (1-16 programs)
3. To end viewing, press the clock button.
Below are instructions for timers of the previous model with 8 programs.
You have purchased a quality electronic water timer that uses an efficient solenoid to open/close the water supply valve. Please read these operating instructions carefully to become familiar with the operation and programming of the timer. Check that the program(s) are running when you use the timer for the first time. The timer is intended for use by adults who have read and understood these operating instructions.
Usage.
This water irrigation timer is intended for use on outdoors(gardens, cottages, vegetable gardens, fields) and provides control of water supply. It is prohibited to use the water timer for industrial purposes or in connection with chemicals, flammable or explosive substances.
Technical data.
Supply voltage: 3 V (2 AAA 1.5 V batteries)
Battery life: 3-6 months
Time error: less than 0.25 sec/day
Operating temperature: from +5°C to +60°C
Allowable water pressure: 0.5 - 8 bar
Keypad lock: prevents accidental program changes.
Operating principle.
An electronic water irrigation timer will provide scheduled watering of your garden and plants in a fully automatic mode according to the program that you set. You can program a timer to water your garden early in the morning or late in the evening when the least amount of water evaporates. The timer will ensure that the plants are watered even when you are on vacation or away. The device provides two ways to control irrigation:
1. Manual: Press the Man/Auto button to switch the valve to:
On - Off - Auto
2. Automatic: it is possible to program timed watering up to 8 times a day. You can also choose from 15 various combinations days of the week on which days the timer will water.
PREPARATION FOR WORK.
1. Unscrew the protective cover. Carefully remove the battery compartment from the front of the timer. Insert two new 1.5V batteries (size AAA). Reinsert the battery compartment.
2. Attach the water timer securely. The water timer must be in the OFF position. Loosen the large outer ring located at the top of the timer until the inner threaded ring rotates freely. Screw the ring with threaded connection on the pipe. Screw only by hand (!), then screw the outer ring of the timer tightly. Open the tap to check the connection for leaks. (DO NOT USE PUNGERS OR PLIERS TO PINCH the timer rings.)
Programming a water timer for irrigation.
| 1. Press the "Program" key. Program 1 ON will appear on the screen. | |
| 2. Press "hour" and "minute" to set the watering start time for program 1. |  |
| 3. Press "day" to set the day(s) of the week on which program 1 will start watering. (The default is mon-sun, i.e. every day). | |
| 4. Click "Program" again. Program 1 OFF will appear on the screen. |  |
| 5. Press "hour" and "minute" to set the program 1 watering shutdown time. |  |
If you want to turn on your water timer only once a day for the days specified in point 3 above, programming the timer is now complete. 6. Click "Program" again. Program 2 ON will appear on the screen. |
|
It is possible to install up to 8 programs per day;
- Total 15 various configurations days-per-week;
- Make sure that the days for turning off the timer (OFF) should be the same as for turning on the timer (ON);
- MAKE SURE that each ON time is set to an OFF time!!;
- To exit programming mode, press "time".
If after pressing “Program” you press “day” repeatedly, you can select the following combinations of days for turning on the timer (see point 3 above)
| 1 | M.O. | 4 | T.H. | 7 | S.U. | 10 | SA SU | 13 | MO TU WE TH FR |
| 2 | T.U. | 5 | FR | 8 | MO WE FR | 11 | MO TU WE | 14 | MO TU WE TH FR SA |
| 3 | WE | 6 | S.A. | 9 | TU TH SA | 12 | TH FR SA | 15 | MO TU WE TH FR SA SU |
Watering timer control keys and display.
Key lock: Press and hold Esc for more than 3 seconds. Press and hold for more than 3 seconds again to unlock.
Time setting: Make sure the keyboard is unlocked. While holding down the "time" key, press "min" to set the minutes, "hour" to set the hours, "day" to set the day of the week.
Esc key: Resets the time of the displayed program.
Today, to facilitate plant care, they are used various systems watering, they make it possible to control the amount of water for each type of plant, apply drip irrigation or sprinklers. Water is saved, and the best conditions for plants are created. favorable conditions development. The only drawback of such systems is the need for constant monitoring; turning on/off is done manually. This is a rather unpleasant task, the duration of watering depends on the type of plant, climatic conditions and a specific system can reach two hours. In order to solve this problem, you should install a watering timer for gravity systems.
First, you need to explain the concept of “gravity-flow systems,” otherwise in some sources you can find funny explanations of the principles of their operation and a complete misunderstanding of hydrodynamics.

Automatic garden watering systems - diagram
There are experts who claim that irrigation timers for gravity systems are so good that they can operate at water pressure from 0 to 6 atmospheres. They will work at zero pressure, but nothing will be watered. Gravity flow is not a physical concept, but a purely everyday one. And this does not mean the absence of pressure, but the absence of constantly operating water pumps. In gravity systems, the pump supplies water only to the storage tank, which is located at some distance from the ground. Due to the difference in height between the upper water level and the place where it exits, pressure is created, which is what forces the water flow to move.
Why are timers used in most cases for gravity flow systems? Because they cannot work at high pressures, their closing valves are too fragile and their drive mechanism is weak. For most devices, the maximum water pressure cannot exceed 0.5 atm; for such pressure, the container with water must be located at a distance of five meters from the surface of the earth. The vast majority of irrigation systems have storage tanks located much lower.

Types of timers
Currently, three types of timers can be purchased:
- mechanical. The simplest ones are related to semi-automatic systems management. They turn on manually and turn off automatically after a specified period of time (up to 120 minutes). They do not require power sources; the closing valve is actuated by a spring. Advantages: low cost and high reliability. Disadvantages - you cannot do without the presence of people during switching on;

- electronic with mechanical control. Irrigation modes are fully automated, the watering schedule can be adjusted for a seven-day period, and watering duration is up to 120 minutes. Advantages: relatively low cost, ease of program creation and management. Disadvantages – inability to connect additional equipment;

- electronic with program control. The most modern devices have the ability to install up to 16 special functions. Disadvantages - high cost. In addition, it can be difficult for untrained users to install programs.

Mechanical timers are rarely used; most often, irrigation systems are controlled by one of the types of electronic devices. The water supply is regulated using a solenoid (solenoid) valve or ball valve.

Timer for irrigation on 2 lines, mechanical “Expert Garden”
- Solenoid valve. IN certain time power is supplied to the electromagnetic coil, under the influence electro magnetic field the core is pulled into the solenoid and shuts off the water flow. If the power stops, the core is pushed up by a spring and the lumen of the pipe opens. In timers, the principle of operation can be the opposite - without voltage, the valve closes with a spring, and when a strong magnetic field occurs, it opens. Due to this principle of operation, battery power is saved. You can distinguish the operation of the solenoid valve by a characteristic click during opening/closing.
- Ball valve. Opening/closing is performed by a gearbox driven by an electric motor. To save battery power, it is also constantly in the closed position; it opens only when the watering system is turned on. When the ball valve timer is triggered, a short operating noise is heard electric motor and gearbox.
Important. As soon as there is a risk of frost, the timer must be turned off. Why? During start-up, large currents appear in the stator windings; as soon as the rotor begins to rotate, the current strength drops to operating conditions. During frosts, the ball valve may freeze a little; the power of the electric motor is not enough to tear it off. This means that the starting currents will be long time flow through the windings, which will inevitably lead to their overheating and short circuit. And the gearbox itself is not designed to withstand significant forces; the drive gears may fail. Such malfunctions require complex repairs or complete replacement devices.
Electronic timers with mechanical control (toggle switch type)
Very easy to operate, reliable and durable devices. To select operating modes of the irrigation system, you need to perform the following steps:
- unscrew the top transparent plastic cover. You need to work carefully, do not lose the sealing gasket, it may fall out;
- Use the left toggle switch to set the frequency of turning on the system, the maximum period is 72 hours;
- Use the right toggle switch to set a specific watering duration, maximum 120 minutes.
Important. The initial countdown time of the electronic device begins from the time the timer is turned on. This means that if, for example, you want the watering to turn on periodically at five o’clock in the morning, then the first timer setting must be done at the same time. In the future, the time when the irrigation system is turned on will not change.
Manufacturers complete with the timer sell a full set of fittings for connection plastic pipes or flexible hoses of various diameters. The timer is powered by two AAA 1.5 V batteries.

Watering timer - photo

Electronic timers with program control
More modern devices, have significantly expanded functions. The delivery set includes adapters for connecting pipelines and flexible hoses of various diameters. Setting up software control is done as follows:
- remove the plastic cover. It is twisted quite tightly at the factory, you will have to make a significant effort;
- press the Time power button, the program installation parameters will appear on the electronic display. Set the current time and day of the week, the action must be confirmed by pressing the Set button;
- go to each day of the week in turn, select the time and duration for turning on the electronic timer. These parameters will be saved throughout the period of use;
- If desired, the device can be configured with up to 16 different programs. To do this, press the Prog button and then configure required quantity programs. All entered data must be confirmed by pressing the Set button.

There is a fairly capacious capacitor installed inside the device. It is designed to signal when the batteries are critically low and to switch the timer to autonomous power mode. When the battery charge is low, a warning signal will appear on the display. Since its appearance, the batteries can still work for 2–3 days, depending on the frequency and duration of turning on the irrigation system.
In full offline mode the capacitor can ensure the functioning of the timer for 3–4 days. If the batteries are not replaced within this time, the timer will turn off. After this, all previously installed watering modes will be erased from memory, and you will have to repeat the installation steps from the very beginning.
In standby mode, the timer consumes no more than 1.2 mA; during operation, the current consumption increases to 350 mA. These are very small values that allow the device to operate on batteries alone for at least a season. Manufacturers specifically avoided this time; during the annual routine inspection of the irrigation system before starting it is recommended to install new batteries.

There are timer models designed to work on large and complex systems glaze. They have several valves, which allows you to control the watering modes of several separate zones; each of them has its own parameters. Multi-valve devices can be connected to a voltage of 220 V or have up to eight AAA 1.5 V batteries.
What data should be taken into account when configuring sensors
The conditions for growing plants largely depend on the correct setting of the timer program. What should you consider?
Breakdown of the irrigation area into separate zones taking into account the types of crops. Each of them has its own requirements, in some cases you will have to buy multi-valve timers.
Hydraulic calculation for maximum water consumption. The operation of timers must take into account total capacity drives. If there is no automatic pumping, then you need to independently monitor the availability of water and, if necessary, fill the containers.
Analysis of the routing of irrigation systems. Large differences in height of individual irrigation lines can have a significant impact on their performance. When setting up, you should keep in mind not only the watering time, but also the amount of water that is supplied to the plants during this time.
After completing installation of the timer, it is recommended to check the functionality of the system. To do this, minimum switching periods are set and the correct operation of the valve actuators is checked. If the timer is operating normally, specific programming can begin and the system will be put into automatic mode functioning.
The process of installing a timer program will be much simpler if you purchase additional sensors with it.


Additional Timer Features
Electronic watering timers using sensors can perform several additional functions, which further simplifies the process of growing crops in greenhouses or open ground.
- Rain sensor. Such equipment is used during installation of irrigation on open areas. The rain sensor sends a signal to electronic device about the presence of natural precipitation. The timer responds to these signals and skips one watering that coincides with the rain period. The sensor is adjustable in the precipitation range from 3 mm to 25 mm. Such a wide range allows you to more accurately regulate watering rates taking into account weather conditions. The presence of an accelerated recall function allows you to stop watering in the shortest possible time after the rain starts; the devices do not require additional maintenance. Depending on the adjustments of the ventilation ring, a delay in returning the dacha to standby mode is set. The time to return to the starting position is directly dependent on the humidity and temperature of the surrounding air. This allows for significant water savings.
- Diaphragm pump. Can be mounted in conjunction with a timer or in a separate housing; it monitors the water level in storage tanks. When the amount of water decreases below a critical level, the pump automatically turns on to replenish supplies. After filling the tanks, the pump turns off.
- Radio channel soil moisture sensor. Most modern device, greatly facilitates plant care. Installed in several places on the beds, it blocks the timer command for watering in case of high soil moisture. The most modern devices increase crop yields by at least 10%.
- Water purification filter. Performs high-quality water purification and significantly increases the operating time of the timer.
Additional monitoring and control devices can be purchased complete with an irrigation timer or separately.


Video - Irrigation timers for gravity systems
Average precipitation in July in middle lane Russia - 95mm, which approximately corresponds to 100 liters of water per 1 m2 per month, or 3 liters per day. Since you can grow on average 5 plants per 1 m2, each plant, when watered, only precipitation receives up to 0.6 liters per day. But this would be if it were ideal summer weather for plants, with night thunderstorms and bright sunshine during the day. What if there is a drought? Or are the plants planted in a greenhouse? Or do you have plants that need more moisture? This is where the Signor Tomato automatic drip irrigation system comes to the rescue. Below are recommendations for setting up a system for watering your plants.
1. Irrigation settings for the Signor-Tomato system - Automatic drip irrigation using watering hoses, which can be purchased.
"Easy way"
When installing a system on 50-70 drippers, in 10 minutes of watering, each dripper receives up to 400 ml of water. The system allows you to turn on the pump 3 times a day and the duration of the pump operation is up to 10 minutes. Accordingly, if you set irrigation to maximum time, then you will get up to 1.2 liters per day for each dropper, which exceeds the watering of a good summer rainfall. For example, this is the same as pouring a 7-liter garden watering can onto 6 plants, only the efficiency of drip water supply is higher, since the soil is not eroded, but is “saturated” with moisture.
"Engineering way"
In this case, several conditions must be met:
1.1. The system should not include a gravity-blocking dripper installed above the barrel.
1.2. If you have added water through a “toilet” float, then the water inflow should be less than the flow through the droppers (the water inflow must be adjusted experimentally). If topping up is done via a timer, you do not need to worry about the flow of incoming water.
1.3. It must be remembered that gravity flow will stop only when all the water has left the barrel, or the barrel is empty to the level set by the gravity-blocking dropper (installed in the water column at the level necessary to stop watering).
If all these conditions are met, then you can set up to pour as much water into the system as you think is necessary - then it is not necessary to start the pump for 10 minutes; to start gravity flow, 1 minute once a day is enough.
2. Watering settings cold water via a tap-timer with an LCD indicator (must be used in conjunction with the system Without Automation +60 and/or Repair Kit +12)
"Heat-loving plants"
Even heat-loving plants can be watered using tap timer with LCD water from the water supply. To do this, you need to set up watering in very short portions - 1-3 minutes, then cold water will not have time to cool the soil under the plants, since it will be fed in very small portions. Such watering must be carried out once every 1-2 hours, so that daily norm 1 drop of water was sufficient for normal plant growth. The duration and frequency must be selected experimentally by placing a two-liter plastic bottle under one of the droppers and measuring the amount of water per day.
"Cold-resistant plants"
Everything is simple here - you set up watering with the required frequency and duration, just to sufficiently moisten the soil. Be sure to check if you are overwatering your plants. The soil should be moist, but water should not stand on the beds.
3. Watering indoor plants.
“Don’t just let it go by itself!”
You can assemble the Signor Pomodor system for watering indoor plants while you are on vacation or at the dacha.
3.1. Fill a container with enough water to water your plants during your absence.
3.2. Place this container below the level of the pots with plants - for example, on the floor if the plants are on the windowsill. This is necessary to prevent gravity flow, which will not please your neighbors below.
3.3. Set the pump to water once a day at short intervals - from 3 to 10 minutes - depending on the number of droppers and the size of the plant pots - determine the duration experimentally, since you need not only to water the plants while you are not at home, but also not to flood them .
3.4. Install solar cell to the brightest part of the window. Remember that when the battery is fully charged, the system can turn on the pump for no more than 40 minutes without recharging from the Sun! If desired, the system can be powered from a household electrical outlet via a regular 9V or 12V adapter.
Original reviews about septic tanks biological treatment Eurolos on the Internet.
Positive experience This is not the first time we have become clients of Eurolos, in particular we bought BIO and ECO units and we want to express our gratitude to the company because we really… EVGENIY, VILLAGE OF THE RAMENSKOYE STATE FARM
Not worth saving WITH THANKS, VICTORIA, ORLOVO VILLAGE
Comfort for country house Thank you for the installation, it just so happens that we are contacting you for the second time. I express my gratitude to your guys who assembled the installation for my home.… VIKENTY SERGEEVICH, VILLAGE BORISOVKA, PODOLSK
Reliability We have had a cleaning system installed for about 6 months now. waste water Eurolos. Although the installation is not cheap, it suits us absolutely, since in time... IGOR, GARDEN PARTNERSHIP ROSS, APRELEVKA

EUROLOS, Solnechnogorsk, Golovkovo
Competent support I haven’t written reviews here, but now I’m writing them. After the installation was installed, the guys collected their tools and left. At first, there were some... , VILLAGE OF DOMODEDOVO, MOSCOW REGION
Aleksino, Istra district Private house in Aleksino Review of the Eurolos station after prolonged continuous use. Vyacheslav January 19, 2016
VILLAGE OF THE STATE FARM RAMENSKOYE Positive experience This is not the first time we have become clients of Eurolos; in particular, we bought BIO and ECO units and we would like to express our gratitude to the company, since indeed, during the entire period of intensive use, we did not have any problems. Now all our friends and of course relatives understand from our experience that autonomous sewerage This optimal solution for a summer house or cottage. everything was very well organized and neat and there were no unnecessary worries about the occurrence of an emergency. As for the work, those employees who worked with us showed themselves to be very professional and neither my wife nor I had any complaints. Now we recommend this company to everyone and we are not afraid to bear responsibility for it. All in all Thanks a lot EVGENIY October 29, 2015
VILLAGE ORLOVO Not worth saving WITH THANKS, VICTORIA September 13, 2015
VILLAGE BORISOVKA, PODOLSK Comfort for a country house Thank you for the installation, it just so happens that we are contacting you for the second time. I express my gratitude to your guys who assembled the installation for my home. Now my granddaughter says that all I have to do is put a pool in the yard, and she won’t leave me. The installation works perfectly, the water drains out without any problems, everything works, and I really couldn’t be happier. Thanks to the girls - consultants, very smart and polite, good luck to them! (ugh, ugh). VIKENTY SERGEEVICH September 13, 2015
GARDEN PARTNERSHIP ROSS, APRELEVKA Reliability We have had the Eurolos wastewater treatment system installed for 6 months now. Although the installation is not cheap, we are absolutely satisfied with it, since during our use there were no reasons for complaints. Before Eurolos we had the usual cesspool, and of course these are incomparable concepts. Firstly, previously we constantly monitored the level and periodically carried out cleaning, but now this is not necessary. It's really very comfortable and freeing unnecessary problems. I highly recommend buying this unit, as this is not a case where you should save money. I think you understand. And I wish the employees of Eurolos success in their work and also provide services only at the highest level professional level. IGOR 5 May 2015
Solnechnogorsk, Golovkovo Septic tank for a dacha in Solnechnogorsk Video review of the installation of the Eurolos BIO 8 station in a summer cottage with seasonal accommodation. EUROLOS March 9, 2015
VILLAGE OF DOMODEDOVO, MOSCOW REGION Competent support I haven’t written reviews here, but now I’m writing them. After the installation was installed, the guys collected their tools and left. At first, some questions arose, I wanted to figure it out a little myself, so I looked for answers on the Internet. I didn’t expect that when I called the company, I would receive a detailed answer. I mean, not banal memorized phrases, but quite professional patronage; recommendations and personal observations were given. Everything is very human, but at a professional level, for which I thank your team. IVAN AND FEDOR MIKHAILOVICH SAMOILOV 23 January 2015


 Simple sections")


