Dried and dried fish is one of the most popular snacks in our country, and it would be strange to pay money for it if you yourself like to fish, and even boast of plentiful and regular catches. The simplest version of a do-it-yourself fish dryer can even be an ordinary clothesline with clothespins on which the prey will be attached. To protect against midges, the catch can be protected with a mosquito net thrown over the top, but with the “production” put on stream, this does not look serious.
Home-made drying for fish of a decent appearance and the same functionality can be done at home by placing a large number of slaves in a small space and providing there at the same time good ventilation and protection from curious insects. In a rural area, such a solution is especially relevant, since not only fish, but also mushrooms, and even meat can be dried in a similar way. Two variants of this design can be distinguished. Let's consider each of them in more detail.

Demountable hanging cabinet
In private houses, in most cases, they resort to making a box, covered on all sides with a mosquito net to protect against insects. Depending on the size, such a structure can be hung on a wall or even be multi-tiered and stand on the ground - then up to several dozen fish can dry in it at the same time, but the likelihood of access by terrestrial insects increases. The dimensions of the future box are determined only by you, based on your fishing abilities.
For good air access, the box should not have walls - in fact, we are talking just about a contour frame. For its manufacture, timber or wooden slats are usually chosen, whose thickness should never be less than 2.5 cm. Moreover, in many cases it makes sense to take the material thicker if the structure has many tiers, or its volume allows several kilograms to be hung at once fish. In order not to be mistaken with the amount of purchased material, you can draw up a drawing in advance.
Just keep in mind that any box of a relatively large size will not interfere with the presence of additional spacers for strength and stability. When purchasing a bar, it is worth taking it with a small margin - just in case.


For beauty, wood is often sanded and then painted, but it is more reasonable to do the first procedure before assembling the structure, and the second after assembly. The polished slats are cut so as to make two identical rectangles out of them, which will become opposite walls. You can connect them together either with several separate spacers, or with two more equal rectangles. After all this, one more rectangle needs to be made according to the size of one of the walls - it will serve as a door. For the perfect correctness of all corners, most craftsmen advise using special metal corners. small size, sold somewhere in the neighborhood with the same lumber.
When the frame is ready, if not painted, then at least varnished, because wood, and even outdoors, will last much longer.
Paint and varnish must be chosen wisely: they must protect the wood from water and salt deposits, but at the same time be environmentally friendly, because toxic fumes will surely soak the fish.


In the upper part of the box, as well as between the spacers of the lower tiers, you need to stretch a twine or wire on which the fish will be hung. The density of the rows and the vertical distance between the rows should be determined based on the size of the catch you can usually show off. Choosing among twine and different types wire, focus on the ability to withstand rain and withstand the expected weight of the catch, it is also reasonable to provide an easy option to replace sagging or torn pieces.
When this stage is also passed, you can start fitting the mosquito net - usually it is simply cut into fragments required size and simply nailed to the rails in a taut state. In this way, all sides of the box are trimmed, except for the one left for the door, and with the planned tight hanging on the wall opposite side can also be left without a grid. The door itself is also upholstered with a mesh, after which it is attached with hinges to the “doorway”. final touch there will be the creation of a “heck” of two or three nails, but here it is worth approaching the task as responsibly as possible so that not the slightest gap remains.


If it suddenly turned out crooked, and there are still cracks, you can paste them on the outside with a sealant.
Many, by the way, do not want to make the door on their own, but specifically adjust the dimensions of the box to the dimensions of the standard counter mosquito net on the window to use it as a door. The very lazy ones may not assemble any frame from a bar at all, simply by connecting several such grids together.
Some craftsmen do not like the fact that when the door is open (at the stage of hanging the fish or extracting part of the prey), insects can get inside, therefore, instead of doors, they sew a zipper into the mesh. This can make the inlet much smaller and easier to control, but this approach tends to degrade the mesh on that side more quickly.


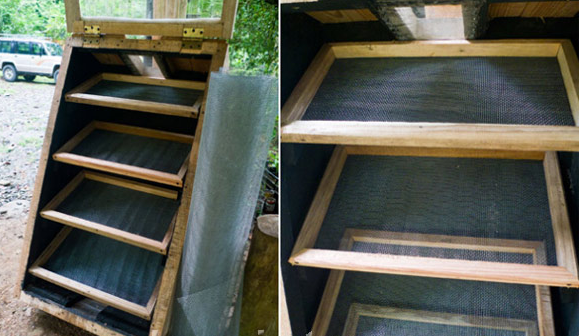
Drying chamber with fan
This design is more intended for the city - at least, it not only can, but should be inside the building, since it requires electricity to operate.
Any box can be used as a frame, only now with integral walls and the possibility of tight closing. You can put it together with your own hands, but the use of large (at least 20 liters) is much more popular. plastic containers from anything.
The ventilation grill is usually built into the box cover located on top, but a small one is installed in one of the narrow side walls. exhaust fan window type, so that by its efforts the air flow passes through the entire box. The presence of an electric fan allows you to completely level the absence of a draft due to the lack of free air circulation in the room, therefore even dense walls plastic box will not interfere with the rapid achievement of the result - in most cases, this design dries the fish faster than the classic one with a net and fresh outdoor air. In the upper part of the box, metal rods with a wrench thread are attached, which are fastened on the outer sides with the corresponding nuts - we will hang fish or other products on them.


On this simplest design home drying cabinet could be finished, but some craftsmen offer options to improve the design. So, it's no secret that for normal drying, you need not only constant inflow air, but also heat , which in winter time even indoors is not always achieved. good decision to increase the temperature inside the cabinet, the use of an electric mat can be used - such an item can be bought at a pet store, since it is necessary for the comfort of most pet reptiles. You can go the other way, providing a place inside the box for installing ordinary incandescent bulbs, which also heat up significantly during operation, but they will take up more space and may require numerous holes in the frame.
When installing any equipment for raising the temperature, it must be remembered that water flowing or evaporating from the dried products should not get on the heated surface, and even more so on the electrical contacts.


Both design options are quite effective, tested over the years of operation and used by hundreds of thousands of our fellow citizens, as evidenced by positive reviews on various fishing forums. Another thing is that for beginners who decide for the first time to try to dry fish or mushrooms on their own, the first pancake comes out lumpy. Out of ignorance, such people often sin on an unsuccessful design, although the reason for the spoilage of products or their very specific taste lies not in the crooked hands of the master, but in the banal non-compliance with the technology for preparing the catch.
For example, it makes no sense to dry fresh fish - the finished product will turn out to be completely tasteless and few people will like it. Before being sent to the drying cabinet, the fish must be salted for at least 10-12 hours, and not any salt can be used for this - only coarse-grained is suitable, and iodized and "Extra" are considered completely unsuitable for these purposes.
Another common mistake is to thoroughly wash the fish before salting - although this may seem unhygienic, this should not be done. The fact is that the inhabitants of the depths are already an excellent breeding ground. various microorganisms, and the increased presence of water also contributes to this, at the same time slowing down the drying process.
A dehydrator is a device that is a dryer for products (greens, fish, meat, mushrooms, nuts, vegetables and fruits). Also, this device can be used to cook healthier (dried, without any other processing) food, such as various desserts, sprouted cereals, cookies, chips and more. Needlework lovers create dry flower bouquets, items from papier-mache, herbarium and others decorative crafts. Dehydration of products in the device occurs due to the action warm air, infrared or sun rays.
Store-bought appliances are quite expensive. They allow you to maintain a constant set temperature inside drying chamber. Making a dehydrator with your own hands is an opportunity available to everyone to save on the device and get a device that allows you to quickly dry products in the required quantity.
A homemade dryer can be made from an old refrigerator. This will make a good dehydrator for fruits and vegetables.
Manufacturing algorithm
The process of manufacturing a drying plant from a refrigerator occurs according to the following scheme.
- Carefully dismantle the compressor, radiator and freezer so as not to damage the pipes and avoid leakage of the working substance (refrigerant).
- Take off inner lining and a heater, leaving a sealing gum on a door.
- In the place where the compressor was installed, a fan is mounted.
- On top (on the roof) of the refrigerator, a hole is made for a pipe (a two-meter section with a diameter of 100 mm is enough) or an aluminum corrugation 3 m long, which is fixed with glue.
- A hook is attached to the door to securely fix it.
- Attach wooden slats to the side walls of the box from the refrigerator with self-tapping screws or bolts after about 10-20 cm, in order to then put shelves on them.
- If any holes remain, they are closed.
- To speed up the drying process, an exhaust hood is placed on the pipe or corrugation.
The final design is shown in the photo below.

The nuances of creating a design
The inner lining and insulation are removed, because plastic and foam plastic decompose when heated, releasing harmful substances.
The insulation should be dismantled with gloves and a respirator to protect against glass wool (if it served as a heater).
Since the remaining tin cabinet is not particularly rigid, it may be necessary to increase its degree by installing spacers or a galvanized inner casing.

For blowing products, it is allowed to use a conventional exhaust fan power 18 W, diameter 125 mm, only installed to blow air inside. Installing a fan heater will significantly speed up the whole process, increasing the productivity of the installation. Instead, one or two can be attached to the back wall. electric heating elements with a total power of up to two kW - then the device will work as an electric dryer. In this case, a second exhaust fan should be installed in the upper part of the box.
The created unit can be used all year round. But if a conventional fan is installed, then painting the case black, as well as installing the device in the sun in warm time year contributes to an increase in the temperature inside, which speeds up the entire process of drying products.
In order for the created dryer to work efficiently, it is necessary to provide good blowing of the product laid on the sheets. This is achieved by leaving a gap of 2 cm between the box and the door on one side, and back wall box on the other.
When using a refrigerator with conventional fans without installation heating elements it is enough to remove only the compressor with a freezer and a radiator. Thus, the grooves for installing shelves on them remain, but if necessary, you need to add more. as shelves can be applied:
- grates designed for grilling, but with cut off handles;
- metal sheets with holes drilled in them;
- grids with different size cells;
- old mesh shelves from the refrigerator;
- made of wire or wooden slats lattice structures.

It is easy to come up with a variety of options for creating shelves for vegetables and other products on your own and make them from improvised materials.
If the compressor is in working condition, and the cooler circulation system is not damaged, then these parts may be useful for creating.
Creating a dryer from a refrigerator takes several hours with the necessary parts and tools. Design can be improved different ways, equipping, for example, temperature sensors and the simplest system automation, or experimenting with the location of the fans. To prevent insects from getting inside the dryer, ventilation holes close mosquito net or gauze folded in 2 or 3 layers.
Homemade dehydrator
A dehydrator can be made from homemade wardrobe in a manner similar to the previous one. Only instead refrigerator compartment here is a plywood cabinet. For this you will need the following materials:
- plywood or chipboard, fiberboard;
- wooden slats;
- metal corners and screws;
- aluminium foil;
- electric heater;
- 2 fans;
It is better to use a fan heater instead of a separate heating element. The other fan will be normal, while working on the hood.
The cabinet must be designed in such a way as to provide unobstructed air circulation. It is collected in this order.

Fans can be connected in parallel and switched on with a switch. Also, the design can be additionally equipped with light bulbs showing the operation of the installation. The fan heater is equipped built-in thermostat. It will automatically turn on the heater heating. If necessary, you can turn off one spiral to reduce the power of the installation.
Simple solar dryer for fruits and vegetables
The solar dryer can be made in various ways. Wherein no electricity costs: vegetables or fruits are dried by the energy of the sun's rays. The simplest design is suitable for summer residents, which can be made with a hammer, saw, stapler and scissors. The work on creating the installation is performed in the following sequence.
- Assemble the frame right size, based on the required volumes of workpieces, for example, from wooden bars 50 by 50 mm.
- Sheathe it from the sides and back with plywood or boards.
- The back wall is sheathed from the inside with a metal sheet.
- coloring inner part in black to make the air warmer.
- At an angle that provides the best exposure to sunlight, shelves made of mesh, wire, plywood, tin, plastic and other materials are installed.
- Ventilation holes are made in the upper and lower parts of the structure, the size of which must correspond to the dimensions of the installation.
- They are covered with gauze or a mosquito net to prevent insects from entering the drying cabinet.
- The front part of the box is made in the form of a frame fixed on canopies.
- It is covered with glass, transparent plastic, polycarbonate or plastic wrap(fixed with a stapler).
- A stand for a box is made from bars or metal pipes.
Also, the created design can simply be supported on something. A possible appearance is shown in the photo below.
In such a cabinet due to heating sheet metal achieved temperature 40-50 degrees. Ventilation ensures the removal of moisture released from the fruit.
Solar dehydrator with collector
More difficult option solar dryer(shown in the photo below) consists of two departments:
- air heating zone, consisting of a collector;
- drying zones where products are located.

The front parts of both zones are covered with a transparent material, for example, glass, polycarbonate.
Collector is a box, the bottom of which is covered with a thin sheet of metal painted black. A heat insulator (mineral wool or sawdust) is placed under it to minimize heat loss. Air enters the heating zone through the ventilation openings. Then it enters up through the shelves with products and exits.
By installing black tubes as an absorbent, for example, painted aluminum corrugation, you can increase the temperature of heating the air with a collector.
For the device to work effectively, it must be constantly kept with a directional collector towards the sun.. If the collectors are installed on three sides, then there is no need for rotation, such a drying unit will work all day. All cracks are sealed with sealant.
Solar dryer with fan and thermostat
To create a working automated model with a length of 1 m, a height of 0.6 m and a width of 0.53 m, the following materials will be needed:
- glass;
- wooden bars and slats;
- plywood;
- metal corners;
- aluminum sheet;
- fan with a diameter of 120 mm with a voltage of 12 V;
- mosquito net;
- thermostat (for example, W1209), consisting of a temperature controller and a thermostat;
- voltage stabilizer with a KR142EN8B chip;
- a solar battery that produces a voltage of 12 V;
- metal mesh for pallets.
The scheme of the apparatus is shown in the photo below.

The construction algorithm is as follows.
- According to the scheme above, a frame is assembled from beams and plywood, connecting individual elements self-tapping screws, metal corners.
- The body is sealed.
- Wheels (40-100 mm in diameter) are attached to the bottom, so that it is convenient to turn the structure in the sun.
- They make the back door of glass so that you can stack the products, as well as observe the drying process.
- Install after 7 cm seven shelves.
- Make shelves from mosquito or steel mesh and rails.
- An aluminum sheet is laid on the collector panel, pre-painted with black heat-resistant paint.
- Mount the fan on top.
- Gather electrical circuit, connecting the stabilizer to each other, solar battery, thermostat and fan as shown in the diagram below.
- Set the controller to the desired operating temperature.

The door must be hermetically sealed so that insects do not enter inside.
A stabilizer is needed to maintain constant voltage on the fan contacts with a value of 12 V. Further improvement of the created design is possible by fan speed control. It is recommended to rotate the device so that the collector and the battery are constantly illuminated by sunlight.
Assembling the infrared dryer
Suitable for mushrooms, vegetables, nuts and fruits infrared dryer. Making it yourself is pretty easy. For this you will need the following materials:
- iron wire with a diameter of 5 to 8 mm;
- cardboard box, for example, from a vacuum cleaner;
- aluminium foil;
- metal mesh;
- bulb holder;
- awl;
- screwdriver;
- self-tapping screws;
- cartridge for an ordinary light bulb with fasteners;
- thermometer;
- infrared lamp;
- aluminum tape or glue.
The installation is created in the following sequence.
- The inside of the box is glued aluminum foil using tape or glue for this.
- Shelves are made from a grid according to the size of the box.
- On any wall near the bottom, a hole is made for the supply wire and the cartridge is fixed with self-tapping screws.
- Screw in the infrared lamp.
- A thermometer is attached to any sidewall.
- Cut the wire into pieces that are approximately 5 mm longer than the width of the box.
- Pierce holes in the sidewalls for the rods for the racks.
- They insert a wire into them and seal its protruding ends with adhesive tape from the outside.
- Laying shelving.
As a result, after all the manipulations, you will get an installation similar to that shown in the photo below.

The side parts of the box can serve as a lid, or it can be made separately from the same cardboard. If you want to automate the design, then you should use temperature sensor. Under his control, the light bulb will turn on automatically.
Also, in the created design, you can use an incandescent lamp (its sufficient power is 60 W) or heating film used to create underfloor heating. In the latter case, at home, a piece of 50 by 100 cm with a power of 110 watts is enough. In the general case, the length of the fragment is chosen according to the box used.
When using the film, you will also need:
- insulation, for example, bituminous, used to create underfloor heating;
- a set consisting of 2 clamps, two eyelets and the same number of ring terminals, which is designed to connect the power to the film.
Lay on top of bituminous insulation pvc tape. To connect the film, you will need to solder wires and contacts.

This dryer allows temperatures around 60 degrees. It can be rolled up and laid on the bottom of a box made in the previously indicated way.
Do-it-yourself dehydrator for meat and fish
Dryer for meat and fish is easy to make from plastic container. For this you will need:
- fan;
- a plastic container with a lid;
- steel bars with a cross section of 5 mm or threaded studs with washers and nuts;
- pipe cut or coupling.
The whole process of making a dehydrator for drying fish, meat and drying other products from a plastic container is shown in the video:
It is easy to assemble a dehydrator for fish, meat, vegetables, fruits and other products from improvised materials: plywood, boxes, a refrigerator. Various working old fans are suitable for blowing. In each case, it will be necessary, of course, to think over a way to secure them, but economic costs will be reduced. In small installations, you can use a fan from a computer, having previously provided the right voltage nutrition. If you automate the dryer, then in terms of functionality it will be able to compete with factory counterparts. When drying meat and fish, be sure to prevent flies from entering the interior of the appliance so that they do not spoil the food.
Any self-respecting fisherman cannot imagine his life without dried fish. Is it considered a kind of trophy, because it is not only caught on its own, but also fish on its own at home? This process requires special skill.
How to dry fish properly
To prevent a fly or other insects from landing? To do this, it is necessary to make its correct preparation before this process:
- It is necessary to salt the fish until it becomes translucent.
- When soaking a salted product, it is recommended to add from 50 to 150 grams of vinegar to the water (this substance repels flies, although not always effectively).
- For drying, it is best to take not very big fish because it dries faster and various insects they are not so willing to sit on an already almost finished fish.
- If you still decide to take large prey for drying, then it is recommended to remove all the intestines from it and remove the gills.
By following this plan, you will slightly increase the chances that flies will not land on fish, but you will not be able to get rid of them 100%.
After that, the product is hung out in the open air and dried for a week, up to ten days.
How to dry fish at home?
Not every fisherman has a special place for drying fish. Accordingly, not everyone knows how to dry fish at home.
To do this qualitatively, you need to stock up on seasonings such as Bay leaf, salt and ground black pepper. In addition, it is necessary to prepare a dense foil and an oven.
So, how to dry fish at home? After preparing all the above things, you need to follow this plan:
- Rinse the fish, dry it with a paper towel, pull out all the intestines, and then make cuts on it. After completing these steps, the product is sprinkled with salt and pepper and placed under oppression. Next, the fish must be thoroughly washed from salt under running water and dry.
- After drying all the fish, you need to preheat the oven and place foil on a baking sheet. All prey is laid out on it, be sure to make sure that the heads are turned in one direction. During the drying process, the oven door must be slightly opened by about 50-70 millimeters. The temperature should be no more than 50 degrees. After two hours, the heads of the fish are covered with foil, and the fish itself continues to dry for three or four hours.
- Then the product is taken out of the oven, strung on an iron wire or thread, and then hung in the fresh air, in the apartment - it can be a balcony. It dries there for at least two days.
In winter, after pulling out of the oven, the fish can be hung on a rope or wire above the stove.

What is a hanging fish dryer and what is it for?
Drying fish on a rope or wire is quite simple and traditional way, but it does not eliminate the spoilage of the product by flies. But the hanging fish dryer is able to protect it from this harmful influence.
The hanging dryer is presented in the form of walls made of gauze or mesh. Such "walls" allow air to pass through and do not slow down the process of drying the fish. As a rule, inside such dryers is placed hanging device, consisting of slats with stretch marks and chains. Hooks for hanging fish are attached to these chains; when buying such a dryer, they are included in the kit.
To install this type of dryer, you just need to stretch the stretch on neighboring trees or simply drive in stakes. If the drying of fish is done in an apartment, then you can purchase a special frame or build it yourself.

Drying fish in the summer
How to dry fish in summer? This process in the warm season almost does not differ from its drying in winter period. The only difference is that in summer the product can be taken out to the balcony or (in a private house) to the street. In winter, it is necessary to dry the fish over the stove, having previously done the above procedure using the oven.
Drying fish in summer is most often practiced, since winter fishing is not as popular as in the warm season.

Drying fish on the balcony
For residents of apartments, the process of drying river prey is a little more complicated, since open air not so much. How to dry fish on the balcony? You need to do the following:
- The fish must be thoroughly washed, the intestines removed. In no case should the scales be removed, as this will attract flies and contribute too much fast drying prey (this may affect its further taste).
- On the back of each fish, it is necessary to make a shallow but long incision, approximately from head to tail.
- Next, the product is salted in a bowl. It is best to choose enameled containers, and coarse salt. The latter is taken with the calculation of 20% of the mass of the weight of the entire fish. If you wish, you can add bay leaf and black pepper to the salt.
- The fish is transferred to another container in layers, each layer is carefully covered with salt. You also need to rub the product inside.
- An oppression is placed on top of the fish and all this is placed in a cool place for several days. The use of a refrigerator is recommended.
- After salting, the fish must be washed and dried.
- Further, it is hung out on the balcony (a thread or wire is used). How to dry fish so that a fly does not sit down? It is best to treat each with 3 percent vinegar.
The fish is dried in about a week.

How to dry fish with intestines?
Drying fish with intestines or not is a matter of taste. It is worth noting that if the product was dried along with the insides, then a certain bitterness can be observed in its taste, which not everyone likes.
Drying fish with intestines is the same as all the above methods, the only difference is that you do not need to remove all the contents of its belly.
On the one hand, removing the insides of a fish is a very difficult task, but if the fisherman does not want to get a dried product with a bitter aftertaste, then it is better not to shirk this business.

What is a fish drying box?
How to dry fish so that a fly does not sit down? To this end optimal solution will be the use of a box for drying fish.
It can be bought or made with my own hands. Creating a box with your own hands will cost about half as much.
The optimal size of the box frame for drying fish is 1 * 1.10 meters, the depth is 0.5 meters. Most suitable material- this is a tree (its breed does not matter).
To create such a box, do the following:
- Mark the timber and cut it with an electric jigsaw. Then, using a screwdriver, corners and screws, assemble the frame.
- Stiffeners are attached on all sides.
- A cable is attached to the side walls (fish is dried on it).
- Then you need to treat the box with an insect repellent.
- It should be absorbed and dry, and after that the box is opened with varnish. It must be applied in two layers with an interval of 4 hours.
- At the bottom of the box you need to install special spacing.
- The base of the door must be glued with a sealant.
After completing these steps, you will get a ready-made box for drying fish, where no insects can penetrate.

How to dry fish so that a fly does not sit down, the reader already knows. Now is the time to talk about how to properly store it.
There are several tips to help keep dried fish as long as possible:
- before putting the fish in a bag for further storage, you need to wipe it thoroughly and put sprigs from coniferous tree, in its absence, plain paper will do;
- in the hot season, it is recommended to lay nettle on top of dried fish, this will increase its shelf life several times.
Here we told you how to dry fish at home. Fulfilling all the requirements, you will receive a high-quality and tasty product. Enjoy your meal!
Delicious, dried fish is the best addition to beer on a nice pleasant evening with friends. To save money and not buy dried fish in the store, you can make it yourself. How? Very simple and inexpensive, you just need to make a little effort.
How to make a box for drying fish with your own hands?
To make a box, we need some materials, as well as some skills to work with tools.
We will need:
Wooden bars;
Mosquito net;
stapler;
Screws for wood.
1. First of all, we determine the size of our future box. We chose the size: 1 meter high, 1 meter long and 0.5 meters wide.
2. We cut the bars of the size we need and sew them together with screws.
3. To make the box more stable, we will strengthen it with several ribs.

4. We hook the cables between the side ribs. They immediately perform two functions: they do not allow the frame to stretch, and we will hang fish on them.

5. Let's start processing wood. We open in two layers with Bio-doctor from beetles.

6. After the wood dries, we proceed to the opening with varnish. It should be opened in two layers, with an interval of 5 hours.

7. After the varnish dries, we will cover it with a mosquito net using a stapler. We sheathe almost from all sides, we do not sheathe the front one, there we will have doors.

8. We do the doors in the same way with the help of bars, mosquito nets, and we hook them on the hinges. They should close the box well.
Evgeny Sedov
When hands grow from the right place, life is more fun :)
Content
For drying fish products, a special device is provided, which is used at home. Before you buy a dryer for fish, you need to familiarize yourself with all existing models, ask the price and choose the option that is best for you in terms of cost, functions and design. All types of dryers prevail in free sale, some model is sure to please the hostess.
What is a fish dryer
This is a special device for drying fish, which is sold in a specialized store. The main differences between the models are in a number of characteristics, in order to simplify the choice of each hostess. Dryers vary in capacity, appearance, functions, design, price. Choosing a drying design for cooking delicious meals, you need to take into account that there are a number of models of Russian and foreign manufacturers that provide a quality guarantee, expand the possibilities of the hostess in the kitchen.
Hanging fish dryer
Having studied all types of dryers, most fishermen prefer the time-tested hanging models, which are made of a steel frame and nylon fabric. The main advantages of such material are the reliability of the design during drying, the protection of fish from unwanted contact with insects, decades of experience.
The design provides for several tiers, which ensures the supply of fresh air to obtain a high-quality and safe food product. For housewives such universal options do not fit (may seem unaesthetic), but true fishermen will be interested. To dry the fish after fishing, you can use the presented hanging models.

Three whales
This is a popular Russian manufacturer that is engaged in mass production and sale of everything necessary for hunting and fishing. If a dryer for fish is required, here is a reliable model for free sale:
- name: Three Whales;
- price: 1,400 rubles;
- characteristics: pendant model, parameters (length, depth, height) - 120x80x40 cm, 4 fish chains, 20 hooks per set;
- pluses: practical model for home use on optimal price;
- cons: none.

sport-fish
These are imported products, which are no less relevant for beginners and professional fishermen. Below is a universal model that, in addition to drying fish, can be used to dry vegetables, fruits, mushrooms:
- name: Sport-Fish;
- price: 560 rubles;
- characteristics: hanging, 50x50x60 cm, double zipper, wire frame, 3 levels;
- pros: comfortable design for everyday use on fresh air, sufficient capacity, reasonable price;
- cons: none.

Cedar
To make life easier for fishermen, a fish drying net from the Kedr manufacturer has been specially designed. The design is reliable and durable, allows you to dry fish on a long trip or in the country. Below is the most best option"on every day":
- name: Cedar 6 chains SU-02;
- price: 1,250 rubles;
- characteristics: the design is folding, the main parameters are 100x80x75 cm, 6 chains at 2 levels, position adjustment;
- pluses: quickly assembled and disassembled, does not take up much space, is inexpensive, can be bought at a sale;
- cons: none.

Electric dryer for fish
All of the above models are manual control, i.e. the desired result depends on the human factor. In fact, such a universal design can be reproduced at home using several layers of gauze, wooden (metal) crossbars. The fish will not only be caught, but also hung up, while regularly monitoring the natural process of its drying.
To speed up the result, it is recommended to use more advanced models - electric dryers. Such modern designs are much more expensive, but as soon as possible give the hostess the opportunity to enjoy an unforgettable taste dried fish. If you have to buy a fish dryer, below are several top manufacturers and their products.

RAWMID
Models of this brand are made of stainless steel, therefore they are distinguished by increased strength and long term services. Among other advantages, we should highlight the presence of a step timer and several operating modes, increased capacity with compact dimensions in case of a large catch, stylish design, quality assurance from the manufacturer. Outwardly, this metal box. Here are the models to choose from:
- name: Rawmid Dream Modern DDM-11;
- price: 24,000 rubles;
- characteristics: electronic control panel, 11 removable trays, 3 modes of temperature change, backlight, built-in air filter, fan;
- pluses: uniform drying, work with an open door;
- cons: high cost.

The price of the above model "bites", so buyers are looking for cheaper offers. Here is the second version of the specified brand, which is considered budgetary, more suitable for use at home:
- name: RAWMID Dream Vitamin DDV-06;
- price: 11,500 rubles;
- features: 0.5 kW electronically controlled convection dryer, plastic housing, 6 trays made of transparent plastic, overheating protection, timer, display, dimensions 34.5x45x31 cm;
- pluses: comfortable and roomy design at the best price;
- cons: none.

ENDEVER
When choosing a fish dryer, it is worth considering another recognizable brand, stated as retail as well as online stores. In the latter case, order frame device available at a good discount fast delivery by mail. Here are the most recognizable models of this brand:
- name: ENDEVER Skyline FD-59;
- price: 2,200 rubles;
- characteristics: 0.35 kW electronically controlled convection dryer, plastic housing, 5 transparent plastic trays, overheating protection, timer, dimensions 27x21.5x27 cm;
- pluses: a budget model for everyday use, you can buy cheaply for a promotion;
- cons: short service life of the device.

Judging by the reviews, such a model is not always reliable and durable. The second no less relevant offer of the dryer, which will pleasantly please many customers:
- name: ENDEVER Skyline FD-58;
- price: 1,800 rubles;
- features: 0.35 kW electronically controlled convection dryer, plastic housing white color, overheating protection, tray height adjustment, automatic fan, dimensions 26x25x18 cm;
- pluses: walls made of durable plastic, original design, the availability of functions, the ability to select and purchase from a photo from the catalog;
- cons: not identified.

miraculous
The dryer for drying fish outwardly represents small closet, which during its work performs the function of a heater. To significantly save on price, while getting a durable assistant High Quality in the kitchen, it is recommended to pay Special attention on the Chudesnitsa trademark and its favorite positions. So:
- name: Miraculous SSH-008;
- price: 1,900 rubles;
- characteristics: mechanically controlled convection dryer with a power of 0.5 kW, temperature control, 5 plastic trays, volume 17 l, dimensions 39x39x40 cm;
- pros: cheap, multifunctional model, which prevails in free sale not only in Moscow and St. Petersburg;
- cons: a long process of drying fish.

Domestic models are distinguished by their practicality, durability. The second offer from this manufacturer is presented below:
- name: Chudesnitsa Lux SSH-010;
- price: 1,600 rubles;
- characteristics: mechanically controlled convection dryer with a power of 0.5 kW, maximum load 5 kg, temperature control, 5 plastic trays, volume 17 l, dimensions 40x40x39 cm;
- pluses: convenient design, affordable price, stylish design, compact dimensions, positive customer reviews;
- cons: none.

Gemlux
The fish dryer is represented by mechanical and electric models, so the price range is very extensive. Before making a final choice, it is recommended to study the main parameters and characteristics of the so-called favorites, ask the price, study real reviews buyers. So:
- name: Gemlux GL-FD-01R;
- price: 3,100 rubles;
- characteristics: electronic control with LCD display, temperature range varies from +40 to +75 ° C, operating time 48 hours, overheating protection system;
- pluses: fully corresponds to the declared price (optimal a budget option);
- cons: cost, lack of operating modes, not always positive reviews on thematic forums.

Another universal dryer from the specified manufacturer. The model is useful not only for drying fish, but also for drying mushrooms, fruits, vegetables:
- name: Gemlux GL-FD-800D;
- price: 12,000 rubles;
- characteristics: black, power 800 W, 8 sections, several protection circuits, a timer and a temperature control function;
- pluses: convenience, speed of cooking fish;
- cons: high price.

How to choose a dryer for fish
Many housewives tend to buy a dryer cheaply, but this indicator should not become the main selection criterion. The main thing is to study the functions of the cabinet, determine the dimensions and roughly imagine the place of its future storage. Only in this case, the purchase will be successful, and inconvenient inventory will not appear in the kitchen - bulky and, in fact, useless. Here are the main selection criteria:
- Device features. There are mechanical, manual and electric dryers. The last option can be safely called the most progressive, since it simplifies the work of the hostess and reduces the time interval for obtaining dried fish. It is important to understand that such structures will cost an order of magnitude more expensive.
- Functions. The more additional features a dryer has, the more expensive it will cost. It is important to understand that the presence of buttons does not indicate the versatility of the selected model, some of them may remain unused throughout the service life. So it doesn't hurt to read the manual first.
- Design. In this matter, it is advisable to build on the taste preferences of the hostess. Models are found round, oval, rectangular shape, have one or more tiers. To place the structure in the kitchen, you must first study the parameters (height, width, depth, length), dimensions.
- Manufacturer. Most buyers trust imported products, but also Russian manufacturers not inferior in quality, functions and service life. There is an extensive list of brands that are engaged in the serial production of dryers. Reviews of their products are also positive.
- Price. This selection criterion depends on a number of indicators. If you buy products foreign manufacturer, overpriced. When choosing a dryer domestic manufacturer You can save on the purchase, but at the same time not lose in terms of quality.


 chancre look like?")
")


