A closer is needed for the door to move smoothly and fit tightly when closing. The design itself is simple, but depending on the model and operating conditions, the specifics of installation vary. Let's consider the existing mechanisms, which one to choose and how to install it correctly.
Functions
Before installing a door closer, evaluate its capabilities. As the name suggests, this simple mechanism ensures smooth and silent closing of the door. Due to the tight fit of the canvas to the box, it is possible to keep the room warm in winter and cool in summer.
Standard functions: automatic closing and adjustment of the speed of the blade, sometimes locking in the open position. Dear models equipped additional features: set access control, time for ventilation of the room and block the door position.

Types of mechanisms
To figure out how to properly install a door closer, let’s look at their modifications.
By type of installation there are:
- Overhead – these models are mounted on top of a canvas, box, wall or auxiliary structures.
- Floor-standing – suitable for doors without a frame, for example glass. They are mounted from below, on one side to the sash, on the other - directly to the floor.
- Hidden - it is unlikely that you will be able to install such closers yourself, since the mechanism is located inside the canvas; in this case, it is better to call a specialist.

Based on the principle of torque transmission, there are:
- Lever is a simple mechanism that consists of a spring and a hydraulic system filled with oil for shock absorption.
- Slide - a free element slides in the body, the friction force slows down the movement of the blade, due to this a smooth closing is achieved. This type of mechanism is installed parallel to the door and looks elegant and laconic. It does not make opening difficult, but on the contrary, it helps. After opening the canvas 30 degrees, the door closer comes into play, thus making the work easier for children and the elderly.
The internal mechanism can be of two types: cam or gear. The first type provides smooth movement, therefore it is more often used for a slide design. The gear type is coarser; such closers are installed on heavy doors with a combination lock in order to provide additional force when closing using gears.
There are simplified models for interior doors; they are adjustable.
How to choose
To choose the right door closer, you should refer to established standards. To determine the size of the mechanism, width and weight are taken into account door leaf.

The manufacturer is obliged to provide a quality guarantee. Deciding to save money increases the likelihood that the mechanism will soon break down. In addition, cheap products are not able to fully perform the task.
A specific type of door closer is selected to suit the requirements. The more features, the more expensive the price.
For more information about the selection rules, watch the video:
Installation methods
The door closer installation process begins with determining the direction of door opening; the choice of installation scheme will depend on this.
Overhead models are used more often; they can be mounted on either side.
There is no difference for interior doors, but entrance doors open outward, so when installing a door closer you may need additional materials, since it is attached from the inside, from the side of the room. This protects the mechanism from dust, precipitation and freezing. The closer also reduces the load on the hinges, which increases the service life.
Before installation, determine the type of door opening:
- “Inside” – the body is mounted on top of the sash on the side where the hinges are located;
- “Outside” - the mechanism is attached to the box, and the lever is screwed to the canvas.

How to install door closer:
- IN included The fastening diagram is in natural size, it is convenient to make markings with its help. You can secure the template with tape on the door.
- Drill holes at the marked points or directly through the glued diagram.
- Screw the housing with screws.
- Do the same for the lever.
- Connect the parts of the structure. IN closed position There should be an angle of 90 degrees between the forearm of the lever and the door leaf.
- Using special screws located on the case, this is done. The desired door speed, closing mode (with or without slam), braking, force, etc. are set.

Decorative overlays disguise the mechanism body.
Non-standard situations
If you have difficulties installing the door closer, the following techniques will help:
- Metal corner. On door frame An auxiliary element is mounted horizontally, then a lever is attached to it. Another option is to install the mechanism body on the corner, and screw the lever to the door.
- Mounting plate. There are three possible ways here. First: the auxiliary element is attached to the upper edge of the door so that it protrudes slightly, then the mechanism is screwed to it. The lever is installed on the door frame. The second method: the plate together with the closer body is installed on the frame, and the lever is attached to the blade. Third option: using a plate, the area of the slope is increased, onto which the lever is then mounted. The mechanism is installed as standard.

As you can see, installing a door closer is possible in different ways. If the instructions seemed complicated or difficulties arose during the process, it is better.
I like
32Due to the nature of my activity, which is the sale of components for metal-plastic windows and doors, I constantly encounter the fact that often seemingly high-quality door closers from world-leading manufacturers in this market segment for some reason refuse to work after just a year, and sometimes and they don’t withstand six months of use. After several visits to clients, it was determined that the main reason for short-term operation is incorrect installation of the door closer or incorrect selection of the door closer based on the weight and width of the door. Therefore, even the installation of a door closer by a door manufacturer does not always guarantee correct and durable operation of the closer due to the low qualifications of the installers. Quite often, in order to save money, closers are purchased and installed by users themselves, and unqualified installation also entails problems in the proper operation of the closer. And for some reason no one bothers to read the installation instructions. In this article I will tell you how to install a closer so that it works according to the European standard EN 1154 , according to which door closers must ensure correct operation for 500 thousand opening-closing cycles.
How to choose the right door closer?
Since the vast majority of installed door closers are top-mounted door closers with a lever arm (pictured in photo 1), then in the text below the main emphasis is placed on such door closers.
When choosing a door closer, the main parameters of the door on which you are going to install the closer are taken into account - its width and weight. The main characteristic of any closer is the closing force (or they also say “closer size”). European standard EN 1154 the efforts that the closer must develop are regulated. Depending on the size and weight of the door, closers can demonstrate different sizes closing force from EN1 to EN7 (Table 1).
 Table 1
When choosing a door closer with optimal closing force, they usually focus on the largest parameter. For example: door weight 50 kg (force EN3 ), and the width is 1000 mm (strength EN4 ). In this case, we select a closer with a closing force EN4 . It is not recommended to install a closer that has a closing force several orders of magnitude higher than required. Since the higher the closing force of the door, the more force will have to be applied to open it. Nowadays there are many door closers on the market. different manufacturers, their cost varies from 500 rubles and reaches tens of thousands. As a rule, most closers have a closing force range from 2 to 4. That is, for example, the GEZE TS 2000 V door closer can take the values EN2 , EN3-4 and EN5 . The force is adjusted by shifting the closer relative to the hinges. Second important factor When choosing a closer, the operating temperature range is considered. Temperature change environment has a significant impact on the operation of the door closer. Depending on where the closer is installed, indoors or outdoors, you should pay close attention to its operating temperature range. For example, the same GEZE TS 2000 V guarantees correct operation at temperatures from –30°C. up to + 40°C. This door closer can be installed on both internal and external office doors. The third factor is the presence of adjustments for the closer to ensure comfortable operation of the closer mechanism in various operating conditions. Closers in low and medium price category, as a rule, have two adjustments: 1. Closing speed from 180° to 15°; 2. “Final slam” - implies a slight increase in the speed of door movement in the last 15°. This function is necessary for doors with a latch in order for the lock to engage (Figure 1).
 Rice. 1
There are door closers with wider functionality; they contain additional adjustments to solve additional problems:
- Back Check- opening damping or wind brake, which protects the door from hitting the wall during sudden opening or gusts of wind. At the same time, some models implement the function of adjusting the response angle;
- Delay Action- closing delay, allows you to delay the closing of the door for a short period of time, which is very convenient when carrying small loads;
- Hold Open- this is the ability to lock the doors in the open position. Thanks to this feature, there is no need to hold the door, and no damage is caused to the closer.
How to install a door closer?
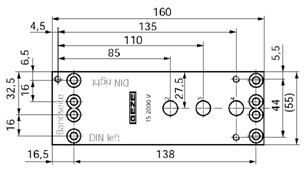
So, the closer has been selected. Now you need to install it. Next, let's look at the installation using the GEZE TS 2000 V door closer as an example (photo 2). As a rule, all door closers include a wiring diagram or installation instructions. The scale of the paper template is 1:1, that is, life-size, designed for easy and quick installation door closer without using measuring tool(photo 3).
 Photo 2
 Photo 3
1) To install the door closer, first of all, you need to decide on which side of the door the mechanism will be located. This will determine how to mount the closer, on the door leaf or on the door frame (Fig. 2).
 Rice. 2
2) Using adhesive tape, the template is based on the door leaf (or frame) relative to the axis of the hinges and then markings are made mounting holes Holes are drilled under the closer body and rod and according to the marks. c) Then we determine the required closing force based on the weight and dimensions of the door and fasten the closer body in one of three positions (Fig. 3).
 Rice. 3
4) This closer has a telescopic rod, which has two moving parts: one extends from the other and is fixed with a special screw. Therefore, we loosen the adjusting bolt of the rod and install the second non-adjustable part of the rod on the body of the closer (the rod is attached using a 6 mm hexagon bolt). We attach the rod at an angle of 80° to the surface of the door as shown in the template. Then we set the angle to 90°, slightly moving the adjustable part of the rod, and tighten the fixing screw when the door is in the closed position and the lever is folded in the knee. This way the closer will work with a slam if the door has a latch. Or we push the rod until the adjustable part of the rod is at 90° degrees to the surface of the door, if the door is without a latch, for a softer closing without slamming. Important!!! The door closer transmits a lot of force to the door and operates in conditions of constant vibration, so the closer and rod must be firmly and securely mounted.
5) After installing the closer, we adjust it. Using the adjusting screws, we set the optimal speed of closing the door and closing the door for reliable operation of the latch. There is no need to turn the screws a full turn, since changes in the closing speed can already be felt when turning the screw just a quarter of a turn (see Fig. 1.). If the installation of the closer is difficult, for example, when the width of the closer body is greater than the width of the door frame, or when the closer is installed on a door leaf with an overlay, where the mounting screws can interfere with the correct functioning of closing the door, use a special adapter - a mounting plate, which is purchased separately (photo 4).
 Photo 4
The mounting board is installed using the same template (photo 3) on self-tapping screws, and the closer body is fixed directly to the board using screws.
And in the end I would like to list a few useful tips, which will extend the service life of the closer:
- do not support the doors with foreign objects (stones, bricks, wedges, etc.), it is better to disconnect the rod from the closer if you need the door to be open for a long time (for convenience, many closers are equipped with detachable rods);
- adjust the door closing every six months (at the beginning of winter and at the beginning of summer);
- Once a year it is necessary to replace the grease in the joint connecting the two halves of the closer rod.
It is recommended to equip entrance doors in private houses and organizations with closers. But these devices, which allow you to conveniently use the door, are quite diverse. You need to select and place them especially carefully.

Features of choosing a closer
The door closer, both on the inside and outside of the door, must ensure automatic closing of the leaf. The simplest type of device is an oil device, which works by moving fluid under the pressure of a spring. When the door is opened, the spring compresses. As soon as the handle is released, it will unclench and smoothly close the sash.


But the most simple devices is now used very rarely. More modern designs often rack-and-pinion based. This type of force transmission ensures the smoothest movement of the spring. However, it cannot be used in devices with sliding channels. In a cam system, energy must be transmitted by a special cam made of a steel profile similar in shape to a heart.
By changing the profile, a certain compression intensity is achieved. This ensures convenient closing of the sash. When selecting a door closer for a street door, you should think first of all about the moment of inertia. This indicator, directly related to the weight and width of the door frame, is reflected in the EN 1154 standard. Products classified as EN1 are only capable of serving interior door, and the easiest one.

If you need to install the closer on a steel entrance structure, then it must comply with class EN7. Important: along with closers of a strictly defined level, there are also adjustable elements. Their markings begin with the lowest closing force, and the highest level is indicated through a hyphen. Complete information on this matter can be obtained in the tables given in technical documentation.


How exactly the torque is transmitted is also very important. If a lever is used for this purpose, it is made from a pair of connected axes. When the sash opens, these axes bend in a certain place. In itself, such a device is quite durable and can last long time. But a completely open mechanism is very easily damaged by hooligans.
Systems with a sliding channel are distinguished by the fact that the free edge of the lever moves along a special recess. Getting to the lever itself is problematic, which complicates the actions of vandals. But you have to put in more effort to open the doors. The use of a cam transmission device helps to somewhat compensate for the difficulties when moving. It is this that allows for the most efficient transmission of kinetic energy.


Floor structures, as their name clearly indicates, are placed in the floor. It is almost impossible for those who want to break something to get to such elements. If the sash opens in two directions, it will be placed on the spindle of the closer. If only one, the device is located near the canvas. These types of door closers are widely used on the doors of shops and similar institutions.

The frame device differs little in its action from the floor device. However, the mounting location is different. As for installation options, there is an overhead scheme and three hidden versions. The closer may be hiding:
- in the floor;
- in frame;
- in the door leaf.


For a plastic door, as for a wooden one, it is usually necessary to choose relatively weak closers. But if the structure is large and the sash is therefore heavy, you will have to install a more powerful device. Important: when the opening force is insufficient, it is recommended to install two devices. The main thing is that their action is completely synchronized. The speed at which the device closes the door is not standardized by standards and there are not even strict numbers yet.

It is necessary to observe how quickly the canvas closes completely. On fire door Closing should occur as quickly as possible to prevent smoke from escaping and spreading fire. And the lowest possible speed is required where there is:
- small children;
- elderly people;
- those who are poorly oriented in the surrounding reality (disabled and seriously ill);
- pets.

The slamming rate characterizes how fast the blade the last one will pass section of its path at closing. This parameter is taken into account only when a snap-type lock is installed. But since it is not always known where it will be installed, it is better to familiarize yourself with this indicator when purchasing a door closer. In public places, unlike a private home, the slow opening function is significant. Sooner or later, some visitors will try to open the door too much - and then braking with the help of a closer will prevent the door from hitting the wall.

Stopping the sash in the open position is important mainly in medical and other similar organizations. When carrying a stretcher, there is no need to somehow additionally support the canvas. Sometimes warehouses are interested in this function. There, too, there is a need to carry or carry out heavy and inconvenient loads without unnecessary problems. An alternative solution is often a door with delayed closing.

If the closer is placed on front door, then in most regions of Russia it must be thermally stable (that is, designed for temperatures from -35 to 70 degrees). Only in the coldest places does it make sense to buy frost-resistant structures that can operate at -45 degrees. Conventional closers are installed indoors, which will not be able to operate at temperatures below - 10 and above + 40. The temperature range is determined by the type of oil located inside the mechanism.

In addition to thermal characteristics, it is necessary to take into account the direction in which the door will open. The closer can move it left, right or in both directions. It is recommended to choose universal designs most often, especially since they can be reconfigured if the opening path of the canvas suddenly changes. Differences may also be due to the type of assembly of the device. Completely sealed devices are relatively inexpensive - but if oil leaks from them or another defect occurs, there is no point in thinking about repairs.

It is recommended to always find out what the resource of a particular block is. Reputable manufacturers supply door closers that can withstand millions of door closures. But, of course, such technical perfection is fully paid for by the consumer. Another point, which is partly related to the previous one, is warranty obligations. There is no point in buying door closers from those companies that provide a warranty of less than 12 months.

Other parameters are closely related to the type of door installed. So, if it is interior and made entirely of PVC, closers designed for force EN1 are sufficient. Fully glazed structures are already equipped with EN2 products. And if you choose a canvas made of solid wood, you need a 4th or 5th class. Please note: it is not recommended to install excessively powerful devices - this will lead to accelerated wear of the hinges and will significantly complicate life.

To aluminum arched door Mostly they install floor closers. In this case, the response circuits are mounted in the threshold. Closers for sliding wardrobe doors are usually special upper rollers. They replace standard roller units. Note: there is no need to change the lower rollers.
Stages of installing the structure on the door
We are developing a scheme
Most often there is a need to install door closers on external doors. Usually the circuit is thought out in such a way that the body ends up in the room. But for models with increased resistance to cold, this is not important. In the diagram it should be noted what diameter of fasteners is required. This will allow you to more accurately select the closer itself and the drills for its installation. If necessary, you should consult with professionals. When the door opens towards the closer, the body is placed on the canvas. But the lever complex is located on the frame. A different approach is required if the door is to be opened outward from the supply unit. Then the blocks are swapped. The sliding channel will have to be installed on the door body, and the main part of the device will have to be installed on the jamb.

Choosing installation options
When installing an overhead door closer, perform the following steps:
- determination of installation position;
- choice of external (option - internal) location;
- determining the directions in which the device should open the door;
- applying wiring diagram, accompanying each officially supplied product, to the canvas and jamb.

The last step is to mark where the holes will be made. You can make neat notes even through a sheet of paper. The required holes for fastening are drilled with a drill. The template always contains a full set of installation methods. It shows whether the door closer will be installed on the right or left door, and whether it will swing inward or outward.
Additionally, using the template, they will find out on which categories of doors a closer can be installed. They also show in what cases you can change the attachment points. Highlighting each option with a color or dotted line will help avoid confusion. Important: if the door is made of aluminum or thin steel, you will have to install special fasteners - the so-called bonks. They help avoid damage to the material where they are attached.

When the marks using the diagram and template are completed, the body of the closer and the lever or bar are secured to the canvas (box) with self-tapping screws. The second segment of the lever is fixed on the body. After this, you can already connect the lever, forming a kind of “knee”. But such a solution does not always allow you to complete the task. Alternative approaches are needed when working with a gate or a door of an unusual type.

In this situation, circuits with parallel installation on a plate or with mounting angles are sometimes chosen. The role of the corners is to help if it is not possible to fix the lever on the surface of the box. In some cases, closer housings are placed on a corner element located above the upper slope. In this case, the levers are pressed against the canvas. In another option, a plate is placed on the door, extending it beyond the top edge.

Then the body is fixed onto this plate. The lever in this version is usually placed on the door frame. To maximize the slope area, the body is attached to the canvas in the usual way. Next, the lever is attached to the mounting plate. There is another way: in this case, the plate is placed on the box, the body is mounted, and the lever element is fixed to the canvas.

How to install: step by step guide
But simply choosing one or another approach to installing a door closer is not enough. A strict sequence of work is required. To do everything correctly with your own hands, the template is attached to the canvas using thin tape. Then they take a center punch and mark the midpoints of the holes. Now you can install the housing using standard fasteners. The accuracy of installation is determined by looking at the location of the adjusting screws. Next comes the turn to attach the lever system. Standard rules stipulate that it must be fixed on the side opposite the door. In some cases, the connecting system is supplied already assembled. Then, while working, the hinge is pulled out - only then you need to put it in its proper place.


Now you need to secure the segment that cannot be adjusted - the knee. To hang it in the air in a precisely designated place, use the axis of the closer. Fixation is done with a nut tightened with a wrench. Important: when the door closer is installed to eliminate noise, according to the instructions, the elbow is secured in only one way - at an angle of 90 degrees to the door. In this case, the lever is positioned at the same angle to the door leaf, and the parts need to be connected only after the door is completely closed.

They act differently when the first priority is increased pressure on the web. In this case, the leaf itself is equipped with a seal or latch, and a rigid lever is mounted at an angle of 90 degrees to the door. The knee is made adjustable, but be sure to ensure that its length allows the mechanism to operate normally. This approach will help increase the speed of the final slam. The installation is completed by connecting the two segments with a hinge.
Many of us remember the simple devices that were previously used to ensure independent and tight closure of entrances, gates, entrances, etc. For this purpose, ordinary springs, counterweights with cables and pulley systems were used, and often craftsmen Even rubber bands or pieces of old tires were adapted for such purposes. Today, such problems are solved much easier and more efficiently, since there is always the opportunity to buy a door closer - the range of them on sale is very wide.
Purchasing such a mechanism is only half the battle, since you still need to install it correctly. You can, of course, turn to the services of craftsmen, however, if you carefully figure out how to install a door closer, it turns out that such work can be done independently.
General information about the design of door closers
A closer is a mechanical device that accumulates potential energy when opening the door, which is then spent on closing it tightly. The “battery” is most often a powerful spring.
The transfer of force to the spring and back to the door leaf can be carried out according to one of two schemes:
1. Closers with an internal hydraulic circuit and rack and pinion force transmission.

- When the door is opened, the gear mounted on the lever axis rotates and transmits translational motion through the rack to the piston ( upper part drawing), and he, in turn, compresses the spring.
- When the opening external force is removed, the spring tends to return to its original position (bottom in the figure). It pushes the piston, causing rotation of the gear, which transmits force to the lever system of the closer.

Smooth operation is ensured by a system of cavities and channels through which oil flows, which fills the entire body of the closer. By changing the internal clearance of the channels, you can precisely adjust the smooth operation of the entire mechanism.
Such a scheme is the most widespread, especially on closers with lever transmission.
Video: device and installation diagrams of a closer with a rack and pinion mechanism
2. Closers with cam mechanism

On the axis of the lever there is a cam of a complex eccentric shape (“heart-shaped”), supported on both sides by rollers. When the door is opened, the protruding part of the cam compresses the spring, which, on its return stroke, causes the cam to rotate in the opposite side, which leads to a smooth closing of the door. The torque is adjusted by changing the geometry of the eccentric profile.
This scheme is more often used in closers with a channel arrangement of traction or in hidden placement mechanisms.
The next parameter for the classification of closers is their installation location. The vast majority of devices are designed for surface-mounted installation at the top. However, sometimes, due to reasons of unesthetics or the impossibility of installing the mechanism from above (for example, glass doors, or in cases where the closer’s appearance will disrupt the intended design of the room), other schemes can be used - hidden installation in the floor, in the frame or in the door leaf .
In turn, overhead door closers are divided into two types:

- Mechanisms with a hinged (lever) rod consisting of two knees. Advantages - simplicity and reliability of design, good power transmission, large built-in potential possible adjustments and additional functions. Disadvantage - the protruding lever system may not be to everyone’s taste for aesthetic reasons. In addition, it is more susceptible to vandalism.
 Closer with a guide channel - slider system
 - Slider system closers – with a sliding channel. The free end of the lever is equipped with a roller and moves in a closed box-shaped channel. Advantages - aesthetics, less susceptibility to vandalism, the possibility of placing a door opening limiter in the channel. The absence of protruding parts makes it possible to install such closers on doors closely located to the walls. Disadvantages - more significant effort is required to open the doors (spring compression), limited adjustments and additional functionality.
What to consider when choosing a door closer
If you want to equip the door in your apartment or house with a closer, before purchasing this mechanism you need to decide on its “size”. Under this concept lies the classification according to the European standard EN 1154. Thus, seven gradations of closers have been established according to the magnitude of the closing force, which are selected based on the size and weight of the door leaf:
 Standard gradation of door closer “sizes”
 - When selecting the right model, you need to focus on the maximum performance of your doors. For example, if the width of the canvas is 900 mm, but at the same time weighs 70 kg, then you will need to purchase a door closer with size EN -4.
- For maximum convenience consumers, the developers of such mechanisms often provide for a certain range of their capabilities. For example, the technical documentation may set the limits “EN -2 ÷ EN -4”. The specific amount of force in this case will be determined only by the installation features of the closer.
- In those rare situations when the effort of one closer may not be enough, they resort to installing them in pairs.
- It is worth purchasing the model that best suits the existing doors. Understating the characteristics will lead to rapid failure of the closer. Too large a size means unnecessary difficulties with normal door opening.
- If you plan to install the door closer outdoors or in an unheated room, you must check whether this option is available on a specific model. The problem is a significant change in the viscosity of the oil in the hydraulic system due to thermal changes. Typically, the product data sheet indicates the permissible operating temperature range.
- You can immediately evaluate functionality the selected model. Basic adjustments of most door closers include changing the spring force, speed and force of closing the door in the sector from 180 to 15º and in the final section (finishing) - from 15 to 0º. In addition, other parameters may be provided:
— A special adjustable hydraulic damper will help prevent sudden opening of doors due to excessive force or in a draft or gusty wind. He will protect the doors from breakage, from impact along adjacent walls, will prevent accidental injury.
— Often the operating conditions of the premises require leaving the door open for a long time. To do this, you will need a closer with a locking mechanism in the open position.
— There are situations when after each opening of the doors and before they begin to close, a certain pause is required, about half a minute (for example, warehouses, storage rooms, utility rooms). This feature can also be implemented in door closers with a closing delay function.
— If the doors have an elastic seal, or they are equipped with latches, the function of precise control of the speed and closing force will be useful.
— If the doors are double-leaf, then an additional mechanism may be needed to coordinate the uniform closing of both leaves.
— For “cold” doors, it is better to purchase a closer with a “thermal damper” system, which, in response to changes in external temperature, expands or contracts, compensating for changes in the viscosity of the oil in the hydraulic system.
Approximate procedure for installing a door closer
Since the most common door closers in apartments are those with a hydraulic rack and pinion system and a lever mechanism, the installation process will be discussed using their example. By and large. Installing door closers with a slider system is not particularly different, and in some cases it is even a simpler task.
- First of all, you should decide on the installation diagram, which depends on the direction of opening the doors:

— If the door opens in the direction of placing the closer, then its body will be attached to the door leaf, and the lever system will be attached to the door frame.
— When opening the door outward, away from you, the scheme changes to the opposite - the body is on the jamb, and the lever system bracket or sliding channel is on the door.
In both cases, the adjustment screws on the closer body must face the hinges.
- The kit of almost any modern door closer necessarily includes a template made in full size, which extremely simplifies the process of accurately marking the mounting locations for both the body and the lever bracket.

Typically, templates are available for all intended installation methods - on left and right doors, opening outwards or inwards.
In addition, if the closer has the ability to work in several standard classes according to EN, then this will also be indicated on the template. There are different lines for its application to the corner of the door (as in the example presented), or the centers for drilling mounting holes for each level (size) are indicated in different colors.
So, if the master has decided on the required size and location of the parts, you can proceed to installation.

- The template is attached with maximum precision using strips of adhesive tape to the door leaf along the indicated lines. The centers of the holes to be drilled are marked with a center punch.

- Using an electric drill, holes are drilled to the diameter required by the installation instructions.

- The door closer body is secured with the supplied fasteners (screws). In this case, you should once again check the correct orientation of the adjusting screws.

- The next step is to install the bracket (foot) with the adjustable knee of the lever system.
If the parts of the lever mechanism included in the delivery set are connected to each other, then this hinge must be temporarily disassembled - its final assembly will be carried out when adjusting the closer.

One more nuance. The bracket may be asymmetrical, so you should check its location with the required door closing force. In the case under consideration (in the figure) two positions are shown - for EN -2 and for EN -3 and 4.


— In the case where the priority is to close the door smoothly without knocking, and the door itself is not equipped with a latch or seal, the adjustable lever arm is placed perpendicular to the surface of the door, and the rigid lever is placed at an angle to it. The connection is made with the door completely closed. The length of the adjustable lever can be easily changed by tightening or unscrewing the screw part of it a few turns.
 Door slam closing required
 — If an accentuated finishing force is required to close the door (a lock with latch or seal), then the scheme changes slightly. In this case, the rigid lever must be perpendicular to the door leaf, and the length of the adjustable elbow is adjusted to this location. Thus, the closer spring initially becomes slightly loaded, which will increase the force when the door is completely closed.
- After adjusting this “triangle”, the joint between both knees is assembled.
In fact, this is where the standard procedure for installing the closer ends and you can proceed to adjustment. However, as practice shows, the door design can present certain “surprises”, which will require the use of special mounting strips (plates) or corners:

- A doorway that is too deep makes it impossible to place the lever bracket directly on the door frame. In this case, it is installed on the mounting bracket.
 The opposite situation - the closer body is installed on the mounting angle
 - “Mirror” situation, when installation on the mounting angle requires the closer body itself .

- The design of the door leaf does not make it possible to install the closer body on its surface (for example, high-positioned glass). In this case, the mounting plate is first attached, and then the housing itself is attached to it.

- The door leaf protrudes slightly beyond the frame, or the space above it does not allow attaching a bracket to it. To align the housing and the mounting of the levers at the same level, to create conditions for reliable fastening, you will need to install a mounting plate.

- The complex shaped shape of the door casing does not provide a level platform for mounting the closer body. The solution is to pre-install the mounting plate.
Mounting angles or plates, as a rule, are not included in the delivery package of the closer, but are usually available for sale in sufficient quantities. wide range for most models.
Find out interesting things interior solution, from our new article -
Adjusting the installed door closer
After installing the closer, you need to carry out necessary adjustments so that his work is most comfortable for the owners.
The door closing speed is adjustable in two ranges. Location and marking of set screws different models may vary significantly - this should be clarified in the instructions supplied with the product. The principle of adjustment is approximately the same.

- First, by rotating the corresponding screw, adjust the door until it is closed. Strength and speed installed“latches” directly depend on the weight and design of the door, its equipment with a lock with a latch (for example, on entrances with combination locks, the latch can be quite tight), and the sealing circuit installed around the perimeter of the opening. In any case, the speed of the door in the finishing sector should not differ too much from the movement in the initial sector.

- Then set the most acceptable speed from the fully open position to an angle of approximately 15º (before the start of finishing). The door should move smoothly, without jerking or stopping.

- The adjusting screws rotate very smoothly, in a small sector - this is quite enough. Excessive tightening or unscrewing of the screws can lead to either breakdown of the mechanism or depressurization of the housing with oil leaking out of it.
- If there is a need to increase the closing force, you can use a special screw to increase the preload of the working spring of the closer.

As already mentioned, some models also have a door closer additional features. The installation and operating instructions for a particular product will indicate adjustment rules that must be strictly followed.
Prices for popular types of door closers
Closers
Video: example of adjusting a door closer
- In no case should the door closer be considered as a limiter for the maximum opening of the door - the lever mechanism will not last long with this approach. For these purposes, it is better to use shock-absorbing door stops mounted on the floor or wall. The exception is some models with a slider lever arrangement - sometimes you can install a limit opening limiter in the guide chute.
- It is prohibited to block a door with a closer in the open position by placing heavy objects in the path of the door leaf or by tying it to the handle. If there is a need to keep the entrance open for a long period of time, it is necessary to disconnect the lever system during this time.
- You should not try to forcefully increase the speed of closing the door manually - this will cause rapid wear of the mechanism.
- It is forbidden to hang on doors, allow children to ride on them, or hang significant loads on the handles.
- The door closer will function correctly if the door structure itself is free of defects. Even before installation, you should check for looseness or sagging in the hinges, distortions of the fabric, correct fit of locks and latches, and constantly monitor this during operation.
- If the closer has to be installed outdoors, it should be protected from precipitation and direct sun rays. Mechanisms installed in such “cold” conditions will require seasonal adjustments twice a year.
- It is necessary to regularly (at least once a year) lubricate the hinge units of the lever mechanism with grease.
Find out installation instructions from our new article.
If the owners comply with the operating rules, the door closer must conscientiously work out the period guaranteed by the manufacturer.
A closer is a device that helps to smoothly close a door by adjusting the force so that it does not slam. It replaced gatekeepers and porters. Designers have developed many various models, suitable for work in the most different conditions. The homeowner can install the door closer themselves using simple tools.
The principle of operation is very simple: the device stores energy when the door is opened, overcoming the resistance of the spring, and returns it during closing.
The spring that pushes the lever is the main part of the mechanism. Based on the path of force transmission, the following types are distinguished:
- With lever pull. A system of levers perpendicular to the canvas is visible above the body of these models. The advantages of the design are its simplicity, fault tolerance and accessibility. There is also a drawback: the wider the sash opens, the harder you have to pull. This creates inconvenience for users in poor physical condition.
- With sliding channel. A lever parallel to the sash is used; this design looks better and there is no risk of breakage. In addition, after reaching an opening angle of 30 o, the force on the handle decreases noticeably. This mechanism is convenient for children and the elderly.
An oblong body covering the mechanism is usually attached to the top of the blade. The other end of the lever pair is mounted on the frame. Any device can be mounted on both the right and left sides of the door.
For glass doors, the third layout option is used. The body with the mechanical part is recessed into the floor - only the mounting plate is visible. This solution is unnoticeable, but sensitive to dirt and damage.
Where is it wise to install a door closer and where is it not worth it?
Most often, devices are installed on those doors for which it is important to be constantly closed: street and entrance doors.
When installing, they try to place the housing not outside, but inside the house or apartment. Frost-resistant models exist, but they are much more expensive and require more frequent maintenance and still have temperature restrictions. It is not recommended to install door closers on light ones interior fabrics, especially with glazing or stained glass. Frequent activation of a spring that is too strong can lead to loosening, rattling and even glass falling out.
The door to the sauna also requires external installation of a door closer or a recessed structure. A conventional device will quickly fail due to changes in temperature and humidity.
How to properly install a door closer
The installation process consists of the following steps:
- template marking;
- drilling holes;
- installation of the housing and thrust plate;
- connecting the lever to the rod;
- adjustment.
The template is included with most modern models. If it is not there, then you can simply attach a sheet of thick paper to the body and use a pen or awl to mark the mounting holes and the location of the axle on it.
Pattern overlay
There are two perpendicular marks on the template sheet. The horizontal one must be aligned with the top of the fabric, the vertical one with the center line of the loops. It needs to be marked on the frame.
The following options are possible here:
- The closer is installed from the hinge side. The axial line is drawn with a pencil and a fairly long ruler.
- The device is attached from the reverse side. You will need to measure the distance from the corner of the door to the center of the hinge. Next, it is laid off from the reverse side of the canvas, and a line is drawn along the marks.
The quality of installation and the smooth functioning of the device directly depend on the accuracy and precision of the markings.
Drilling holes
The marked holes are transferred from the template to wooden doors with an awl, and on steel or aluminum - with a center punch. Using a drill of the diameter specified in the instructions, make holes according to the markings. Before starting installation, you need to disconnect the levers. On some models they can be removed with a click, on others you will need to unscrew the bolt.
Do not try to install while standing on random supports - chairs, tables, boxes, etc. This will lead to falls and injury. Work from inventory ladders.
Door closer installation
You need to attach the body to the drilled holes, select fasteners that match the material of the canvas and the box - screws for wood or iron. For thin and light doors, it is recommended to mount the device and lever on through screws and nuts with mounting plates.
Connect the lever to the rod and adjust
Attaching the rod to the lever takes a second: just align both parts and press until it clicks. Before doing this, you need to adjust the clamping force. This is done by lengthening or shortening one of the levers. By rotating the threaded rod, set its required size. The longer the arm, the closer it is to the perpendicular, the less the clamping force. Then the fine-tuning goes smoothly and smoothly.
If there is a latch that fixes the sash in the closed state, the pressing force should be enough for it to work. For a door from the street, it is important that the spring can overcome the wind load.
Nuances of non-standard installation
During installation, sometimes situations arise that prevent you from fixing the door closer in the usual way. In these cases, mounting plates and angles are used to move the mounting location of the housing or lever to where possible.
Such situations include the following:
- too light or, conversely, heavy sashes;
- deep doorway;
- patterned carving on the canvas;
- the box is deeply recessed into the finish.
Plates and angles are selected based on specific situation. A consultant will help you make your choice.
How to install on a gate
For outdoor work, you should choose frost-resistant models. Some gates, especially forged ones, do not have a top crossbar. In such a situation, the lever is fixed to the side post, orienting the mounting plate along it accordingly.
Even winter models have their own restrictions on minimum air temperature. If there are installations in the region severe frosts, a pneumatic system is suitable - it will cost more, but it will not freeze.
How to install a door closer on a metal leaf
Installation is carried out in the same sequence as for wooden plastic doors or double glazing. You just need to make sure you have drills for metal, appropriate fasteners, and use a center punch instead of an awl for marking. The weight of metal doors is significantly higher, therefore automatic door closer you need to select with a lot of force on the lever.
If the canvas is made of thin metal sheets, it is better to immediately choose the option with a mounting plate and through bolts. Metal screws that go one or two turns quickly become loose.
Features of installing hidden closers
Devices hidden installation belong to one of the following types:
- Floor-standing. Usually used for glass doors, less often - for wooden, PVC and metal doors, when design requirements exclude wall-mounted installation. The mechanism is recessed into the floor - only the mounting plate is visible. Such devices are susceptible to contamination and damage and are not suitable for street installation. Adjusting them is quite complicated and requires special tools.
- Upper. They require special care when marking and installing. They can work on street doors because they suffer less from dirt and damage.
- Built into hinges. Applicable for double-sided doors, such as arched or saloon. They are used where there are large reverse flows of people: metro, shopping centers etc.
- Hidden in door leaf. The grooves into which the mechanism is mounted are selected for them. Adjustment requires special tools.
Hidden automatic door closers are limited in size, so their spring strength is insufficient for heavy metal sheets. In this case, you will have to return to the classic design of the device.
Installing the door closer of most hidden models can be done by hand, but a higher level of plumbing and general construction skills will be required.
Proper use and timely maintenance can significantly extend the service life of important and useful equipment. home comfort devices. The designers designed it to be strong and durable, designed to withstand tens of thousands of opening cycles. The main thing is not to interfere with the mechanism in fulfilling its duties as a gatekeeper.
Operating rules are given in the user manual. You need to study them carefully and do not forget the main points:
- You should not speed up the movement of the blade by holding or leaning on it.
- It is unacceptable to place stones, boards or other objects under the door to block the structure while carrying things or ventilating the premises. To do this, you need to disconnect the levers. Some models have an open locking mode.
- Can't be hung on door handles bags and other heavy objects and allow children to ride on them.
Failure to comply with these simple and reasonable requirements will lead to increased wear and premature failure of the closer. Most models cannot be repaired and will have to be replaced.
You can install the door closer yourself, following a simple sequence of operations. This requires precision and accuracy. Following simple operating rules will extend the life of the closer.


, Islam, Judaism How do temples of different religions differ")


