Adjusting windows for winter is very important aspect. But often people don’t know about this or simply forget. If you do not maintain windows, even the most expensive ones can break or lose their properties. Windows must be handled with care, otherwise consequences such as drafts, cold and noise coming from the street may occur.

This manipulation should be carried out before the onset of frost, while the air temperature outside is above zero.
Why is it necessary?
Probably many people know that plastic windows have two modes: summer and winter. Each of these modes plays its own important role. When purchasing and installing windows, you should be instructed on how to properly set up and use plastic windows. Thanks to this, you can avoid many problems. However, most often no one knows how to configure it correctly, so they use the services of specialists. But to customize the windows, you won’t need much effort, because there is nothing complicated about it.


The initial adjustment is made immediately after installing the window. Of course, this makes life easier, but it will not help you in the future when the seasons change.
Many craftsmen say that adjustment is very important for windows; this is the main test of how the windows will behave in cold weather. By adjusting the windows, the temperature in your room will remain within normal limits, you will be able to avoid drafts and significantly improve the tightness of the windows. If adjustments are neglected or performed incorrectly, this may cause excessive moisture, and severe frosts Frost may form on the windows. If your window is not the first year old, then the tightness of the window is already much lower than at the beginning of its operation; there are quite a few reasons for this problem.


To avoid unexpected damage, windows should be adjusted before each change of season. If you don't change the modes from summer to winter, you will allow cold air to penetrate into your home. As a result, the air temperature in the house decreases significantly and more energy is spent to maintain heat. The first window adjustment should be made when the window is initially installed. Also try to carry out technical inspections at least once every 2 years. Often during inspections, specialists find any deviations in the design. The wizard will help you figure out this problem.


When adjusting structures, do not forget that weak pressure corresponds to the summer season, and strong pressure corresponds to the winter season.
Adjust yourself PVC double glazing with your own hands on winter period It's not difficult at all. Our instructions will help you.

Tools
To adjust the windows you may need special tools. Try to stock up on tools such as pliers, hex keys, Phillips and flat-head screwdrivers, and it's a good idea to have a set of screwdriver bits on hand.
To lubricate the structure, you can use regular machine oil or a special spray.


Identifying areas that need adjustment
In order to determine the places that need to be adjusted, you first need to find out whether the sash pressure needs to be adjusted. To do this, you need to set the position of the trunnions, which are located near the handle, on the edge of the window. Determine the pressure using dots or small stripes that are located on round section trunnions If the stripes point to the top position, this means that at the moment The window clamp is in the middle or normal position. Usually this is the position that the specialist set for you when installing the window.


If you see that the stripes look inside the room, then this indicates that the design is currently set to winter season. And if the stripes look at the opposite side, then, accordingly, for the summer season. In addition to the above, it would be useful to determine the frame for sagging. Windows that were installed a long time ago are more likely to sag.
The sagging of the frame (sash) can be determined even by sound. When the sash sags, it rubs against the bottom of the frame, of course, this is accompanied by a specific sound.

Common Problems
The most common problems with plastic windows are:
- condensate;
- mold;
- depressurization;
- breakdown of fittings;
- freezing in winter time years and other problems.
Condensation and mold– very unpleasant aspects plastic structures. In principle, the very presence of condensation is the norm, but there should be very little of it, and it is allowed only at the edges. If the window sweats completely, it is most likely due to high humidity indoors or due to a large temperature difference (outdoors and indoors).
The most economical and, of course, simplest solution is simple ventilation several times a day for 10-15 minutes.
But you can also install a special shutter on the window, which allows micro-ventilation. However, this service costs little money. Can be done indoors ventilation system. However, this is not cheap, and it will take a lot of effort.


Mold- This is a consequence of condensation. The cause of mold can be improperly made slopes. They can be plastered or made of plasterboard. The problem with plastered slopes is that they quickly freeze, which leads to the development of fungus. Slopes finished with plasterboard are not such a bad option, especially if they are insulated mineral wool. In this case they have excellent thermal insulation properties. But it is worth considering that such slopes can be made in rooms with low humidity.


Ideal option- This plastic slopes. They are easy to clean, do not need to be painted, and when insulated with mineral wool they retain heat well.
If the rubber band (seal) deteriorates, this may cause poor sealing. The easiest way is to replace the rubber band. However, remember that the elastic band will last you longer if proper care. The seal should be lubricated with silicone grease twice a year. Dust and dirt can accumulate there over time, causing the elastic to lose elasticity and crack. To avoid this, simply clean the rubber from dust and dirt before lubricating it. Do this at least twice a year.

Another common problem is hardware failure. This can be caused by dirt, dust and improper care. The first sign may be a clicking sound when turning the handle. Within a year the mechanism will most likely be broken. To extend the life of your window, lubricate and clean it at least 2 times a year.


Peculiarities
Before working with a window in the winter, you first need to set the value to neutral (standard) and check for the fact that the window is blowing. It is not recommended to press the rubber band immediately after installing the window, as they can shrink and become deformed in a new state.
If you have a high-quality seal, then most often they give a guarantee, but this is subject to proper care. If you immediately set the pressure to strong, then it will quickly become unusable, and as a result, when the next winter comes, you will find that it is blowing from the windows even when switching the modes from summer to winter, and the rubber has dried out and is all cracked. In this case, the seal should be replaced.

There are cases that even after adjusting the windows to correct mode, in winter it still drafts from the window, and even replacing it with new insulation did not help. This usually happens if the house “sits”, then the window also sags. When you turn the window handle, the trunnion should go behind the plate and press firmly against the window. If this does not happen, then the window settings should be different.
How to install?
- Before starting work, you need to find out which of the journals do not reach the plate. To do this, inspect the window sash and remember all the protrusions. After this you need to close the window.
- Next grab the frame where the trunnions are installed, and pull it towards you. If the pin goes behind the protrusions, then the window will not move; if it doesn’t go, then, accordingly, the window can be moved. Thus, check all the places where there are trunnions and determine which places do not press tightly. Determine in which direction you need to move the sash. This can be done by adjusting the top and bottom loop.
- If the window does not close well at the bottom, then you need to adjust the lower hinge. At the very bottom of the hinge there is an adjustment hole, it can be for a hex key or for an asterisk. To adjust, turn the key clockwise or counterclockwise. Accordingly, as it moves, the window moves closer to the hinge, and against it, it moves away. If you unscrew everything all the way, but there are no changes, return everything to its original position, most likely the matter is different.


- There is another adjustment screw at the bottom of the hinge, but to get to it, you need to put the window on ventilation and remove the protective cap. There will be no problems with removal; it is done very easily. After this, you will see a recess, insert the hexagon there and twist it clockwise or counterclockwise. When turned clockwise, the sash rises, and when turned counterclockwise, it lowers.
- If this problem occurs at the top of the window, open it 90 degrees. There is also a hinge at the top of the window, but it is not the same in design as the bottom. But there is also a hole for a hex screwdriver. Next, make adjustments by turning the key in the desired direction. However, do not forget that you need to leave a distance of just a few centimeters between the sash and the hinge. This is necessary so that the tilt and turn mechanism has the opportunity to go there. Every time you turn the key, check how your window closes and opens.
Typically, adjusting the pressure means changing the mode for different seasons. In winter the pressure needs to be strengthened, and in summer it needs to be loosened.


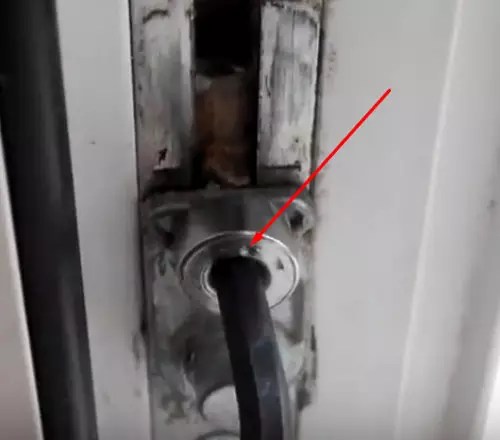
First, make sure that you really need the adjustment. The easiest way is to hold about closed window have a match or lighter near the door. The flame will show whether the window needs adjustment, whether it is blowing out of it or not. Open the window and look closely at inner part doors There you will see three pins, they are the ones that regulate the window pressure. Using a hex screwdriver you can adjust the window.
And the translation of plastic windows into winter mode will reduce heat loss from the house. You can perform this operation yourself. Switching windows to winter mode does not require large quantity tools and special skills. Our article describes in detail the sequence of actions that are understandable even for people without technical skills.
What is winter mode in windows?
Modern plastic windows have several functions that allow you to control and regulate the microclimate in a living space. Manufacturers and sellers do not always inform buyers about availability given opportunities plastic windows. An independent study of their characteristics and a careful inspection of the frames will reveal the presence of an eccentric, which is a fit regulator window sashes to the frame.
Most apartments are equipped with plastic windows. Indeed, they are easy to use, durable, and have various sizes and can be of varying degrees of insulation. However for the right choice Such a window will require proper measurements. will help you correctly take the appropriate measurements yourself.
Plastic window modes
There are three modes, differing in the position of the valves and characterized by maintaining different temperatures:
- summer - this mode is recommended to be installed on frames in the spring and before the onset of autumn. The loose fit of the sashes to the frame allows for sufficient air flow into the rooms;
- winter, which is installed with the onset of cold weather. The tight fit to the frame makes it possible to make minimal losses heat from the room;
- The standard position is characterized by the middle position of the eccentric, which regulates the degree of fit of the sashes to the frame. It can be left for the whole year due to the most optimal air flow into the room.
Due to deformation of parts of the product under the influence of temperature and humidity, correcting the fit will reduce the degree of wear on window parts.
When to set winter mode
The onset of cold weather can be considered the reason for changing the regime in a plastic window.
However, the following situations should also be considered reasons why it is recommended to switch windows to winter mode:
- blows from the window. In summer, such blowing entails excessive dust entering the apartment, and in winter it leads to a decrease in the overall temperature in the apartment;
- sash sagging. This defect can be eliminated by replacing the fittings or tightening the hinges. A tighter connection of the sash to the window frame, that is, winter mode, will also help;
- poor closing or opening of the window. This may result from an incorrectly set window mode.
The listed reasons should be considered a sufficient reason to switch the window to winter mode. The process of setting this mode is described in the next chapter. Correctly performing the above steps will allow you to save for a long time normal functioning windows will provide warmth and comfort in the house.
Switching windows to winter mode
Often, owners of plastic windows call an employee of the company from which these windows were purchased to transfer them to a certain mode. However, if done correctly necessary actions, then you can independently set the required window mode.
Sequence of actions
Before translation, the location of the trunnions should be determined. The number of eccentrics depends on the size of the sashes and windows. You should find all of them, because when you switch to a certain mode, you need to adjust each of them.
Usually there are three of them on the side where the handle is located, and one on the opposite side, where the hinges and awnings are.
- Before exposure begins, all fittings should be thoroughly cleaned. This will keep her from mechanical damage, will ensure flawless functioning in the future;
- Apply lubricant and wipe again. This action will allow the translation to be carried out more accurately. Warning probable breakdown the window mechanism guarantees the expected result: blowing, dust entering the room;
- after transfer to desired mode the mechanism can be re-lubricated;
- carefully examine the eccentrics. You should find all the marks that mark the modes. This is usually a stripe and the position of the trunnion relative to the horizon line;
- Now you should directly transfer to the desired mode. A hexagon or pliers can be used for this. The oval-shaped eccentric is more convenient to move using pliers.
After completing the manipulations, you can check the degree of air penetration into the room as follows. Place a thin piece of paper between the sashes of a closed window. If it vibrates or flies out of it, it means the window is in summer mode.
It must be remembered that some manufacturers of plastic windows have eccentrics recessed into the sash. Before carrying out manipulations to switch the mode, you should first pull it out.
After completing the transfer to the desired mode, set it to the original mode. It is most convenient to perform this action with pliers.
Winter mode is usually marked with a flat line, which is turned inward. If the trunnion is oval-shaped, then the dash or dot should be located horizontally. This general requirement to all types of plastic windows that have the function of switching to different modes.
With the onset of cold weather, the issue of home insulation becomes more relevant than ever. Windows are the first thing that needs to be insulated, and for this, as it turns out, there is no need to reinvent the wheel.
Did you know that there is such a thing as summer and winter mode of plastic windows? If not, then the editor “So Simple!” will tell you this small but very important secret!
How to switch plastic windows to winter mode
This little secret It also helps you save a lot of money in the winter. This is especially true in houses where there is no central heating, or at a time when it’s already cold outside, but the houses haven’t been given heat yet. Yes and saving money there won't be any redundancy. And this secret is that the seasonal regime in plastic windows can be changed.

© DepositPhotos
Seasonal window mode is an extremely useful thing, because in the summer this option allows you to relieve pressure between outer part frames and rubber gasket, which allows air to circulate more freely. But in winter mode it works exactly the opposite - the pressure increases, the heat is retained inside.

© DepositPhotos
This is all good, but first you need to find out if your windows have the ability to change the seasonal mode. To do this, you need to look at the so-called eccentrics, in other words, the bolts on the side of the sash. If they have a hole for a hex key or they are oval-shaped, then these windows can be seasonally adjusted.


Overall the trick is extremely simple. You just need to turn the bolt to the right or left 90 degrees, depending on what mode you want to switch the windows to. Do all this carefully and carefully. First, find all the bolts on the sash; their number may vary depending on the size of the window or who the manufacturer is. You need to translate every eccentric, because otherwise you won’t get the result.

For change windowed mode you'll need suitable tool- screwdriver or hex key. Pliers can also work, but we do not recommend using them, as this can damage the fragile adjustment mechanism. It’s important to understand one thing here: you don’t need to turn the bolt all the way, it simply doesn’t have it. The bolt will scroll constantly, and you need to turn it exactly 90 degrees, guided by the mark.

© DepositPhotos
If you did everything right, window handle should move more tightly, because the fittings now press the sash harder. If this does not happen, something went wrong, check that you have found and turned all the bolts.
To check how hard the window is pressed, you will need a piece of paper. Press it with the flap and try to remove it. If the leaf comes out difficult, the window is switched to winter mode. Well done!
This video contains visual instructions How to switch windows to winter mode.
Plastic windows are a very convenient and practical thing, but they also require maintenance and adjustment. Now you know how to change the seasonal window mode, but that's not all. At least once a year you need to lubricate all moving parts of the window frame with a small amount of oil. And also check how tightly the bolts are tightened. This check will take you a couple of hours, but the windows will always be like new.
And don’t forget to share our
Plastic windows protect from street noise and provide comfortable temperature air of an apartment, private house. However, once installed, they require periodic maintenance. Adjustment of the locking mechanisms is necessary every off-season - only then will the double-glazed windows perform their intended task. Today’s article will tell you how to switch windows to winter mode, why this is needed, and when such actions are performed. Along the way, it is worth understanding the features of locking mechanisms, the design, and some of the nuances of operation. Photo and video instructions will help us, explaining in detail the algorithm of the actions performed.
 Interseasonal adjustment of window sash locking mechanisms is necessary for its proper operation.
What does “summer” and “winter” mode of plastic windows mean?
Let us immediately make a reservation that if you lack knowledge and experience, our editors recommend turning to professionals in your field. Well, for those who still want to tackle this issue on their own, here is a little information.
Modern plastic windows are adjustable according to the pressing force of the sashes in three modes:
- summer– the window sash is pressed weakly. This ensures air circulation in the room, implementing the ventilation mode. The wear of the rubber seals is minimal;
- winter mode on plastic windows provides a tight clamp. There is no air circulation, which ensures heat retention in the home. The load on the sealing rubber bands is maximum;
- standard– average position of the eccentrics (trunnions). More often than not, installers leave the locking mechanisms in this position. The only difference is that professionals who value their reputation show the owner how to convert double-glazed windows to winter or summer mode, and the careless ones (which, unfortunately, are the majority) do not bother themselves with explanations. The standard mode is intended for off-season use.
 For this purpose, you can call a specialist, but it is better to do all the work yourself. If you want to do it well, do it yourself
 Why switch the modes of plastic windows
It is enough not to switch the “winter-summer” mode on plastic windows for 2-3 years, so that after, even with the correct adjustments, it begins to blow from under the window sill or balcony door. Let's look at the problems that arise with incorrect settings.
The first is a violation of the microclimate of the room. Excessive humidity promotes condensation on frames, double-glazed windows and walls, which leads to mold. “Summer” settings in winter lead to heat loss, and the need for additional heating arises. The result is higher gas or electricity bills.
 It is better not to touch this unit when adjusting if you have no experience in such work
 Important! Using the winter position of plastic windows in warm time years will lead to rapid wear of the seals. The result is the futility of any subsequent adjustments. The solution is to replace the rubber seals, which are not cheap.
Switching modes of plastic windows: advantages and disadvantages
Disadvantages in window adjustment can only occur if done incorrectly home handyman. If everything is done correctly, switching modes will only bring benefits. Let's figure out in what cases it is justified.
 Trunnions (eccentrics) can be varied, but their settings are identical
 Timely switching will extend the life of the windows, even if these actions have not been performed for some time. Drafts in winter or dust ingress in summer due to wear of the seals can be treated by switching the fittings to winter mode. Maybe not for long, but the repairs will be delayed for a year or two. Sagging loops are eliminated in the same way. Replacing fittings is a last resort measure.
Good to know! Incorrectly set modes can cause a window or door to jam separately in the ventilation position or together with opening.
Determining the possibility of changing the seasonal regimes of plastic windows
Not all models of plastic windows have the ability to change modes. To understand whether it is present on your double-glazed windows, you need to look at the shut-off valves. The eccentric located in the middle can be oval or have a hole in the center for an asterisk or hexagon. This indicates the presence of winter mode on plastic windows. The photos below will help the reader understand this issue.


The algorithm for adjusting windows with different trunnions is identical, but their position may differ. Let's try to understand in detail the types of eccentrics.
Shapes of eccentrics and nuances of mode transfer
The oval trunnion after installation is often located diagonally - this is the standard position, average between winter and summer. The horizontal position indicates winter mode, and the vertical position indicates summer mode.
If the eccentric shut-off valves round (hexagon), then its positions are as follows. Pushed towards the street - winter, located in the center - standard, recessed towards the apartment - summer.
The third option is a round hexagon pin that does not move when turning. In this case, there is a mark on it, which indicates the correct position. To make it easier to understand, we offer pictures for viewing on how to switch windows to winter mode.
 Some eccentrics can be turned by hand without the aid of a tool.
 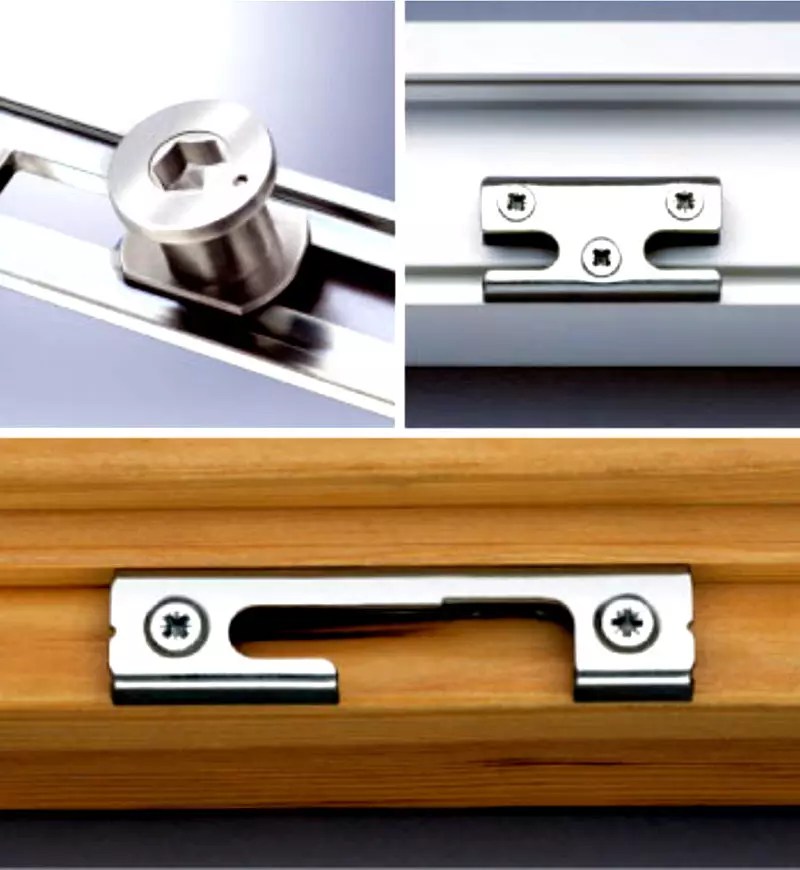 Hex eccentric - pay attention to the mark or marker
  The most common eccentrics - the mode is determined as follows - the thicker side from the center inward is winter, vice versa - summer
  This is the standard position. Installed from the factory and rarely changed by installers
 How to switch windows to winter mode: preparing double-glazed windows
Before putting plastic windows on winter mode, you should preparatory work. The first thing to do is to remove the lubricant from the locking mechanism components with a rag so that dirt and dust do not get inside with it during adjustment. After all the work done, the mechanism is lubricated again.
 Here the sealant is treated with silicone gel, but it is better to use a spray
 Very important! The rubber frame seal should be treated before cold weather. You can do this with a lubricant (silicone or glycerin based), but it is better to use silicone spray, which is sold in all hardware and automotive stores.
How and when are plastic windows switched to winter mode?
Experts recommend switching locking mechanisms from summer to winter only in extreme cases, when drafts become sensitive. However, this is only suitable for warm weather climatic zones Russia. It is optimal to switch at the beginning of the heating season.
A fogged glass unit or a slight appearance of ice on it from the inside may also indicate the need for adjustment.
 Consequences of incorrect adjustment of double-glazed windows
 Useful information! Before switching the windows to winter mode, you should carefully inspect the rubber seal. Perhaps the sash fittings are adjusted correctly, but the seal is cracked or torn. In this case, you must definitely replace it. You can buy cheap seals for one winter, but they don’t last more than a season.
Other adjustment options for plastic window frames
Having figured out how to switch the windows to winter mode using a hexagon, screwdriver or pliers, you can move on to the rest of the adjustment. After all, over time, the frame may move, and one side will fit tighter than the other, which is unacceptable. This creates a load on the window fittings and contributes to the appearance of drafts.
 Various sash adjustments that you can do yourself
 The sash is adjusted vertically and horizontally from the bottom hinge. Remove the plastic protective cover and find a screw with a hexagon hole located on top. When you turn the screw clockwise, the frame will begin to rise. Turning counterclockwise, lower the glass unit. In order to move the sash away from the frame or, conversely, to install it closer, we use a screw located on the side at the bottom of the hinge.
Important! If all adjustments are made correctly, and draft problems have not disappeared, this indicates wear of the seals, a manufacturing defect in the frame, or improper installation of the sashes. We check the rubber seals, and if they are normal, we file a complaint with the installer. That is why it is important to perform adjustments in the first year of operation - the possibility of warranty repairs and sometimes replacement remains.
Transferring plastic windows to winter mode: video and photo instructions
Let's start this section with photo instructions on how to switch windows to winter mode:
| Illustration | Action to be performed |
 |
Having opened the sash, we find eccentrics on the end part. On standard window there are three of them. The photo shows summer position axles (the marker is located closer to the street side). We need to move it in the opposite direction, towards the apartment. |
 |
To work you need a hexagon of suitable size. The most commonly used tool is 4 or 6 mm. But it’s better if you have a set of hexagons on hand different sizes(a thin tool is needed to adjust the sash vertically and horizontally). |
 |
Having selected the necessary key, we begin to turn the trunnion. The photo shows the moment of setting the “standard” position. |
 |
Having turned the eccentric further, we stop in the “winter” position. We perform the same actions with other eccentrics. Afterwards, you can check the tight fit of the sash to the frame. |
But photo instructions are one thing, but a video will be easier to understand. So it’s worth watching a short, but very educational video how to switch windows to winter mode:
We hope that after watching the video, the question of how to switch Euro-windows to winter mode has ceased to be relevant.
Let's sum it up
Regardless of the design of the plastic window frame, adjustment is easy. The main thing is to follow some of the rules that were discussed today. If the double-glazed windows were installed recently and are located warranty service, it is best to call the craftsmen from the company that installed them. This service is provided free of charge. However, you should not hope that the settings will be 100% perfect. Be prepared to do some fine-tuning yourself. But they will make the basic adjustments, which will save the home handyman from unnecessary work.
Subsequently, by adjusting even one sash, you can perform such work completely independently.
 If rubber seals cracked or torn, they should be replaced
 We hope that the reader found the information in the article for which he came to our resource. If you are interested in other topics on construction or renovation, we suggest you look through other articles on our resource. We promise that the reader will find a lot of interesting and useful information. If you have any questions, we will be happy to answer them in the comments below.
And finally one more thing short video on today's topic:
Since PVC windows appeared in most houses, the life of their inhabitants has become more comfortable, and winters are much easier to endure. Plastic windows have great strength, are reliable and last a long time, but they sometimes require maintenance and repair. To prevent windows from letting you down in the cold season, to conserve heat and protect the house from drafts, you should carry out a series of preparatory activities. Only they can ensure the correct functioning of your window in winter. Photo and video illustrations are presented below.
Cleansing of accumulated dirt, routine care before the season change

- The first thing you need to do when preparing your windows for winter is to wash them well. Double-glazed windows, profiles, window sills, slopes, if they are finished with plastic - nothing should be left unattended. To remove dirt, use non-caustic detergents, soft sponges, and rags. It is necessary to wash not only the inside, but also the outside. After opening the window, you should also clean the drainage channels; a sharp object, such as a toothpick, will do for this. If the window is well cleaned, then in the autumn-winter period the water will not linger in the drains, but will flow freely. The window sashes will be able to move freely without encountering any obstacles along the way.
- You also can’t ignore moving elements. window fittings. Most of the pollution accumulates in those places where the pressure rollers are located. Because of this, they cannot function smoothly. It is more convenient to remove dust and old grease here using a hard brush.
- Once the window has been completely cleaned, including hard to reach places, begin to lubricate all its mechanisms. For these purposes, imported silicone grease is preferable. It is not only thicker than domestic, but also lasts much longer. If it's too expensive, then Russian analogues Solid oil is quite suitable. Some people think that food products are suitable for these purposes. vegetable oils, but this opinion is deeply erroneous. When applied, these oils dry out very quickly and turn into a kind of sandpaper that can damage mechanisms in just a year. When lubricating the rollers, you must constantly turn the handle so that the lubricant has the opportunity to spread evenly over the entire surface of the moving contacting parts.
- The next step is to check the condition of the seals. Caring for them should be approached with the greatest responsibility, because... It is the seals that most determine the “weather in the house.” If extraneous noises begin to penetrate into the room, they begin to sweat and become covered with ice, then this sure sign his damage.

To extend the service life of the seal, it must be cleaned and lubricated periodically. Lubricate it with the same silicone grease or technical petroleum jelly along the entire length to prevent freezing and drying out. If, while inspecting the window before the onset of cold weather, you find that the seal has worn out, then it will have to be replaced. It is quite possible to do this yourself. To do this, purchase a sealant from the construction market, taking into account the shape of the seat, because it varies sometimes. Helping yourself with a flat-head screwdriver, carefully remove the worn material and place a new one in its place. To make your work easier seat treat with lubricant. Upon completion of the work on top, generously treat the entire sealant.

How to adjust windows for winter
As cold weather approaches, it becomes necessary to adjust the windows for the winter. It consists in pressing the frame more tightly to the window to eliminate drafts. This is done using a hex key.
Adjustment of the horizontal sides is done along the panels at the top and bottom. To make this possible, the window hinges have slots for a hex key.

To adjust the top panel, the window must be kept open. To lift the edge opposite the hinge, the hex key should be rotated right side. To lower - to the left.
If your window is low and you have access to it free access from the street side, the adjustment is made without opening the sash. In this way it is possible to move the frame by 2 mm, or eliminate the bevel by the same distance.
The loop located at the bottom makes it possible to adjust the vertical sides. To gain access to the hex hole, you need to remove the safety cap. To raise the window, you need to turn the key to the right; to lower it, you need to turn it to the left. The shift is also 2 mm.
When varying the pressing force horizontally or vertically, we must not forget that the eccentrics responsible for this are located along the entire frame edge at equal intervals. When you turn the handle, they each go behind their own clamping area.

To increase the pressing force of the frame, it is necessary for the eccentric to turn to the right, to decrease - to the left. Each eccentric has special marks that allow you to determine the clamping force. Thus, if the mark is turned in the direction of the seal, this means strong pressure, if in the direction of the street, therefore, the pressure is weakened.
Sometimes window eccentrics are designed in such a way that it is possible to turn them with ordinary pliers.
At the locations of the loops there are also devices that regulate the clamping force. It is recognized by the degree of protrusion of the tongue. The longer it is, the tighter the frame is pressed against the window. Its length is changed with a hex wrench.
To extend the tongue, the key must be turned to the left if the hinges are on the left. Therefore, when the hinges are on the right, the key should be turned to the right. It is best to press the frame tighter in winter and looser in summer. But when doing these manipulations before the arrival of winter, it is important not to overdo it, because... If you press the frame too hard, it will cause premature wear of the seal.

When preparing windows for winter, it is also worth adjusting the hinges and pressing them tighter. Remove the special cap from the bottom hinge and turn the perpendicular bolt.
Pressure force adjustment top loop only possible if there is a flap. Then it is installed for ventilation, making the hexagon accessible. Producing this operation, the window must be held, because it is fixed with a single hinge.
How to insulate windows in winter
If, after some time has passed after installing PVC windows, they begin to let in drafts and retain heat poorly, then you need to insulate the windows for the winter. But before that, it’s worth thinking about why the depressurization occurred. The most common causes and ways to eliminate them:
- The rubber seal on the window is worn out. Then it should be replaced with a new one.
- The junction of the frame and the slope was depressurized. To eliminate this drawback, you need to remove the slopes, insulate them, and install them back.
- After installing the windows, the walls began to shrink. In this case, it is enough just to adjust the fittings.
It is possible to insulate plastic windows in winter using film. Although this method is quite expensive, it is very effective. Most often, the film is applied from the street side, but sometimes this is also done from the room side. This option is the highest quality. The film is stretched over the entire area of the frame and secured along its edges.
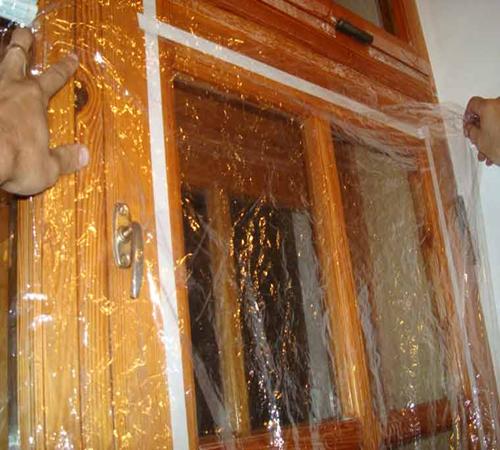
While doing this, you need to simultaneously control the strength and uniformity of tension. If in one of the areas the film is stretched more loosely, then when strong wind a breakthrough may occur. If this has already happened, then seal the torn area with tape so as not to change everything.
When choosing a film for window insulation, you should give preference to frost-resistant ones. The most suitable material for these purposes is recognized by its yellowish tone. It is best to refrain from going to the market and purchase it at a large hardware store. In order not to disturb the aesthetics appearance room, it is better to choose film designed for greenhouses. It is, of course, somewhat more expensive than a regular one, but it can last a very long time due to its resistance to low temperatures.

Attach the film to the edges of the frame with regular tape. Sometimes they use buttons or construction stapler, but in this case damage will appear on the frame.
In addition to film, it is quite acceptable to use PVC insulation. This material is reliable and environmentally friendly, guarantees good thermal insulation. Such insulation materials are not afraid low temperatures and are not deformed. Their manufacturers guarantee that PVC windows will be reliably protected in winter.


