A small pedestrian bridge in is a good decoration for a private area, but it can carry not only decorative functions. If necessary, you can build a bridge with a good functional load for a summer residence, which will be actively used in a garden area. In addition, this building can be decorated with various plants and flowers.
decorative bridge from logs in the garden
If the bridge is properly planned and constructed for suburban area or, then it can become a unique place on your site, eye-catching. Before proceeding with the planning of the structure of this structure, it is necessary to understand that ordinary pedestrian bridge structures for a river in a private area are various structures whose function is to overcome obstacles of various kinds.
There is an opinion that the installation of a bridge for a summer residence is justified for large garden plots. But in fact, they will look good in modest areas. For example, you can make a continuation with a decorative bridge, which will help to overcome a place that is inconvenient for a pedestrian, and also help to make the garden more interesting and intriguing.
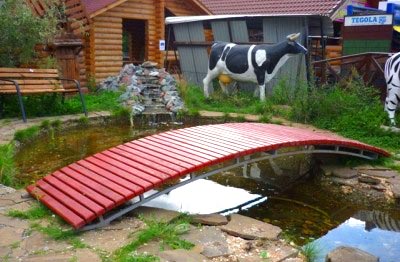 An example of a country bridge made of boards and a metal frame
 In order for the decorative bridge in the design to look organic and at the same time luxurious, it is worth planning in advance the design of this structure, suitable for general type area and river.
If you have a small territory at your disposal, then you need to choose as many as possible simple design bridge, and its color should be neutral, not particularly distinguishable from colors throughout the territory. The next thing to pay attention to when planning a decorative bridge is the selection suitable design and its location.
Basically, such structures are a good addition to a garden and a house that has a river on the territory, so components and Construction Materials it is necessary to choose just the style of the rest of the territory.
It is also worth considering the presence various buildings, such as, or lights that will be located next to it.
 Construction of a wooden bridge over a pond in the garden
 If yours, especially in the presence of low-lying areas flooded with water in the spring, the presence of a forged bridge is a must. Another situation in which the bridge is a good addition is the design of the road leading to the wooden gazebo. Having made such a special structure near the recreation area, the owner will be able to give his summer cottage a look of completeness.
There are several basic requirements that must be observed when installing a forged bridge:

The main task of those who want to build a garden bridge with their own hands on dacha territory, is the choice of the type of structure, as well as the correct selection of landscape design. One of the options for designing a bridge for a private area is monolithic buildings. The second option is to use natural and improvised materials, such as smooth a natural stone, plank squares or circles.
 Variant of a decorative bridge made of natural stones
 One of the most exotic and at the same time beautiful options for large ponds is laying out the entire structure of stones. This option will help to achieve a combination with already on coastline in the same style.
It is worth noting that for such a decorative bridge, it is necessary to select stones the same size and one kind. One of the main conditions for the construction of such a crossing is the depth in the reservoir, which should be no more than 45 centimeters. The minimum height to which the bridge should rise above the river is 10 centimeters.
In order for the surface on which the crossing will be made to be as convenient as possible, its width should be at least 60 centimeters. Another option for decorating a small garden bridge with your own hands from natural material- This is the use of stones of a non-standard type. 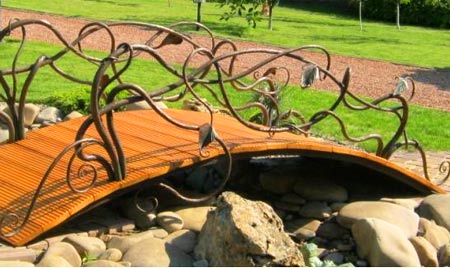
Such material will be especially relevant if it has a smooth and comfortable upper part. Such a structure is well suited for areas where flowing waters form small wave oscillations at the site of a natural obstacle.
Today there is a large number of various imitations of concrete, repeating the shape of natural boulders. concrete material is different high level durability, and it is also well protected from the negative effects of high humidity.
If the owner of the plot with the river wishes on your own create cozy corner on your territory using a connecting bridge, you must follow the following tips:

Building a wooden bridge with your own hands
To make a decorative garden bridge from boards and wood bars, it is not at all necessary to buy new materials. In some cases, improvised means are also well suited. Before proceeding with the construction of connecting bridges for the pond, it is necessary to make sure that the right tool. The tips below will help you set up a bridge for small area with your own hands.
If there is liquid in the reservoir, it must be drained. After draining the bottom of the water obstacle, you can proceed to the installation of pre-prepared boulders. Each of the bars must be laid on a good layer of mortar.
 An example of a mounted suspension bridge across a stream on a site
 After their installation, height alignment is carried out, which is done using the previously installed plates. You should also monitor the presence of strict horizontal tops of all stones. After the behavior of all procedures, the structure should be allowed to dry for 1 - 2 days.
You also need to think about the path leading to the future building. One of positive features bridge at their summer cottage is the ability to connect two different types tracks that differ in texture. In addition, this structure will help to decorate any stream or reservoir.
In some cases, it is considered impractical to make water barriers in your area. But this does not prevent the construction of a small decorative wooden bridge, which greatly increases the attractiveness of the garden area. 
For example, the presence of a suburban area in a recreation area already serves as a reason for the construction of a bridge, which will serve as both an ornament and a guide for visitors.
Designing a bridge for a summer cottage
The main condition for the arrangement of bridge structures in the suburban area is the material from which the structure is made. For this purpose, the same building and finishing elements are selected that were used when laying out paths, mounting gazebos or other interior elements.
Since one of the cheapest, but at the same time beautiful materials for the construction of a decorative bridge is a tree, it is worth thinking about increasing the service life of wooden elements. To do this, you can apply the simultaneous use of material from wood and metal.
 Project and drawing with dimensions of a metal bridge over a stream
 The metal parts of the bridge will be in most contact with water, which will significantly extend the life of the structure. One of the most popular stone options for the design of the bridge structure is granite or sandstone. This option is especially relevant for territories in which masonry or stone compositions.
If the area where the wrought iron bridge is planned to be built is small or has a small body of water, then building a large bridge, which will take a lot of time and resources, is not justified. In such cases, it is best to use a large sandstone slab that can be laid on each of the banks of the stream, thereby connecting them. In the absence of the possibility of using large materials, forged bridges are perfect.
DIY decorative bridge
Thinking of building a bridge is a very difficult task? It is not necessary to use complex iron structures or go around solid parts.
The classic humpback structure is installed in just one day, given the following nuances:
- Very thick boards are chosen for the base of the bridge. You can also use a wooden beam.
- For small pond two integrated beams with a section of 50 by 200 millimeters and 2.4 meters long are suitable.
- The most difficult thing in such a project is to draw a straight line, along which the wooden material will then be sawn.
To begin with, we measure 120 millimeters from the length of the beam, leave a mark on one edge of the board, then find and mark the middle of the beam. At the other end of the material we measure 40 centimeters. Similar works we carry out with the second bar. 
Now we connect the mark in the middle of the board with the drawn mark on the sides of the tree. Thus, auxiliary lines will be obtained. Each of them has a center, and a measurement is placed in the middle between the extreme and middle marks. This task requires some skill. If the worker is not sure of the success of the markup of the structure, it is best to make a paper template.
When drawing a curve, it must be remembered that the distance between the edge of the beam and the top of the arc is only a couple of centimeters.
Having finished the drawing, we will get a drawing on the bars, which will subsequently need to be cut out. To do this, you need a special saw with a narrow blade. Also, a jigsaw will help to cope well with this task. Its advantage is that it is quite easy for them to turn. Having finished processing the wooden material, we lay the resulting curved part on top of the rest of the boards.
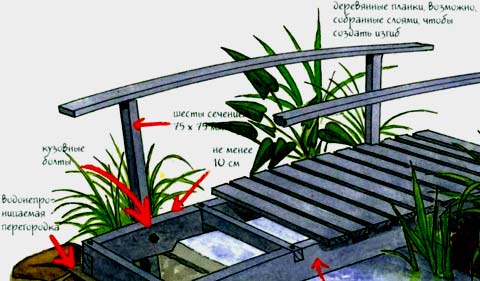 The design of the device of the country bridge made of wood
 Thanks to this, you can see how part of the material taken has taken the form of the part needed for the construction of this structure. Now the received parts must be connected. To do this, you can use four bolts with a diameter of 10 millimeters and a length of 220 mm.
You need to draw a mark where the bolts will be located. The same fastening material is best placed at a distance of up to 10 millimeters from each other. With the help of two clamps we fix parts of the future bridge. In order to make the necessary holes, you can use a large drill for a drill.
It must be remembered that when making a hole on the curved side, the drill must be held at a slight inclination, which will greatly facilitate the further fastening of all elements of the bridge. For reliable fastening of two bases for a wooden bridge, a certain procedure should be followed:
 Scheme for assembling a wooden bridge
In the same way, the manufacture of the second part for the foundation of the construction of the garden bridge is carried out. Finished parts can be used as a template for the second part. By applying the bends of the finished kosour to the board, you will get two identical parts. After the manufacture of the second part, it will be possible to proceed with the installation and design of the entire structure.
The two base elements must be threaded together. drilled holes should be located 5 cm from the bottom edge 10 cm from the sides. In order to save time, two parts of the bridge base can be drilled simultaneously with an 8 mm drill, stacking the bridge elements on top of each other.
 Construction drawing of a country bridge
 On one part of the base we twist the threaded pin and fasten it with a nut and washer on both sides. Now you need to measure how much distance is needed to secure the second part of the base on the other side of the pin. Thanks to this structure, the width of the structure can be easily adjusted and the distance between the foundations of this building can be changed.
After prefixing fasteners, you can start assembling the bridge. Before finally tightening the washers and nuts, it is best to double-check the width of the sides of the building. After you need to tighten all the nuts as much as possible and check the width of the bridge again.
 Final bridge assembly before installation
 The protruding parts of the rods can be cut with a hacksaw. Now we proceed to stuffing transverse boards onto the bridge. They should slightly protrude beyond the edges of the base. For fastening the strips, it is best to use self-tapping screws.
In order to select a suitable fastening material, it is necessary to take all measurements in advance and, based on the data obtained, buy self-tapping screws. But before proceeding with the fastening of the boards, it is best to outline the places for installing the planks along the entire length of the base. The best distance between two boards that people will walk on is one centimeter.
According to the tradition of landscape design, a decorative bridge is made over “dry” streams and artificial reservoirs. Such a design can take bizarre forms, or it can look like a standard bridge in miniature. The choice of the type of bridge and its decor depends on the design idea of the entire suburban area.
Varieties of designs
The installation of a bridge on the site has not only an aesthetic, but also a practical function. Bridges are installed where it is necessary to step over something or bypass an obstacle.
Among the various types of structures, the following can be distinguished:
- Wooden;
- Bamboo;
- stone;
- metal;
- Concrete.
These are the most used materials in construction. vertical structures and elevations. They are freely available, so constructing a bridge with their help is not difficult.
Also, the bridges are divided into those that you can walk on, and those that carry only a decorative load. Decorative options are usually small. They are made in those places where it is required to diversify the monotonous landscape as much as possible with boring accents.
Wooden
Wooden products naturally fit into any landscape. They harmoniously complement the space around, making appearance area is even more interesting.
To the benefits wooden structures aspects such as:
- Ease of preparation and assembly;
- Eco-friendly material;
- Ease of construction;
- Long service life;
- Ample opportunities for decoration.
The most common wood for such bridges is pine. More expensive options are made from oak, ash and cedar. The wooden bridge can be painted in any color. Its shape can be made more sloping or flat. And the repair of such a bridge will be inexpensive.
Bamboo
Bamboo designs look gentle and delicate. They fit perfectly into the landscaping of the garden and open area. If there is an eastern corner in the country house, then the bamboo version of the bridge will come in handy.
Plot designed in Japanese style, just won't look complete if it doesn't have a bamboo bridge. Lightweight and airy material is strong enough to withstand long operation. And its appearance reminds of the beauty of oriental gardens and parks.
Stone
Stone options are considered one of the most durable. They fit perfectly into European style landscape. They look solid and presentable. Such bridges are well combined with other stone structures on the site.
The simplest version of a stone bridge is the location of stone blocks over a stream or pond. landscape in antique style will require finer work. Therefore, marble or granite can be used here. And the structure itself can be built using public drawings and cement.
metal
Metal bridges will decorate the area in the Gothic style. They are also suitable for modern style. And forged options are perfectly combined with romantic notes in the landscape of the site.
Metal structures can be bought at a specialized store, or you can weld it yourself. Such a bridge has a long service life. Not afraid of serious temperature changes. Easily combined with other materials.
Metal to create a bridge is suitable for those who do not like change. The material is able to stand on the site for decades. And changing its shape is quite difficult. Therefore, metal bridges will appeal to true conservatives.
Concrete
Concrete products are among the most durable decor items. Fountains and artificial water tanks are being installed next to them to emphasize the beauty of concrete bridges.
To make such a bridge high, you need to build in its design metal fittings. Low options can be created from solid concrete blocks.
Concrete bridges have not only a decorative function, you can safely walk on them and transport a cart with tools. A properly designed bridge can withstand significant loads.
Accommodation options
Where to place a decorative bridge so that it becomes bright accent landscape? Do it better in the following areas:
- Near lakes, ponds, streams;
- Near natural ravines and ditches;
- Over dry streams;
- Near flower beds, rockeries and flower beds;
- Over paths and paths.
Sometimes such structures are placed as a continuation of the path on a hilly area. Step-by-step bridges are made right in the water. And part of the design of suspension bridges is installed under water.
The bridge structure must be placed over the narrowest section of the path or stream. small bridge do not make it high, so it will not look harmonious. Traditionally, a large wooden walkway can be raised to a considerable height. Then you can even fish from such a bridge if the owner of the site is interested in fishing and all its derivatives.
Metal is installed on flat surfaces. And stone options are built into earthen ramparts and water edges. The tree can be placed on any piece of garden or lawn. Such decorations are also good for terraces.
Shape selection and design
The selection of a bridge structure design begins with a detailed study of the site. When the place for the bridge is determined, it is easy to check the relevance of its placement. It is enough to take a picture of the site and apply a schematic drawing of the structure to the photo. It is also possible to place the drawn bridge on the site plan to see how it fits into the general concept landscape.
After the place for placement is checked, it is necessary to choose a certain type of structure. Consider the most common options:
| View | Description |
| Straight | Easy to make by hand, suitable for different styles and directions. |
| Zigzag | Contributes to the site oriental flavor, mounted from durable and wear-resistant materials. |
| Arched | It has a familiar look, combined with different landscape styles. |
| step by step | Suitable for streams, dry and real waters. |
| stepped | It fits perfectly into the concept of a children's corner on the site, it is made in the form of two stairs with a common platform in the middle. |
| Suspension | Installed by professionals as it is complex design With heightened danger during operation. |
Direct options during installation are installed together with a drain for water. For wooden bridges, these are the gaps between the boards. Stone bridges involve the use of a drain gutter.
Zigzag designs in oriental style treated with antiseptics. Additional protective equipment used when such a bridge is installed near the water.
The bearing beams of the arched structure are initially selected curved. So the appearance of the bridge looks really correct and sloping.
Exclusive step by step designs made from flat natural stones right size. The distance between them is selected in such a way that it is convenient to walk along them without getting your feet wet.
The landscape version of the stepped structure is installed on a hill. Here the main task bridge lies in its review function.
Suspension bridges are placed on piles in the water. Therefore, the foundation for them must be strong and durable.
Suspended structures are not installed in areas with increased seismic activity due to high probability displacement of the earth layers beneath them.
In general, each type of bridge can be successfully and organically placed on any type of site. Summer residents prefer small wooden options, and the owners of spacious areas choose long and intricate products.
Master class make a wooden bridge
It is quite possible to make a bridge yourself and cheaply. Most inexpensive material for this type of landscape decor - a tree. Some craftsmen manage to construct a full-fledged bridge from improvised materials, such as boards from an old barn. But to increase the aesthetics of the structure, as well as to increase its strength, it is worth using specially purchased boards.
Before starting work, select appropriate place. Then a work plan is drawn up, drawn detailed drawing products. For a wooden bridge, you do not need to fill concrete foundation or install piles. Do not forget about the gaps between the boards. After all, they will save the structure from excessive moisture and dampness.
The basis of a homemade bridge - two wooden beams, the length of which varies in the region of two meters. They are made curved with a jigsaw. The rest of the structure will be attached to these beams.
To increase the stability under the bridge, you can install special wooden props. The banks of the reservoir, over which the bridge will pass, are strengthened in advance with stone or cement. When pouring concrete, you can immediately install piles of wood into it, so as not to make a support for the bridge separately.
After installing the entire structure, a fence is mounted on it. This part can be double-sided and one-sided. It not only increases the safety of the bridge, but also serves as its decoration.
The wooden flooring of the bridge is made of boards, the thickness of which must be at least 3 cm.
The final part of the work on the bridge is its lighting. It is dangerous to cross the bridge without lighting at night. Therefore, you can install garden lights near it on solar panels You can also use LEDs. Product illumination may vary. Sometimes steps are illuminated near decorative bridges, there are options for lanterns that are placed under water. With the standard lighting method, street lamps with long “legs” are selected. They do the best job with their lighting function. When the bridge is installed at the house, it can be illuminated by lanterns from the terrace or balcony.
If desired, the wooden bridge can be decorated with a layer of varnish or wood carvings. It is best to soak it with an antiseptic in collapsible, so the joints of the parts will be less susceptible to smoldering and will last longer.
Structural areas that will be in continuous contact with water must be carefully insulated with special materials, otherwise the base of the bridge will be shaky and quickly deteriorate.
Conclusion
A decorative bridge is a huge space for creativity, a functional thing and a real decoration of the site. You can make a drawing of such a design yourself, but it is best to turn to professionals. They will be able to offer different variants bridges for every taste and budget. And there are a lot of these options in the world: bridges with pallets, decorative structures with mosaic supports, forged walkways and many other variations. And many of these options are suitable for different landscape styles.
DIY decorative bridge in the countryIt is quite pleasant to create coziness in your summer cottage. Here there is an opportunity to create and create places for moral and physical relaxation. All flower beds and various decor at their summer cottage will definitely cheer up a person and help to create further. When the site is decorated on its own, it is doubly pleasant. One of wonderful opportunities to create individuality in the garden is the construction of a bridge.

To date, the functions of the bridges have become different, even changed dramatically. This is not only a connecting element of the banks, but also the division of the site into zones, a decorative addition. Thus, before choosing the style and type of the bridge, it is necessary to consider how it will serve in the country, which zones will be connected. This is important because it determines the location of the bridge.
One of the reasons for creating a bridge: the garden needs a building for decoration. The style of the bridge depends on its beginning and end.
Please note that if the bridge is located above the reservoir, then there is a need for a gazebo. This completes the garden.
When the owner decided that he would build the bridge on his own, then best material- this is a tree. A wooden bridge suits any style of site. If certain parts of a wooden bridge have deteriorated, then it is easier to replace or repair them. A metal or concrete bridge generally needs to be rebuilt or left as is.

Tools for work.
- Drill, file, screws, nails.
- Screwdrivers, hammer, saw, sandpaper, planer, boards.
- Ruler, protractor, pencil, paint brush, varnish.
Every building must have a foundation. Boards are the basis. At the base, the length depends on how long the bridge will be. The base should be 50 cm longer than the bridge itself.
The bridge in the dacha has a rounded shape, because straight bridges are not considered decorative. To round the bridge, steps can be made that rise from both sides to the middle. A rounded base will be obtained as a result of attaching boards to this base, which form a semicircle.
Wood is pre-processed: planers are used to process boards that need to be sanded sandpaper. This is done in order to achieve the smoothness of the tree. Wooden building materials must be protected. They are processed with means that prevent the tree from rotting or being affected by a bug.
On the flat surface a bridge is installed: the boards lie in parallel, the steps of the bridge are fixed on them. To make the view beautiful and neat, the boards should not be wide. In the form of railings, boards are used, basically, the railings are even. But if necessary, they are made curved.


August 5th, 2015 , 12:11 pm
Original taken from print_design to the humpbacked bridge in the country. Made of Metal project
Plans have been hatched for a long time to make humpback bridges on the site. Some dreams are only under 20 years old.
This year, thanks to the found "masters" who undertook to bend the details, the project was realized. Why the master in quotation marks will be clear later.
Very detailed step by step master class for making a humpbacked bridge with your own hands.
By clicking cut, you guarantee that you are able to view 87 photos of 36 megabytes.
01. Everything starts with drawings.
In the course of the play, profiles were replaced with others, something was added, but much more was removed. In general, as usual, they sculpted, in fact, from a sheet.
02. They brought blanks. You can't look without tears. The metal was bent by some kind of crooked mediocrity. It is a pity that we bent two sets of blanks at once. It would also be necessary to bend the manufacturers, but we forgave the poor.
(No, this is not a bottle of beer "Zatetsky Hus", with which we celebrate the beginning of the construction of the bridge - this is gasoline)
03. I chose four arcs that are closest in shape. It was not easy, they are all different.
04. The design is oversized, in the country we don’t have a workbench for such a workbench. I cook on a paved area. I achieve horizontality due to different linings of pieces of wood. great way. Don't throw away scraps of plywood, etc. Even linoleum came in handy somewhere.
Checking the laser level. Everything comes out quite accurately, no "screws".
05. On the welded first board, I lay it on top of the second one and weld it.
06. Finished - aside!
07. Everything that goes underground I do from the corner. We have it in bulk, where to put it is not clear, but the profile is a pity.
"Fangs" are welded onto the legs from all sorts of scraps, so that it holds better in the cement.
08. In progress.
Now that it is clear that there is nowhere to retreat, it's time "destroy to the ground, and then..."
09. This is an old bridge that has served for 10 years. It looks organic.
10. But it is rotten through and through and it is frankly dangerous to use it.
11. Breaking is not building
12. No bridge!
13. I move with tools to a distant cardon
15. Key elements flooring retention. I do not regret the electrodes.
I carefully seal all cavities where water can leak. I don’t clean the seams - it’s not necessary, it won’t be visible, but the work is superfluous.
16. The design emerges.
17. Weld buttresses.
19. Now you can put in place and pour concrete.
Everything below is qualitatively stained. Then there will be no more access to it.
It was decided to quickly pour in order to give time to stand and harden well, since a decent break in work was supposed.
20. Four holes for almost the entire depth of the drill (about a meter) on both banks. Immediately filled with water.
21. Put
22. Aligned vertically
23. And well filled with broken bricks
24. The process of pouring concrete.
At first I made it thinner in order to fill all the cavities in the bottle well. The last batch for each leg is thicker.
25. All ground water extruded concrete without problems. I don’t know what brand turned out at the bottom, but it will stand. The whole coast will be washed away, but the bridge will not move.
26. And on the other side the same way.
We move on to the next step - welding the balusters.
27. First, I bend to the desired shape of the workpiece of internal arcs.
A couple of trees for this just right
28. I try on the place.
30. Smoke break watsaping (from whatsapp)
Interestingly, enterprises now allocate special places for transfer with fast wifi? Especially for non-smokers and die healthy.
31. Be sure to mark the location of each half of each arc, because then they will be dissected and the main thing is not to confuse which is where.
32. I work in such conditions
In the meantime, the process of preparing a wooden flooring is underway.
33. A larch board has been selected, lying in a shed for several years idle. The surface is velveteen.
In general, with regard to larch - strange and Hazardous Material. This is not the first time I am convinced that when it dries, it releases hard and sharp chips, which can be cut like a scalpel.
So it was this time. Therefore, the reverse side of the boards (the one with fewer grooves) was chosen as the front side for the flooring. She was in better condition than the front.
Well, the hope is that no one will walk barefoot on these bridges.
34. Boards are first treated with an antiseptic. Are dried up
35. Then they are abundantly impregnated with "working out" - machine oil.
by all woodwork Traditionally, the father is in charge. Well, I don't like working with wood.
Back to metal.
36. I brought a full wheelbarrow of the tool.
37. Welded arcs
38. The process of cutting balusters. Each one was customized. Not one is the same.
39. The first of 4 spans is ready
40. Already two. Step by step.
41. I cook, standing in the water, of course.
42. It was easier to weld the balusters still "on land". But as I said, I wanted to pour concrete faster so as not to waste time. Now I'm slapping...
43. The working day is over
Two seconds to think and give the correct answer. Look at the photos above.
Answer:
I mean the ends of the handrails and buttresses.
45. The ends of the handrails, made by metal benders. Honestly, they should be kicked out of the profession.
46. I can’t look, I sawed off the front sight nafig.
It even looks better.
47. And this is waste.
As for the buttresses, they have been changed from the original drawing. But even this form, invented by me, I do not really like. She does not live with the smooth curves of the bridge. But for now, let's close our eyes. Endure, fall in love.
So - the end of the handrails.
I will do mine.
I don't have a bending machine for bending a profile. Do homemade for a long time.
I chose a laborious, but unmistakable way - a notch.
48. Calculated from the difference between the outer and inner lengths of the arcs, how wide the notch should be and in what quantity. I marked the profiles with a step of 1 cm.
49. Notched first around 1 mm. I did not cut to the end with a circle of 2.25 mm. It doesn't make sense until the end, because there and from the millimeter circle the gap remains.
50. Received such a "washboard"
51. And bent her
52. Fixed the desired bend and brewed. I did not touch the inner surface, because. it's hard to clean it up.
53. The logo of the Moscow Department of Transport is ready
54. Perfect abutment of the inner surface
55. Worms...
56. The length was with a margin.
After fitting in place, sawed off the excess
57. Brewed open end (can't stand plastic stoppers), cleaned thoroughly.
58. And - the ends of the handrails are ready!
60. Compare with what was
62. I strengthen the banks with pipes and boards from erosion. Because it will not be visible, do not look for special beauty.
64. Now it's time to fix another school of metal benders - crumpled profiles.
65. I putty the most malicious holes in the handrail
66. Layer by layer
67. I work with these automotive putties.
Below - rough with fiberglass filler. Above is the finish line.
Freeze very quickly. This is convenient, but you need to act quickly, hesitate a little, breed a new batch.
68. Layer finishing putty. At the same time, I putty the inner surfaces of my ends of the handrails.
71. Ready for painting.
72. Before laying the flooring, everything must be carefully painted. Classic color - yellow-green black.
73. It immediately began to play differently ...
74. The final marriage of metal and wood
75. You can use
77. But first, it is necessary to hold the official opening ceremony of the bridge.
78. In the meantime, the invited persons are gathering ...
79. Children arrange a photo shoot
80. The honor of opening the bridge is given to the elder of the family.
The ancient tradition of opening bridges says: bridge builders are required to stand under it and stand there while a herd of animals with loaded carts is driven over the bridge. By doing so, the builders make it clear that they are so confident in the quality of their work that they are betting their lives on it. If the bridge collapses, they will be crushed.
81. The builder climbed under the bridge
82. Herd of animals with loaded carts
83. The bridge did not collapse, you can use it!
Satisfied builder.
84. Satisfied pedestrians


 in the near future - forecasts and expert opinions")


