To perform the interior decoration of the bath, you need knowledge of the properties of wood and stone, safety requirements and minimal skills in working with wood. We will talk about the materials and types of finishes recommended for use in the bath, and the skills of a joiner and carpenter will have to be acquired along the way.
Does the bath need finishing
Regardless of what kind of bath you have - Russian, Finnish sauna or Turkish hammam, a bath is high temperature and high humidity. Without finishing, without isolating the walls, floor and roof, you will be forced to heat the steam room for hours, and with it the surrounding air, throwing money literally into the wind.
Due to the difference between the external and internal temperatures, moisture will settle on the walls as condensate, which over time will lead to the formation of fungus, mold and rotting of wooden structures. If the building is made of masonry material (brick or blocks), a steam room without finishing threatens to burn when in contact with a red-hot wall. Only in the case when the bath is cut down from logs or folded from timber, can it be left without additional finishing if the thickness of the walls provides standard resistance to heat transfer. If this is not the case, we return to reading the first sentence of the paragraph.
If the bath is made of logs, complete interior decoration can be omitted
There are many requirements for the decoration of the bath in terms of safety:

The walls and floor of the bath are most often insulated with stone or basalt wool, but this is not the best option: mats and slabs of mineral insulation contain a small amount of bituminous binder, which evaporates under the influence of high temperature, as well as the smallest particles of fibers that cause irritation when deposited on the skin.
A safer and more economical option - foam glass insulation - avoids these disadvantages. Vapor barrier is performed with aluminum foil or foiled polyurethane foam, which belongs to the group of non-combustible materials and will serve as an additional heat insulator.
Finishing materials for a bath - how not to make a mistake
The interior decoration of different rooms in the bath performs different tasks, in accordance with them, and choose the type of finish.
Table: requirements for finishing the bath
| room | Peculiarities | Type of finish | ||
| Floor | Walls | Ceiling | ||
| steam room | High temperature - fire protection of wood is required. Humidity - impregnation with antiseptic and fungicide is required | Ceramic tiles or porcelain stoneware with waterproofing, hardwood flooring, drainage | Hardwood cladding, stone or brick cladding at the heater | Hardwood false ceiling |
| washing | Humidity - materials are needed that allow periodic washing of surfaces | Ceramic tiles or porcelain stoneware with non-slip surface, drainage | Tiling or finishing with materials that allow wet cleaning | moisture resistant painting or false ceiling |
| Restroom | No requirements | Wood or underfloor heating with tiles | No requirements | No requirements |
Steam room finishing
For steam room cladding, it is better to use hardwood, which does not emit resin when heated. When choosing a material for wall cladding, one must remember that a bath is not only pleasant, but also useful. Inhaling phytoncides secreted by a heated tree into the steam room, we increase the body's resistance to colds, and heal the respiratory tract.
| Type of wood | Advantages | Flaws |
| Oak | Sturdy wood, durable, great looks | Slips when wet, high price |
| Ash | Durable wood with a beautiful pattern, resistant to rot | High price |
| Birch | Light pleasant aroma | It is susceptible to decay, does not hold its shape well at high temperatures |
| Linden | It has a pleasant color when heated, exudes a delicate aroma, is resistant to rot and high temperatures, is affordable | Not |
| Aspen | Low price, light pleasant aroma | Subject to rotting, over time changes color to dirty gray |
| Alder | Beautiful appearance, reasonable price, odorless, does not absorb odors, durable | Not |
If you are interested in a budget option for finishing - choose alder, if there are no cost restrictions, then the best option is ash.
Bath, trimmed with ash clapboard, will look prestigious and expensive
For lovers of coniferous smells, a combined finish can be offered: where contact with the skin is possible, we make hardwood finishes, and, for example, we sheathe the space under the shelves with cedar, larch or pine.
For lining the wall section near the heater, it is necessary to choose a material with high heat capacity and thermal conductivity, which ensures maximum accumulation and uniform heat transfer. The structure of the stone must be homogeneous so that it does not explode when water enters. Stones are selected round or oval in shape with a smooth surface for free air circulation, the optimal size is from 5 to 21 cm. Another requirement is environmental safety: when heated, they should not emit harmful substances.
Table: properties of stones for a bath
| Mineral | Properties |
| Gabbro - diabase | Gabbro - diabase is the most affordable and popular option. The stone is dark gray, almost black in color with low water absorption, excellent heat capacity and very durable. Unfortunately, with strong heating, it emits an unpleasant odor, and when essential oil enters, it forms carbon deposits on the surface. |
| Soapstone | Talcochlorite is durable, strong, has excellent heat capacity, it comes in colors from light gray to cherry. In order to exclude dusting, the stones are washed and calcined before the first use. It has a pleasant, light steam with a healing effect: it reduces pressure, heals the respiratory system and skin. Negative characteristic - high price. |
| Basalt | Basalt is the hardest stone of all volcanic rocks. It has only positive characteristics - it is strong, durable, has a large heat capacity, tolerates temperature changes perfectly, and does not emit harmful substances. I am pleased with the availability even the price. |
| Jade | Jadeite is a semi-precious stone, so do not be surprised at the high price of this mineral. The color from white through emerald green to black makes it attractive in appearance, and its medicinal properties were appreciated in ancient China. An excellent choice for people who care about their health. |
| Crimson quartzite | Raspberry quartzite, just like jadeite, is attractive in appearance with its bright color and has excellent operational qualities - hardness, durability, heat resistance, low water absorption and environmental safety. It perfectly tolerates high temperatures, you can pour water on it without fear of an “explosion”. When buying, you should avoid split stones, as they will continue to crumble. |
| white quartz | White quartz is not very durable and does not tolerate high temperatures, but due to its spectacular appearance it is one of the most expensive stones: this translucent mineral consists of silicon and oxygen molecules, and when heated, it releases ozone, which makes the steam room with it especially useful. |
The ceiling in the steam room above the heater, as well as the wall behind it and the floor around it, requires protection with fireproof material. Above the heater, you can make a section of a suspended ceiling from a soapstone slab. Soapstone is a versatile material for heater stones, floor and ceiling wall cladding. A more budget option is a metal sheet above the stove, the foundation and wall cladding of solid, well-fired bricks.
Soapstone can be used not only as a material for stones, but also as a wall and ceiling decoration behind the heater
The floor in the steam room is made of concrete or ceramic tiles, with waterproofing and a drain for draining water. Hardwood flooring is laid on top.
Finishing materials for washing
A washing room with open shower screens requires the installation of channels, drains and a moisture-resistant finish: facing with ceramic tiles or other durable and moisture-resistant material that can withstand elevated temperatures.
If you plan to install individual shower cabins, such a finish is not required, you can sheathe the walls with clapboard, paint them or plaster them with moisture-resistant decorative plaster.
In order for water not to affect the frame of the sink, it is tiled
It is desirable to perform floors with heating. The tile should be with a rough surface, excluding slippage. It is undesirable to make an oak floor in wet rooms, as it is very slippery when wet. A coating of coniferous wood is welcome, especially larch, as the most resistant to decay.
The area of the floor near the font, where significant spills of water are possible, is best made of ceramic tiles with a ladder.
The ceiling of the washing room will have to be washed periodically, respectively, the material must withstand the treatment with detergents: larch lining, metal slatted or cassette suspended ceilings.
Restroom
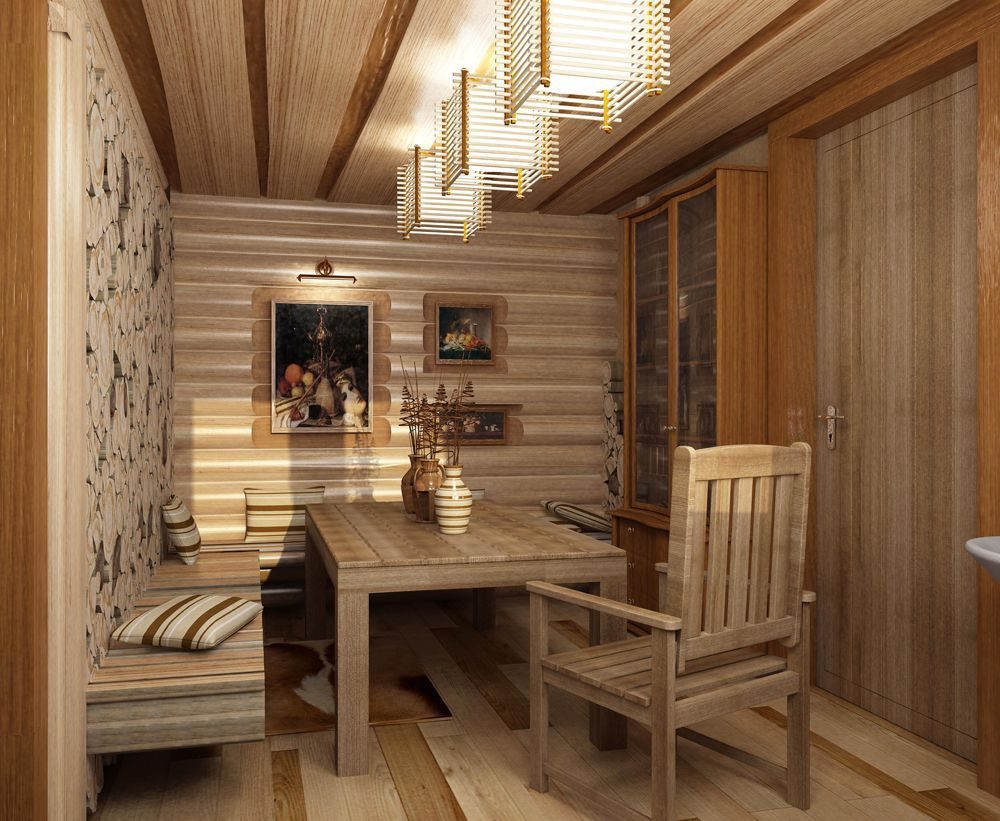
The rest room has no restrictions on decoration, with the exception of a warm floor - it is always pleasant to walk barefoot on a warm tree. The rest of the interior design depends on the taste and requirements of the owner of the bath.
Photo gallery: options for finishing the premises of the bath
 In this steam room, the firewood rack serves as an interesting element of the interior.
  Soft diffused light and heat from a brick Russian stove will create an unforgettable experience of visiting the bath
  Protective rail lampshades protect lamps from mechanical influences and create directional light streams
  It is very comfortable to take bath procedures in a small steam room
  The interior of the steam room is very decorated with a combined layout of lining made of different types of wood.
  A steam room for a large company should be heated by a high-powered heater
Do-it-yourself bath decoration
In order to be beautiful in the bath, you need to choose reliable and high-quality finishing materials and mount them in accordance with the specifics of the premises described in the previous sections.
Choice of finishing materials
The choice that takes into account the size of the building, personal taste and financial component will be optimal for each owner of the bath. In order not to make a mistake when buying material, you must first:

Calculation of the area of premises
To determine the need for materials, it is necessary to know the surface area to be finished. All calculations are done in meters.
For the floor and ceiling, multiply the length of the room by its width. To get the area of the walls, we calculate the perimeter of the room: add the length and width and multiply by two. The product is multiplied by the height of the ceilings. From the result we subtract the area of doors and windows, if any.
In rooms with complex combined finishes, the area of each section is calculated separately.
How to buy quality materials and prepare them for installation
When choosing a material, it is necessary to pay attention first of all to the quality of the goods.

Calculation of the need for materials
- Find the area of one board. So, with a standard length of 6 m and a thickness of 90 mm, the area of \u200b\u200bthe board will be equal to 6 ∙ 0.09 \u003d 0.54 m 2.
- Calculate the surface area to be treated. Suppose that it is necessary to upholster the walls of a room measuring 3 x 6 m with a ceiling height of 2.5 m. The surface area is: (3 + 6) ∙ 2 ∙ 2.5 \u003d 45 m 2.
- Calculate the number of boards. To do this, we divide the surface area by the area of one board: 45 / 0.54 \u003d 83.3 boards.
For example, here is the specification of the material for finishing the steam room:

In the same way, the need for wood is calculated for the remaining rooms.
To calculate paintwork materials, the surface area should be multiplied by the paint consumption, which is usually given on the packaging in liters per square meter. The product will show how many liters of paint you need to buy.
All goods must be bought with a margin of 10%, taking into account the tolerance for waste and defects in work.
Required Tools
To finish the bath with your own hands you will need:
- Perforator.
- Screwdriver.
- Building level.
- A hammer.
- Furniture stapler.
- Plane.
- Hacksaw or electric jigsaw.
- Self-tapping screws, nails or clamps.
Step-by-step instructions for finishing the bath
Work is performed after laying electrical wiring and ventilation ducts, starting from the floor. The floor of the steam room is raised 10-15 cm above the level of adjacent rooms. After the clean floor is laid, proceed to the decoration of the walls. The ceiling is completed last.
- Making a frame for insulation. The frame is assembled from a 100x40 mm timber impregnated with a flame retardant and fungicide. The beam is fastened with screws or dowels to the wall at intervals equal to the width of the insulation plate minus 5 mm.
A frame made of wooden beams is mounted on the walls and ceiling
- Heater installation. Between the bars of the frame, plates or mats of insulation are laid on heat-resistant glue with additional fastening with dowels, 5-6 pieces each. per 1 m 2.
- Installation of heat-reflecting material. Aluminum foil or foil fire-resistant film, for example, foil foam, is fixed with staples using a construction stapler to the thermal insulation layer.
On the heat-reflecting layer, a counter-lattice is mounted under the finish coating
Wall cladding. The lining is attached to the frame in accordance with the selected layout. Nails are hammered into the grooves so that they are not visible on the finish. Nail the plinth.
For finishing the premises in the bath, you can choose different types of wood with different shades of color.
Installation of the false ceiling frame. To the floor logs or to the walls of the 100x50 timber with a vertical orientation, the frame of the false ceiling is attached. The distance between the bars should correspond to the width of the insulation board minus 5 mm for the spacer.
The ceiling installation is started after the wall cladding
Installation of heat-reflecting material. Foil or foil material is fixed in the same way as on the walls.
Clapboard ceiling lining. It is carried out similarly to wall upholstery. The section of the ceiling above the stove is protected by non-combustible material: stainless steel sheet or plate material. Attached ceiling plinth.
A foil vapor barrier is attached to the insulation, and then a lining is nailed to the finished crate
Video: interior decoration of the steam room
Having got acquainted with the requirements for the premises of the bath and having studied the information on the correct execution of the finish, you have received the necessary theoretical knowledge. The work does not require special professional skills and is within the power of any homeowner.
Popular styles in finishing the dressing room and the steam room itself are country, rustic and chalet, Provence and modern, minimalism and oriental (for Turkish hammam), as well as Asian style, which also gravitates towards minimalism. Let's break down each style point by point and find out what color and finish they need.
| Style | Color spectrum | Finishing material: floor / walls | Furniture | Budget |
| Country | red, brown | tree/tree | wooden | $ |
| rustic | light or dark brown | stone or tile/wood | wooden | $$ |
| Chalet | chocolate, coffee, stone gray | stone/stone or massif | wooden, slabs | $$$ |
| Provence | light, white-blue, gray-white | tree/tree | wooden | $$$ |
| Modern | any, even bright or neon | tree/tree | any, including plastic | $ |
| Minimalism | black and white, white, white and gray | porcelain tile or marble/marble or stone | concise and fashionable | $$$ |
| Eastern (hammam) | white-blue, orange-red or golden-orange | marble/marble or mosaic | in oriental style | $$$ |
| Asian minimalism | black, white, brown | wood/wood + porcelain stoneware | stylized | $$$ |
The dressing room usually has a small area - about 10-20 square meters, therefore, different layout options are not created here, but only different design methods (including ethnic ones) that do not affect the specific arrangement of furniture.
What can be placed in the dressing room
Atmospheric, as a rule, you can create with your own hands: here the idea of \u200b\u200bfinishing from natural wood was originally laid down - a material that is simple, affordable and quite flexible in terms of finishing. There are three rooms in the bath that need to be arranged - a relaxation room (it is also a dressing room), a steam room (actually a bath or sauna) and a shower room. Consider the dressing room for functionality.
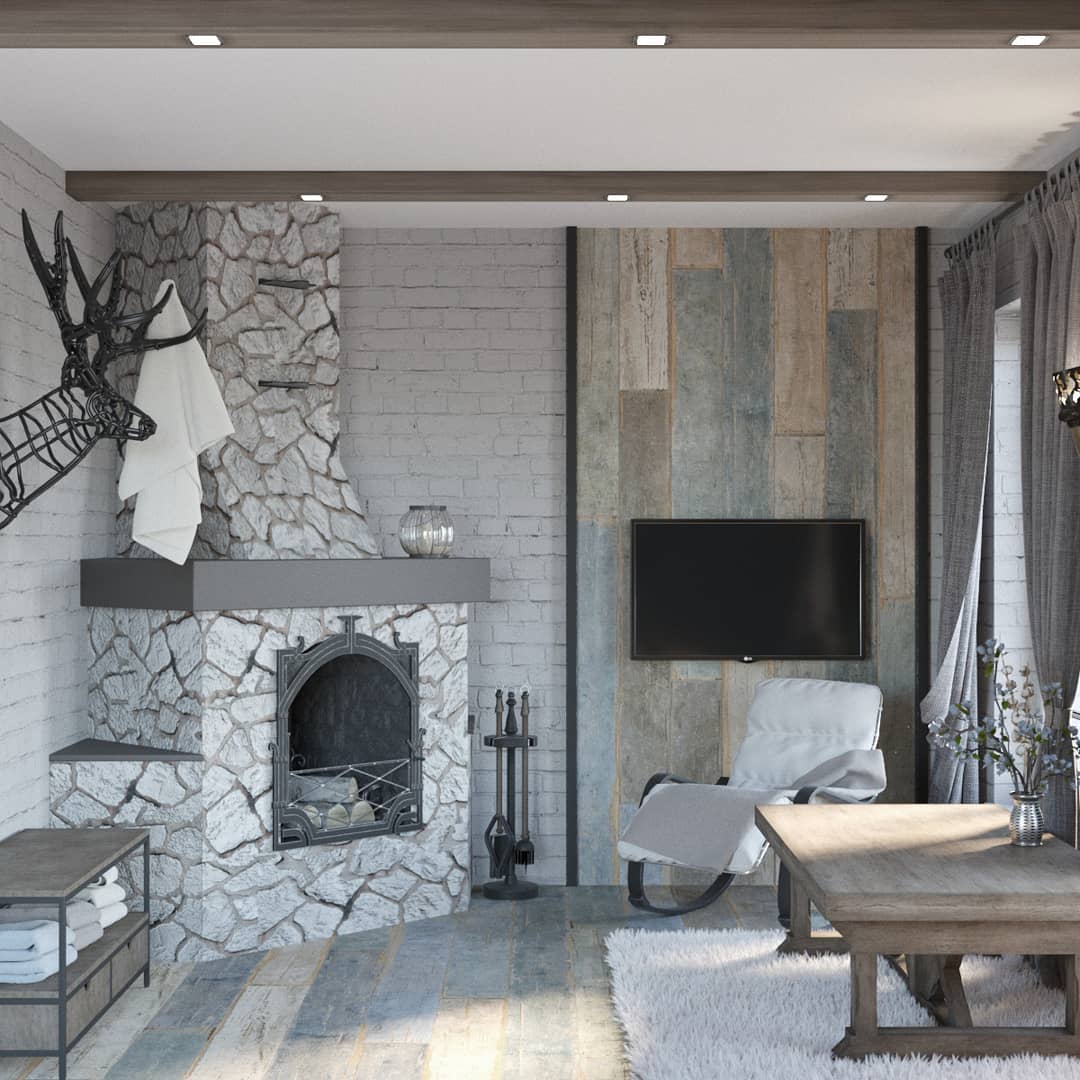
- Restroom. Usually composed of a dining group or upholstered furniture, sometimes it includes a mini-kitchen, a brick fireplace, a beautiful bay window or. It is important to understand that the humidity of the steam will also penetrate into this room, so it is best to design it as practical as possible. Many people prefer to use lining with moisture resistant impregnation.
- Furniture. It should be practical, moisture resistant, which is not afraid of high humidity for a long time. For example, natural rattan or techno-rattan are great, but MDF or chipboard furniture is absolutely not suitable, it is not only impossible to use it here, but also dangerous to health (humidity can cause poisonous glue to evaporate into the air).
- Kitchen. Not all dressing rooms have a kitchen, but placing it here is a fairly popular idea. By the way, with access to the terrace with barbecue, it will be as functional as possible. Usually it is small in size, as well as an area with a bar and a decorative sideboard.
- Storage space. In the dressing room there may also be a warehouse of details necessary for a good rest. Brooms, aromatic oils, scented candles, water with a certain aroma - all this can be found here.
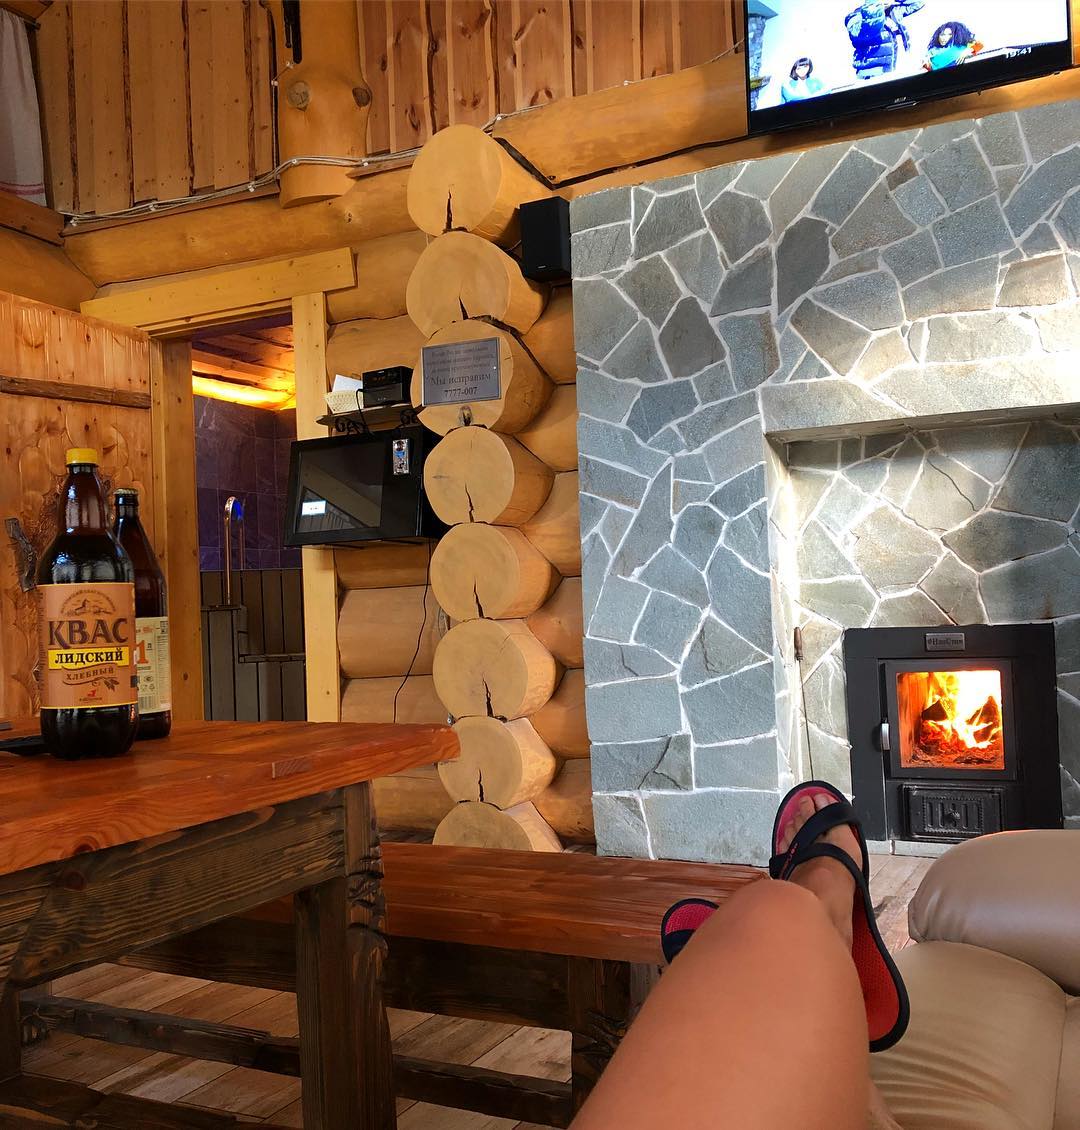
- TV area and fireplace. In addition, in the lounge part there is a fireplace and a TV. Usually the layout of the dressing room is such that the upholstered furniture is oriented precisely towards these items, so that you can enjoy watching the fire or watching your favorite TV show with pleasure.
- Swimming pool or tub. They can also be located in the dressing room. In this case, it all depends on the specific layout and the chosen style for decorating your bath. The pool is not an obligatory element of the dressing room, because it takes up a lot of space and requires almost the same amount of money for implementation as the rest of the bath.
TOP-5 design techniques in the design of the dressing room
The dressing room, like any other room, requires careful design and high-quality walls and ceilings. Also here you need themed furniture, suitable both in functionality and style. Design tricks from professionals will help you make your break room as interesting as possible.
- Proper lighting. It is fundamentally important for the dressing room. Firstly, there should not be bright and white light here, only warm yellow shades, otherwise you will not be able to fully relax. Bright light should be replaced with diffused light, it is best to abandon the chandelier in a small room, replacing it with a stretch ceiling with clapboard trim with many built-in lights. An illuminated false ceiling is ideal for a small dressing room, where a chandelier usually looks too big and makes the room feel less cozy.
- Textiles and decor. These are things that you should not forget about when decorating the dressing room. It is thanks to them that you can stylize the interior as Provence or country, chalet or Asian minimalism. For decor, you need to prudently put shelves, hammer in nails for paintings or posters, leave a place in the sideboard.
- Mosaic decoration. It is very popular in the design of the dressing room in different styles - classic, oriental, Greek and others. It can be implemented even without a font or pool, where it is usually most appropriate.
- Wall decoration with clapboard or blockhouse. A popular idea that not only looks very authentic, but is also inexpensive.
- Bright decorative accents in natural tones. Marsala, emerald, canary yellow and other bright shades will add depth to the interior.
Even more ideas for decorating a dressing room and a steam room are in this video.
The traditional Russian bath has a long history. While in enlightened Europe the royal courts invented perfumes to mask the smell of unwashed bodies and died of lice, our man performed the washing ritual weekly. Whole families went to the bath without fail on Saturdays. This day was not chosen by chance. On Sunday, it was necessary to attend church in its purest form, and on weekdays, a Russian person worked in the sweat of his brow from dawn to dusk and waited for Bath Day.
From the history
Initially, the wooden building was primitive and was drowned "in black". The stove did not have a chimney, so a dense layer of soot covered the inside of the wall. The interior of the baths of those times left much to be desired, there was no talk of any aesthetics, only functionality mattered. Steaming in such a room was not very convenient, but at that time there was no alternative. Over time, the buildings became more and more monumental. Furnaces began to be equipped with chimneys, and the ablution ritual became more and more complicated and overgrown with traditions. For example, according to popular beliefs, in each bath house there lived a special "brownie": an eternally dirty lover of dirty tricks to those who did not cajole him with a present in time.
Despite the main purpose of the building - cleansing the body, people associated it with dirt. Icons were never hung here and divination was carried out, which was considered unclean. The bath was set in the outskirts, as far as possible from the house: in the gardens and "hollow places". Fire safety requirements? Not at all, like a dirty building, the bath should not have come into contact with the house. Utensils from it were never brought into living quarters.
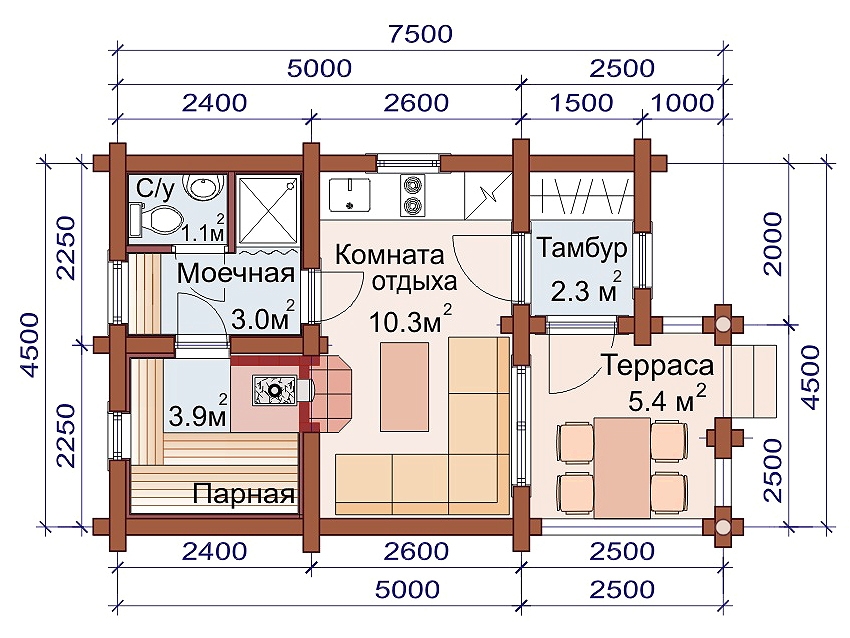
Steam rooms also became popular in ancient Rome, whose citizens carefully monitored their appearance. On the ruins of the once great empire, the remains of these complexes have been preserved, which speak of the high culture of their creators. In Rome, baths were used not only for washing, but also for debates and lively conversations on political and philosophical topics. Now the baths have a modern look, and they work no less on their design than on the interior of the house. The building will become a real decoration of the suburban area. A country house is not complete without this pleasant addition in every sense. A bathhouse is usually built outside the yard near the recreation area: gazebos, summer kitchens, barbecues and gardens. Unfortunately, it is forbidden to combine this building with other structures into a single complex by the regulations that regulate the minimum distance between buildings in private ownership. In a typical bath, there are three rooms:
- steam rooms;
- Rest rooms or dressing rooms;
- Washing room.
In various designs, the number of rooms can be reduced or supplemented. For example, if there is direct access to a pond or pool, then there is no need for a shower (washing room). In summer you can plunge into cool water, and in winter organize a font in the ice. In some luxury options, entire pool complexes can be inside. Thus, the owners provide an alternative to hot "bathing". On the site, the bathhouse can be not only a separate building, in some cases (small plot), the owners, in order to save space, equip the sauna in their basement, attic or on the basement floor. Before proceeding with the construction, the building project is prepared in advance. Since it is classified as a fire hazard, it will be useful to consult with professionals. Sometimes complex two-story structures are erected with a miniature fence, a veranda, a porch, a toilet, a billiard room and a courtyard. For the construction of such complexes, it is better to contact a professional designer-architect. He will prepare an individual project. With their own hands, they start building simpler structures. So, let's try to sort through the types of baths, the features of their construction and common mistakes that novice decorators make.
Bath area
Its performance depends on the size of the bath. If the area of \u200b\u200bthe room is calculated incorrectly, then too large a steam room will have to be warmed up for a long time, and the heat will quickly evaporate. When calculating the size of the building, they are primarily guided by the steam room. This is the most important room, the rest are just its addition. You should take into account:
- The number of people who will visit the bathhouse at the same time.
- Dimensions and features of the location of the furnace (outside or inside).
- Fuel type. The best option for uniform heating of the room is still considered to be a stove and firewood. However, some use gas and electric heaters, the performance of which should be comparable to the size of the bath.
- The number of seating shelves: follows from the first paragraph.
Also, the area depends on the size of the site. If the building is too dense, then the bathhouse will turn out to be small, since it should be located at a certain distance from other buildings. The most important nuance is the financial capabilities of the owners and the construction budget. After all, the larger the bath, the more the purchase of materials for it will deplete the wallet.
The optimal size for an average family is 5x5 (25 sq.m.). In such a building there is a place for a medium-sized steam room, a fairly spacious dressing room and even a shower room for one person.
Sauna capacity
The capacity of the bath is perhaps its main characteristic, which must be taken into account even at the design stage when preparing a drawing. Layout, location of window and door openings, communications - all this will be calculated later. The smallest bath-barrel can accommodate two or three people at the same time. Its dimensions on average vary from 2x2 to 3x3 and 3x4 meters. In order for a family of four or the same small company to relax in the bathhouse at the same time, a structure measuring 4 by 4 meters is enough. 16 sq.m. belong to the optimal dimensions, which represent the "golden mean": construction is not very expensive, and the premises do not resemble cramped pantries. For a large number of visitors, spacious bathhouses 6X4 or 5X5 m are equipped. The buildings can have a square or rectangular shape. The steam room usually occupies the farthest place, and in front of it there is a rest room, dressing room and showers.
Types of baths
Almost every country has its own bathing traditions. For an unaccustomed person, many of them may seem exotic. Each type of bath creates its own unique microclimate. In some, you can spend at least a whole day, while others recommend visiting no more than once a week due to overly aggressive conditions that can negate the entire healing effect. The main types include:
- Russian bath (steam sauna). Usually these are wooden buildings either from a bar or decorated with a rounded board. Modern Russian baths, apart from design and characteristic “decorations”, bear little resemblance to their ancestors. Traditionally, their hot "heart" is a heater, but recently more and more simple electric furnaces and gas heaters are being used. The air in the Russian bath is hot, but humid. The human body endures such an environment with more difficulty than dry soaring in a Finnish sauna. First, the stones with which the furnace is lined are heated, and then water is poured on them, evaporating instantly. Traditionally, in Russian banyas, the process of soaring is accompanied by “grooming” with birch brooms over the body. For greater effect, bundles of medicinal herbs are soaked in water: nettle, thyme, chamomile, celandine. In winter, the procedure is interrupted by “bathing” in snowdrifts or dousing with ice water. A wood-burning stove is recommended to be heated with birch or alder chocks.
- Finnish bath (sauna with dry air). This type has gained popularity in the west. The average temperature in the room can reach 100 degrees, and the humidity level does not exceed 20-30%. Thus, soaring occurs due to dry air. You can spend a lot of time in the Finnish sauna, but you can’t use brooms, as you can get severe burns. By size, this type of bath is classified into mini-options and "family" buildings. The first can be installed even in your apartment. Ready-made mini-baths are purchased in specialized stores.
- Roman version. Their standard "package" includes two rooms: tepidarium and laconium. In one, it’s just warm, and in the other, the temperature reaches 70-90 degrees, and you can sweat as it should. Usually their visits alternate.
- Hamam (dry air). In this eastern variety of baths, you can sit at least a whole day. The air is hot and dry, but the temperature is not raised above 50 degrees.
- Ofuro (water bath). Soaring in barrels of heated water is actively practiced in Japan. In fact, this is just a very hot bath of an unusual shape.
In addition to the above options, more exotic buildings are installed much less frequently: Egyptian sand baths (vertical and horizontal), Czech "beer houses", Japanese sentos (the same ofuro, but for the whole family), Swedish bastu, Indian temazcals, English hot stones, Moroccan and Indian (oldest) steam rooms.
The type of bath is chosen based on the allowable dimensions. A barrel-bath will fit in a small corner of the site, and the Roman washing complex will require a large quadrature.
Interior styles
The style solution is a combination of external design (exterior) and interior decoration (interior). Unlike the design of an apartment or house, furniture in a simple bath uses a minimum. In the rest room, armchairs and sofas are replaced with spacious benches that are installed around the table. Even less decor is used in the steam room. The most common option is rustic style. This interior solution recognizes only simplicity bordering on primitivism. Raw surfaces and the most "wild" look of the building - this is the hallmark of the rustic style. For decoration, carvings are used that decorate the exterior of the house. Baths, decorated according to the principles of French Provence, have a more elegant look. The decoration and surfaces are an imitation of antiquity. In such a room, the furniture is painted white, and the porch is decorated with a bench with a blanket and pillows in a cheerful flower. Antique style is referred to as "ancient" trends: it has managed to retain its features, having passed the test of time. For interior decoration, tiles are used, and the room is decorated with fountains and decorative columns that support the domed vault. As a highlight of the interior, you can use old amphorae and figurines. The country style is characterized by a touch of recklessness. In the interior and exterior, brickwork or its imitation (prohibited in the steam room), metal elements and raw wood are used. The austere loft breathes unobtrusive luxury. The dressing room and the rest room are decorated with chic: expensive carpets on the floor, pillows on the benches, multi-level lighting, perhaps even a bar counter. Chalet style descended to us from the Alpine slopes: it is simple, but elegant. The decor is dominated by rough wood and wide windows, which creates an almost homey feel.
Finishing materials
In Russian baths, steam had a special healing effect due to contact with the interior of the logs. The wood has "breathing" pores, which exude a unique aroma at high humidity. For this reason, baths are not built from conifers, as they emit resin. For interior decoration, it is not recommended to use artificial materials that, when heated, can release toxins: PVC panels and tiles, artificial stone, brick, MDF, and chipboard. The latter seem harmless, since they are based on waste from the woodworking industry, but the adhesive that holds the sawdust together can release harmful substances when heated. Facing of external walls is carried out by clapboard. The internal ones are trimmed with thermolint boards (special material for baths) or with a block house. The floor is laid plank or tiled, and the ceiling is lined with clapboard. In order for the required temperature regime to be maintained in the building for a long time, it is necessary to insulate it with high quality. For these purposes, three layers of different materials are used:
- Vapor barrier. Apply foil insulation.
- Mineral wool. Lightweight and non-flammable material.
- Waterproof film.
The resulting layered insulating "cake" is covered with finishing materials that perform a decorative function.
Lighting
When organizing lighting in the bath, it is necessary to take into account two main features of the microclimate of the building:
- High humidity;
- Elevated temperatures.
Moisture is considered a more dangerous “enemy” of wiring, as it can provoke a short circuit in the network, which often causes a fire. Light bulbs, switches, wiring and switchboards are selected from special options. In baths, the entire lighting system must be qualitatively protected from the aggressive effects of the internal environment of the building. In the washing and dressing room, you can use ordinary light bulbs, and for the steam room you will have to purchase special sealed ones that will reliably protect the “insides” of the device. The plafond and parting body must be moisture-proof. The lighting in the steam room should not be too bright, as this will not contribute to relaxation.
steam room
The steam room is the central room of the bath. The main healing process takes place in it, and interior design usually begins with it. The atmosphere in the steam room is modest. The main element of furniture - benches. In primitive versions, they are placed around the perimeter of the steam room. In more complex interiors, multi-tiered compositions are performed that allow the whole family to freely settle down. The central position in the steam room is occupied by a stove, which is decorated to match the overall decoration.
The dressing room can be called a "waiting room". Here they install a couple of benches, a wardrobe or a separately fenced-off locker room. Its main task is to prevent the flow of cold air into the steam room. It serves as a kind of intermediate zone between the street and the main room. In the dressing room, people, as a rule, rest while waiting for the heating of the room or their turn to visit. In more modest versions with a lack of space, it is combined with a rest room.


A bath is a mandatory attribute of any country house or cottage. In it, people relax after a working day, spend holidays. The comfort and organicity of the interior largely determines how comfortable the pastime will be. The design of a bath with a relaxation room inside can be made beautiful and cozy.
We analyze the best materials for finishing the bath
Increased requirements are imposed on the decoration of this building due to special conditions. Therefore, we will further consider the best options for decorating different departments of the healing complex.

Features of finishing the steam room
The steam room is a room with special requirements for the materials used. This is due to high levels of humidity and temperature. Therefore, this area must be finished with materials that can withstand such harsh conditions.

Remember the main thing: you can not use pine boards. The fact is that when heated, they begin to release the resin contained in their structure. As a result, hot drops will fall on your head during bathing procedures, which can lead to serious burns. There will also be unpleasant streaks on the walls and ceiling. Hence the conclusion: you can not use resinous wood. There are a number of other requirements for finishing a steam room:
- The material must be moisture resistant and dry quickly. Only in this case it will not rot.
- Have a smooth and even structure, that is, there should be no roughness and notches on the wood. This is especially true for finishing shelves.
- Low thermal conductivity. If the tree gets very hot, it can lead to burns.

The best option is linden. Traditionally, Russian baths are decorated with such wood. Lining from it has zero resinousness, low thermal conductivity, and its surface is easy to process. In addition, when heated, linden emits essential oils and a pleasant smell. Thanks to this, the rest will become not only pleasant, but also beneficial for health.

The better to finish the dressing room
We note right away that if the bath is built from round logs, then it is better not to finish it with anything, this will only spoil its natural appearance. If the structure is made of other materials (glued laminated timber, brick, log house, cinder block type of construction), then it is desirable to produce internal wall cladding.

Walls made of "round timber" in combination with wooden furniture will give the room a touch of antiquity and comfort.
Almost any material can be used to finish the dressing room. The best option is PVC panels. They are inexpensive and moisture resistant. Due to the variety of models, the room can be decorated in any style (for example, Provence or Chalet). A moisture resistant lining is also suitable.

For flooring, it is better to use ceramic tiles. It perfectly tolerates high humidity and temperature changes. It is unacceptable to use synthetic-based coatings (laminate, linoleum, etc.). Under the influence of moisture, such materials quickly deform and begin to emit harmful fumes. The floor can be covered with wood, having previously treated it with an antiseptic.

The nuances of shower design
The best option for finishing the washroom (i.e., shower room) is ceramic tiles. However, not everyone likes this design, because the main credo of the bath is lost - environmental friendliness. Perhaps, many people want to see wood trim in the room. But not every tree is acceptable to use in these conditions. The following breeds are allowed:
- cedar;
- Abashi;
- larch;
- Linden.

To make the sink creative, you can arrange the lining in different directions (vertically, horizontally and diagonally). However, this will require the ability to work with wood (you will need to saw the boards at perfectly precise angles).

If there is a desire, and most importantly - opportunities, it is best to make a full-fledged recreation area out of the bath. Especially popular is the idea of creating a terrace (in other words, a veranda) and a pool.

Features of creating a terrace in the bath
The veranda does not have to have a regular rectangular shape. The extension can be made in the form of an oval, semicircular or triangular structure. It will look beautiful and non-trivial. Such a building will be the highlight of the whole cottage. Conventionally, there are 2 types of terraces for a bath:
- open - a small building with a roof, used only in the warm season;
- closed - a full-fledged extension with windows, doors, thermal insulation, in which you can spend time even in winter.

If you give preference to the second option, it is advisable to make an attic or loggia from above (i.e., on the second floor). This is permissible when the design features of the structure allow (a solid foundation, sufficient area, etc.).

It is not at all necessary to make a veranda from the same material as the bath itself. A combination of brick and timber will look organic. Naturally, the best option is to build a terrace along with a bathhouse. However, if you think about the construction of an additional building later, then you will have to carry out the procedure for fastening the two foundations. Then the extension is made frame.

If a simple open veranda is planned, it can be arranged according to the type of gazebo - railings trimmed with balusters. If necessary, the upper part (i.e., above the railing) can be sheathed with a structure of slats arranged crosswise.

An example of an unusual design of a bath veranda. Making railings from bars is not only beautiful, but also cheap. You can make them from the remnants of lumber left after the main
construction.
As for the arrangement, the veranda does not need to have a lot of furniture. It is enough to have a large table and benches (or chairs) on which guests can be placed. Pay attention to the insulation of sockets: if the terrace is open, then during rain, water drops will get inside the room. To prevent them from causing a short circuit, it is necessary to purchase lockable sockets.

Features of the arrangement of the pool
Perhaps the most desirable extension for a bath is a pool. A sharp change in temperature has a positive effect on well-being (increases the immune system, causes the release of endorphins, etc.). Let's single out 3 types of swimming pool for a bath:
- Finished exterior design. We are talking about plastic products installed on the street. This solution is the most economical. Depending on the size and manufacturer, the tank will cost 10-100 thousand rubles. In addition, it will not take much time to erect - it is enough to assemble the structure, it will take only a few hours.
- Outdoor monolithic pool. These are full-fledged structures, buried 1-2 m into the ground. But they are only suitable for warm climates. Therefore, in Russia they are not very popular (in most regions they can be used only 3-4 months a year).
- closed type. The most optimal and at the same time the most expensive option. If the size of the bath and financial resources allow, it is advisable to make a separate room with a pool (usually it is combined with a steam room). So it can be used all year round (if you bring heating and water heating).
Tip: with the proper skills, the pool can be made independently from improvised materials, for example, from a barrel.

An example of the design of an indoor pool with mosaic tiles and a slope underwater. This style is bright, but it does not allow you to relax.
Regardless of the chosen type of construction, the pool must be located as close as possible to the steam room. So, after hot bath procedures, people can immediately cool down by jumping into cool water. It is better to cut through an additional door from the steam room directly to the pool.

Bath interior design: the most interesting styles
Next, consider the most interesting ideas for a do-it-yourself bath. Depending on your preferences and needs, this room can be decorated in different styles: Russian, Finnish, Turkish and others. Next, we will describe each of them in detail.

Features of the bath in the Russian style
The modern interior of the bath in the Russian direction implies wood trim (lining, boards, etc.). The room is decorated with wood, additional accessories (shelves, furniture, etc.) are bought. This style is natural and environmentally friendly.


The main component of the bath is a Russian stove with a stone chimney, which can be decorated with special plaster or tiles (the most expensive option). Wood tables and chairs with carved elements, brooms on the walls, etc. will fit well into the interior.

The rustic (i.e. country) style is also distinguished separately. A feature of the premises is simplicity and practicality. Country is different, but common features can be distinguished:
- light furniture with polishing;
- the presence of decorative elements made of natural materials;
- cotton textiles;
- decorating walls with ceramic tiles or eurolining.

It all depends on your preferences and needs. Having shown a little imagination, they make out a unique interior. Some, in order to create a more comfortable atmosphere, install a fireplace instead of a stove.


Everyone's Favorite Finnish Sauna
A Finnish sauna is a dry-type bath (humidity - no more than 25%), in which the air is heated by an electric boiler to 100-110 degrees. Due to the low humidity, heat is much easier to tolerate than in a traditional Russian bath, which has a positive effect on the state of the body.

Mandatory attribute of the Finnish sauna - wooden shelves. It is also advisable to take care of low lighting and the presence of thermometers.

Due to the technological features of the Finnish sauna, there are a number of requirements for the design of such a room:
- It is not recommended to use wood for finishing the floor, as it will quickly begin to rot. The best option is ceramic tiles laid on a concrete screed. Such a floor covering will last for many years, even with constant use of the sauna.
- A pit is required to collect water. The liquid must be discharged to the tank or sewer system through drain pipes. It is desirable to install the base with a slope of several degrees in the direction of the pit.
- For wall and ceiling cladding, it is permissible to use eurolining, but only of high quality (grade 1). The requirements for wood are the same as in the case of the Russian bath.
Tip: It is better to use clinker tiles for the floor, as it does not slip.


A Finnish sauna requires a stove. You can use an ordinary heater - in most cases it is enough. However, the best option is an electric furnace. It is safe, compact and functional.


Electric ovens are made of stainless steel and galvanized steel. Thanks to this, a high level of environmental friendliness of the room is achieved. Such devices provide uniform, and most importantly - rapid heating of the air. The temperature is adjusted using the control panel. There are also models with an installed steam generator. Among the manufacturers, HELO and Sawo should be singled out. Such ovens will cost a little more than domestic or Chinese counterparts, but they are of high quality and increased functionality.


Turkish bath
Hamam is widespread not only in Turkey, but also in Iraq, Syria, Uzbekistan, Tajikistan and other Muslim countries. The layout of this type of bath resembles a human palm: a large central hall (serves as a room for relaxation), from which several small rooms with different temperature regimes depart.


Interesting: the locker room in the hammam is called jamekyan.

Luxurious hammam with marble and black ceramic finishes.

The central hall usually has high ceilings, and its arch is made in the form of a dome. It also has small windows. In the relaxation room, people relax, undergo massage procedures. The architectural features of the hammam include:
- Swimming pools with different water temperatures. Initially, hamams were built next to hot springs. Today, thanks to modern technology, this is not necessary.
- Designer fountains. Such designs give the room an oriental charm and create a favorable atmosphere inside.
- Wall cladding made of tiled mosaics in bright colors. This is the main visual feature of this type of bath.


The construction of a hammam in a private cottage will cost a large amount (at least 10 million rubles). Therefore, such buildings are built mainly for public use. However, you can stylize an ordinary bath in an oriental style by adding appropriate wall decoration and installing a small fountain.


If the bath is of sufficient size, a rest room is allocated in it. In it, people relax after visiting the steam room or shower. The comfort of the room depends on the interior of the room. Therefore, design should be given special attention.


The decor of the rest room in the bath
There are no special requirements for the design of the rest room. However, in such a room it is necessary to provide the following elements:
- hooks for bathrobes and towels;
- rugs outside so that guests can comfortably change shoes;
- lockers or shelves for storing things (phones, wallets, etc.);
- a mirror, preferably full-length, so that people can put themselves in order.

This photo shows an example of a Scandinavian-style lounge design. Its distinctive feature is calm colors and minimalism in the interior.

It is desirable to design the room in soothing colors so that guests can relax after bath procedures. It is not necessary to use the same finishing materials as in the design of the entire bath. The main thing is that they have sufficient moisture resistance (for example, ordinary drywall will not work).


If the size of the room allows, the rest room can be divided into several zones: a kitchen, a living room (an area where tables and chairs are located), a playroom (for children). In the case when a large number of guests are expected, it is advisable to make an area with sun loungers or a compact sofa in which you can lie down if a person is very tired after bath procedures.


Choosing the right furniture
The list of necessary furniture depends on the size of the room. The standard ones include:
- armchairs and sofas for relaxation;
- tables for feasts;
- closet or shelves for storing personal items.


If it is supposed to have a kitchen, then you will need a set (on which cooking will take place). To give additional comfort, you can equip the room with a fireplace (it is easier to use an electric one).


To create a modern bath interior with a relaxation room, you need a competent approach to design design. It is important to use high-quality materials, remember the functional features of each room. Given all the subtleties, you can create a room for good rest and recovery.

Bath is an amazing place for relaxation and recuperation. Therefore, it should be not only hot, but also comfortable. Each owner strives to give his bathhouse an attractive appearance both outside and inside. In this article, we bring to your attention some tips on how to equip, the interior decoration of which is no less important than the construction itself.
So, if you are planning to do the interior decoration of the bath yourself, then this article will come in handy for you. Here you will find professional instructions for different types of finishes, step-by-step photos of important finishing works, and detailed videos that will help you solve your tasks at the highest level. Our advice will help you not to deviate from the principles of building technology when cladding, cladding, etc.
Finishing inside the bath is the most important stage of construction. Its quality and level of performance determine not only the aesthetic characteristics of the bath, but also the atmosphere of coziness and comfort, the degree of convenience. In addition, the materials used in the decoration directly affect the creation of a special microclimate in the bath and its healing properties. The main task of finishing is to make your stay in the bathhouse as pleasant, comfortable and useful as possible.
A modern Russian bath involves the presence of several rooms:
- vestibule;
- steam room;
- washing.
If you have built a large bath, then it is quite possible to equip an additional rest room, a billiard room, a kitchen area, a playground, a pool and much more in it. Theoretically, you can plan and build any bath, equipped with everything that you think is necessary and useful. However, this does not affect the basic defining requirements for the bath:
- all rooms should have an attractive and practical design;
- in the steam room there should be hot and pleasant steam;
- in the washing should be comfortable and safe.
Finishing has a big impact on the functionality of the bath. Even if you used high-quality material for construction, which does not require mandatory interior decoration, it still needs to be done in the bath. Properly selected materials will allow you to create optimal conditions for a comfortable stay, as well as significantly extend the life of walls, floors, ceilings. Materials are selected in accordance with the purpose and characteristics of a particular room. How best to finish the steam room, washing, vestibule, read below.
When planning the finishing of a steam room, take into account the following features of this room:
- The constant presence of heated steam coming in a concentrated and dense stream;
- Temperature fluctuations, heating to high temperatures;
- High humidity level.
The conditions in the steam room are, one might say, extreme. Many materials are simply not designed for use in such an environment. However, the modern widest range of finishing materials makes it possible to choose the option that will best meet even such harsh conditions. We recommend paying attention to the sheathing board. Its characteristics must meet the following requirements:
- Low heat capacity, the ability to quickly warm up and not accumulate heat;
- moisture resistance;
- High aesthetic characteristics;
- Pleasant smell, no tar when heated;
- Resistance to fungus and mold;
- Air purification.
Today, there are several classes of lining:
- C-class. Differs in low cost. But for finishing the bath, its characteristics are not high enough.
- B-class. Such material may have contrasting spots, cracks, minor damage, resin pockets. This class includes material on which, for every 1.5 m of length, there are no more than four knots;
- A-class. May have shallow cracks. There should be no cores in the cut. No more than one knot per 1.5 m of length is allowed on each panel.
- Premium class. The highest quality and corresponding cost. The color is uniform, cores and knots are absent.
The most common profiles are eurolining, thorn-groove, Softline, Calm.
Linden lining shows excellent results as an interior finish for a bath. Its density is quite low, due to which it does not heat up very much in the steam room. However, it does not emit tar. Linden panels provide excellent sound insulation.
And also lining from other types of wood is suitable for solving this problem. For example, cedar and aspen have proven themselves well.
When choosing one or another material for sheathing, carefully inspect the panels. The wood must be dry, well-treated, and free of nicks, knots, and other obvious defects. A high-quality material must meet these requirements, and only it will provide an aesthetic, reliable, durable finish.
Additional processing by special means does not require the material for sheathing the steam room. Do not use antifungal, antiseptic compounds or paints and varnishes. All these products are harmful to humans, and when heated, they will begin to actively release their wood, making bath procedures more dangerous than useful.
Before proceeding with lining the clapboard, the steam room must be insulated. An affordable and time-tested material that is suitable for this purpose is mineral wool. It is the most sought after in this area. Another option, no less effective, is basalt wool. It successfully copes with the effects of high temperatures, so it will last a little longer than mineral wool. But if we talk about the ideal insulation for a steam room, then one cannot but recall the cork agglomerate. Among its advantages are hypoallergenicity, resistance to fungi and rot, fire resistance.
The floor in the steam room should be pleasant to the touch, non-slip, not cold and not too hot.
The washing room is designed not only to take a shower and wash yourself properly at a comfortable temperature. The washroom should have a place to relax, so you can leave the steam room for a while, pamper yourself with massages, face and body masks and other relaxing and enjoyable treatments. It is necessary to think over all these possibilities before starting finishing work, and even better - at the construction stage.
In any case, the choice of finishing materials should be carried out taking into account all these functions of the washing room. The best option is wood or ceramic tiles. If for a steam room you can choose among hardwoods, then only conifers are suitable for a washing room - pine, spruce, larch. It is very easy to explain this choice. Softwood is resinous and highly water-repellent. Therefore, under washing conditions, it will perform better than hardwood, and will last for many years, while maintaining a pleasant appearance.
Particular attention should be paid to the selection of material for finishing floors in the washing room. The main qualities of the finished floor in this room are a comfortable temperature and anti-slip properties. To achieve this result, the base for the floor is made of concrete, and ceramic tiles are laid out on it. In order to prevent strong slipping, wooden pallets or removable logs are placed on the ceramic floor. After each visit to the bath, they are taken out into the air to dry. However, the floor in the washroom can be completely wooden, but ceramic tile as the main finish is a more practical and durable option. She copes well with an abundance of water, various cosmetics, shampoo, etc.
A high level of humidity is maintained in all areas of the bath. This is the most important aspect that must be considered when choosing finishing materials. For the vestibule and other rooms, you can use any type of wood. But don't limit yourself to wood. Other materials are also suitable for high-quality and stylish finishing of the vestibule, rest room and other bath rooms:
- Porcelain stoneware;
- Plaster;
- Natural stone;
- fiberglass wallpaper;
- Majolica.
Various combinations of these materials open up wide possibilities for aesthetic and practical decoration of the baths. For example, a combination of natural stone and wood looks very solid and beautiful. Do-it-yourself bath will allow you to translate non-standard creative ideas into reality. The interior decoration, the photo of which is presented on this page, will help you choose the best materials and their combinations.
The ceiling of the bath must withstand high temperature loads, as well as cope with the flow of hot wet steam. Do not forget about the need to protect the floors from heat and steam with the help of heat and vapor barrier materials. For this purpose, you can purchase building membranes or aluminum foil. If you put them hermetically, then their effectiveness will be equally high. It is not recommended to perform vapor barrier with foil with a layer of cotton wool, because this material has a thinner thickness, so it is much more difficult to work with it during the sheathing process. The same applies to foil with a layer of polypropylene foam. This material, when exposed to high temperatures, releases substances toxic to humans, therefore it is unsuitable for use in bath rooms.
Each joint of the vapor barrier and thermal insulation is glued with aluminum tape to ensure complete tightness. Sometimes, when performing work, the material is pierced, torn, etc. If this happens, then the hole formed in the material must be immediately sealed with aluminum tape, because later you may simply not remember about it or not find the damaged place. As a result, the vapor barrier will be leaky and of poor quality.
The steam room requires a pipe hole. It is equipped with a box with a stainless steel frame filled with expanded clay.
Cutting the ceiling for a pipe hole must be carried out taking into account maintaining a sufficient distance from the wooden floor to the outer contour of the pipe, as well as taking into account the characteristics of the chimney used.
To make a pipe hole you will need:
- 2mm stainless steel sheet
- galvanized box;
- Clamp clamp.
Cutting the ceiling is carried out mainly in order to ensure the fire safety of the ceiling slabs. In addition, in this way, the elements of the chimney receive additional support and are securely fixed in place. Cutting allows you to design the outlet of the pipe.
The box 400x400 mm is installed from the side of the attic. A sheet of stainless steel 500x500 mm is attached to it from below, from the side of the steam room. Near the steel lining, the pipe is fitted with a clamp, preventing the pipe from coming into contact with the furnace. This significantly extends the life of the furnace, since the entire load from the pipe falls on the upper steel circuit.
After the box and the steel sheet have found their places, the inside of the box is insulated and covered with expanded clay. This will prevent heat loss through the duct contour.
The steel sheet on the ceiling provides additional protection against high temperatures.
We bring to your attention an instruction that will help you complete the lining of the ceiling in the bath with clapboard quickly, economically and efficiently:
- The ceiling is sheathed with slats 2x4 cm. They are fastened with a distance of 40-45 cm. In those places where the frame is attached, ventilation gaps of 10 mm must be left.
- Horizontal slats are placed on the walls perpendicular to the lining;
- Fastening panels begins with one of the walls. The first bar is exposed with the groove out. The spike of another panel is hammered into it. The order of connection of the spike and groove can be changed, it is not fundamental.
When sheathing, use rubber pads and a mallet to handle the material gently and gently without damaging it.
- Fasten the planks using special clamps. Kleimers are attached to the rail with a screw or nails. You can also use a construction stapler, it will be even more convenient. With the help of a stapler, the fastening is reliable, and the time to complete the work is significantly reduced.
- There should be gaps between the sheathing and the wall, up to 2.5 cm in size. They are necessary for additional ventilation and to prevent deformation of the finish. To mask the gaps, it is enough to nail the ceiling plinth. The first panel and the last are attached with inconspicuous nails. It is necessary to hammer in such nails at an angle, and drive the hat tightly into the wood.
Do not forget that the sheathing should be carried out along strictly vertical lines. A level check is required after each panel installed. If there is no level at hand, then you can simply measure the distance between the wall and the edge of the sheathing. It should be equal along the entire length of the bar.
If the values obtained as a result of the measurements diverge, then the lining must be knocked out so that the measurements converge. Otherwise, the skin will turn out uneven and sloppy. Stuffing is done with a piece of panel, which is driven into the groove with a mallet or hammer to fit the size.
You can achieve perfect evenness in another way. The wooden lining is fixed and sharp wood chips are hammered under it.
The only material suitable for wall cladding in a steam room is wood. It is also suitable for other bath rooms, but other materials can also be used in them - stone, tile, etc. In the vestibule and the relaxation room, you can create original ensembles by combining different materials.
Clapboard wall cladding
According to the main parameters, wall cladding with clapboard is performed in the same way as ceiling decoration.
- The first stage is to fill a thick beam around the perimeter in a horizontal direction. Step - 80-100 cm.
- In the recesses between the bars you need to put a heater. For example, mineral wool. It is cut with a sharp knife into appropriate pieces. It is not necessary to tamp the heater.
Note! All work with mineral wool should be carried out with gloves, a respirator and goggles.
- Then a vapor barrier is laid, each joint is glued with aluminum tape.
Pay special attention to insulation in corner joints.
- Don't forget to leave gaps for ventilation. To do this, you can fill the remote rail. The crate is created at right angles to the lining. Therefore, if you want to sheathe the walls, placing the lining vertically, then the crate must be nailed horizontally.
First of all, rails for the frame are installed in the corners of the walls in a vertical position. Care must be taken to ensure that their position remains strictly vertical. In order to facilitate the alignment of the horizontal slats, string can be pulled between the vertical slats at the ceiling and floor.
- With separate bars, you need to separate the area of \u200b\u200bthe door and the window;
- Now you can go directly to the paneling.
It is recommended to fasten the lining for baths from one corner in the vertical direction. Due to this, it will be easier for water to drain from the walls, without lingering in the grooves of the panels. If you like a horizontal pattern, then the panel spike should be directed upwards so that moisture does not collect or linger in the grooves. In this case, you need to start work by fixing the boards to the ceiling. The crate in this situation is performed in the vertical direction.
The lining is directly fastened with kleimers, nails, self-tapping screws or a construction stapler. If you are using self-tapping screws or nails, then insert them at an angle, driving the caps deep into the wood. Ventilation gaps of about 2 cm should remain between the ceiling and the sheathing, the floor and the sheathing.
A common problem that people face when doing self-cladding of the walls of the bath with clapboard is the need to cut the material. It's easy to do. You can cut the lining with a fine-toothed saw or a jigsaw.
The last panel on the wall is cut to the desired size and fixed to the crate. The next wall starts with a panel where the comb is cut off. It should fit snugly against the last rail of the previous wall. In the corners, the elements must be adjusted especially precisely. Determine the exact angle values before sawing the batten or panel. Draw a line with a pencil on the material to avoid mistakes. There should be no seams at the corners of the panels.
The most important moment when performing finishing work inside the bath is the insulation of the furnace. The following materials are suitable for solving this issue:
- Stainless steel sheets of appropriate size;
- Minerite is a special material with high heat-resistant characteristics. It is a mixture of cement, reinforcing fiber and mineral fillers. With a close location of the stove near the wall, the mineralite must be put in two layers. If at least 40 cm remains between the oven and the wall, then one layer will be enough.
- Ceramic heat-resistant tiles;
- Solid red brick. They need to lay out the walls from the floor to the base of the pipe or higher;
- Profile iron is the cheapest option.
Ceramic tiles are the best option for finishing all bath rooms, except for the steam room. Considering the modern variety of models and collections, it will not be difficult to make the design of a rest room or washing room not only practical, comfortable and durable, but also aesthetic. The most important argument in favor of tiling is its excellent moisture resistance.
Laying tiles is carried out step by step. The first step is preparation. The second is the direct execution of work.
Preparatory stage
The preparation of concrete or cinder block walls consists in removing dust, dirt, plastering and leveling. The preparation of wooden walls is to perform waterproofing. With a construction stapler, roofing felt, roofing felt is nailed onto wooden panels. A chain-link mesh is sewn on top of the waterproofing, on which a concrete solution is densely placed.
Then, in both cases, it is necessary to nail an even beam. It will become the basis of a fine finish. Instead of a bar, a metal profile is also suitable. Do not forget to check the horizontal and vertical rows during the laying process. For horizontal, use the building level. For vertical, you can use a plumb line.
Instructions for laying tiles in the bath
You can prepare a tile fixing solution yourself. To do this, you need to mix cement and sand in a ratio of 1:5. But you can also buy a ready mix. It is recommended to give preference to a special adhesive designed for laying tiles in rooms with high humidity and temperature fluctuations. Tiles must be immersed in water before laying to remove air. Thanks to this, the tile will adhere much better to the solution.
Start of work - from the attached level. The first row must be laid out especially diligently, because it is he who determines the evenness of all subsequent rows and the accuracy of the entire lining.
Glue is placed on the reverse side of the tile. Use a notched trowel for this. Glue can also be applied to the wall. Then the tile is carefully applied to the wall and pressed down so that the adhesive protrudes slightly beyond its edges. You can adjust the position of the tile with a rubber mallet.
It is important to maintain an equal distance between the tiles. Therefore, after you lay adjacent rows, fix special plastic crosses in the corners of the tiles. This will keep the same gap both in length and in height.
It will take a couple of days for the tiles to dry. After that, you can remove the level and wipe the seams. The color of the grout should be in harmony with the color of the tile.
The final stage is the removal of grout residues, cleaning the tile and giving it the final aesthetic appearance.
With the help of ceramic tiles, you can realize the most daring creative fantasies. You can lay it evenly, diagonally, offset, patterned. The easiest and fastest way is to lay the tiles in even rows.
If you decide to tile a complex pattern or pattern, it is best to transfer it to the floor or wall so that you can immediately see where which tile should be located. This will allow you to accurately complete the cladding and give your bath a truly original and unique look.
An unusual and very stylish solution for a bath is terracotta tiles. They are ideal for this type of room, as they are resistant to both temperature and moisture. At the same time, they allow you to create an original and interesting design, eco-friendly, practical and stylish. The laying of this material has its own characteristics, primarily due to its significant weight. This tile requires a special adhesive. Mastic will work too.
The installation process consists of the following steps:
- Mastic is densely distributed on the stove. This material will require much more adhesive than conventional ceramic tiles;
- We apply the plate to the wall, press down and align;
- We continue to work in the same order with the rest of the plates;
- To align the joints between the tiles, pieces of drywall can be inserted into the seams;
- Do not forget to regularly check the parallelism and evenness of the rows with a level;
- 10 hours after the installation is completed, you can start processing the seams. It is performed with a heat-resistant grout for wide joints. The composition is diluted with water to the density of sour cream.
- Then pieces of drywall are removed from the seams;
- The grout is applied with a construction gun. The spout must be cut at an angle of 60º so that the width of the hole is 8-10 mm;
- The seams are carefully filled with grout. It should not fall on the plates themselves or other surfaces.
Handling a pistol requires experience. So be very careful with it. If the grout still gets on the tile, then do not try to remove it immediately. You will only spread the composition over a larger area. It is better to wait a little while the grout dries. So, you can gently scrape it off.
- The direction of applying the grout can be any;
- Two hours later, you can move on to the stitching, which will provide a finished look to this finish.
- Jointing is done with a 7-8 mm screwdriver or a wire ring;
- After that, you need to walk along the seams with a finger in a clean glove.
The wooden floor in the bath does not need additional finishing. A concrete floor involves laying ceramic tiles with a non-slip coating.
Laying starts from one of the corners. In this case, the ideal evenness of the rows is not required, because the floor in the bath is made with a slope towards the drain. But the approximate location of the tiles is still worth noting on the floor by level before you start laying them.
The work is carried out in the following order:
- The solution is distributed on the floor with a spatula in accordance with the size of the tile;
- The teeth of the spatula imprint a pattern on the mortar, which ensures its reliable connection with the tile;
- Tiles are laid out. In the process of work, its position is adjusted with a rubber hammer. Don't forget about slope formation! Tiles for the first row must be dry. And it is desirable to pre-soak all other elements in water.
- Corner elements are cut to the required size using a tile cutter;


