Having a personal plot, you immediately want to equip it, ennoble it. And then plant, and this ... Fantasy is in full swing, and there are so many ways to realize your plans! We just need to understand what exactly we want and HOW to do it? And you don’t need to immediately rush in search of a newfangled designer, calm down, you can arrange everything YOURSELF! And our site will help you make the right choice.
What can give each garden a special individuality, exclusivity? Of course, garden paths!
There are many different types of garden paths that can be made at low cost. And there is nothing complicated in their manufacture, and the savings are obvious. Having done everything with your own hands, you will save on the services of a designer, and by correctly “seeing” and selecting materials from those already available on the site, you will also reduce these costs to zero.
The most popular country paths from improvised materials, which you can easily make with your own hands, we will now take a closer look at:

- Here's everything you need to get started:
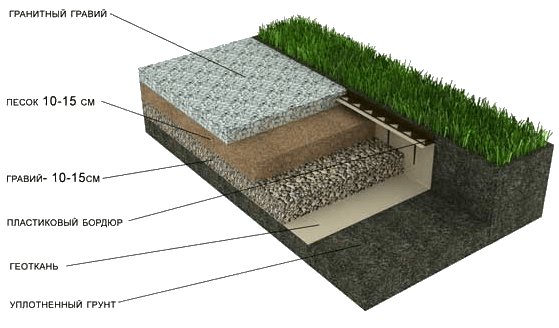
- Gravel (pebbles, expanded clay), at the rate of 1 ton per 15 m ^ 2;
- Dense film or geotextile;
- Sand;
- Boards made of wood or concrete on both sides of the track.
- Mark your future path on the plot, draw all its turns and bends (if any);
- On both sides of the future path, dig in the sides of wooden blocks, or concrete strips;
- Remove the top layer of turf along the entire path by 15-20 cm;
- Take a geotextile or a dense film and lay it along the entire path, while trying to put the edges under the sides of the path;
- Sprinkle the cleaned place with sand for 5 cm;
- Carefully level the sandy surface;
- All preparatory work is completed, now you can finally start filling the prepared space of the path with gravel;

- That's all the difficulty when doing a gravel path!
Related video: the secret to a quality gravel path
Paths made of natural stone are considered the most durable and durable. However, to make them, you will need to purchase natural stone, if one is not available in your area.
- Prepare the following materials:
- Booth or chipped cobblestone;
- Sand;
- Sand compacting tool.
Stages of laying a stone path:
Work should begin with marking the future path, after which the turf should be removed from the place along which the path will be laid. Moreover, the largest of the stones you prepared will indicate the depth to you (dig 5-10 cm more than the largest stone);

Then you should fill the entire path with sand and evenly level it, the height of the sand embankment should be about 10 cm;
Lay the stones on the sand, pressing them well into the sand. For large stones, the distance between the stones can be up to 8 cm, subsequently it is covered with earth and, for beauty, can be sown with grass. For a small stone, a distance of 2-3 cm will be sufficient. Such seams are subsequently sealed with a cement mortar;
The stone path is ready! Do you have installation difficulties?
Do-it-yourself concrete garden paths
For concreting garden paths, modern manufacturers have come up with a special plastic frame. With this device, your concrete garden path with their own hands will appear in the garden very quickly and will not require any extra time or delivery of the stone. What materials are needed for garden paths - sand, fine gravel or small gravel, cement, water.
Related video: Concrete garden path, mold for making
- We prepare the path in almost the same way as the gravel one, only the trench under the path should be dug 20 cm wider than your finished path will be.

- We take out the excess soil and tamp everything down well;
- Fix the formwork with pegs along the entire path on both sides;

- Attach transverse rails to the formwork every 2.5-3 m. This will help protect the concrete from cracking during operation;
Apply the form to the prepared sections of the track and proceed to fill the form with cement mortar. At the same time, it is very important to ensure that the entire form is filled with cement evenly and that there are no voids anywhere. If you still haven’t noticed the void that has formed somewhere - don’t worry, apply the form again and fill it with cement - everything will be fixed;

Thoroughly compact the concrete with a heavy flat object, possibly a board;
Move from one section of the track to another. At the same time, cover the finished one with polyethylene - so as not to inspire debris on the freshly prepared and not yet completely cured concrete;

Fill the space between the cement tiles with earth and sow them with herbaceous plants - it should turn out very beautiful!
The remaining spaces around the path (remember, we dug a larger trench than necessary) can be lined with bricks, covered with earth or small pebbles.
Related video: We concrete the garden path with our own hands
An excellent and very popular material for your garden path can be an ordinary tree. Thanks to the variety of colors and textures of wood, you can get a unique and very beautiful path!

Neat paths gracefully winding between green spaces and landscape decor are an essential attribute of any garden. So, if you want your site to be truly well-groomed and complete, by no means neglect the paths. Fortunately, for their arrangement you do not need to spend fabulous sums and involve professional designers - you can make beautiful paths with your own hands, seriously saving both on materials and on work. How? There are many answers to this question, because there are a huge number of types of garden paths that can be laid at low cost. Next, we offer you instructions for the most popular options with accompanying photos and videos - after reading them, you will definitely be able to effectively ennoble your site.
The original path from saw cuts of wood
Wooden round logs are a very simple, but original material for garden paths. Raw materials for them can be found at every site - for sure, there are old trees everywhere, which it would be time to replace with new seedlings. It is advisable to use larch or oak - they are the most resistant to external influences, which means they can boast a long service life. The path of saw cuts is made according to the following scheme:

Advice. In order to protect the path from moisture and increase its durability, equip the simplest drainage - pour a layer of fine gravel between the sand cushion and saw cuts.
Durable stone paths
One of the most durable garden path options is natural stone. Here you can use cobblestone or but - they are equally durable. The path is laid out as follows:
- Mark out the garden path.
- From the area where the path is planned to be laid, remove the top layer of the drain. The depth of this layer should be 7-10 cm more than the height of the largest stone prepared for the path.
- Fill the resulting trench with a 10 cm layer of sand, carefully level it and compact it.
- Alternately lay the stones on the sand cushion, pressing them firmly into the base. The distance between small stones should be no more than 2-3 cm, and between large ones - up to 8-10 cm.
- Carefully fill the remaining gaps with cement mortar. When the track sets, fill the seams with earth or fine sand to make them look more natural.
Classic concrete paths in the country
Concrete is a traditional material for laying paths, which is always popular due to its low cost and ease of use. Everyone can definitely make a cast track:
- Mark the boundaries of the path - drive in pegs along its contour and stretch the wire between them.
- Within the marked contours, dig a small trench - up to 30 cm deep.
- Lay on the bottom of the base a layer of gravel 5 cm and the same layer of sand. Seal the resulting pillow.
- Cover the base with a chain-link or any other thin metal mesh.
- Install lumber formwork along the perimeter of the future track.
- Prepare a cement mortar: 1 part dry cement, 1.5 parts sand, 2 parts gravel and 1 part water.
- Pour the cent and evenly, with vibrating movements, using a spatula, distribute the composition over the entire area of \u200b\u200bthe track. During installation, pierce the mixture with a rod to prevent the formation of voids.
- Using the rule, finish the alignment of the path and cover it with polyethylene.
In 3-4 days the track will be ready. During this time, remember to gently moisten it with water to protect the concrete from cracking and give it maximum strength.
Advice. To make the path more interesting, even before the concrete mixture finally sets, “drown” various decorative pebbles, glass or shells in it.
Budget garden paths from tires
Transport tires have long been widely used in summer cottages: they make flower beds, ponds, swings, and now also garden paths. This trend is not surprising, given the performance characteristics of the material: tires are resistant to moisture and temperature extremes, easy to care for, do not slip and are durable. You can equip a garden path from them like this:
- With a knife, divide the tires into two parts: rolling tracks and sidewalls. To make the knife easier to enter into the rubber, regularly lubricate it with oil or soap.
- Cut out the resulting rings of ribbon. Trim them to length and trim the edges.
- Take wide wooden boards and carefully fasten rubber bands on them with nails so that they completely cover the wood - there should be no empty gaps between the elements.
- Remove the top layer of soil with a depth of no more than 5 cm along the entire length of the future path and press wooden boards into the base. If desired, the rubber can be painted.
Country paths made of bricks
Another traditional material for garden paths is brick. It is recommended to use clinker products, as they are characterized by high resistance to various kinds of chemical and mechanical influences. It is important that the bricks are intact and without chips, otherwise the path will turn out not only unaesthetic, but also unsafe.
The track is laid out like this:
- Mark the path: drive a peg around the perimeter and pull a rope between them.
- Dig a trench along the marked contour - up to 25-35 cm deep.
- Along the trench, lay the limiters from the bars or boards.
- The space between the limiters, that is, the "body" of the track, cover with a 10 cm layer of gravel and carefully compact it. Lay a layer of sand no more than 5 cm high on top.
- Remove the limiters and make curbs in their place: on both sides of the path, lay one row of bricks in the “on the ribs” position.
- Form the interior space of the path with the bricks: lay them in their usual position, gently tapping with a wooden spatula or rubber mallet so that they sit down.
Advice. Bricks do not have to be laid closely - to give the path a more original look, leave small gaps and fill them with pebbles. In addition, you can not even close the gaps - after a while, grass will sprout in them and decorate the path.
Variety of wooden walkways
Wood is one of the most fertile materials for making garden paths, as it can be used in completely different guises. Consider two common options: board paths and bark paths.
Site preparation in both cases looks the same:
- mark the path and remove the top soil - about 20 cm;
- lay geotextiles on the resulting trench;
- top with a 10 cm gravel layer.
Further technologies diverge. So, if you are making a path from boards, prepare the constituent elements: adjust them in length and width and treat with an antiseptic. If desired, you can give them a sinuous shape. Further along the edges and in the center of the trench along its entire length, install wooden supports and fix them with cement mortar. The final stage is to nail already prepared planks to the supports.
If you want to build a path from the bark, make sure that the material is durable - it should not crumble. Be sure to treat the bark with an antiseptic. Before fixing the material in the trench, lay a sand cushion on its base, and then drown the bark in it.
Tiled garden paths
Although tile cannot be called a very cheap material, it is still used very often for the manufacture of garden paths. There are several reasons for this: aesthetic appearance, good performance and ease of working with the material. The technology of laying a tile track will convince you of the latter:

Now you know many interesting ways to make a garden path with your own hands at low cost. Following simple instructions, you can implement any of the above options on your site, so feel free to get to work and discover new opportunities for ennobling the garden area.
Garden paths in the country: video
DIY garden paths: photo


Garden paths are part of landscape design. They make the summer cottage well-groomed and attractive, facilitate movement around the territory.
In our article, we have collected detailed instructions, photos and videos on how to make tracks with your own hands.
Do-it-yourself economy options for tracks in the country
Different materials are used for arranging garden paths, but there are general requirements that they meet:
- Aesthetics
- Safety
- Moisture resistance
- maintainability
- All season
- Strength
- Easy Care
Gardeners and summer residents make paths from concrete, wood, natural stone, paving slabs and other materials. See what they look like.
Concrete walkway using ready-made forms

Walkway paved with natural stone

wooden garden path

Path of concrete and paving slabs

Walkway made of concrete imitating natural stone

gravel path

Combined stone and gravel garden path

Another option for combining crushed stone, stone and paving slabs

Walkway from paving slabs

Clinker path

Walkway made of stone

Ideally, garden paths are combined with the exterior of the house and complement the landscape. The material for the tracks is selected taking into account the expected load.
Decorative paths are rarely used for their intended purpose. Bulk materials are suitable for them: gravel, sand, crushed stone.
It is better to move along paths made of durable concrete, brick or paving slabs. Parking for cars is recommended to be paved with concrete, paving stones or stone.
Do-it-yourself concrete paths in the country
Concrete garden paths are practical, durable, and can withstand heavy loads. The rough surface of concrete pavements does not slip.
Such paths are equipped in two ways: using formwork or special forms.
Filling with formwork
First, prepare the base: remove the top layer of earth and tamp it down. Then proceed according to the scheme.

Gray concrete looks boring, but there are ways to ennoble it.
In small areas, lay winding paths with smooth turns and bends. This will visually expand the space.

Add pigment to the concrete mix to color the walkway the color you want. Introduce coloring pigments at the stage of preparing the mixture for pouring.

Show your imagination, and gray concrete will turn into an imitation of wild stone, as in the photo below. This requires a sharp knife and a steady hand to cut stone-shaped grooves into the surface when the concrete has already set but not completely hardened.

Pouring into special molds
Plastic molds for pouring concrete are sold in hardware and garden stores.
Prepare the base for the path. To do this, go deep into the ground by 10 cm. Next, compact the soil and lay a pillow of sand and gravel. If you add crushed stone to the concrete mix, make a sandy base.

Moisten the prepared base with water, and treat the molds for pouring with a special lubricant from the inside.
Then place the molds in a sand cushion, press them in so that the upper part protrudes 0.5 - 1 cm above the ground.

Prepare the concrete mixture, add a plasticizer to it to give the track strength, add a color pigment (optional) and pour it into the molds so that the concrete is evenly distributed over the entire area. Level the top layer with a spatula or trowel.

After 30 - 40 minutes, when the concrete sets, carefully remove the forms, cover the path with a film for 1-2 days. You can walk on the path after 5 days.
The video of the thematic master class will help you
Do-it-yourself tile paths in the country house
Paving slabs of different designs, colors and sizes are used for garden paths. It is laid on a prepared base with a sandy substrate, as in the diagram below.

Tiles of 40x40 cm are often used for laying. The large size reduces the time for arranging garden paths. The tile is laid so that the distance between its centers is no more than a step.

The gaps at the docking points are filled with sand, and the edges of the track on both sides are limited by curbs.

The advantage of paving slabs is that it is combined with country houses and cottages of any style, fits into simple and complex landscapes.

Do-it-yourself wooden paths in the country house
Wooden paths in the country look natural, stylish and durable. Garden paths in the country are made from ordinary boards with a thickness of at least 5 cm.
The advantage of such wooden trails is quick installation and a neat appearance. Manufacturing begins with the selection of materials and tools. Inexpensive and common lumber is softwood boards. It is better to choose larch, but the cost in this case will be higher.

The tree is treated according to the standard scheme: with an antiseptic, and then coated with varnish or paint - for further protection. A clear lacquer enhances the texture of the wood, while colored paint sets the accents. Boards are cut into segments of the same length. For paths of complex shape, the length of each plank is selected individually.

The base of the paths made of natural wood, as well as for a wooden path from saw cuts, is made from a sand and gravel cushion. Preparatory work is carried out in the following sequence: marking, pit, geotextile, crushed stone layer, sand layer, tamping.

Then the boards are laid on the base or placed on an elevation - a specially arranged frame. Boards laid in the ground look natural and at ease, but such a wooden path deteriorates faster. The structure on the frame will be stronger and more durable, in a word - capital. Such an idea requires more effort.
Watch the video on how to make wooden garden paths at minimal cost
The arrangement of a garden path made of wooden saw cuts resembles paving stones. Instead of stones, flat wooden dies of the same height are laid. To create a dense path, large saw cuts alternate with stumps of small diameter, the free space is filled with large branches.
From ordinary stumps or cuts of a tree, pretty winding paths are obtained. Choose the right material, understand the laying techniques, and you will be able to make a garden path from tree cuts with your own hands in the garden or in the country.

Pay attention to the preparation of the tree. Untreated wood will quickly become unusable, and the tree ring path will have to be redone. First, select the type of wood. Suitable:
- pine
- larch
- Birch
The difference between hardwood (larch, beech, oak) and other types is the service life. Larch will last 25 years, pine will be in operation for 5-7 years.

Use a dry tree without traces of pests. Dissolve the logs into dice of the same height. The optimal size is 15 cm. For convenience, use a template. If you are doing the harvesting yourself, make sure that the cut is made strictly perpendicular to the log. Sort the sliced \u200b\u200bpancakes by size, remove cracked specimens. Clear the rings from the bark.
Next, process the wood cuts for the paths to protect them from rotting and decay. An elementary method is processing with drying oil. Bring the drying oil to a boil, then dip each stick into the hot oil. The boiling substance seals the pores of the wood and prevents moisture from getting inside - the first enemy of wooden products. Disadvantages of this method: long and dangerous. Hot oil can burn you.
Another option is special formulations. Arm yourself with a brush or spray gun and treat the tree with an antifungal agent. After preventive treatment, let the tree dry.
After preparing the material, proceed to the device of the path. Do not rush to lay the path from the saw cuts of the tree. First, carry out preparatory and excavation work:
- Mark a path in the garden
- Remove the top layer of soil
- Dig a trench
- Arrange waterproofing
- Prepare the base.
Now you can take on the shovels. Don't make the trench deep. Add 10 cm to the height of the dies - this depth will be optimal.
Lay a waterproofing layer in the trench. Some use a film, roofing material, but it is better to take geotextiles in such cases. This material does not allow stagnation of water and the germination of weeds.
Pour a 10 cm layer of gravel on the waterproofing - this is a drainage for water drainage. Tamp and cover with 5-10 cm of sand.
Wet the sand to better compact and level the base for the stump garden path. When wet, the sand is rammed by hand.

Wood is laid in a pattern or in random order. The logs are placed on a sand cushion, then they are rammed and leveled. Sand or gravel is poured into the gaps. Mulch, sawdust, pebbles, moss are suitable for seams on top.

The arrangement of garden paths is necessary for cleanliness, comfort and convenience on the site. Paths are needed not only for functionality, but also for decoration in landscape design, a green zone.
To create tracks, it is not necessary to hire specialists; you can carry out the work using your own efforts, while reducing financial costs.
Country path project
Before starting work on the design of garden paths, they begin to plan the site.
- When creating a plan, the most passable places are taken into account and marked.
- Next, they determine the width of the future paths, apply markings on the site.
Country paths should be easy to use. The thickness and shape are made in any version, it depends on individual preferences.
The main point in the arrangement will be the choice of material. It directly depends on the composition of the soil, climate, personal wishes.
Advice! When planning a site, they first determine the area of \u200b\u200bthe main and auxiliary paths. Important criteria are taken into account: entrance to the site, outbuildings, irrigation, recreation area, passage between flower beds.
Material selection
After planning the site, the question arises: cheap?
Consider the main types of materials that are most often used in the arrangement of country paths.
Wood
Traditional material, harmonizes well with the lawn and flower beds. Wooden paths are environmentally friendly, safe. You can easily install them yourself.

Wood is exposed to an aggressive environment, therefore, in order to extend its service life, the material is pre-treated with chemicals that protect against moisture penetration and dampness.
Wooden paths are used only in dry areas.
Natural material is not cheap, therefore, to save money in arranging paths, they use the remains of saw cuts or bars.
Winding paths look good from ordinary stumps. Prepared sections are laid directly on the ground, leaving a small distance between them.

Wooden board paths look spectacular on a green lawn. The edges of the path are trimmed with wooden chocks, or they are completely left without decoration. Wooden boards, if desired, are combined with small pebbles.

Such budget paths look no less attractive.
This video details how to make a garden path from old logs:
Concrete
Concrete paths are easy to make on your own, which will significantly reduce the cost of arranging. Your own work will not be in vain, because such paths will last a long time. The path of concrete is made of any shape, size.
The advantages are:
- low cost;
- ease of installation;
- durability;
- resistance to precipitation;
- inability to grow grass.
An interesting option for execution are special forms that give an original look to the concrete pavement. A budget option would be to purchase one plastic form, with which you can equip a small area of the path.

The arrangement of long paths with one form will turn into a laborious process.
Advice! The absence of clear lines will help to get away from boring design. When creating tracks, you can use curved lines, rounded bases. Such a process will be more difficult, but the result will be much more beautiful and interesting. .
Watch a useful video on how to make a concrete path using a plastic mold:
Bulk materials
With the help of bulk materials, you can create attractive and functional paths in your summer cottage. Among the advantages of this type of material are:
- low cost;
- no need to prepare the foundation for arranging trails;
- the possibility of making your own hands;
- a wide range of;
- opportunity to implement creative ideas.
As bulk material for arranging paths in the garden, they use: pebbles, crushed stone, gravel, slate.


Natural stones differ in structure, size of fractions, color.


Bulk material is well combined with natural stone and wood.
Look at the video, the technology of building a garden path from decorative granite screenings with granite paving edging:
paving slabs
Another type of material for arranging country paths. Today, paving slabs are especially popular in the arrangement of suburban areas. The high demand for the material is due to its high strength, durability, and aesthetics.

Do-it-yourself work will help to save on the manufacture of sidewalk paths in your own garden.

Each tile has its own size, pattern and color. Select material according to the general design of the site. It is better for a beginner to abandon complex geometric patterns, but laying out exactly paving slabs on their own is quite possible.
Related video, paving slab laying technology:
Natural stone
Paths made of stone are considered the most durable and strong. They are perfect for a site where increased strength of the paths is needed.

Natural stone is laid on a sandy base, or on the ground in the form of smooth paths or randomly decaying areas. Natural material is perfectly combined with other types of road surface finishes.
From natural stone, you can not only make garden paths, but also design landscape design.

The only disadvantage of this material is the formation of ice on the surface of the stone path in the winter. The technology of laying natural stone with your own hands is simple, not requiring special skills.
Advice! The use of homogeneous materials in the arrangement of the facade of the house and garden paths will add conciseness and harmony to the exterior.
Watch an interesting video, the process of creating a garden path from ordinary stone:
Making tracks with your own hands from improvised materials
Many summer residents are wondering: how to lay out the tracks without experiencing serious financial losses? For this, the use of improvised materials is suitable.
rubber tire resistant to external natural phenomena, so it is perfect for arranging paths in the garden.

The material can be easily purchased at the tire shop for free.
Car tires are prepared for further laying in place of the future track: the edges are cut off, and the straight part is straightened. There is no need to prepare the base, the tire is laid directly on the ground.
This video shows how to make garden paths from old car tires:
In nature, you can find a lot of useful material that can become a coating for garden paths. For example, coniferous forest is rich in tree bark.
This natural material looks great in the landscape design of the site, and laying it yourself will not be difficult.

The bark of trees is durable, perfectly passes moisture. The bark laying technology is simple - it is enough to prepare a trench, pour a layer of sand and fill the space with bark to a height of at least 10 cm.

Advice! When arranging the paths, the design of the borders will not be superfluous. They will help hide flaws and give completeness to the road pattern.
Conclusion
In order to do it yourself in the country, knowledge in the field of construction and architecture is not required. The main thing is to follow the advice, choose the right material, fulfill all the conditions for preparing for work.
Paths in the country between the beds are equipped according to the same principle as indicated above in the article.
Budget design options for country paths can look very interesting and concise. With a little effort, showing imagination, you can create a beautiful garden alley on your site without experiencing large financial losses.
Paths should be in every garden. Their presence makes it easy to navigate and move freely around the territory. Making garden paths with your own hands, at minimal cost, is not difficult. Instructions, photos and videos of this article will help to realize your ideas. See how many ideas and a variety of inexpensive, improvised materials exist on this topic.
Do-it-yourself concrete paths in the country
Concrete is most often used for arranging paths and paving around the house. This traditional material is available and cheap. With your own hands, classic cast tracks from it, anyone can make.
1. Start by marking the boundaries. Mark the outline with wire or fishing line tied to stakes driven in at the corners.
2. Within the indicated boundaries, make a trench 25-30 cm deep, with a slope of 3-4% in the transverse direction from the axis of the track or in both directions.
3. Level the bottom of the trench and lay it with a bearing layer of gravel. Pour a 5 cm layer of sand over it. Compact each layer with a rammer.

4. Prepare the formwork, for which, around the perimeter, install a frame made of metal or lumber. Well for this purpose, an edged board with a section of 25 * 150 * 6 mm is suitable.
5. Reinforce the body of the future track, use a chain-link mesh or other metal elements (pieces of wire, old water pipes) for this.
6. Insert dividing partitions into the formwork, or special cellular forms treated with a protective solution. This will save the concrete from cracking when it dries and give the path a decorative relief.
7. Prepare the solution:
- cement (not lower than M 500) - 4 kg;
- sand - 6 kg;
- gravel - 13 kg;
- water - 1.9 l.
You should get a plastic semi-liquid consistency. It is desirable to add a plasticizer and a concrete hardening accelerator. To give the mixture the desired color (brick, stone), experiment with the color scheme.
8. Pour concrete into the formwork trough flush with the edge. Spread evenly with a spatula, making vibrating movements. Pierce (pierce) the mixture with a metal rod (reinforcement) to make it uniform.
Advice! To improve adhesion to the base, lay the solution on wet sand, crushed stone, gravel.
9. Finally level the surface of the filled track with a rule. The procedure for filling and forming the body of the track, perform sequentially. Go from one dividing rail to another, from one loading form to another, gradually.

10. Cover the lane with polyethylene to prevent the mortar from drying out quickly. Concrete gains strength for 3-4 days, during which moisten it with water. This will prevent cracking and give concrete additional strength.
To achieve an even greater decorative effect, various components are “embedded” into the surface that has not fully set: pebbles, colored glass, shell rock. The relief of the track is given by various strokes, furrows, prints. And to imitate antiquity, as if the path was overgrown with moss, kefir or milk is introduced into the solution.
Garden paths made of bricks and paving stones - scheme, layers, implementation
Durable and inexpensive material for the manufacture of garden coatings - facing bricks or paving stones. This material is resistant to frost and abrasion. Brick is less durable due to greater porosity. However, it has a decorative look and is available in several shapes and colors. In addition to the natural dark red color, there is brown, red, brown, anthracite, white. The brick path can be easily laid in the form of an arc, or herringbone, which greatly improves the spatial perception of the site.

Advice! When laying paving stones, keep in mind that paving stones ~ 4 cm thick are better suited for paving walking paths or terraces. And on paths with heavy loads, use cubes ~ 6 cm thick.
Pavement paving stone
Start by removing the topsoil to a depth that allows you to lay all the layers of the path so that the last layer of paving stones is level with the ground. More often, this depth is 20-40 cm.
Important! The base for paving stones is the basis for proper installation. This is the layer responsible for the uniform transfer of load from the surface of the pavers to the ground. It also acts as a drainage layer that protects against the effects of precipitation and negative temperatures.
Making a base for paving stones - 3 important rules
In order for the base under the paving stones to perform its function properly, for a long time, its design and manufacture takes place according to the rules.
1. The thickness of the base layer. We are talking about the correct ratio of the thickness of the base layer for the planned load of the surface of the pavers. On the paths, a base 10-20 cm thick is more often used. In the case of pavements on which heavy traffic is planned, the base is increased to 25-40 cm.

2. Foundation material. The base under the pavers must be permeable to water, quickly pass it through itself to drain into the ground. For the manufacture of a drainage layer of the base, use: gravel, crushed stone, slag, or a mixture of sand and gravel.
3. Laying layers of the base. To ensure uniform laying and compaction of the base under the paving stones, lay the material in layers of 10 cm thick. Be sure to compact each layer, this will prevent possible subsidence in the future.
Attention! If the soil below the base has low water permeability, an additional drainage layer of geotextile may be required.
Making a sand "cushion"
Create a frame for the future track, according to the type of formwork. In the formed trough, make a dump of sand. Its task is to introduce and fix individual structural elements. Layer thickness ~ 3-5 cm. For greater strength, sand is mixed with dry concrete in a ratio of 3: 1. However, this kind of material makes later repair work difficult. Level the screed with a wooden slat. Soak a layer of sand until a liquid "slurry" is formed.
Laying brick pavement
The procedure is to place one element after another, in the direction "away from you". At the same time, light tapping on the upper part of the brick / stone with a rubber mallet or mallet allows you to plant the elements in a sandy base.

Surface fixing
The final stage of work consists in sprinkling the working surface with quartz sand, which fills the gaps between the cubes, bursts and gives solidity to the structure. The action is repeated several times. In between, the sand is abundantly wetted with water, swells. The excess is squeezed out, dried and removed with a whisk. A dense, cemented packing remains between the bricks.
Stone garden paths
Paths made of wild stone are durable and elegant. Their natural texture and various shades of color are perfect for any environment, look good in combination with other materials.
The most commonly used granite flagstone. It is a hard and very durable material. He is not harmed by water and frost. Popular colors are gray, red, pink-red granite is beautiful. Similar properties have basalt (black), porphyry (gray-red-brown stone), syenite (gray, almost black), as well as: travertine, gabbro, diabase. Sandstone or slate looks attractive in different variations.
In the garden among the greenery, informal paths made of mosaic-laid stone slabs look great. In the intervals between them, grass or undersized, creeping plants are sown, for example: alissum, iberis, stonecrop.

The method of laying stone material is similar to that described above and depends on the location, purpose of the path and the permeability of the soil under it. On drained lands with low operational load, stone garden paths are laid on a 5-10 cm layer of mortar of sand or gravel / crushed stone, cement, in a ratio of 1:12.
However, there are a number of problems associated with the use of a field stone:
1. Irregular natural forms. Stones are difficult to pick up, link together. Creating a perfectly flat plane is also problematic. This makes it difficult to move on them, for example, garden equipment.
2. The stone draws moisture from the ground. Therefore, it is often overgrown with moss and lichen. Easily exposed to dirt that is difficult to remove. To prevent this, wild stone, at least once every 3 years, is treated with a composition based on silicone or resins (Dynasil, Lithofin). These products form a protective layer without creating a slippery surface. At the same time, they clog pores and give the effect of a “wet stone” without changing its natural color.
Garden paths from paving slabs
The functional coating of this material is unparalleled. The price of the material is not fabulous, and laying tiles with your own hands is easy to perform.
There are antique-styled tiles imitating stone pavement and cut granite or raw sandstone. There are high-strength clinker tiles obtained by single firing. Colored and textured concrete are used to make elements that resemble boards, wooden sidewalks, or old railway sleepers.
In the collections of trading companies there are elements of different thicknesses and shapes: square and rectangular. Thin 3-5 cm, used for paving decorative paths, thicker tiles - for facing the entrance.

Do-it-yourself paving slabs have become popular. Suitable molds for making castings can be bought everywhere today. They are made of high-quality, durable plastic, laminate, and wooden ones are also found. Designed for repeated use. The sizes, a design, forms, the price are various. The surface of the casting can be smooth or patterned.
The preparation of the filler solution is carried out according to the technology described above.
Paving slabs are quite heavy, so they need a solid foundation. It is recommended to do two layers:
- leveling layer (sand, crushed stone, 10-15 cm);
- retaining layer (a mixture of sand and cement, 3-4 cm).
The thicker the frame layer, the more stable the coating - the plates will not move!
Care should be taken when cleaning tiles in winter - it is better not to beat off the ice with sharp tools, the outer layer is damaged.
Wooden garden paths - ideas, implementation
Wooden paths in the garden are not as resistant to weather conditions as stone or concrete, but they always attract attention with their naturalness, environmental friendliness and high decorative aesthetics.
Do-it-yourself garden paths from saw cuts of a tree
The path lined with wooden round logs looks original. The best wood for this job is oak or larch. Their solid and weather-resistant structure, "survives" for more than a dozen years. It remains unchanged without impregnation, due to the large amount of tannins. Pine and spruce, unfortunately, are less durable.
1. Cutting wood. From the trunks and branches of an old tree, cut fragments with a diameter of 10-40 cm and a height of 15-25 cm. The optimal ratio of large blanks (25-40 cm) to small ones (10-15 cm) should be 3:1. Since the saw cuts are round and form large spaces between them, different cutting diameters complement each other during subsequent laying.
2. Remove the bark and dry the blanks for several days in the sun.
3. To protect the wood, be sure to impregnate the saw cuts with an antiseptic primer to a depth of 3-4 cm.

4. After the impregnation has dried (24 hours), it is advisable to apply a coat of varnish for outdoor use.
5. Installation. Remove the soil to a depth of 5 cm. Fill with sand. You can make a 4 cm cement screed. When tying the track, alternate the combination of three large and one small die. Between them, a perfect pattern is obtained, practically without a gap. The free space between the cuts is covered with fine sand. After a while, it will only be necessary to replenish its natural decline.
Tips.
Do not place slices close to each other. Over time, the wood swells, the track elements are squeezed out.
It is better to have wooden walkways in sunny, ventilated places. In the shade, wood absorbs and retains moisture, as a result of which it undergoes biological corrosion. Remember, wet wood is slippery!
To increase the durability of a wooden walkway, place a 20-30 cm thick layer of crushed stone drainage under the surface.
With proper operation, the service life of such a track will be 10 years.
Tree bark garden paths
It is a cheap and environmentally friendly material. Walkways made of bark, arranged among flowers and ornamental shrubs, provide them with nutrients and protect the ground from freezing. The best, such paths are in places where there are plants that prefer acidic soil (heather, rhododendron, hydrangea, erica). Path preparation is not difficult. It is enough to make a pit, and fill the bottom with a layer of sand (10-15 cm), then put 8-10 cm of bark on it.
Advice! The bark naturally decomposes. Once a season, the path from it requires additional backfilling.
Railroad sleeper track
Railway sleepers are a durable material, but difficult to access. You can make paths out of them, laying them flat, tightly with each other or positioning them freely, and fill the voids, for example, with gravel.
Important! Remember, paths should not run too close to trees, especially those with shallow root systems. Growing over time, it can break the surface of the track.
Do-it-yourself garden paths from car tires
We are all car enthusiasts. Using old car tires in this case is an ideal budget option in the manufacture of garden paths. It is the tire that is designed to experience the maximum load.
Constructions from it are obtained:
- reinforced;
- resistant to temperature extremes;
- not slippery;
- not absorbing moisture;
- not soaking;
- easy care;
- easy to manufacture.

The process is as follows:
1. Using a knife, separate the tire track from the side part. To make it easier for the knife to penetrate thick rubber, treat the blade with machine oil or soap from time to time.
2. Cut the resulting rings into ribbons. Three to four such tapes may be required to make a garden path.
3. Trim the strips to length and nail them to a wooden board or beam, next to each other.
4. Press the structure into the ground along the perimeter.


 Constellation Scorpio description")


