Heating system tests produced after completion installation work. But first, all plumbing pipes must be flushed.
Before testing, check compliance with the test heating systems project, produce an external inspection of pipelines, connections, equipment, instruments, fittings.
Put to the test heating systems in general and certain types equipment, as well as their regulation. According to the test results, acts are drawn up.
Testing of heating systems, heat supply perform hydrostatic and manometric (pneumatic) methods.
Hydrostatic testing of the heating system produced by filling all elements of the system with water (with complete removal of air), increasing the pressure to the test pressure, holding the system under test pressure within a certain time, reducing the pressure and, if necessary, emptying the system. Hydrostatic testing is safe: the system is tested in conditions that are closest to the workers. However, such a test requires water to be supplied to the building to fill the plumbing system, which is unacceptable. If the tightness is violated, it is possible to flood the premises, soak building structures; in winter time possible freezing of water in the pipes and their “defrosting”.
That's why hydrostatic testing of heating systems, heat supply, boilers, water heaters are performed at a positive temperature in the premises of the building. The temperature of the water that fills the system must be at least 278°K (5°C).
Hydrostatic heating tests carried out before finishing the premises.
Gauge testing of the heating system in many respects they are devoid of the shortcomings of hydrostatic tests, but they are more dangerous, since if pipelines or system elements are accidentally destroyed under the action of compressed air, their pieces can get into the people conducting the tests.
Gauge heating tests spend, filling heating system compressed air under a pressure equal to the trial, and keeping it under this pressure for a certain period, then the pressure is reduced to atmospheric.
For testing, a pneumohydraulic unit TsSTM-10 is used in the form of a two-axle trailer, on which a tank with a volume of 2.5 m3 and all test equipment are mounted.
Testing of heating systems. Acceptance of heating boiler houses is carried out on the basis of the results of a hydrostatic or manometric test, and heating systems– based on the results of hydrostatic and thermal tests, as well as external inspection of the installed devices and equipment. Heating systems tested for tightness (but not for strength) manometric method under an excess air pressure of 0.15 MPa to detect mounting defects by ear and then at a pressure of 0.1 MPa for 5 minutes (in this case, the pressure should not decrease by more than 0.01 MPa).
hydrostatic water heating system testing carried out after installation and inspection. To do this, the system is filled with water and air is completely removed from it by opening all air collectors, taps on the risers and at heating appliances. Fill the system through the return line, connecting it to a permanent or temporary water supply. After filling the system, close all air collectors and turn on the manual or powered Hydraulic Press, which create the required pressure.
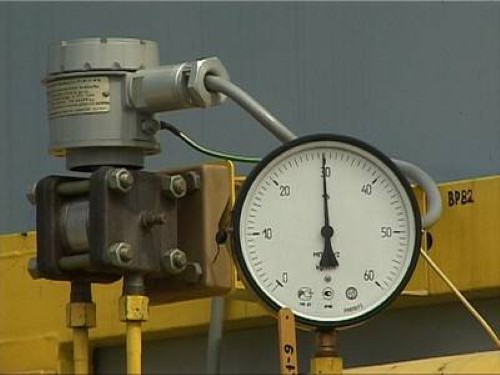
Water heating systems tested with a hydrostatic pressure equal to 1.5 times the working pressure but not less than 0.2 MPa at the lowest point. During the test, the boilers and the expansion vessel are disconnected from the system. The pressure drop during the test shall not exceed 0.02 MPa for 5 min. The pressure is controlled by a checked and sealed pressure gauge with divisions on the scale through 0.01 MPa. Minor faults found that do not interfere with the hydrostatic test are marked with chalk and then corrected.
Installation and country house.
To provide heat in the house in winter, you need a reliable and efficient heating system. After installing the boilers, installing pipes, replacing individual components, as well as in preparation for the new season, they carry out hydraulic tests heating systems. These tests are aimed at identifying leaks, local damage, leaky connections and other problems that can cause the system to become inoperable during operation.
If in apartments hydraulic testing and pressure testing falls on the shoulders of housing and communal services workers, then owners of private houses should contact specialists or conduct hydraulic tests with their own hands.
Hydraulic testing of pipelines of heating systems
The hydraulic test of the heating system is prerequisite security comfortable conditions in a private house. Over time, heating elements wear out and fail, testing the heating system helps prevent damage during the heating season.
Before installing heating elements and pipelines, a hydraulic calculation of the heating system is performed, taking into account the material and the inner diameter of the pipes, the diameter shaped products and fittings, pipe wall thickness and other technical parameters. With incorrect calculations, the efficiency of the system can be significantly reduced, and the operating period can be reduced several times.
Consider how the calculation of the diameter of the pipeline of the heating system is carried out and the diameter of the pipes is determined depending on the nominal load on a single section.
Calculation of the section of the heating pipe
D = √354∙(0.86∙Q:∆t):V
where D- diameter of the heating pipe, cm;
Q- load on the calculated section of the system, kW;
∆t– temperature difference between the falling and return pipes, ᵒС;
V is the speed of movement of the coolant, m/s.
This calculation allows you to determine the average diameter of the pipe of the heating system. Professional calculations of the heating system use significantly more data. In this case, not only the size of an individual pipe is determined, but also the diameters of the narrowed sections, the distance between the pipelines, and so on.
Why is hydraulic testing of a heating system necessary?
Each separate system heating has its own operating pressure, which determines the degree of heating of the room, the quality of the circulation of the coolant, the level of heat loss. The choice of working pressure is influenced by a number of factors, including the type of building, the number of storeys, the quality of the line, and so on.
While the coolant moves through the pipelines, various hydraulic processes occur, which lead to pressure drops in the system, called water hammer. It is these loads that usually cause the accelerated destruction of the heating system, therefore hydraulic tests are carried out at a pressure 40% higher than the nominal one.
Hydraulic testing of pipelines of heating systems is carried out after performing the following work:
- checking valves, serviceability of valves of shut-off type;
- strengthening the tightness of the system by means of additional glands (if necessary);
- restoration of pipeline insulation layers, replacement of worn materials;
- cutting off the house common system with a blind plug.
When carrying out pressure testing, as well as for further filling the system with coolant, a drain-type valve is used, which is installed on the return.
Technology for pressure testing of the heating system
In the process of filling the system, the liquid is supplied under moderate pressure, which makes it possible for it to gradually fill all the elements of the system. Air must be bled from the system from time to time.
In apartments multi-storey buildings leaks are detected by testing with a pressure of 20 - 30% higher than the working one. For this, a special press is used to pressure test the heating system, and the pressure is controlled by a pressure gauge. After reaching the required pressure, the system is left for 30 minutes. If the pressure subsequently decreases, then there are leaks or leaks in the system.
The most common cause of loss of tightness is damage to gaskets, stop valves, junctions or bends of pipes, wear of threaded connections or heating radiators. After troubleshooting and re-checking, a act of testing the heating system. A heating system that is ready for start-up without damage and leakage of the coolant is considered to be pressurized.
Crimping of a warm floor, features of carrying out
In addition to the heating system, the underfloor heating also needs to be checked regularly. Pressure testing of the warm floor is carried out until the pressure in the system stops dropping. Required pressure in the system is achieved by using a pressure test pump. In apartments of multi-storey buildings, medical and educational institutions pressure testing is carried out by special supervisory authorities. After the tests, a hydraulic test report is drawn up, which indicates the control parameters and the date of the test.
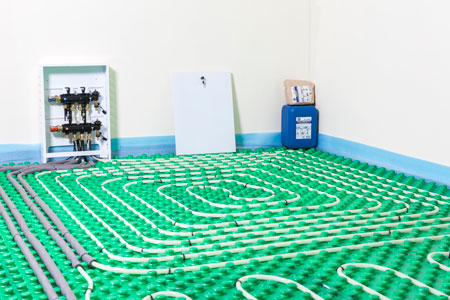
During the installation of the underfloor heating system, different links may become clogged with small debris, and the connections may be deprived of tightness. All this can interfere normal functioning underfloor heating, cause leaks or loss of efficiency. Crimping of the warm floor is carried out immediately after installation before pouring the screed or laying the finished floor.
During pressure testing, the underfloor heating system is filled with water from the central pipeline through the valve for filling and draining the coolant. Test pressure during hydraulic testing should be 2.5 - 2.8 atm. After filling the system, it must be left for 20 - 30 minutes, leaks should be identified and eliminated.
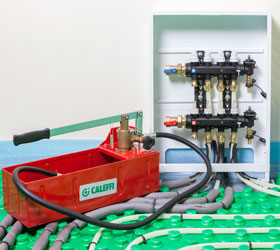
When pouring water into the underfloor heating system is difficult, pressure testing can be done by forcing air masses. To do this, you can use a compressor or a car pump with a pressure gauge, which must be connected to any valve in the system. Also, for crimping underfloor heating, you can use special crimping machines, the cost of which is usually quite high. The pressure during pressure testing with air should be 2 - 3 times higher than the working one. For example, at an operating pressure of 1.5 - 2 atm. It is necessary to achieve a pressure of about 5 atm.
After filling the system with water or air, check all connections for leaks. The filled underfloor heating system can be left under pressure for 24 hours to check the strength of the connections and detect leaks. It should be remembered that with temperature changes in the room, the pressure in the system also slightly decreases. After pressing the underfloor heating, you can lay the finishing floor or pour the screed.
The overall reliability of the heating system depends on effective work each node. The physical condition of all elements individually and as a whole must be subjected to periodic testing. The results obtained after hydraulic testing of pipelines of heating systems must comply with building and installation standards.
One of these methods is crimping. For legal or individuals the company conducting this procedure may issue a confirmation certificate.
Features of self-diagnosis
To carry out the check, you will need to pour a sufficient amount of coolant into the return system. It must be borne in mind that the movement of water will be parallel to the movement of air. Due to this solution, it will be possible to remove air by opening special air valves reset or by means of an expansion tank.

For hydraulic testing it is necessary to use a pressure tester
When free cavities are filled with liquid, it slowly rises through the system. Heating devices and a vertical type pipeline will be at the same level in terms of liquid level. At this time, air bubbles under fluid pressure are displaced during hydraulic testing of the heating system.
Due to the fact that the vertical riser is filled with coolant faster than horizontal radiators, there is a risk of air formations in the batteries. Pipelines running on water are tested by pressurizing. Raising its level, it is necessary to control the value on the pressure gauge.
For efficient operation of the heating system, it is necessary to get rid of in full from the air.
The test pressure should not be higher than the working one by more than 0.1 MPa, and it is also not allowed to lower it during testing below 0.3 MPa.
All hydraulic tests of pipelines must be carried out with the expansion tank and other equipment.
For central heating do not test if the stacking of risers was carried out open method during cold weather. Also, there is no need for pressure testing if the system has been functioning effectively for the last 2-3 months. System control with insulated pipes carried out before applying special insulation to their surface.
VIDEO: Test different types fittings
General verification algorithm
In the process of crimping, you will need the following set of tools and materials:
- Hydraulic Press;
- compressor-supercharger;
- shut-off valves;
- pressure gauge with scale division up to 10 atm;
- measuring instruments.
By connecting the compressor, we pressurize the system. The calculated value should leave all elements of the system intact. As a rule, it does not exceed 30-50% of the working value established by SNiP.
It is necessary to build up pressure gradually to minimize the effect of water hammer. Get more exact value will succeed if there are a couple of pressure gauges in the circuit. Temperature error must also be taken into account.
The set pressure will need to be held for 10-15 minutes. At this time, it is necessary to clearly monitor the readings of the manometer. There should be no strangers in the room. After a measured time interval, the force is reduced to the working value.
When no decrease in readings is detected, this indicates the absence of coolant leaks. If a clear decrease in value is detected, then it will be necessary to determine the place with a leak. It is easy to find by the presence of moisture nearby.
When the leak testing is completed, the strength of the formed seam can be tested. First of all, visual control of open areas is used. For wiring from non-ferrous metal or related alloys, integrity control is determined by tapping. In the process, a wooden mallet up to 0.5 kg is used. With regard to the steel line, a hammer up to 1.5 kg will be relevant.
For bimetallic installations or combined cavities, as well as containers with different meanings pressure, it is necessary to use a check on each site.
Hydraulic calculation
During the check, the correct installation of pipes will need to calculate the hydraulic parameters of the system. The following data is required for calculations:
- the material from which the pipes are made;
- internal diameter of pipes;
- the diameter of the shut-off valves and the diameter of parts with a curved surface;
- Wall thickness.
Incorrect calculations can provoke a pressure drop in the pipeline and the occurrence of heat losses.
For the calculation, it is allowed to use a special formula:
|
G=√354*(0.86*R:T):W |
- G - pipe diameter in cm;
- R - power value on the site in kW;
- T - temperature difference between supply and return 0 С;
- W - the speed of water passage through the system m / s.
For professional calculation, it is taken significantly large quantity components included in the formula.
This formula helps to calculate the required pipe diameter.
Test conditions
Certain conditions must be met for the verification to take place. Otherwise, you can get invalid data as a result. The ambient temperature must be at least +5 0 C. The permissible range for the coolant value is +5-+40 0 C. In some documentation, this corridor can either be expanded or narrowed.
If pneumatic tests, then are selected electronic thermometers, having a division scale of 0.1 0 C.
Hydraulic leak tests can be carried out with any pipe configuration, even for circuits with different operating pressures. In this situation, the maximum value from the loop is taken as the base operating value. For the test, an excess of up to 50% is made.
The operating value that pipes are able to withstand, manufacturers indicate in their passport. Based on this indicator, you can calculate the maximum allowable parameter for testing.
VIDEO: Pressure testing of the heating system with air
Any work, be it: pipe laying in St. Petersburg or areas mounting engineering networks , flow repair of engineering networks, device or repair of sewerage/heating/water supply systems. All of the above types of work are carried out by the specialists of our organization, PiterRem LLC, quickly, efficiently, and inexpensively.
Types of pipe laying:
- outdoor - pipes are laid by a plumber on walls, floors, ceilings. Mounted on clips or clamps
- internal - pipes are removed into the walls, the floor and then plastered
- combined - when the pipes are closed with a box
Options for wiring heating systems:
Working mechanism for all hydraulic systems
as the masters say, PiterRem is about the same; it involves heating the coolant in the boiler (heat generator), from where the coolant enters a closed chain of pipes and heaters laid throughout the house. Water is usually used as the heat carrier; much less often other liquids are used for these purposes - the so-called ``antifreeze``, special antifreeze liquids. Passing through all the heating devices of the chain, water or another coolant gives off heat to each of them, after which it returns to the boiler, and then the whole process is repeated.
Diagrams of hydraulic heating systems
differ not only in their engineering features but also the principles of operation. According to the nature of the movement of the coolant, they are divided into systems with natural and forced circulation. The former are used in small houses(50-150 m²), the second - in traditional construction (250 m² and more).
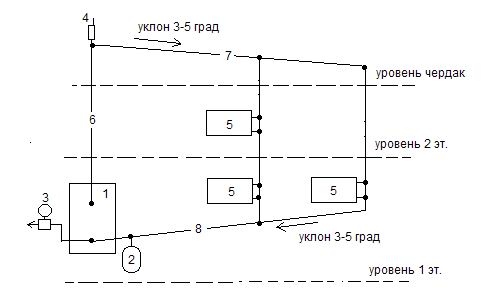
- natural circulation - water is heated in the boiler and rises through the supply vertical pipeline. As the water cools, it becomes heavier, its density increases, and completing the circle, giving off heat less warm water returns to the boiler through the return pipeline. Such a system is able to work without electricity, but it looks ``not very`` in the interior of the house and ``eats`` more fuel.
- forced circulation- the coolant moves with the help of a circulation pump, which allows the use of pipes of smaller diameters and does not observe slopes. The circulation pump only helps the coolant overcome the resistance of the pipelines. A system with forced circulation is more comfortable, the heat in such a system can be controlled. The quality of such a heating system is higher, but uninterrupted power supply is required here.
Piping layouts in heating systems:
- Single tube vertical systems - this is a well-known example of wiring in the Soviet apartment buildings. Horizontal single-pipe circuits have a rather narrow scope (mainly for heating large rooms like cinema halls). As our plumbers here say, a single-pipe supply line sequentially bypasses several heaters that are on the same level, with a slight slope towards the movement of water. The water cools down in each radiator and comes to the last heaters in the chain already significantly cooled. If you want to significantly reduce the cost of pipelines and their installation, then this scheme is for you. But if the main thing for you is comfort and aesthetics of the interior, then you need to decide in favor of a two-pipe system, as our masters advise, who can be called to any part of the city for a more detailed consultation.
Single-pipe systems have three significant disadvantages:
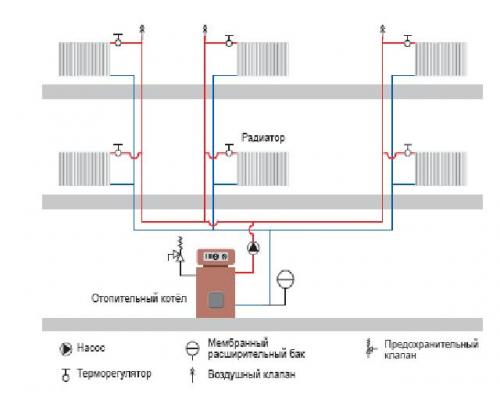
Two-pipe systems. Two pipelines, direct and return, are connected to the heaters with the help of bends. Water enters each radiator at the same temperature, which allows you to useradiators are the same size. The diameters of the supply and return pipes, as well as the dimensions of the fittings (connections) are smaller than in single pipe systems.
It is possible to carry out hidden laying of pipelines in concrete screed floor or under plaster or in a plinth box. These systems make it possible to regulate the heat transfer in the room, for which a thermostatic valve is installed on each radiator, with the help of which the regulation process is carried out automatically. Another advantage of two-pipe schemes is that sections of the heating system here can be put into operation in stages, as the floors are built.
vertical two-pipe systems also allow the use in houses with a variable level of floors (that is, when the floors are lined up vertically in a checkerboard pattern).
Options for two-pipe schemes:
- options with top and bottom wiring.
- dead-end two-pipe systems and systems with associated movement of the coolant.
- two-pipe systems with a central high-temperature main and collectors from which pipes are supplied and discharged to each radiator separately. This allows you to reduce the diameter of the pipes and when laying heating circuit give up a large number expensive shaped elements (tees). In addition, the collector circuit also benefits from the fact that it is easy to link individual heaters by pressure here. Despite the fact that due to the greater consumption of pipes and the cost of the collector, this scheme turns out to be somewhat more expensive than traditional two-pipe schemes, the collector system is becoming increasingly popular in individual construction.
- Tee wiring reduces the total footage of the pipe, but the number of fittings and pipe sizes increases - this complicates the installation work.
- The collector (beam) scheme increases the consumption of the pipe, but all pipe connections (at the collector and mixer) remain accessible - if necessary (for example, when leaks are detected or repairs are made in the room), any of the beams of the system can be turned off, and defects can be quickly detected and eliminate. The number of fittings is reduced. Pipes of a smaller diameter are used, which makes it possible to make the screed thinner, while maintaining the living volume of the room. Besides, in collector circuit does not occur sudden changes in the water supply with the simultaneous use of several plumbing fixtures, as happens with a tee wiring, (the pressure and temperature of the water do not change when other taps in the apartment are turned on).
Both beam and perimeter wiring work well, but beam is preferred for large areas.
Hydrostatic and gauge tests
systems of cold and hot water supply must be made by a plumber before installing water fittings.
The value of the test pressure in the hydrostatic test method should be taken equal to 1.5 excess working pressure.
Hydrostatic tests:
- Systems are considered to have passed the test if within 10 minutes. under test pressure, no pressure drop of more than 0.05 MPa (0.5 kgf / sq. cm) and drops in welds, pipes, threaded connections, fittings and water leakage through flushing devices at the end of the test
- using the hydrostatic method, it is necessary to release water from the internal cold and hot water supply systems
Gauge tests:
- fill the system with air with a test overpressure of 0.15 MPa (1.5 kgf / sq. cm)
- if defects in the installation are found by ear, the plumber should reduce the pressure to atmospheric pressure and eliminate the defects
- then fill the system with air at a pressure of 0.1 MPa (1 kgf / sq. cm)
- keep it under test pressure for 5 minutes
Before testing, all plumbing pipes must be flushed. Prior to testing, the compliance of the tested ristem with the project is checked, an external inspection of pipelines, connections, equipment, instruments, fittings is carried out.
The system as a whole and individual types of equipment are subjected to testing, as well as their regulation. According to the test results, acts are drawn up.
Tests are performed by hydrostatic and manometric (pneumatic) methods.
Hydrostatic tests are carried out by filling all elements of the system with water (with complete removal of air), increasing the pressure to test pressure, keeping the system under test pressure for a certain time, reducing pressure and, if necessary, emptying the system.
Tests of heating systems, heat supply, boilers, water heaters are carried out before finishing the premises and at a positive temperature in the building. The temperature of the water that fills the system must be at least 278 K (5°C).
Gauge tests are largely devoid of the shortcomings of hydrostatic tests, but they are more dangerous, since if pipelines or system elements are accidentally destroyed under the action of compressed air, their pieces can get into the people conducting the tests.
Manometric tests are carried out by filling the system with compressed air at a pressure equal to the test pressure, and keeping it under this pressure for a certain period, then the pressure is reduced to atmospheric pressure. For testing, a pneumohydraulic unit TsSTM-10 is used, made in the form of a two-axle trailer, on which a container with a volume of 2.5 m3 and all the equipment necessary for testing are mounted.
Testing of heating systems. Hydrostatic tests of the water heating system are carried out at the end of its installation and inspection. To do this, the system is filled with water and air is completely removed from it by opening all air collectors, taps on the risers and at the heaters. Fill the system through the return line, connecting it to a permanent or temporary water supply. After filling the system, close all air collectors and turn on a manual or powered hydraulic press, which creates the required pressure.
Water heating systems are tested with a pressure equal to 1.5 working pressure, but not less than 0.2 MPa at the lowest point. During the test, the boilers and the expansion vessel are disconnected from the system. The pressure drop during the test shall not exceed 0.02 MPa for 5 min. The pressure is controlled by a checked and sealed pressure gauge with divisions on the scale through 0.01 MPa. Minor faults found that do not interfere with the hydrostatic test are marked with chalk and then corrected.
Hydrostatic testing of surface heating systems is carried out before termination mounting windows pressure 1 MPa for 15 min. In this case, the pressure drop should not exceed 0.01 MPa. At negative outside temperatures, a manometric test of these systems is allowed.
After hydrostatic conduct thermal test system for 7 hours, checking the uniformity of heating of heaters. If the outside air temperature is positive, then the water temperature in the supply lines must be at least 60°C, if negative, at least 50°C.
Steam heating systems with working pressure up to
0.07 MPa is tested with a pressure equal to 0.25 MPa at the lowest point of the system. After a hydrostatic test, the system steam heating tested for tightness of heat pipe connections. To do this, steam is allowed into the system at operating pressure.
Water heaters are tested for density with a pressure of 1.25 times the working pressure plus 0.3 MPa for the steam part and 0.4 MPa for the water part.
Pumping units are first tested for Idling and then under load. Before testing, the installation is carefully inspected, the reliability of fastening, the absence of any objects inside (gaskets, parts) are checked. To do this, the pump shaft is turned manually and turned on for 3-5 minutes. When extraneous noises and knocks appear, the pump is turned off and disassembled. During normal operation, the pump is run in for 12-15 minutes, after which the rubbing parts are checked, there is no overheating. Causes of overheating may be inaccurate fit, distortion, tight tightening, contamination of rubbing parts or lubricating oil. Then the pump is run in for 1 hour, then 6 hours, monitoring its condition. If no defects are found, the pump is switched on for trial operation and put under load.
The test results are documented in the act of acceptance of the heating system.
Heat pipelines of heat networks are subjected to a pressure test equal to the working one with a coefficient of 1.25, but not less than 1.6 MPa. During the test, the following requirements are met: the gate valves in the test area must be fully open, the seals must be sealed. To disconnect the tested section of the heat pipeline from the existing networks, plugs must be installed.
After filling the line with water with a temperature of at least 5 ° C, a pressure equal to the working pressure is set in the heat pipes and maintained for 10 minutes. If no defects or leaks are found at the operating pressure, it is brought to the test pressure and kept for the time necessary to inspect the route, but not less than 10 min.
The results of testing heat pipelines are considered satisfactory if during the test the pressure did not drop, and there were no signs of rupture, leakage or fogging in the welded seams of pipes and valve bodies.
In the course of installation work, in some cases, the hydrostatic test of heat networks is replaced by a manometric one (usually separate sections heat pipes no longer than 200 m).


